Must-Have WordPress Plugins: Setup and Usage Guide

The reason why WordPress.org stands strong in the global website building field is not only due to its fully open-source, flexible, and controllable architecture, as well as its comprehensive and excellent features as a Content Management System (CMS), but also an often overlooked core advantage — its vast and mature ecosystem. This ecosystem is not just a simple accessory, but a crucial foundation for WordPress to continue evolving and attracting millions of users and developers.
What is an ecosystem? We can break it down into two key components. First, there is the wide variety of themes with different styles. Whether it is a basic theme suitable for developers to deeply customize, with a clean and simple design, or a business-specific theme that is meticulously designed and ready to use out of the box, the WordPress theme market can meet almost any website building need, from personal blogs to corporate websites, and even complex e-commerce platforms. The other component, which this article focuses on, is functional extension plugins. The WordPress Plugins directory is so rich, it can be considered the "ecosystem king" in website building systems. Although there is always room for functional expansion, with new needs and ideas emerging constantly, the number and variety of plugins provided by WordPress has long surpassed most other open-source or closed-source website building platforms on the market. Many plugins, after years of iteration and user validation, have become more than just tools for developers; they have become indispensable "wheels" in website building, playing a key role in areas like website performance optimization, security protection, SEO configuration, form management, and cache acceleration.
Thanks to the existence of these plugins, building a WordPress website has never been as efficient and convenient as it is today. However, despite the abundance of plugins, proper selection and scientific configuration is not a simple task. Improper choices and misconfigurations not only affect the website’s operational efficiency but may even pose security risks. Therefore, this article will focus on the WordPress Website Building process, introducing popular and widely recognized essential plugins in detail. By breaking down their installation steps, configuration methods, and practical use cases, we aim to help website owners and developers avoid unnecessary detours in plugin usage, truly enhancing efficiency and ensuring stable operation. It is hoped that through this explanation, both WordPress beginners and advanced users looking to further optimize their website's performance can find the right plugin combination for their site.
This WordPress Guide continues the blogger's consistent writing style and emphasis on the reading experience. The structure of this article is designed to be clear and organized, allowing readers with different reading habits to easily access the information they need. Whether you prefer to quickly skim through the article in one go to quickly grasp the key points on plugin installation and configuration, or you prefer to bookmark the article and read it chapter by chapter as needed, the directory design is tailored to match your reading pace and needs. To facilitate this, the WordPress Essential Plugin Installation and Configuration article has embedded anchor links in the titles of each chapter and subsection, ensuring that readers can easily jump to the specific content they are interested in at any time, making it easier for you to reference and operate. It is hoped that this arrangement will help readers quickly find the plugin configuration solution that best suits their needs. The directory is provided below to help you efficiently access each core chapter.
- Installation and Configuration of Elementor Page Builder
- Installation and Configuration of TranslatePress Multilingual Support Plugin
- Installation and Configuration of WPForms Contact Form Plugin
- Installation and Configuration of WooCommerce Product Management Plugin
- Installation and Configuration of UpdraftPlus Website Backup Plugin
Ⅰ、Installation and Configuration of Elementor Page Builder

Among the many WordPress page editing plugins, Elementor is undoubtedly one of the most popular and highly regarded visual editors today. As a drag-and-drop page builder, Elementor has revolutionized the way website pages are developed and edited, with its intuitive user interface, rich component library, and highly flexible design capabilities. This is why Elementor has become the page editing tool of choice for over tens of millions of sites worldwide. However, while Elementor is easy to use, to truly unleash its powerful features, proper installation and correct configuration remain crucial. This chapter will guide you from scratch, providing a detailed explanation of how to successfully install the Elementor plugin and, after installation, how to adjust its basic settings based on the specific needs of your website, setting up the functionality for the subsequent development of page elements.
1、Installing the Elementor Page Builder
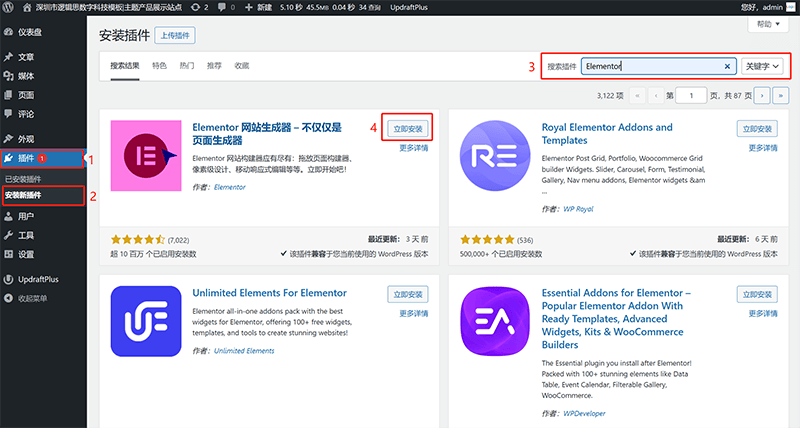
As shown in the red box in the above image, the installation method for Elementor is very convenient. Readers can directly search and install it through the WordPress Backend plugin directory. The specific steps are as follows: log in to the WordPress backend, then click on "Plugins" > "Add New" in the left sidebar. Next, enter "Elementor" in the search box of the WordPress plugin directory interface, and the system will automatically list related plugins. Find the Elementor website builder plugin developed by the official Elementor team, as shown in the image above, click the "Install Now" button. After the installation is complete, click "Activate," and the Elementor plugin will be officially activated.
It is also worth mentioning that Elementor is available in both a free version and a pro version (Elementor Pro). The free version offers a limited number of components, while the Pro version unlocks access to all the dozens of components. From the blogger's experience, when we need to create overall page elements for a website, the combination of various components is essential. In this case, using the free version of Elementor, which has limited components, can make the page editing process quite inconvenient. The blogger recommends upgrading Elementor to the Pro version before starting to edit the site’s pages. All plugins have the same two methods for upgrading to the Pro version, not just Elementor. The first method is to check if there are any local agents in China, and if so, you can directly purchase the license from them. The second method is an alternative to the first, which is to go to the plugin’s official website to purchase the PRO version license. Why is it preferable to first look for a domestic agent? The answer is — generally, purchasing a single-site license directly from the plugin’s official website is much more expensive than buying from an agent. Additionally, there is the issue of cross-border payments, as most plugins are operated by foreign companies. Therefore, it involves cross-border currency payments, which can complicate the purchasing process.
2、Configuring the Elementor Page Builder
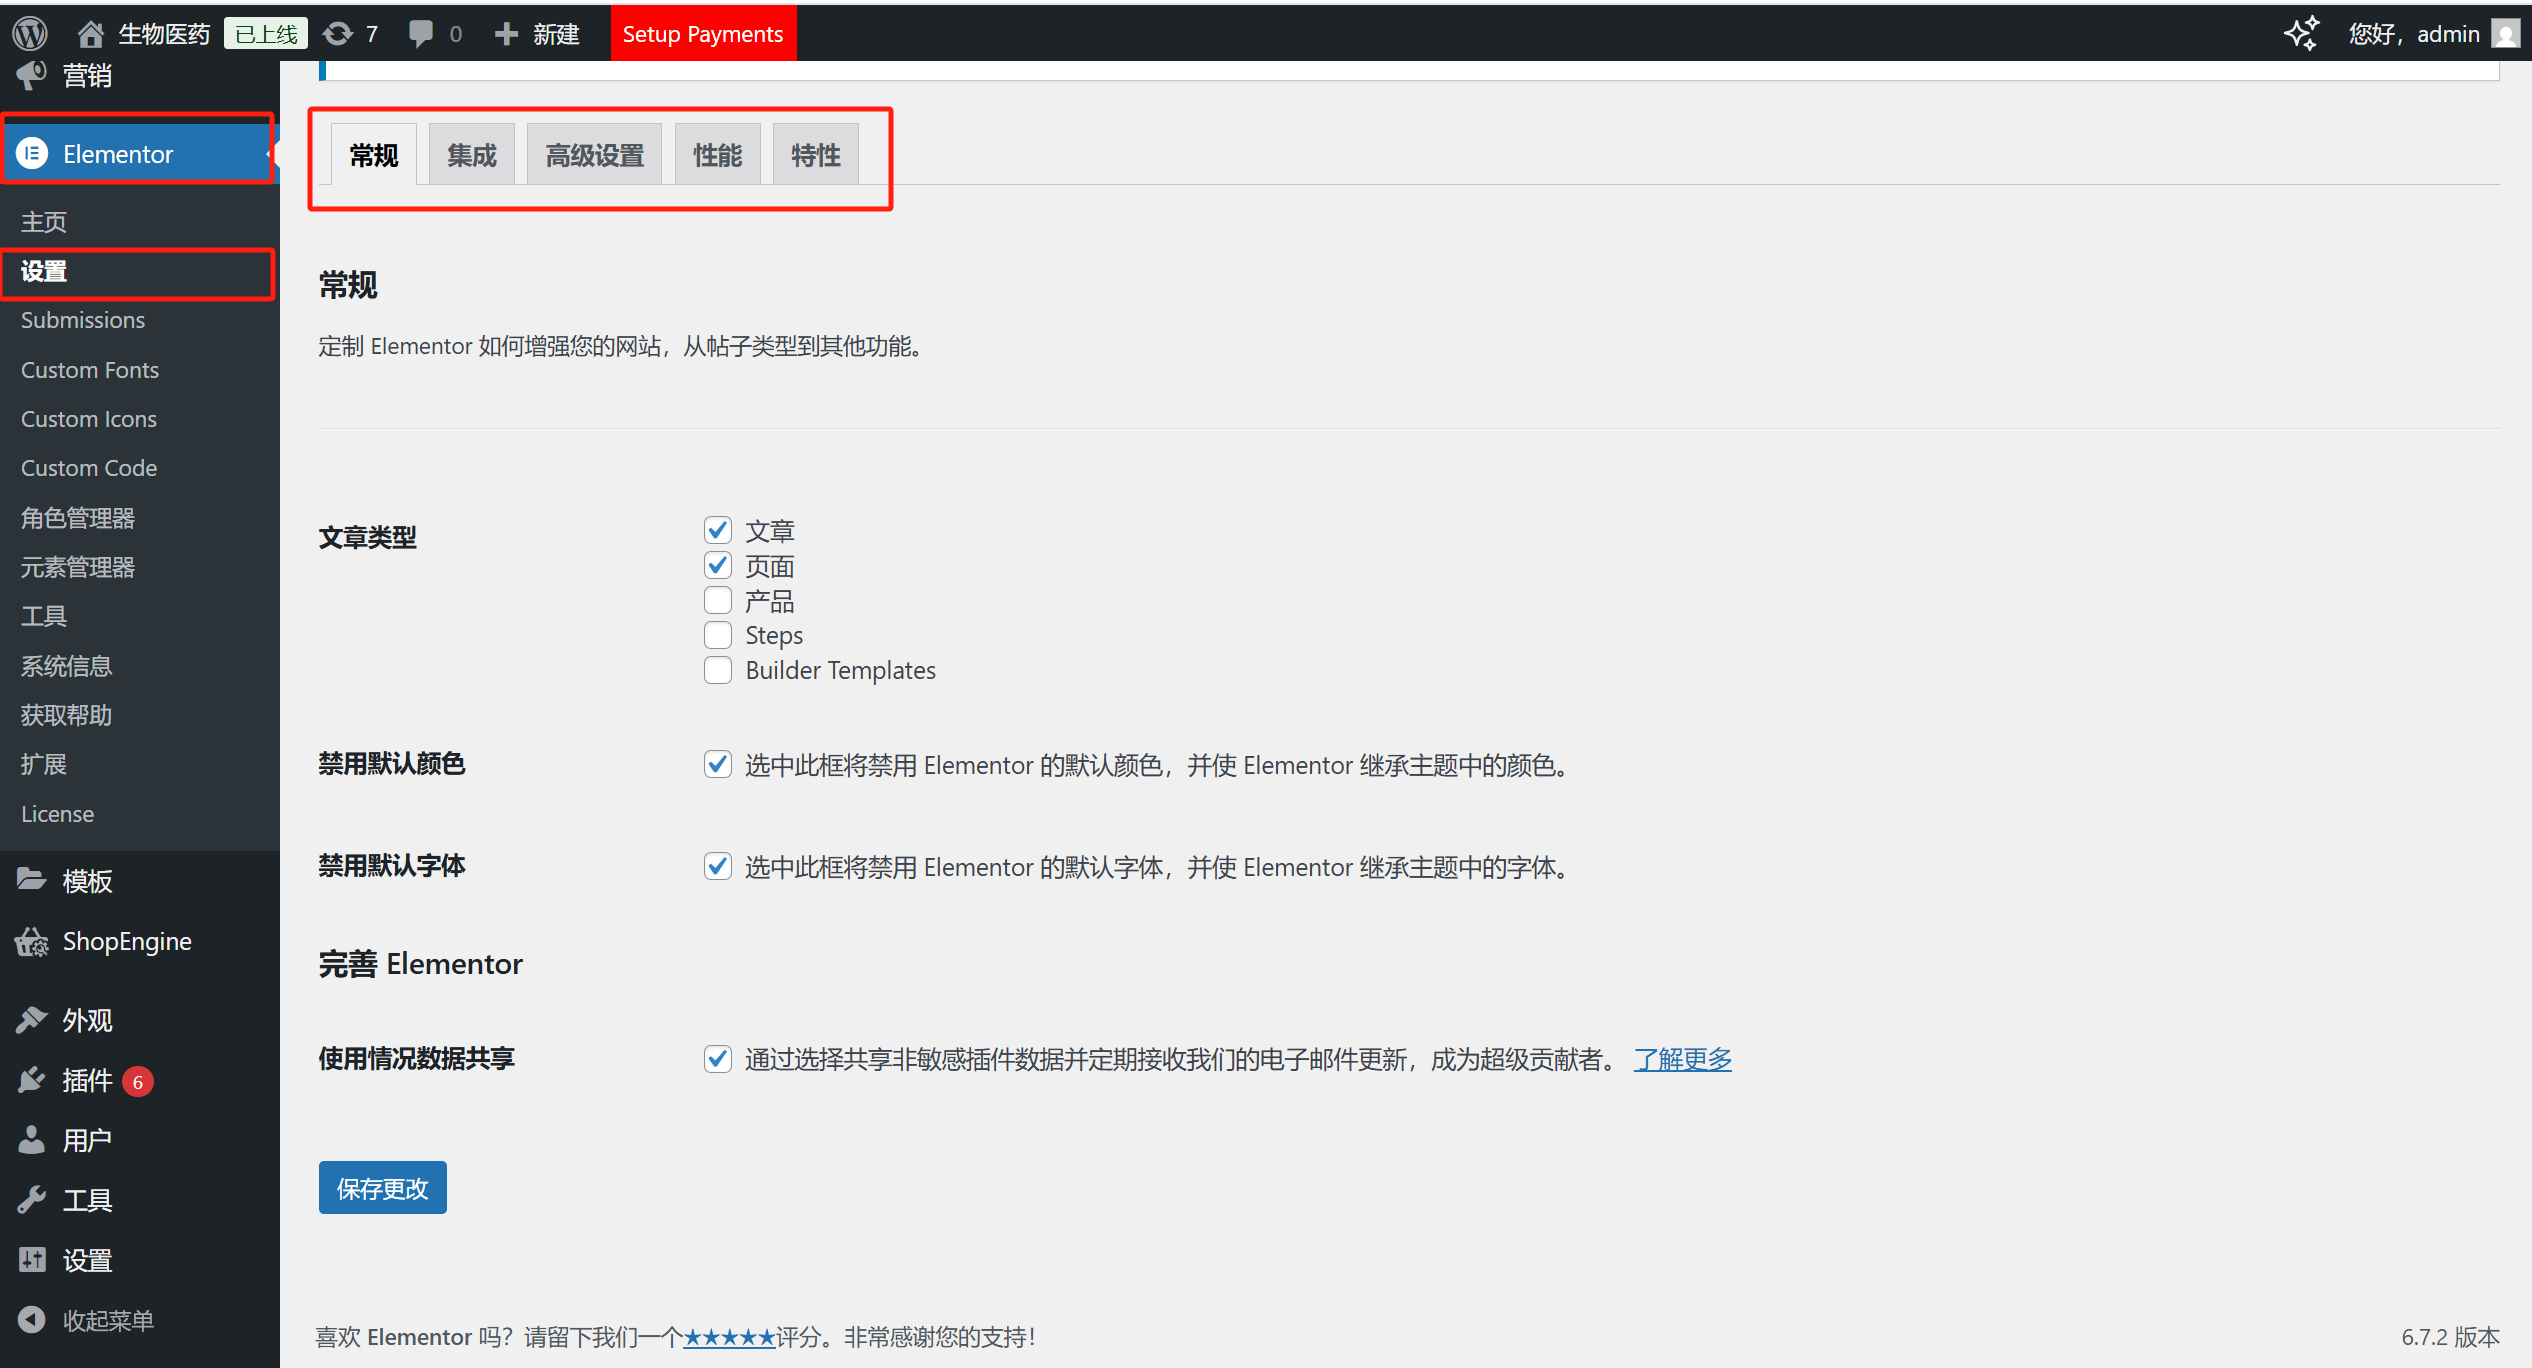
After successfully installing, activating, and upgrading to the PRO version, we need to perform some basic configurations for Elementor. The entry point for Elementor’s backend settings is consistent with the path marked by the red box in the image above. Elementor's settings are very comprehensive, with four setting tabs on the settings page, each containing numerous features that can be checked or enabled. Some of these settings include hidden features that need to be manually activated before they can be used in page editing. It's important to ensure that all necessary features for editing are configured, successfully enabled, and compatible with the current theme and other plugins. Below are the key configuration items for Elementor:
(1) Disable Default Colors
Elementor comes with a set of built-in color schemes for its widgets and layout elements, making it easier for beginners to quickly build pages. However, in actual development, most website owners design their sites based on their brand colors or theme styles. If the default colors are not disabled, Elementor’s built-in colors may override or interfere with the theme settings, resulting in inconsistent page styles. By checking "Disable Default Colors," Elementor will no longer enforce its preset colors, but instead inherit the colors from the current theme or custom settings, ensuring the overall consistency and aesthetics of the website's color scheme. This setting is especially suitable for corporate or brand websites that have specific design style requirements.
(2) Disable Default Fonts
Similar to color control, Elementor also comes with a set of preset font styles, which by default are applied to text content in various components. However, if your website has already defined custom fonts through the theme or global settings (such as brand-specific fonts or particular typography styles), Elementor's default fonts might cause inconsistency in the typography. Enabling the "Disable Default Fonts" option allows Elementor to automatically use the fonts set in the current theme or custom CSS, without applying its own font settings, thereby maintaining a consistent text style across the website and avoiding style conflicts.
(3) Additional Custom Breakpoints
Responsive design is an essential element for modern websites. Elementor comes with three default breakpoints: desktop, tablet, and mobile, to adapt to different devices. However, in some cases, such as when you need to set independent styles for more specific device sizes or particular screen widths, the default breakpoints may not be sufficient. By enabling the "Additional Custom Breakpoints" feature, you can manually add multiple custom breakpoints, allowing for flexible page layouts and styles at various screen sizes. This ensures that your website achieves the best visual effects and user experience across all devices, making it especially useful for sites with high mobile adaptation requirements.
(4) Nested Elements
In earlier versions of Elementor, the page layout hierarchy was relatively limited, making some complex structures slightly cumbersome to implement. Enabling the "Nested Elements" feature allows you to nest other components or containers within certain widgets (such as containers or inline blocks), greatly increasing the flexibility and control of your page layout. It works similarly to nested div structures in HTML, making it easier to create more complex design requirements, such as multi-level grids, filterable sections, card layouts, or specific interactive effects. This feature is especially important for developers who need detailed page designs or custom structures.
(5)Menu
The "Menu" setting is a recent addition to Elementor, designed to help users customize the website’s navigation menu in a visual way. Compared to the traditional WordPress menu editor, Elementor’s Menu feature allows you to drag and drop menu items within the page, set menu styles, alignment, dropdown animations, and even adjust the menu’s appearance in responsive view. This significantly lowers the barrier for customizing navigation bars, enabling users without coding knowledge to create personalized and highly brand-consistent advanced menus.
二、Installation and Configuration of TranslatePress Multilingual Support Plugin

As the user base of foreign trade websites or independent sites becomes increasingly diversified across regions, multilingual support for website content has become an essential requirement in modern website development. This is especially true for cross-border e-commerce, international enterprises, or websites targeting global users. Providing smooth and accurate multilingual versions not only enhances the user experience but also contributes to the site's performance in global search engines. The native WordPress framework does not include multilingual management functionality, which requires the use of powerful multilingual plugins. Among the various multilingual plugins, TranslatePress has become one of the most popular solutions due to its visual translation interface, SEO-friendly support, and excellent compatibility with most themes and plugins. The biggest highlight of TranslatePress is that it allows users to translate content directly on the website frontend in real-time, without needing to switch to the cumbersome backend page lists for editing. This WYSIWYG (What You See Is What You Get) translation process greatly lowers the barrier for multilingual content management. In this chapter, I will guide you through the basics of plugin installation and the commonly used settings during the actual configuration process, helping you quickly build a complete multilingual structure for your website.
1、Installing the TranslatePress Multilingual Translation Plugin
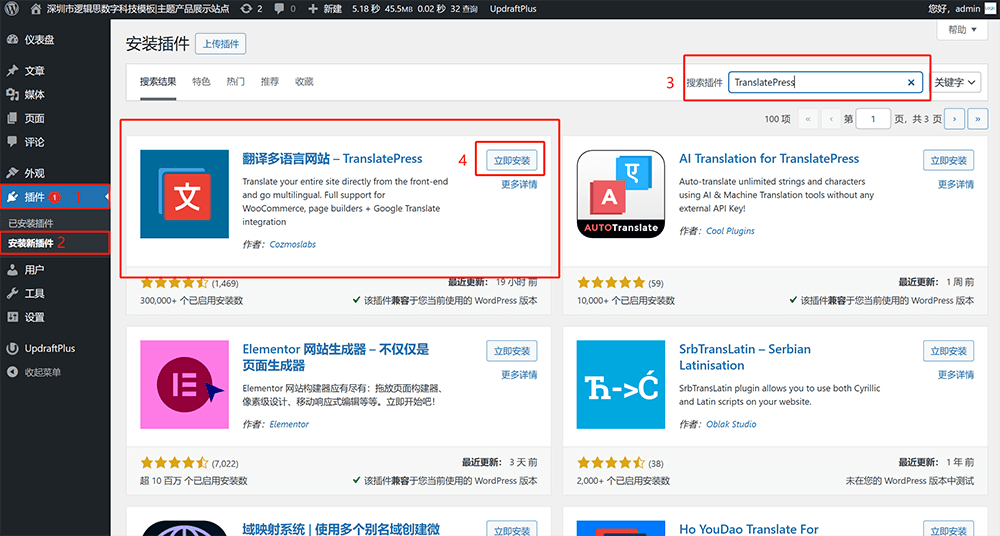
The process of installing TranslatePress is very simple, and users can directly obtain it through the WordPress backend plugin library. As shown in the screenshot marked by the blogger above, TranslatePress can be installed by following the path indicated. Specifically, in the WordPress backend, click on the left-hand menu “Plugins” > “Install Plugins,” then enter “TranslatePress” in the search box. The system will automatically recommend the TranslatePress plugin, which is the official translation plugin for multilingual websites (as shown in the red box on the plugin query feedback page in the screenshot above). After finding the plugin, click “Install Now,” and once the installation is complete, click “Activate” to officially activate the plugin. TranslatePress offers a free version that supports adding one additional language, suitable for websites with basic multilingual needs. If your site requires more languages or advanced features such as multilingual SEO and custom language switchers, you can consider upgrading to the pro version. The pro version can be purchased from domestic agents or through the official website. After obtaining the Pro version zip installation package, go to the backend “Plugins” > “Upload Plugin” to upload the package. The installation and activation process is the same as with regular plugins. After installation, a new TranslatePress menu will appear under "Settings" in the backend sidebar, and you can then enter the settings page to begin configuring multilingual settings.
2、Configuring the TranslatePress Multilingual Translation Plugin
After installing and upgrading to the PRO version of TranslatePress, it is necessary to properly configure various parameters to fully leverage its multilingual support capabilities. Below are the key settings to focus on during the configuration process:
(1) Default Language and Additional Language Settings
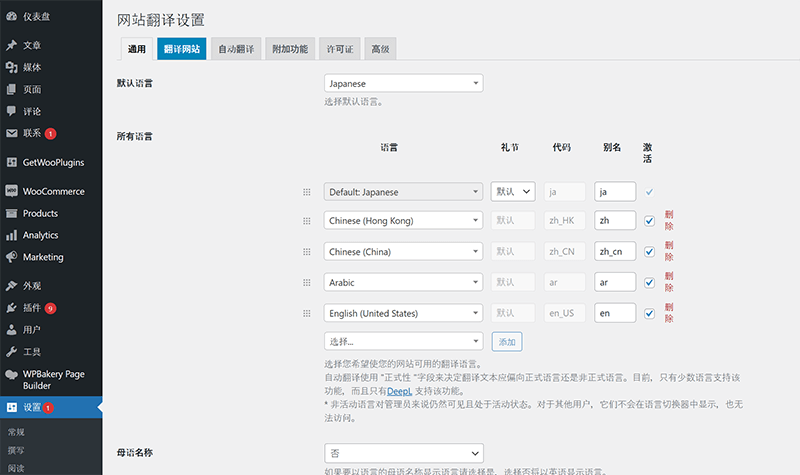
In the WordPress backend > Settings > TranslatePress > General Interface, you will first see the options for "Default Language" and "All Languages." "Default Language" refers to the website's base language, i.e., the site language, which is the original language when editing page text elements. "All Languages" can also be understood as additional languages, and by clicking, you can add new language versions. The languages listed under "All Languages" are the versions we need to translate. TranslatePress natively supports dozens of languages, covering major global languages. The free version allows adding one additional language, while the professional version supports an unlimited number of languages. This setting is the foundation for multilingual websites and determines the range of available front-end display languages.
(2) Language Switcher Settings
The language switcher determines how visitors can switch the website language on the front-end. TranslatePress provides several flexible configuration options, including menu switchers, shortcode switchers, and floating switchers. With the menu switcher, users can directly add the language switch option to the website's top or side navigation menu by simply setting it up in "Appearance > Menus"; using the shortcode switcher, simply insert the "language-switcher" shortcode into the specific container location on the page to add the switcher to page and post areas; while the floating switcher allows setting a floating button on one side of the page, making it easy for users to switch languages at any time. All switcher styles support custom positions, styles, and display methods (such as text, flags, or a combination of both), ensuring that visitors can quickly and intuitively find the language switch entry.
(3) Translation Method Settings
TranslatePress supports two translation methods: manual translation and automatic translation. Automatic translation is the default mode, where a click automatically translates the page text through a translation interface. Manual translation allows you to directly click the page text in the website's front-end visual editing interface and manually fill in the translation. Manual translation is WYSIWYG (What You See Is What You Get), which is suitable for websites with higher translation quality requirements. Automatic translation requires binding a third-party translation API service, such as Google Translate or DeepL. Once enabled, it automatically generates translations of the page content into the target language, significantly improving translation efficiency, and also allows manual modifications on top of automatic translations to ensure semantic accuracy. It is important to note that the automatic translation feature has certain limitations in the free version, while the PRO version provides more API integration options and higher word limits.
(4) Multilingual SEO Settings
To improve the visibility and ranking of a website's multilingual versions in search engines, TranslatePress offers an SEO Pack extension. However, this feature is not enabled by default; users need to enable SEO Pack in TranslatePress > Settings > Add-ons to unlock the full SEO support functionality. Once the SEO Pack is enabled, you can deeply optimize the multilingual SEO of your website, which includes the following core features:
- SEO Page Support: The SEO Pack ensures that each language version of the page generates a unique URL structure that is recognizable and indexable by search engines (usually with a language prefix in the URL, such as /en/, /fr/), thus avoiding issues of duplicate content and distributed authority, which helps improve the performance of each language version page in search results.
- Page Title and Description Translation: Through the SEO Pack, website administrators can set separate Meta Title and Meta Description for each language version of the page, ensuring that search engines can accurately identify the core information of each language’s content during crawling, improving click-through rates and search engine friendliness.
- Social Media Chart Information Support: The SEO Pack also extends support for multi-language websites' Open Graph (Facebook information) and Twitter Card (Twitter Card) tags, allowing different sharing titles, descriptions, and thumbnails to be set for each language version, making the page more localized and professional when shared on social platforms, enhancing brand influence.
- Automatic HTML lang Attribute Setting: The SEO Pack automatically generates the correct lang and hreflang tags for each page based on your configured multilingual settings. These tags are key elements for the SEO of international websites, clearly indicating the language and regional version of the page to search engines, preventing different language content from being mistakenly identified as duplicate content.
(5) Frontend Visual Translation Interface
After configuration is complete, click Translate Page in the admin toolbar at the top of the frontend page to enter the visual translation interface. Using the WYSIWYG (What You See Is What You Get) method, you can directly click any text content on the page to translate, without the need to switch back and forth in the backend, greatly improving translation efficiency.
Ⅲ、Installation and Configuration of WPForms Contact Form Plugin
When building a fully functional WordPress website, a contact form is an essential component for almost all sites. Whether it’s for a corporate website, a foreign trade site, or an e-commerce website, a simple and user-friendly form system can effectively enhance website conversions. Among the many form plugins, WPForms stands out with its “drag-and-drop editor,” “rich templates,” and “flexible and expandable functionality,” making it a favorite among WordPress users worldwide. WPForms is not only suitable for beginners to quickly create basic forms, but its premium version also offers powerful features such as payment integration, multi-step forms, conditional logic, and email marketing integration, which can meet the form needs of almost all complex business scenarios. This chapter will focus on the WPForms plugin, explaining its installation process and core functionality configuration methods in detail, helping you complete form setup and collect user inquiry information in the shortest time.
1、Installing the WPForms Contact Form Plugin
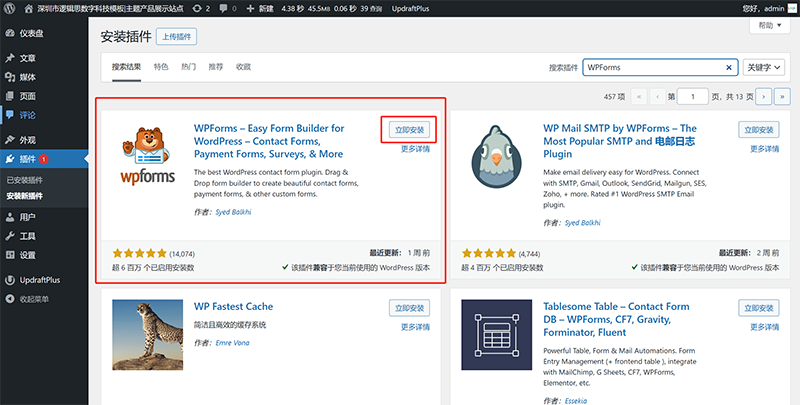
Similar to the plugin installation method described above, the WPForms plugin can also be directly searched and installed from the WordPress plugin directory. WPForms offers both a free version and a paid version. The free version (WPForms Lite) includes basic form creation features, suitable for building simple contact forms, while the paid version unlocks advanced features such as multi-page forms, payment integration, conditional logic, and marketing platform integration, meeting more complex usage needs.
2、Configuring the WPForms Contact Form Plugin
After the plugin is activated, a WPForms menu will be added to the WordPress backend. Users can quickly start using it through the "All Forms" and "Add New Form" entries. Next, the blogger will demonstrate the process of creating a form with WPForms and applying it to a page.
(1) Form Creation
Step 1: Form Creation Entry
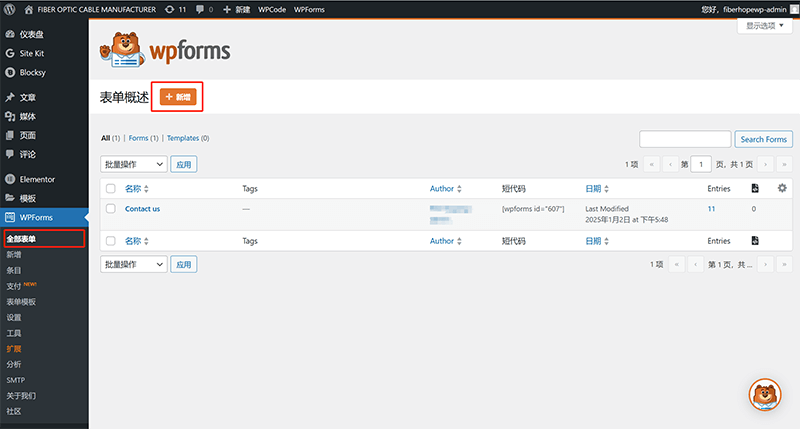
As shown in the image above, first click on the "WPForms" menu entry in the WordPress backend sidebar. After entering the WPForms plugin interface, click the "Add New" button in the right content area to start creating a new form. After clicking, the system will jump to the WPForms form editing interface, where we will introduce the field selection and layout features in detail.
Step 2: Name the New Form and Choose a Form Style
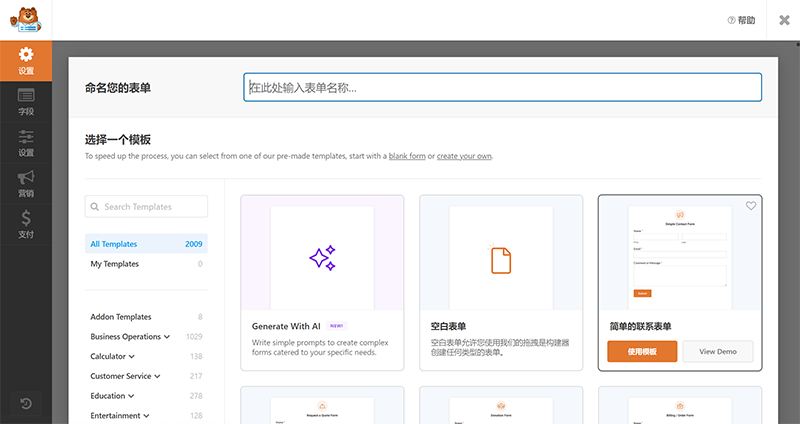
The demonstration image above shows the window for creating a new form in the WPForms plugin. Enter the name of the new form in the entry box at the top, as shown in the image. The PRO version of WPForms offers a large number of pre-designed form templates. Simply select a template style and click the "Use Template" button to use it directly. After using a pre-made form template or a blank form, we will move on to the next step of arranging the form fields.
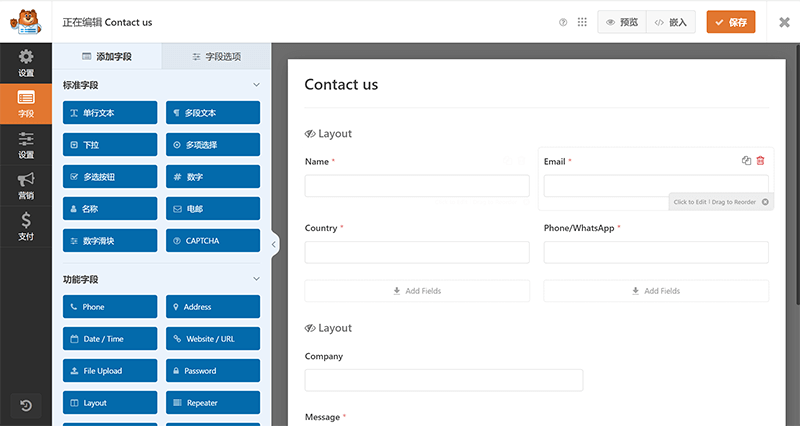
(2) Form Field Layout
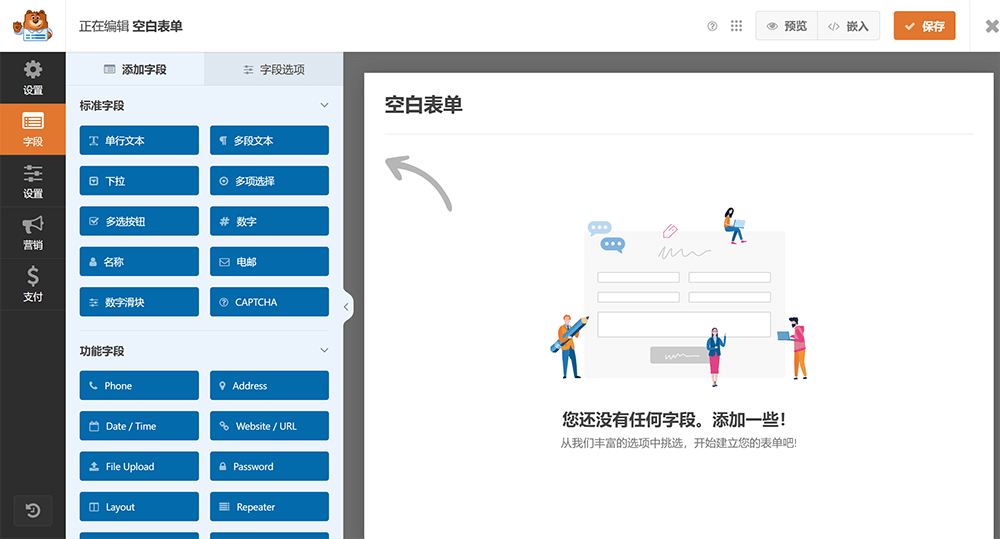
To better and more conveniently demonstrate the form field layout for readers, the blogger purposely selected a blank template in the previous step when choosing the form template file. The field editing mode of the WPForms blank form template is shown in the image above. When you first enter or edit a blank form template without saving, the right section will prompt you to add fields. Before dragging the form content fields, you need to first plan the form's layout, then create the form layout using the "Layout" field. Below, the blogger will demonstrate each detailed step of the form field layout operation.
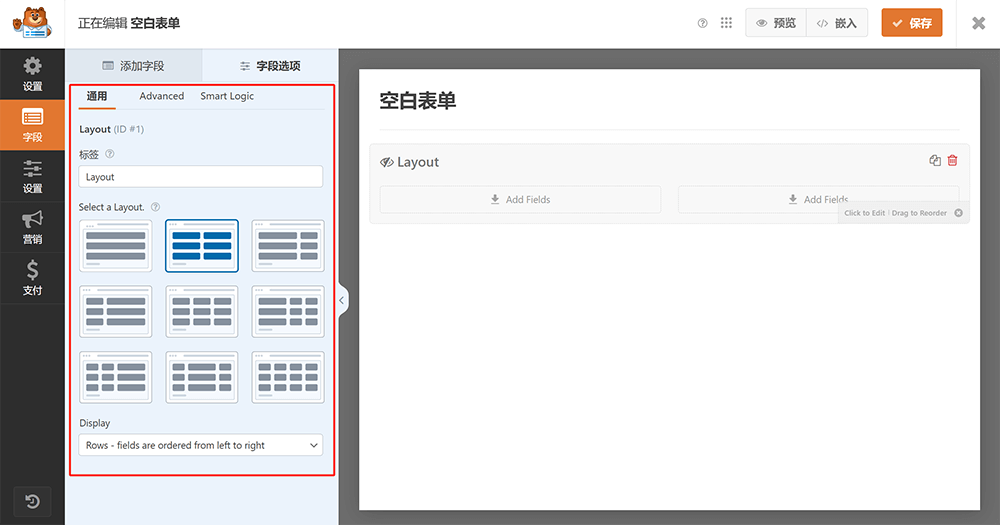
Form Field Layout Operation Step 1: Click the "Layout" Field

As shown in the image above, click the "Layout" field in the field selection window on the left side of the current page. The right window will synchronize and display the settings for that field. Then, click the operable area marked by the red box on the right. The left field selection window will switch to the layout style selection interface. In this interface, you can further choose and configure the form's layout style to achieve a more flexible form layout effect.
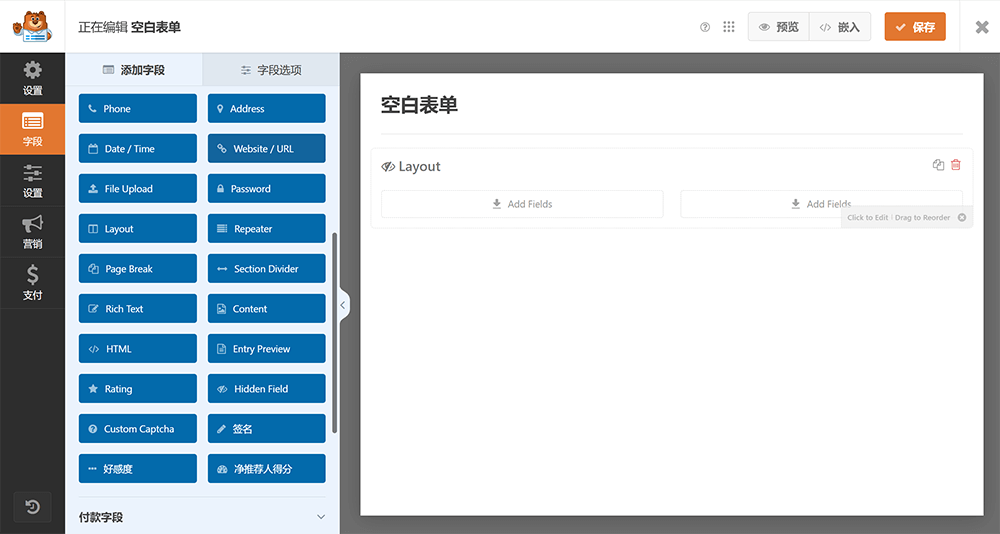
Form Field Layout Operation Step 2: Select the Layout Style
As shown in the image above, the "Layout" field provides various layout styles to choose from, including single-column layout, two-column form with equal or unequal widths, as well as three-column and four-column multi-column layouts. Users can select the appropriate style based on the actual form design requirements. After selecting the layout style, click the "Add Field" button at the top of the left window to return to the field selection interface and continue adding and configuring other required fields.
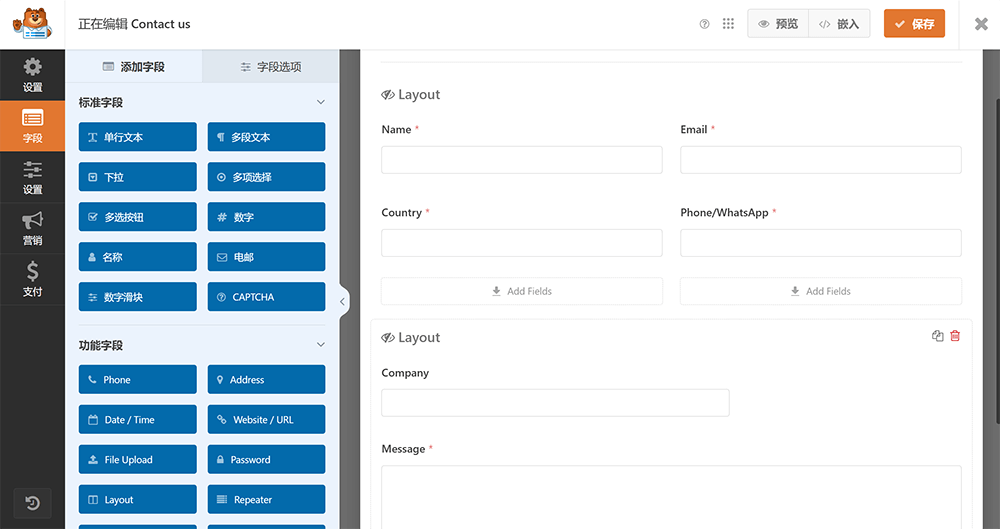
Form Field Layout Operation Step 3: Select Fields and Drag Them into the Form
At this point, we can drag the fields needed for the form, as shown in the field selection window on the left, into the form layout we created in the previous step. For a contact form, commonly used fields include: Name, Email, Phone, Address, Content (text area), and Single Line Text, etc. The interface after applying the complete form fields to the layout is shown below:
(3) Conditional Settings for Form Fields
Custom Labels (Titles)
.png)
Each field in WPForms has a custom label, which means the title. The label name set here will be displayed at the top right of the field input box. The location for setting the custom label is shown in the red box in the image above.
Field Required Switch Settings
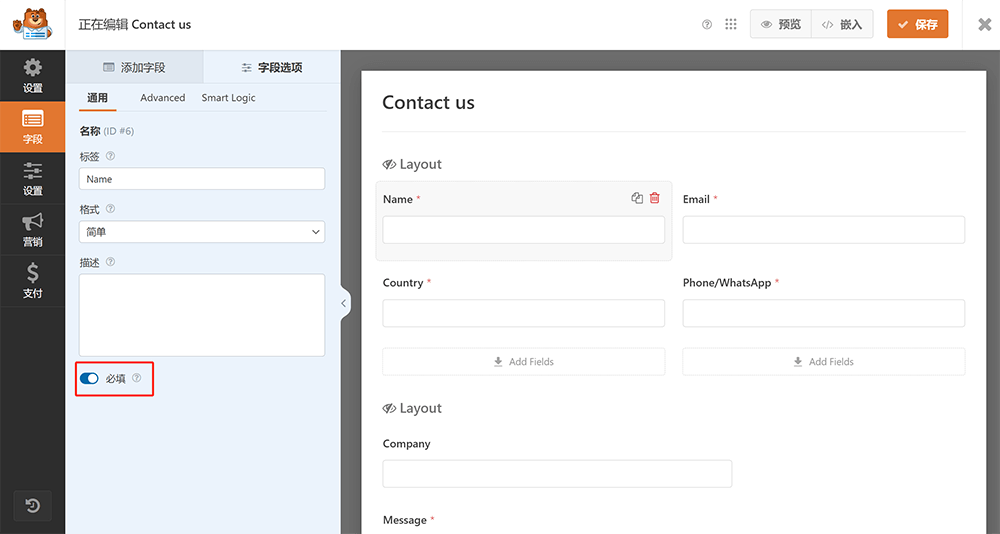
As shown in the image above, at the bottom of the parameter settings interface for each WPForms field, there is a switch to control whether the field is set as "Required." When the "Required" switch is enabled, a "" symbol will automatically be added at the end of the field's display label (title), such as "Name," to prompt the user that this field is required. In addition to the visual prompt, enabling the "Required" function will also force the user to fill in the field before submitting the form; otherwise, the form cannot be successfully submitted, effectively preventing the user from missing essential information.
Field Placeholder Settings
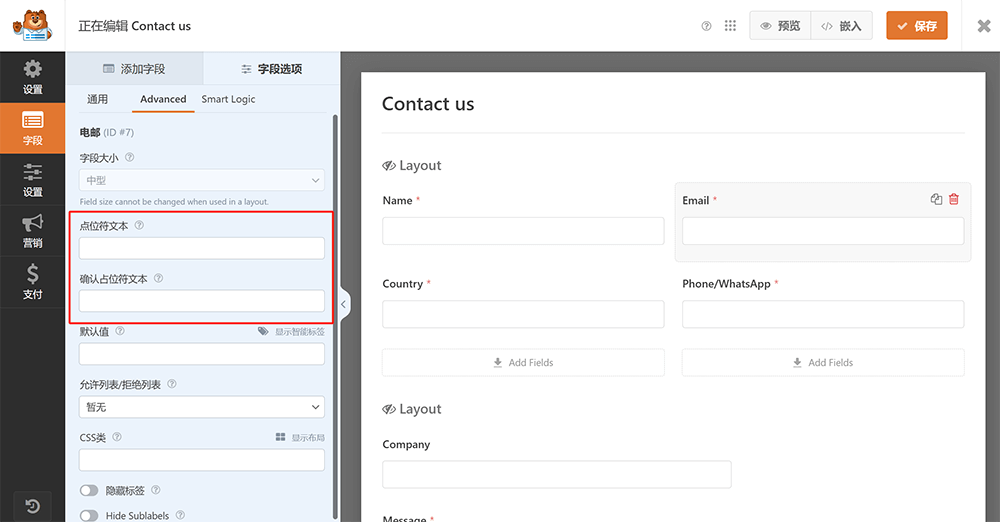
In the WPForms field settings interface, as indicated by the red box in the screenshot above, we can customize the "Placeholder Text" for each input field. This setting is located under the "Advanced" tab, with two input boxes: "Placeholder Text" and "Confirmation Placeholder Text." Placeholder text refers to the prompt text that appears inside the field input box before the user starts typing, typically used to guide the user to fill in the correct content or provide example information. For example, for the "Email" field, you could set the placeholder as "Please enter your email address," making it clear to the user what the field is for. Setting an appropriate placeholder not only improves the user experience, reducing confusion, but also enhances the efficiency of form completion.
(4) Embedding the Form into a Page Using WPForms Shortcode
Getting the Form Shortcode

This is the final step after creating a form in WPForms. Before embedding the form into a specific page, you first need to get the form's shortcode, which allows you to load the form's style and functionality directly into the page. Getting the shortcode is very simple. As shown in the image above, just return to the "All Forms" page in WPForms, and the red-boxed area shows the shortcode for that form. After copying the shortcode, enter Elementor editing mode, select the "Shortcode" widget provided by Elementor, and paste the copied form shortcode into the widget. The form will then appear fully in the specified position on the page, achieving seamless embedding.
Using WPForms Shortcode in Elementor
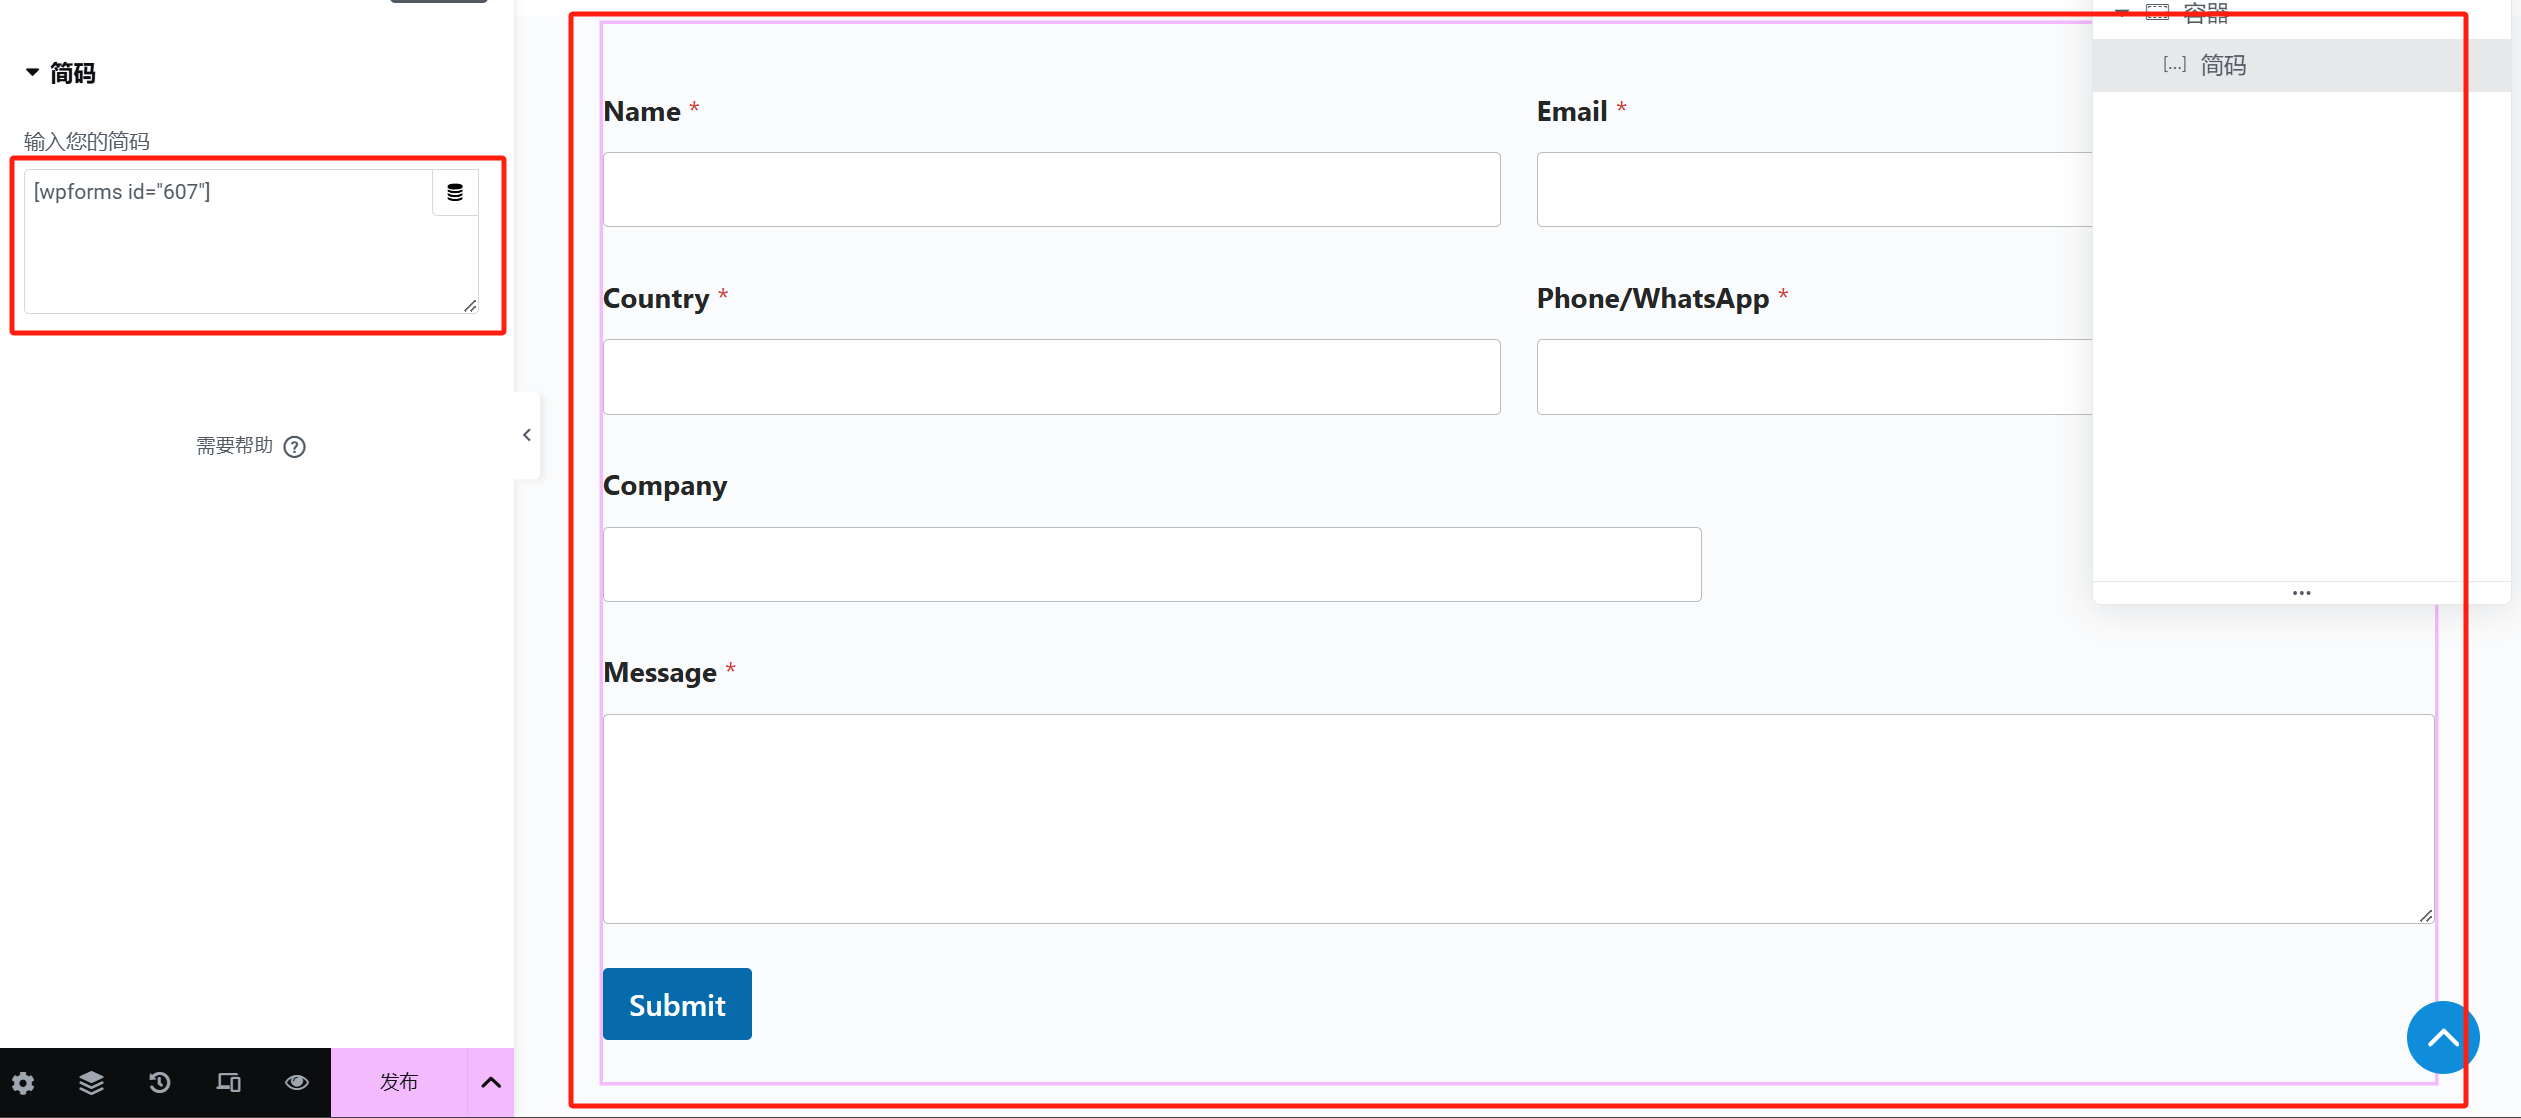
Once you’ve created the contact form with the WPForms plugin in the WordPress backend and obtained the form's shortcode, you can easily embed the form into a page using the Elementor page editor. The specific operation is shown in the image above. In the Elementor editing interface, simply find and drag the "Shortcode" widget (also called the "Shortcode" component) to the designated position on the page. Then, paste the WPForms-generated form shortcode (e.g., [wpforms id=”607”]) into the input box of the shortcode widget. After pasting the shortcode, the full form layout, including field layouts and required field markers, will be previewed immediately on the right side of the page. Users can further adjust the form's position and surrounding content as needed. This method allows seamless integration of WPForms forms into any page built with Elementor, without needing to write any code. After completing the setup, click the "Publish" button at the bottom of the page to apply the changes.
Ⅳ、Installation and Configuration of WooCommerce Product Management Plugin
If WordPress is the "universal tool" in the website building field, then WooCommerce is undoubtedly the most powerful and widely used e-commerce solution under the WordPress system. As the e-commerce ecosystem plugin theme program under WordPress's parent company Automattic, WooCommerce relies on its robust product management features, flexible extensibility, and the support of a global developer community, making it the core product management framework for countless online stores, subscription websites, and even B2B platforms. WooCommerce not only helps build a fully functional e-commerce site on WordPress, but it also comes with a variety of built-in modules for payment gateways, shipping settings, inventory management, coupons, tax rate configuration, and more, covering almost all aspects needed for online product transactions. What’s even more notable is that, due to its origin within WordPress, WooCommerce’s high compatibility with WordPress ensures that website performance and SEO friendliness remain outstanding. In this chapter, the focus will be on the WooCommerce plugin, where we will provide detailed instructions on how to complete its basic installation and core configurations, as outlined below:
1、Installing the WooCommerce Product Management Plugin
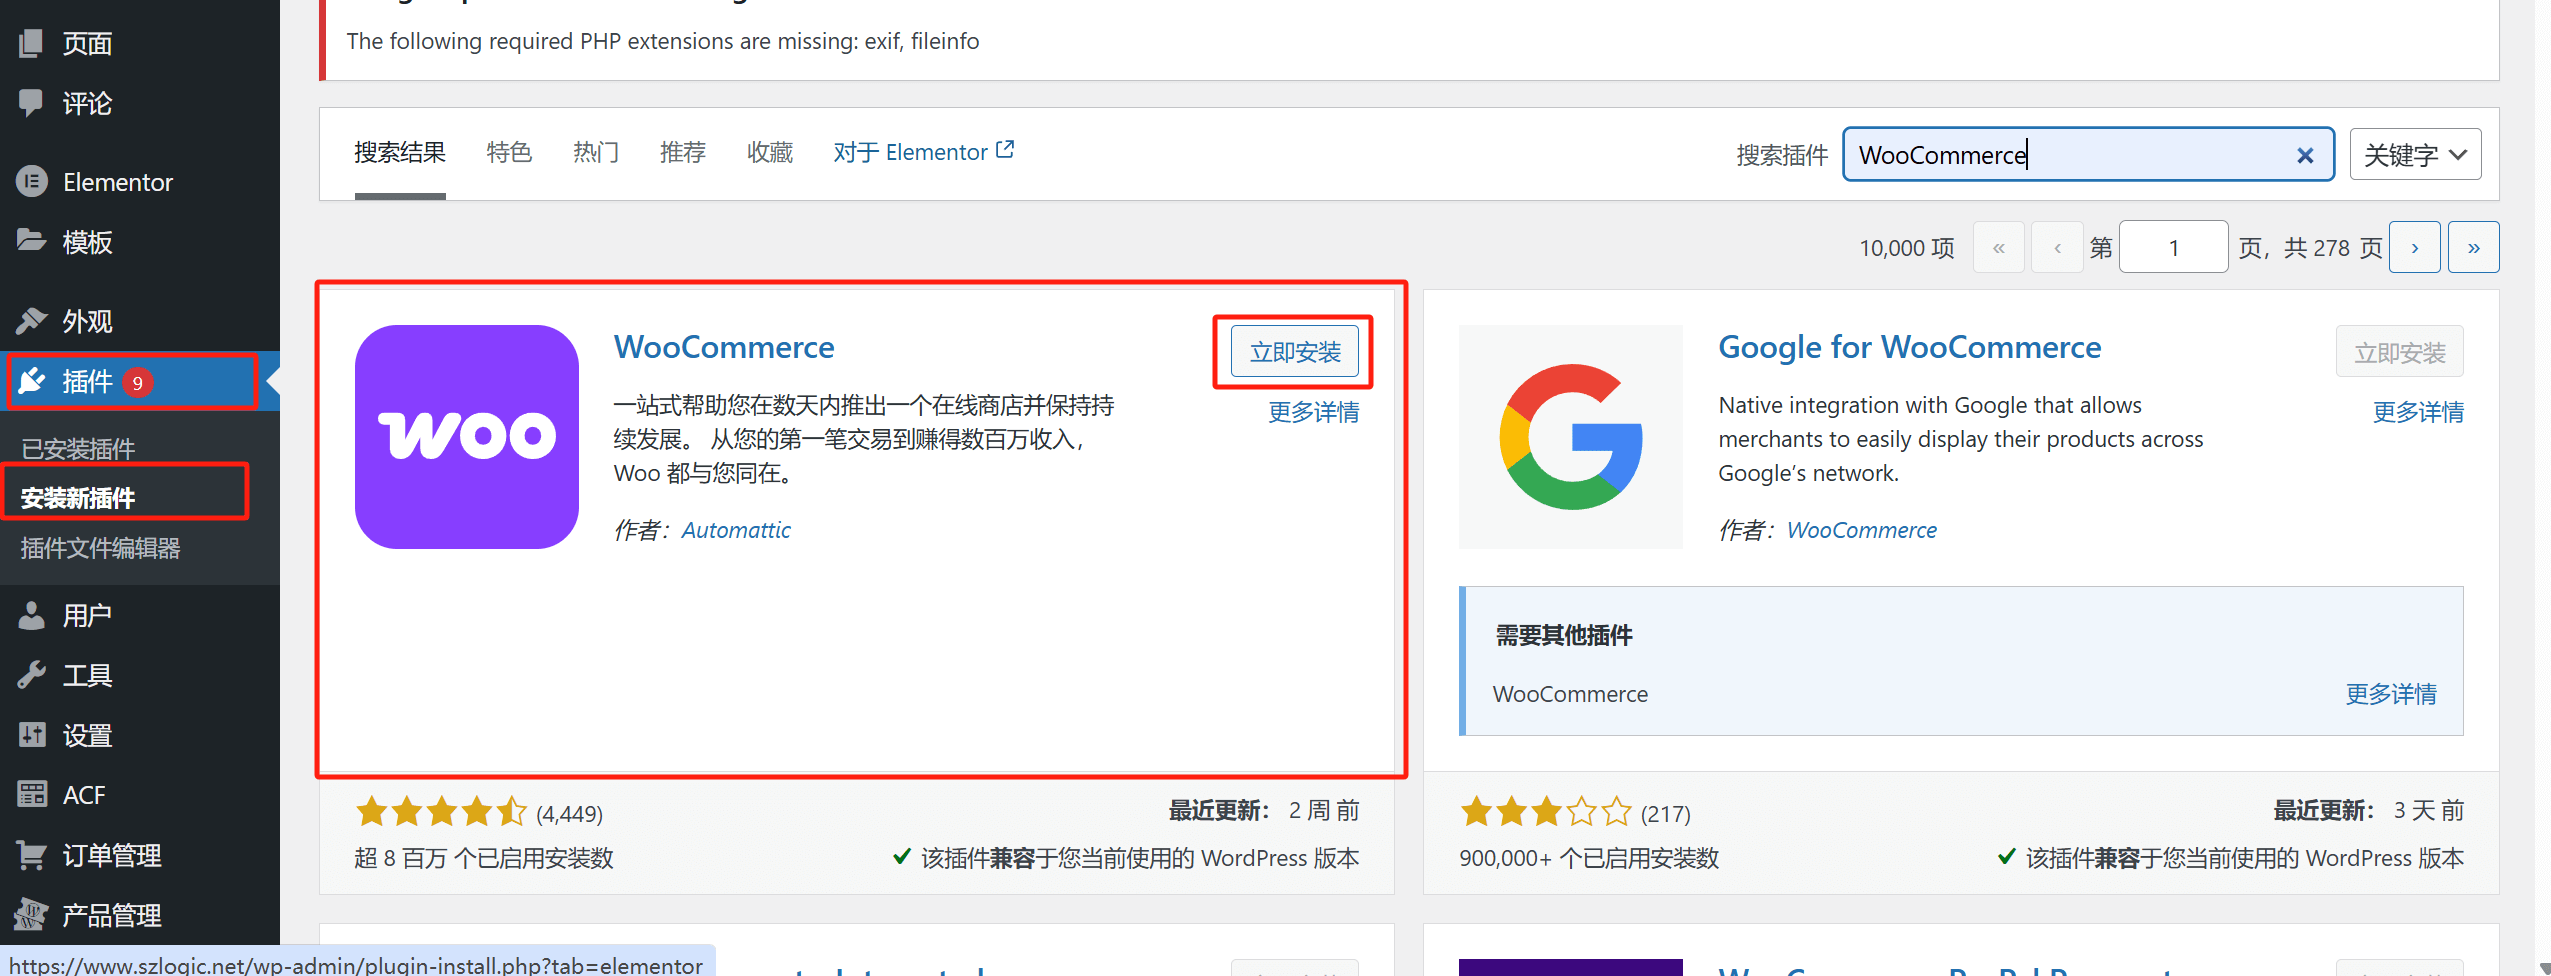
The installation method for WooCommerce is no different from the installation method of other plugins mentioned earlier by the blogger. You need to enter the WordPress admin interface, then click on "Plugins" > "Add New" in the left-side menu. In the plugin search box, type "WooCommerce". The search results page will look as shown in the image above, where the system will display the WooCommerce plugin published by Automattic. Click the "Install Now" button, and then activate the plugin.
2、Configuring the WooCommerce Product Management Plugin
After installing and activating the WooCommerce plugin, the next crucial step is to configure its core features properly, so that your e-commerce site truly offers good product management, transaction experience, and backend operations. WooCommerce's configuration interface is well-organized, covering several aspects such as store basic settings, payment gateways, shipping fees, product categories and attributes, inventory management, and more. By carefully adjusting these settings, you can ensure that product information is well-structured, payment and shipping processes are smooth, and you can effectively enhance the customer's shopping experience and backend operational efficiency.
(1) WooCommerce Store General Settings
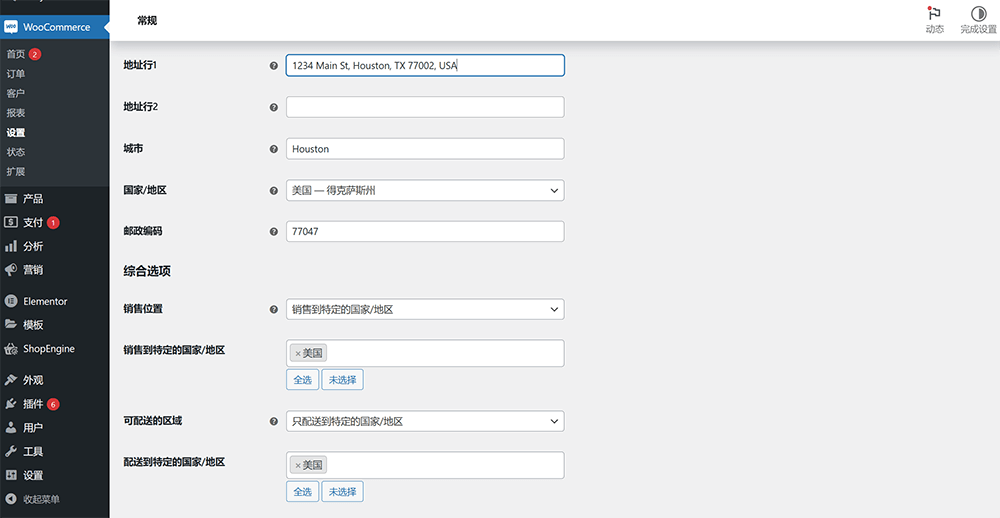
First, go to the WordPress admin panel, click on WooCommerce > Settings in the left menu. In the "General" tab, you can see the basic store settings. You need to set up the store address, including country/region, state, city, and specific address. This information not only affects tax rates and shipping zones but will also appear on invoices and email notifications. Next, select the sales locations supported by the website, which can be all countries, specific countries, or excluding certain regions. At the same time, set the default currency options, such as Renminbi (CNY), US Dollar (USD), etc. All product prices and checkout processes will be displayed in this currency. Additionally, you can configure whether tax rates are enabled and whether customers can enter coupon codes. After completing the settings, click the "Save changes" button at the bottom of the page to ensure the settings take effect.
(2) WooCommerce Product Categories and Attributes Management
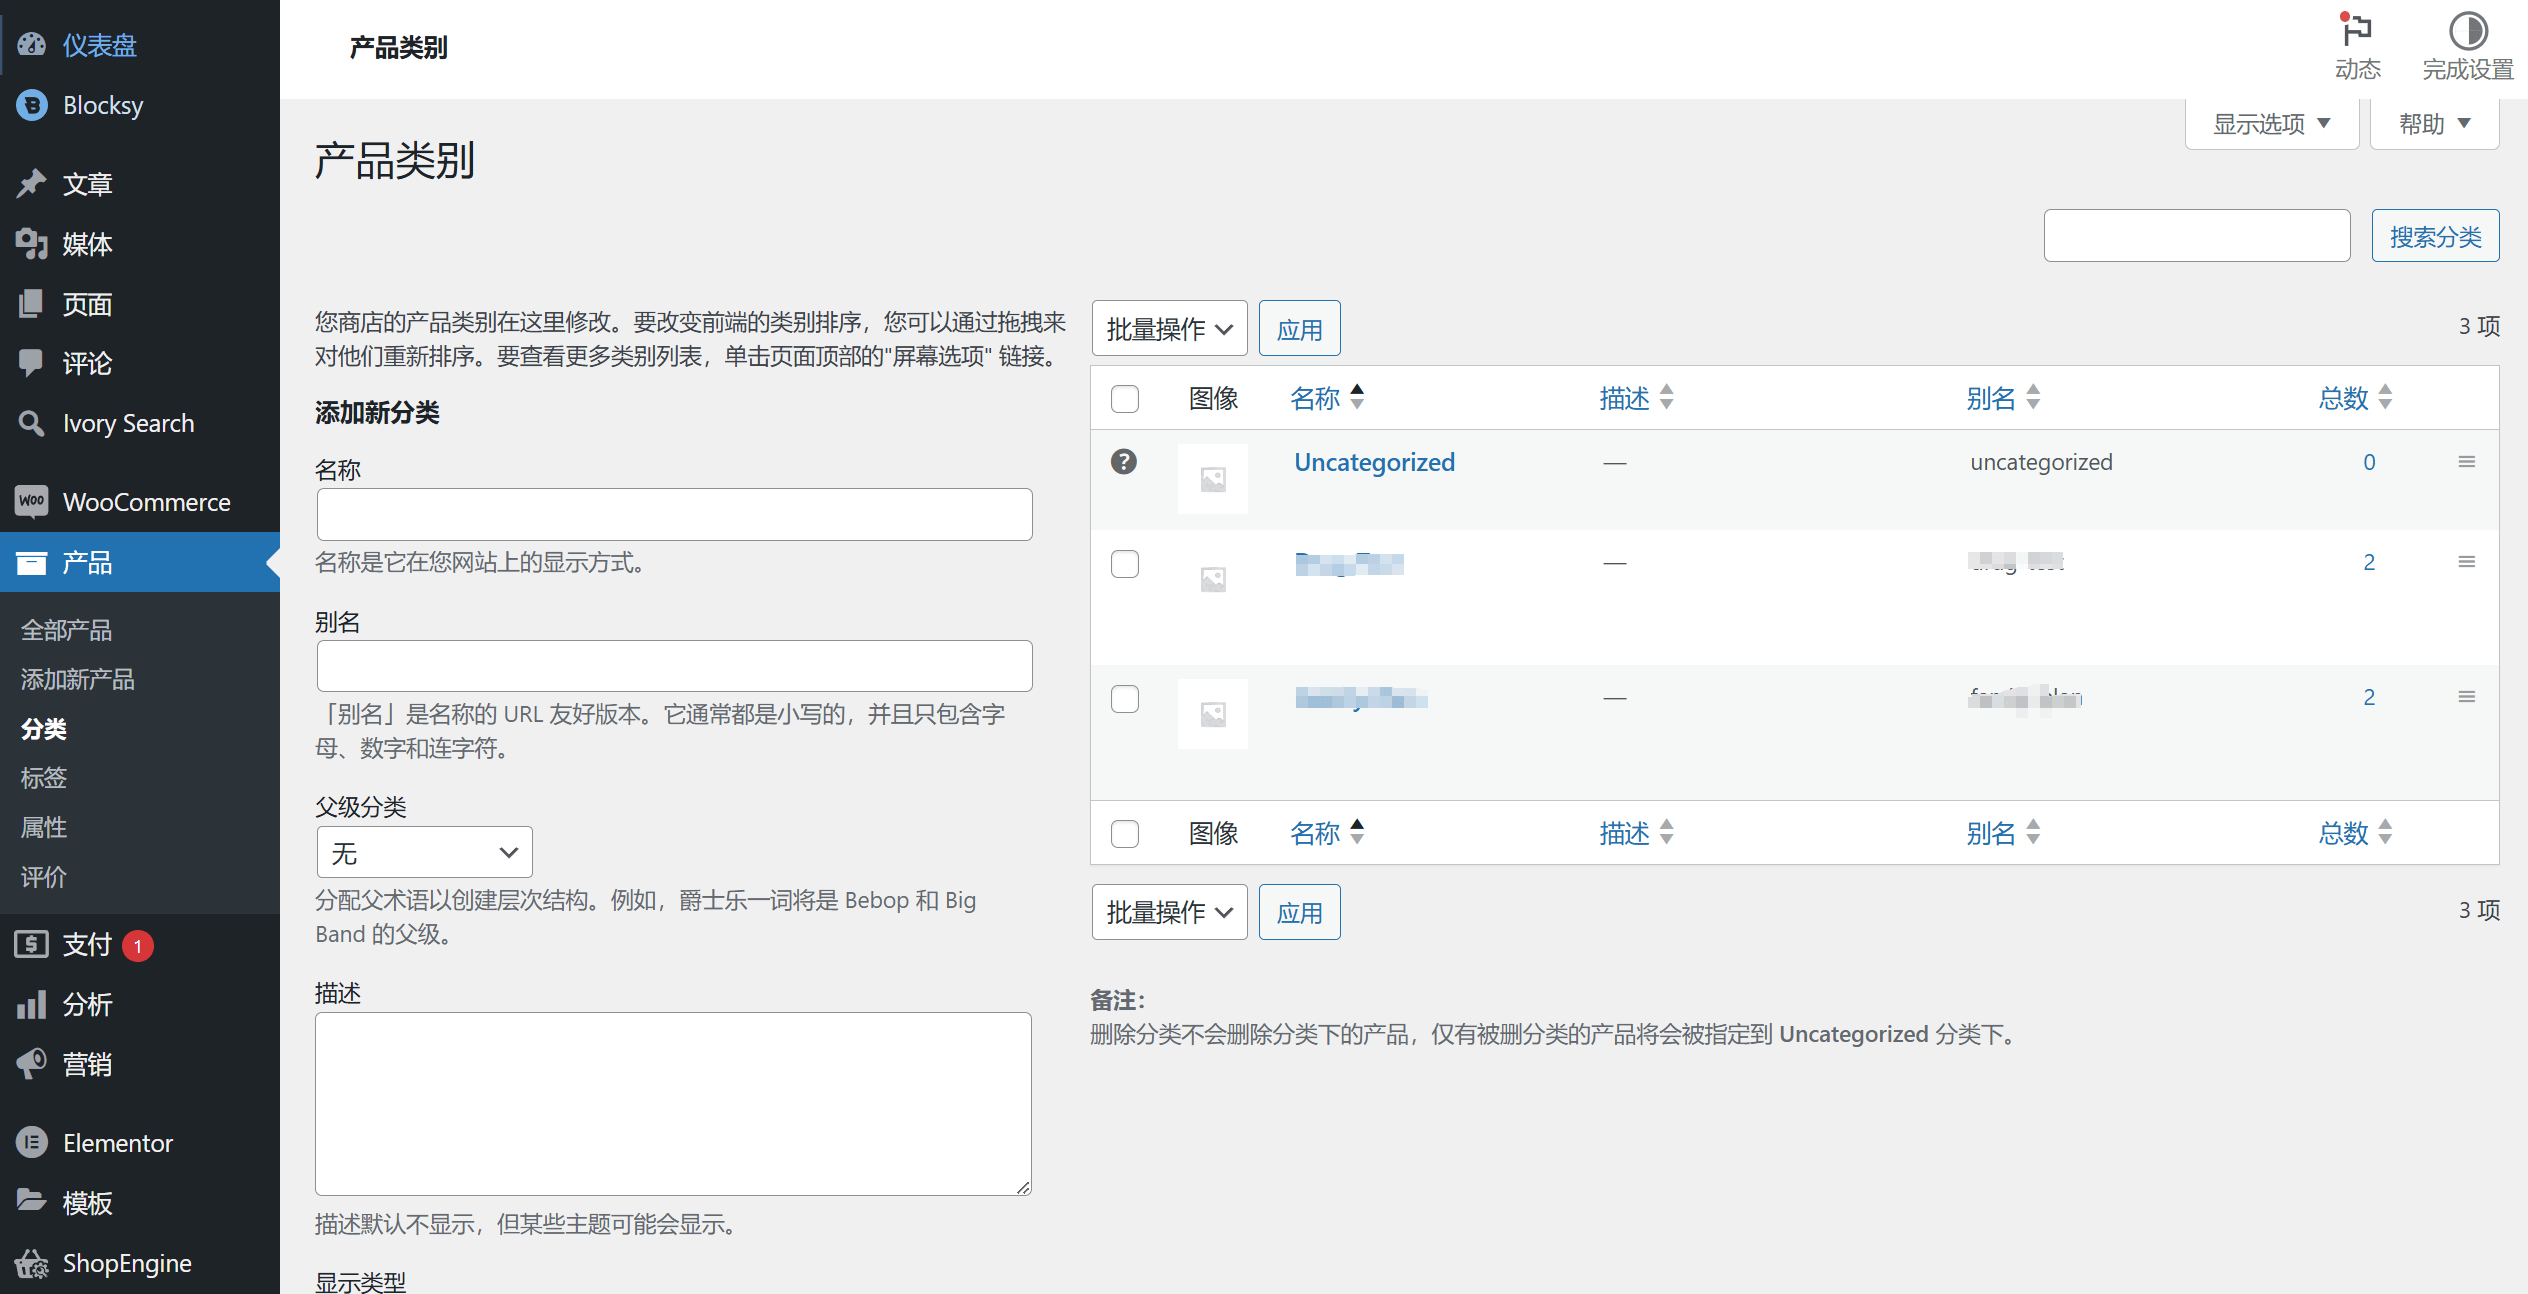
Good product categorization is a key factor in ensuring users can quickly find the products they need. The example image above shows the management interface for WooCommerce product categories. In the WordPress admin panel, click Products > Categories to enter this interface. Here you can create new product categories, enter category name, slug, parent category, and add a thumbnail to the category. For example, you can create large categories like "Clothing," "Electronics," etc., and set up subcategories under them like "Men's Clothing," "Women's Clothing," or "Smartphones," "Laptops." Then, go to the Products > Attributes page to create custom attributes like "Color," "Size," "Brand," etc. Each attribute can be set to a dropdown selection, text, or color block format to help users filter products on the frontend. After creating the attributes, you can call them in the specific product edit page to assign attribute values to the products.
(3) WooCommerce Payment Gateway Configuration
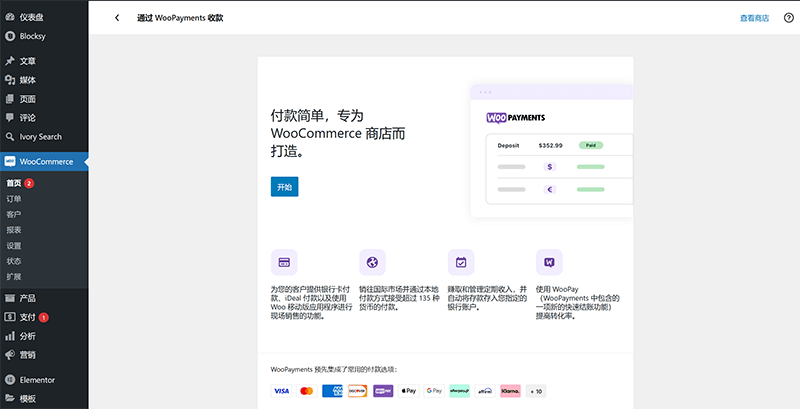
To set up payment methods, go to the WooCommerce payment settings page as shown in the image above. The specific path is: WordPress admin panel > WooCommerce > Settings > Payments. WooCommerce provides several default payment gateways, including Bank Transfer, Check Payments, Cash on Delivery, PayPal, and more. You can enable the corresponding payment options as needed and click the manage button next to each payment method to enter the detailed configuration page. For example, in the PayPal settings, you will need to enter the PayPal merchant account email address, select the currency for receiving payments, and decide whether to enable sandbox testing mode. For localized needs, if it is a domestic e-commerce site, you can also expand payment options by installing third-party plugins like WooCommerce Alipay or WeChat Pay. For cross-border e-commerce independent sites, you will need to choose a payment gateway provider that supports global credit card transactions and work with a WordPress website development company to integrate the payment system. Once the settings are complete, the blogger recommends conducting a payment test to ensure the process works smoothly.
(4) WooCommerce Shipping and Shipping Fee Settings
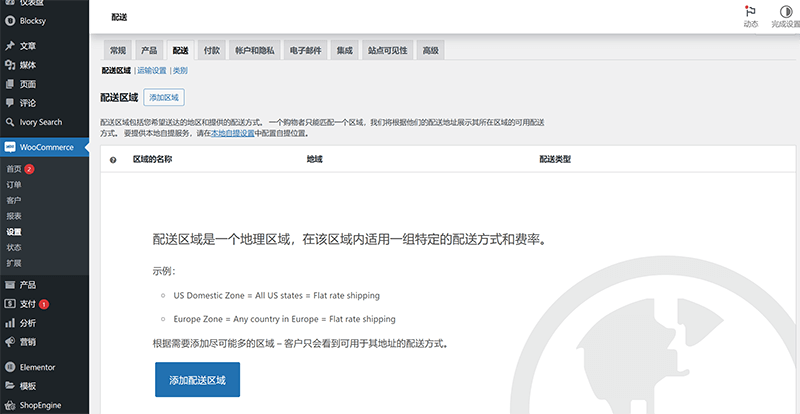
As shown in the image above, the shipping settings are located in WooCommerce > Settings > Shipping. First, you need to add shipping zones, such as nationwide, specific countries, or cities, and set shipping methods for each zone. WooCommerce supports shipping methods including Flat Rate, Free Shipping, and Local Pickup. Under each shipping method, you can further set specific costs, such as setting a base fee for flat rate shipping and adding conditions based on product weight, quantity, total order amount, etc. Additionally, you can install extra shipping plugins to enable features like different shipping rates by region or custom logistics service provider integrations. After completing the settings, remember to switch to the Shipping Options and Shipping Classes tabs to ensure that the shipping calculations and default options meet your business needs.
(5) WooCommerce Inventory Management

As shown in the image above, WooCommerce's inventory management settings are located in the "Product Data" section within the product editing mode. Here, you can set product stock quantities, out-of-stock thresholds, low stock warning thresholds, and whether to allow backorders.
(6) WooCommerce Email Notification Template Adjustments
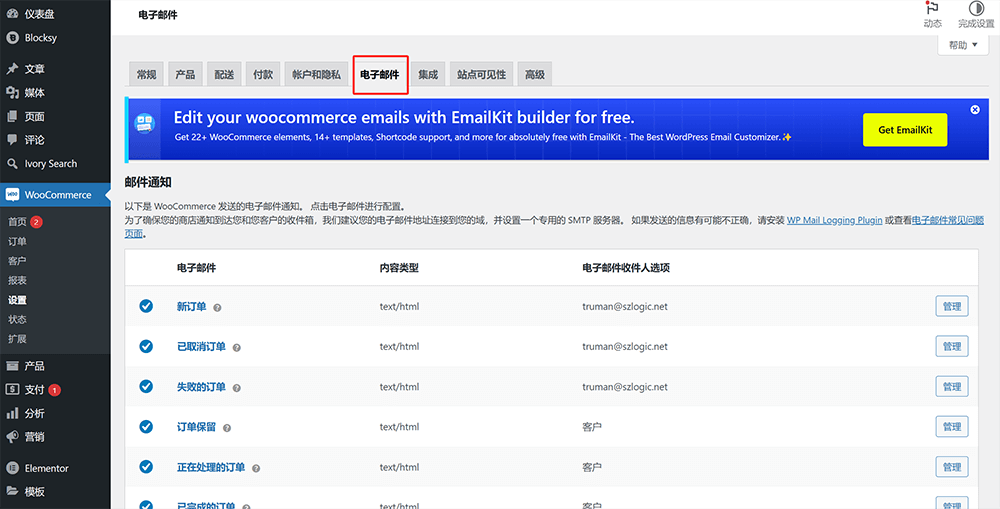
WooCommerce has built-in email templates to send notification emails to users or administrators at various stages of transactions. The image above shows the email settings page in WooCommerce, which can be accessed via WooCommerce > Settings > Emails. This page allows you to view and manage all email types, including new orders, cancelled orders, completed orders, password resets, etc. By clicking the "Manage" button next to each email type, you can customize the sender's name, sender email address, change the email subject, modify the email header text, and upload your brand logo. WooCommerce also supports overriding the email HTML templates through the theme's woocommerce/emails folder to achieve more advanced visual customization. After setting up, it is recommended to send a test email to ensure that the style and content meet your brand requirements.
Ⅴ、Installation and Configuration of UpdraftPlus Website Backup Plugin

In the operation of a WordPress website, data security is crucial. Whether it's website content, database information, or theme and plugin configurations, data can be at risk due to various reasons such as server failures, hacking attacks, or accidental operations leading to data loss. To prevent potential issues, establishing a stable and reliable backup mechanism is essential. Among the various one-click backup plugins, UpdraftPlus is undoubtedly one of the most popular and powerful solutions. UpdraftPlus, with its simple user interface, one-click backup and recovery operations, support for multiple remote storage options, and excellent scalability, has become the preferred data backup tool for WordPress site owners. It not only supports manual and scheduled backups of website files and databases but also allows automatic uploading of backup files to various cloud storage platforms, such as Google Drive, Dropbox, Amazon S3, and FTP, significantly enhancing the security and flexibility of backup data. In the following, the blogger will continue to follow the clear structure used in previous plugin tutorials and demonstrate the installation and configuration process of the UpdraftPlus plugin step by step, ensuring that readers can easily get started. The detailed operation instructions are as follows:
1、Installing the UpdraftPlus Website Backup Plugin

The installation method of UpdraftPlus is no different from other plugins, so the blogger will not repeat the steps here. If the readers have not followed the article from top to bottom but have directly selected this section from the table of contents, they can simply scroll up the page in the browser to the section on installing other plugins and follow the same method.
2、Configuring the UpdraftPlus Website Backup Plugin
The power of the UpdraftPlus plugin lies in its flexible and detailed configuration options, which can tailor the backup plan according to the actual needs of the website. Next, the blogger will explain step by step how to complete the configuration of the UpdraftPlus plugin and the key parts of the backup functionality to ensure that the backup is both secure and efficient.
(1) UpdraftPlus Backup Content Selection
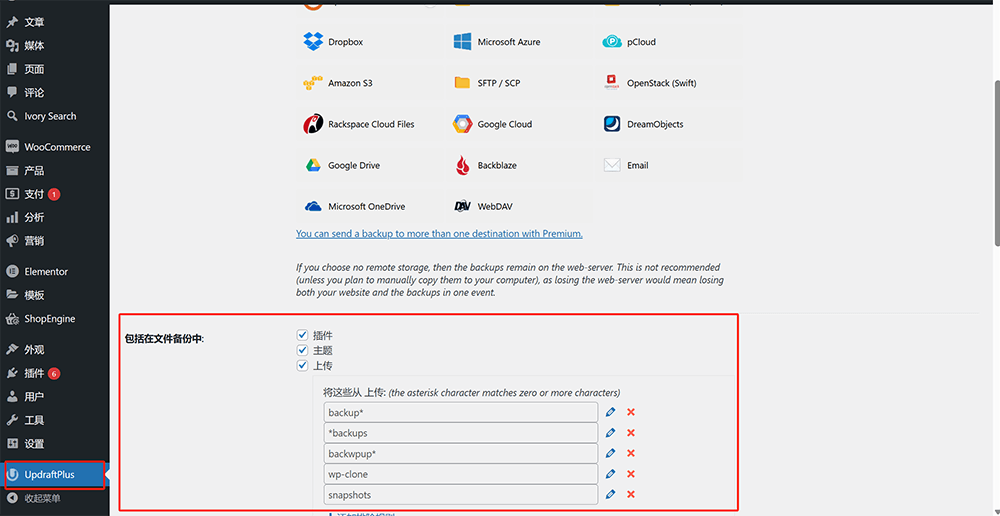
As shown in the red box in the image above, in the left sidebar of the WordPress backend, click on the UpdraftPlus plugin icon to enter the UpdraftPlus interface. Then click on the "Settings" tab in the upper part of the right content area. The first settings displayed are "File Backup Schedule" and "Database Backup Schedule." By scrolling the browser down, you will see the section to select what to "include in the file backup," which includes the following:
- Plugin: The plugin is the default checked option, which means the backup will cover all the plugin files installed on the current website, including both enabled and disabled plugins, ensuring that the plugin environment can be fully restored during the recovery process.
- Theme: By selecting the theme, UpdraftPlus will back up all the theme files installed on your site, including both the currently active theme and any backup themes, ensuring that they are fully preserved.
- Uploads Directory: The uploads directory corresponds to all the uploaded content in the WordPress media library, including images, audio and video files, documents, and other media resources, ensuring that the website content and page visuals remain consistent.
- Must-use plugins: This is an important component of the backup. They are typically located in the wp-content/mu-plugins directory, belong to auto-loaded plugins, and cannot be disabled through the backend. UpdraftPlus provides a dedicated option to include such critical plugins in the backup scope.
- Any other directories found in wp-content: With this setting, users can customize and add other folders under the wp-content directory, such as certain cache directories, custom upload directories, or folders generated by third-party plugins, ensuring the comprehensiveness of the backup.
(2) UpdraftPlus File Backup Schedule and Database Backup Schedule
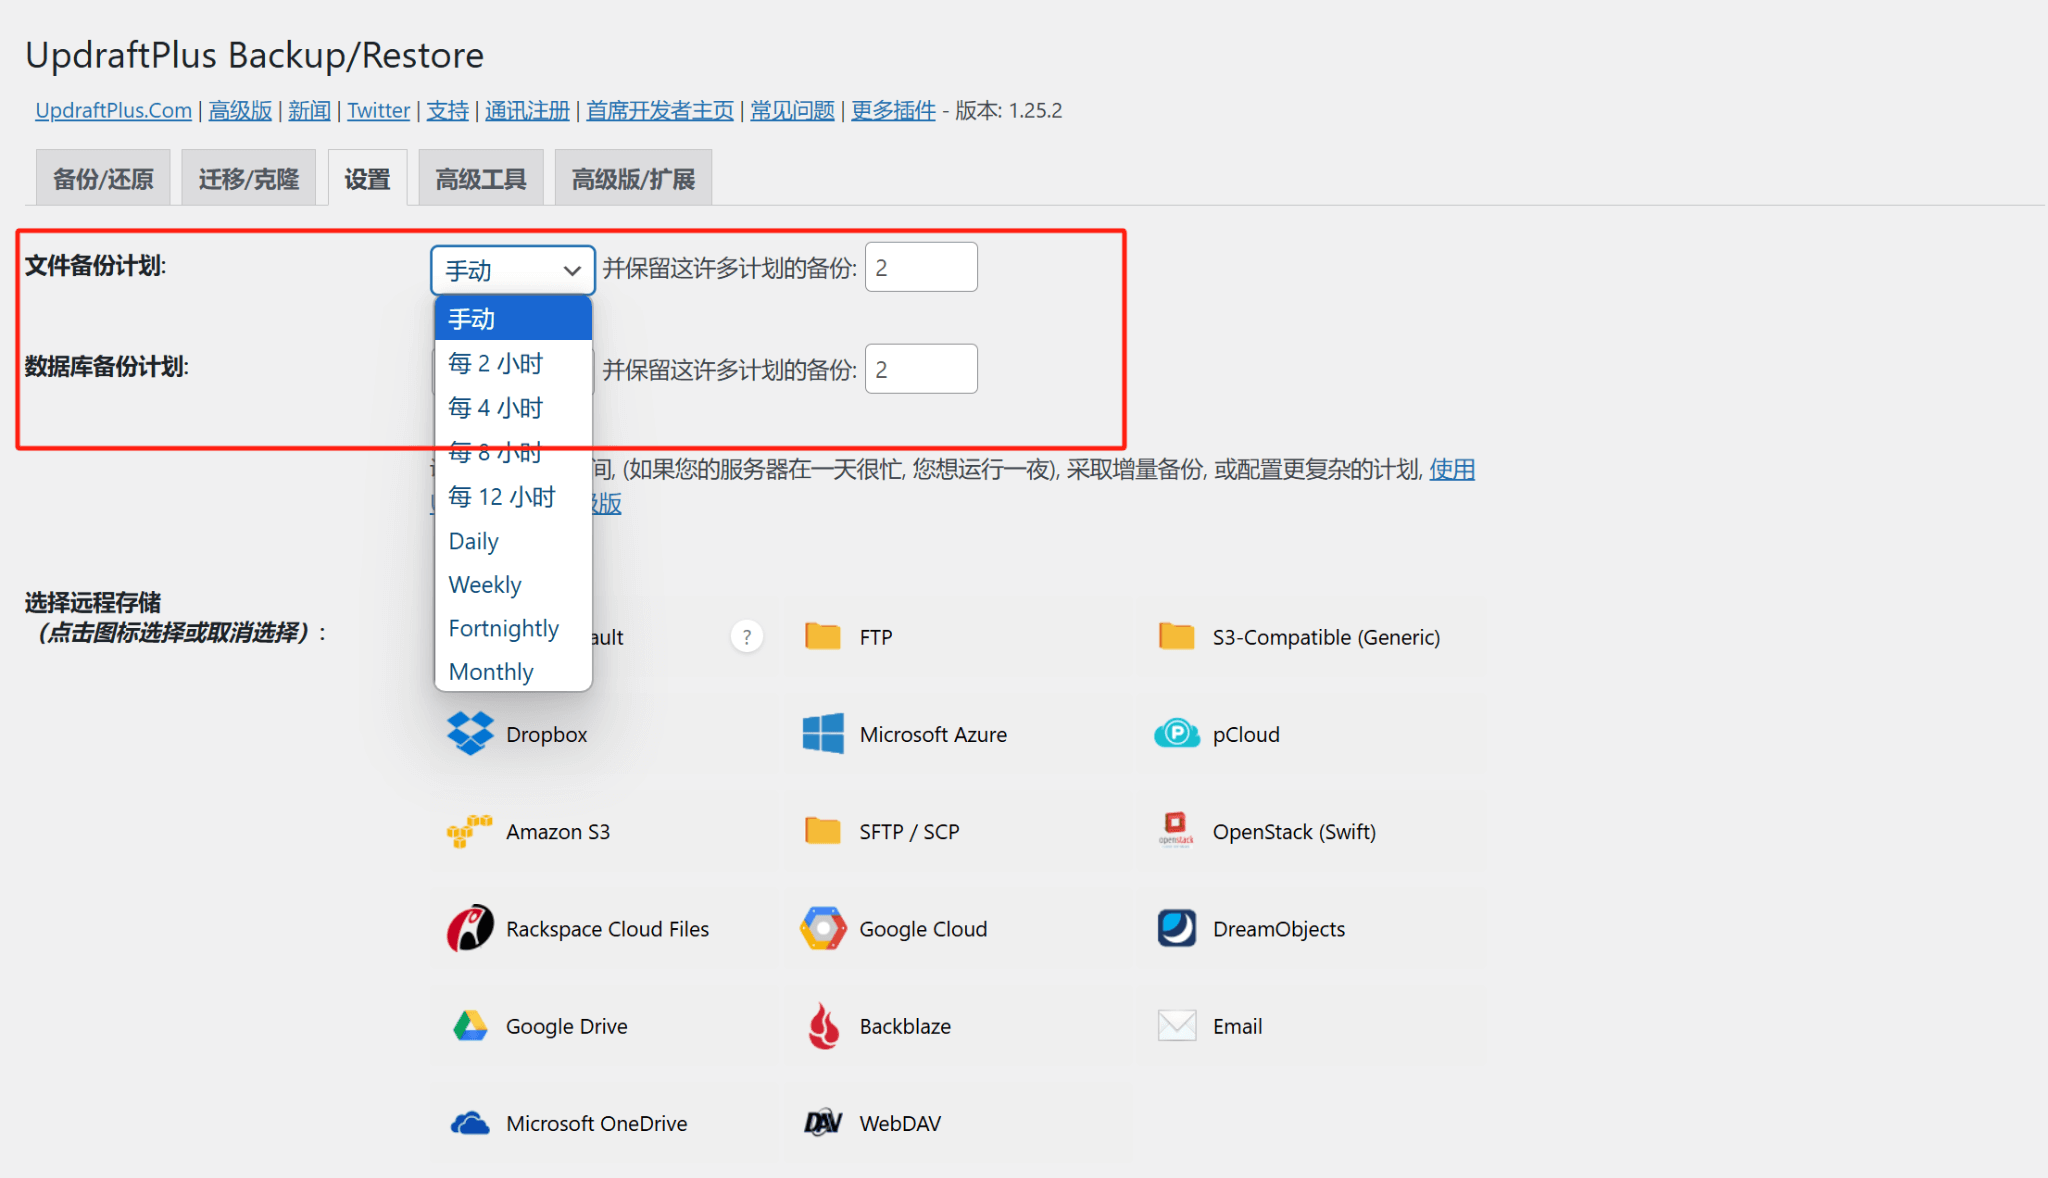
As shown in the image above, in the UpdraftPlus plugin's settings interface, the automatic backup feature for website data is clearly divided into two parts: "File Backup Schedule" and "Database Backup Schedule," corresponding to the backup cycle and retention settings for the website's files and database.
File Backup Schedule is mainly used to back up all files in the website directory, including themes, plugins, uploaded media files, etc. In the settings page, you can choose the backup frequency from the "File Backup Schedule" dropdown menu. The system provides various cycle options, such as "Every 2 hours," "Every 4 hours," "Every 8 hours," "Every 12 hours," as well as "Daily," "Weekly," "Fortnightly," and "Monthly." If you do not want automatic backups, you can also select "Manual," and the backup will only be executed when the backup button is clicked. The adjacent input box is used to set the retention number of backup files. For example, if set to "2," the plugin will automatically retain the most recent 2 backups, and any older backups beyond this number will be automatically deleted, effectively preventing too many backup files from accumulating and occupying server space.
Database Backup Schedule is specifically for backing up the website's database, which includes dynamic data such as posts, pages, user information, comments, and order data. Similar to file backup settings, users can separately choose an appropriate backup frequency for database backups, with several cycle options ranging from "Every 2 hours" to "Monthly." It is recommended that e-commerce websites with frequent database changes or blogs with active content updates set a higher backup frequency, such as daily or every 12 hours, to reduce the risk of data loss. The retention number for database backups can also be customized, and users can input a number to control how many historical backups the system will keep.
(3) Configuring Remote Storage in UpdraftPlus
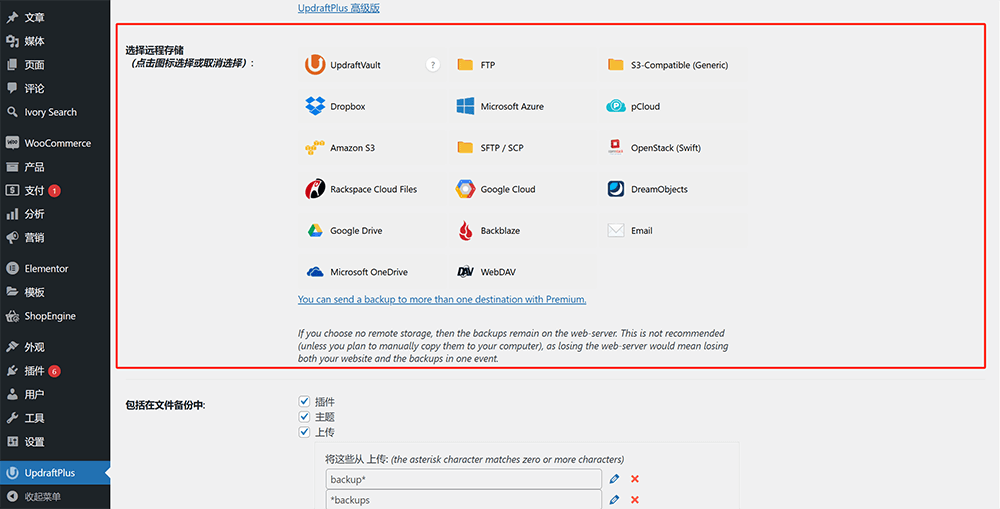
In the "Settings" tab of UpdraftPlus, the "Choose Remote Storage" setting is a crucial step. It determines where your backup files will be stored to ensure data security. The plugin offers multiple mainstream remote storage options, including Dropbox, Google Drive, Amazon S3, Microsoft OneDrive, as well as FTP, SFTP servers, etc. Simply click the corresponding storage service icon and follow the prompts to complete authentication or enter connection details. After configuration, the plugin will automatically upload future backup files to your designated remote location, preventing data loss risks due to single server failures.
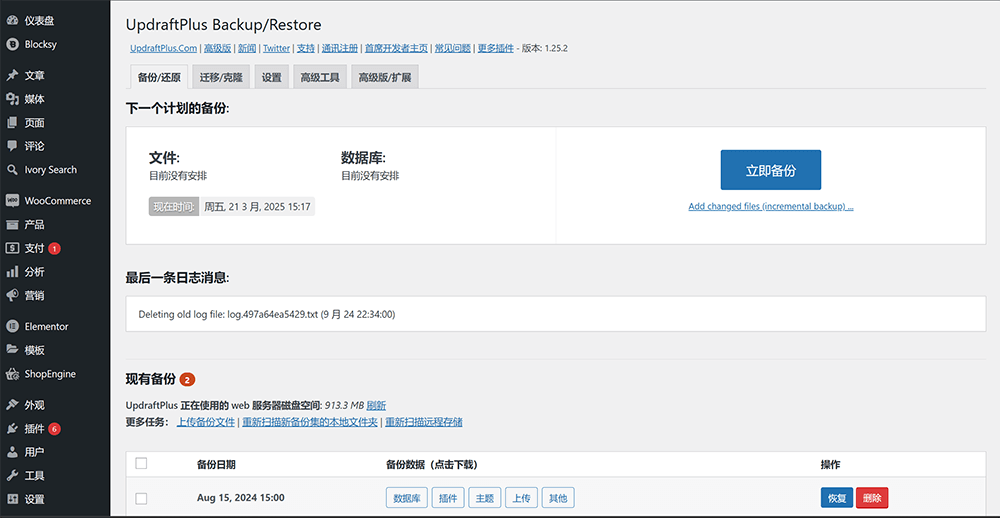
(4) UpdraftPlus Backup and Restore Operations
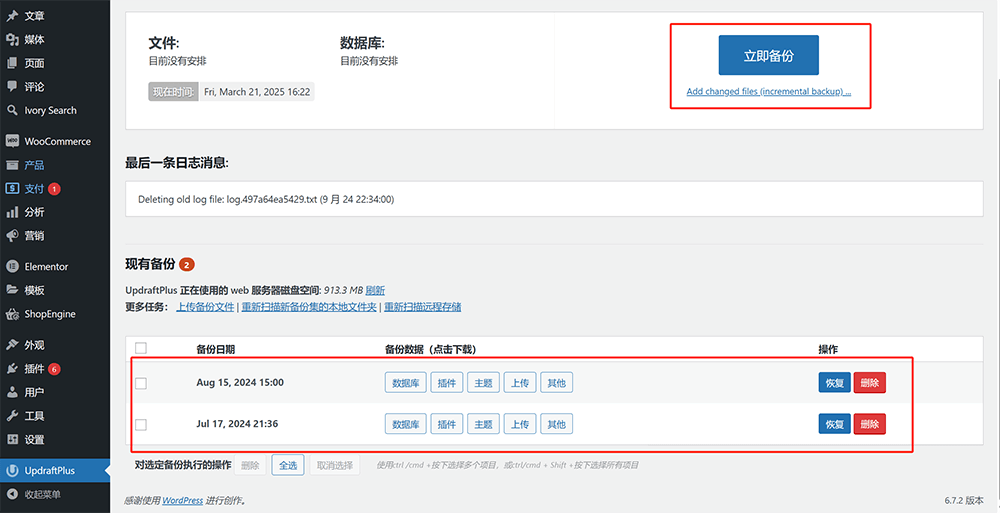
As shown in the image above, UpdraftPlus provides a convenient and intuitive backup and restore feature. In the WordPress backend, navigate to the UpdraftPlus plugin homepage, and click the "Backup" button in the top menu, as highlighted in the red box in the image above, to back up your site with one click. Additionally, the backed-up files will appear in the list at the bottom of the current page, with each backup record clearly marked with the backup date and included content (such as database, plugins, themes, upload files, etc.). Select the backup version you wish to restore, check the specific items to restore, and click the "Restore" button to initiate the restoration process. The plugin will automatically extract and restore the backup files to your site directory. The entire process requires no complex operations and easily handles unexpected website issues.
Conclusion: With that, the article "Essential WordPress Plugins Installation, Configuration, and Usage" has thoroughly covered the installation and core configuration methods of several key plugins in the process of building a WordPress website. From page building with Elementor, to multilingual support with TranslatePress, to efficient form management with WPForms, and essential e-commerce management with WooCommerce and site security with UpdraftPlus, the detailed operation steps for each plugin have been explained. The aim is to help readers, whether beginners or experienced developers, easily master and quickly deploy these plugin features. In the WordPress ecosystem, these plugins have long become the "infrastructure" of site development and operation. Proper use of them not only greatly enhances development efficiency but also ensures the stability and scalability of the website. I hope this article can provide practical reference and technical guidance for your future WordPress projects. Finally, if you have read this far and are only interested in understanding the functionality of basic WordPress plugins, but do not intend to develop and configure them yourself, it might be better to leave the professional tasks to the experts. Feel free to contact Logic Digital Technology, and we will provide you with comprehensive planning advice, as well as customized WordPress website solutions covering the entire process from site design to programming development, helping your project be implemented efficiently.
This article is copyrighted by Logic Digital Technology (SZLOGIC) . Personal sharing and learning are welcome. Unauthorized use for any commercial purposes or reproduction of this article is strictly prohibited.