WordPress Setup: WP Server Deployment Guide

When building a WordPress website, we are usually referring to using the open-source CMS system provided by WordPress.org. WordPress has gained immense popularity worldwide due to its open-source nature. It is this openness that allows developers to extend and deeply develop its functionality based on the core PHP language, giving WordPress great flexibility. At the same time, WordPress's powerful plugin and theme ecosystem is also a result of this open-source nature. Whether you are doing local development or online programming with WordPress, there is one crucial step that cannot be avoided — deploying the completed code to the server to ensure the website operates correctly and serves content to the outside world. The term "deployment" can actually be broken down into two levels: on one hand, there is the deployment of the website code itself, i.e., uploading the WordPress files to the server; on the other hand, there is the deployment of the underlying web runtime environment. As a web program, WordPress, like all software, must run in an appropriate environment to function properly.
For readers without a computer technology background, the concept of "runtime environment" might be relatively unfamiliar. We can understand it with a simple analogy: just like the Windows operating system provides the foundation for running various Windows applications, a web program also needs a runtime environment to execute. For WordPress, its runtime environment mainly includes the operating system (usually Linux), database (MySQL), web server (such as Nginx or Apache), and other core components. The main goal of this tutorial is to help build such a complete and stable environment for WordPress to run. In the following sections, the author will dive into how to install and configure key components like the Linux system, MySQL database, Nginx server program, etc., to help readers build a WordPress website server environment from scratch.
- Deploying MySQL Database on Linux System
- Deploying PHP Main Program on Linux System
- Deploying Nginx on Linux System
- Deploying WordPress.org Main Program on Linux System
Ⅰ、Deploying MySQL Database on Linux System

MySQL plays a crucial role in the operation of a WordPress website; it is the core for storing and managing all the website's data. As a dynamic content management system, WordPress does not store articles, pages, comments, user information, site configurations, and all other data directly in PHP code files. Instead, all this information is systematically stored in the MySQL database. When a visitor opens a WordPress page, the website's PHP code sends a query request to the MySQL database, retrieves the relevant content, and dynamically renders it on the webpage, thus achieving real-time display of information. MySQL is not just a simple data storage tool; it also manages the website's data structure, including categories, post tags, user permissions, plugin, and theme settings. For example, when an administrator publishes a post in the WordPress admin panel, the post's title, content, publication date, and other information are written to the MySQL database. When a visitor accesses the post, WordPress retrieves the corresponding data from the database and displays it in the browser. Therefore, MySQL can be seen as the "brain" of the WordPress website, coordinating and storing all the essential information required for the website to function properly.
In addition, MySQL performance optimization is crucial for the access speed and stability of a WordPress website. For high-traffic sites, frequent database queries can slow down response times and even affect the overall performance of the server. If database indexes are not properly set, query efficiency may suffer, or if the database has not been optimized for a long time, it could lead to slow page loading times or even timeout errors. Therefore, optimizing the MySQL database—such as using indexes appropriately, reducing redundant data, optimizing query methods, and regularly cleaning the database—is key to improving the operational efficiency of a WordPress site. To help everyone better understand and manage MySQL databases, the blogger will gradually demonstrate how to install MySQL on a Linux system and create a database in the following content.
1、MySQL Installation Method
(1) Step 1: Update CentOS components
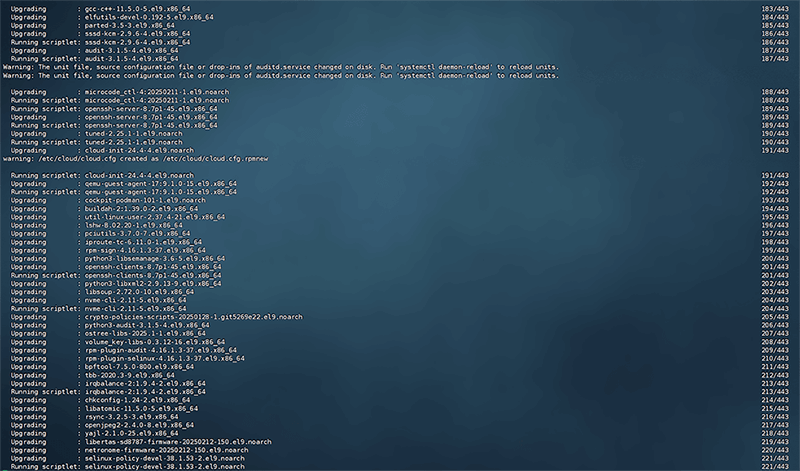
Use the following CentOS command to update the system components and ensure they are up to date. This can help avoid installation failures of MySQL due to outdated system components.
sudo dnf update -yThe feedback information of the CentOS component update system is shown in the following figure:
(2) Step 2: Add the MySQL official YUM repository
MySQL officially provides a YUM repository. After adding the YUM repository, you will be able to install the latest version of MySQL. Before adding YUM, we need to check if MySQL or other databases are already installed on the existing Linux system. If you find that software like MariaDB is already installed, please uninstall it first. The commands for checking, uninstalling, and installing YUM on CentOS are as follows:
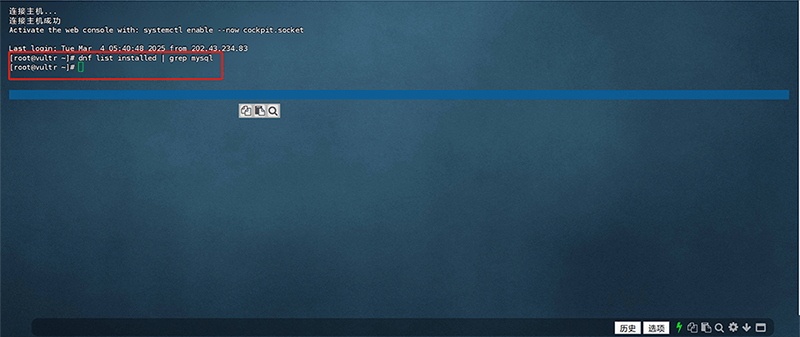
Check if MySQL is installed
dnf list installed | grep mysqlCheck whether MySQL is installed. The system feedback is as shown in the figure below: No data is displayed, which means that MySQL is not installed on the system.
Uninstall MariaDB instructions
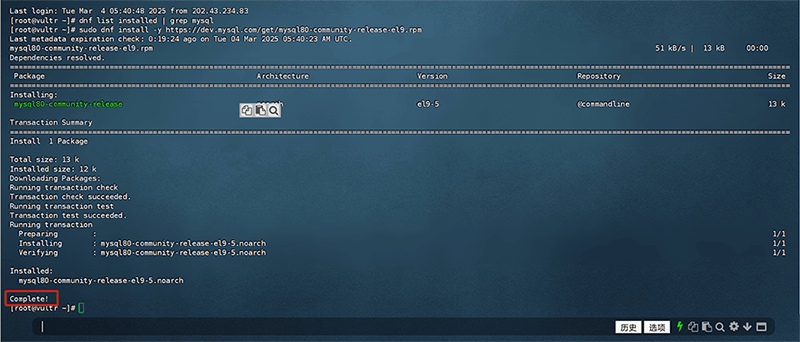
sudo dnf remove mariadb*Download and install the MySQL official YUM repository
sudo dnf install -y https://dev.mysql.com/get/mysql80-community-release-el9.rpmDownload and install the MySQL official YUM repository. The system feedback is as shown in the figure below: The "Complate!" marked in the red box at the bottom of the figure means that the installation has been successfully completed.
(3) Step 3: Install MySQL
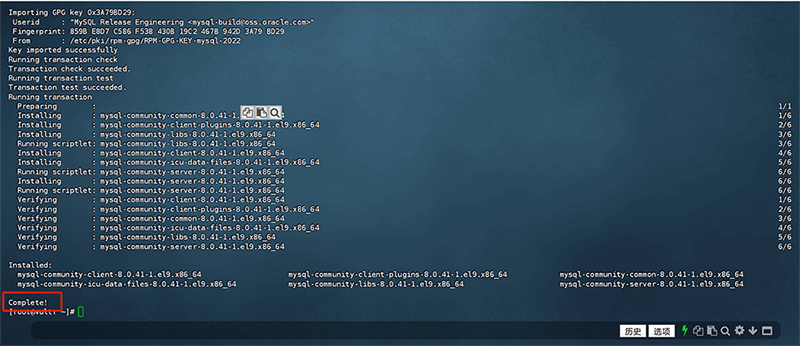
Install MySQL server on CenOS using the following command:
sudo dnf install -y mysql-community-serverThe system feedback after installing the MySQL server is as shown in the figure below: The "Complate!" prompt marked with a red box in the figure below appears, which means that MySQL has been successfully installed. If the command is executed and the prompt is not consistent with the blogger's screenshot, but an error prompt is displayed, you need to troubleshoot and solve the problem based on the specific error clues.
2、MySQL Configuration
(1) Start the MySQL service
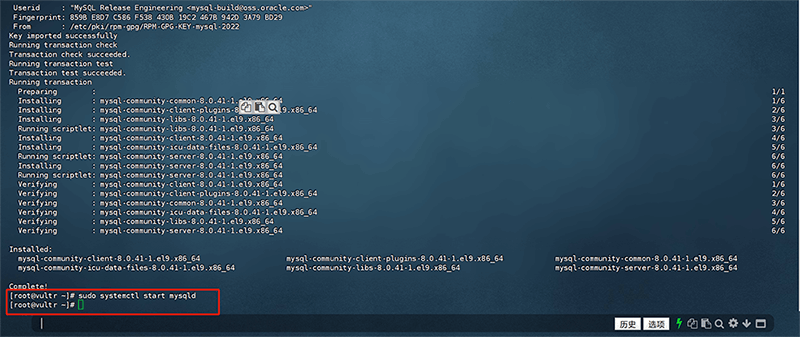
After successfully completing the installation of MySQL, use the following Linux command to start the MySQL service. The MySQL service must be enabled normally to support the operation of the Web program:
sudo systemctl start mysqldThe system feedback of starting the MySQL service is shown in the following figure:
(2) Set MySQL to start automatically at boot
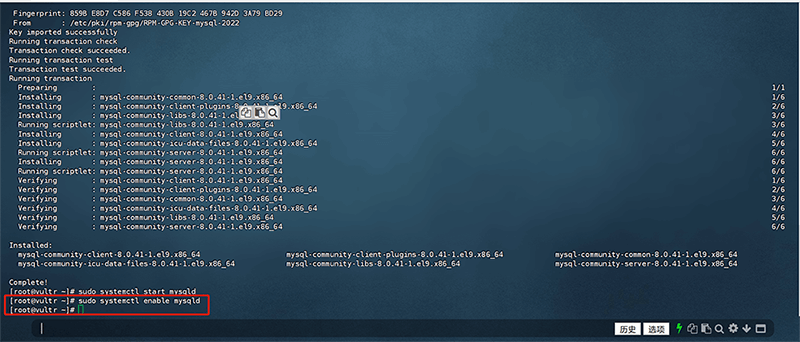
You need to set MySQL to automatically start when the system is running, otherwise the MySQL database will stop running when the server restarts, causing the website to be unable to connect to the database. The command to set MySQL to start automatically at boot in Linux is as follows:
sudo systemctl enable mysqldAfter executing the command for MySQL to automatically run at startup, the system feedback information is as shown in the figure below:
(3) Check the running status of MySQL
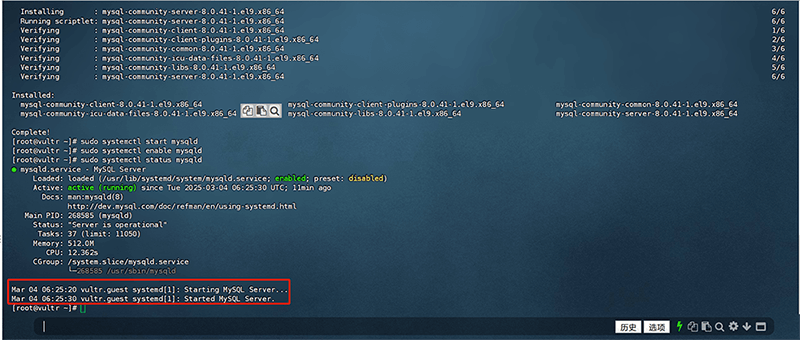
Finally, we need to execute the following Linux operation command to check the running status of MySQL and confirm whether the MySQL running status is enabled.
sudo systemctl status mysqldThe system feedback of the result of checking the running status of MySQL is shown in the red box below: The running status of MySQL is Enabled (Starting means Enabled).
3、Retrieving MySQL Initial Password
After MySQL is installed, a temporary root password is automatically generated. You can view it directly by opening the file in the /var/log/mysqld.log directory or executing the following command to obtain it directly:
sudo grep 'temporary password' /var/log/mysqld.logThe system feedback after executing the Get MySQL Initialization Command is as shown in the figure below: The red box marks the MySQL initialization password.

4、Logging into MySQL and Creating Databases and Users
(1)Log in to MySQL
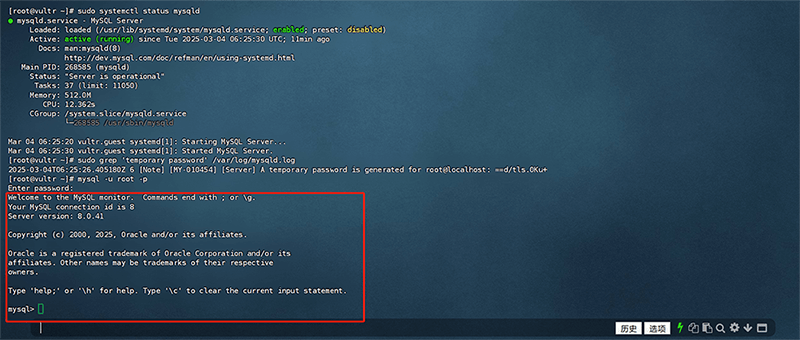
We execute the following command to log in to MySQL using the MySQL initialization password:
mysql -u root -pThe system feedback interface after successfully logging into MySQL is shown below:
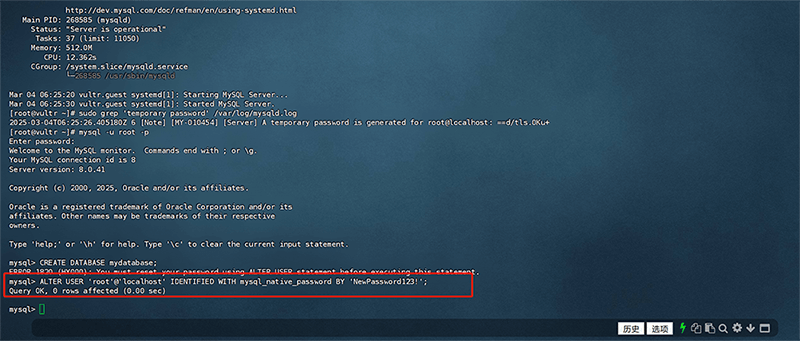
(2) Reset MySQL password
After logging into MySQL for the first time, we need to reset (modify) the initial password of MySQL first, otherwise we cannot proceed to the next step of creating a database and user operations. After logging into MySQL, the command to modify the MySQL password is as follows (change the password in the single quotes "" of the command to the password you need to set):
ALTER USER 'root'@'localhost' IDENTIFIED WITH mysql_native_password BY 'NewPassword123!';The system feedback interface after successfully changing the MySQL login password is as shown in the red box below:
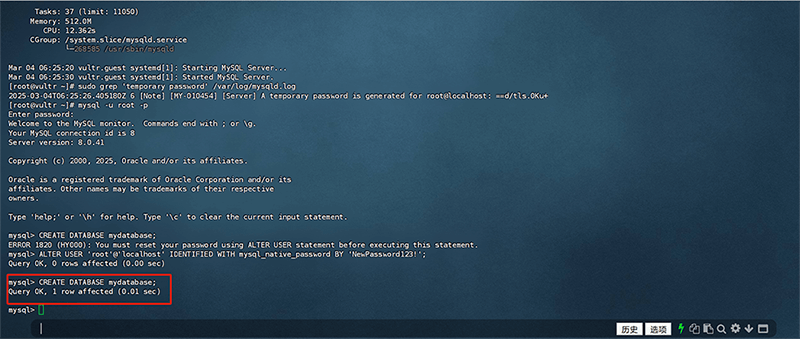
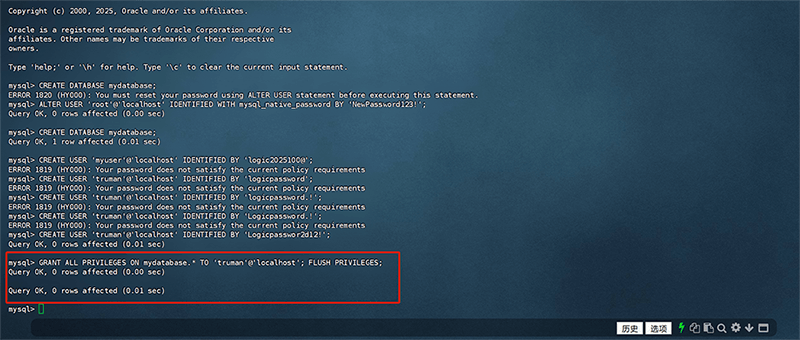
(3) Create a database and user
We need to create the MySQL database and user in advance. After all the programs for the WordPress runtime environment are deployed, the WordPress deployment will use this database connection. The following Linux commands need to be executed in order to create the database and user:
Command to create a database:
CREATE DATABASE mydatabase;A new database is created successfully, and the system feedback information is shown in the red box below:
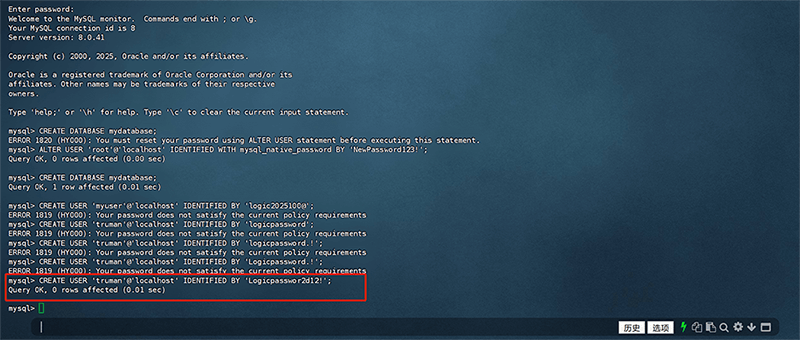
Command to create a new user (replace 'myuser' in the command with your custom username and 'mypassword' with the user password you want to set, pay attention to the standard requirements for passwords):
CREATE USER 'myuser'@'localhost' IDENTIFIED BY 'mypassword';After the command is executed, the system feedback information of successfully creating a new user is as shown in the red box below:
Command to grant permissions: In order to control the user's access to the database and operation permissions, and ensure the security of the database and the flexibility of management, it is necessary to authorize the permissions of the MySQL database and users we created, otherwise the user will not have the highest operation permissions on the database.
GRANT ALL PRIVILEGES ON mydatabase.* TO 'myuser'@'localhost';
FLUSH PRIVILEGES;
The system feedback information after executing the command successfully to grant permissions to the database and user is as shown in the red box in the figure below:
Ⅱ、Deploying PHP Main Program on Linux System

The deployment of the PHP main program is one of the underlying environments necessary for a WordPress website to run properly. WordPress itself is a dynamic content management system developed based on PHP, and all its core functions, including page rendering, data interaction, user authentication, plugin extensions, etc., are executed via PHP code and interact with the server. Therefore, correctly installing and configuring the PHP runtime environment on the server is fundamental to ensuring that the WordPress website can operate. When a user accesses a WordPress website, the server receives the request, invokes PHP to parse the core WordPress code, and interacts with the MySQL database to dynamically generate web content and return it to the user's browser. This is different from static websites, where the content is fixed; WordPress relies on PHP to process data in real-time and dynamically generate web pages based on different user requests. For example, when a visitor opens an article, PHP will extract the article content from the database and render it into a HTML page according to the structure of the WordPress template files, which is then displayed to the user.
In addition, the version and performance optimization of PHP directly affect the speed and security of a WordPress website. Different PHP versions have significant differences in execution efficiency and security mechanisms. Newer PHP versions typically offer faster parsing speeds and more comprehensive security patches. If the PHP version is too outdated, it may not only prevent some new features of WordPress from functioning properly, but also introduce security vulnerabilities, making the website more susceptible to attacks. Therefore, selecting the appropriate PHP version and optimizing PHP runtime parameters for WordPress—such as adjusting memory limits, enabling necessary extensions, and optimizing execution times—are crucial measures for improving website performance. To ensure that PHP runs smoothly on the server and provides stable support for WordPress, the blogger will gradually demonstrate how to install PHP on a Linux system and modify related configuration files to achieve efficient PHP operation in the following content.
1、PHP Installation Procedure
(1) Install PHP Step 1: Enable Remi repository
In the default software sources of Linux systems, the PHP version is usually older. We need to execute the following commands in order in Linux to enable the Remi repository to install the latest PHP version:
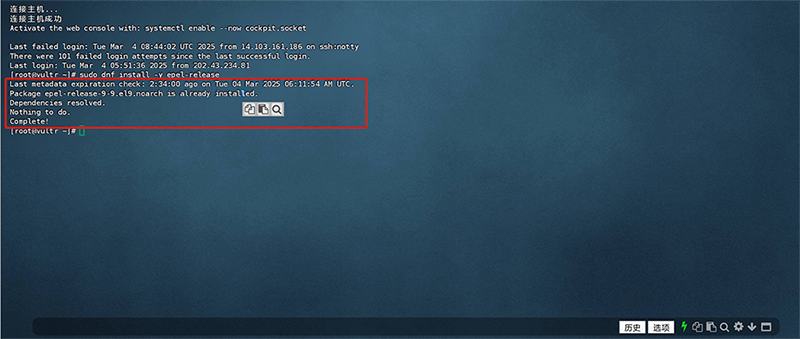
Execute the following command to install EPEL (Extra Packages for Enterprise Linux):
sudo dnf install -y epel-releaseThe system feedback information of executing the EPEL installation command is shown in the red box below:
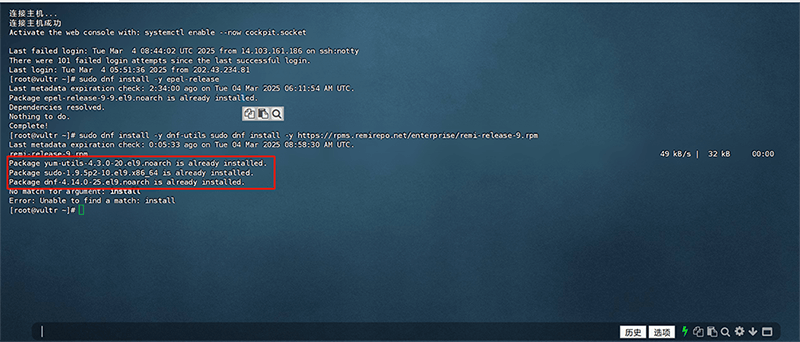
Execute the following command to install the Remi warehouse:
sudo dnf install -y dnf-utils
sudo dnf install -y https://rpms.remirepo.net/enterprise/remi-release-9.rpm
The system feedback information after executing the Remi warehouse installation command is as shown in the figure below:
(2) Install PHP Step 2: Install PHP
Use the following Linux command to install PHP:
sudo dnf module enable php:8.3 -yAfter the PHP installation command is executed, the system feedback information is as shown in the red box in the figure below: "Complate!" indicates a successful installation. If an error message such as Error or not found is displayed, you need to check whether the command is correct or there are other errors.

(3) Install PHP Step 3: Install common PHP extensions
In the following command, the blogger has added the commonly used PHP extensions to the installation list of command execution. You can directly use the command to install these normal extensions. The command is as follows:
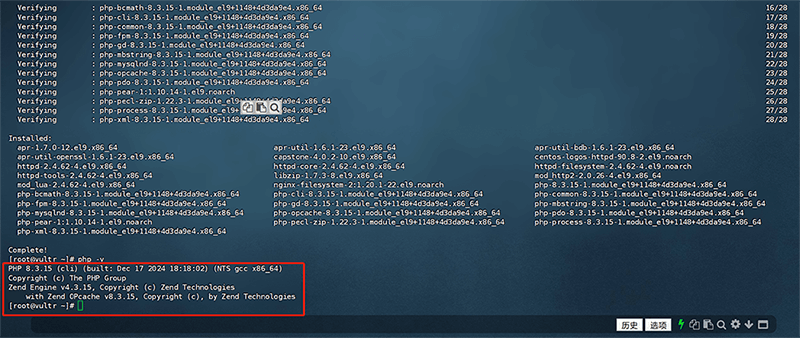
sudo dnf install -y php php-cli php-fpm php-mysqlnd php-zip php-gd php-mbstring php-curl php-xml php-bcmath php-json php-pearExecute the installation command of PHP common extensions. The feedback information of Linux successfully installing PHP extension system is shown in the figure below:

2. Verify PHP installation
After completing the above PHP installation steps, we need to further confirm whether PHP has been successfully installed and is working properly. First, we need to execute the command to check the version of PHP we followed, and then check the components of PHP.
(1) Check the PHP version
php -vAfter executing the above command, if PHP has been installed successfully, we will see the output as shown in the red box in the following figure:
(2) Check PHP components
In addition to checking the PHP version above, we can also execute the following command to check PHP components to confirm whether the PHP components are complete. The command is as follows:
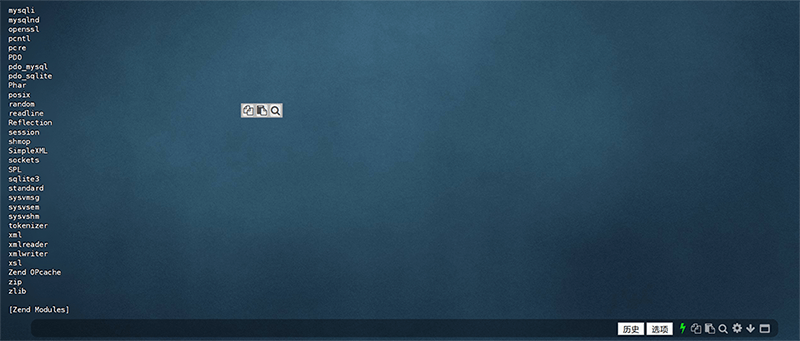
php -mThe system feedback information after executing the check PHP component command is shown in the following figure:
3. Common PHP configuration modification methods
(1) PHP configuration modification step 1: Find the php.ini configuration file
Use the following command to find the directory where the PHP configuration file (php.ini) is located:
php --iniAfter entering the command to search for the php.ini file, the feedback information on the system interface is as shown in the figure below: the red box marks the file path of php.ini.

(2) PHP configuration modification step 2: Modify the main PHP configuration
After we execute the above command to find the php.ini file and obtain the file path, we can use the vi text editor in the Linux system to edit the php.ini file. The command is as follows:
sudo vi /etc/php.iniAfter running the vi text editor to edit the command of the php.ini file, the system interface is as shown below:
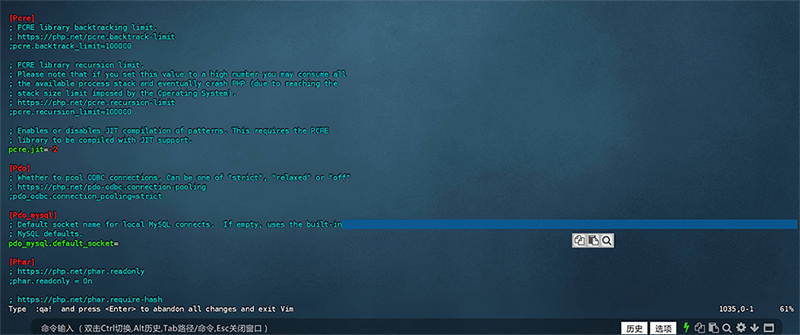
Recommended configuration table for PHP runtime
| Configuration items | Efect | Default Value | Recommended Changes |
| memory_limit | Limit the maximum memory of a PHP process | 128M | 512M or larger |
| max_execution_time | Maximum script execution time (seconds) | 30 | 300 (suitable for long-running scripts) |
| post_max_size | Maximum size of POST data allowed | 8M | 50M or larger |
| upload_max_filesize | Maximum file size allowed for upload | 2M | 50M or larger |
| date.timezone | Server Time Zone | UTC | Asia/Shanghai |
(3) Restart PHP
After modifying the PHP configuration file (php.ini), you need to restart PHP for the new configuration to take effect. The command to restart PHP is as follows:
sudo systemctl restart php-fpmⅢ、Deploying Nginx on Linux System

The deployment of the Nginx main program is crucial for the operation of a WordPress website and is one of the necessary conditions for running a web program. As a web server software, Nginx is responsible for handling and distributing requests from users' browsers and correctly transmitting the dynamically generated web content from WordPress to the visitors. Compared to the traditional Apache server, Nginx has become the preferred web server for many WordPress sites due to its high concurrency handling capability, lightweight architecture, and efficient static resource loading speed. When a user enters the address of a WordPress site in the browser and accesses it, Nginx will first receive the request and determine how to handle it based on the server's configuration rules. For static resource requests (such as CSS, JavaScript, images, etc.), Nginx can directly return data from the server cache or file system, greatly improving the website's access speed. For dynamic requests (such as article loading, user login, comment submission, etc.), Nginx forwards the request to the PHP parser (such as PHP-FPM), which then interacts with the MySQL database to process the data, ultimately generating an HTML page and returning it to the user.
In addition, Nginx can enhance the performance and security of a WordPress website through reverse proxy and load balancing features. For sites with high traffic, Nginx can distribute user requests to multiple servers or different PHP processes, preventing server resources from being overloaded by a single point. Additionally, through Nginx's caching mechanism, the number of calls to PHP and the database can be reduced, improving page loading speed. At the same time, Nginx can act as a security defense for the website, supporting HTTPS encryption, blocking malicious requests, limiting access frequency, and other functions, thereby improving the website's stability and security. Correct installation and configuration of Nginx plays a key role in the stable and efficient operation of WordPress. Therefore, in the following content, the blogger will demonstrate how to install Nginx on a Linux system and modify the relevant configuration files to ensure the stable and efficient operation of Nginx.
1、Nginx Installation Method
Use the commands in the following code block to install Nginx:
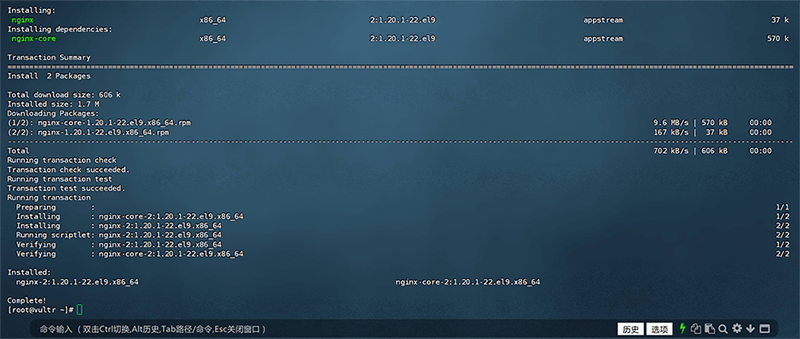
sudo dnf install nginx -yAfter Linux executes the Nginx installation command, the information interface fed back by the system is as shown below:
2、Configuring Nginx
(1) Start Nginx and set it to start automatically at boot
After installing Nginx in the previous step, we need to set Nginx to start automatically at boot, otherwise Nginx will stop running due to server restart. The command to set Nginx to start automatically at boot is as follows (the commands need to be entered one by one):
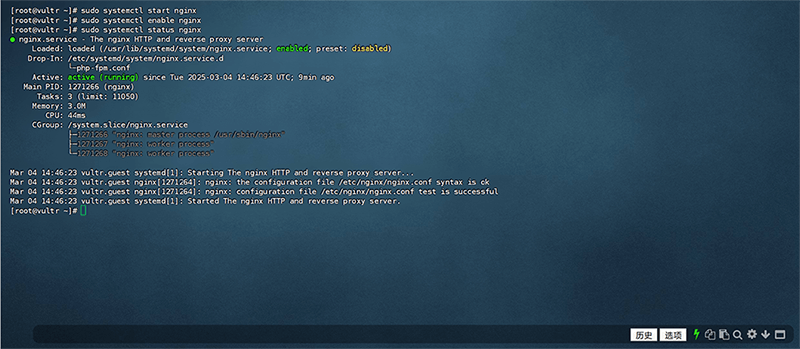
sudo systemctl start nginx
sudo systemctl enable nginx
(2) Check the Nginx running status
Use the following Linux execution command to check the running status of Nginx and make sure Nginx is enabled. The command is as follows:
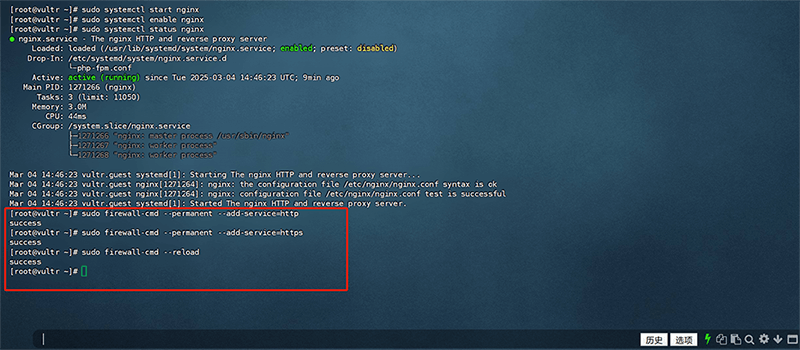
sudo systemctl status nginxAfter executing the command to check the Nginx running status, if it is running successfully, you will see " active (running)" as shown in the image below. "active (running)" means that Nginx is in the started state.
(3) Allow Nginx to pass through the firewall
The execution commands that allow Nginx to pass through the firewall are as follows. They need to be entered one by one when executing the system:
sudo firewall-cmd --permanent --add-service=http
sudo firewall-cmd --permanent --add-service=https
sudo firewall-cmd --reload
The system feedback information of the three running commands successfully setting Nginx to pass the firewall is shown in the figure below, and the system will give a success prompt:
(4) Configure the Nginx main file
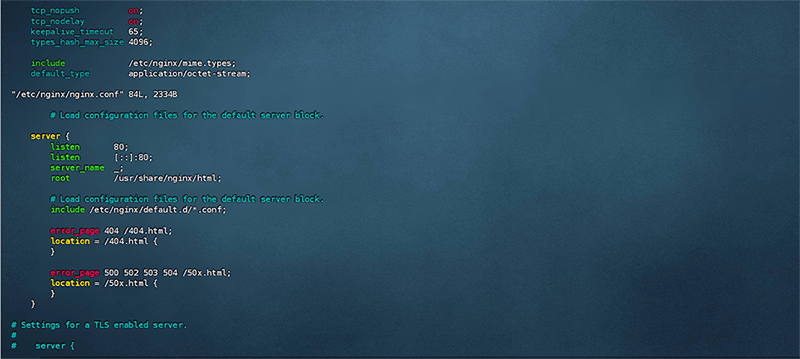
Run the following command to edit the configuration parameters of the nginx.conf file using the vi editor of the Linux system.
sudo vi /etc/nginx/nginx.confThe editing interface of the nginx.conf file opened with the vi editor is shown in the figure below:
(5) Reload Nginx
After completing the parameter configuration of the above nginx.conf configuration file, you need to run the following command to reload Nginx so that the modified configuration can take effect.
sudo systemctl reload nginxⅣ、Deploying WordPress.org Main Program on Linux System

1、WordPress Installation Method
(1) Install WordPress Step 1: Download WordPress
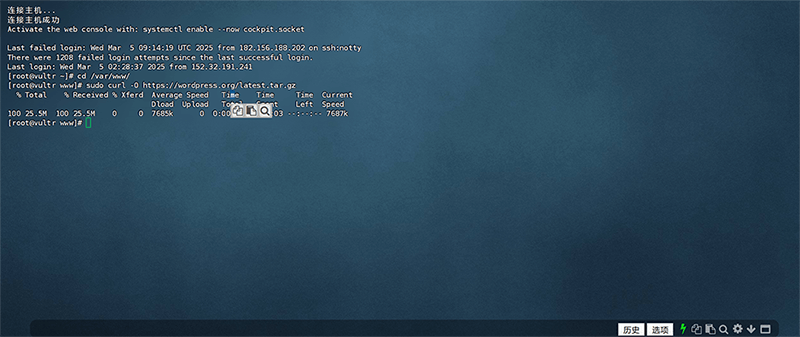
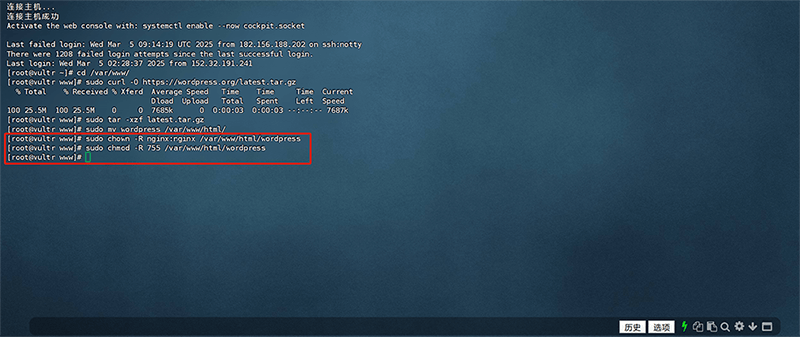
Run the following Linux command to download the WordPress.org main program. The command is as follows:
cd /var/www/
sudo curl -O https://wordpress.org/latest.tar.gz
The system feedback information after executing the command to download WordPress.org is as shown in the figure below:
(2) Install WordPress Step 2: Unzip the WordPress compressed package
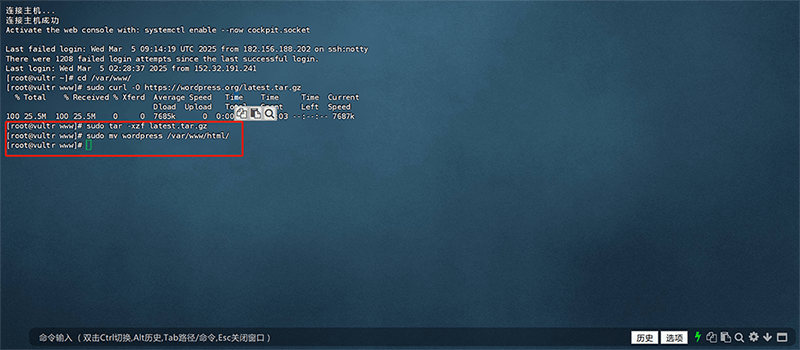
After successfully downloading the installation package of wordpress.org, run the following Linux command to decompress the installation package.
sudo tar -xzf latest.tar.gz
sudo mv wordpress /var/www/html/
The system feedback information after the WordPress installation package decompression task is completed is as shown in the red box below:
(3) Install WordPress Step 3: Grant Nginx permission to operate the WordPress directory
Set the ownership and access permissions of the WordPress directory to ensure that the Nginx server can correctly read and execute WordPress files to avoid permission issues that cause the website to fail to run.
sudo chown -R nginx:nginx /var/www/html/wordpress
sudo chmod -R 755 /var/www/html/wordpress
The system information feedback after running the command to execute the authorization is as shown in the red box below:
2、Configuring WordPress
(1) Configure WordPress Step 1: Copy the WordPress configuration file
cd /var/www/html/wordpress
sudo cp wp-config-sample.php wp-config.php
(2) Configure WordPress Step 2: WordPress database configuration
Open the wp-config.php configuration file using the vi editor
Use the vi editor to open the wp-config.php configuration file of WordPress and add the database account information to link WordPress with the database. Execute the command as follows:
sudo vi wp-config.phpThe code of the wp-config.php configuration file is shown in the figure below:
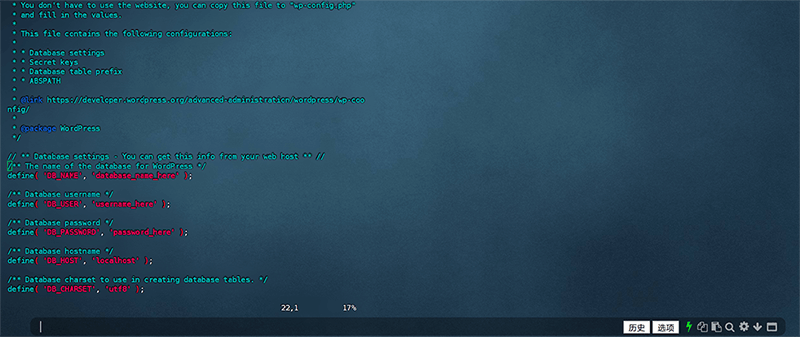
Add database information in wp-config.php code
Find the following code block in the wp-config.php file and change the database name, username, and password to the database name, username, and password we created in the above MySQL deployment section. After the database configuration is modified, execute the :wq or :x command to save and exit the vi editor.
define( 'DB_NAME', 'wordpress' );
define( 'DB_USER', 'wp_user' );
define( 'DB_PASSWORD', 'StrongPassword!' );
3. Configure Nginx
(1) Configure Nginx Step 1: Execute the command to open the Nginx nginx.conf configuration file
Execute the following command to open the Nginx configuration file using the vi editor:
sudo vi /etc/nginx/nginx.conf(2) Configure Nginx Step 2: Add Nginx configuration code
In the nginx.conf file, find the code block marked in the red box in the figure below (the code in the figure below has been configured and replaced), and replace the initialization code of nginx.conf with the code written by the blogger below.
    listen 80;
    server_name 你的域名;
    root /var/www/html/wordpress;
    index index.php index.html index.htm;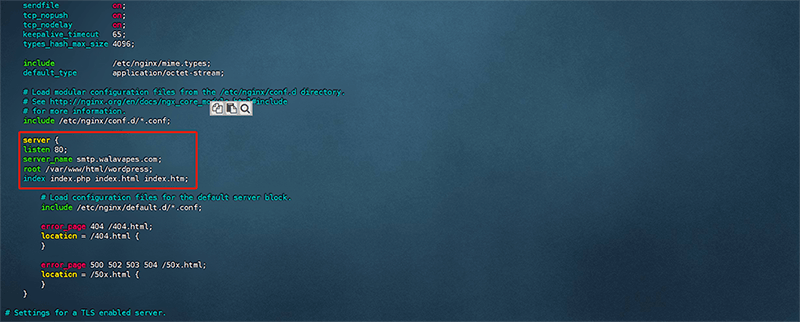
(3) Configure Nginx Step 2: Reload Nginx
After replacing and saving the above Nginx configuration code, you need to execute the following command to restart Nginx for the new configuration to take effect.
sudo systemctl restart nginx4. Access WordPress backend
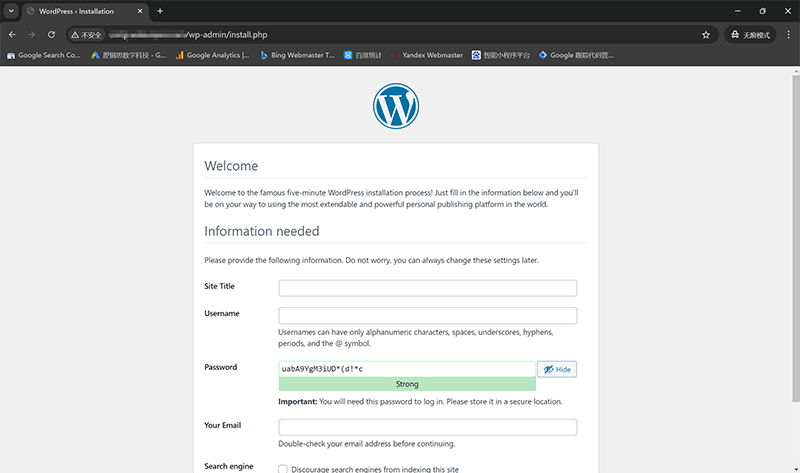
Visit your WordPress website backend URL (http://your-domain.com/wp-admin) in a browser. If you see the WordPress installation wizard as shown below, it means that the WordPress operating environment and setup above are successful! Then fill in your site name, administrator account, password, email address, etc. in the form on the WordPress installation page. After filling in this information, click the "Install WordPress" button at the bottom of the page to complete the WordPress installation.
Conclusion: In this tutorial, the author has detailed how to set up the WordPress server environment, from the installation of MySQL, PHP, Nginx, and WordPress, to the configuration of parameters. Each step is crucial. WordPress, as one of the most popular CMS platforms worldwide, boasts strong scalability and a rich plugin ecosystem, while a stable, secure, and efficient server environment is the key to ensuring the long-term operation of the website. We hope this WordPress tutorial helps you successfully build your WordPress website and lays a solid foundation for future optimization and maintenance. If you encounter issues during setup, it’s worth checking whether the commands and configuration parameters are correct. Finally, if you're reading this article just to understand the principles of WordPress setup and program operation, but don't want to dive deep into learning and implementing WordPress development, leave it to the professionals. Feel free to contact Logic Digital Technology, and we will provide you with professional WordPress design development solutions.
This article is copyrighted by Logic Digital Technology (SZLOGIC) . Personal sharing and learning are welcome. Unauthorized use for any commercial purposes or reproduction of this article is strictly prohibited.