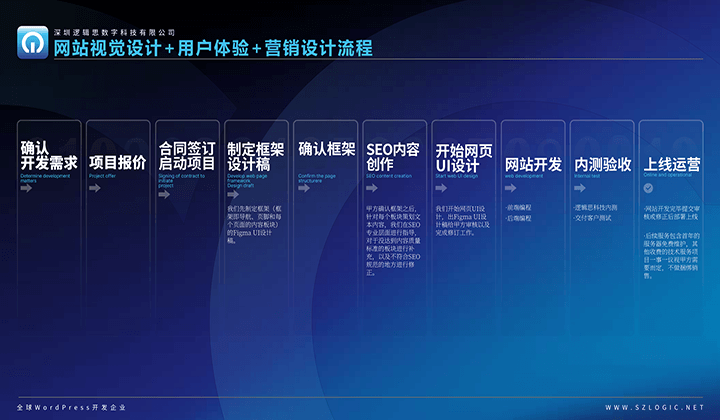
WordPress Backend Usage Tutorial
WordPress management dashboard is a clean and intuitive user interface that allows WordPress site administrators to manage various aspects of their website. Even individuals without programming or website development expertise can easily operate these features, which enable administrators to effortlessly manage the content, appearance, functionality, and user permissions of a WordPress site. Below are the main features and components of the WordPress management dashboard:
- Dashboard: The dashboard is the homepage of the management backend, providing an overview of the website, including recently published posts, comments, website data statistics, and plugin activity logs. Administrators can also customize the layout and content displayed on the dashboard.
- Posts: In the posts section, administrators can create, edit, and manage posts on the website. They can categorize posts, add tags, set publication dates, and more.
- Media Library: Administrators can upload, edit, and manage images, videos, and other media files used on the website. They can categorize media files and add descriptions.
- Pages: Similar to posts, but used to create static pages, such as an "About" page, "Contact" page, etc. The difference between pages and posts is that pages typically do not include attributes like timestamps, categories, or tags.
- Comments: Administrators can view, moderate, edit, and delete comments on the website. They can reply to comments, mark them as spam, or set them to pending review. WordPress site administrators can also configure the display options for comments, including pagination, sorting, and other settings.
- Appearance: The section for managing the website's appearance, including Themes, Customize, Widgets, Menus, etc. Through the Appearance section, administrators can change the website’s theme, layout, and style.
- Plugins: Manage and install plugins required for the website. Plugins can add new functionalities, optimize performance, and more. The plugin management interface allows administrators to enable, disable, install, and uninstall plugins.
- Users: Manage users and roles on the WordPress website. Administrators can add new users, assign user roles, edit user profiles, and more. Different user roles have different permissions, such as Administrator, Editor, Author, Subscriber, etc.
- Settings: Allows administrators to configure general settings for the website, including site language, title, tagline, time zone, comments, administrator email address, and more.
The detailed settings and operation tutorial for the WordPress website backend allows you to fully master WordPress site management. The article "WordPress Backend Usage Tutorial" provides comprehensive guidance and operational skills. Through this article, readers can learn how to create and manage posts and pages, optimize the display of media content, and choose the right themes and plugins to meet website needs. Additionally, readers can also learn how to manage user permissions, secure the website, and more. Mastering these skills not only improves the efficiency of website management but also enhances the functionality and user experience of the website, providing strong support for achieving personal or business goals in the digital world.
The article primarily follows the previously mentioned structure of “Main Features and Components of the WordPress Admin Dashboard” as its table of contents and chapters. However, to make the content even more comprehensive, an additional section titled “Logging into the WordPress Admin Dashboard” has been included. The remaining nine sections follow the same order as the original list. Given that the article spans tens of thousands of words, it is necessary to create clickable anchor links for all ten chapters. This allows readers not only to read the entire article sequentially but also to quickly navigate to specific sections by clicking on the desired items in the contents.
- WordPress Admin Dashboard Login Entry
- WordPress Dashboard
- Creating Managing and Setting Functional Blocks for WordPress Posts
- WordPress Media Library Management
- Creating and Managing WordPress Pages
- WordPress Comment Management Features
- WordPress Appearance Management and Settings
- Installing and Uninstalling WordPress Plugins
- Creating and Managing WordPress Users
- WordPress Backend Management: Settings
一、WordPress Admin Dashboard Login Entry
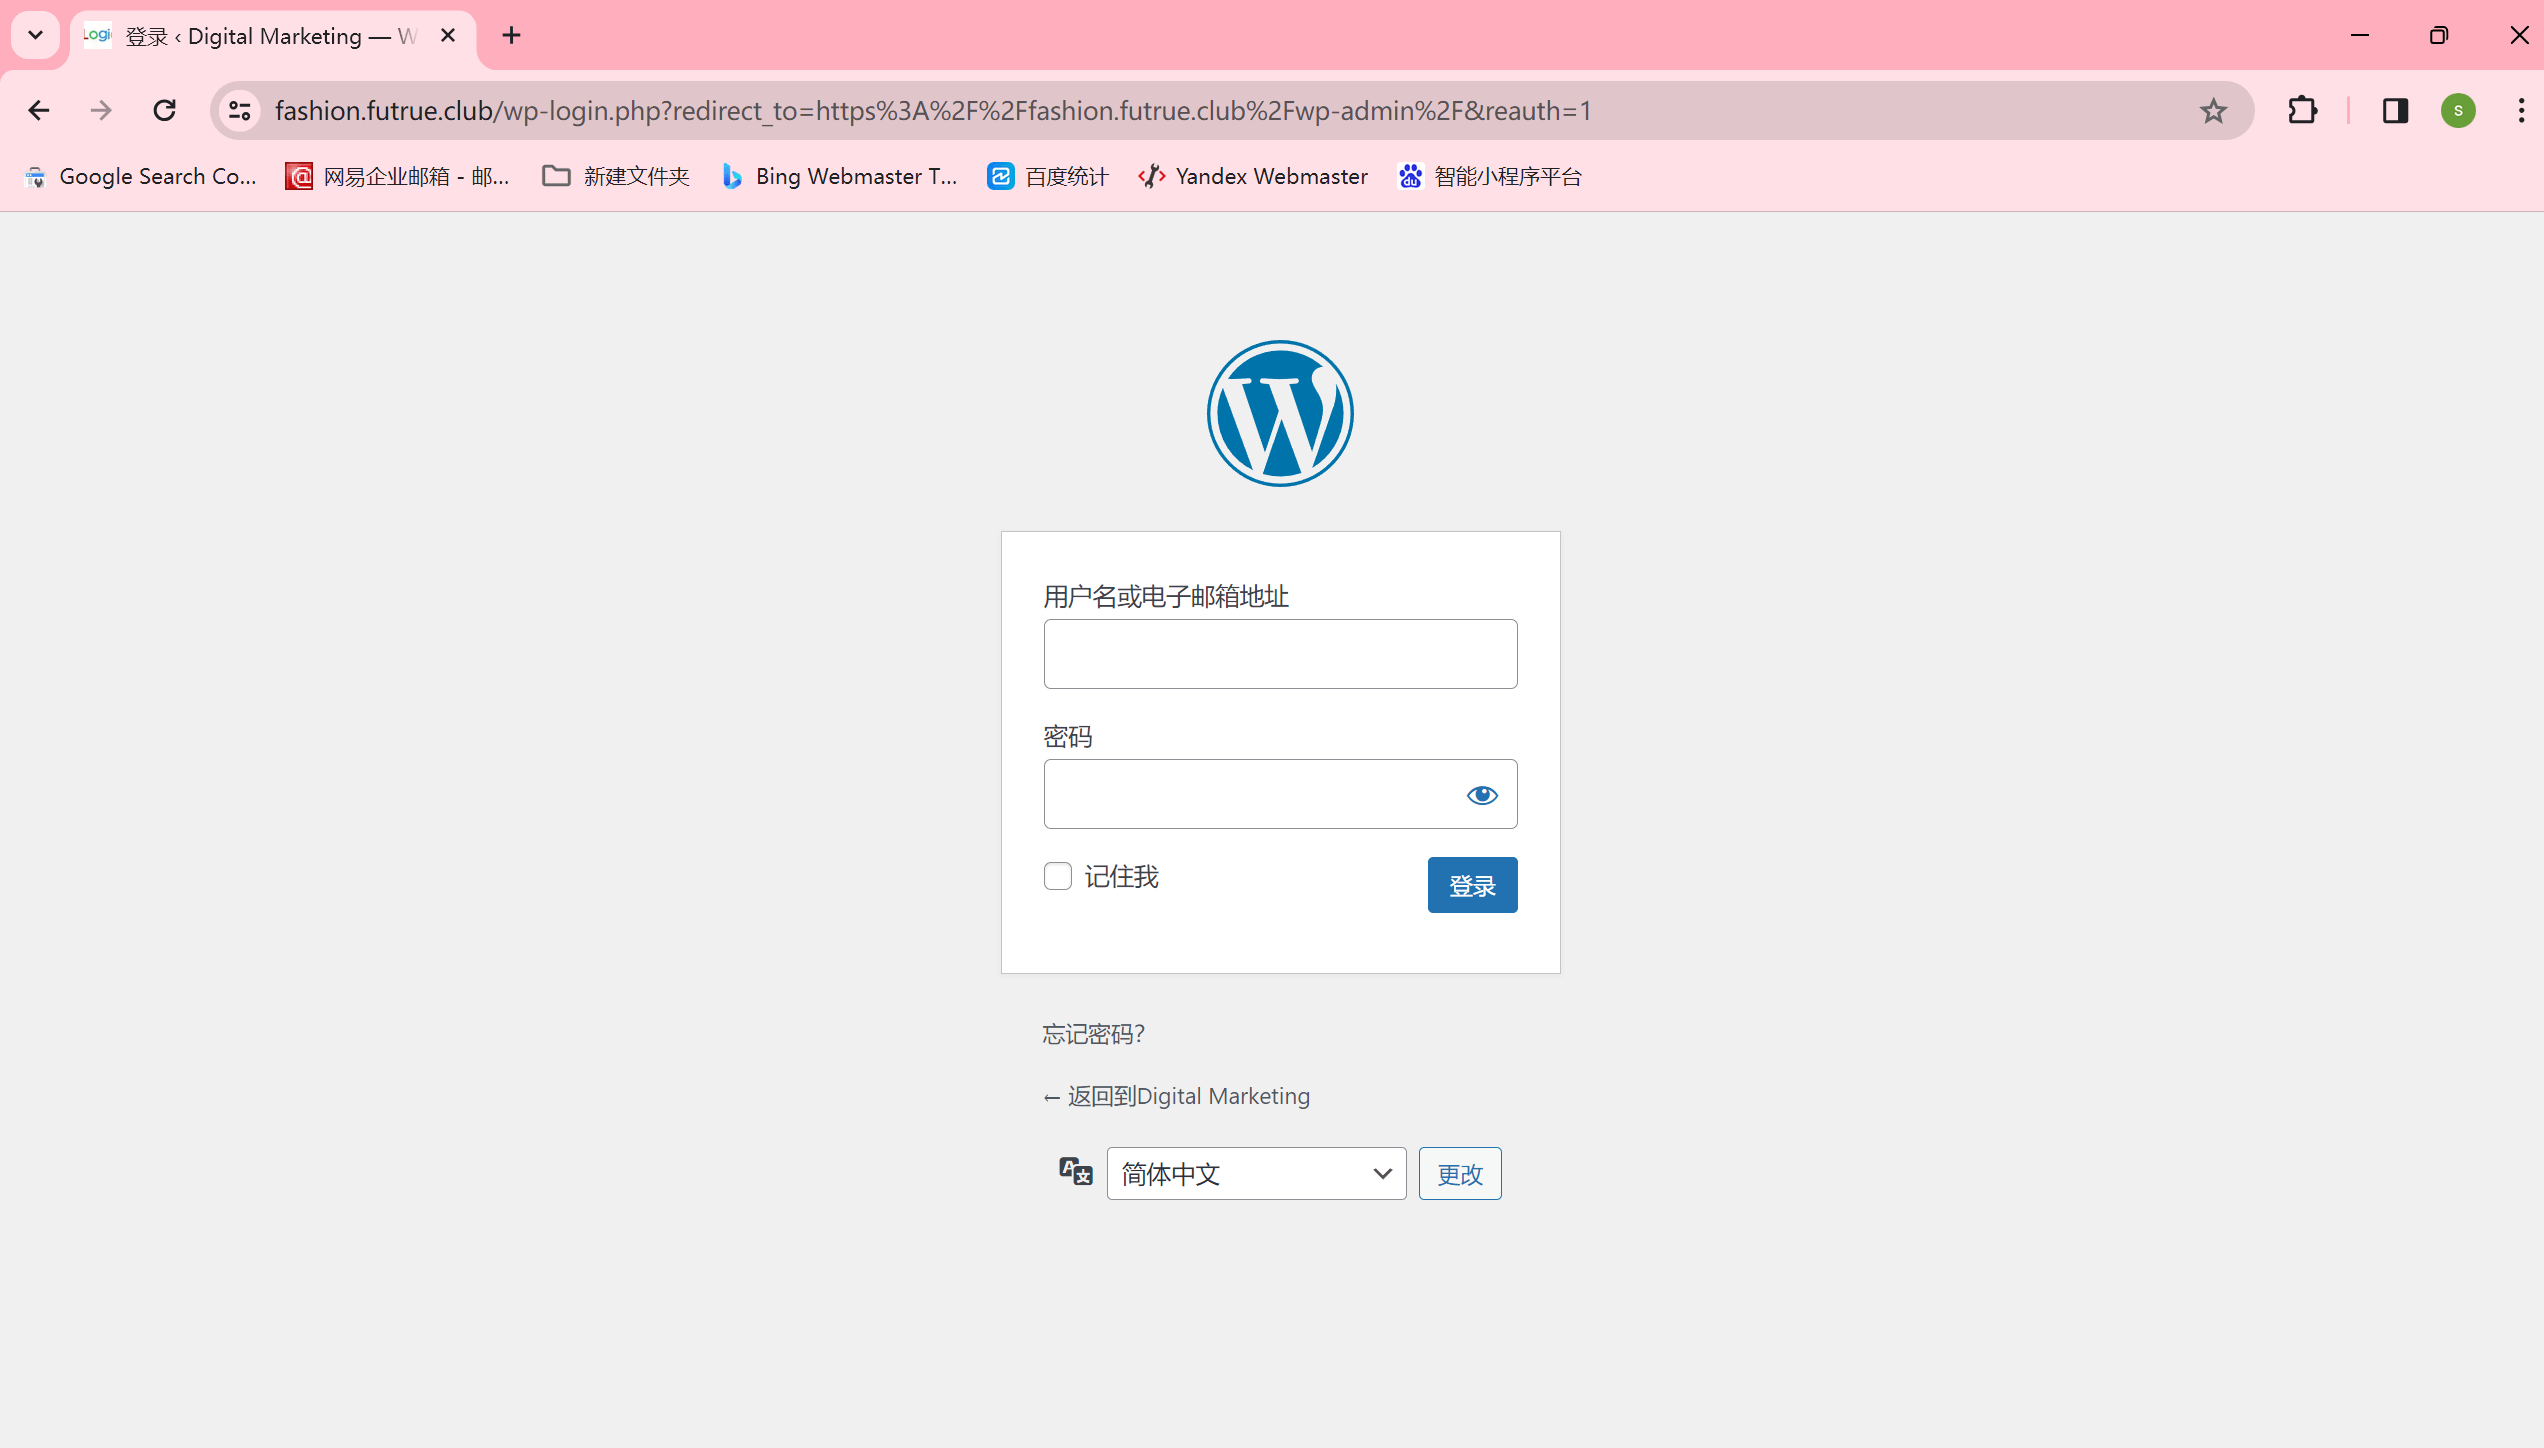
After WordPress is deployed on the server, the default URL to log in to the WordPress backend is: www.yourdomain.com/wp-admin. The login screen is shown below, and you can log in by entering the username and password set during the WordPress deployment process.
二、WordPress Dashboard
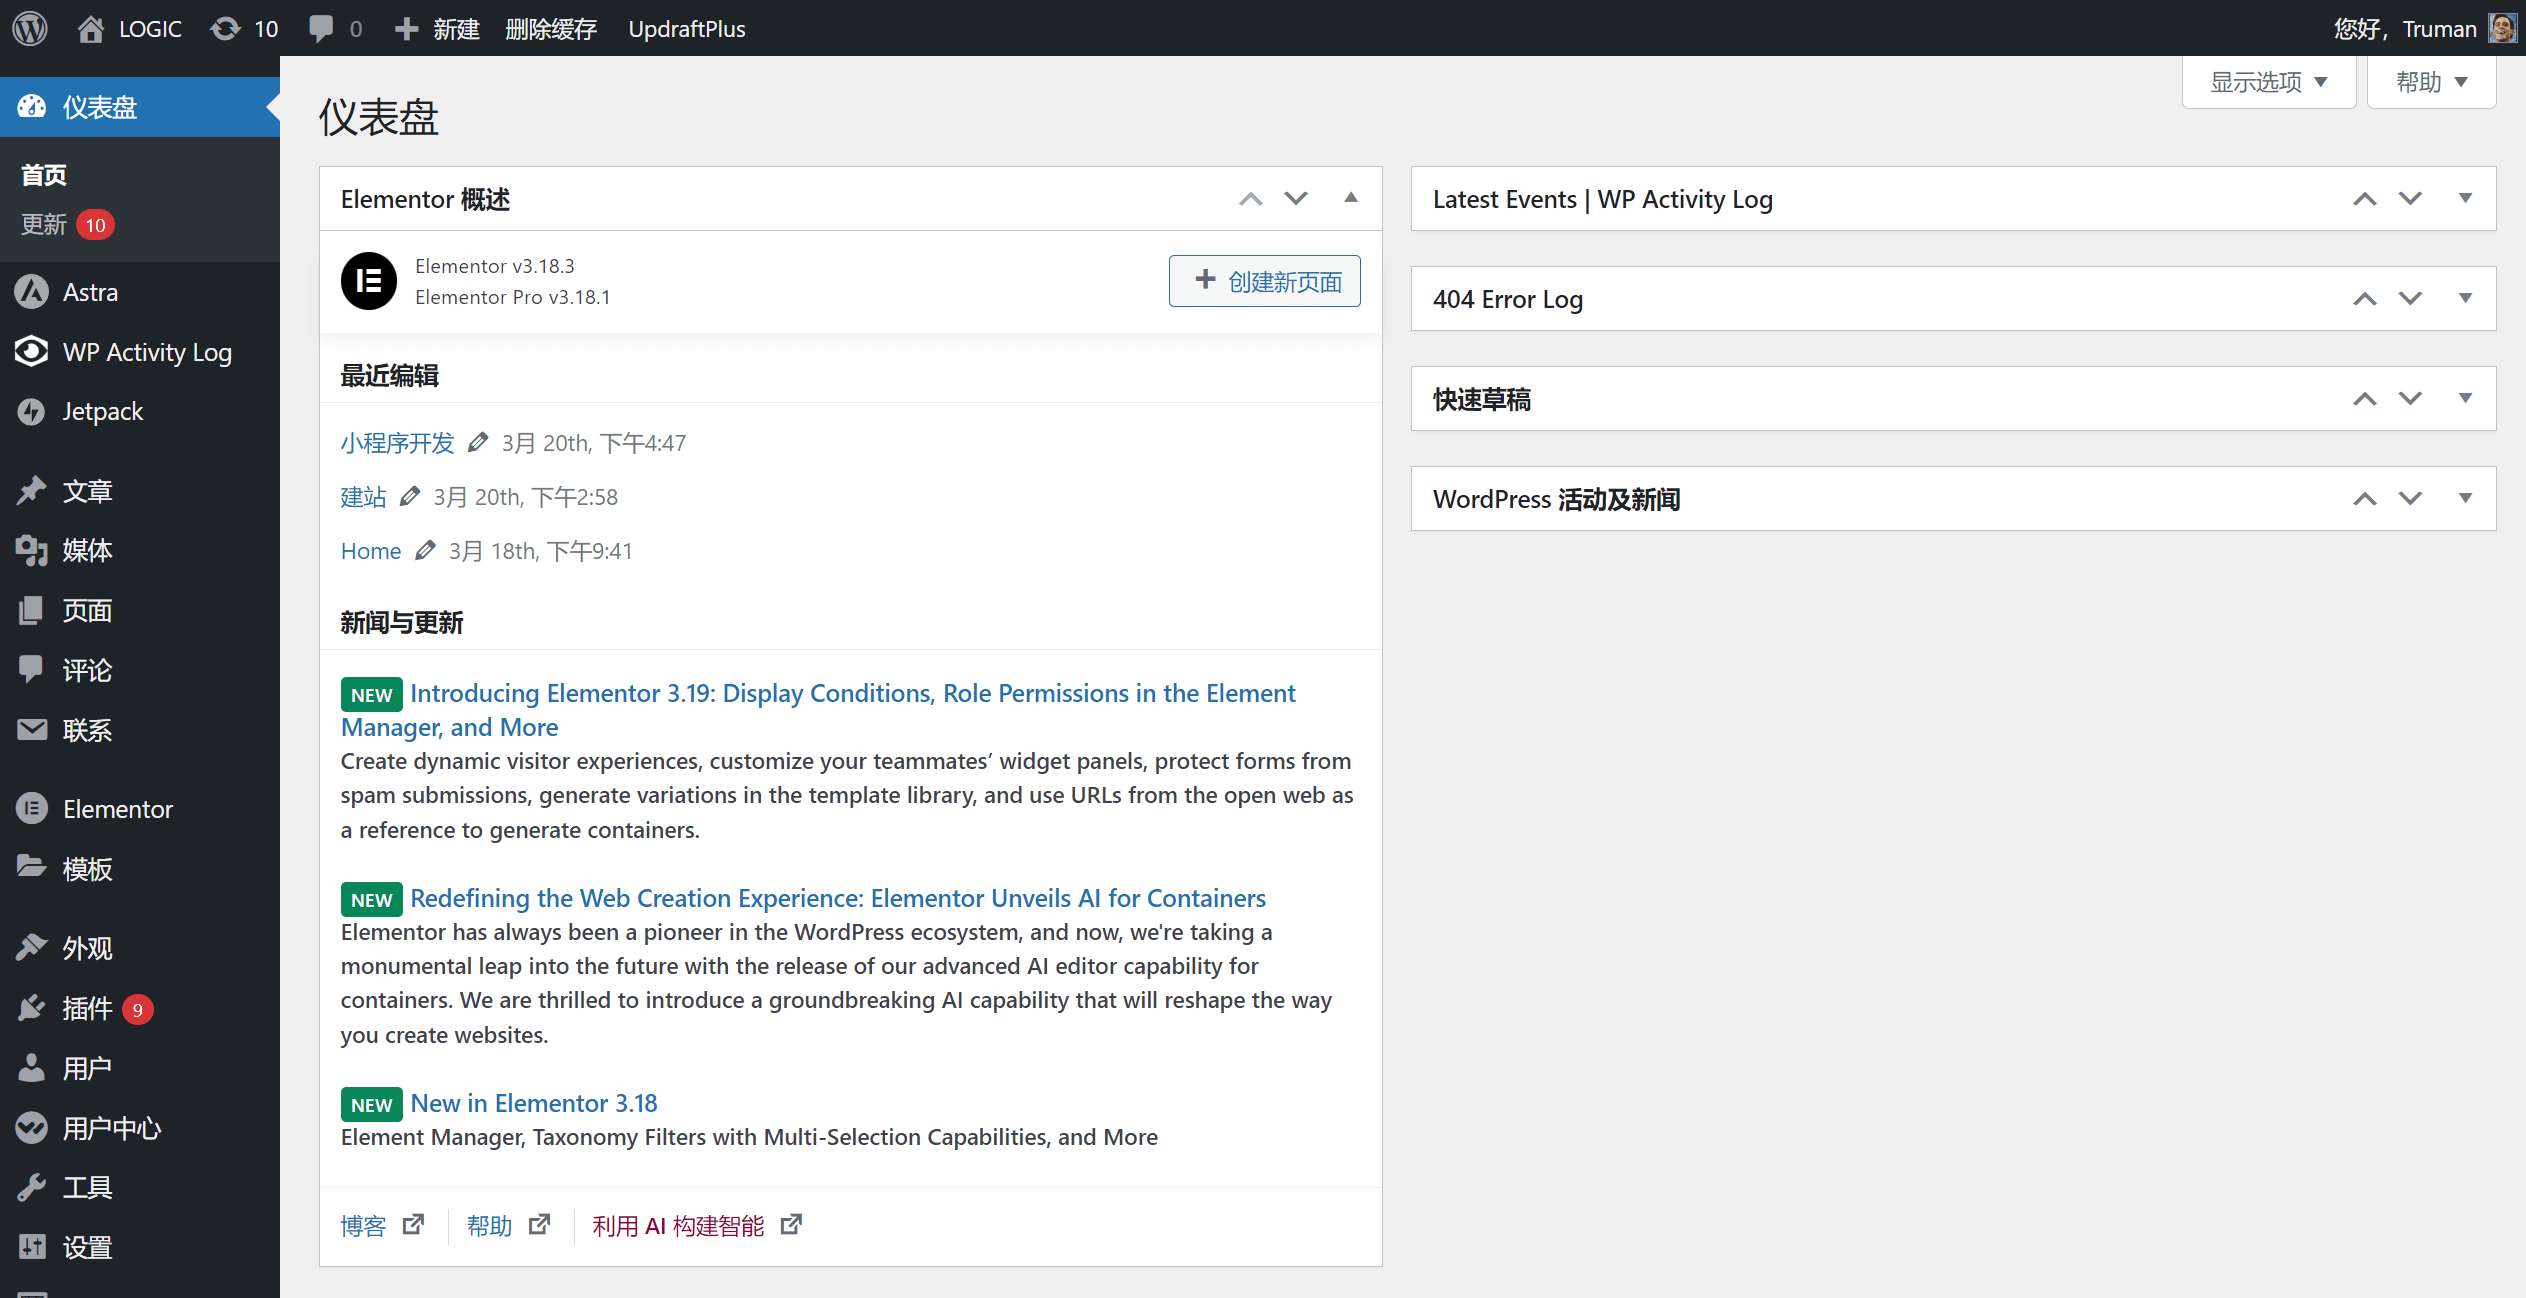
The WordPress dashboard is the homepage of the WordPress website management backend, which is the first interface displayed after successfully logging into the WordPress backend. The interface of the WordPress website management backend dashboard is shown in the image below:
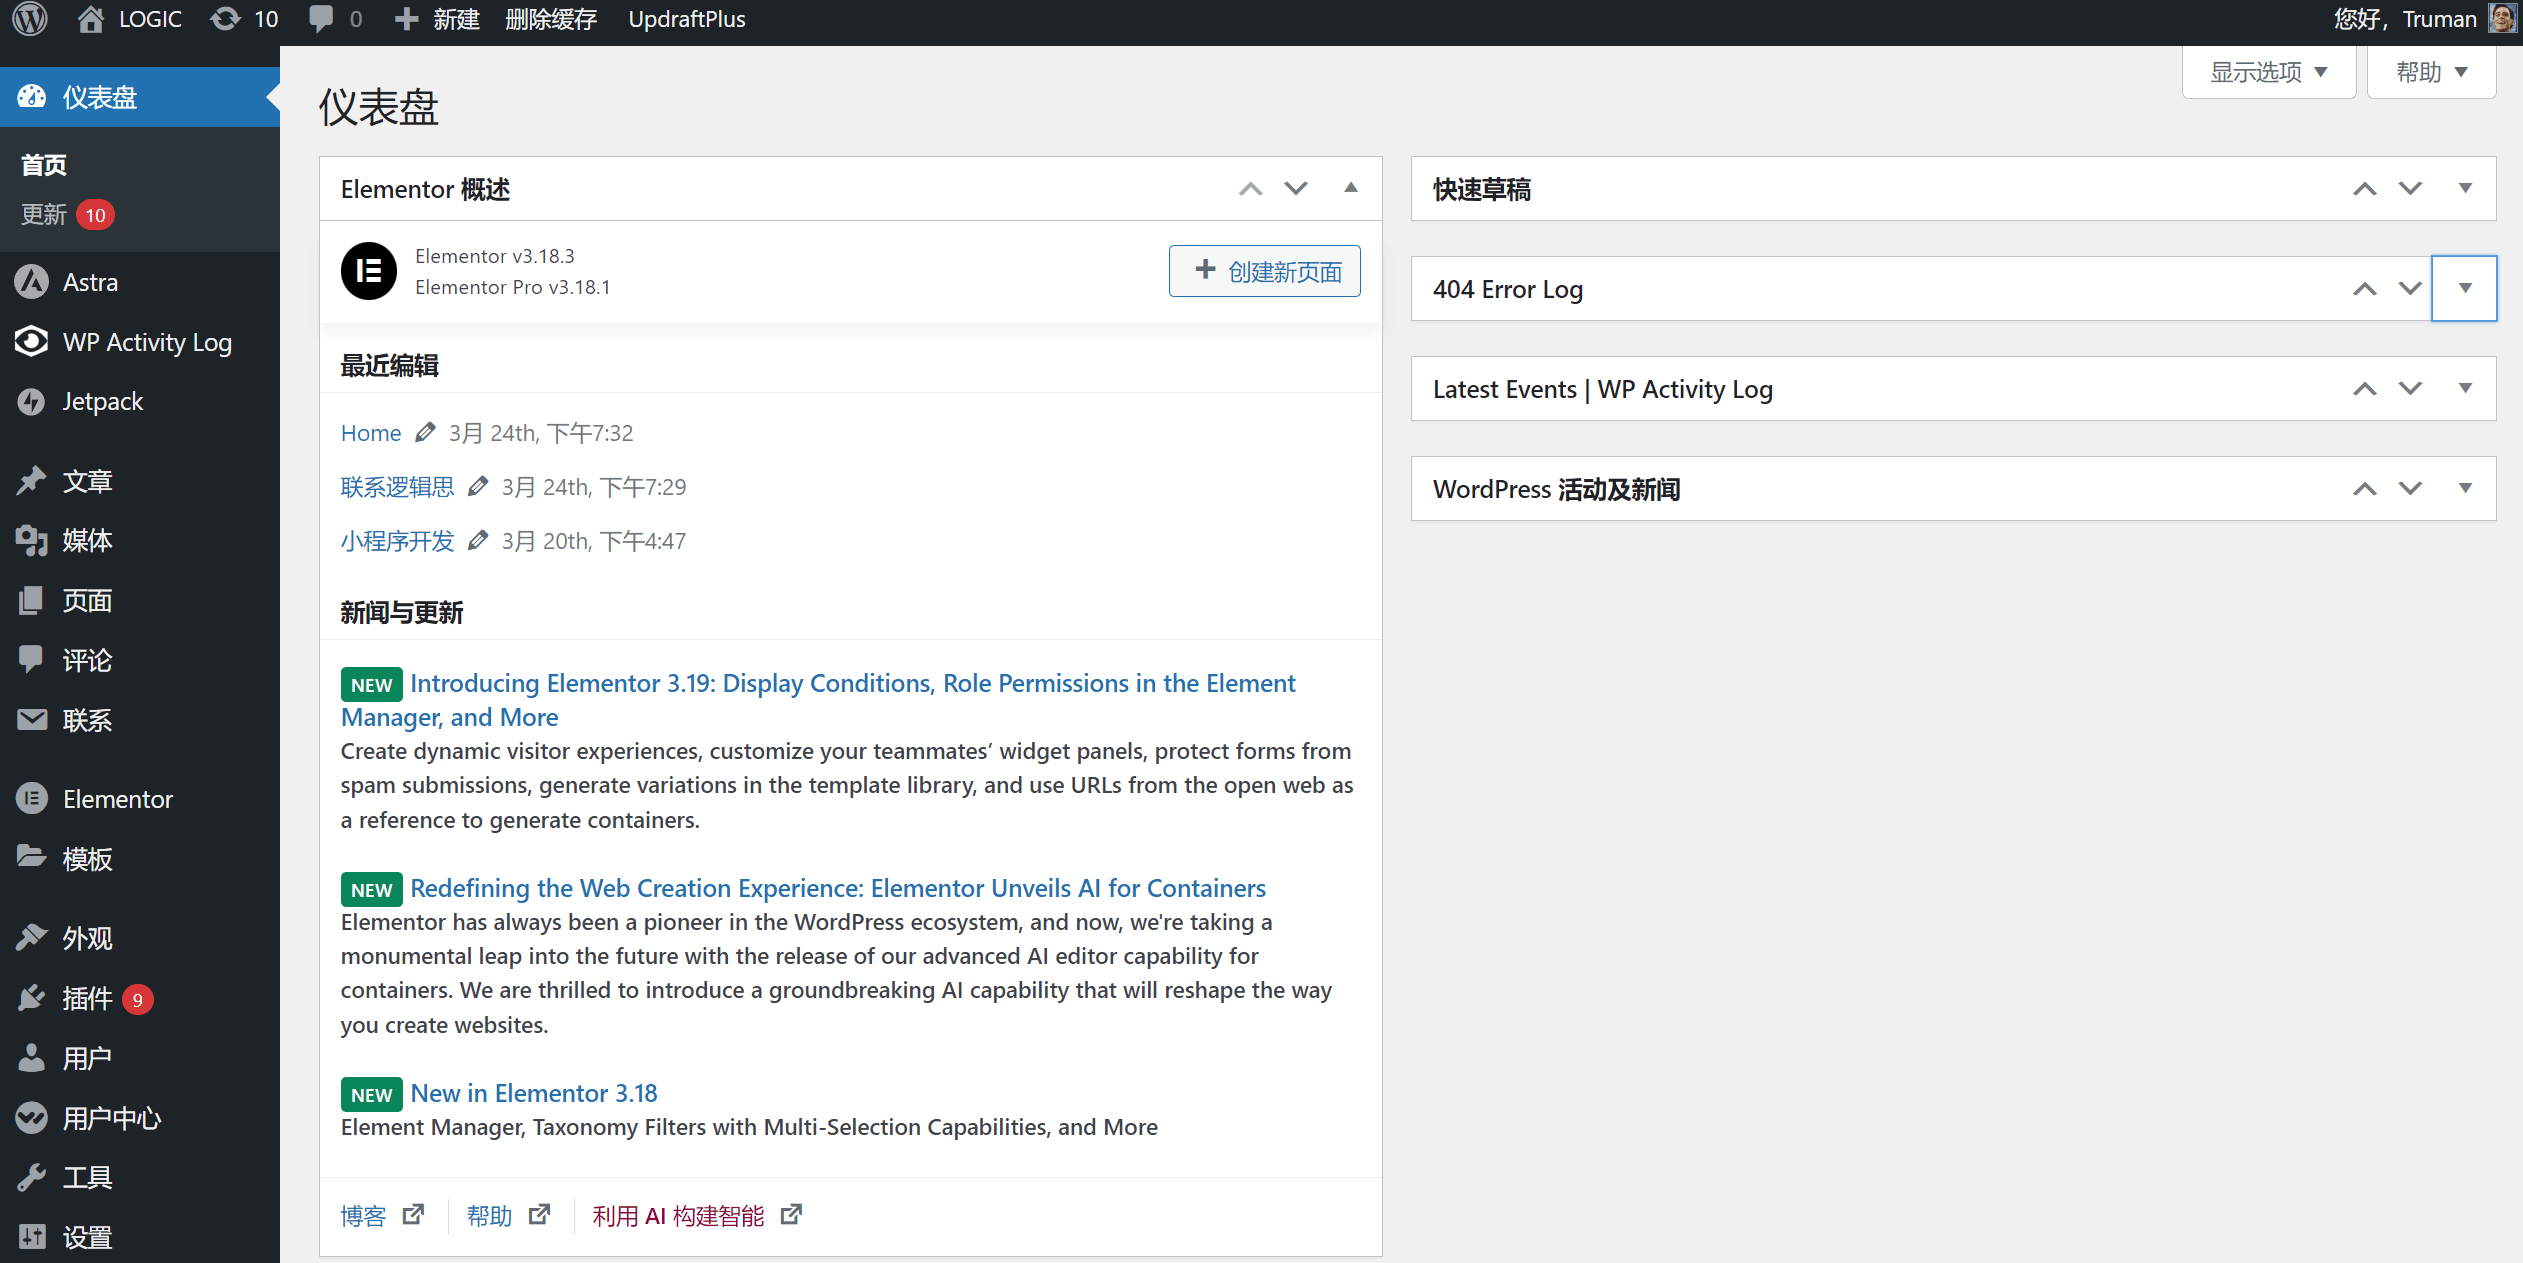
The Dashboard includes content such as recent edit information (edit history), site health status, recent comments, WordPress events and news, plugin activity logs, and data statistics. The Dashboard can be understood as an overview page that summarizes key information within the WordPress admin backend.
三、Creating Managing and Setting Functional Blocks for WordPress Posts
“Posts” are a vital component of WordPress, serving as the section responsible for creating and editing article content on a WordPress website. It is one of the most frequently used and essential features for operating a WordPress site. The “Posts” section includes a variety of functional items. We'll first explain the features listed under the “Posts” menu in the sidebar, and then delve into the commonly used functions and specific applications of content blocks within the post editor when editing article pages.
Features Listed Under the "Posts" Section in the WordPress Admin Dashboard
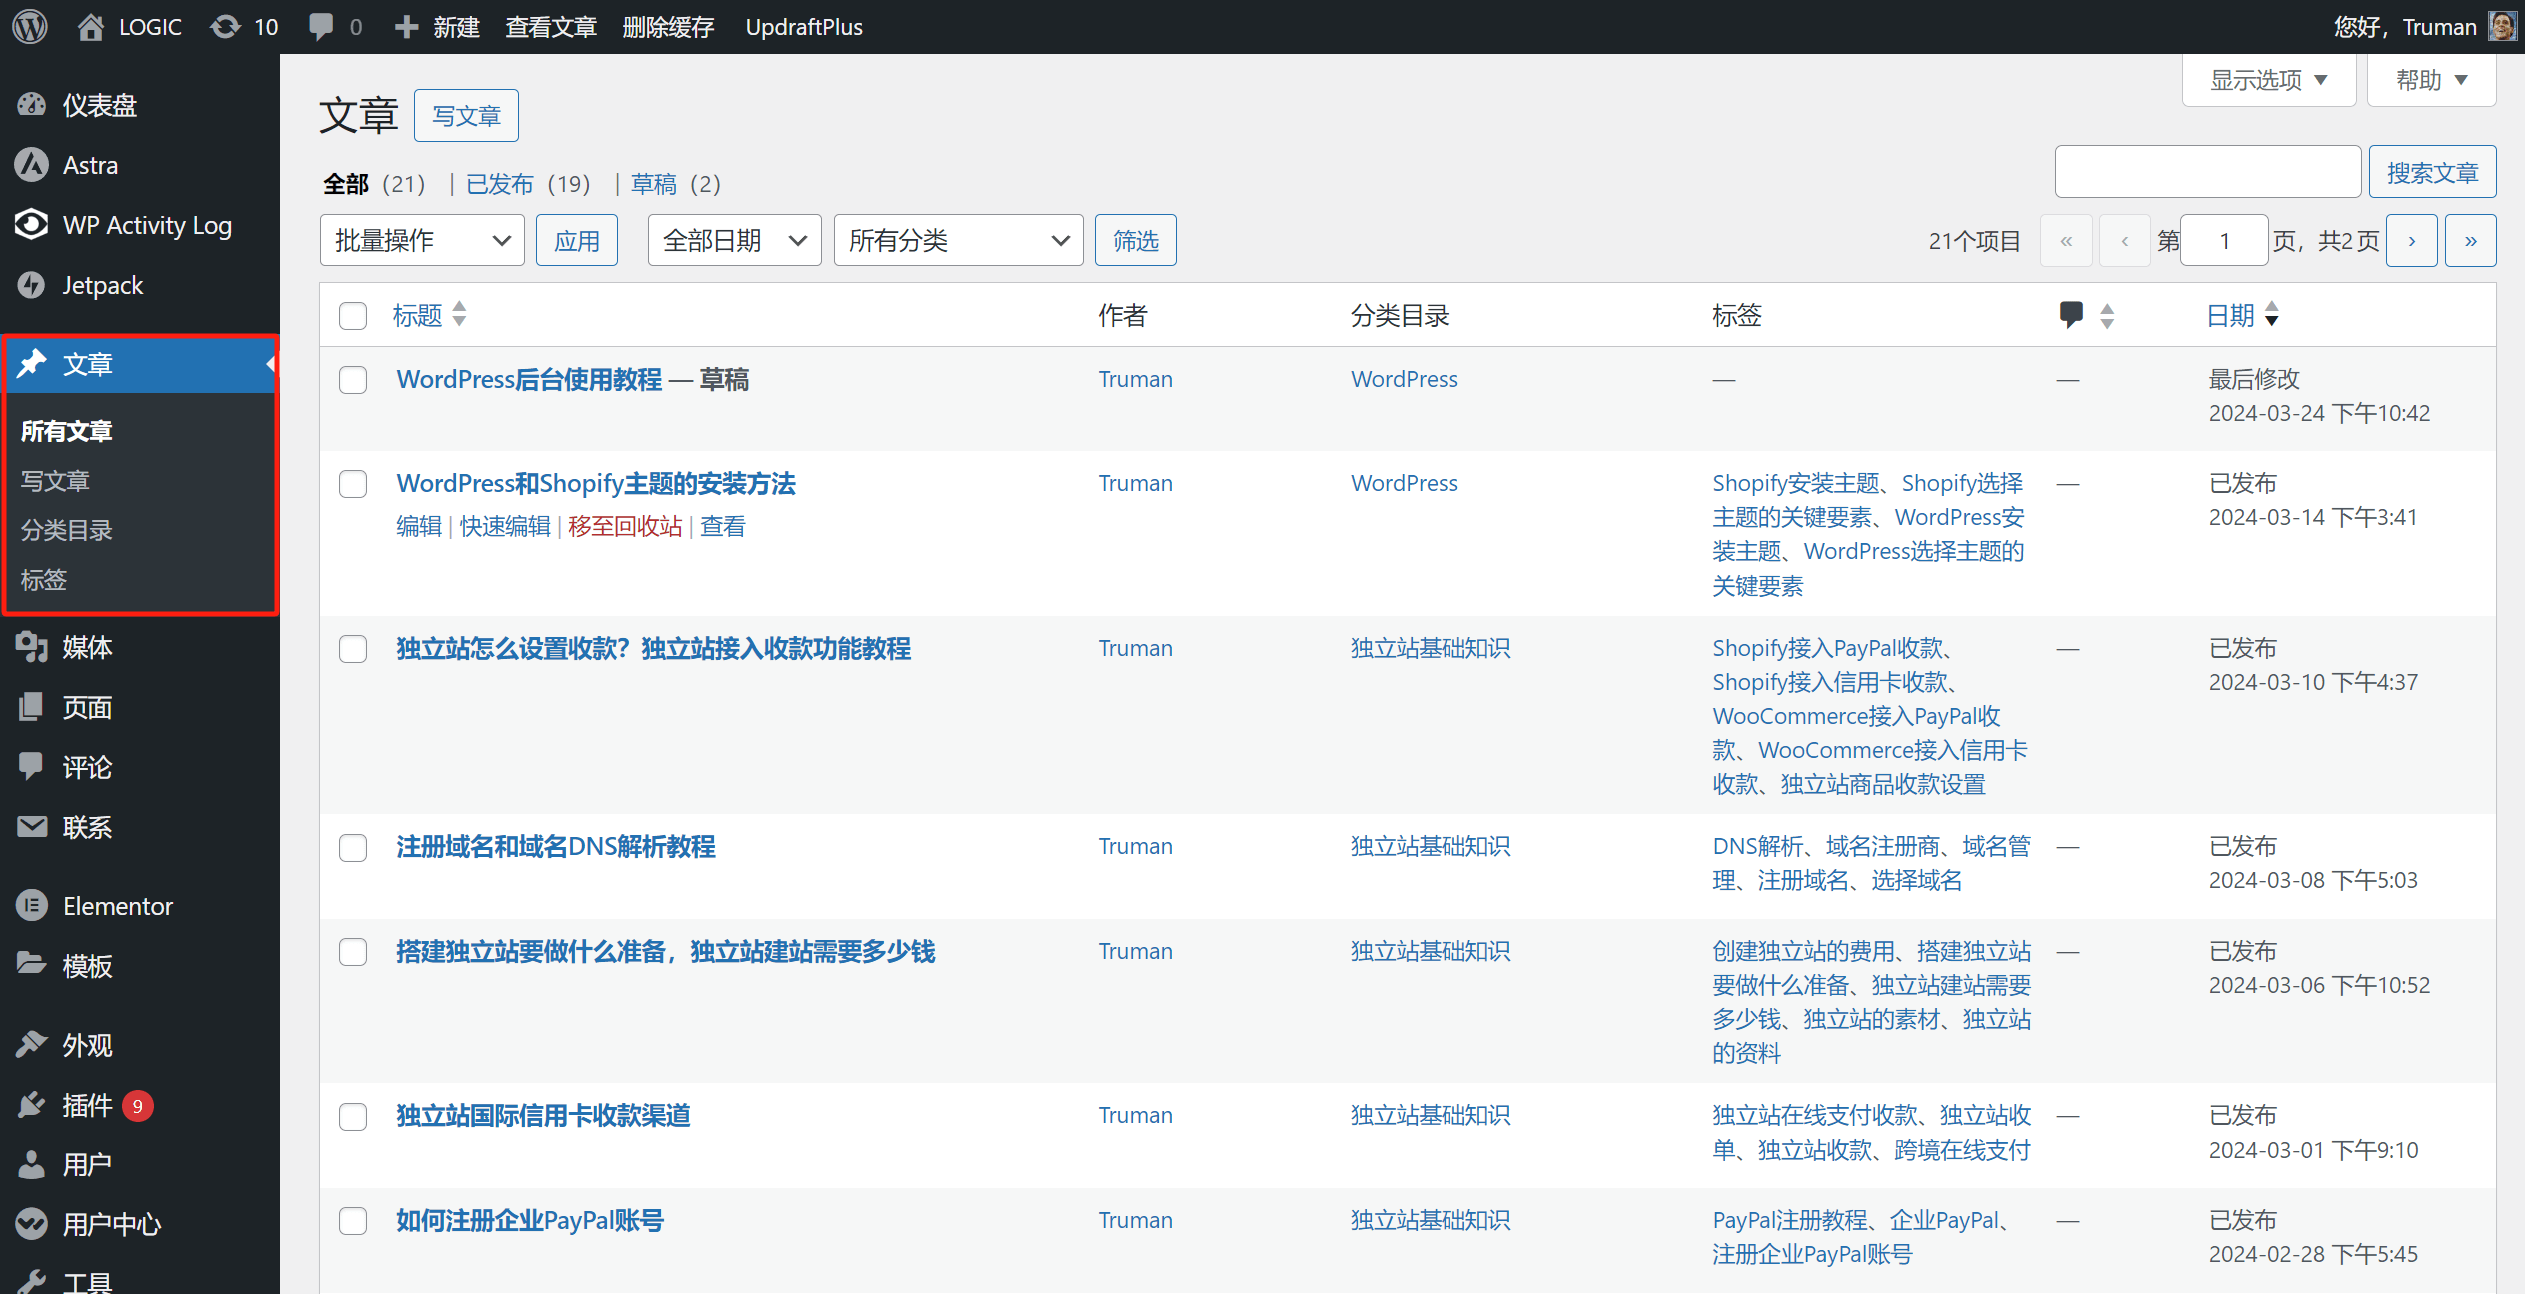
The features listed under the "Posts" section, as shown in the image above, include: All Posts, Add New, Categories, and Tags. The detailed settings and operations for these four features are as follows:
1. All Articles
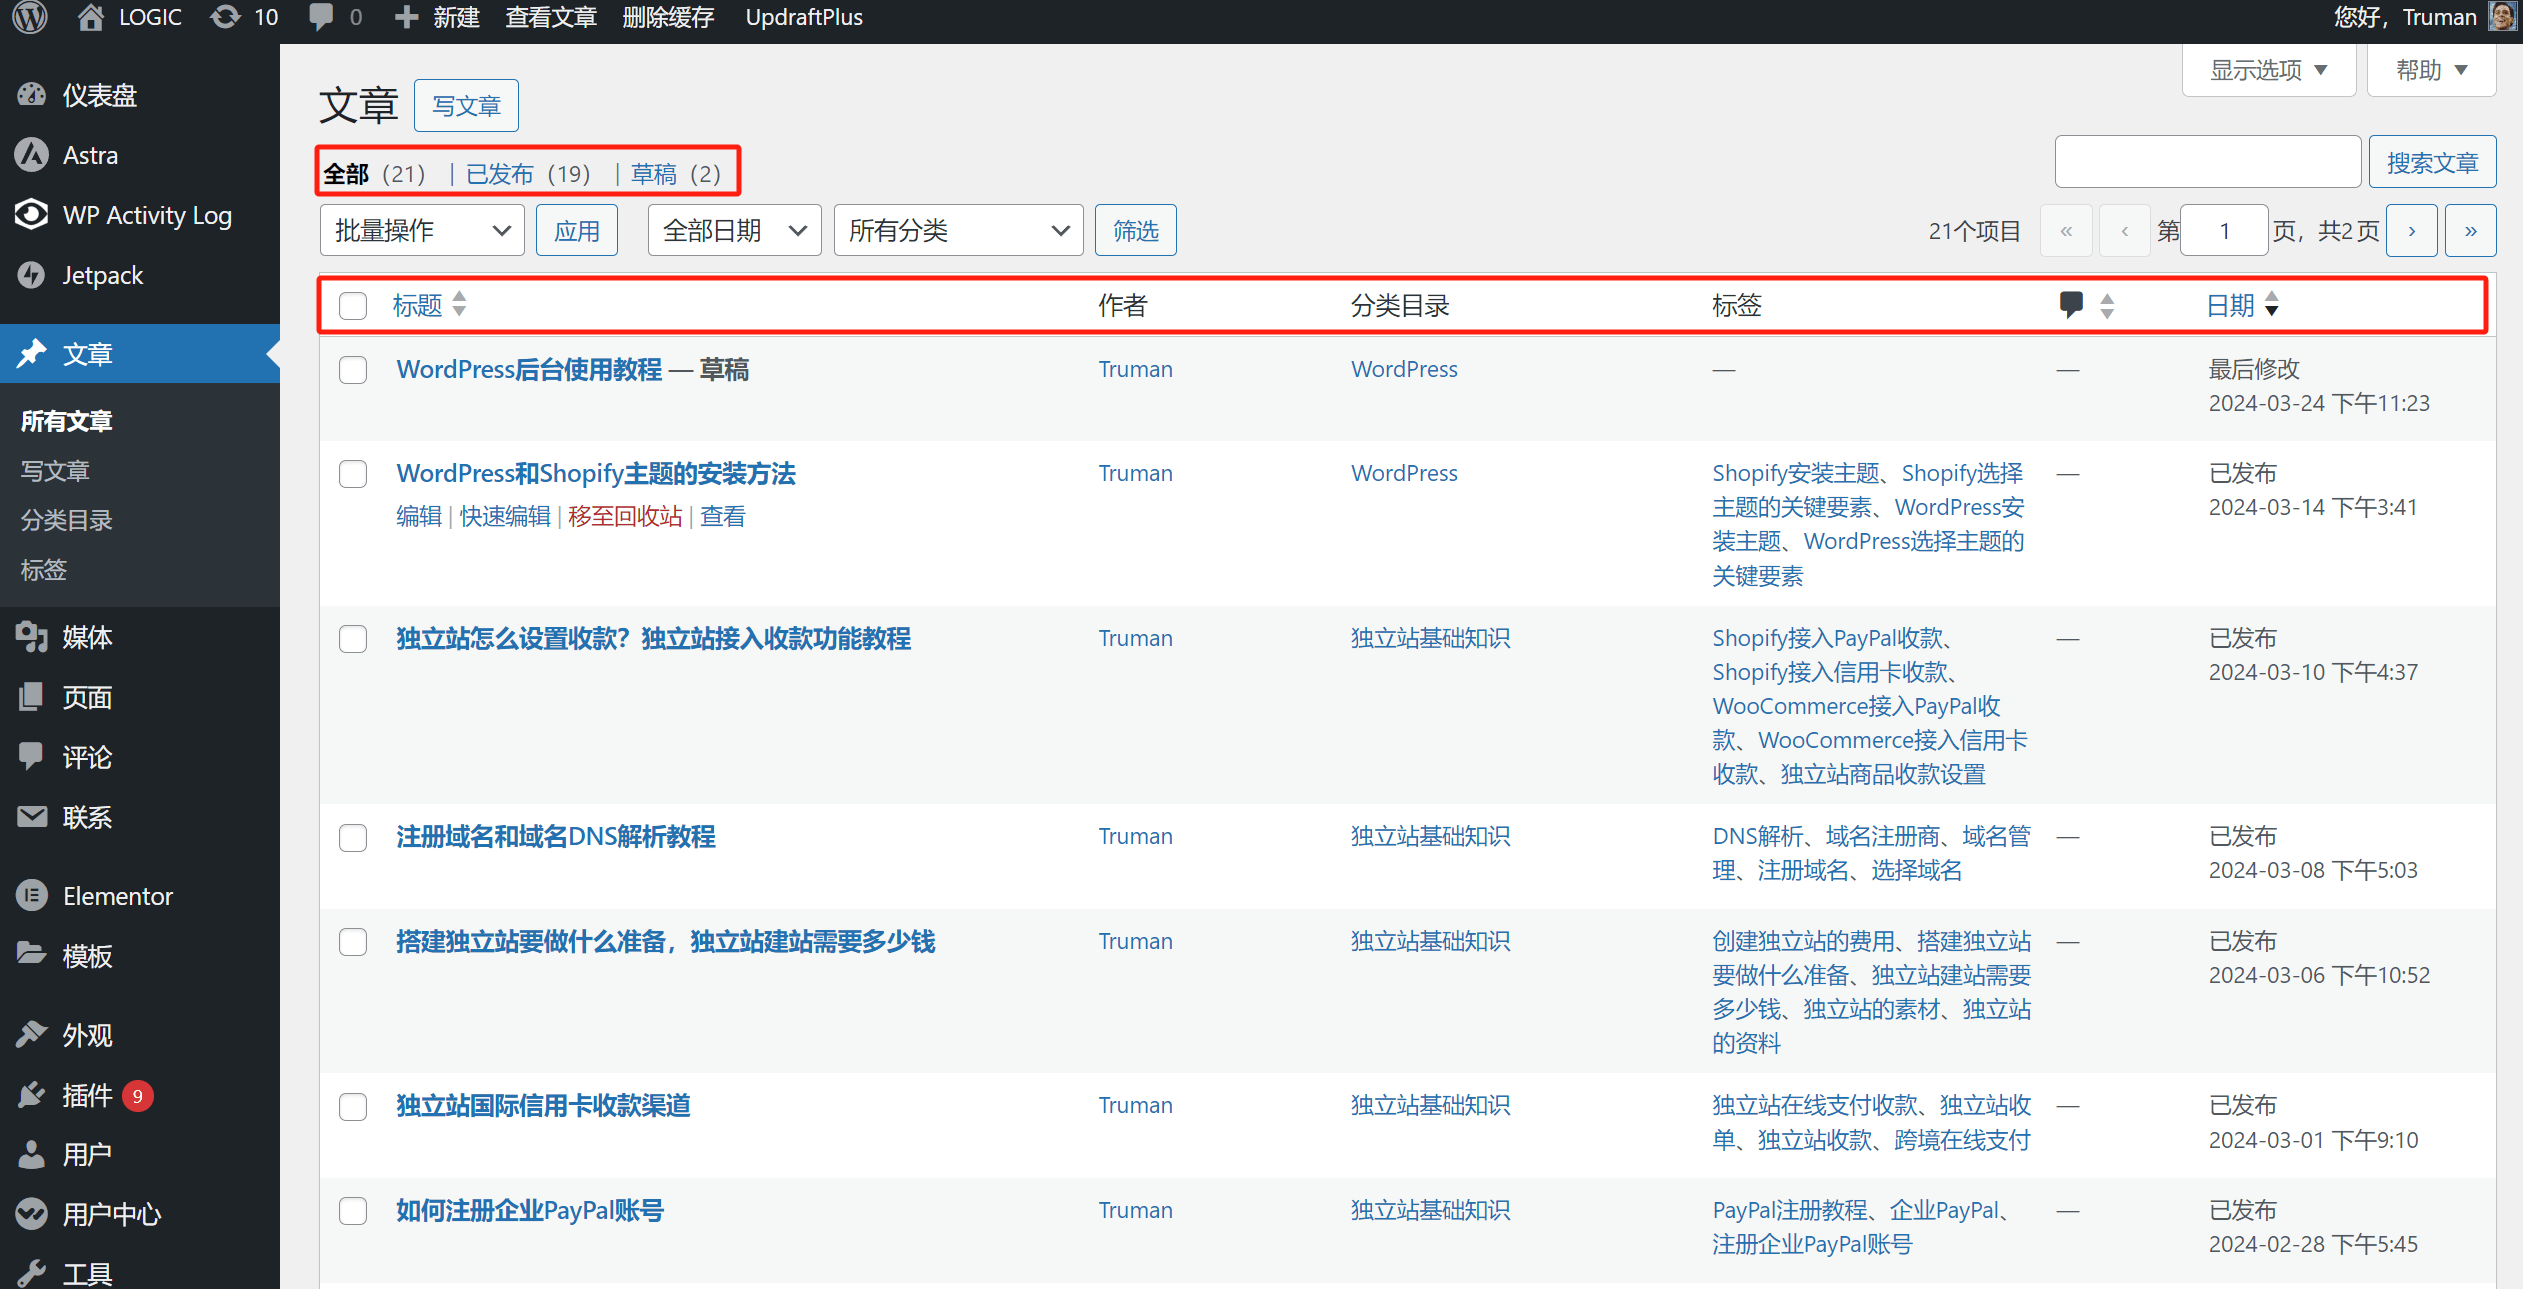
As shown in the image below, “All Posts” refers to the post archive page. After clicking “All Posts,” the content window on the right will display information about all the posts that have been created. These include both published posts and drafts. In addition to viewing the number and status of posts, the archive page also lists the author, categories, tags, and last modified information (as highlighted in the red box in the image below).
2. Write an article
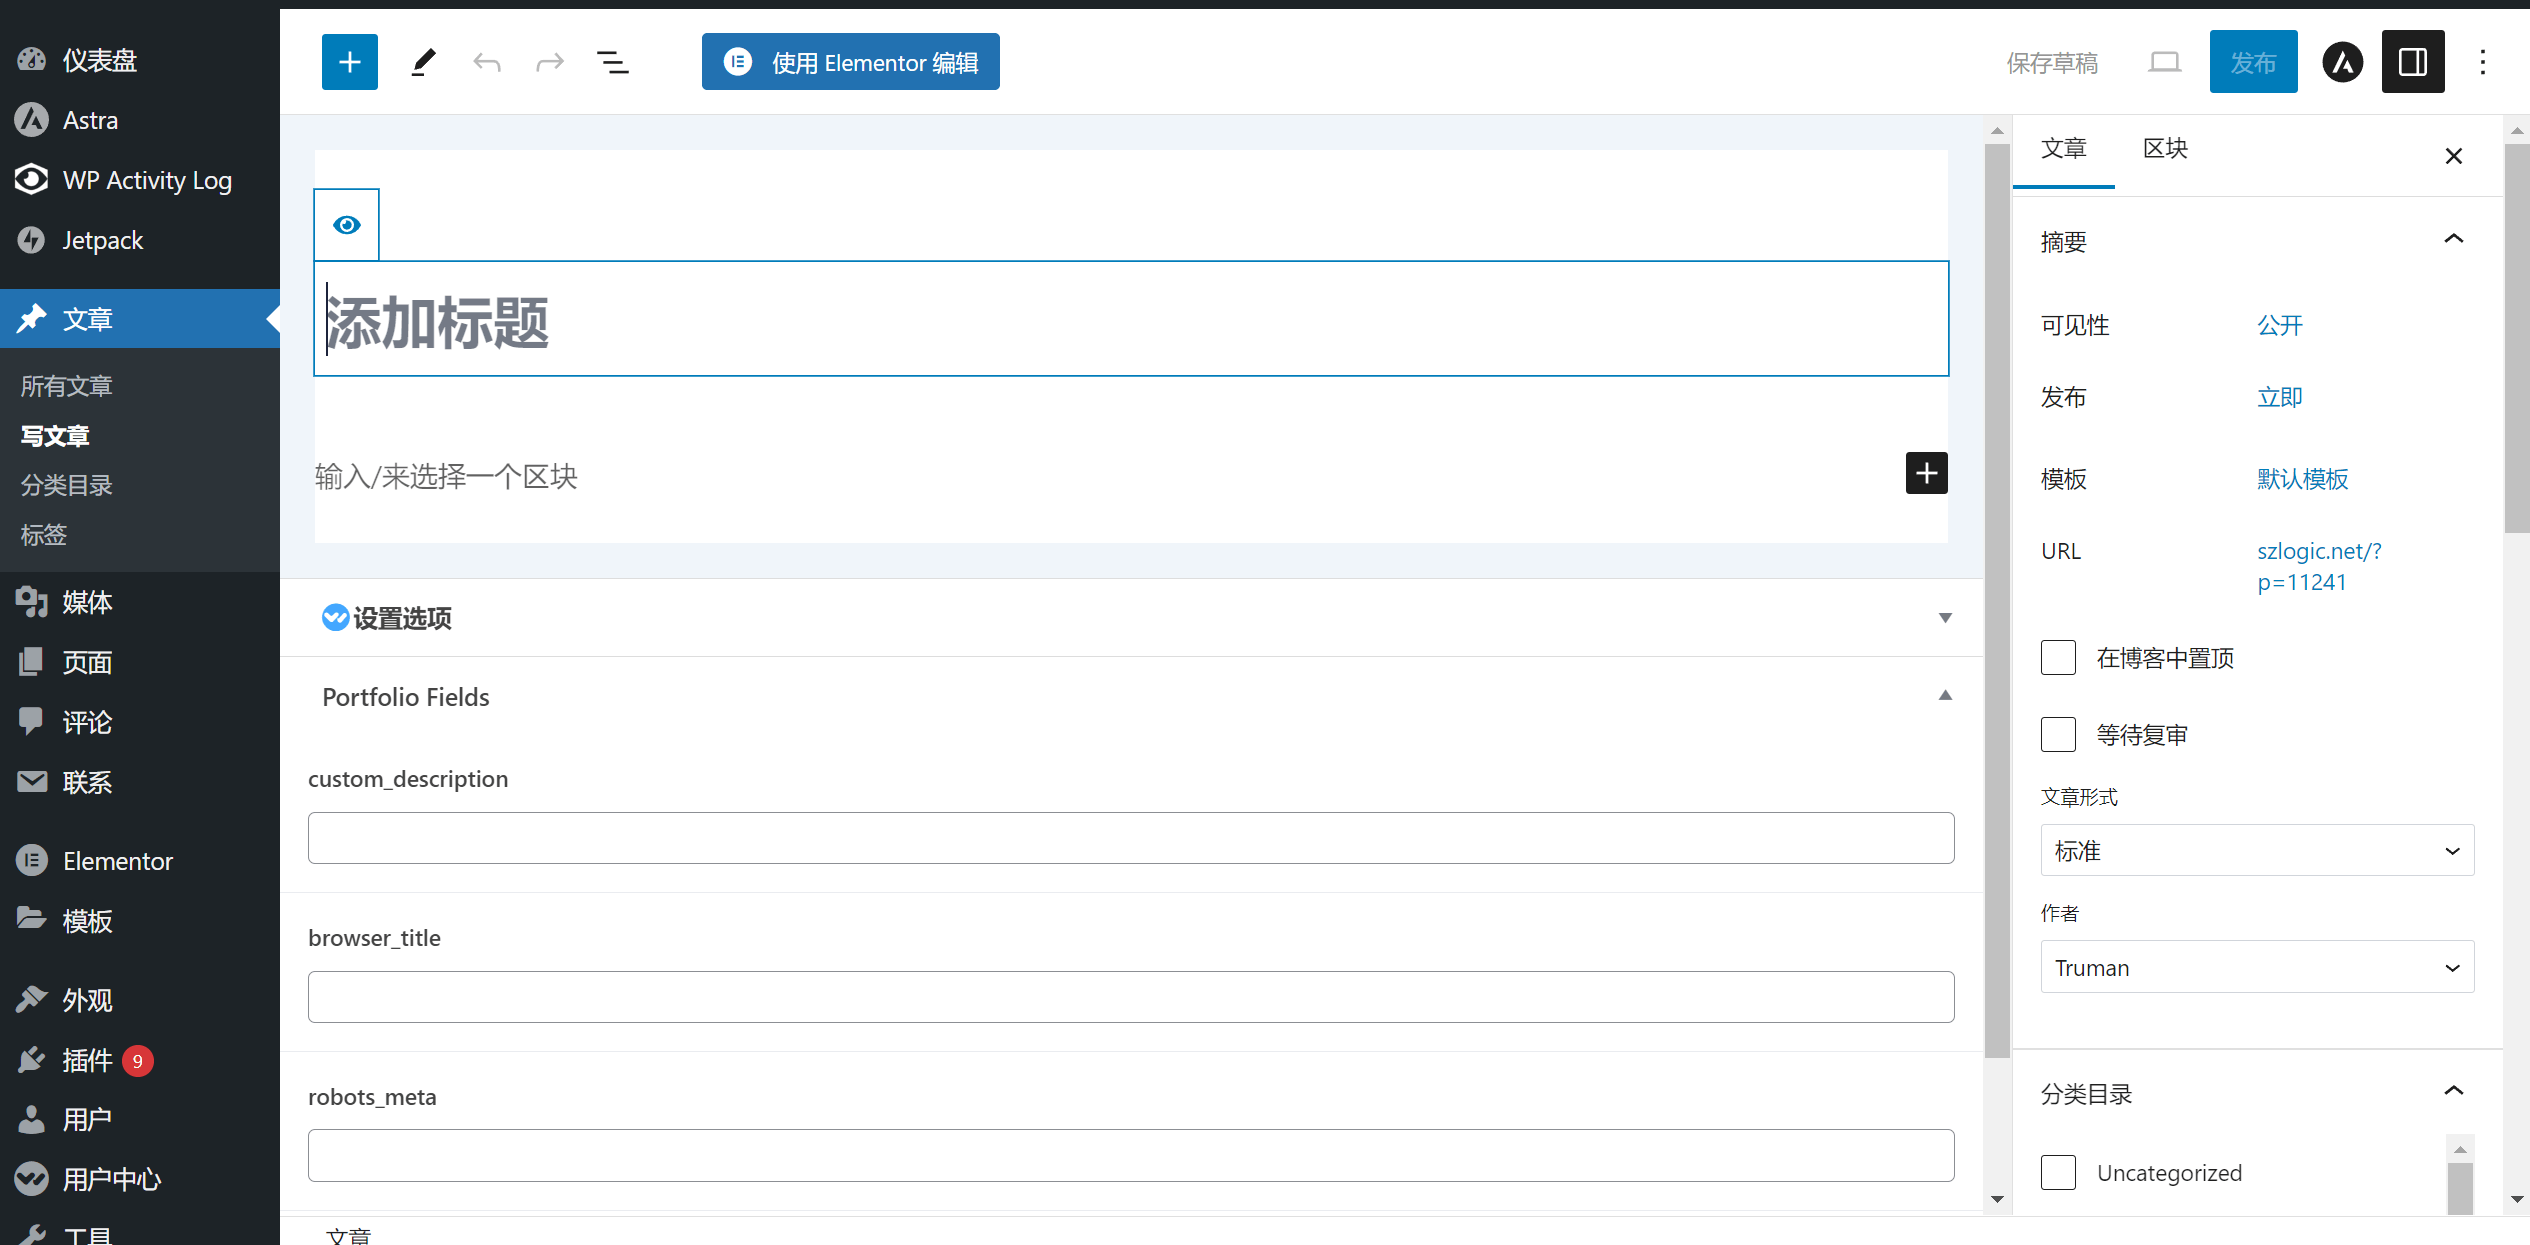
“Add New” refers to creating a new post. After clicking “Add New,” you’ll be taken to the post creation page. In this page, you can set the post’s metadata and block layout in the settings panel on the right, and create content by entering the post title and paragraph text in the editing area. The post creation page is shown in the image below:
3. Category Directory
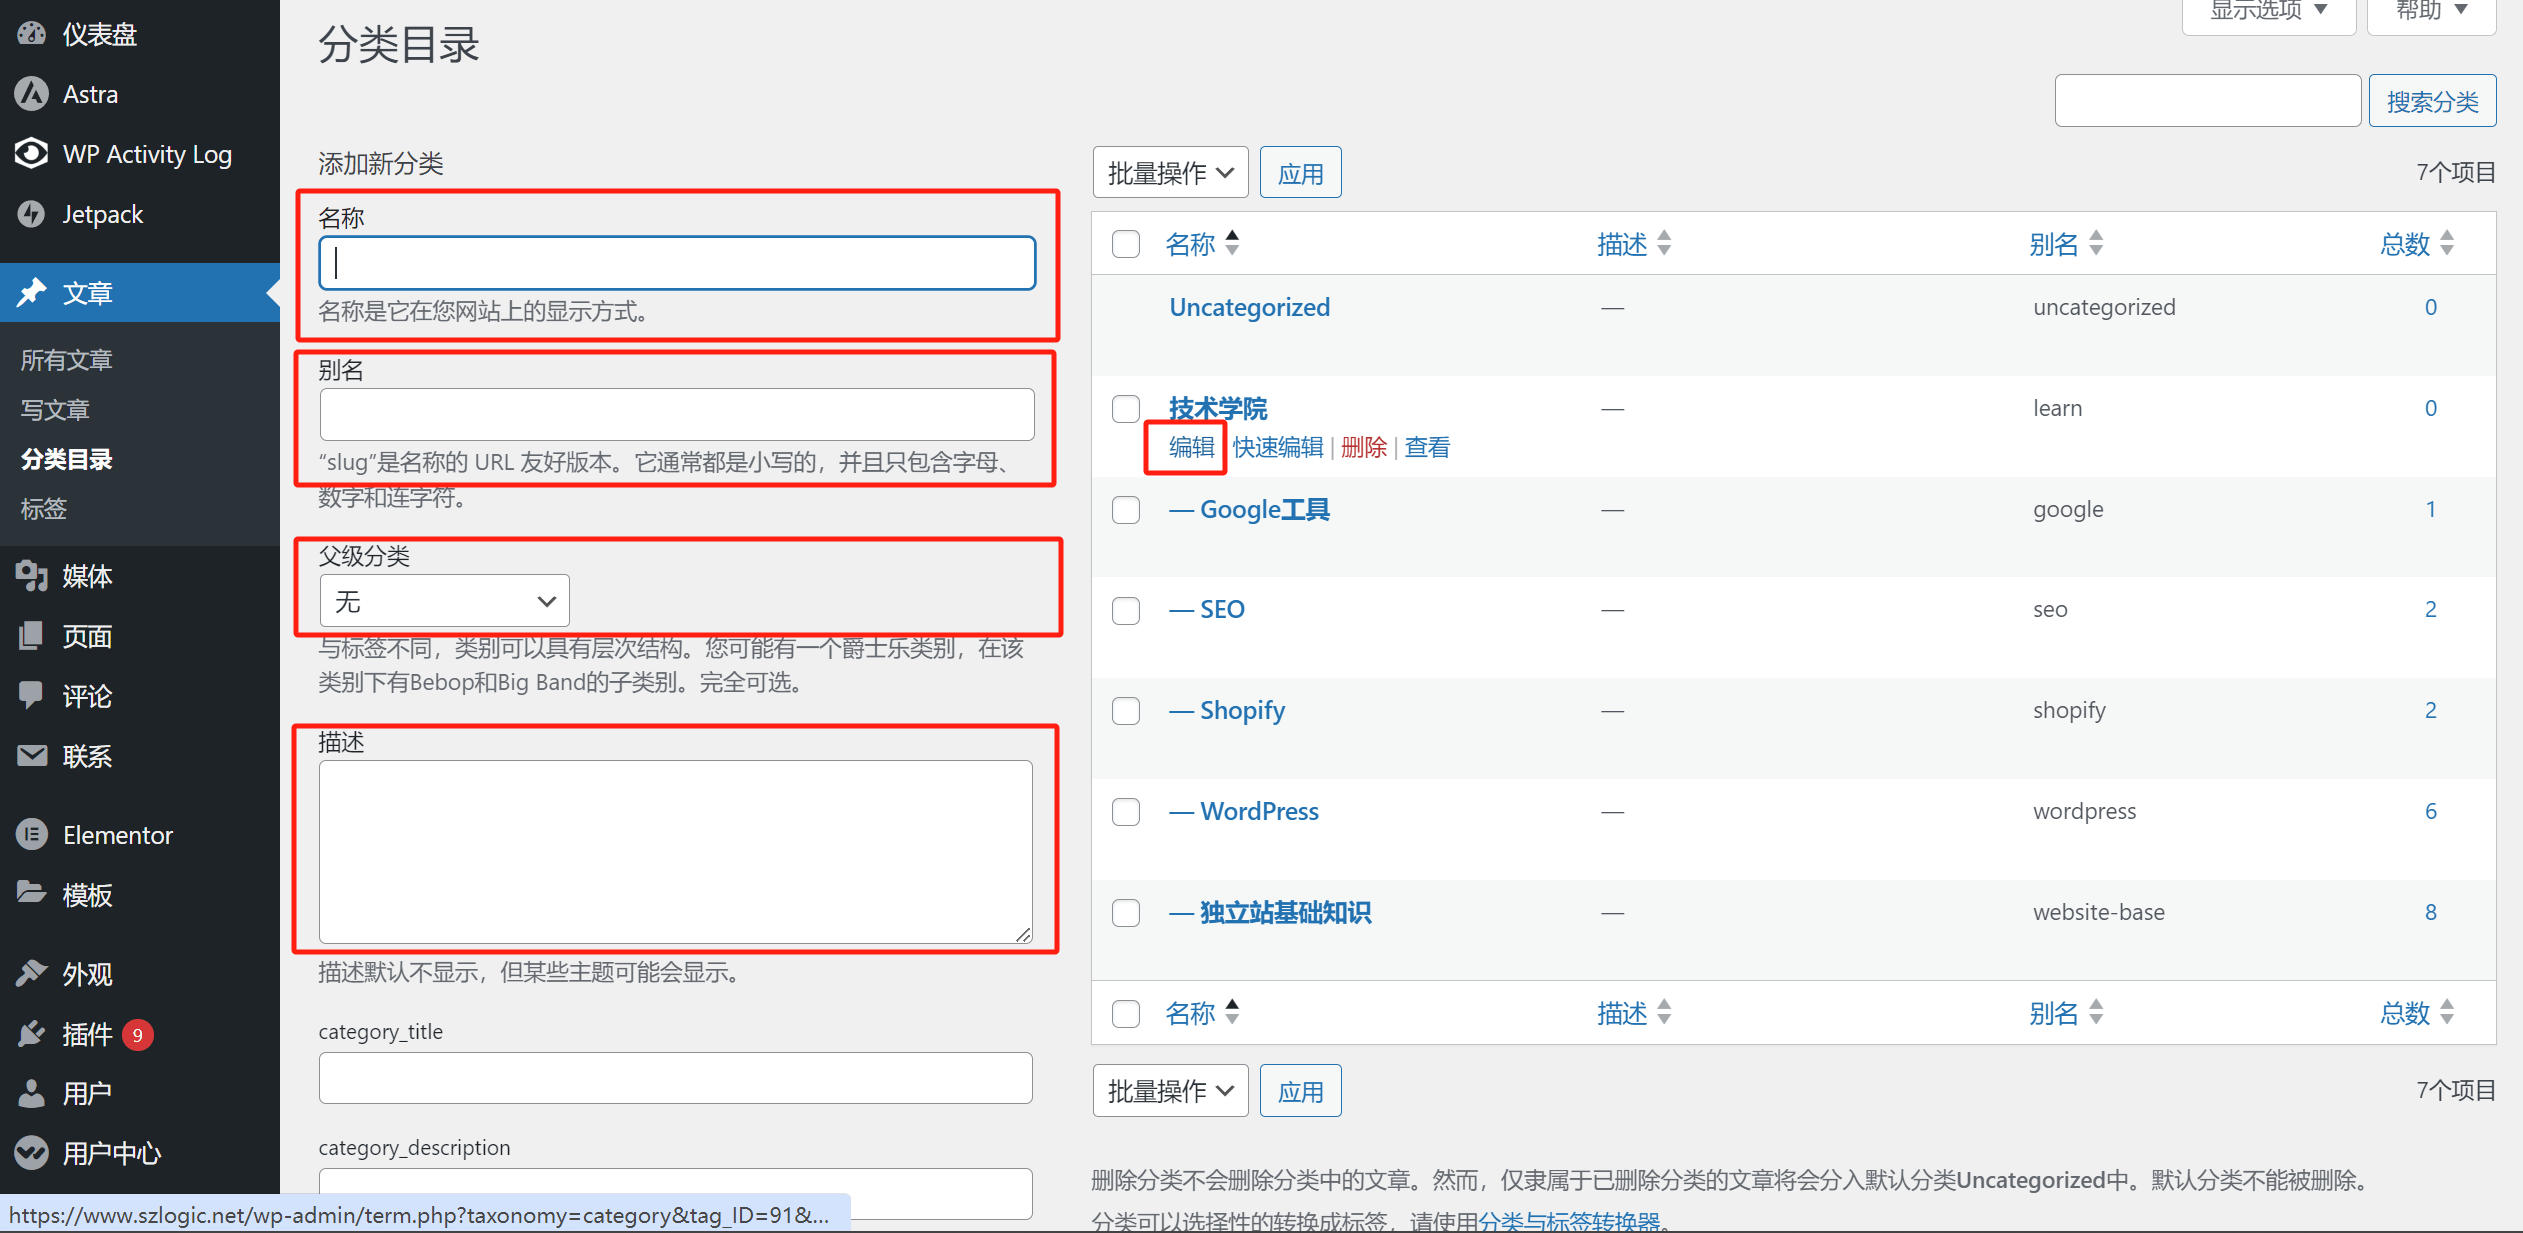
The category creation and management feature for WordPress posts can be accessed by clicking on “Categories.” The content window on the right will appear as shown in the image below. To edit an existing category, hover your mouse over the category in the list—an “Edit” button will appear beneath the category name. Click this button to enter the category editing page. To create a new category, as highlighted in the red box in the image below, go to the “Add New Category” section on the left. Fill in the category name, slug, parent category (if any), and description. Then click the “Add New Category” button at the bottom of the section to complete the process.
The names and descriptions of categories are straightforward and can be understood literally. The name refers to the category's name, and the description refers to the category's page description. However, many people may not fully understand "slug" and "parent category," so I will explain these terms in detail. The content of the slug will be used as the suffix of the URL (the URL suffix). To make it easier to understand, let me give an example: our article archive page's URL is www.szlogic.net/category/learn/. If we set the slug to "wordpress," the complete URL for this category will be www.szlogic.net/category/learn/wordpress. After explaining the slug, let's move on to "parent category." A parent category refers to the hierarchical relationship between parent and child categories. The default option for the parent category is none, as shown in the image below. If you want a newly created category to be a subcategory of an already existing category, simply select the parent category from the dropdown menu. The parent category will also appear in the URL of the subcategory (once the parent category is selected, the new category will become a subcategory of the selected parent category). For example, if the selected parent category is seo, the URL of the newly created subcategory will be www.szlogic.net/category/learn/seo/new-category-slug/.
4. Tags
The function of post tags is somewhat similar to category directories. Users can categorize posts by tags into an archive page. While categories are necessary for organizing posts, tags are not essential. Generally, it's not recommended to use the tag feature unless there is a specific need, because each time a new tag is created, WordPress automatically generates a tag page. These pages do not provide any substantial content and can create duplicate pages, which is obviously not SEO-friendly. To mitigate the SEO impact of these automatically generated tag pages, it will increase the amount of SEO optimization work. The reason why the tag feature is used in the author's example is that Logic Digital Technology's Baidu Mini Program uses the official API to synchronize keywords for the mini-program pages, requiring the tags from the website's article pages to be crawled. Therefore, the tag feature was used for the posts.
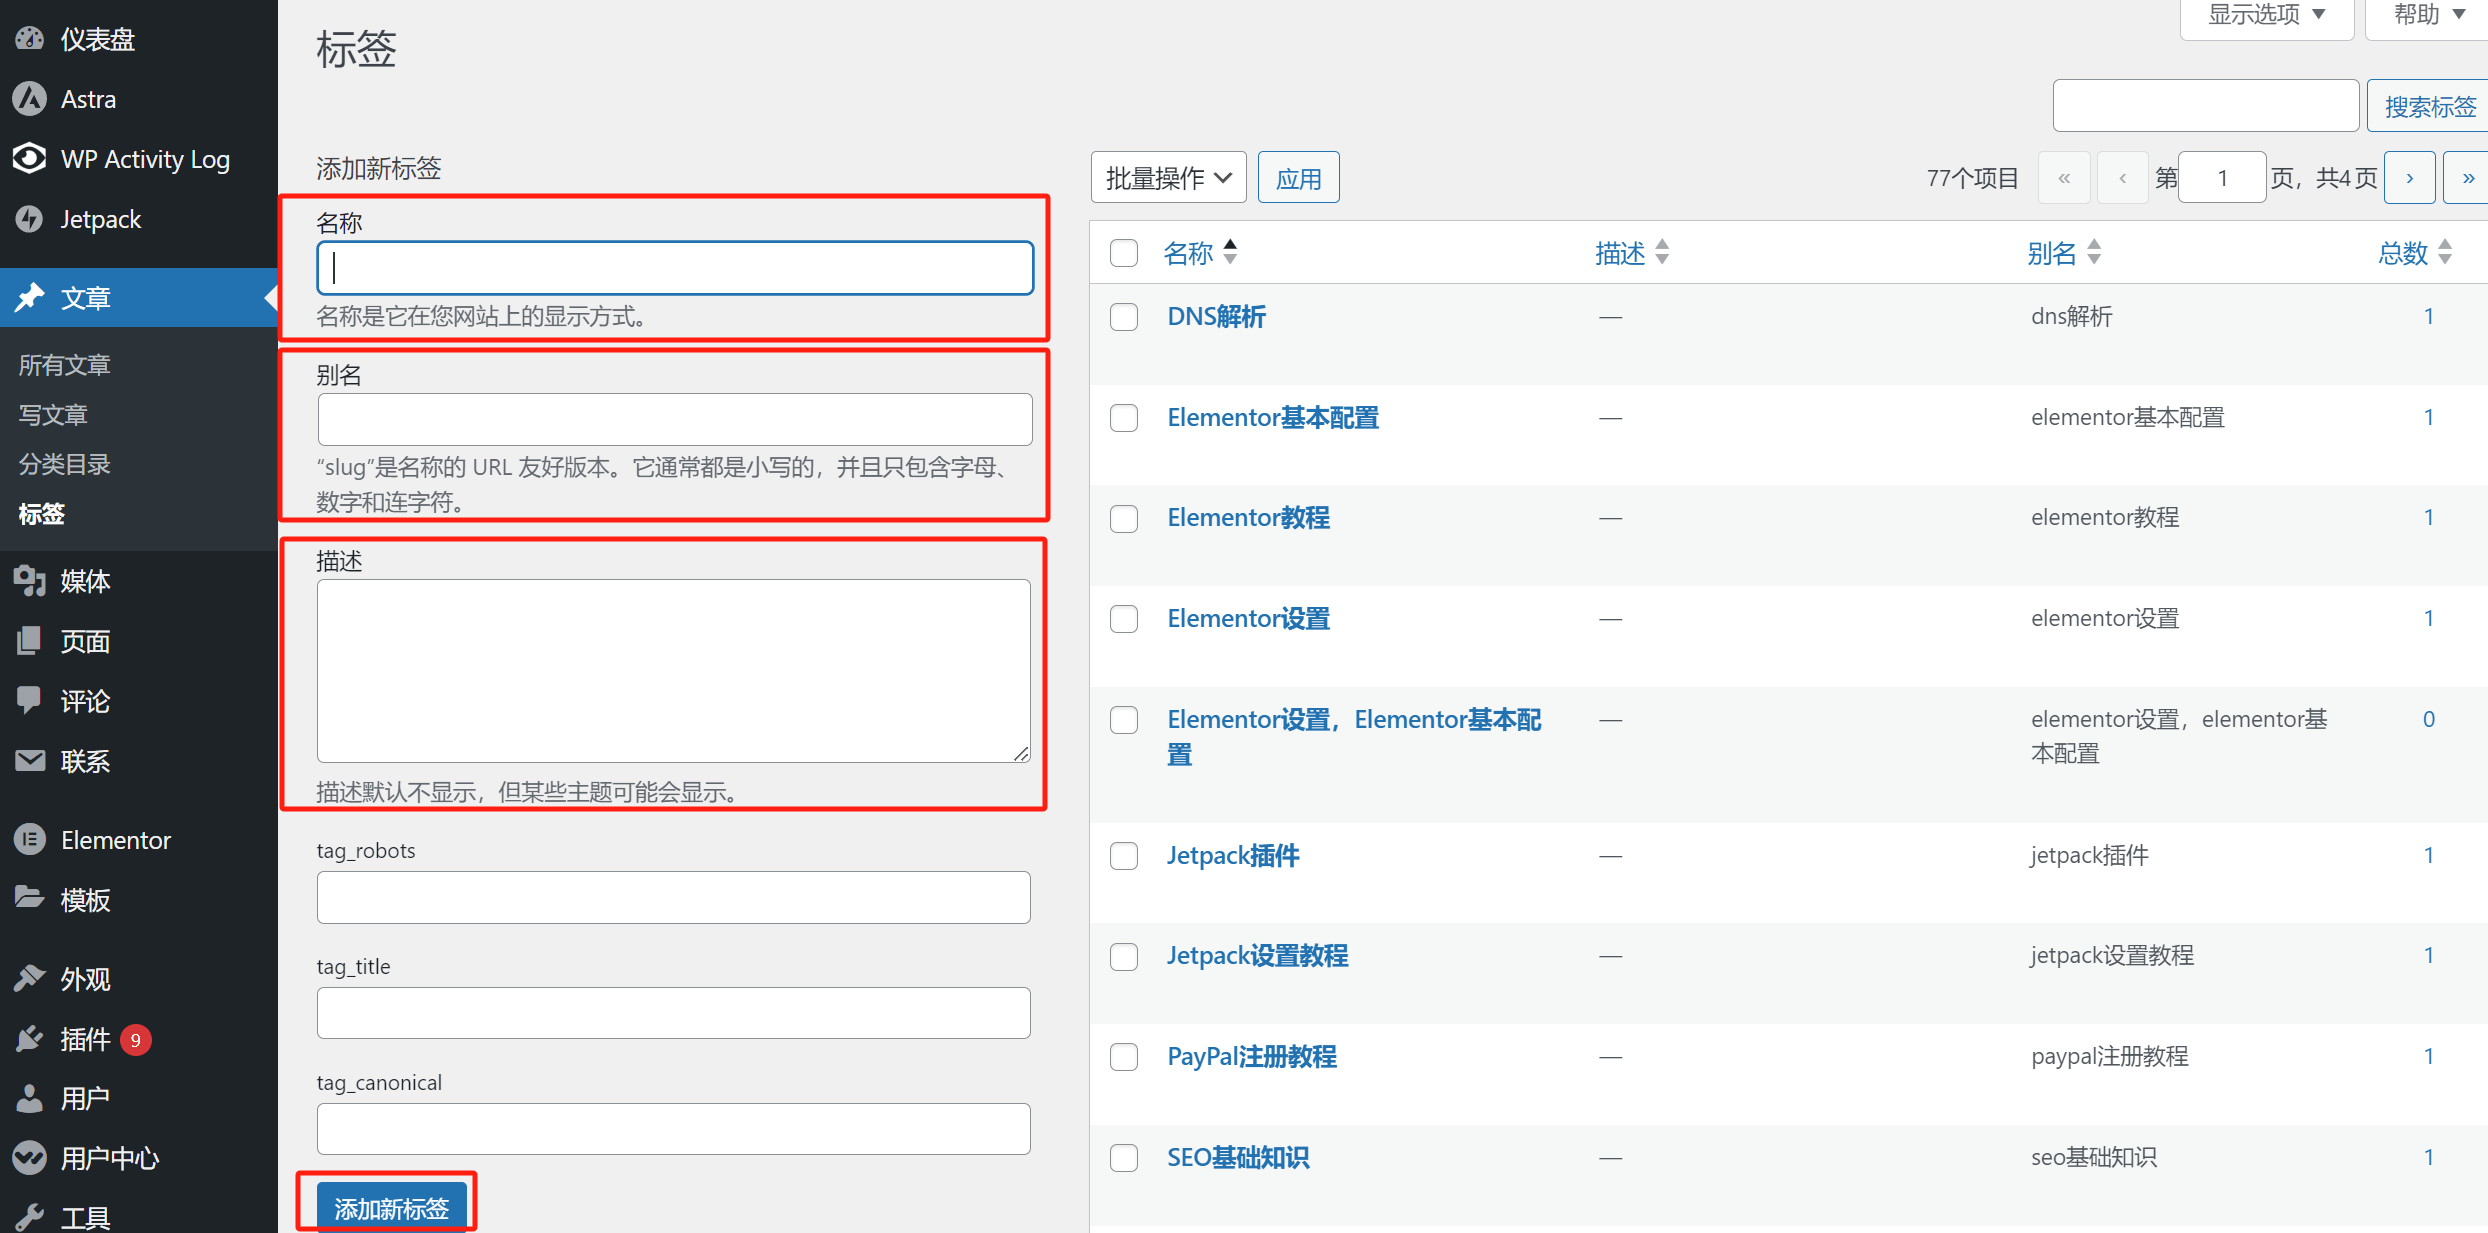
As shown in the image below, clicking on "Tags" will take you to the tag configuration page. The method for adding new tags is similar to the one for categories. This includes entering the tag name, slug, and description, which follows the same instructions as for categories. Once the new tag’s information has been filled in, click the “Add New Tag” button at the bottom to create the new tag.
Common functions for creating and editing articles in WordPress
1. General functions of the article
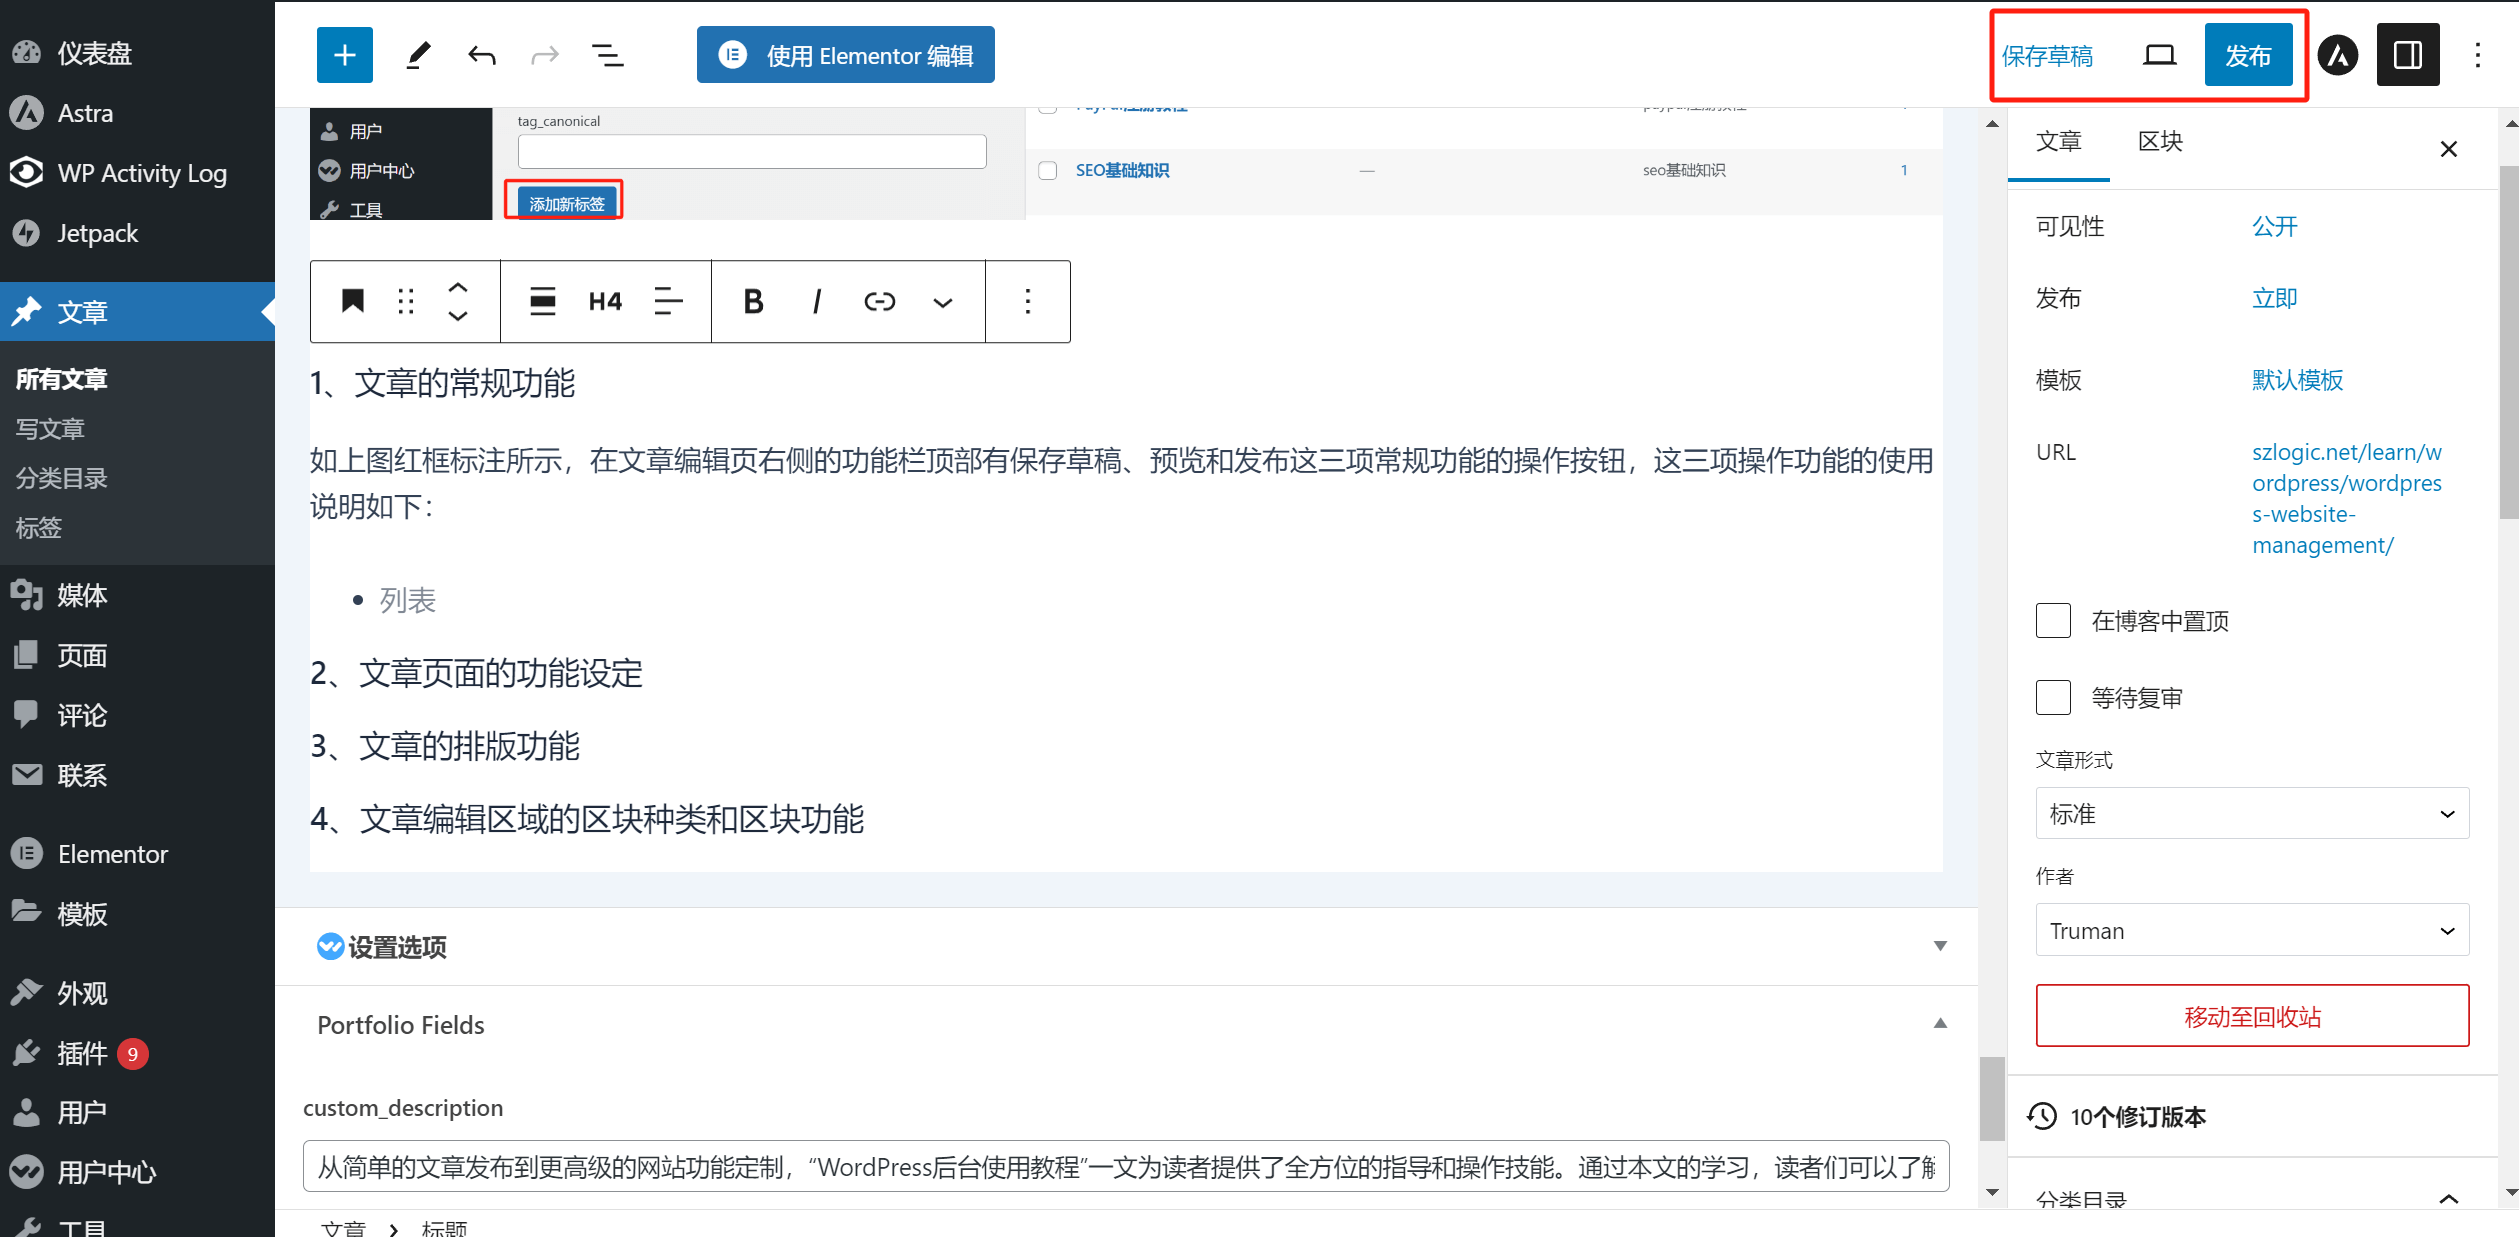
As highlighted in the red box in the image above, at the top of the sidebar on the post editing page, there are three common action buttons: Save Draft Preview and Publish . The usage instructions for these three functions are as follows:
- Save Draft: This feature is used when editing a post and needing to interrupt the content creation process, allowing you to temporarily save the content that has already been edited.
- Preview: Preview the content that has already been edited in the normal page mode. This feature is generally used to check the text content of the article and the layout effect of the page before publishing.
- Publish: After the article has been edited and reviewed, it is published. The article will appear on the website's blog archive page and category pages.
2. Function settings of article pages
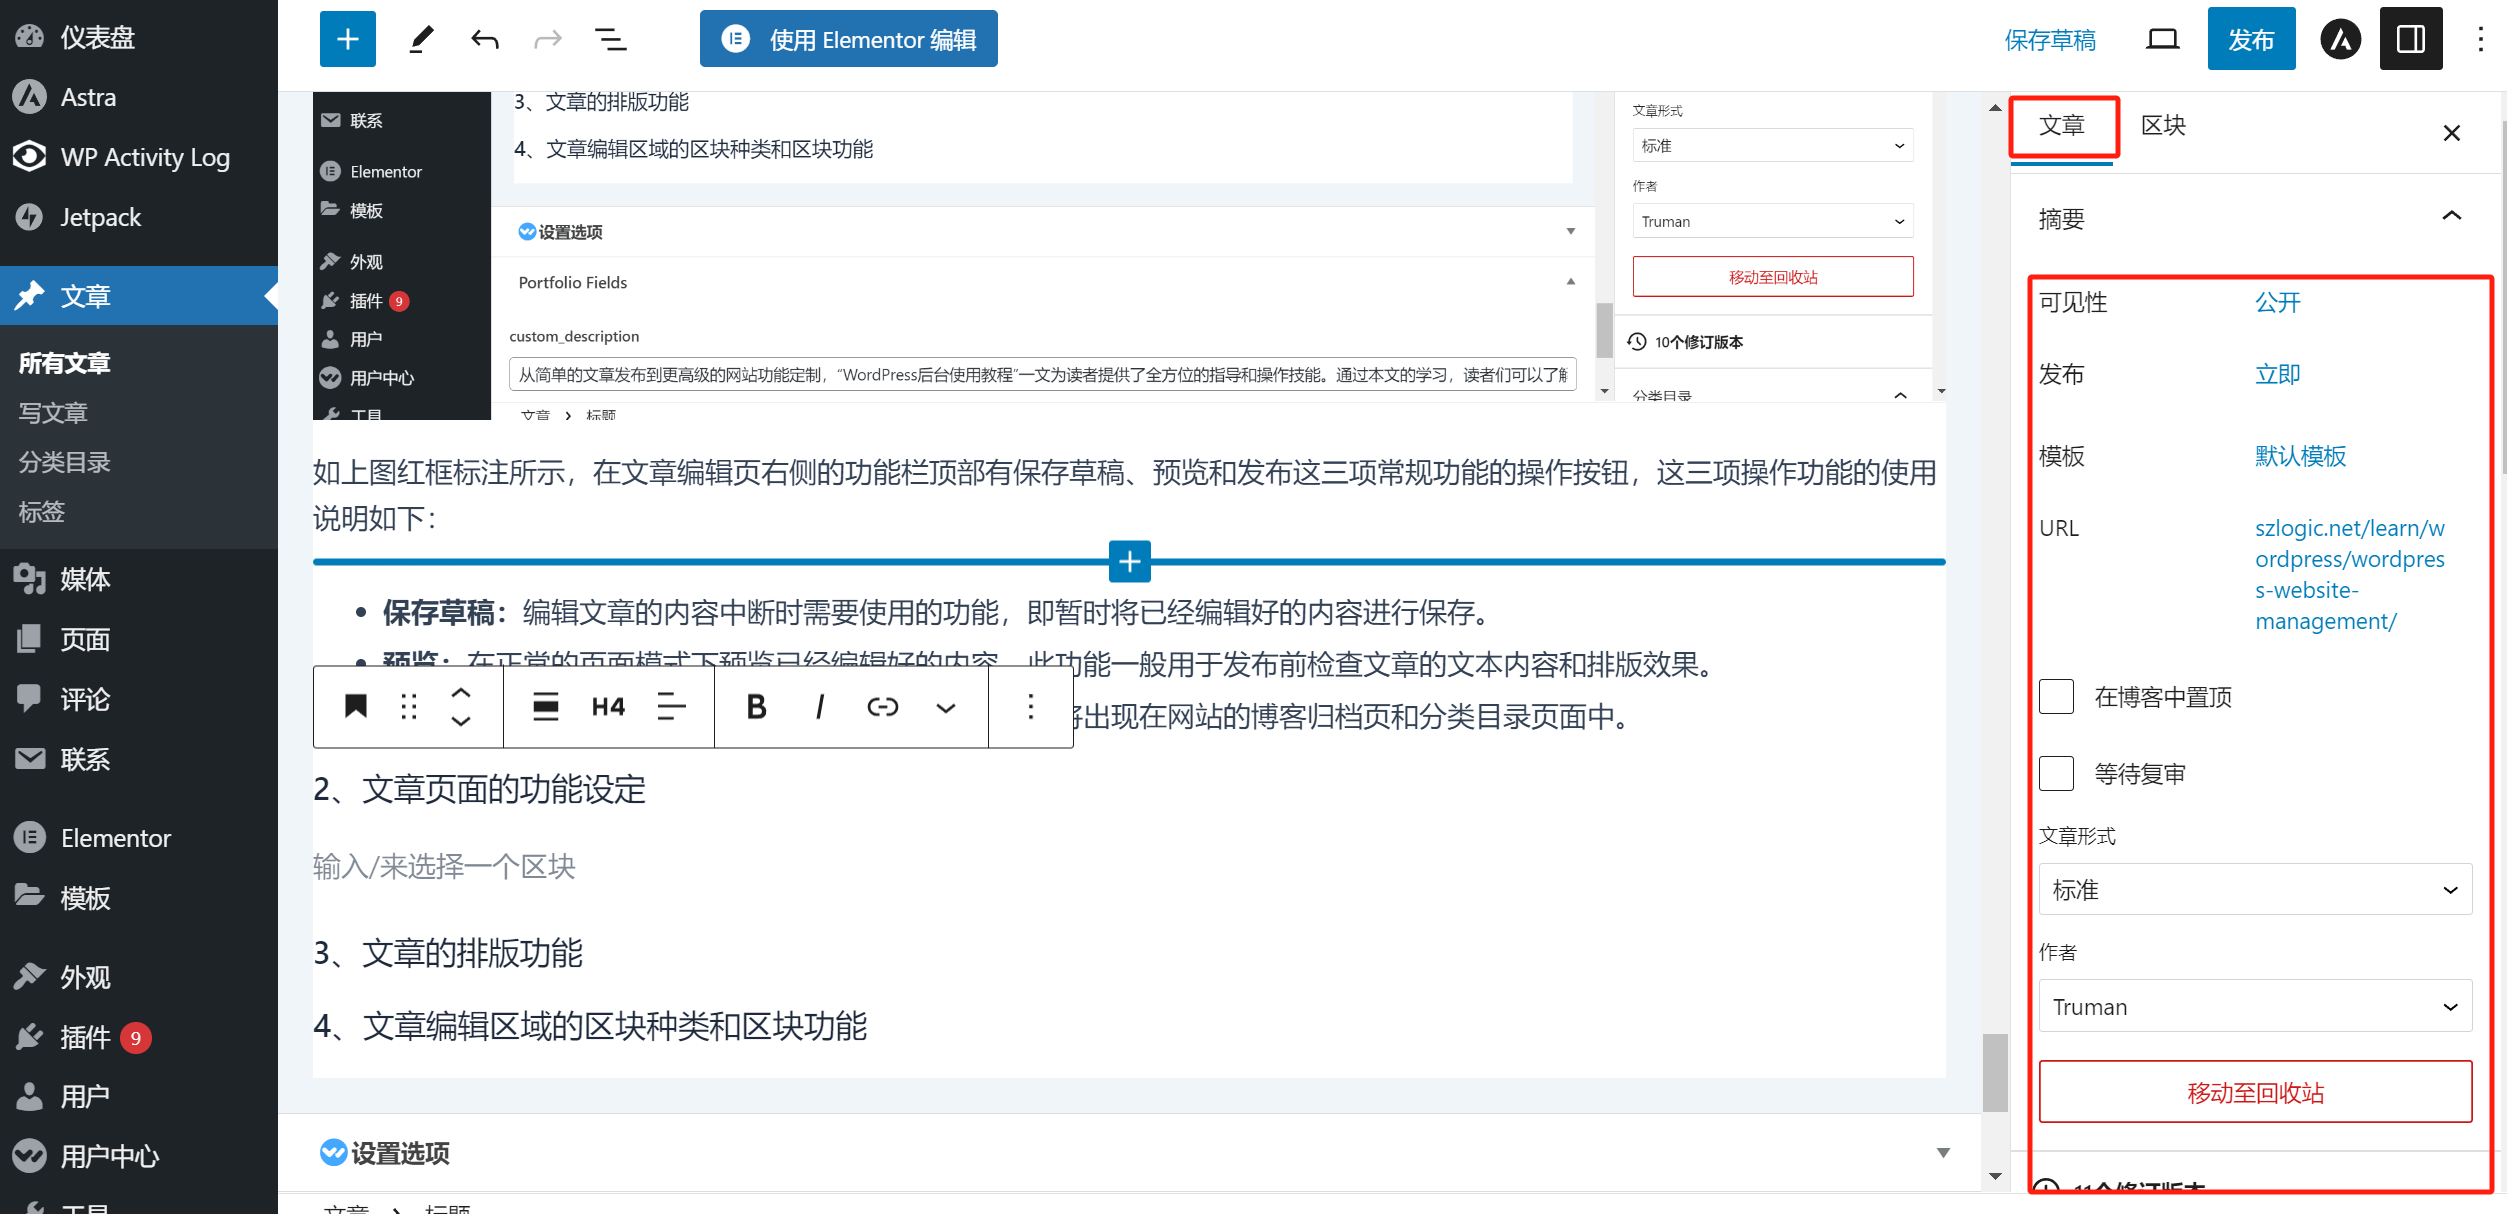
As highlighted in the red box in the image above, the options under the “Posts” section are quite extensive. The example image doesn't capture the entire content, and scrolling down the function area reveals more available options. The detailed settings options under the “Posts” section are as follows:
- Visibility: You can set the post to one of three reading modes: Public, Private, or Password Protected. The default is Public. Private means the post is only visible to the site administrator, while Password Protected requires a password to be entered in order to read the post.
- Publish: You can set the publication time of the post, with the default being immediate.
- Template: Select the template file for the article page. If no separate page template file has been developed for the article, simply choose the default template.
- Stick to the Blog: After checking the "Stick to the Blog" checkbox, this post will be displayed at the top of the archive page.
- Pending Review: After checking the "Pending Review" checkbox, the article will need to be reviewed by an administrator with the highest level of access before it can be published.
- Post Format: Select the type of post format from the dropdown menu based on the content type. The default is "Standard". If it is a regular text and image post, keeping the default "Standard" format is sufficient.
- Author: The Author field in WordPress is automatically set to the logged-in account by default, and no additional action is required unless the post needs to be assigned to a specific author.
- Move to Trash: Deleting this post will move it to the trash by default in WordPress.
- Categories: After setting up the categories, all the article categories will be displayed here. You can select which category to place this post under by checking the corresponding category name. In addition to setting categories in the "Posts" section of the WordPress admin dashboard, you can also create a new category by clicking the "Add New Category" link below the categories here.
- Tags: Enter the tags you want to add to the post here.
- Featured Image: The feature to display a featured image requires support from the WordPress theme. Not all WordPress themes have this feature. The featured image is used as the cover image displayed for articles on the archive page or in post display widgets.
- Excerpt: The text content displayed on the archive page or in the post widget.
- Discussion: The discussion feature has two options: Allow Comments and Allow pingback and trackback. By default, Allow Comments is checked. Other comment-related default settings can be configured in the final section of the text, under "WordPress Dashboard Settings - Discussion Settings" in the Default Post Settings. After logging in to the WordPress website, users can post comments in the comment box at the bottom of an article. Allowing pingbacks and trackbacks means that if another third-party website links to one of our articles in their post, the third-party site will send a link notification to our WordPress site when they publish their article. Pingback is manually sent, while trackback is automatically sent.
3. Style setting function of article block
Example of options that can be set in the picture block
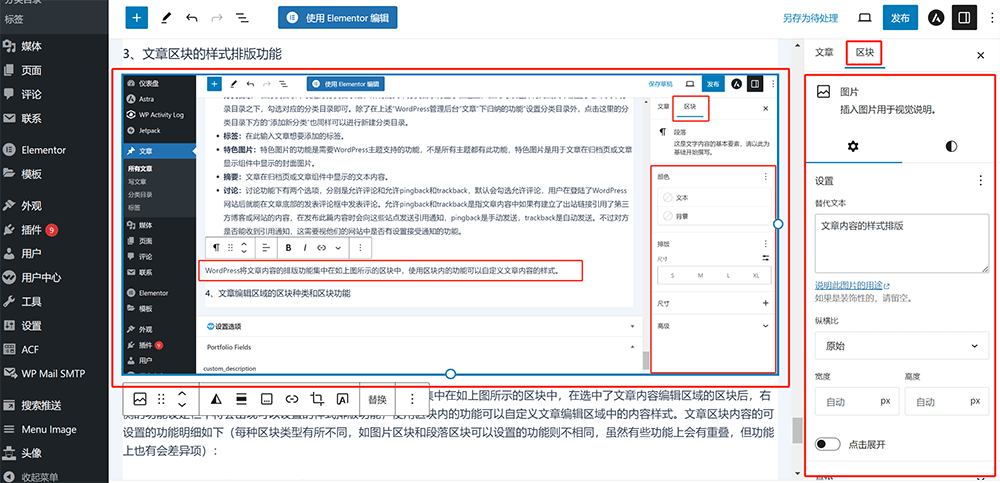
Example of options that can be set in the paragraph block
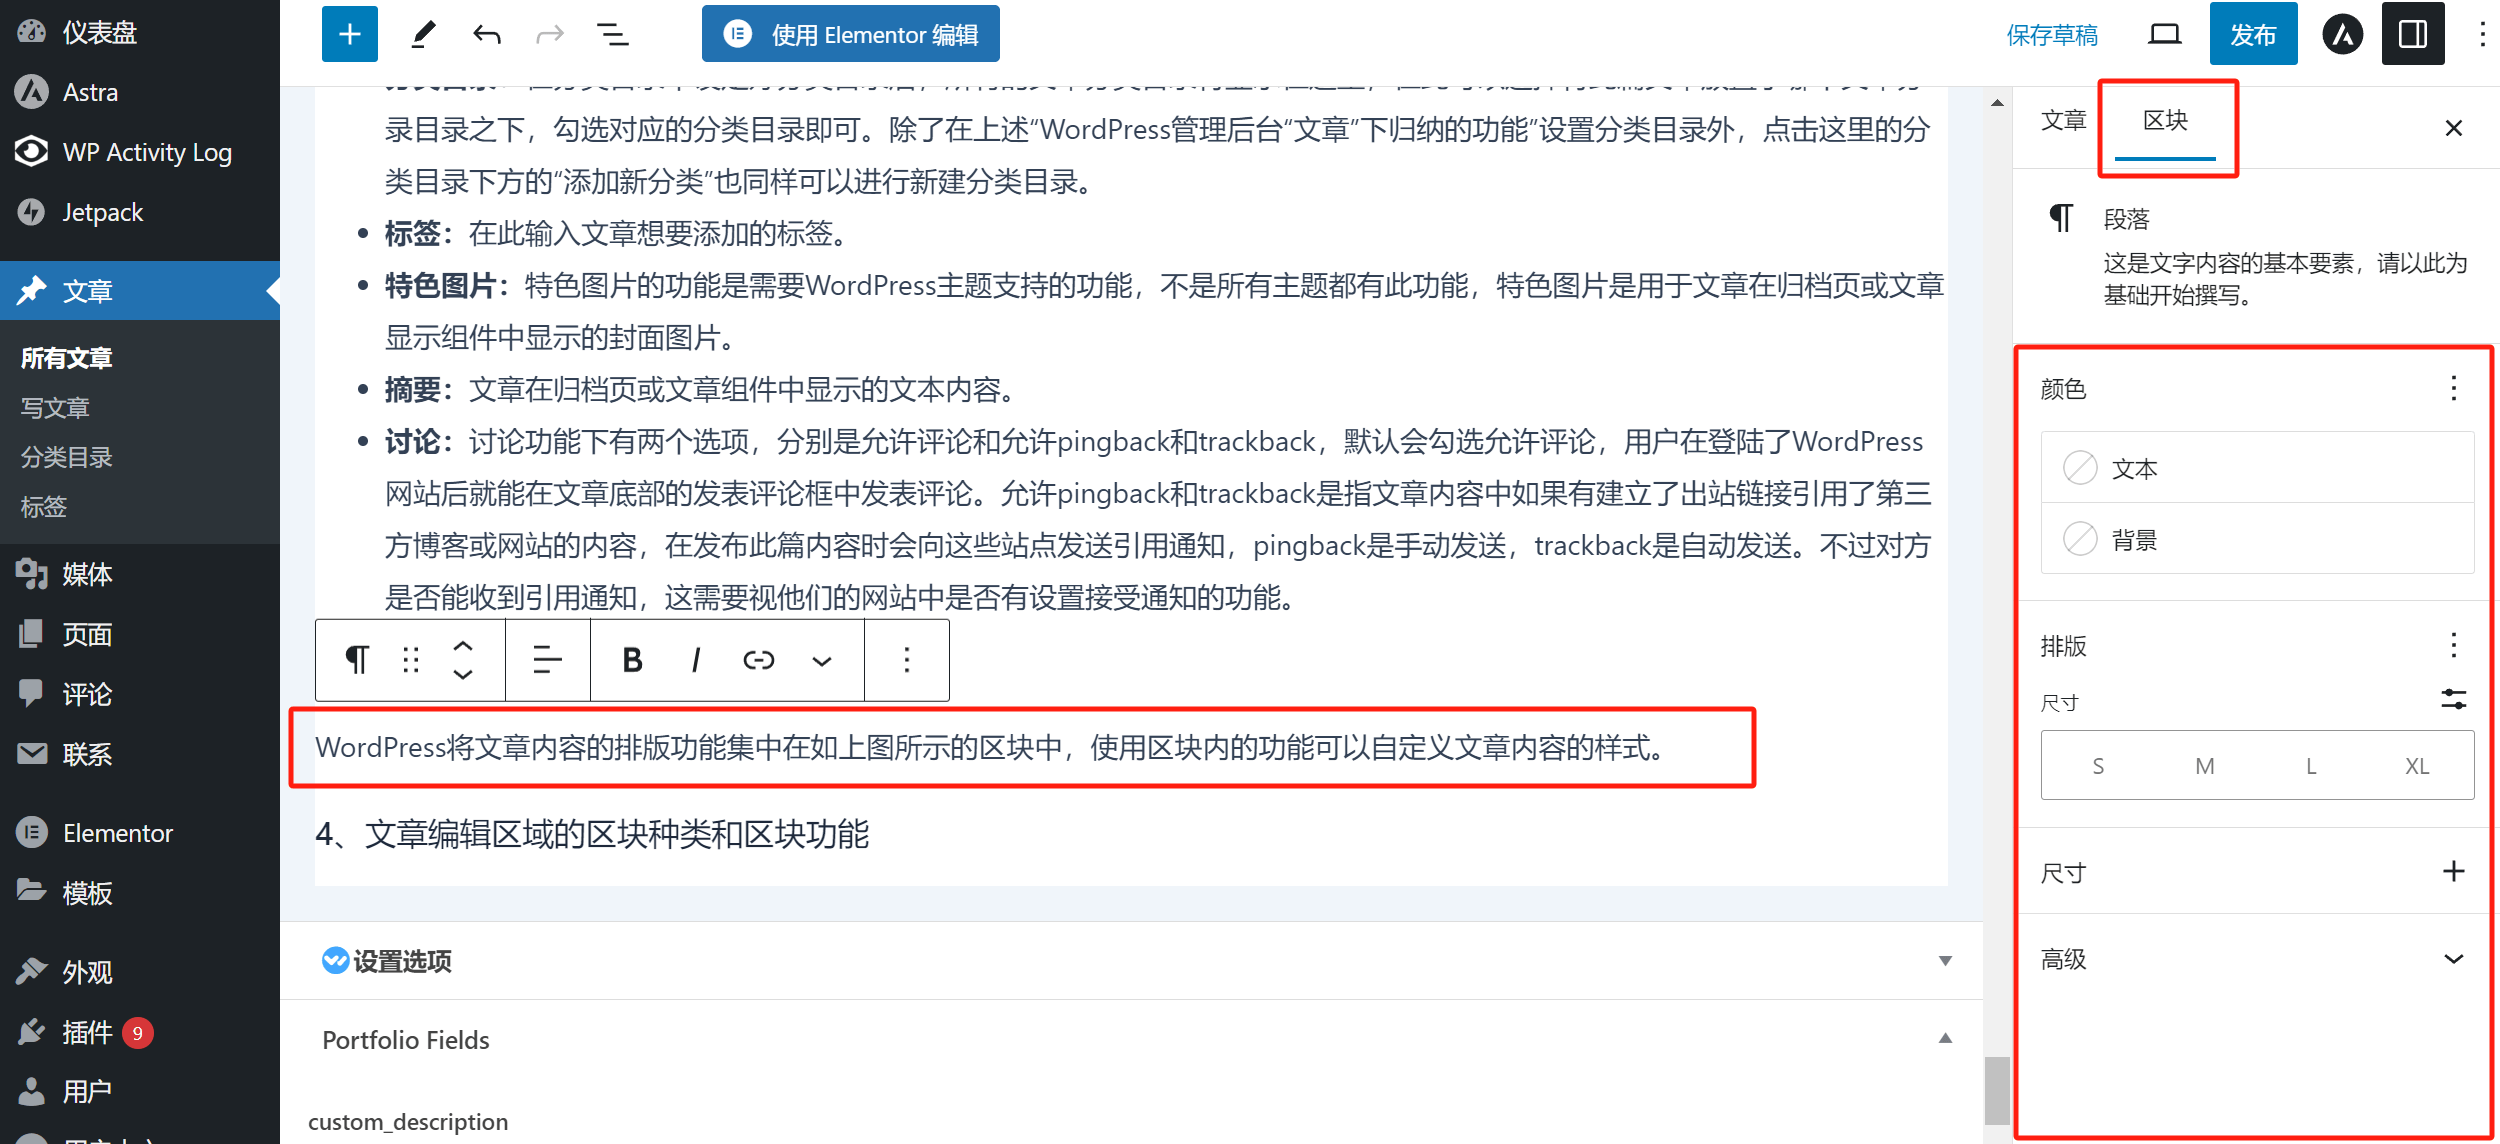
As highlighted in the red box in the image above, WordPress consolidates content styling features into what are called “blocks,” as shown in the image. When a block within the post editing area is selected, the settings panel on the right will display styling options specific to that block. These style options allow users to customize the appearance of content within the editing area. Below are the detailed customizable features for two commonly used blocks Image and Paragraph . (Note: While some style options are shared across different block types, each block also has unique settings. For example, the available options for an Image block differ from those for a Paragraph block.)
3.1、Function items that can be set in the picture block
- Settings - Alt Text: The alt text for the image. By default, it will read the alt text set in the media library, but you can enter new alt text here. This new alt text will only apply to the image inserted on this page.
- Settings - Aspect Ratio: Adjust the aspect ratio of the image's pixel size. The default is "Original," meaning the original image. Unless you specifically need to set a custom aspect ratio, it's generally best to keep the default, as adjusting the aspect ratio may distort the image.
- Style - Style: You can set two types of outline styles for the image. The default is "None," meaning the image will display with its original outline. If you select the rounded style, the image will display in a circular form.
- Style - Dual Color: Change the image's color, with multiple color combinations available to choose from.
- Border: Set the pixel size of the image's border. The default is 0px, meaning the image will be displayed without a border.
- Advanced: The Advanced section contains general functions for the block, allowing for additional customization and advanced settings.
3.2. Block General Functions - Advanced
- HTML Anchor: Set the anchor link name, typically used for creating anchor links in a table of contents. To set this, enter the point name (e.g., pay) in HTML, and then use pay in the anchor link when setting the table of contents anchor text.
- Additional CSS Class: Enter the CSS class name that needs to be additionally applied.
3.3、Function items that can be set in paragraph block
- Color: Set the text and background colors. After clicking the button for text or background, a color picker window will pop up, where you can also enter the color value (hex code) to select a specific color.
- Typography: Under the typography options, you can set the text size. In addition to the four preset sizes (S, M, L, XL), you can also click the "Set Custom Size" button at the top right of these sizes. A pop-up input box will appear, allowing you to directly enter the desired text size in pixels (px).
- Size: The size function here is used to set the padding and margin of the paragraph block. This refers to the internal spacing within the block and the spacing between blocks.
- Advanced: The Advanced section contains general functions for the block, allowing for additional customization and advanced settings.
4. Types of Content Blocks in the Post Editing Area and the Functional Applications of Each Block
When editing content in the post editing area, you can bring up the WordPress block options by using either of the two buttons highlighted in the red box in the image below. Once the full list of content blocks appears, simply click on the block you want to use, then enter the corresponding elements according to the block's specific properties.
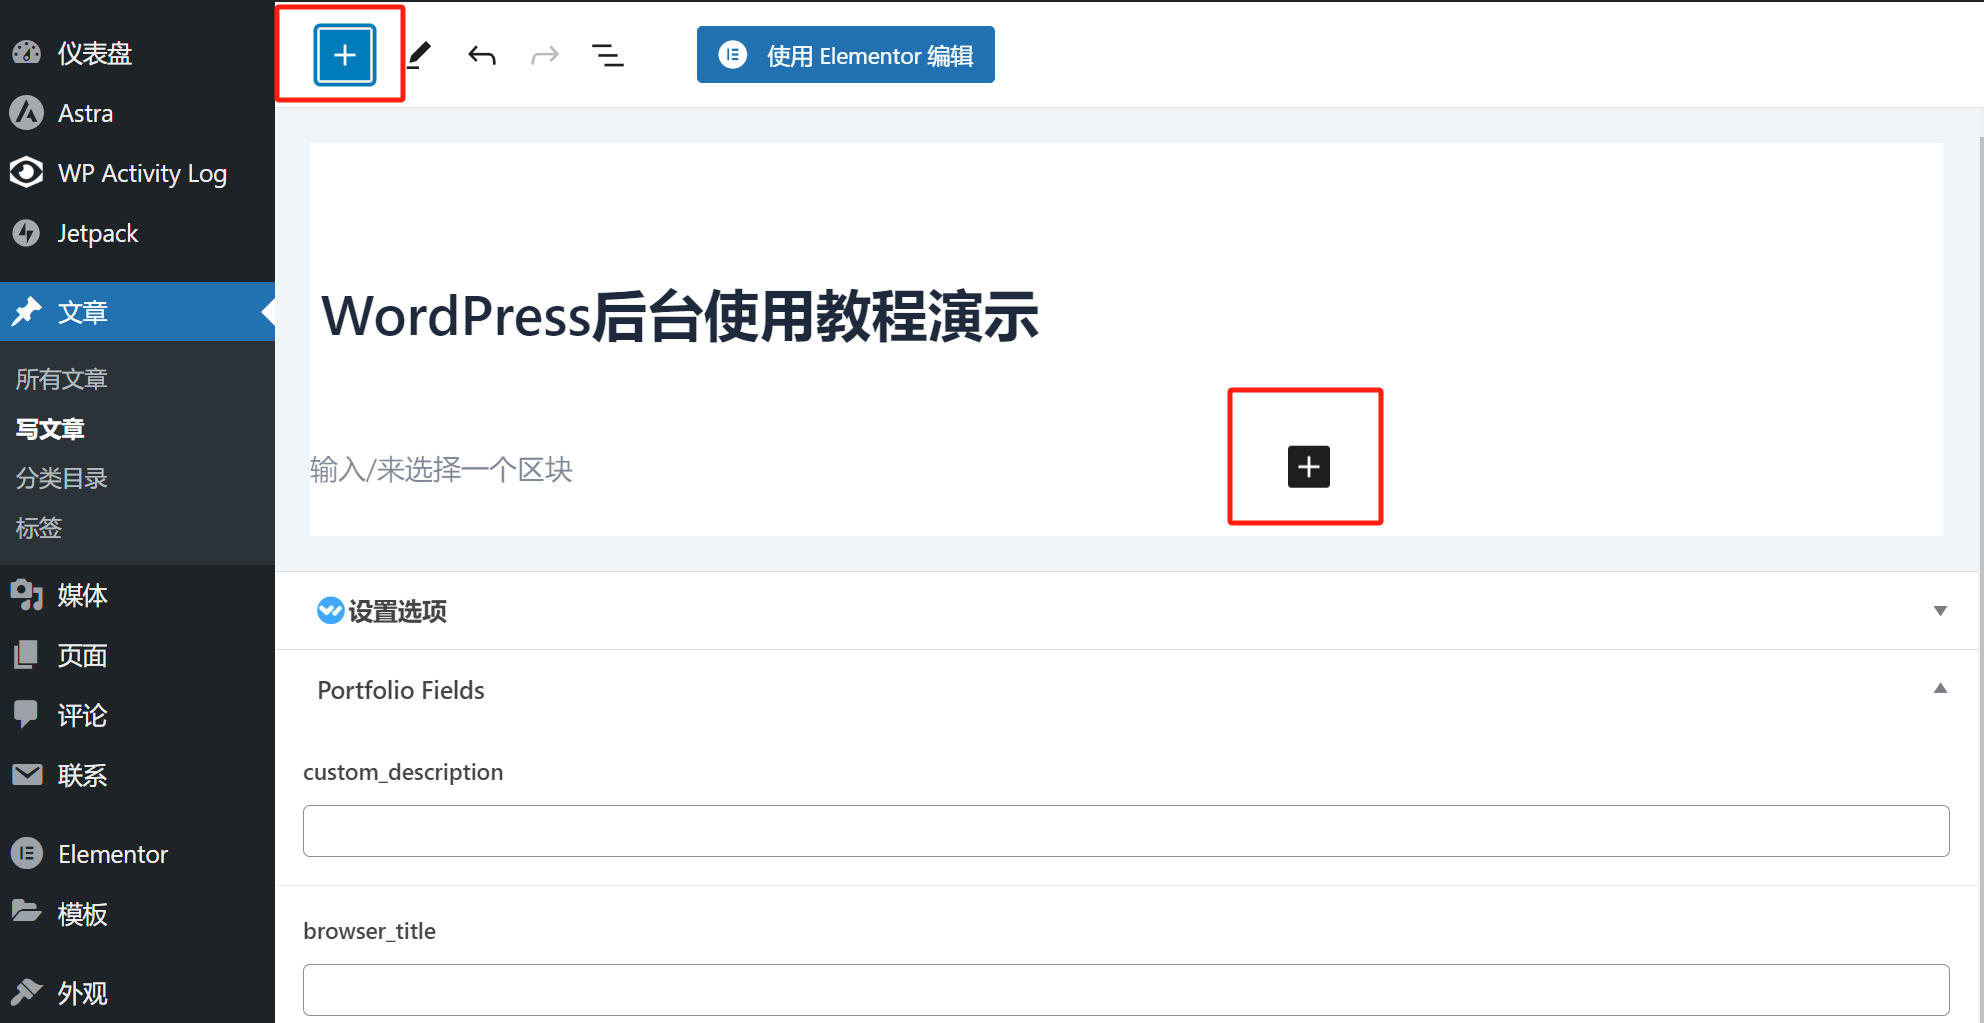
Example of all functional blocks of the WordPress editor
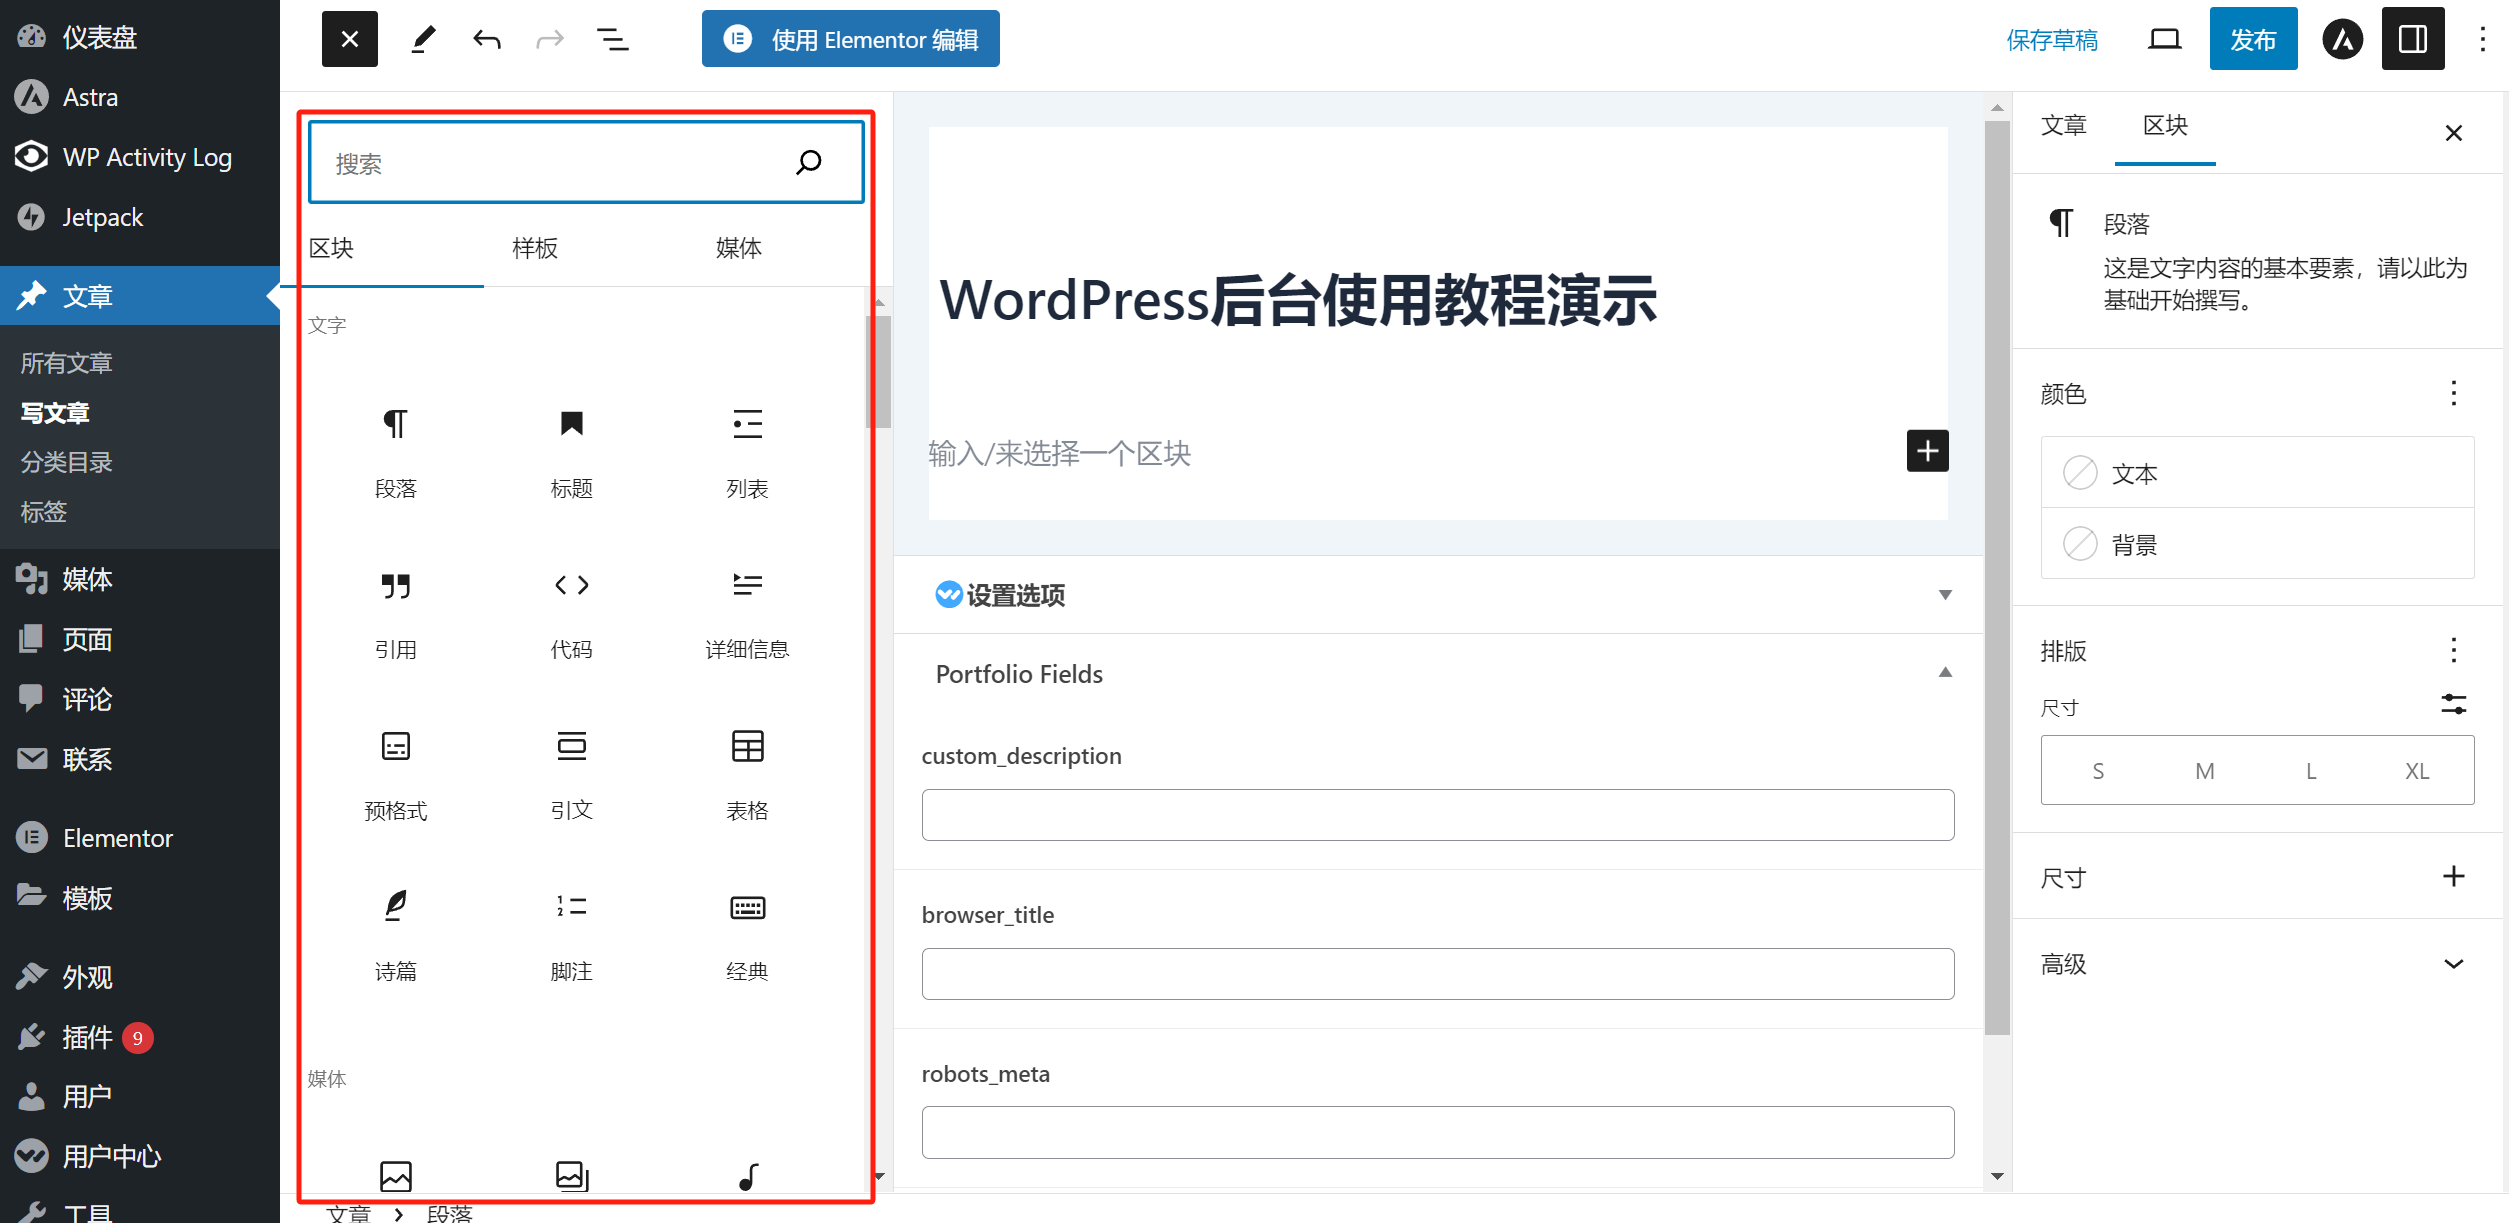
In addition to the default blocks provided by the WordPress system, some themes and plugins also generate additional usable blocks. The types and number of blocks available under the Widgets section, for example, may vary depending on the theme being used. WordPress’s default blocks are categorized into five main groups: Text Media Design , Widgets and Embeds . Each group contains a varying number of functional blocks. The types and details of the functional blocks under each category are as follows:
4.1 Text Block
- Paragraph: A paragraph is a block for entering text, with an optimal reading experience typically achieved by limiting each paragraph to around 200 words. In HTML code, a paragraph block is denoted by the p tag, and is closed with the /p tag.
- Heading: The h1-hn elements are used to define headings (main and subheadings). When using a heading block, you can set the desired heading size in the block's toolbar. The h1 tag represents the largest heading, typically used for the main title of the document, and should appear only once in the entire content. The h2 to hn tags are used for subheadings.
- List: The list can take two forms: unordered and ordered. In the list's toolbar, you can select between these two types. For example, the list under "4.1. Text Block" here uses an unordered list. If the list uses numbers like 1, 2, 3, 4 to arrange the items, it is an ordered list.
- Quote: Add quoted text in different types of blocks. This feature is used to highlight or reference a specific part of text, often to show a citation or a piece of information taken from an external source.
- Code: Use the HTML pre tag to place a code block. When using the "Code" block feature, the content entered will be displayed with a gray background on the front-end within the block's content area by WordPress.
- Details: Add detailed information above the functional block, similar to the "Quote" block.
- Preformatted: Similar to the "Code" block, the "Preformatted" block uses the HTML preformatted text tag `pre` to display text, symbols, or code content with preserved formatting.
- Quote: A block used for quoting text, typically with quotation marks, to highlight important content. This type of block helps emphasize key information or direct references.
- Table: When using the table block, input the number of columns and rows in the table toolbar and click the "Create Table" button to generate the corresponding table. You can then enter content into the cells of the generated table.
- Poem: Similar to "Code" and "Preformatted," the "Poem" block uses the HTML `pre` tag to display text, symbols, or code content. Essentially, it serves the same purpose as "Code" and "Preformatted" blocks. WordPress lists them separately to provide more versatile usage options for users, particularly beginners, allowing them to access the same functionality with different block types for varied use cases. This approach likely helps new users to easily work with preformatted content in multiple styles.
- Footnote: A block that displays the footnotes of an article.
- Classic: Classic refers to the older version of the WordPress Classic Editor. Currently, we are using the Block Editor. The Classic Editor is still available to accommodate the usage habits of early WordPress users, but in practical terms, due to its simplicity, it is not suitable for the layout of modern article pages.
4.2 Media Block
- Image: The image block is a functional block that allows you to insert images into the content of your article. It is one of the commonly used blocks when writing articles. After uploading images to the media library, you can select the appropriate image from the image block and insert it into the article page.
- Gallery: The gallery block allows you to select multiple images at once and display them within a single block. It is a functional block used for displaying a collection of images together.
- Audio: The audio block allows you to upload audio files into the block. Users can play the audio file by clicking on the audio player when visiting the article page where the audio file is inserted.
- Cover: The cover block allows you to insert an image or video file. By adding text over the image or video, it creates an effect where the text is layered on top of the media file.
- File: A block that allows you to upload files to the article page for readers to download.
- Media and Text: A block that allows you to upload media files and add text in a side-by-side layout, enriching the content layout of the article.
- Video: Similar to images and audio files, after uploading a video file to the media library, you can select and insert it into the article page using the video block. Once the article is published, readers can click the player to play the video file.
4.3 Design Blocks
- Multiple Buttons: After selecting the "Multiple Buttons" block, click the "+" icon in the block's toolbar to add multiple buttons. You can then set the corresponding link for each button, enabling the display and use of multiple buttons within a single block.
- Columns: The use of the Columns block is similar to the combination container in the Elementor page editor. It divides a block into a custom number of containers, and each container can contain the same or different functional blocks. For example, you can set up a 3-column container with the Columns block, add a heading block in the first container, an image block in the second container, and a paragraph block in the third container.
- Group: The Group block is used to combine blocks together for layout purposes, achieving the same layout effect as the "Columns" block.
- Row: The Row block is used to add multiple functional blocks in a horizontal layout. It achieves the same layout effect as the "Columns" and "Group" blocks, but with a different usage method. The "Row" block allows you to add block containers one by one, rather than setting the number of block containers in advance.
- Stack: The Stack block is used to add multiple functional blocks in a vertical layout. It achieves a similar effect as the "Columns" and "Group" blocks, but with a different usage method. The "Stack" block allows you to add block containers one by one, rather than setting the number of block containers in advance.
- More: The "More" block functionality displays the text content before the "More" block on the archive page.
- Pagination: The "Pagination" block will split the content before and after it into different pages. For example, if a pagination block is inserted after the first h2 heading, the article page will display clickable pagination symbols (1, 2, 3, ...). The content of the first h2 will be on the first page, and the content of the second h2 will appear on the second page.
- Separator: A horizontal divider block used to separate content within an article.
- Spacer: A block used to set the spacing between blocks, allowing you to control the vertical space between content sections.
4.4. Widget Block
- Archive: A functional block that displays a date-based archive of posts. After using the archive block, a list of posts sorted by date will be inserted into the post content.
- Calendar: A functional block that displays a calendar of all site posts, showing the publication dates of posts in a calendar format.
- Category List: A functional block that displays a list of post categories.
- Custom HTML: A functional block for adding HTML code to the front-end code of the post page. The HTML code added in the custom HTML block is not displayed within the post content, but is instead inserted into the front-end code.
- Recent Comments: A functional block that displays the most recent comments. After using this block, the latest comment content will be inserted at the position of the block.
- Latest Posts: A functional block that displays the most recent posts. After using the “Latest Posts” block, a list of the latest posts will be shown within the post content.
- Page List: A functional block that displays the hierarchical structure of all pages on the WordPress site in a list format.
- RSS: RSS stands for Really Simple Syndication, which refers to a simple and easy way to aggregate information. Using the RSS block, you can specify the URL of an RSS feed to display and optionally set the number of items to show. This way, you can import content from other websites into your own WordPress site.
- Search: A functional block for search. When the search block is inserted, a search box will appear at that position.
- Shortcode: A functional block for inserting and executing shortcodes. By entering the shortcode of a relevant plugin into the shortcode block, you can display the corresponding functional interface.
- Social Icons: After clicking to apply social icons, select the social icon block in the editing area, then click the “+” button in the block again to choose the style of the social media icon you want to use.
- Tag Cloud: A functional block that displays a list of commonly used tags.
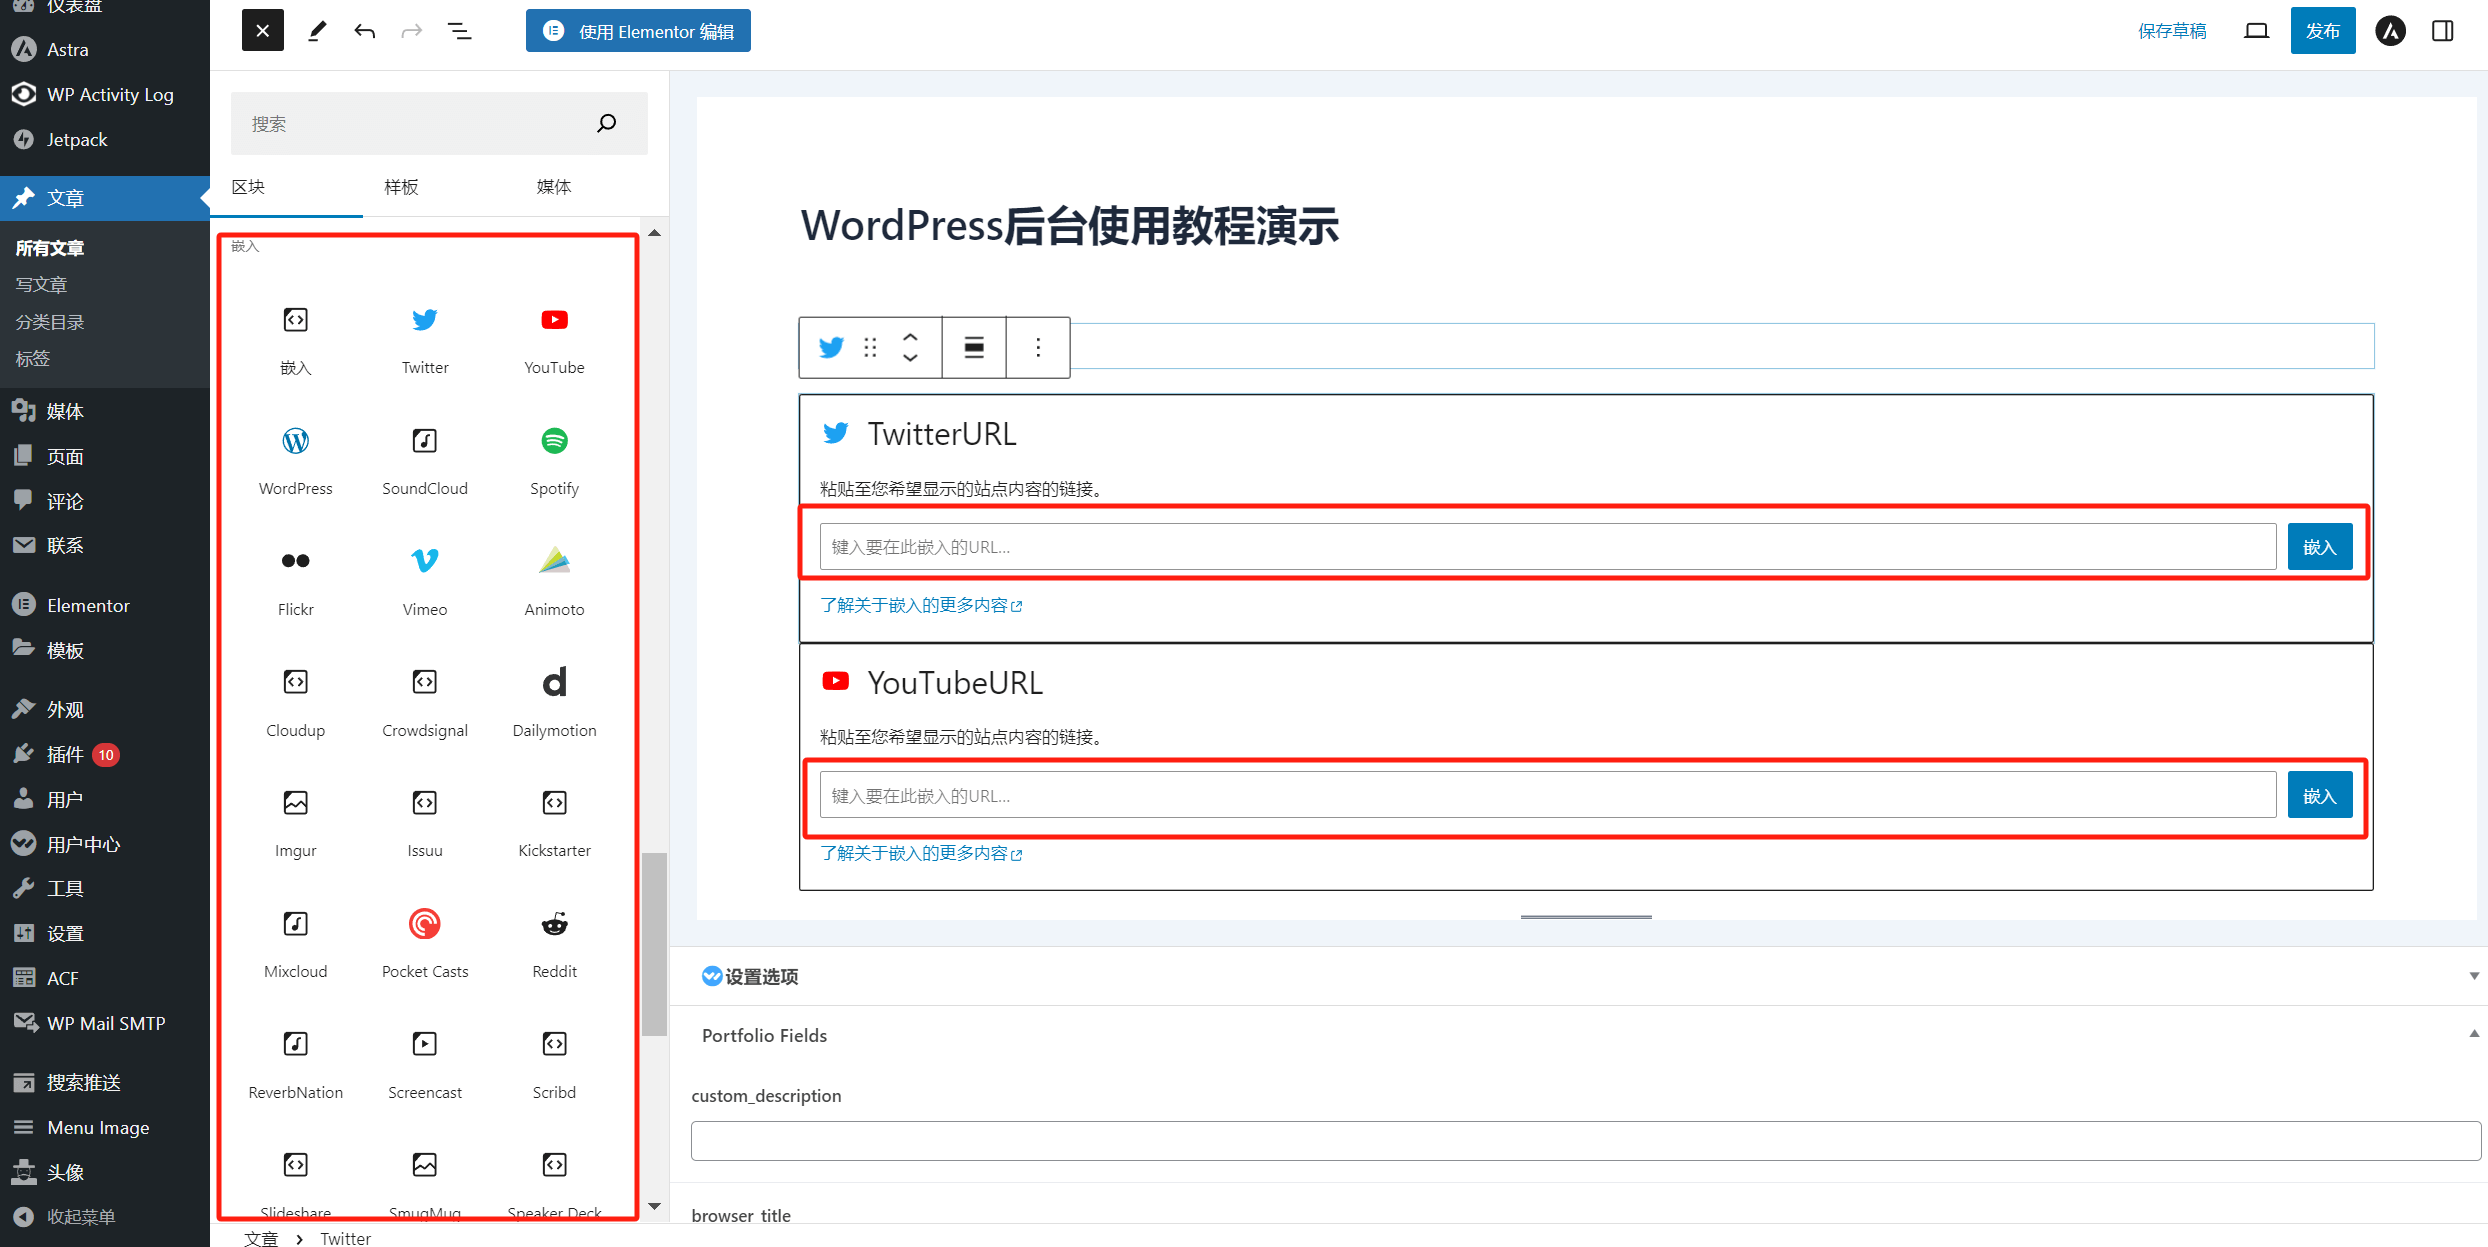
4.5. Embed Block
Supported platforms for embedding content into a WordPress website allow you to display content by simply entering the URL of the specific platform after selecting its corresponding embed block (as highlighted in the red box in the image below). The supported embed platform blocks are shown in the image below:
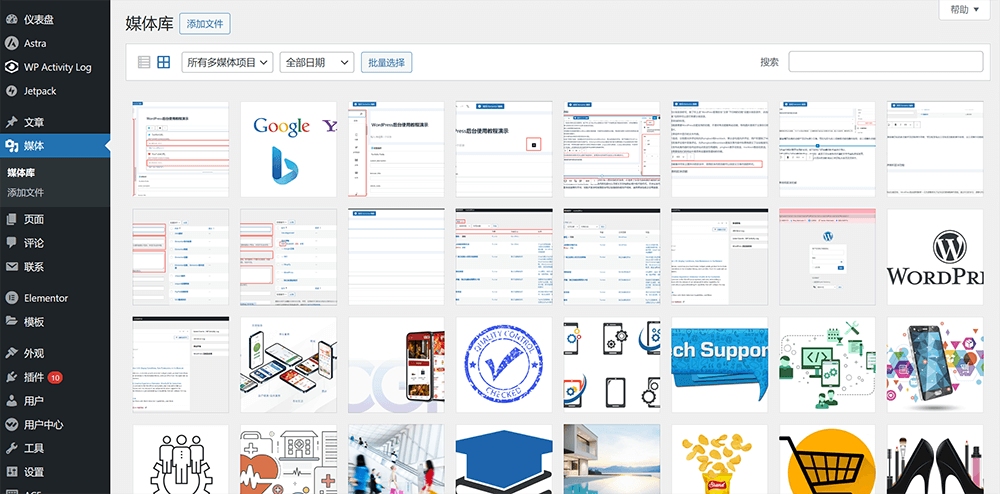
四、WordPress Media Library Management
The WordPress Media Library is a powerful and user-friendly tool responsible for managing the media files used on a WordPress website. It allows users to easily upload, organize, and manage images, audio, video, and other files. Whether you're creating post content or editing pages, you need to upload the files to the WordPress Media Library first before selecting and using them within the relevant components. Once a file is uploaded to the Media Library, WordPress generates a unique URL for that file. In addition to selecting media files through the editor, you can also access them directly via their URLs. Below, we’ll walk through how to use the WordPress Media Library and explain the methods for setting up and managing your media files.
1. Common media file types and formats used in WordPress
The specific formats supported by the WordPress media library may vary depending on the WordPress version. In its default state, the WordPress template functions file may not support uploading certain file formats to the media library. You can install the code provided in the “Remove WordPress Media Library File Format Restrictions” section below to enable uploading of different file formats.
- Image Format:jpg、jpeg、png、gif
- Audio File:MP3、WAV、M4A、OGG、FLAC、AAC、AIFF、WMA
- Video File:MP4、MOV、WMV、AVI、FLV、WebM、Ogg、3GP/3G2
2. Two ways to upload files to the WordPress media library
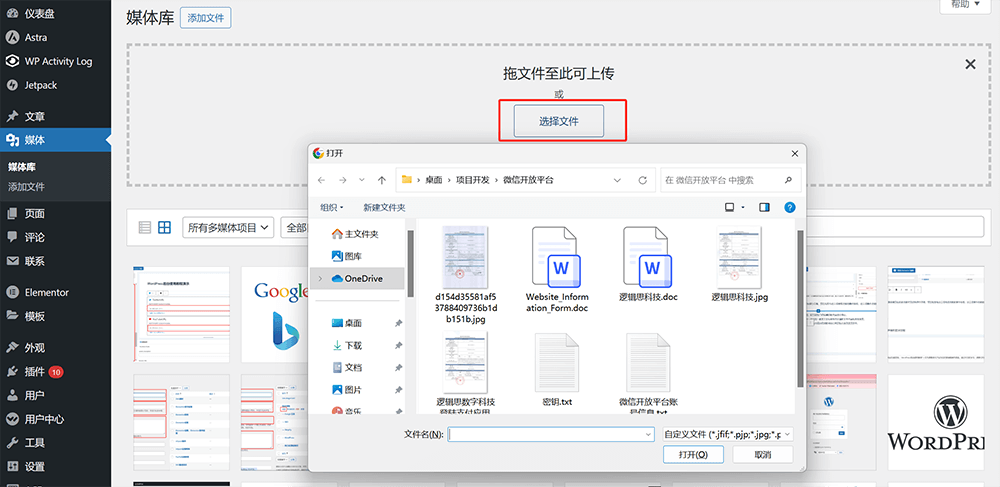
2.1. Method 1 for uploading files to the WordPress media library: Select the file path on the local computer to upload the file
As shown in the red box below, click the "Add File" button on the media library interface, and then click "Select File" again in the pop-up drop-down window.

Click the "Select File" button, select the path of the media file in the local computer, and select the file to upload.
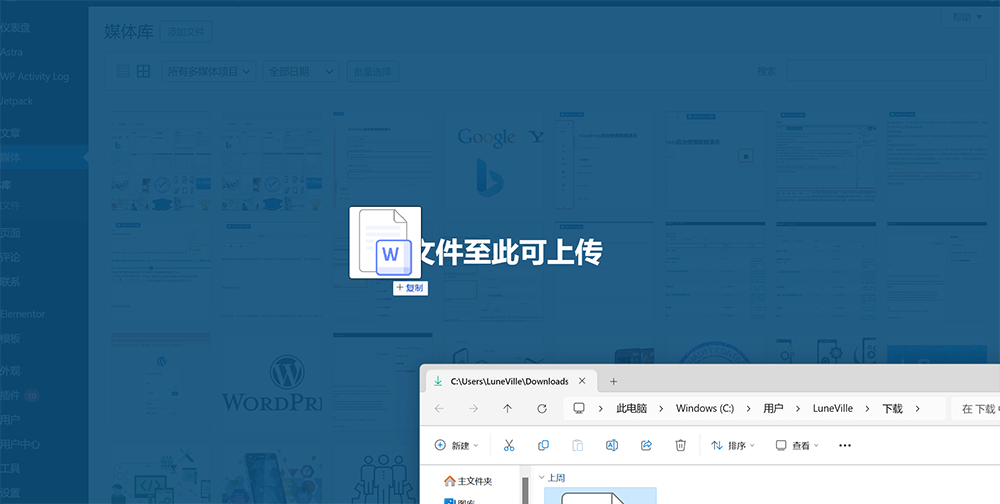
2.2. Method 2 for uploading files to WordPress media library: Drag and drop files to upload
As shown in the figure below, you can also upload media files by dragging and dropping files directly into the WordPress media library.
3. WordPress media file information and editable content
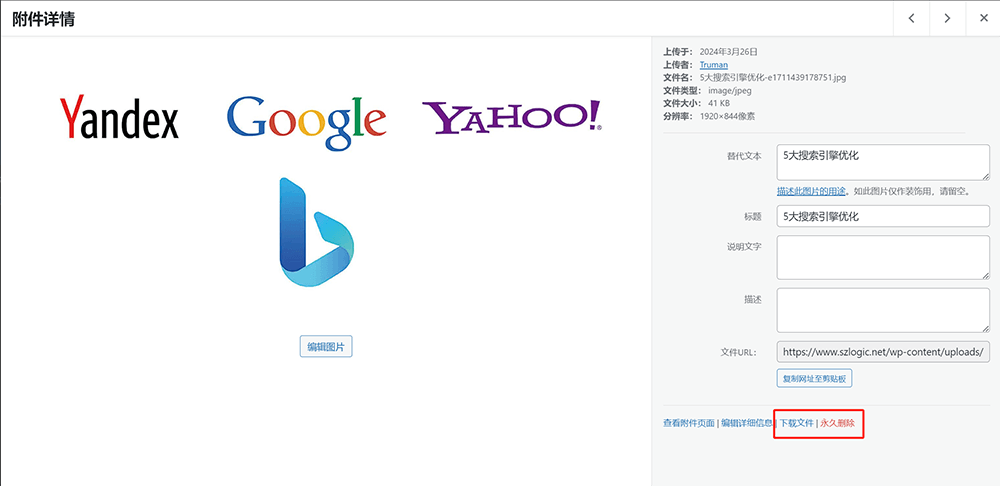
Clicking on a specific media file in the WordPress media library will take you to the file's details page. All the information and editable content of the media file are shown in the red box below:
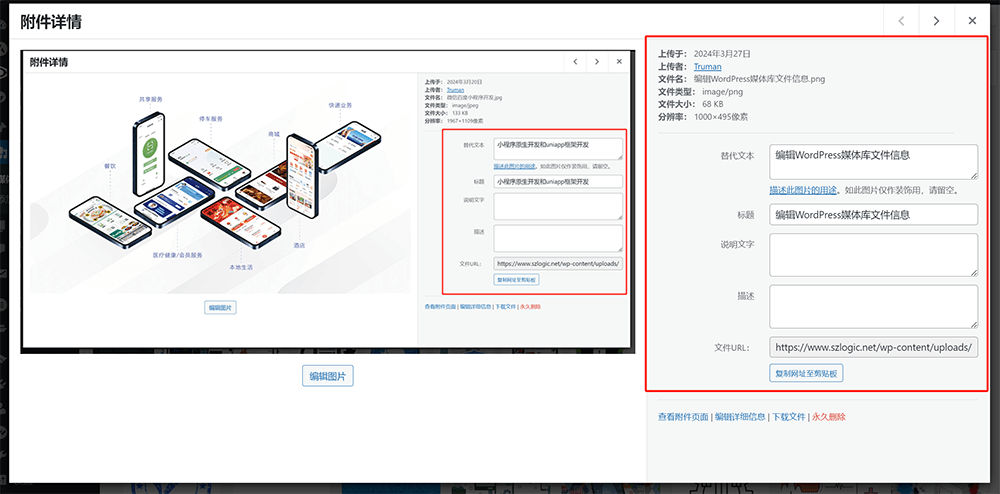
The content on the details page of a WordPress media file can be divided into basic information of the file and editable content. The information details are as follows:
- Uploaded On: The date the file was uploaded. This is basic file information and cannot be edited or modified.
- Uploader: The WordPress user account that uploaded the file. This is basic file information and cannot be edited or modified.
- File Name: The name of the file used at the time of upload. This is basic information and cannot be edited or modified within the WordPress media library.
- File Type: The format of the file. This is basic information and cannot be edited or modified.
- File Size: The storage size of the file. This is basic file information and cannot be edited or modified.
- Resolution: The pixel dimensions of the file. This is basic information and cannot be edited here. However, if the image is cropped, the resolution will automatically update to reflect the cropped dimensions.
- Alt Text: Alt text is also known as alt text. You can customize the content of the alt text. Its purpose is to provide a textual description of the media file, allowing users to identify the file’s content when it is not displayed. Additionally, alt text plays an important role in SEO by informing search engines about the content of the media file.
- Title: By default, after a media file is uploaded, the title in the media details is automatically set to the file name used during the upload. You can modify it later by entering a custom title in the input field.
- Caption: A customizable caption for the media file. Aside from being used by certain web editing components as a conditional element, it typically has no other purpose and can be left empty.
- Description: A customizable description of the media file. It is generally used for file identification or by other program components for recognition. In most cases, it can also be left empty.
- File URL: The URL of the media file, automatically generated by the WordPress media library tool based on the upload directory and file name. This URL can be used to access the file. When inserting a media file into a post or page component, the front-end code of the site uses this file URL to create a link for downloading or displaying the media file.
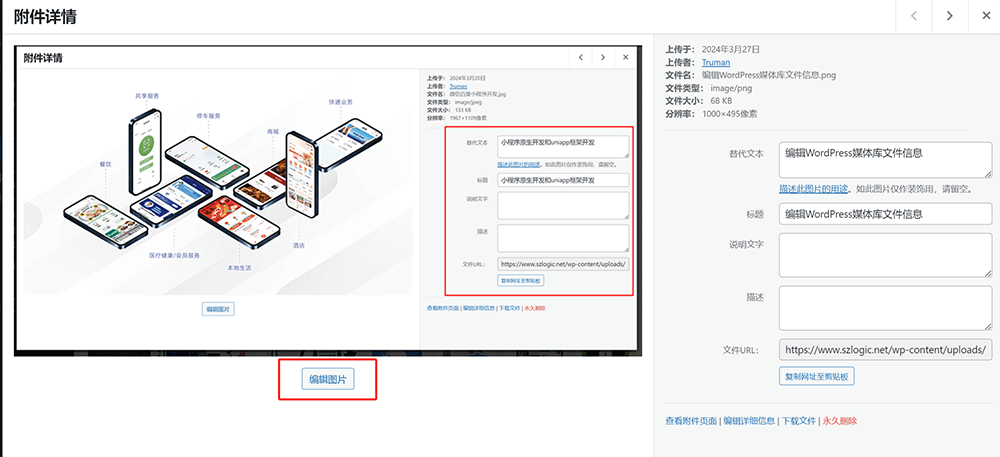
4. Edit image size in WordPress media library
After entering the details page of the image file, click the "Edit Image" button marked with a red box as shown in the figure below to enter the user interface of the image editing function.
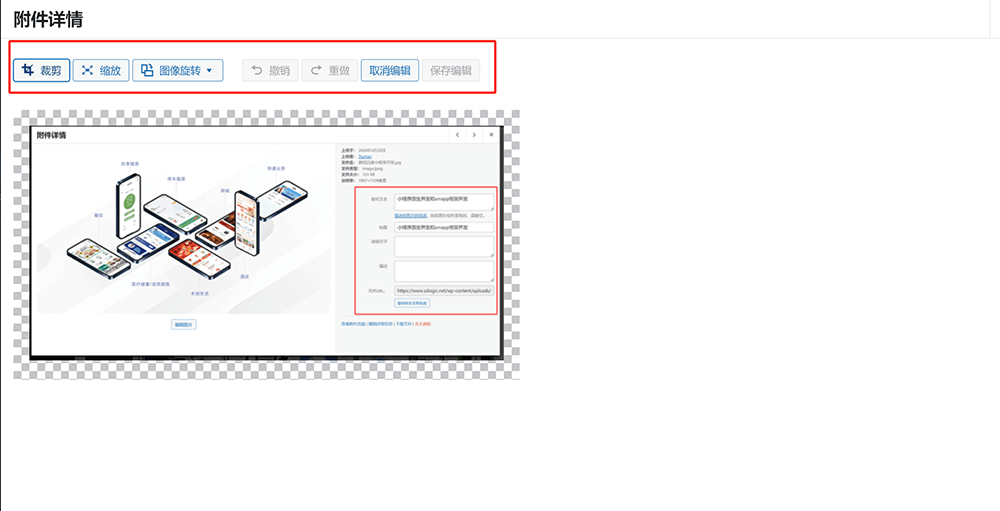
The image editing interface is shown in the image below. The WordPress Media Library provides several image editing features, including: crop, scale, and rotate. You can use these three commonly used functions to make basic edits to your image. Once the editing is complete, click the "Save Edit" button to apply and save the changes.
5. Delete and download files from WordPress media library
As shown in the red box in the figure below, there are "Permanently Delete" and "Download File" buttons at the bottom of the right side of the content of the WordPress media library file details page. Click the corresponding button to complete the file deletion and download operations.
6. Remove restrictions on the WordPress media library
6.1. Disable automatic cropping of WordPress media library image files exceeding 2560 pixels
Copy and paste the following PHP code snippet into the `functions.php` file of your WordPress theme. The code can be placed anywhere in the file as long as it is not inside another existing code block. The simplest way is to paste it at the very bottom of the `functions.php` file. Don't forget to click the "Update File" button after pasting the code.
//禁止超过2560px的图片自动剪裁
add_filter( 'big_image_size_threshold', '__return_false' );
6.2. Remove the restrictions on the file format uploaded to the WordPress media library
Just like the method for disabling automatic cropping of images larger than 2560 pixels, the following PHP code snippet should be added to `functions.php` for execution. This code removes the file type restriction for .ies files. If you want to allow other file types, simply replace `['ies'] = 'application/octet-stream';` in the code with the file extension you want to allow. The line `unset( $mimes['exe'] );` sets the file types that are disallowed — in this case, it blocks the upload of exe files.
function wp_custom_mime_types( $mimes ) {
    // 添加 .ies 文件类型
    $mimes['ies'] = 'application/octet-stream';

    // 如果存在,你也可以移除其他类型,比如 'exe'
    unset( $mimes['exe'] );

    return $mimes;
}
add_filter( 'upload_mimes', 'wp_custom_mime_types' );
五、Creating and Managing WordPress Pages
The “Pages” section in the WordPress admin dashboard is structurally similar to the “Posts” section. It also displays archive information such as the number of pages, title, author, and creation date. However, unlike posts, pages do not support categories or tags. Therefore, under the “Pages” menu in the sidebar, there are fewer options—only a single entry point labeled “Add New Page.” To create a new page, you can either click “Add New Page” in the sidebar or use the “Add New Page” button at the top of the archive page. Although WordPress pages do not have categories or tags, they do support a “parent-child” page hierarchy.
Like posts, pages in WordPress can be edited using the WordPress editor. However, since pages often require more complex layouts, greater customization, and richer elements than posts, page design is typically not done with the default block editor. Instead, professional page builder plugins such as Elementor or Gutenberg are used. Whether you choose Elementor or Gutenberg generally depends on the theme you’re using. As such, the “Pages” section in the WordPress dashboard primarily offers basic creation and management capabilities. The actual design and development of pages are handled using Elementor or Gutenberg. Since using these page builders involves a wide range of tools and configurations, Logic Digital Technology will cover them in separate tutorials. For now, we’ll focus on explaining the functions and settings of the “Toolbar,” “Quick Edit,” and “Edit” options in the WordPress Pages section.
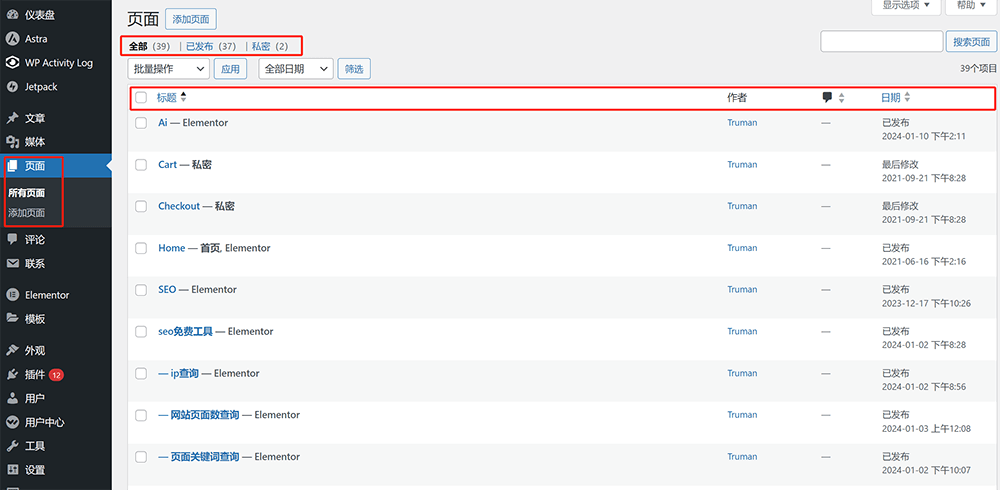
1. WordPress Page Toolbar
In the “Pages” archive interface, when you hover your mouse over a specific page in the list that you want to operate on, a toolbar will appear as highlighted in the red box in the image below. The functions in this toolbar can be directly clicked to perform the corresponding actions.
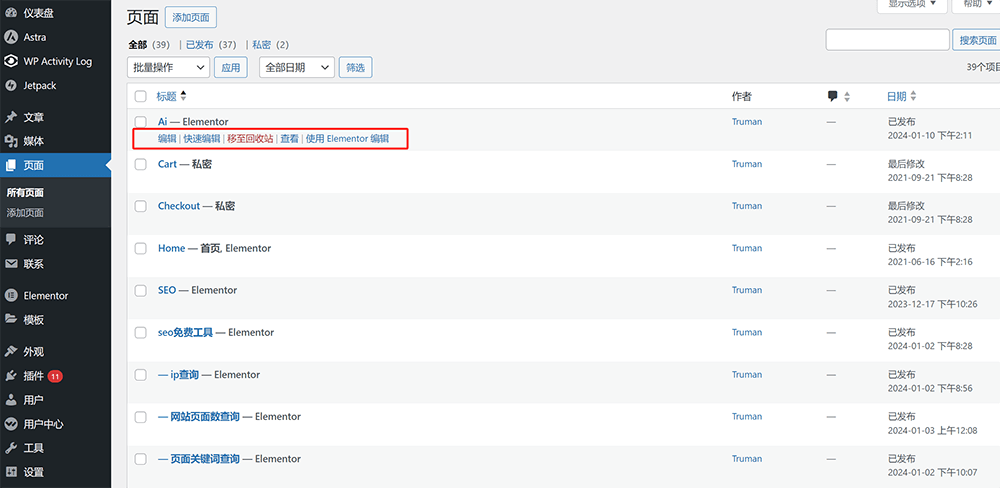
The toolbar has five operable functions: Edit, Quick Edit, Move to Recycle Bin, View, and Page Editor. The functions that can be operated in the toolbar are as follows:
- Edit: Enter the edit mode interface of the page.
- Quick Edit: Allows editing of basic page parameters such as the title, slug, and parent page settings.
- Move to Trash: Moves the page to the trash, effectively deleting it.
- View: Opens the page for viewing on the front end.
- Edit with Editor: The entry point for third-party page builders. This editor is not built into WordPress by default—it only appears in the toolbar after a specific page builder plugin has been installed. The button displayed here will correspond to whichever page editor is installed (e.g., Elementor, WPBakery, etc.).
2. Function items of WordPress page editing interface
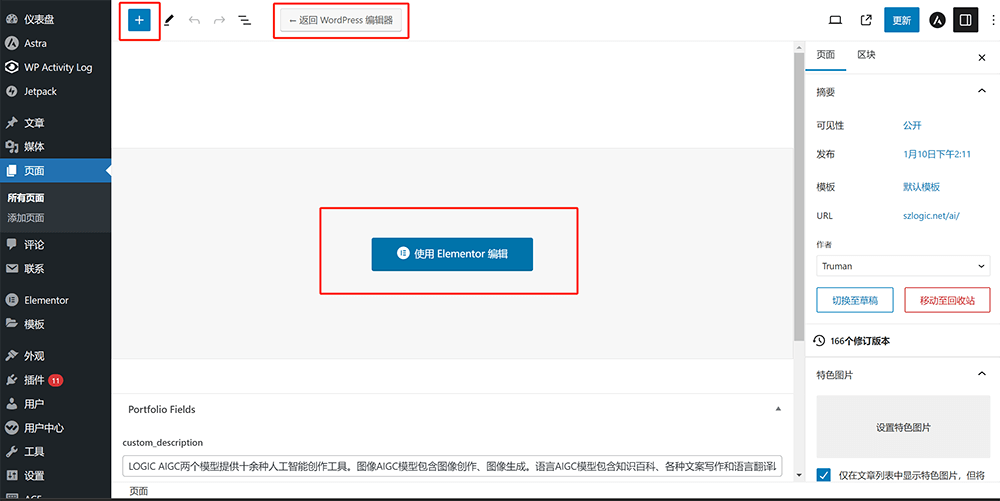
After clicking the "Edit" option in the page list toolbar, the page will redirect to the interface shown in the image below. For Logic Think Digital Technology's pages, Elementor is used as the page builder, so it is not possible to perform visual editing of the page elements in this "Edit" interface. To enter the Elementor editing mode, you need to click on the "Edit with Elementor" button highlighted in the red box in the image. However, if you prefer to use WordPress’s block editor to edit the page, you can click the "Return to WordPress Editor" button to go back to the WordPress block editor interface. From there, you can click the "+" button to add various block types and continue editing the page layout and design, just like when editing posts.
The functionality panel on the right side of the page editor is essentially the same as the one for posts. Under the "Page" section in the functionality panel, you can set the page’s visibility, URL, and other page attribute parameters and information.
3. Function settings for quick editing of WordPress pages
After clicking the Quick Edit option in the page list, a set of editable options will appear on the screen, as highlighted in the red box in the image below. Using Quick Edit to set these options is more convenient than navigating to the "Edit" page, as it allows you to make changes without having to load a new page, making the process more efficient. Once you've made the necessary changes in the Quick Edit settings, don't forget to click the "Update" button for the changes to take effect.
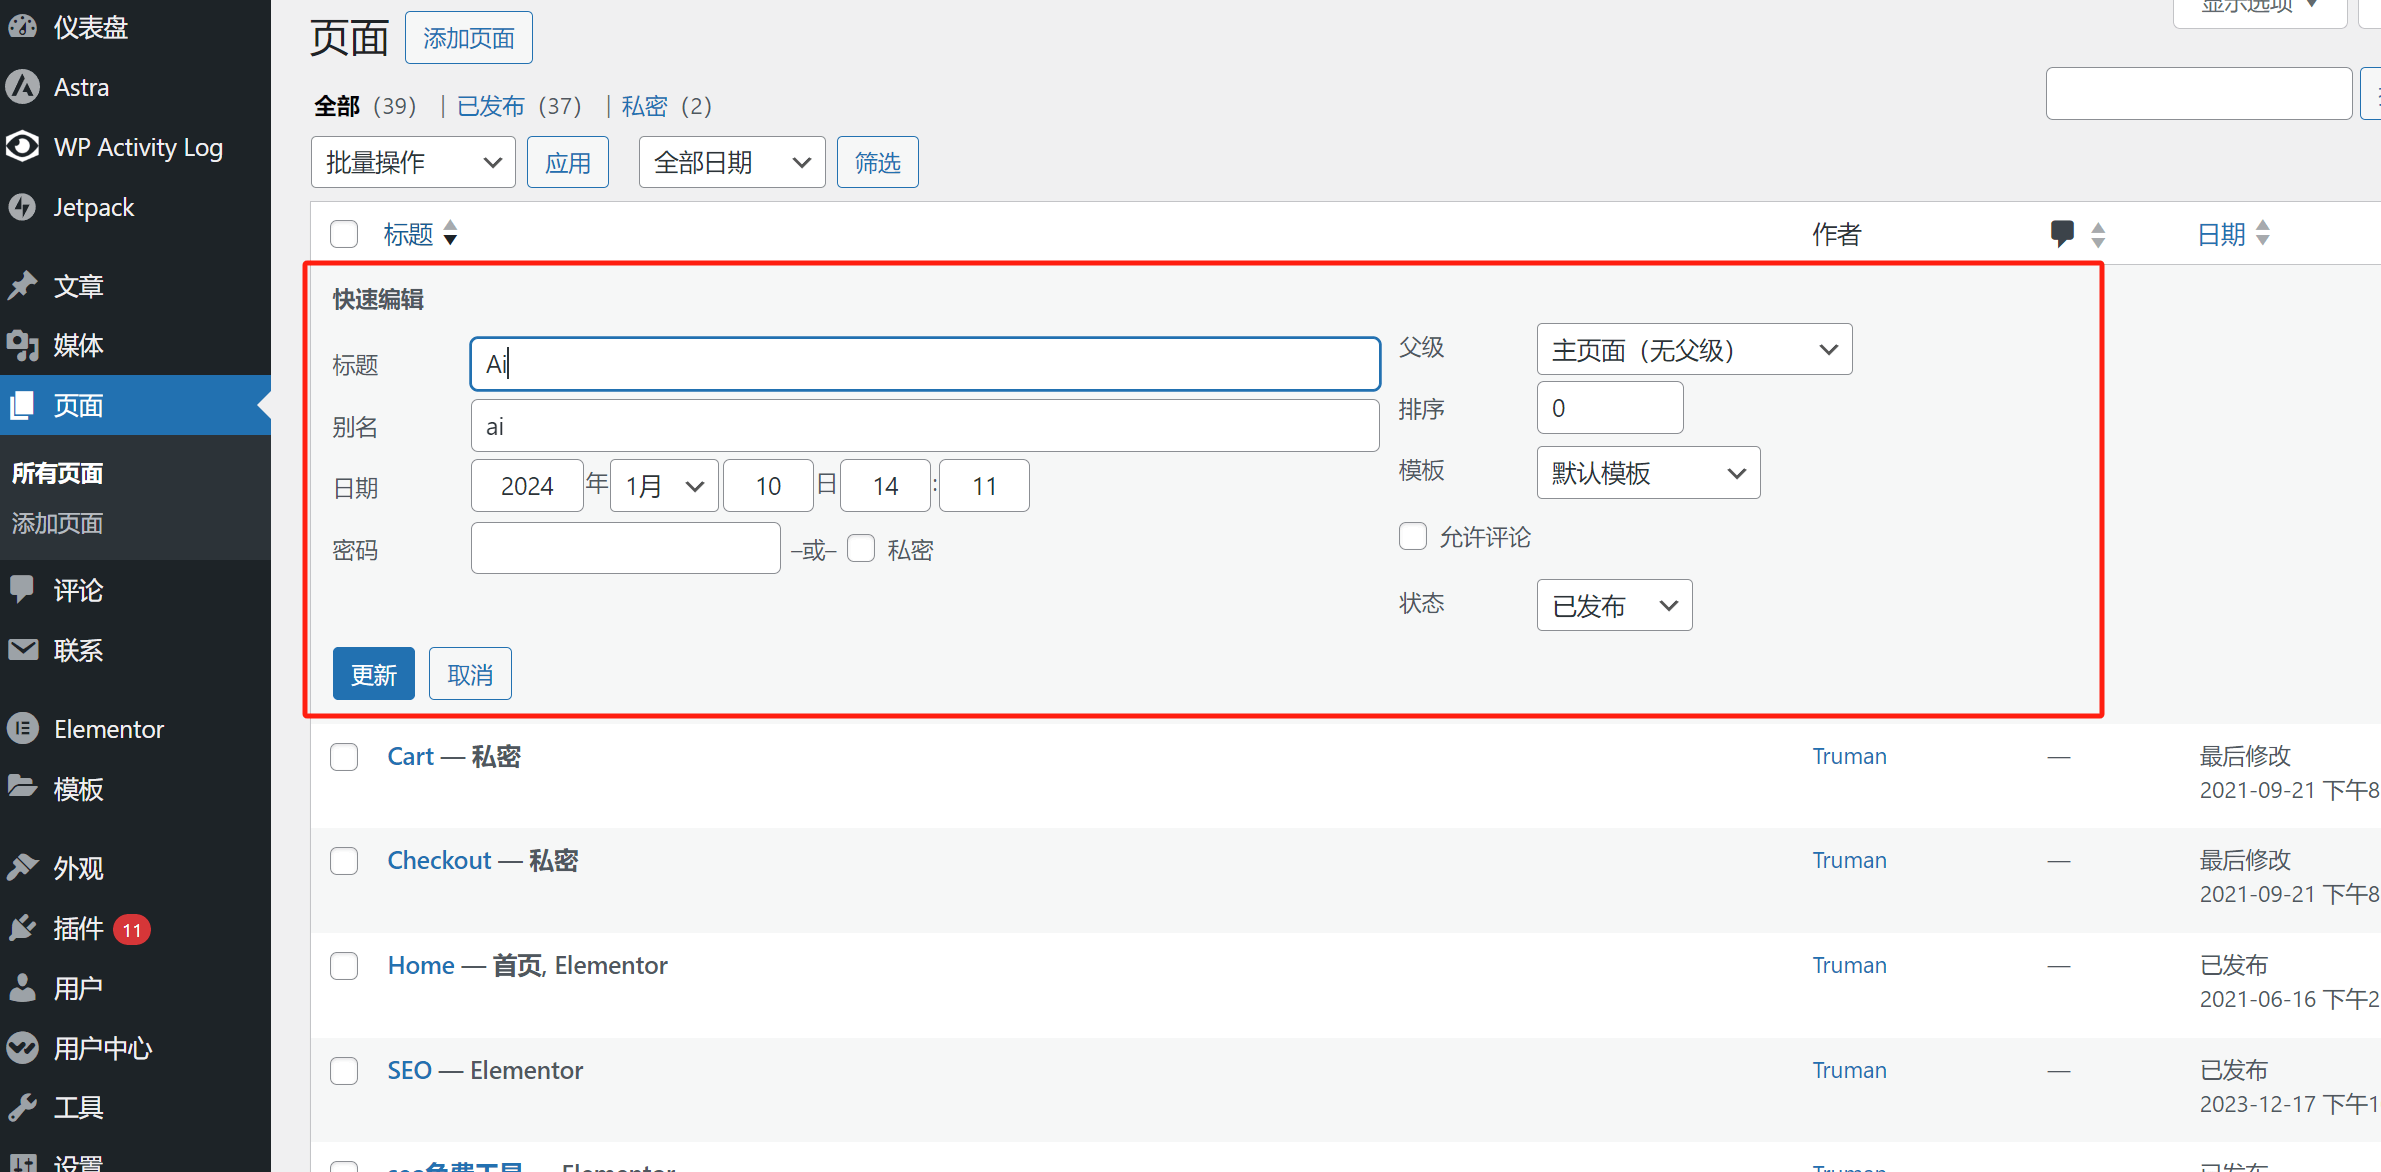
The functions and contents that can be set under the quick edit of WordPress pages are as follows:
- Title: This is the title of the page. The title will be synced to the page’s front-end code inside the
'title'tag and will be displayed in the browser tab. - Slug: By default, WordPress automatically generates the slug based on the title. The slug serves no front-end purpose—it’s simply used for identifying and managing the page.
- Date: The publication date of the page. Typically, there's no need to modify this.
- Password: Allows you to set a password to restrict access to the page. By default, this field is left empty, meaning no password is required to view the page.
- Parent: Refers to the hierarchical structure of pages. Setting a parent allows the child page’s URL to reflect this relationship. For example, Logic Digital Technology's web design page is located at https://www.szlogic.net/web-design/. A subpage under it—WordPress Website Plans—has the URL https://www.szlogic.net/web-design/wordpress-plan/, where “web-design” serves as the parent directory in the URL.
- Order: This defines the order in which the page appears in the archive listing. A lower number places the page closer to the top. The minimum value is 0. If a specific display order is needed, you can manually assign order numbers accordingly.
- Template: The default setting is “Default Template.” Unless a specific custom template file has been created and assigned, it’s best to leave this as is.
- Status: Indicates the current status of the page. There are three available statuses: Published, Pending Review, and Draft. Only pages marked as “Published” can be accessed via URL. The other two statuses will make the page inaccessible to the public.
六、WordPress Comment Management Features
Compared to the previous sections, WordPress comment management has much simpler settings and operations, requiring less explanation and demonstration. Overall, it is also one of the easiest parts to understand and operate. The functional controls are all located at the top of the left side, and on the right, there is a search box that allows you to search for specific comments. By entering the content you wish to search for in the search box, you can filter and find relevant comments. The interface for WordPress comment management is shown in the image below:
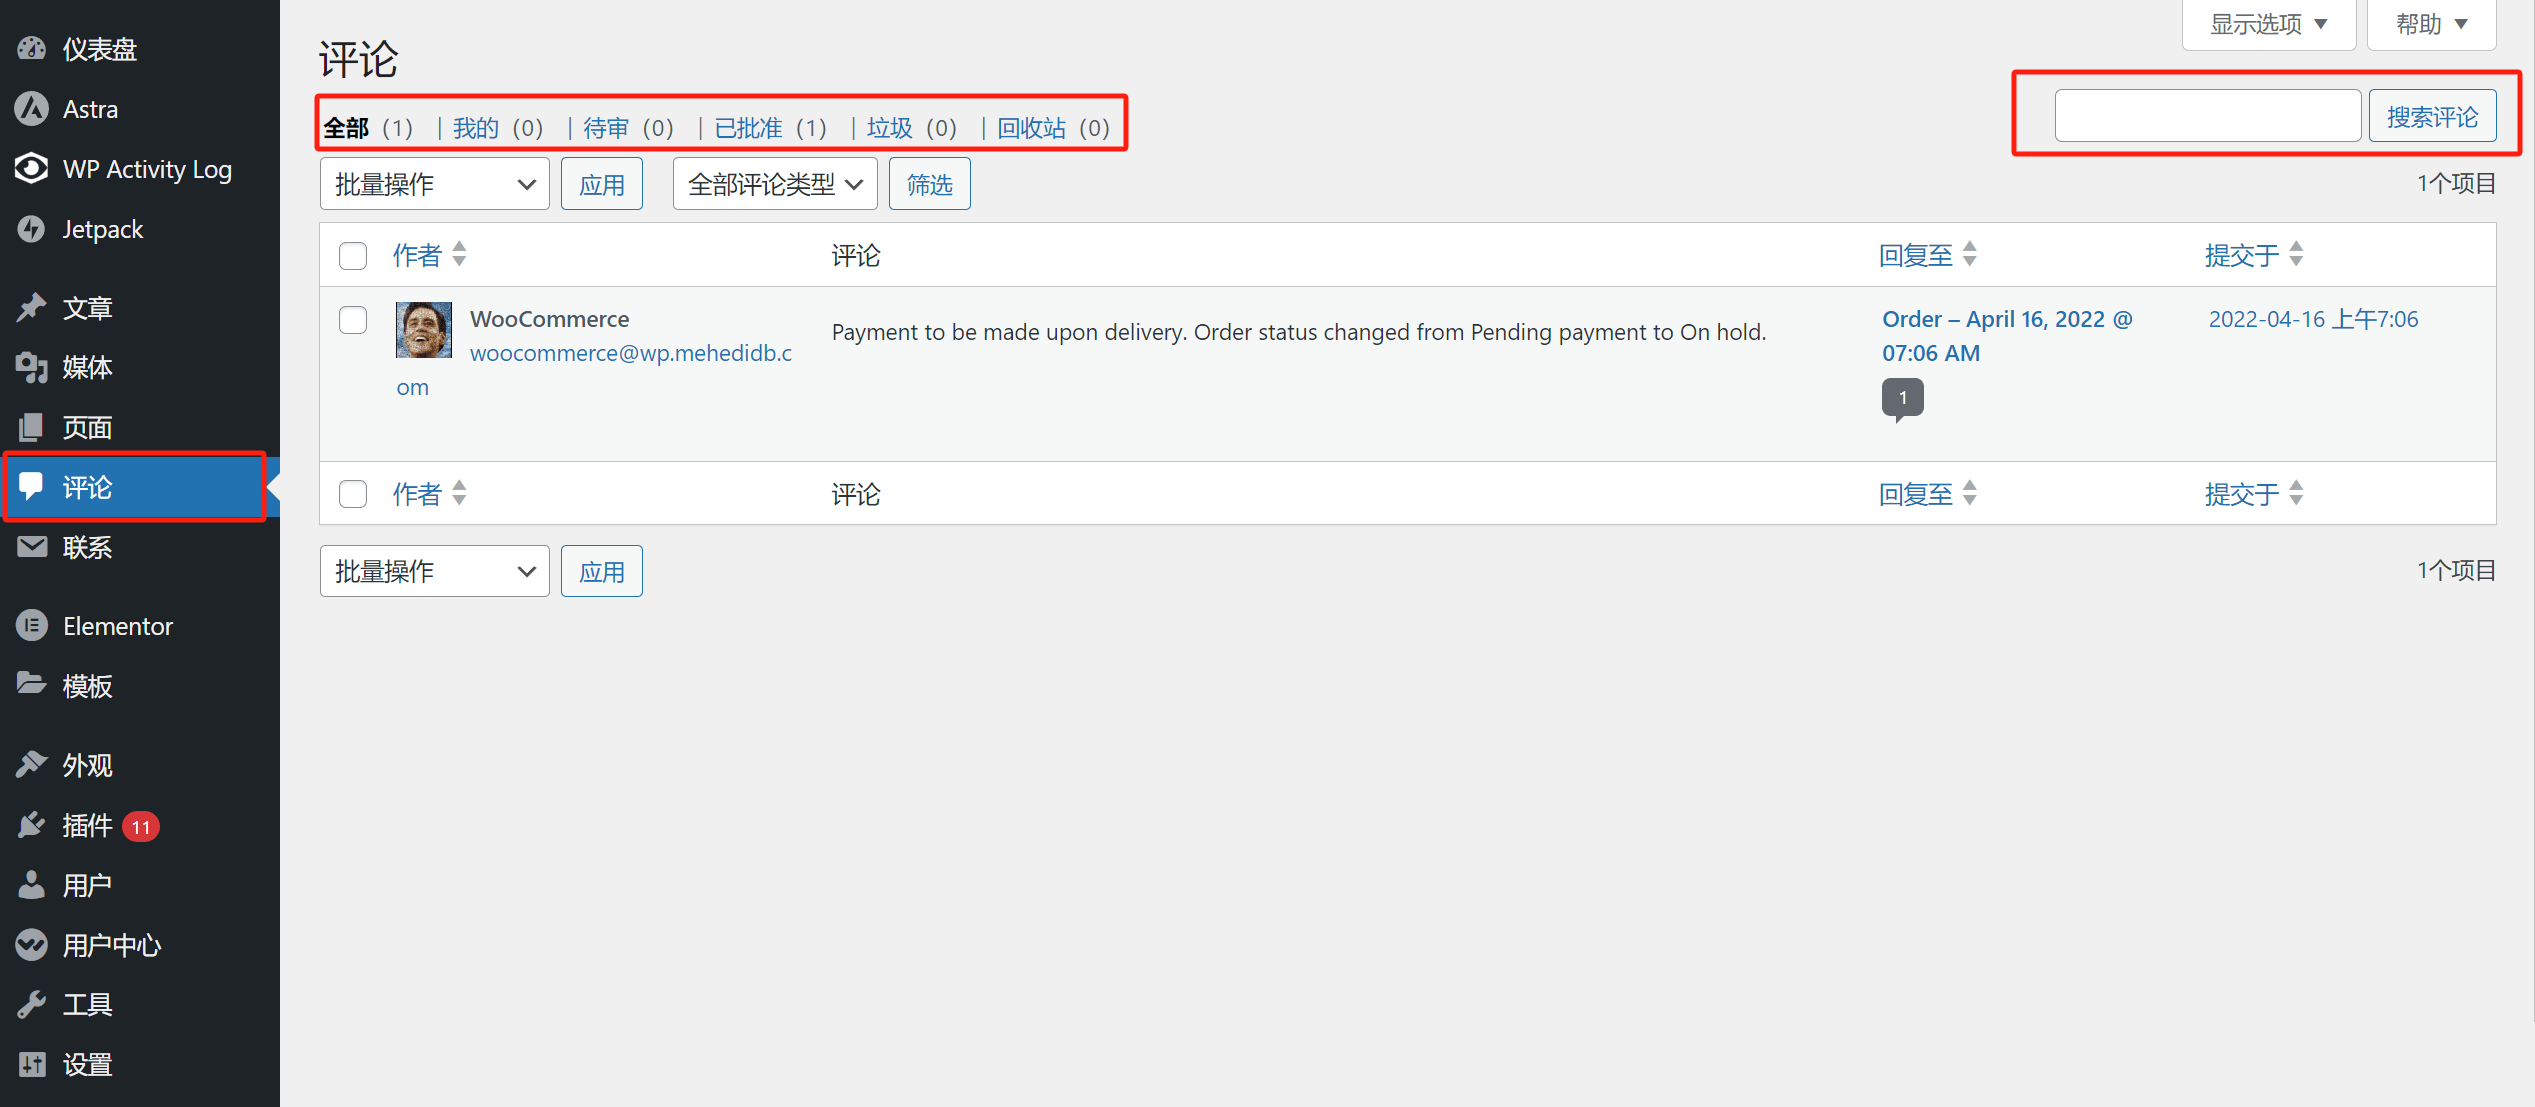
The application functions of the comment management interface are shown in the red box in the figure above. The functions that can be applied in the comment management interface are as follows:
- All: The homepage of the comment management interface, a list of all comments on the WordPress site.
- Waiting for review: A list of comments waiting for approval. Only approved comments can be displayed on the page.
- Approved: A list of comments that have been approved.
- Spam: A list of comments marked as spam.
- Trash: Deleted comments.
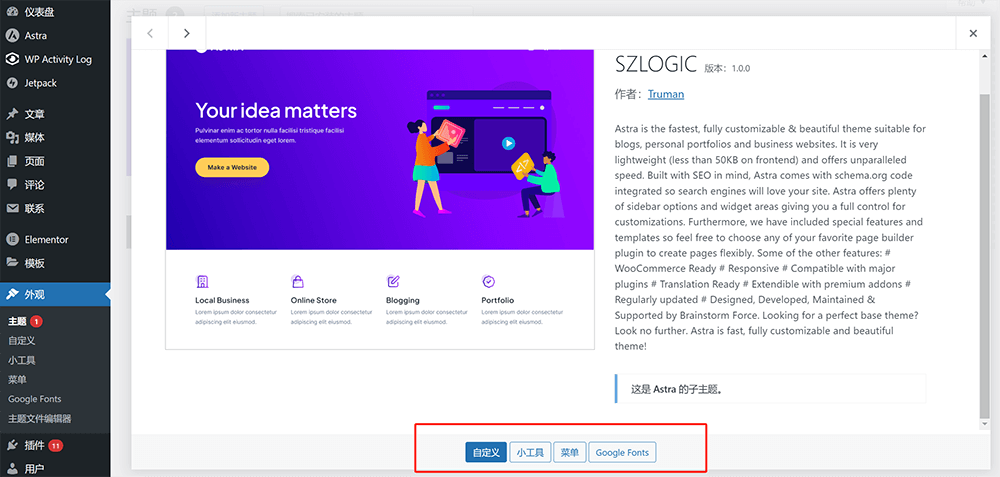
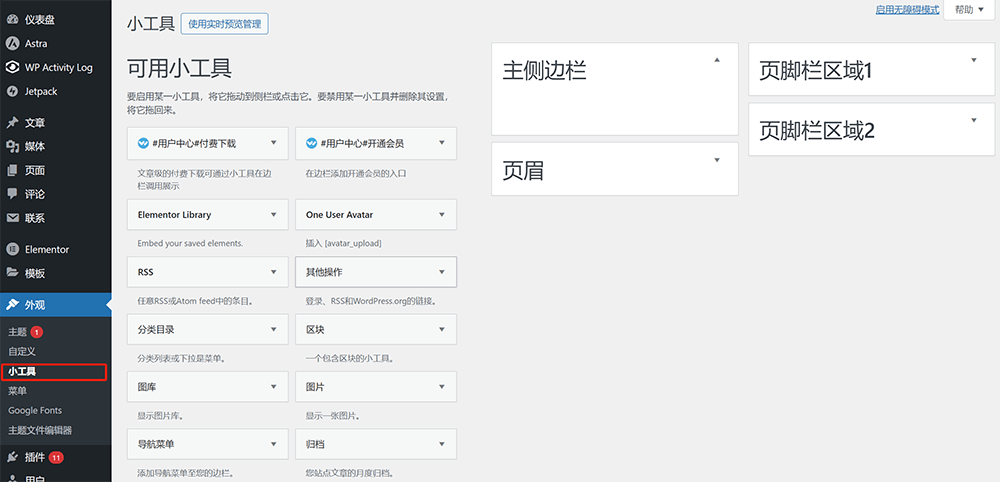
七、WordPress Appearance Management and Settings
The Appearance Management and Settings section in WordPress serves as a summary of the settings related to the website's visual elements. It includes options for theme updates and installations, theme customizations, widget blocks (components), navigation menus for both desktop and mobile, and the theme file editor (the editor for WordPress core PHP files). The specific functions and styles available in these sections can vary between WordPress websites. This is because these features are determined by the theme being used. Therefore, when different themes are installed, different sets of functions will be generated under the Appearance section. The Appearance homepage and the available functions under this section in the WordPress admin panel are shown in the image below, as highlighted in the red box.
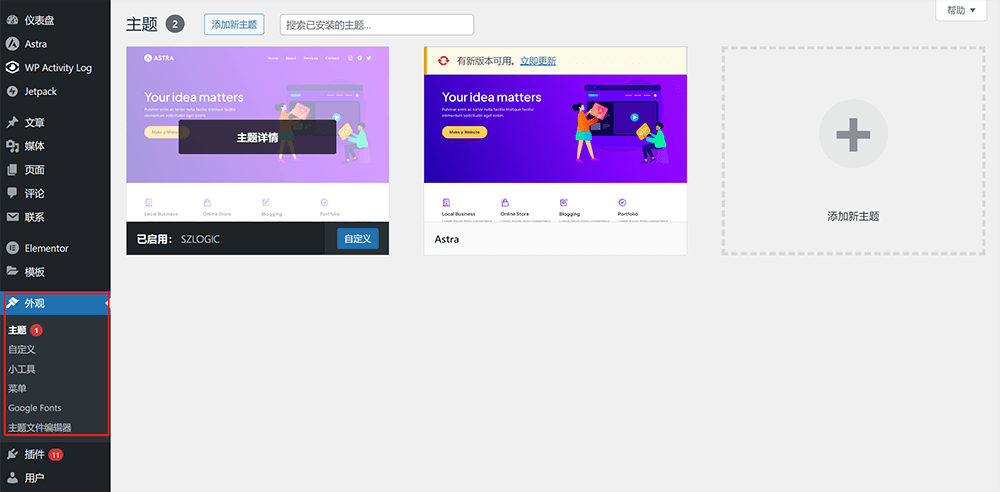
1. Theme
1.1. Add New Theme
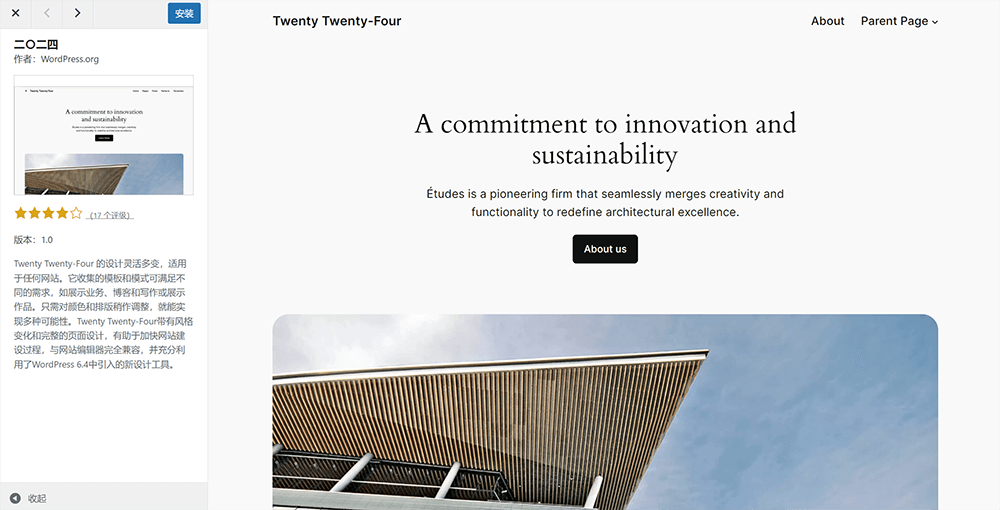
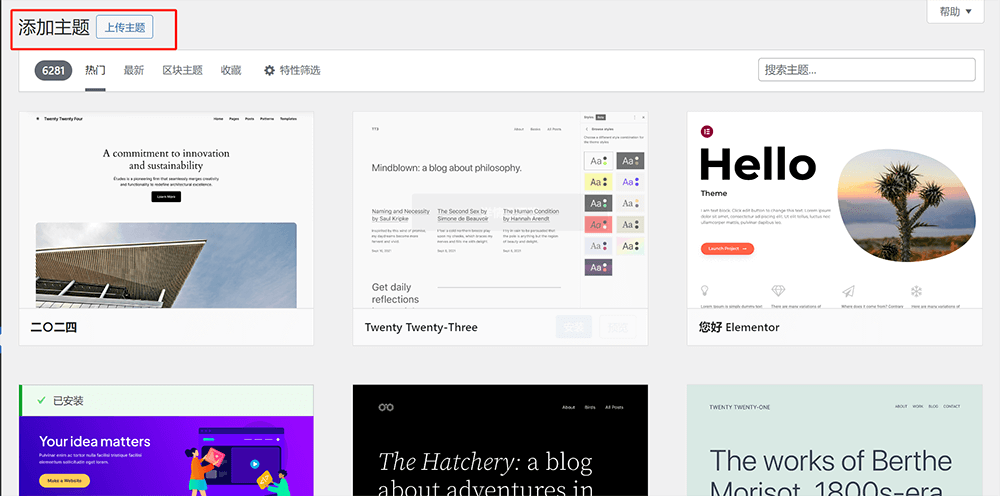
After clicking the “Add New Theme” button at the top of the Themes interface (as shown above), you'll be taken to the WordPress Theme Directory page (see image below). Here, you can browse and select the theme you wish to install. When you hover your mouse over a theme, an “Install” button will appear, as shown—click this button to complete the installation of the WordPress theme. Clicking directly on a theme will take you to a preview and details page, where you can view a full preview of the theme's layout across different pages. If you’re using a third-party theme that’s not available in the WordPress Theme Directory, you can install it by uploading the theme’s installation package directly. This article’s “Themes” section under “Appearance” provides a general introduction to using the add and upload theme functions. If you need a full step-by-step guide on how to install a WordPress theme, please refer to Logic Digital Technology’s detailed tutorial: How to Choose and Install WordPress and Shopify Themes, which walks you through the installation process in detail.
Example image of WordPress theme market:
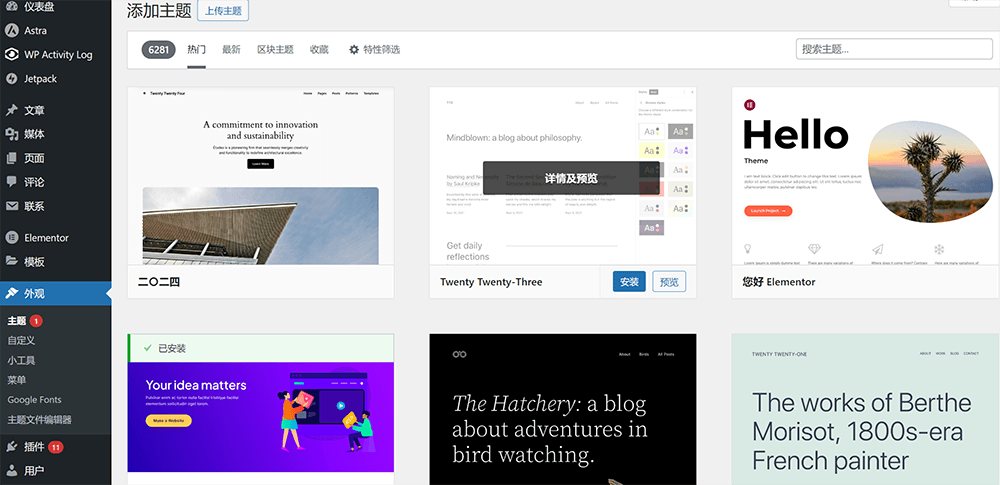
Example image of a WordPress theme in preview mode:
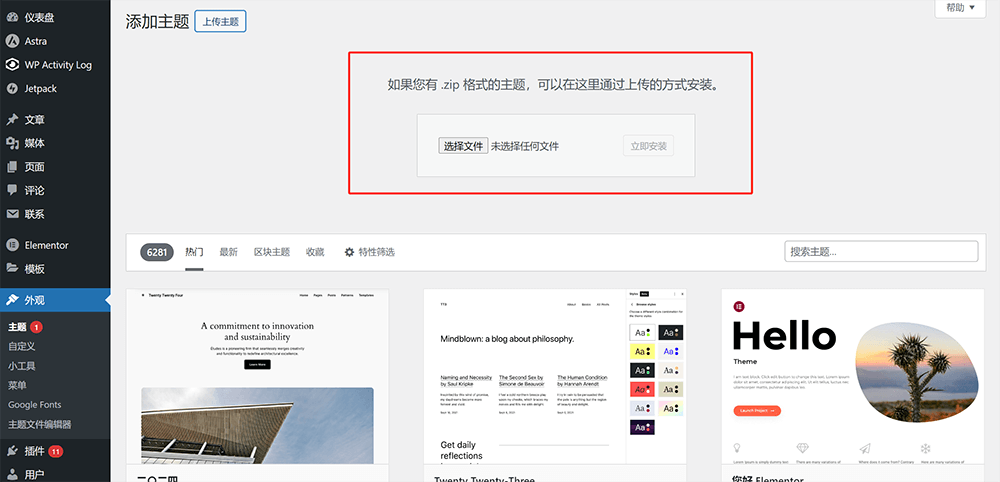
An example of how to install a theme by uploading a third-party theme file installation package. The first step is to click the "Upload Theme" button as marked in the red box below.
The second step is to use the WordPress theme file upload function. After uploading the WordPress theme file, click the "Install Now" button on the right, as shown in the red box below:
2.2. View topic details
In the Appearance > Themes interface, by clicking on either the active or inactive theme, you will be taken to that theme's details page. On this details page, you can click the relevant action buttons to customize the theme's appearance and functionality. The steps to access the theme details page and the details page interface are shown in the image below:
The click entry of the WordPress theme details page is shown below:
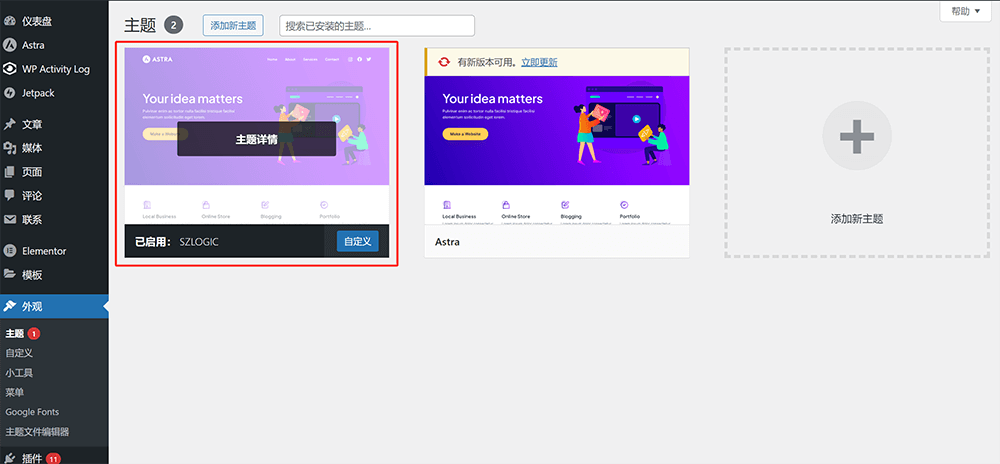
As shown in the red box below, you can directly click on the relevant operation functions of the theme to set the theme.
2. Customization
The Customize feature is the control panel component of WordPress themes. The customization tools are used to control the global styles and layout settings of the website. The features that can be set and applied in the customization interface depend on the theme's development. Essentially, the features in the customization section are functions written by the theme developers using programming languages during theme development. Therefore, the available features in the customization section can vary between different themes. In this section, I will explain the features available in the customization of the theme used by Logic Think Digital Technology. By learning this part, you will be able to understand how to design the appearance, layout, and style of your WordPress website. The customization interface under Appearance is shown in the image below:
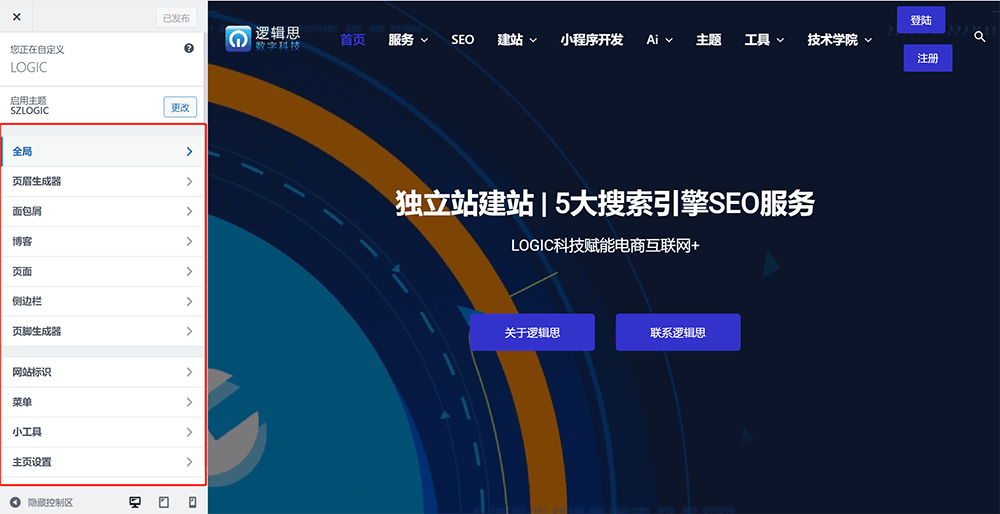
2.1. Customization - Global
By clicking on the global list under Customize , as shown in the image below, the items that can be set within the global settings are displayed. These include font styles, colors, containers, buttons, scroll-to-top functionality, accessibility features, block editor settings, and other configurations. The styles set in the global section will be inherited and applied when editing post and page layouts, ensuring a consistent appearance and design throughout the site.
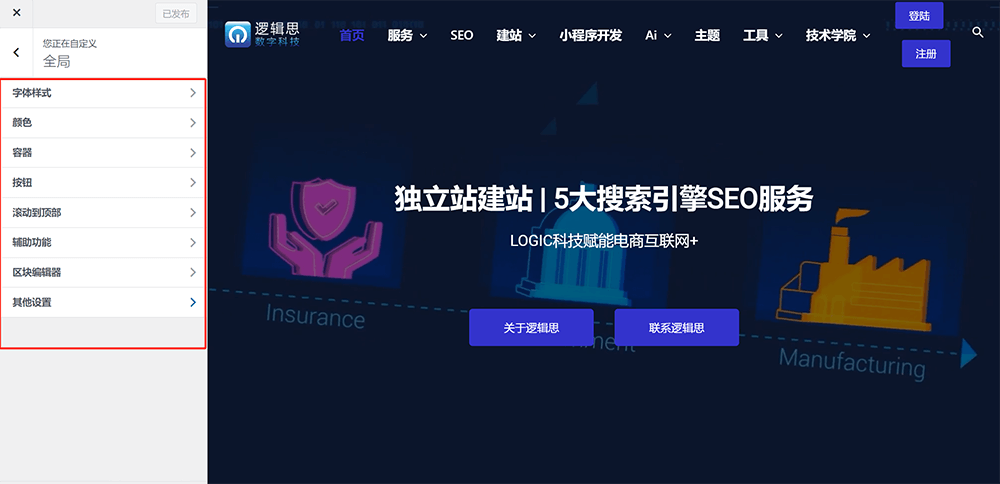
The following are the types of styles that can be set under the WordPress theme/appearance customization global settings:
- Font style: The font style includes the style settings for headings of different sizes (h1-h6) and paragraph fonts.
- Color: You can set the text accent color, link color, title color, body text color, border color, and page background color in Color.
- Container: Sets the layout of the page, the width of the page container, and the style of the container.
- Buttons: Set the default styles of the button radius, button border color, button text color, button background color, and button padding on the page.
- Scroll to Top: Scroll to Top is a button component that controls the page scroll bar to return to the top of the page in the front-end page. Some themes have this function, while others do not.
- Accessibility: Accessible reading settings for people with reading disabilities. Multiple reading modes are provided through the function settings in the accessibility function to meet the different reading habits of users with visual impairments, including adjusting the CSS style of the page such as color or font size.
- Block Editor: The WordPress editor allows you to set the size and spacing of blocks.
2.2. Custom-Header Generator
The Header Builder is a tool used to configure the site-wide Navigation Bar in WordPress. Within the Header Builder interface, you can design and arrange the layout and style of your website’s navigation bar. As shown in the image below, the red highlighted area indicates the specific features available for customization within the Header Builder interface:
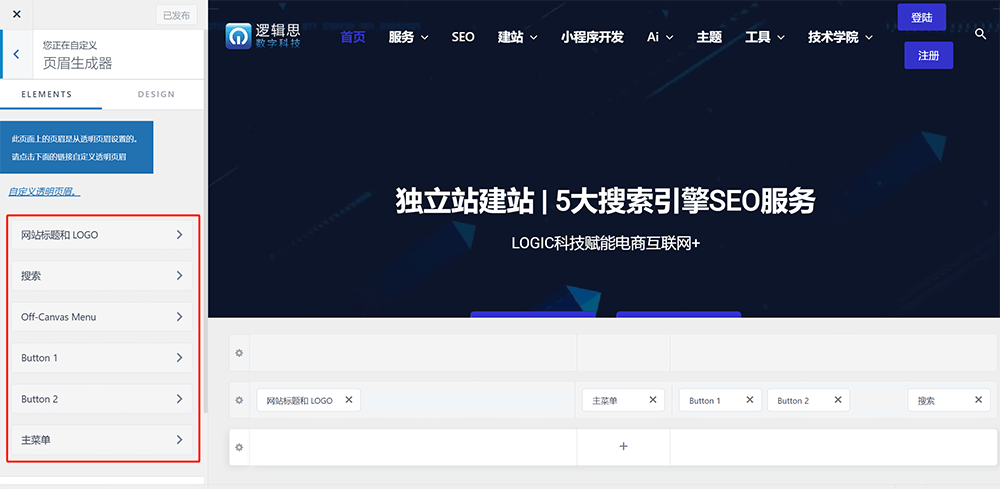
The functions for manipulating layout and adding elements in the header generator are as follows:
- Website title and logo: Add the website title and site logo in the header (navigation bar area) and customize the appearance of the title and site logo.
- Search: Sets the styles applied to the search box in the header (navigation area) of your WordPress site.
- Button: Sets the parameters and appearance style of the button applied to the WordPress website header (navigation bar area), including the button's text, link, and link relationship.
- Main Menu: Creation, management and parameter configuration of navigation bar menu.
2.3. Customization - Breadcrumbs
Many readers who are new to website management may find the term “breadcrumb” confusing and may not understand what it refers to. In fact, a breadcrumb is a type of navigational element on a website. It is typically displayed in a hierarchical format at the top of a webpage or just below the page title. In SEO, showing breadcrumbs on a page is considered a best practice because it helps users understand where the current page fits within the website’s structure. It also enables them to easily navigate back to previously viewed pages, thereby improving the overall user experience. The interface for setting breadcrumb style and functionality under WordPress theme customization is shown in the image below:
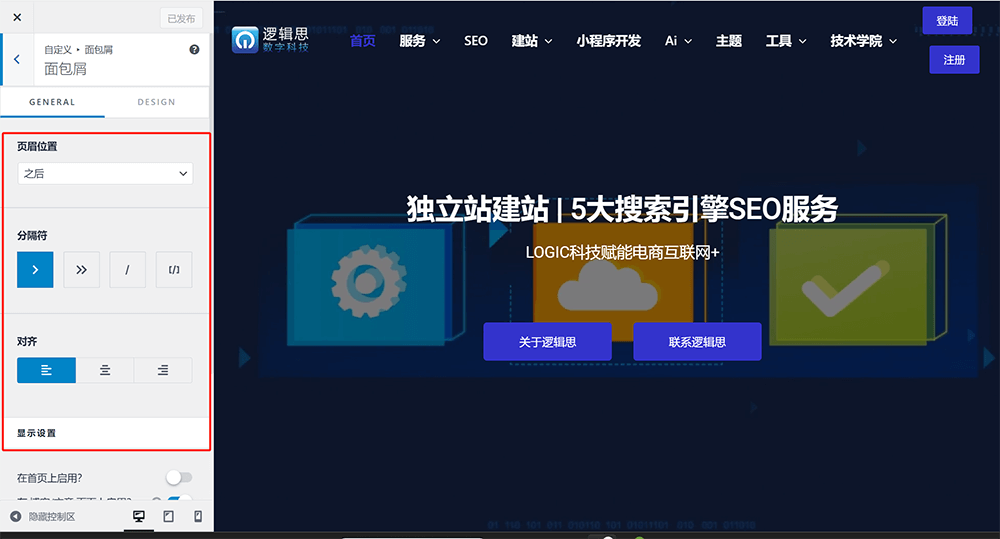
The function settings of Custom-Breadcrumbs are as follows:
- Header Position: The position of the breadcrumbs on the page can be set to appear inside the header, before the title, or after the title.
- Separator: Select the separator style to apply to the breadcrumb hierarchy.
- Alignment: The alignment of the breadcrumbs.
- Display settings: You can limit which pages the breadcrumbs are applied to, that is, which pages display the breadcrumbs and which pages prohibit the display of breadcrumbs.
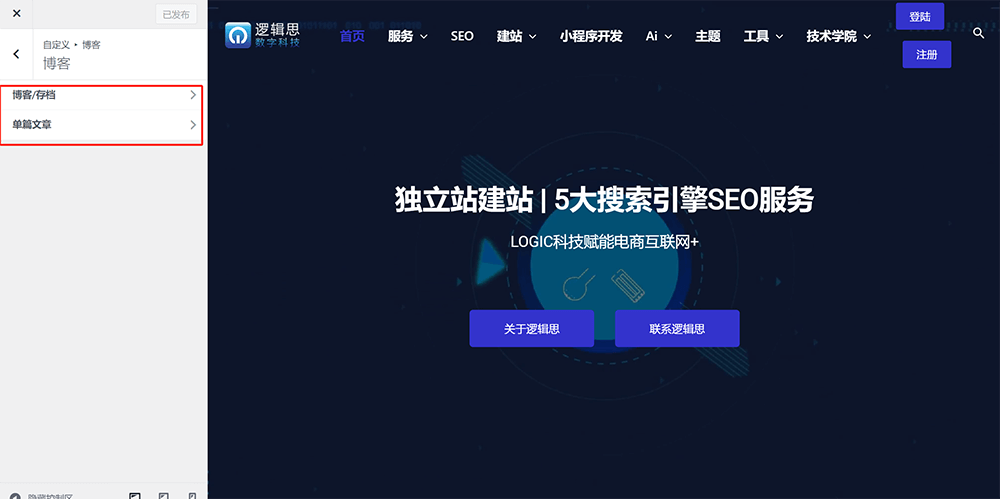
2.4. Customization-Blog
The Blog section under Appearance (Theme) Customizer , as highlighted in the red box in the image below, is the tool used to set the layout, elements, and styles of the blog archive page and single post pages. The blog archive page is essentially the homepage of the blog, while the single post page is the page displaying individual article content. These pages are crucial parts of the website, and customizing the style and functionality of the blog archive and post pages is an essential feature for a mature, user-friendly, and successful theme. Below, we will list the detailed customization options and style parameters available for the blog archive and single post pages.
The general settings and design options for the blog archive page are as follows:
- General Settings - Title Area: Whether to use the title to display on the blog archive page. This feature can be turned off or on.
- General Settings - Container Layout: The specifications of the page container, which is a full-width or narrow container layout.
- General Settings - Sidebar Layout: Whether to enable the sidebar as the page layout and select the sidebar style.
- General Settings - Blog Layout: The arrangement method and arrangement parameters of the article list.
- General Settings - Article Structure: Article structure refers to the meta information structure of the article list when it is displayed on the blog archive page, such as the option to display or not display the article's featured image, title, category directory, author and other meta information.
- Design: Set article title, article meta information, and article border color, size and other style parameters.
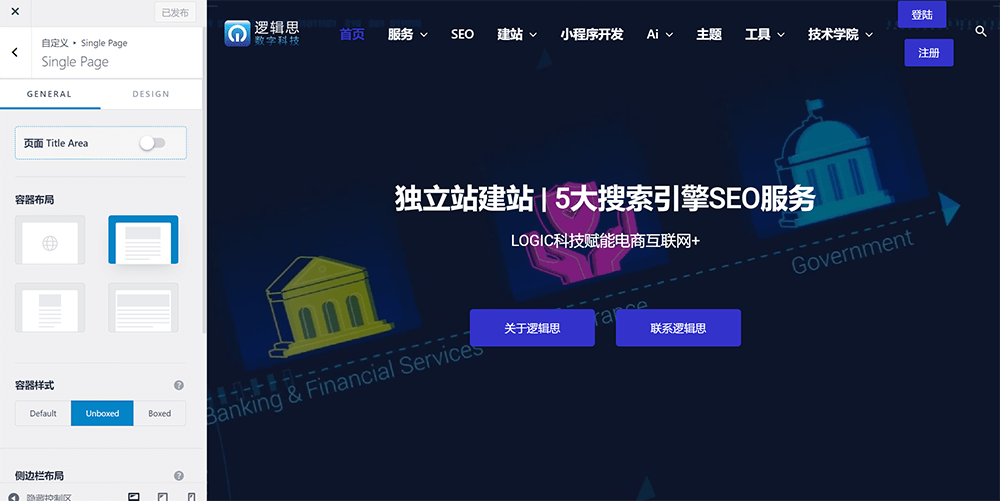
The optional style parameters that can be set on the blog article page are as follows:
- General Settings - Title Area: Same as the setting principle of blog archive page, whether to add a title display area in the article content to display the title of the article.
- General Settings - Container Layout: The same principle as setting up the blog archive page, set the layout of the article page container.
- General Settings - Sidebar Layout: The setting principle is the same as that of the blog archive page, whether to turn on or off the sidebar layout of the article page and choose the style of the sidebar.
- General Settings - Author Information: You can turn on or off the function of displaying the article author's profile and avatar.
- General Settings - Social Sharing: Icon button function for sharing article content to social media platforms.
- General Settings - Related Articles: The related articles feature is displayed at the bottom of the article page. It is generally recommended to enable it. The related articles feature can effectively increase the reading volume of the listed related articles.
- General Settings - Comments: The display position of the comment input box on the article page, the distance between the inner and outer margins, and the border style.
- Design: Set the distance between the inner and outer spacing of the article content.
2.5. Customization-Page
The page settings are similar to the blog settings described above. Under customize > page, you can configure the display area for the page title, container layout, container style, sidebar layout, and sidebar style. In the design section, you can also adjust the spacing between containers. The interface for page settings and the available configuration options are shown in the image below.
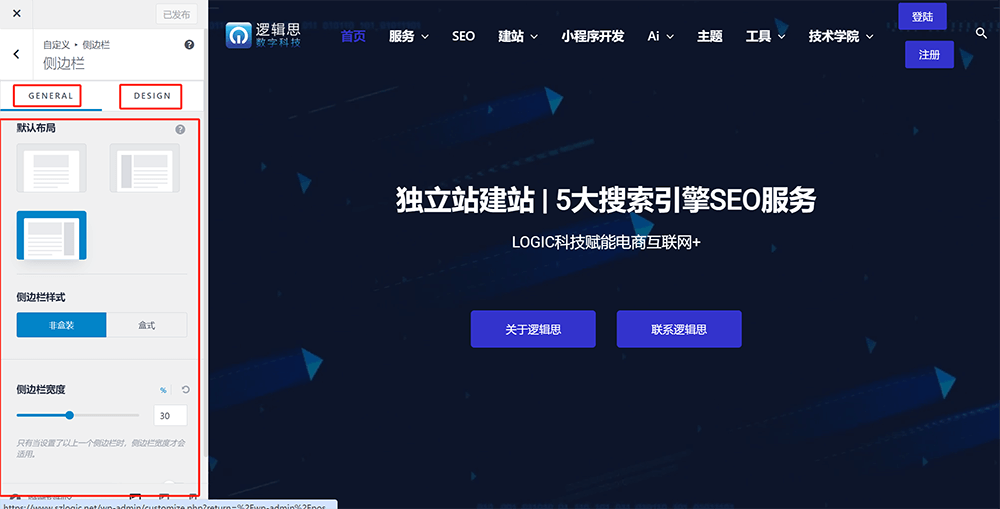
2.6. Customization-Sidebar
In the Sidebar settings under Customize, you can configure the global sidebar layout style and the width of the sidebar. Additionally, in the Design section within the sidebar settings, you can set the colors and font styles of the elements inside the sidebar. The interface for configuring the sidebar settings is shown in the image below.
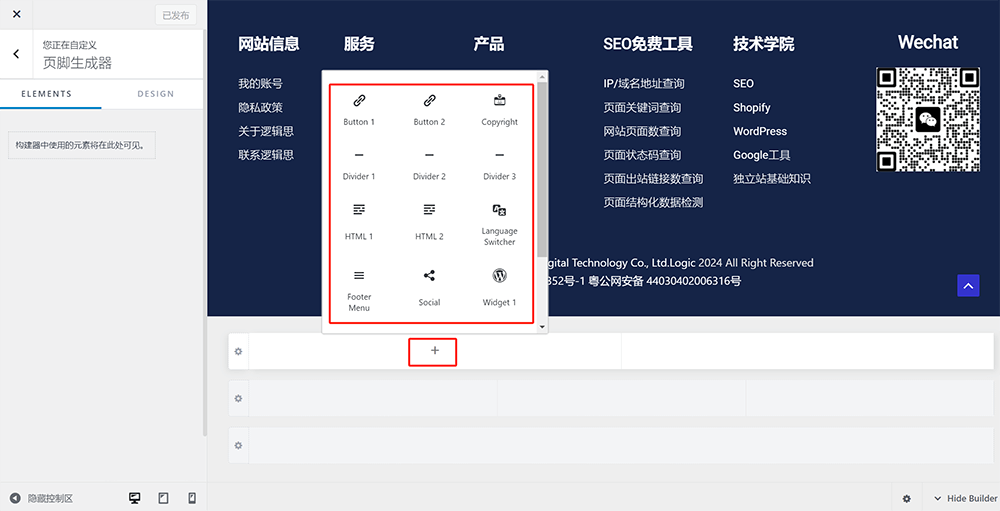
2.7. Custom-Footer Generator
The Footer Builder under Customize is responsible for setting up the layout and styles of the footer content on a WordPress website. It allows the site administrator to adjust the layout, style, and content of the footer according to their needs. As shown in the image below, to customize the footer, click the "+" button within an existing section. A block selection window will pop up, allowing you to choose the required blocks to configure the footer's layout and style.
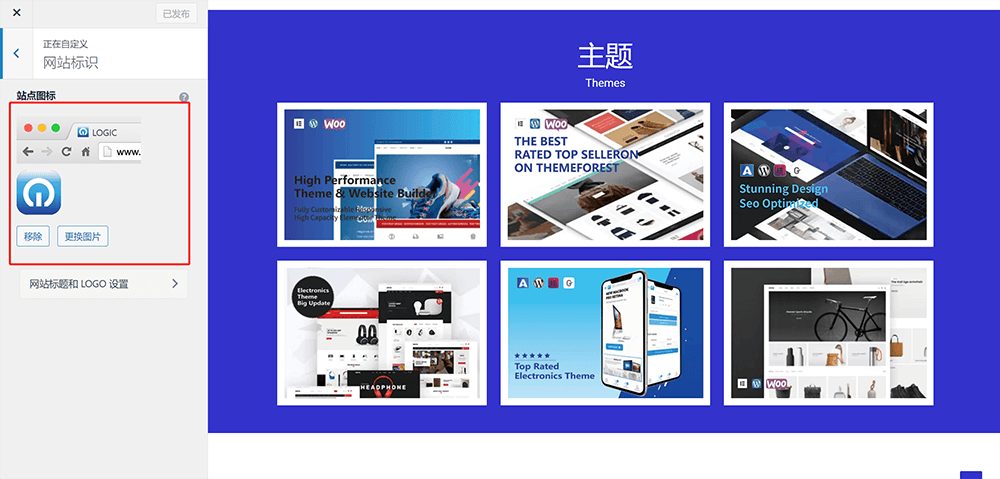
2.8. Customization - Website Logo
The site icon is the website's favicon, which can be uploaded for use as the icon in the browser's taskbar. To upload the site icon, click the "Change Image" button in the site identity interface, as shown in the red box in the image below, and then upload the image file for the site icon.
2.9 Menu
The menu refers to the website’s main navigation menu. The term “menu” here is the same as the one mentioned in Item 4: Menus below. There is also an entry point for configuring the main navigation menu under the Customizer. However, in most cases, users do not typically access menu settings from this section, as the steps required to reach the configuration options under the Customizer are relatively cumbersome and not in line with common usage habits. Therefore, we will skip the menu setup explanation here and cover it in detail in Item 4: “Menus” below.
2.10. Gadgets
Just like the menu, the widgets under the Customizer are the same as those mentioned in Subsection 3: Widgets below. This is simply a different entry point for configuring the widget functionalities. This section will also be skipped for now, and the detailed operation and setup instructions for widgets will be covered in Subsection 3 below.
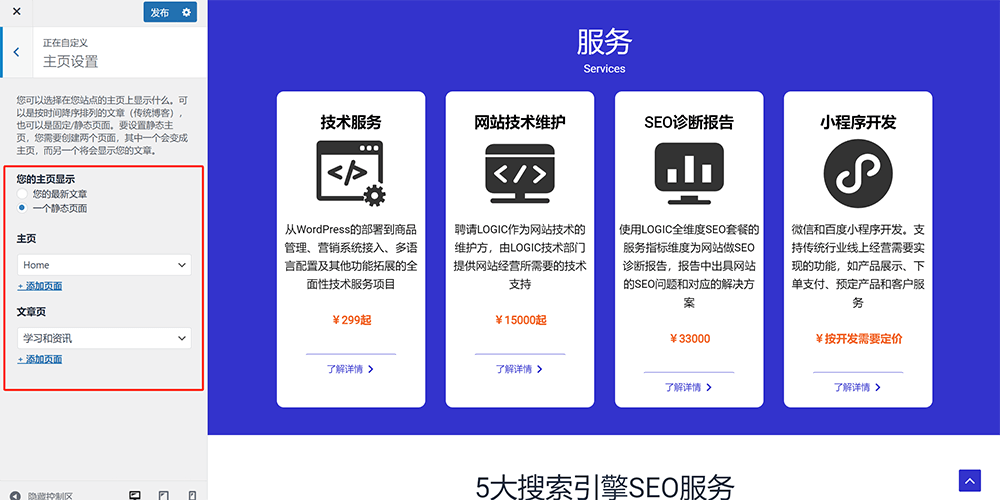
2.11. Home page settings
The homepage settings under Customizer are the same as the “Reading Settings” under Section Ten of this article — “WordPress Admin Settings.” Whether you configure the static page settings here under the homepage settings of the Customizer, or through the “Settings” → “Reading” section in the WordPress admin sidebar, both locations will automatically reflect the changes made. The correct method to configure your homepage is shown in the figure below. Under the “Your homepage displays” option, you need to select “A static page,” then correctly assign the homepage and posts page using the dropdown menus based on your pre-set pages in WordPress. As for what a static page is, and why WordPress needs to be configured with pseudo-static settings, that’s a more detailed topic. LogicThink Digital will explain this in the upcoming WordPress deployment tutorial article.
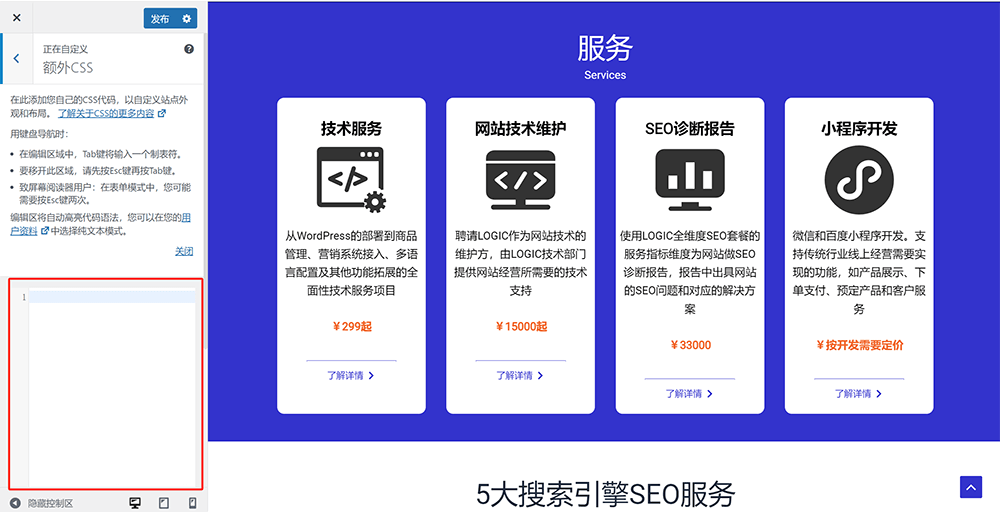
2.12. Additional CSS
The Additional CSS feature under Customize allows you to add custom CSS code in the provided input box to modify the theme's appearance and styles without directly editing the theme files. This makes it easy for frontend developers to customize styles, such as changing colors, fonts, spacing, etc., to meet specific design requirements for the website. The interface for the Additional CSS feature and the CSS code input box are shown in the image below:
3. Widgets
WordPress widgets are modular features used to add various functions and content to specific areas of a website such as sidebars, footers, or other designated widget areas. Through a simple user interface, you can add, manage, and configure different types of content like recent posts, categories, tag clouds, search bars, and social media links. With these widgets, you can easily customize the layout and functionality of your WordPress site during page design, making it better suited to your own page structure and planning needs.
The archive and operation page of the widgets is shown below:
3.1 How to Apply Widgets
Applying WordPress widgets to a page is very simple. As shown in the image above, the widget management interface is divided into two sections: the left side lists all available widget components already present in your WordPress site, and the right side shows the areas where widgets can be applied on the page. Just follow the operation as illustrated—either add or drag the desired widget to the corresponding area on the right. You can choose either of the following two methods:
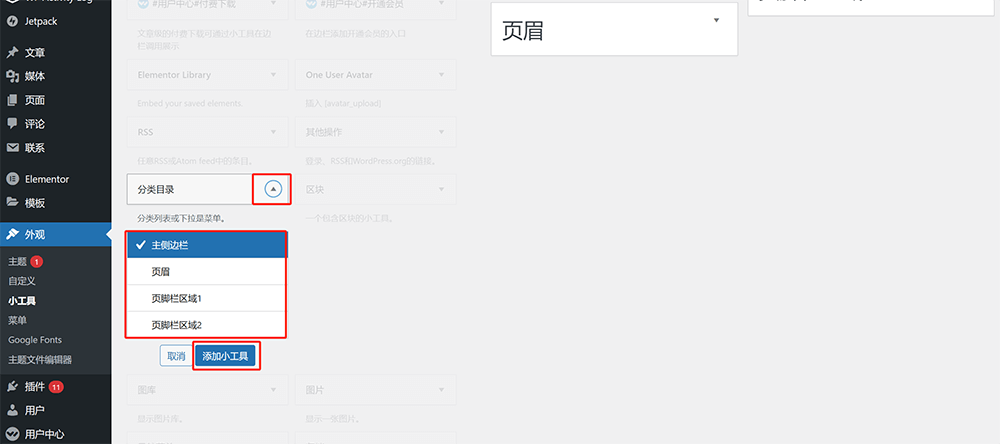
Method 1: Click to add a widget to a designated widget area. Click the expand button of the specific widget, select the area where the widget should be applied from the dropdown list, and finally click the "Add Widget" button. As shown in the red box below:
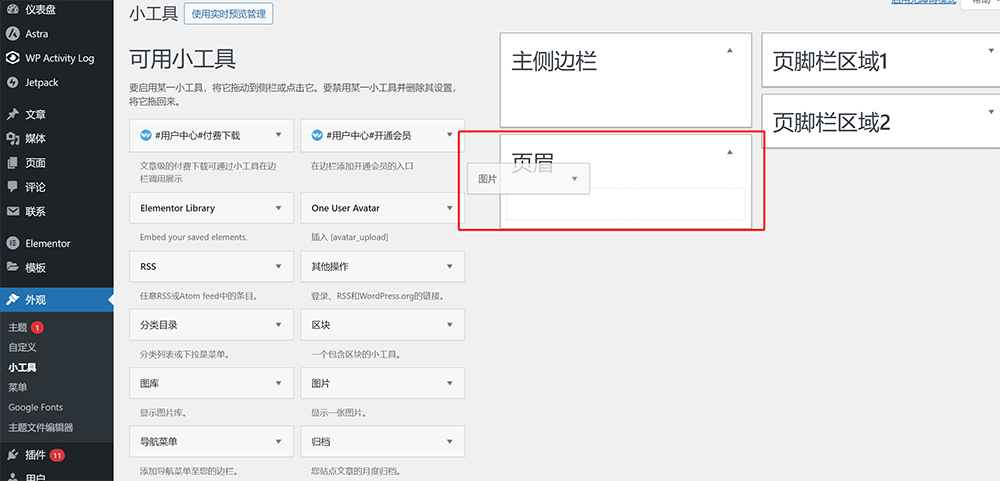
Method 2: Drag and drop the widget to the target widget area. Perform the operation as marked in the red box in the image below:
4. Menu
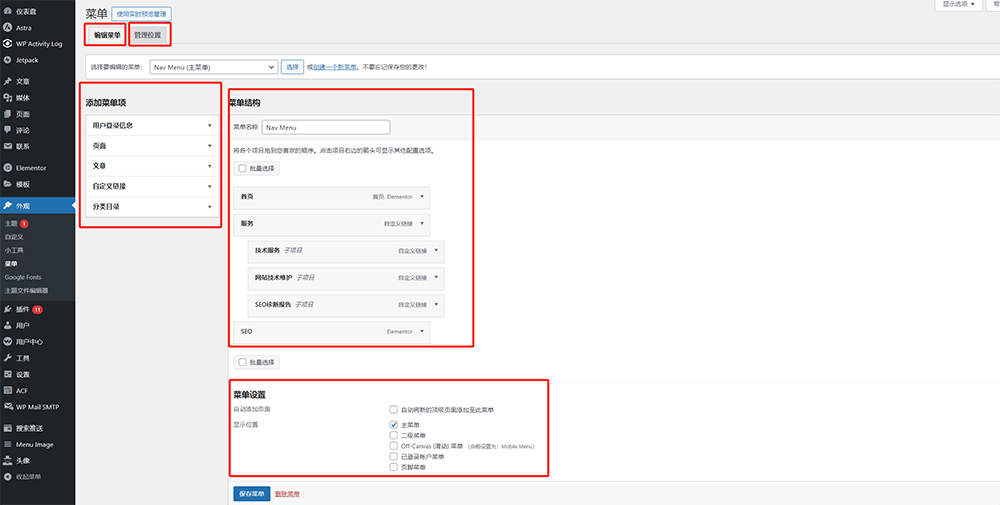
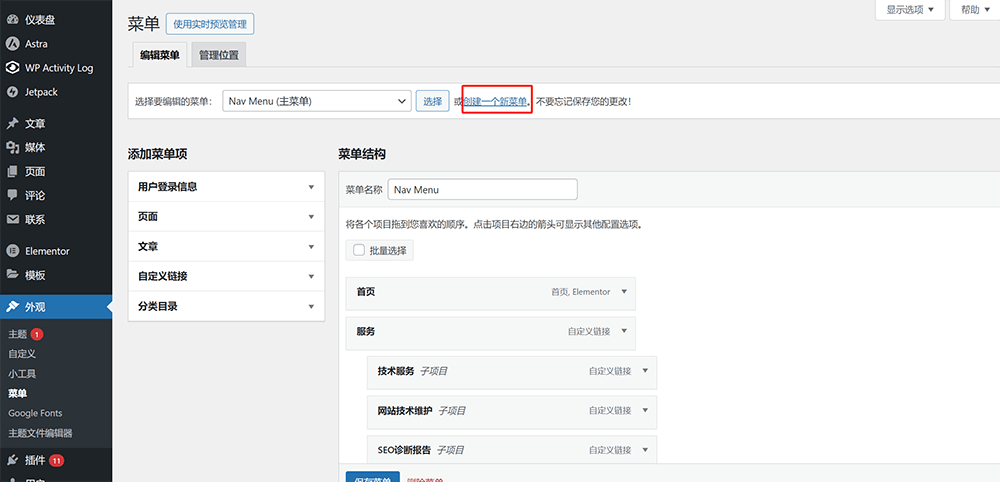
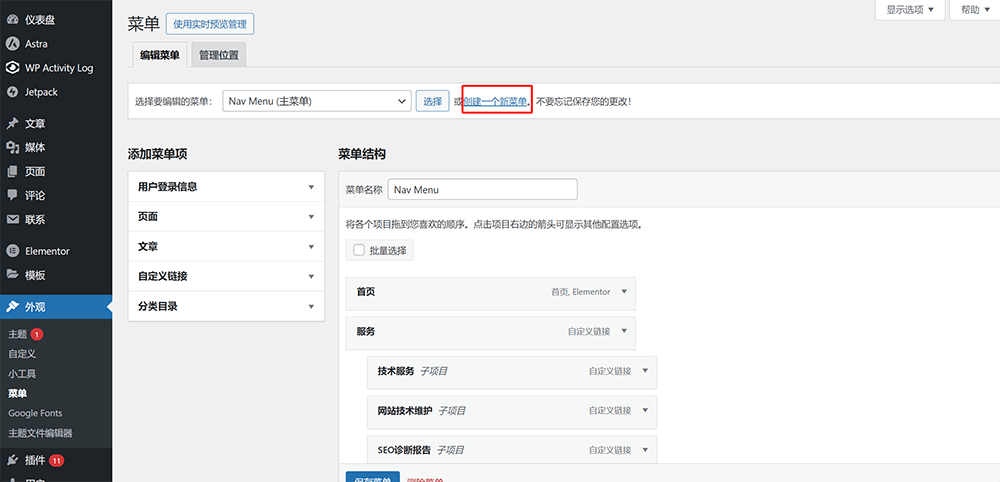
The menu refers to the main navigation menu of a WordPress website. Within the menu function, you can create and manage the structure and content of the site's main navigation. Through the menu settings interface, you can visually build custom menus that include pages, posts, custom links, and more, and arrange them in a desired order and hierarchy. The menu settings under the WordPress Appearance section allow site administrators to have full control over the site's navigation structure, including the main menu, submenus, and navigation bar locations. The menu interface consists of two tabs: “Edit Menus” and “Manage Locations.” In the “Edit Menus” tab, there are three functional areas: the “Add Menu Items” section on the left, the “Menu Structure” section on the right, and the “Menu Settings” section at the bottom (as shown in the red boxes in the example image below). The interfaces of both “Edit Menus” and “Manage Locations” are shown in the images below.
The operation interface of the edit menu and the three functional areas of the edit menu interface are shown in the red box below:
The interface of the "Manage Location" column of the menu is shown in the figure below:
4.1. How to create a new menu
In the menu operation interface, click "Create a new menu" as shown in the red box in the figure below, then enter the name of the menu and check the display position of the menu in the menu creation interface, and then click the "Create Menu" button to complete the task of creating a new menu.
As shown below, click the "Create a New Menu" button
In the menu creation interface, enter the menu name and check the menu display position, and then click the "Create Menu" button.
4.2. How to add a menu page
The "Add Menu Items" section offers various ways to add pages to the menu. By default, WordPress categorizes all pages (such as page and post pages) under "Pages," "Posts," and "Categories" within the "Add Menu Items" section. By clicking the expand buttons for "Pages," "Posts," and "Categories," as shown in the image below, you can select the pages you want to add to the menu. Once selected, simply click the "Add to Menu" button to add the pages to the "Menu Structure" section. Additionally, it is important to note that some WordPress plugins that require adding functionality to the menu will also generate an operation list under "Add Menu Items." This means that, in addition to the default options for pages, posts, custom links, and categories, any additional lists in the "Add Menu Items" section are generated by relevant plugins.
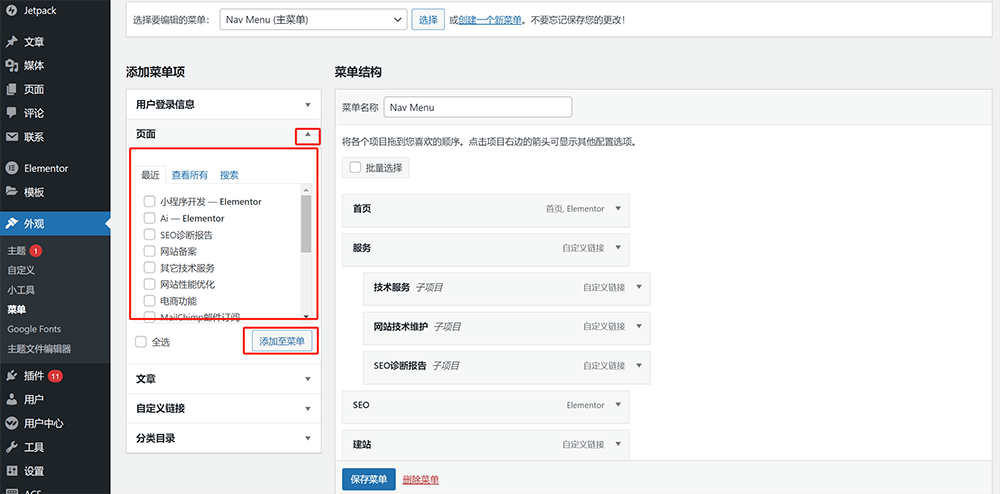
Add detailed instructions for the operation list (page) under the menu item:
- Pages: All published pages under the "Pages" sidebar in the WordPress management backend will be summarized in this directory.
- Articles: All published article pages in the "Articles" sidebar of the WordPress management backend will be summarized in this directory.
- Custom link: You can enter the URL of the page and link text (menu name) to add it to the menu structure.
- Category Directory: The category directory page of the article, that is, the archive page of the article category.
4.3. How to set the menu structure
Methods for arranging and nesting menus: You can arrange the order of menu items and create nested (hierarchical) menu structures by dragging and dropping items within the "Menu Structure" section. The specific operation method is illustrated in the example image below.
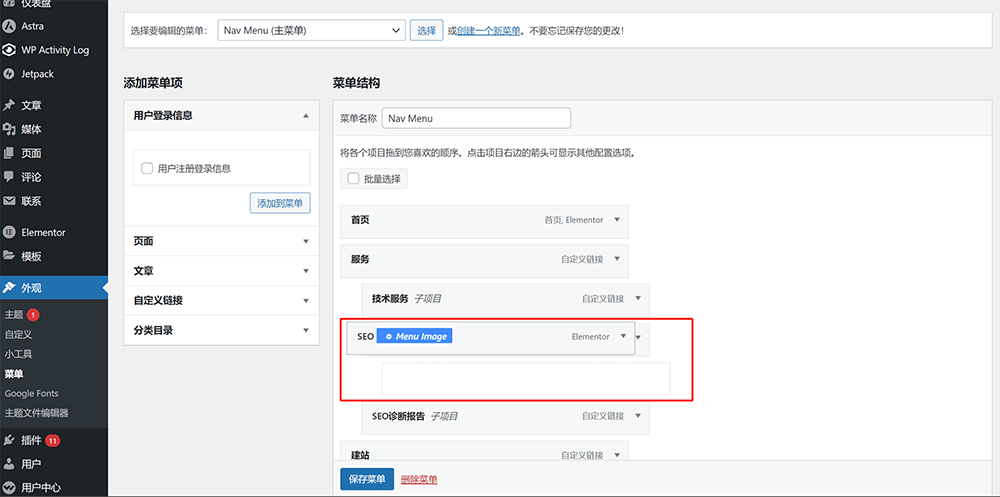
How to modify the menu URL and navigation label (menu name): As shown in the example image below, click the expand arrow on the menu item. In the fields for URL and Navigation Label, enter the new link and menu name respectively.
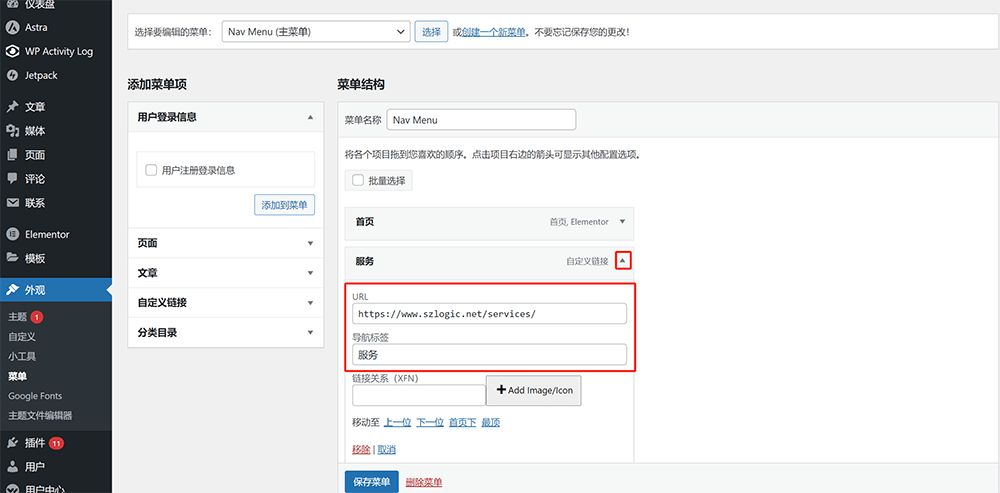
It is important to note that only menu items added through custom links can have both the URL and the navigation label modified. If the menu item was added via "Pages," "Posts," or "Categories," only the navigation label can be changed—the URL cannot be modified, as it is fixed based on the selected item from the list.
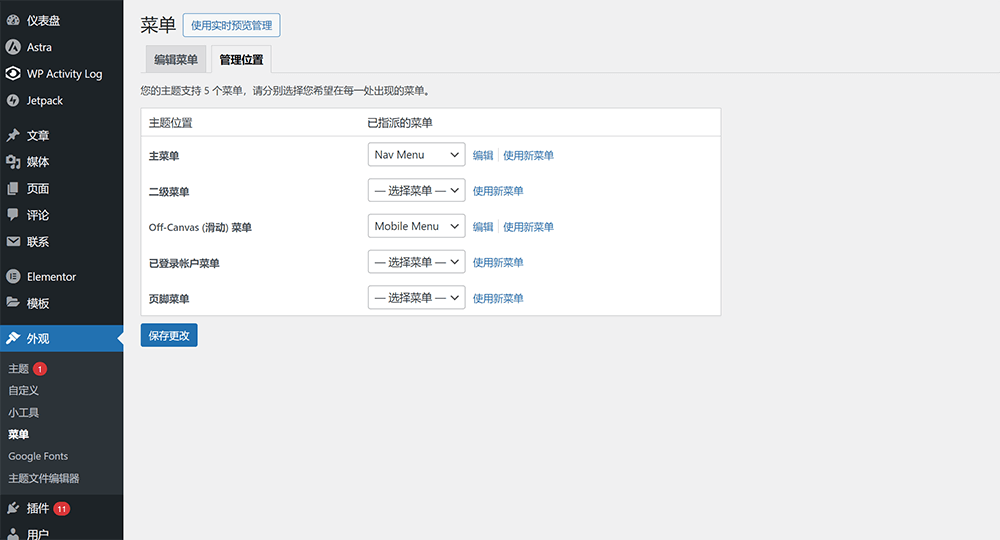
4.4. Menu management location and menu display location
The menu management locations are used to assign menus to specific theme positions. As shown in the image below, the theme positions are divided into “Primary Menu,” “Secondary Menu,” “Off-Canvas Menu,” “Logged-In Account Menu,” and “Footer Menu.” After assigning the created menu to these positions, the menu will be displayed in the corresponding location on the front end of the website. To help readers better understand the display positions of the menus, the details of each position are also listed below.
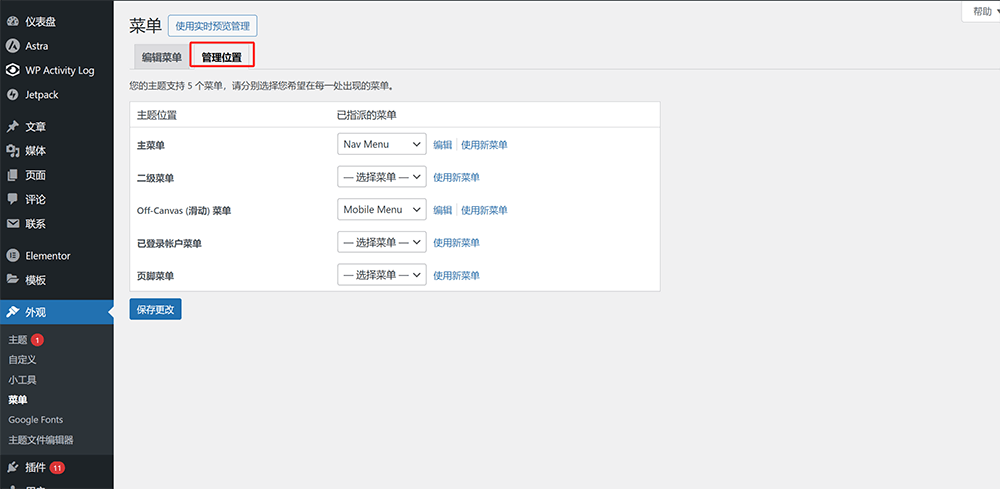
WordPress menu management location - theme location details:
- Main Menu: This is the main navigation position, the main navigation bar menu in the Navigation Bar position of the entire site.
- Secondary menu: If you have already defined the menu structure by customizing the drag menu list in the menu structure, you generally do not need to configure a secondary menu.
- Off-Canvas (Sliding) Menu: The Off-Canvas (Sliding) Menu is the name of a customized theme location, specifically the mobile navigation menu.
- Logged In Account Menu: This is the location of the theme generated by the User Management plugin.
- Footer Menu: The navigation menu is located in the footer section of your theme.
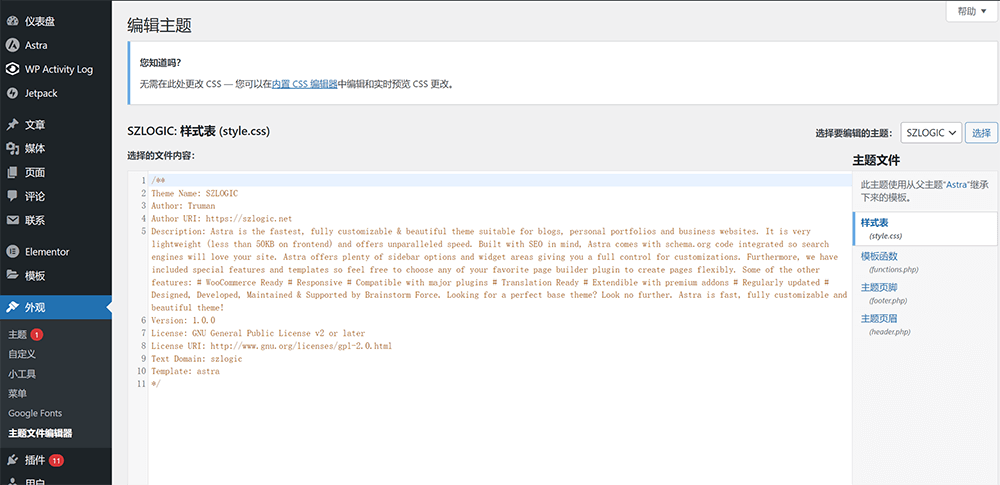
5. Theme File Editor
The PHP files in the Theme File Editor are the core files of WordPress. When the Theme File Editor is accessed for the first time, WordPress will automatically display a warning message. The functionality and appearance of the entire WordPress website are built through these core files. For readers without a computer science background, it is recommended not to make changes lightly to avoid accidental code loss or code errors that could affect the operation of the entire website. The Theme File Editor interface is shown in the figure below:
八、WordPress Plugin Installation and Uninstallation
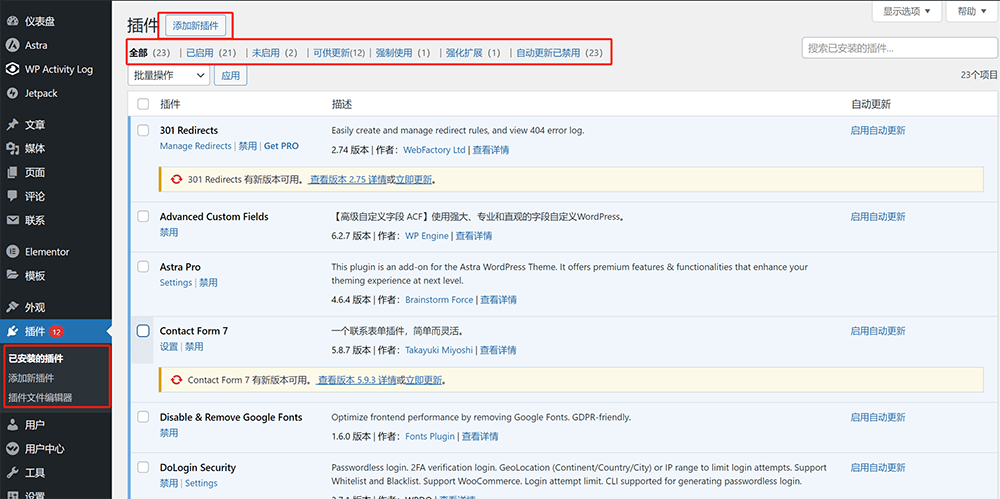
The plugin installation feature in WordPress directly connects to the WordPress plugin ecosystem marketplace. Installing and uninstalling plugins is a routine operation in WordPress site management. The vast plugin ecosystem and the ease of plugin installation are major advantages that have helped WordPress gain such a large market share among global website building tools. Site administrators can install plugins to expand and enhance the functionality of their websites, enabling more personalized features tailored to their specific needs. As shown in the red box in the image below, the "Plugins" section in the left sidebar of the WordPress admin dashboard contains three operational entries: Installed Plugins, Add New Plugin, and Plugin File Editor. The following sections will explain each of these in detail.
1. Installed plugins
The "Installed Plugins" section is the homepage of the "Plugins" feature. In the "Installed Plugins" interface, all installed plugins will be listed, and you can enable, disable, uninstall, and update plugins from the list. As shown in the image below, there is also an "Add New Plugin" button in the "Installed Plugins" interface. After clicking this button, the page will redirect to the WordPress Plugin Market. At the top of the installed plugins list, there is a toolbar displaying plugin-related data statistics, which include: all plugins, active plugins, inactive plugins, and plugins that need updating, among others.
2. Add new Plugins (install plugins)
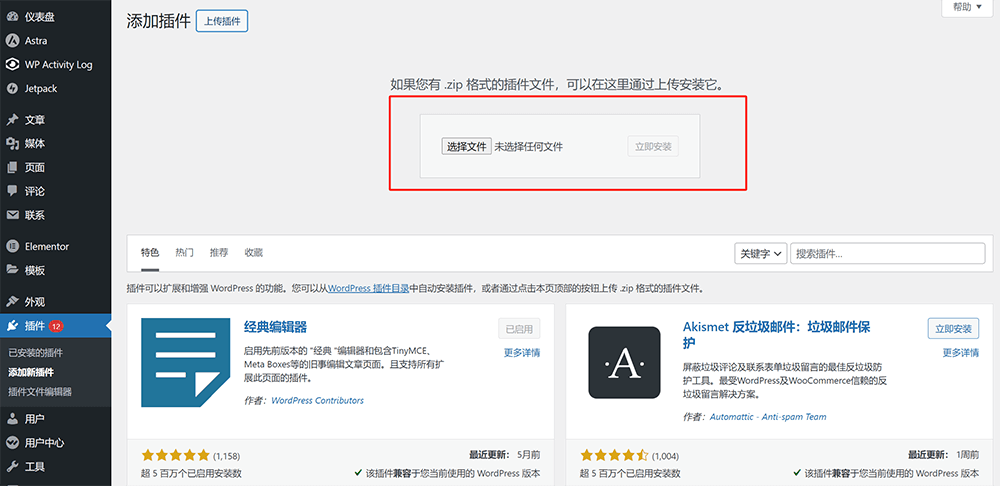
After clicking the "Add New Plugin" button, the content view in the WordPress admin dashboard will switch to the plugin installation interface, as shown in the image below. As indicated by the red box in the image, there are two ways to install WordPress plugins on this page. The first method is to click the "Upload Plugin" button at the top of the page and upload the WordPress plugin installation package to install it. The second method is to enter keywords in the search box on the right side of the page to search for related plugins from the WordPress Plugin Directory and install them. The following images demonstrate the operation steps for both installation methods.

Installation Method for Uploading a Plugin Package: The interface for clicking the "Upload Plugin" button is shown in the image below. Within the upload section, click "Choose File" to select the plugin installation package in .zip format stored on your local computer. Once the file is selected, the "Install Now" button on the right will be activated and clickable. Proceed by clicking it to install the plugin.
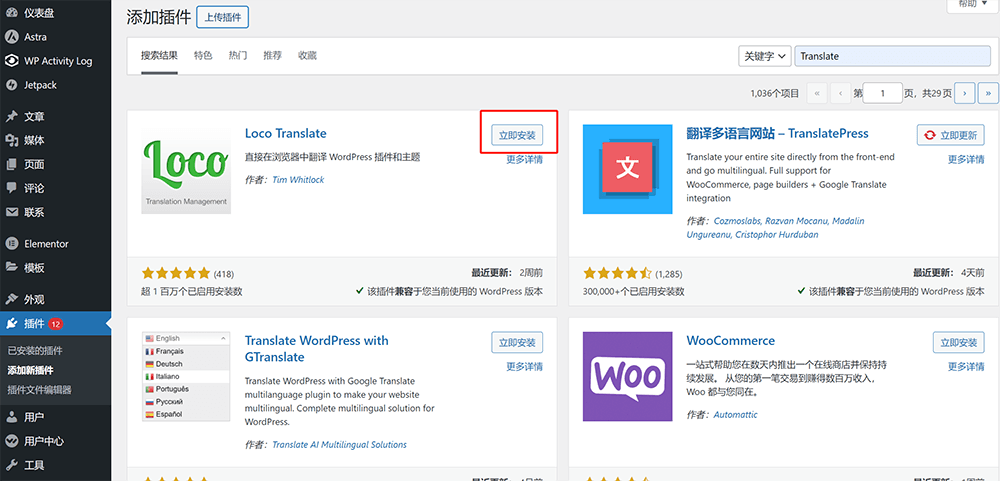
Method for Installing Plugins by Entering Keywords in the WordPress Plugin Directory: As shown in the red box in the image below, on the search results page in the WordPress Plugin Directory, click the “Install Now” button for the plugin you want to install. After the plugin has been installed, you need to activate it from the Installed Plugins list. Only after completing this activation step will the installed plugin function properly.
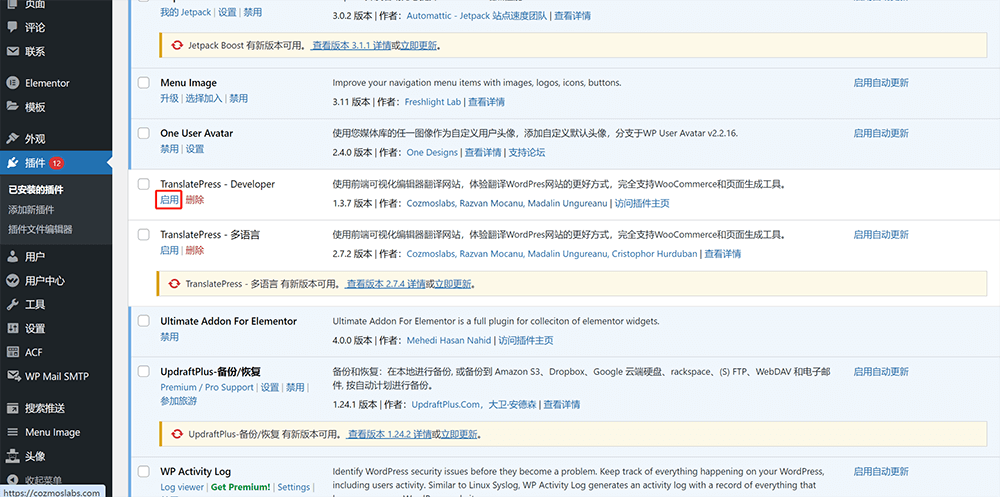
The operation of enabling the plug-in is shown in the red box in the figure below. Click the "Enable" button of the plug-in on the list to enable the plug-in:
3. Disable and uninstall plugins
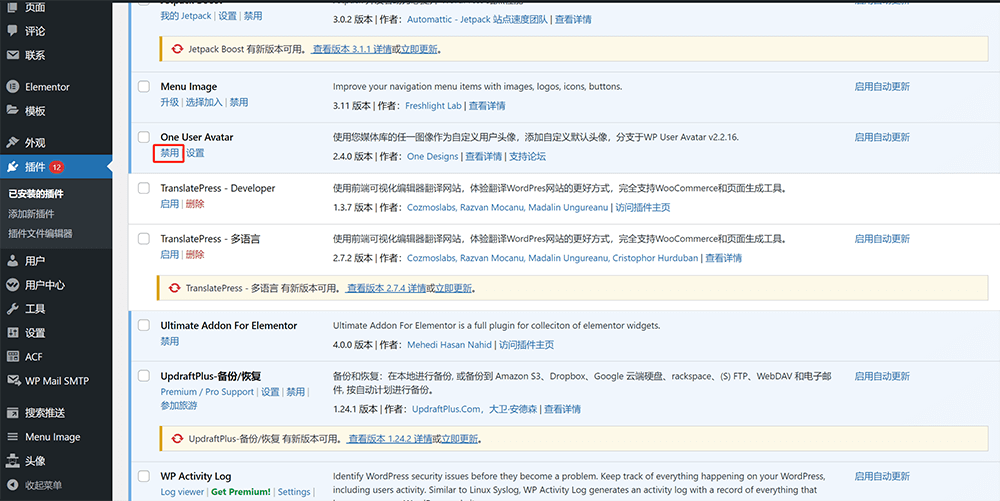
The functions to deactivate and uninstall plugins can be accessed directly from the Installed Plugins list page. However, it's important to note that if a plugin is currently active, the delete (uninstall) button will not appear below it. To make the delete button visible, you must first deactivate the active plugin—only then will the delete option be available below the plugin.
The operation method of disabling WordPress plug-ins is shown in the red box in the example picture below (click the disable button of the plug-in in the example picture):
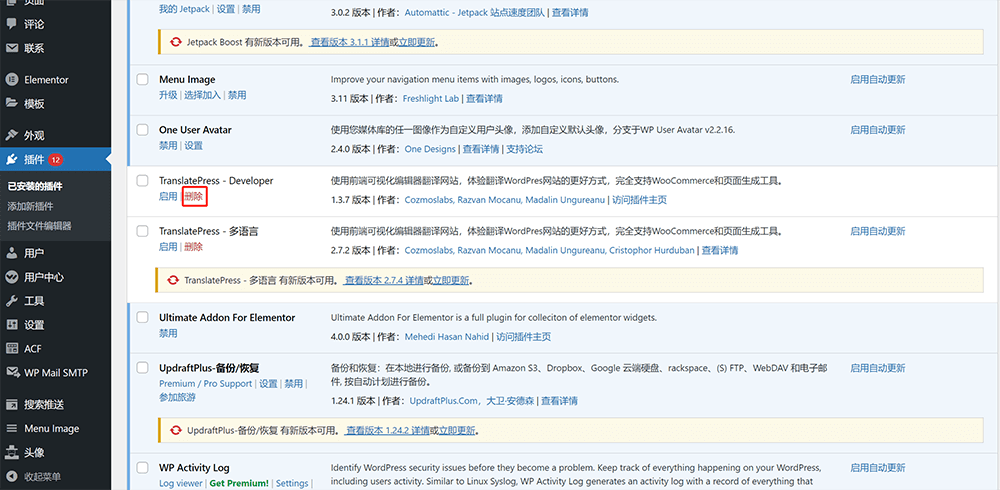
To delete (uninstall) a WordPress plugin, click the "Delete" button in the red box in the example below:
4. Plugin File Editor
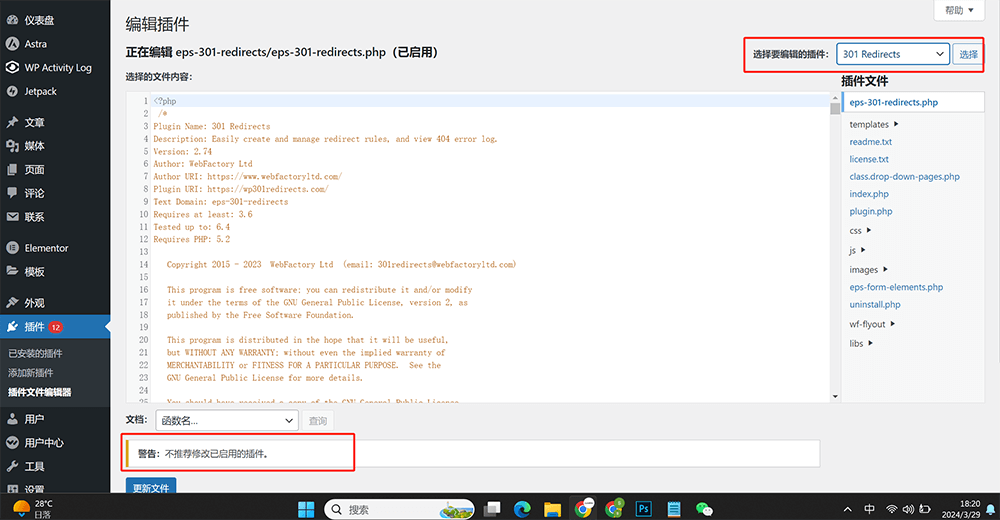
The Plugin File Editor is the place where plugin source code files are stored. The source code of the plugins installed on WordPress can be viewed and modified by selecting the corresponding plugin in the Plugin File Editor. This operation is not suitable for website administrators without programming skills. It is recommended that individuals without a computer science background do not perform any operations. Loss or corruption of the plugin’s source code can cause the plugin to fail to function. The interface of the Plugin File Editor is shown in the image below. As marked in the red box in the example image, WordPress also displays a warning advising against modifying active plugins. In the dropdown box marked in red at the top right, you can select the plugin you want to view or edit.
九、Creating and Managing WordPress Users
The user roles in a WordPress site include both frontend registered users and backend users, and all of them are created and managed under the "Users" function. The highest-privileged admin account in WordPress can create new user accounts, assign different user roles and permissions, edit user profiles, reset passwords, and more. User roles include Administrator, Editor, Author, Contributor, and Subscriber, each with varying levels of permission that control the user's ability to access and edit site content. Additionally, the admin can view and manage the login activity logs of users to ensure the site's security. The user management feature in WordPress allows administrators to efficiently manage multiple users on the site, ensuring the security and integrity of the site's content. The user management interface in the WordPress backend is shown in the image below:
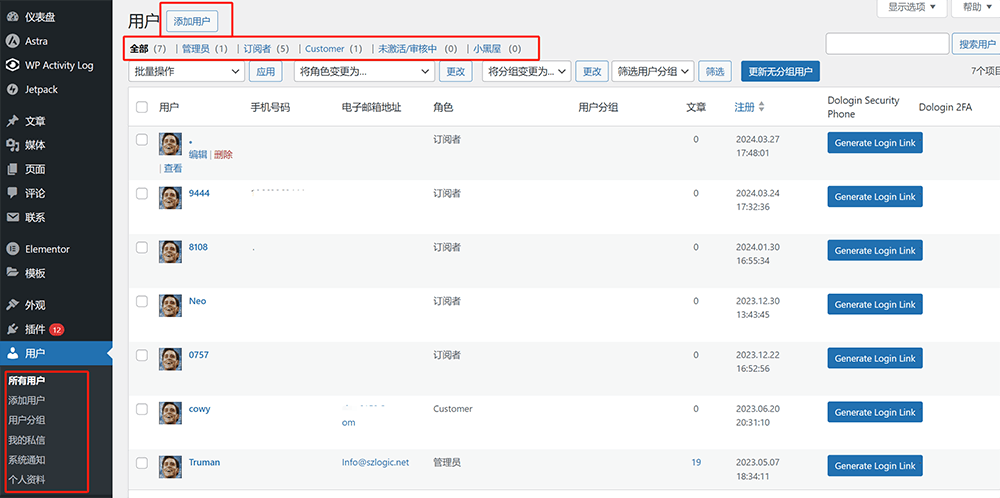
In the image above, you can see that under the "Users" section in the WordPress admin sidebar (marked in the left red box), there are six functional areas: "All Users," "Add New," "User Groups," "My Messages," "System Notifications," and "Profile." However, only "All Users," "Add New," and "Profile" are part of the WordPress system's user settings. The remaining three—"User Groups," "My Messages," and "System Notifications"—are features generated by third-party membership management plugins. This section will only cover the WordPress system's user functionalities, and the third-party plugin-generated features are not discussed, as they are not relevant to the focus of this article. The "All Users" interface is the homepage for user management. In this interface, as highlighted in the red box in the image, there is also an "Add New User" button at the top left. The top toolbar includes various user account statistics, and the user list shows the information used by users during registration.
1. WordPress user roles and permissions details
| Username | User roles | Permissions |
| administrator | Super Administrator | All permissions, including management and control of the entire site. |
| Shop Manager | Store Manager | The user role generated by WooCommerce has full permissions for store management, but does not have plugin and code editing permissions. |
| Editor | Editor | Can publish, edit, and delete all posts and pages, as well as manage content posted by other users. Has management rights over comments, and can approve, edit, and delete comments. Cannot access advanced features such as site settings and plugin management. |
| Author | author | Can publish, edit and delete their own articles, but cannot manage other users' content. Has management rights over comments and can approve, edit and delete comments. No access to advanced features like site settings and plugin management. |
| Contributor | Contributor | Can write and edit their own articles, but need to be reviewed by an editor or administrator before publishing. Cannot publish, edit or delete other users' content. Can manage comments on their own articles, but cannot access review and deletion permissions for comments. Cannot access advanced features such as site settings and plugin management. |
| Subscriber | Subscriber | No permissions are required, you can only log in to the website and subscribe to its content. |
| Customer | customer | The user role generated by WooCommerce has no permissions and can only manage and modify one's own personal information and query one's own order details. |
2. Add users
Once we have understood the details of "WordPress User Roles and Permissions" mentioned above, we can add new users to WordPress when needed. During the process of creating a new user, we can directly assign user roles and permissions. The interface for adding new users in WordPress is shown in the image below. The details of the information and options required during the new user creation process are also listed below.
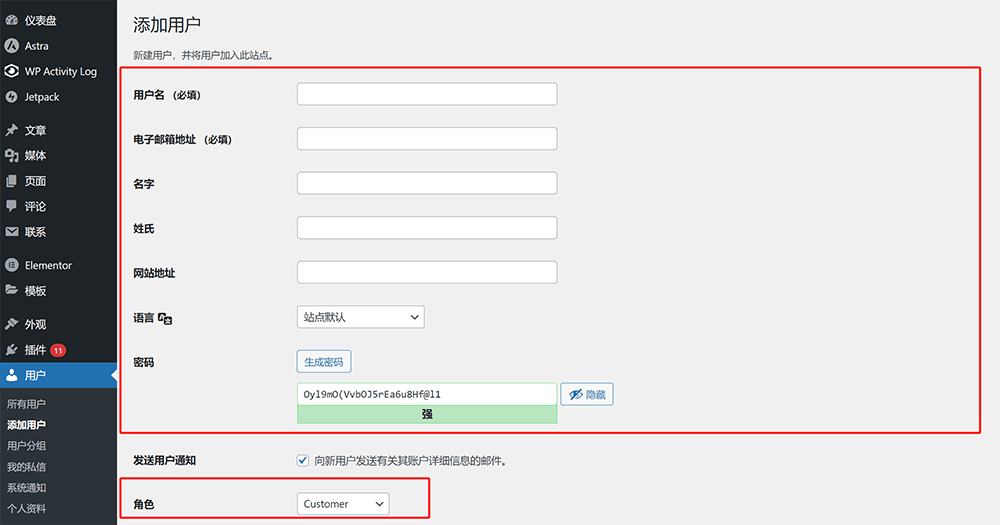
The information and options for adding a new user to WordPress are as follows:
- Username (required): Set the user name used when logging in to a new account. Letters and symbols are supported.
- Email address (required): The email address associated with the newly created account.
- Name (optional): can be left blank. If you are opening an employee account, it is recommended to use the employee's name for easy identification.
- Surname(optional): This field can be left blank. If you are opening an employee account, it is recommended that you use the employee's surname directly to facilitate account identification.
- Website Address(optional): This field can be left blank. It has no practical application or functional significance.
- Language: When an account logs in to the backend, the language of the backend content can be configured according to the language of the account user. The default language setting of the WordPress account follows the language of the site. If the site language is set to English and the website operator uses Chinese, the setting in the user language cannot use the default setting. Conversely, if the website is a Chinese website, the user's language setting can remain the default "site default" setting.
- Password: Set the account login password here. WordPress will automatically generate a strong but difficult to remember password by default. It is recommended to customize the input of easy-to-remember characters as the account login password.
- Send user notifications: Emails new users with their account details. WordPress will check this option by default, so just keep the default settings.
- Role: The role of the account is assigned according to the usage attributes of the user account. The role determines the permissions of the account.
- Personal Avatar: Upload the avatar of the newly created user. The personal avatar is a personalized setting. It depends on the account user's personal wishes to upload it.
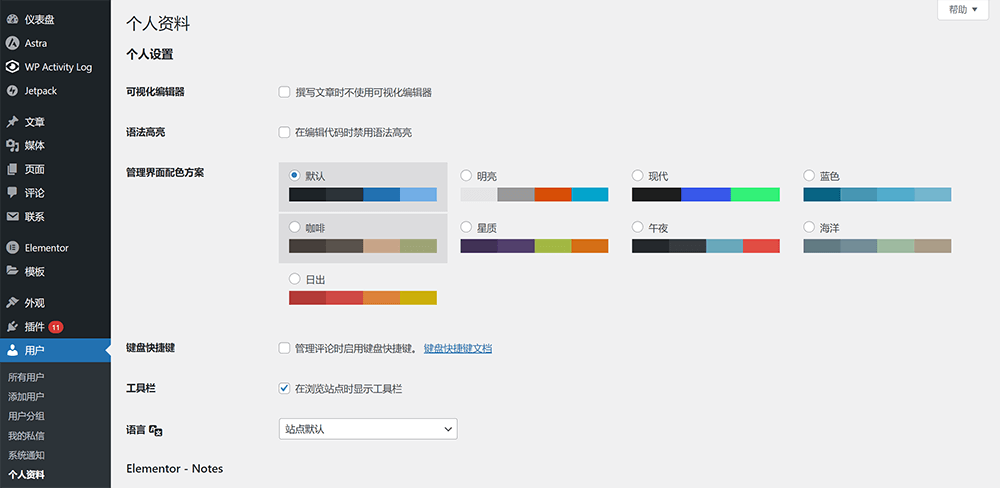
3. Personal Information
The "Profile" section is the details page of the currently logged-in user's profile. Most of the information in the profile is the data filled in when the user account was created. Except for the username and password, most of the information can be modified. The profile page is shown in the image below.
十、WordPress Backend Management: Settings
At the bottom of the left sidebar in the WordPress admin dashboard, there is an important section called "Settings." As the final chapter of this "WordPress Admin Usage Guide," this section provides a series of critical configuration options for controlling various site functions and permissions. Here, you can configure the site's basic information, including the site title, tagline, and URL. Additionally, writing options can be set, such as the default email category and email format. Under the "Reading" settings, you can define how the homepage is displayed and set the number of posts per page. The "Discussion" settings allow you to control the comment features on the site, including whether to moderate comments and whether commenters are required to provide their name and email. The "Media" settings section allows you to adjust the media file sizes. Finally, under the "Permalinks" settings, you can customize the structure of the site's URLs.
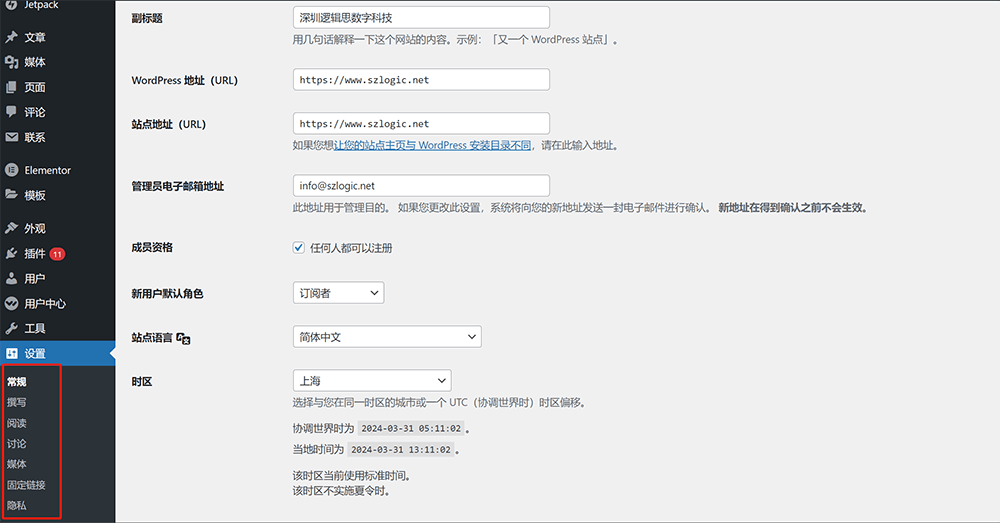
As indicated by the red box in the example image above, the "Settings" section includes a total of seven setting options: General, Writing, Reading, Discussion, Media, Permalinks, Privacy. These setting options contain the core configuration functions of the WordPress CMS. All items under the "Settings" section are considered system settings in WordPress and should be the first configurations to adjust after the main WordPress program has been deployed on the server and you are able to log into the WordPress admin dashboard via the domain.
1. General options
The "General" settings interface is the homepage of the "Settings" section, as shown in the image below. In the "General" settings, the configuration items are crucial global settings for the WordPress site. Each of these settings will impact the normal operation of the WordPress website. Below is a list explaining how to correctly configure each setting:
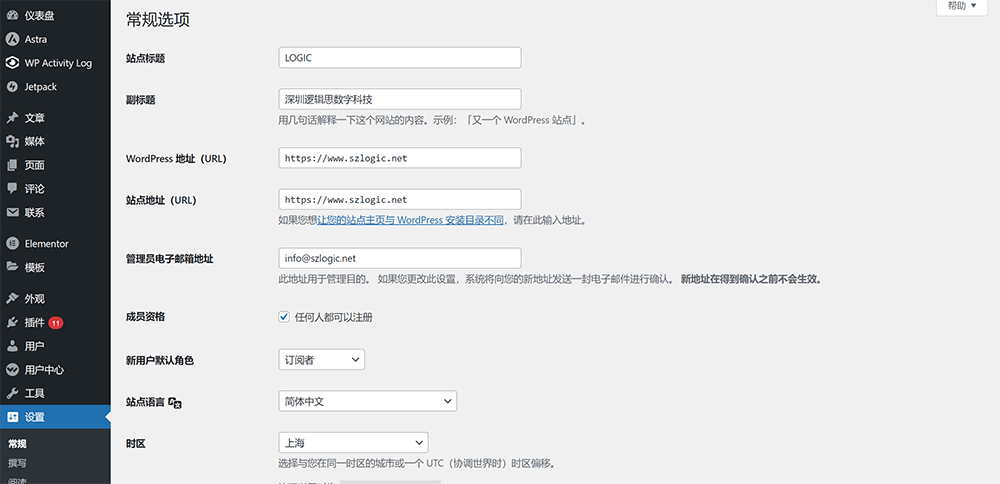
- Site Title: The site title is the title displayed in the browser tab of the homepage. The configured site title will appear in the front-end code in the format of ‘title’ Content of the site title ‘/title'.
- Tagline: The tagline is used on every page. Once set, it will appear after each page title using a hyphen as a separator.
- WordPress Address (URL): The WordPress address refers to the URL where the WordPress core program is deployed on the server. By default, when deploying a WordPress site on a server, the WordPress core is installed in the wwwroot (i.e., root directory) folder. In this case, the default WordPress address (URL) would be: www.yourdomain.com. You only need to enter the site's main domain name in the WordPress Address (URL) input field. Note: the protocol should be https; using http may cause functional issues with certain plugins.
- Site Address (URL): The site address refers to the domain name currently used by the WordPress site. Enter the domain name address of the WordPress site in the input field. Note: the protocol should be https; using http may cause functional issues with certain plugins.
- Administrator Email Address: This is the email address of the administrator account with the highest privileges on the WordPress site. It is used for receiving account modification information and site-related emails.
- Membership: Determines whether user registration is allowed. When the “Anyone can register” option is checked, the system will assign roles to new users registering on the front-end registration page based on the “New User Default Role” setting below.
- New User Default Role: The default role assigned to users who register through the front end. This role determines the permissions of the account.
- Site Language: The site language is different from the "Language" under User Settings. The site language here refers to the language attribute of the WordPress site itself, such as whether it is a Chinese or English site, and does not affect the language of the WordPress admin panel. This setting typically reflects the language displayed on the front end (based on the region/country where the website operates).
- Timezone: The timezone used by the WordPress site for reading and processing data. The timezone setting should generally align with webmaster tools, analytics, and SEM platforms for consistency in data timestamps, facilitating better data analysis and management.
- Date Format: The date display format of the time zone. There are multiple types of date display formats to choose from. You can choose according to your reading habits.
- Time format: The time display format of the time zone. There are many types of time display formats to choose from. You can choose the appropriate format according to your viewing habits.
2. Write settings
The "Writing" settings include the following configuration items: default post category, default post format, the default editor for all users, and whether to allow users to switch editors. Other options are either unnecessary or rarely used, so it's best to keep the default settings. After configuring the options in the Writing settings, don't forget to click the "Save Changes" button at the bottom of the page to apply the new settings. Below is a detailed tutorial and operation interface for the "Writing" settings in the WordPress admin dashboard:
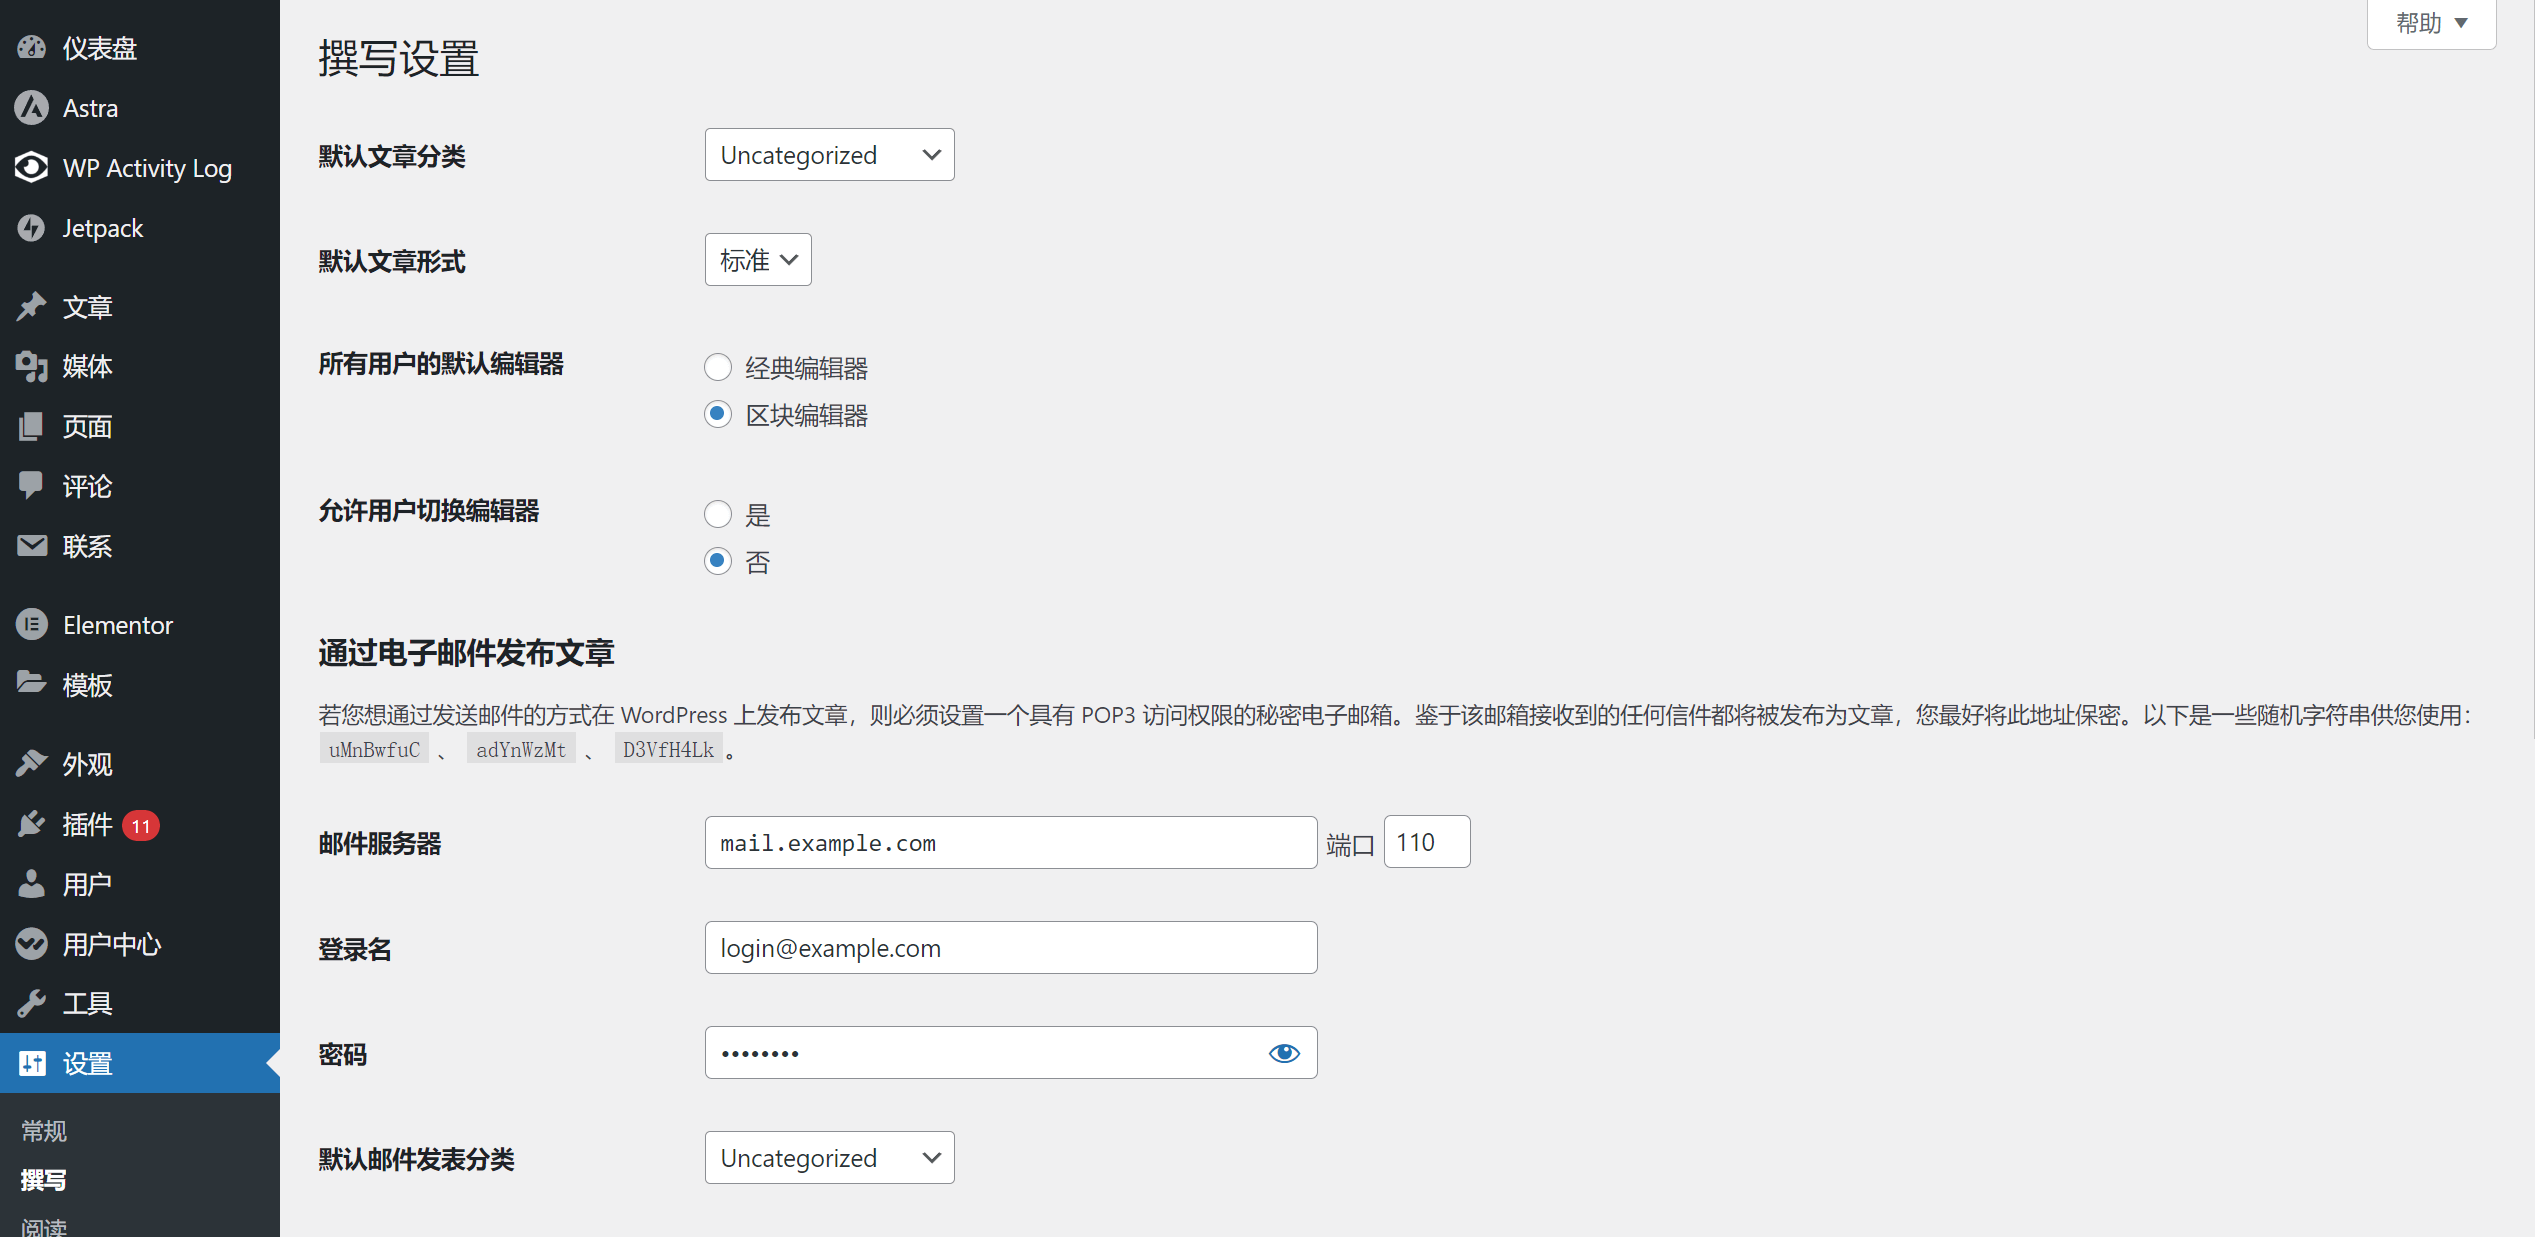
- Default Post Category: The default setting for post categories is "Uncategorized". After setting the default post category here, the Category selection box in the post editing page will automatically select the category set here. Unless there is a specific need, it is fine to leave the default post category as "Uncategorized".
- Default Post Format: Similar to the "Default Post Category" setting above, once the default post format is set here, the post format in the post editing page will automatically select the format set here. The default post format is "Standard". If you are creating content that includes both text and images, keeping the default "Standard" setting is sufficient.
- Default Editor for All Users: Here you can choose the type of WordPress editor. There are two types available: the Classic Editor and the Block Editor. It is recommended to use the Block Editor, as it provides a more realistic layout effect, richer functionality, and more versatile elements compared to the Classic Editor.
- Allow Users to Switch Editors: Whether to enable user accounts in the WordPress admin dashboard to switch editors when editing posts/pages.
3. Reading settings
The "Reading" settings include two important options: the assignment of static pages and "Visibility to Search Engines." The feed-related settings can generally be kept at their default values. If the WordPress theme also has settings for the number of blog posts displayed, the "Blog pages show at most" setting in the Reading settings will be overridden. In this case, the setting in Appearance > Customize for the blog display count takes precedence over this setting.
Under the Reading Settings interface, the correct setting for “Your homepage displays” is to select “A static page,” and then choose the appropriate homepage and posts page in the corresponding dropdown menus. This setting for “Your homepage displays” is the same as described in Section 7 “WordPress Appearance Management and Appearance Settings” – Customize: Homepage Settings. In other words, whether the settings are made under Appearance → Customize → Homepage Settings or here under Reading Settings → Your Homepage Displays, the result is the same.
After WordPress is deployed, it will by default have the "Discourage search engines from indexing this site" option checked under the Reading settings. This is done to ensure that search engines do not index incomplete or under-construction content during the website's development phase. The technical mechanism behind this setting is that when the "Discourage search engines from indexing this site" option is checked, it prevents access to the WordPress site's `robots.txt` file, effectively blocking search engine crawlers from indexing the site. This protocol is generally respected by major search engines like Google, Bing, and others, meaning they won't crawl the site. However, other web crawlers may not necessarily adhere to this request, which is why WordPress includes a disclaimer that search engines will follow the request voluntarily, but not all search engines may comply with it.
The reading settings operation interface and setting items of WordPress "Settings" are shown in the figure below:
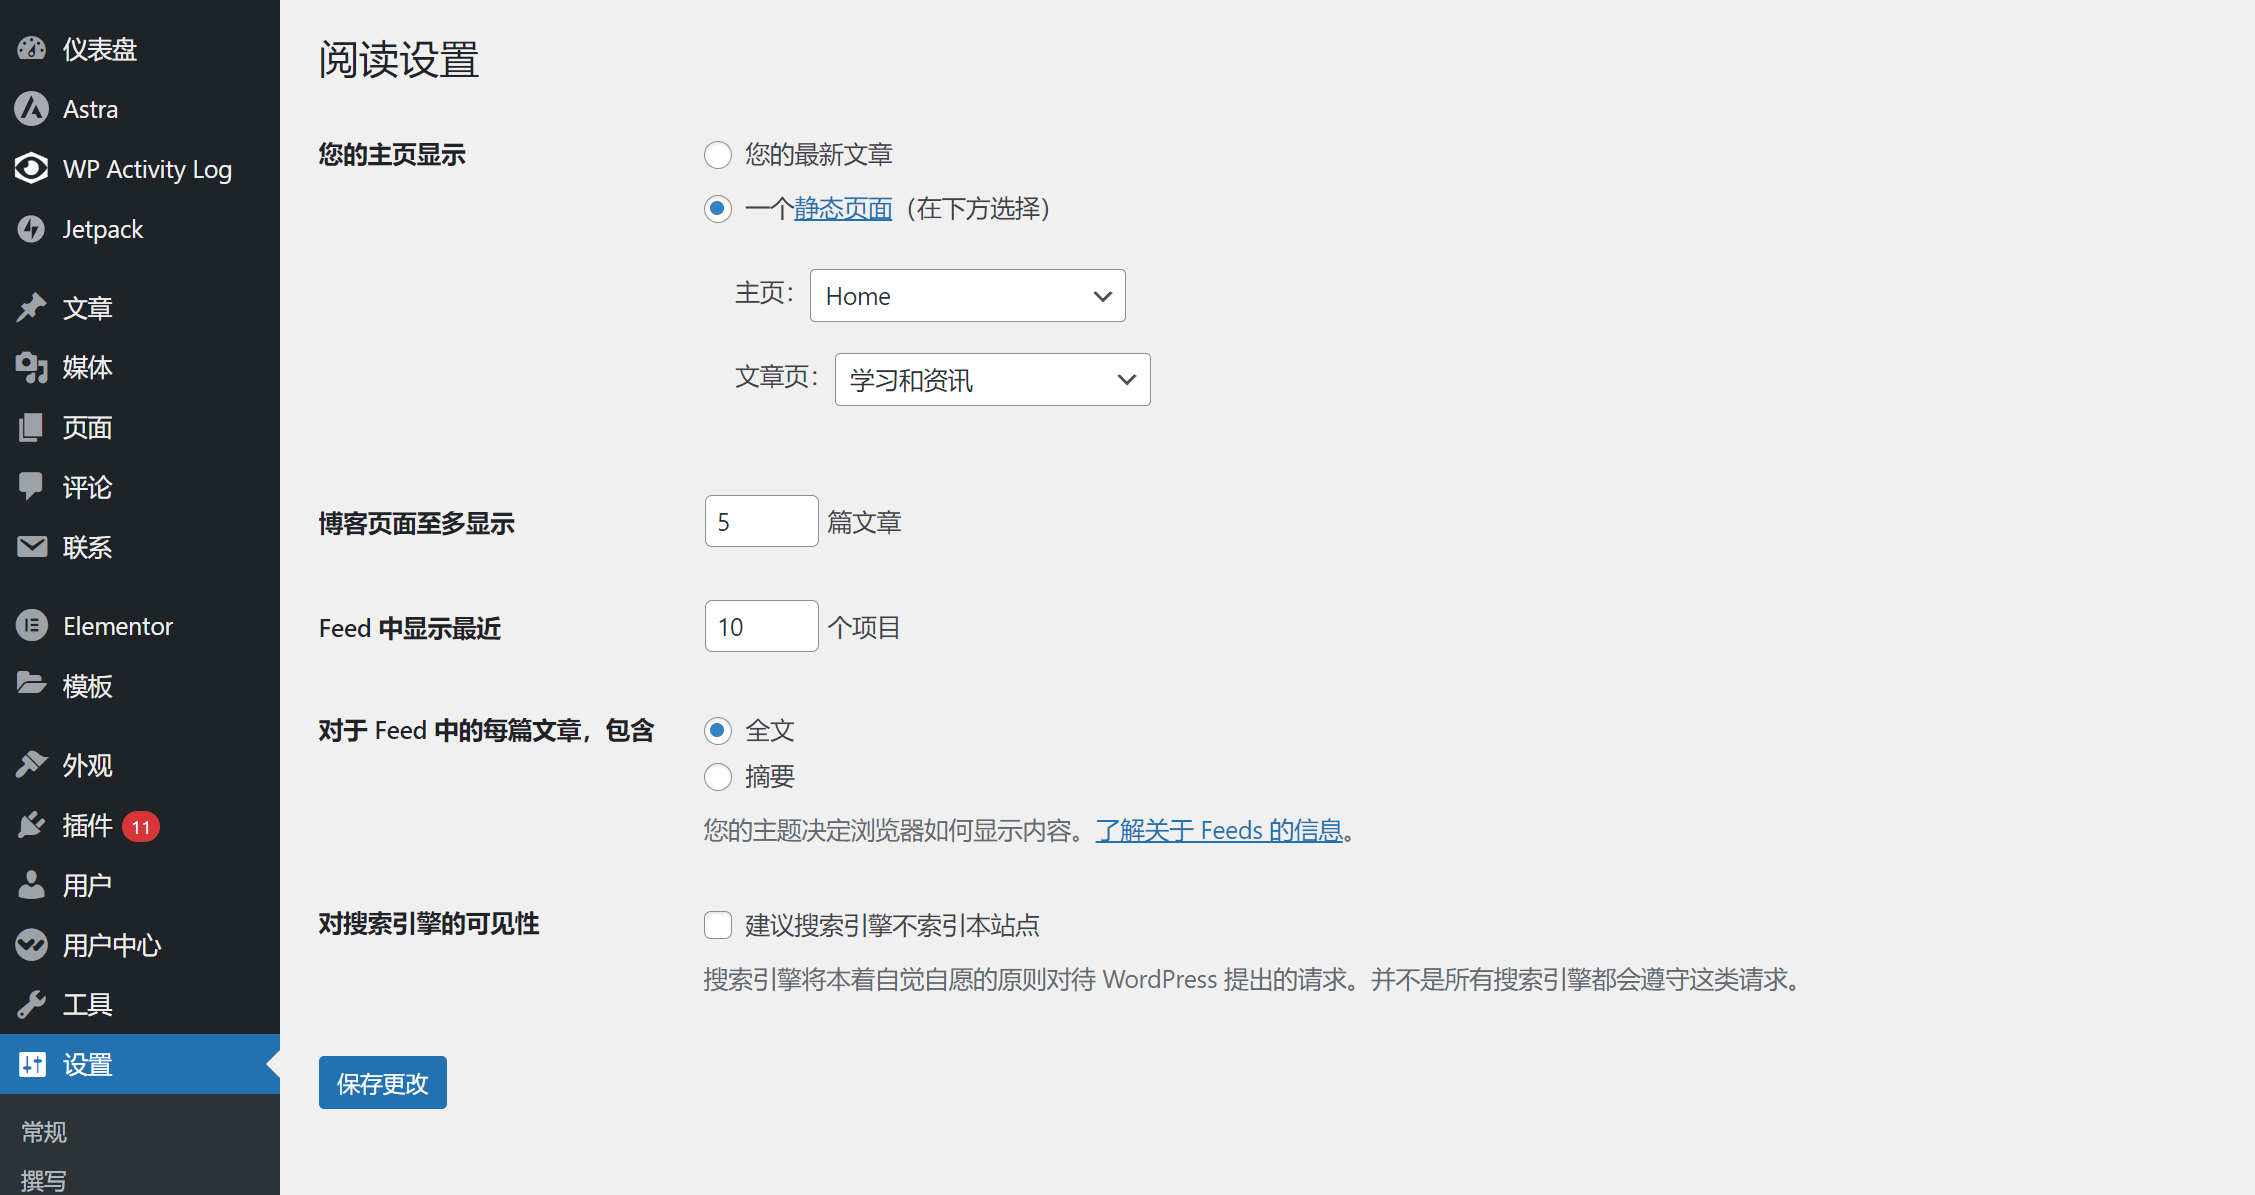
4. Discussion Settings (WordPress Comment Settings)
WordPress's Discussion Settings offer control over the site's comment functionality. Here, you can configure various settings such as comment moderation, whether to require commenters to provide their name and email, the order in which comments are displayed, and whether nested replies to comments are allowed. By choosing these settings according to your site's plan and needs, administrators can effectively manage comments and ensure that the interaction and communication in the comment section align with the site's objectives and preferences. The functional operation interface for WordPress's Discussion Settings is shown in the following image:
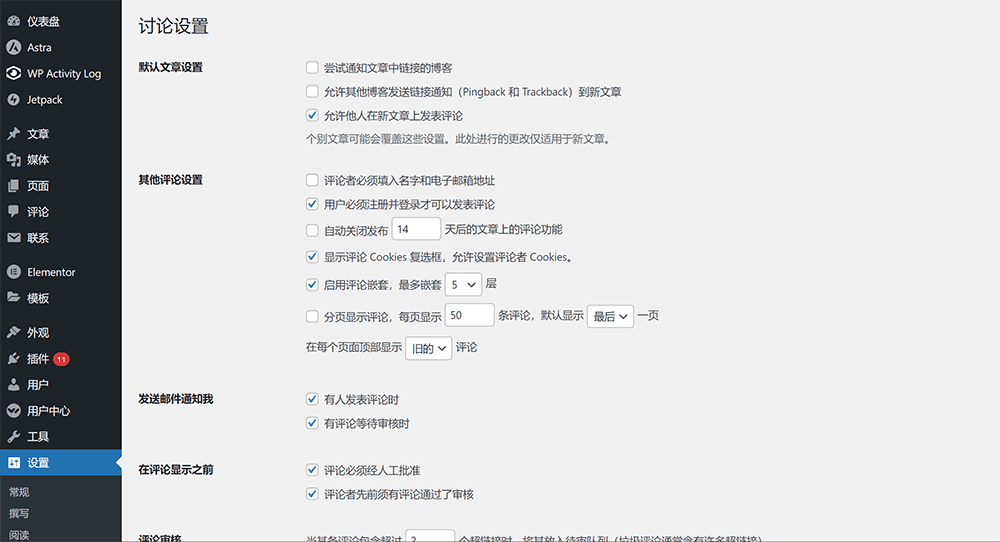
4.1. Default article settings
The function options under the default article settings are checkable functions. Select the function items you want to enable according to the following function detailed description list.
- Attempt to notify blogs linked to from the post: This enables the pingback function, which sends link notifications to third-party websites that are referenced within the content of your post.
- Allow link notifications from other blogs (pingbacks and trackbacks) on new posts: This corresponds to the pingback and trackback features mentioned in Section 3 "Creating, Managing, and Configuring WordPress Posts and Content Blocks" — under "Common Post Editing Features – Post Settings." When this option is checked, the "Discussion" section in the post editor will have pingbacks and trackbacks enabled by default. Enabling this allows other websites that link to your content to send link notifications to your site.
- Allow people to post comments on new articles: When this option is checked, the comment feature will be enabled by default for new posts.
4.2. Other comment settings
- Commenters must provide name and email address: If this option is enabled, users will be required to provide their name and email address before they can post a comment.
- Users must register and log in to post comments: After checking this option, users need to log in to their account before they can post comments.
- Automatically close comments on articles published x days later: Whether to enable the automatic closing of comments on old article pages. Check "Automatically close comments on articles published x days later" and enter the set number of days in the input box. Articles that reach this number of days will automatically close the comment function.
- Show comments Cookies checkbox to allow setting commenter Cookies: This refers to displaying a checkbox in the comment form that allows commenters to choose whether to save their name, email, and website information as a Cookie. Specifically, when a commenter fills in their name, email, and website in the comment form, if the WordPress site administrator has enabled this option, WordPress will set a cookie in the commenter’s browser after the comment is submitted to store this information. This way, when the commenter visits the site again in the future, the comment form may automatically fill in their previously saved details, making it easier for them to comment.
- Enable threaded (nested) comments, with a maximum depth of x levels: This setting controls the nesting level of comments, allowing replies to individual comments to form threads. The default setting in WordPress is 5 levels. The dropdown menu under this setting offers options from 1 to 10 levels. Users can select the number of nesting levels according to the needs of their own websites.
- Paginate comments, with x comments per page, and display the “last” or “first” page by default: This setting determines whether to enable comment pagination. You can specify the number of comments to display per page in the input box. Additionally, you can set whether the default comment page shows the newest (last page) or the oldest (first page) comments.
- Display “older” or “newer” comments at the top of each page: Set whether the top of the comment section on each page displays older or newer comments. You can make a selection using the dropdown menu provided with this setting.
4.3. Send me an email
The two options under Send email notification are checkboxes. You can selectively check them or check both according to the planning of your own website.
- When someone posts a comment: When a user posts a comment on your WordPress website, an email notification will be sent to the administrator's email address.
- When a comment is awaiting moderation: If WordPress has enabled the comment moderation features below, when a user posts a comment on an article page of the WordPress site, the comment will not only be added to the pending moderation list in the comment management section, but the system will also send a moderation notification email to the site administrator.
4.4. Before comments are displayed
Under the "Before a comment appears" section, there are two options to select, both of which are checkboxes: "Comment must be manually approved" and "Comment author must have a previously approved comment." These settings determine whether a comment will be immediately displayed after submission or if it will require approval from the site administrator before being shown.
- Comment must be manually approved: When this option is enabled, comments posted by site users on article pages will not be displayed immediately. Instead, they will be added to the "Pending" list under the comment management section in the WordPress admin dashboard. These comments must be approved by the site administrator before they can be displayed on the front-end article page.
- Comment author must have a previously approved comment: If the option "Comment must be manually approved" above is not selected, enabling this option means the system will use whether the commenter has had a previously approved comment as the condition to determine whether the new comment should be displayed. If the condition is met (i.e., the commenter has a previously approved comment), the new comment will be displayed. If not, it will not be shown.
4.5. Review of comments
The comment moderation settings allow you to define how to handle comments that contain hyperlinks and specify keywords within the commenter's content, name, URL, email, IP, or browser user agent string. If a comment contains any of these keywords, it will be marked as pending review. Each keyword or IP address should be entered on a separate line in the input box. WordPress will match the submitted comments with the custom keywords entered in the input box.
4.6. Prohibited comment keywords
In the input box under the "Disallowed Comment Keywords" section, each line should contain a keyword or IP address. The WordPress system will match the submitted comment content with the disallowed keywords. If the commenter's content, name, URL, email, IP, or browser user agent string contains any of the set keywords, the comment will be moved to the trash.
4.7. Avatar
The user avatar settings include options for displaying user avatars, the rating required to view avatars, and the ability to set a default avatar for users. The details of the avatar feature options are as follows:
- Avatar display: WordPress will check "Show avatar" by default. After checking the option to display avatar, the user's avatar will be displayed in the user's message in the comment area.
- Highest Rating: Set the age rating of the viewing audience of the user's avatar. "Highest Rating" is a single option with four levels to choose from: G - Suitable for visitors of all ages, PG - Potentially controversial avatars, only suitable for readers over 13 years old, R - Mature, only suitable for adults over 17 years old, and X - The highest level, not suitable for most people. The system's default check option is "G - Suitable for visitors of all ages", which means that users of all ages can view this avatar.
- Default avatar: Upload and set the user's default avatar through the "Select image" function on the right side of the default avatar.
5. Media Settings
The Media Settings feature allows WordPress site administrators to adjust the dimensions of media files and configure how uploaded files are organized. Administrators can set default media file sizes here and choose whether to enable the folder-based organization for files in the Media Library. This feature helps administrators manage and display media files on the site more effectively. The interface for Media Settings under the WordPress “Settings” section is shown in the image below:

5.1 Image size
As shown in the red box in the image above, WordPress will, by default, set three pixel dimensions for uploaded image assets. These three dimensions are: thumbnail size 150×150; medium size 300×300; and large size 1024×1024. Note that starting from WordPress version 5.3, the system automatically generates multiple copies of uploaded images. These corresponding copies can be viewed under image resolutions in the page editor. The three sizes set in the Media Settings are among the presets WordPress uses to create these image copies automatically. This is often the main culprit behind excessive server disk usage. To disable the automatic generation of these three preset image sizes, set all values in the corresponding input boxes to 0. Then, uncheck “Crop thumbnail to exact dimensions (normally thumbnails are proportional),” and finally click “Save Changes” to apply the settings.
5.2 File Upload
By default, WordPress will check the option "Organize my uploads into month- and year-based folders" under the file upload settings. This option means that when media files are uploaded, WordPress will create folders within the wp-content/uploads/ directory on the server, organized by year, month, and day. The default setting, "Organize my uploads into month- and year-based folders," helps with managing and finding media files. Unless there is a specific requirement, it is recommended to keep the default setting.
6. Fixed link settings
The permalink settings feature allows WordPress site administrators to customize the URL structure of their website. Administrators can choose from various permalink formats, such as post name, year/month/post name, or even define a completely custom structure. This functionality helps optimize the site's URL format to make it more readable and SEO-friendly. In practical applications focused on readability and SEO, Logic Thinking Digital Technology recommends the best practice of using a “Custom Structure.” This is because other formats often fail to provide a complete and logical URL structure that includes proper directory and keyword formatting. When using a custom structure, the parameters and order to define the URL structure should be set as follows:
https://www.yourdomain.com//%category%/%postname%/The interface for the permalink settings is shown in the image below. The red box highlights the custom URL structure used by Logic Digital Technology (if you wish to adopt the same URL structure as Logic Digital Technology, simply select the options and parameter values as shown in the image below).
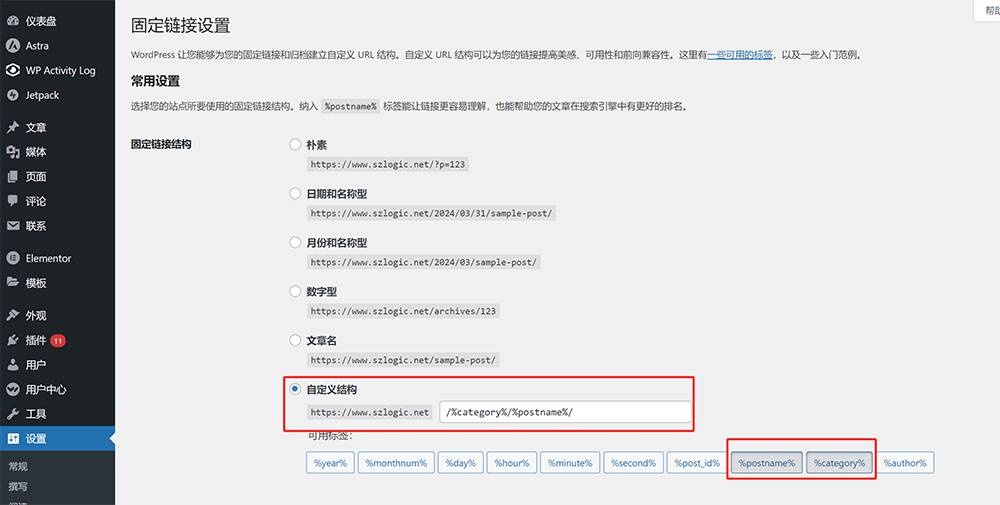
6.1、Detailed structure of fixed links
- Simple: The simple URL structure type refers to using the domain name plus the article page/page ID value as the URL structure.
- Date and name type: The date and name type URL structure type refers to the use of the year, day and month of the article/page publication plus the article/page title as the URL structure.
- Month and name type: The month and name type URL structure type refers to the URL structure that uses the year and month of article/page publication plus the article/page title.
- Numeric type: The numeric URL structure type uses the archive directory name plus numbers as the URL structure.
- Article Name: The URL structure of the article name is the shortest type of URL structure. There is no hierarchical directory in the middle of the URL structure, and the article name is used directly as the URL structure.
- Custom Structure: You can select the parameters used by the custom structure in the available tabs below as the format of the URL.
7. Privacy
The "Privacy Settings" function under "Settings" in the WordPress admin dashboard allows administrators to define the site's privacy policy. The privacy page is important for ensuring site compliance, increasing user trust, protecting user data, and addressing potential legal and dispute issues. In the privacy settings interface, you can either choose "Create a new privacy policy page" or use the dropdown next to "Change your privacy policy page" to select an already created privacy policy page. Once the correct privacy policy page is selected, click the "Use this page" button next to it to save the changes. The specific operational flow for privacy settings is shown in the image below, with the red box highlighting the relevant area.
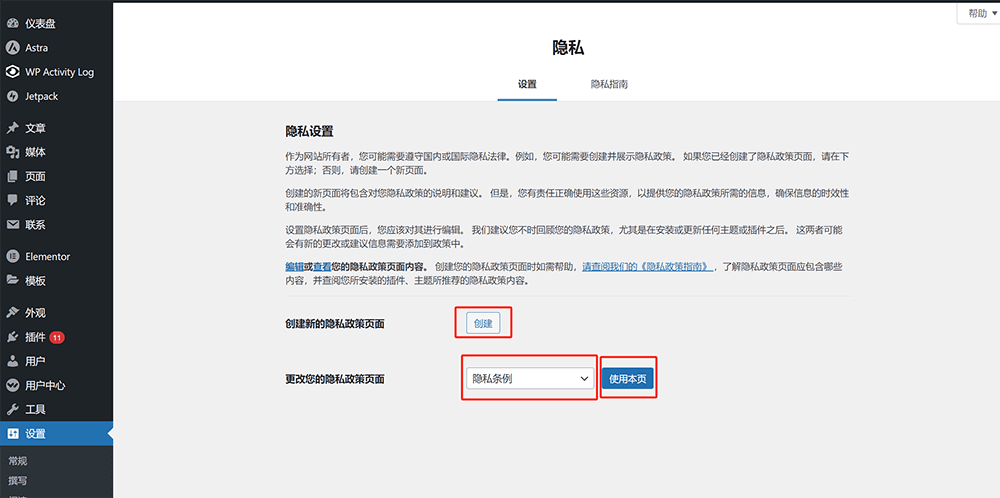
Conclusion: After spending a full week writing and proofreading, this article, “WordPress Admin Panel User Guide,” now comprehensively covers all areas of the WordPress dashboard and the configuration details of each functionality. The entire guide is divided into ten chapters, totaling over 30,000 words, and provides a step-by-step demonstration of each feature in the admin menu with illustrated instructions from top to bottom. We hope this article proves helpful to both WordPress beginners and experienced users looking to expand their technical capabilities. Our aim is to help users become more familiar with and adept at using the WordPress admin panel to implement more customized functionalities. As time goes on, Logic Thinking Digital will continue to update and improve this article to ensure it stays in sync with the latest WordPress platform versions—offering readers high-quality WordPress learning resources and technical services.
Finally, as a WordPress website grows and evolves, its functional requirements will also change continuously. Whether it's due to marketing strategy adjustments, membership system upgrades, or product sales expansion, website functionality—just like its content—is never static. It must be continually optimized and enhanced in line with business growth and market demands. The team at Logic Thinking Digital specializes in WordPress site development, design, and custom programming. If your WordPress website requires new features or customized development, feel free to contact the Logic Thinking Digital team. We’re here to provide you with efficient and professional solutions to help your website continuously improve and grow.
Logic Digital Technology (SZLOGIC) All rights reserved. Reproduction is prohibited.