


Theme Setup Guide for WordPress & Shopify
Using theme templates to create WordPress and Shopify websites is a common website building method. The more closely a chosen theme matches the style plan of your independent website, the faster the website creation process will be. This is because once the theme is installed, users simply need to upload and fill in their content elements into the framework. As for functionality, different theme developers often integrate relevant built-in features into their themes. If these built-in features align with the functionality planned for your site, it can save you both time and money that would otherwise be spent searching for third-party plugins or hiring developers for custom solutions. Therefore, choosing a theme that aligns with your independent website’s structure and features can help you quickly build an attractive and user-friendly site.
The article "Methods for Choosing and Installing WordPress and Shopify Themes" begins by guiding readers on how to select a theme for their independent website. Using the criteria provided in this article, readers can choose suitable WordPress and Shopify theme templates and follow step-by-step instructions to install the theme and build their own independent site. Along the way, they will also learn:
- The differences in installation methods for themes acquired from different channels
- The characteristics of themes in the WordPress theme marketplace
- How to delete old themes when changing themes on an independent website
The article “How to Choose and Install WordPress and Shopify Themes” is organized into five sections to demonstrate how to install themes for both WordPress and Shopify websites. The tutorial uses a combination of text and images for clear explanation. Readers can select the relevant section based on their chosen website platform for targeted reading.
- How to Choose WordPress and Shopify Theme Templates
- WordPress Theme Installation Tutorial
- How to Delete a WordPress Theme
- Shopify Theme Installation Tutorial
- How to Delete a Theme in Shopify
一、How to Choose WordPress and Shopify Theme Templates
When selecting a theme template, the general indicators include appearance, functionality, and the theme’s performance and response speed. A well-optimized theme ensures fast website loading, improves user experience, and contributes to better search engine rankings. On the other hand, choosing a popular theme template also benefits the future maintenance and updates of the independent site. Popular themes are usually updated regularly, fixing bugs and adding new features. They also have more user community support and available resources. This makes it easier to find solutions when encountering issues during usage, and helps maintain the website’s security and stability. Regarding how to choose a theme for WordPress and Shopify themes, in addition to appearance, functionality, performance, and popularity, here are 10 key criteria compiled by Logic Digital Technology for choosing theme templates for WordPress and Shopify. The 10 key factors are as follows:
- Supported CMS Version: Whether the theme supports and is compatible with the current version of the CMS (Content Management System) being used. When purchasing a theme template, it is important to check this item; otherwise, the CMS may fail to install the theme file properly, or there may be style and functionality issues due to incompatibility with the system.
- Appearance on Desktop, Mobile, and Tablet: Use the demo preview feature to check whether the theme's responsive design across the three device types meets your requirements, and whether the visual style aligns with the layout and design plan of your independent site.
- Features: Check the completeness of the theme's built-in features in the demo preview. Test the functionalities provided by the theme to ensure there are no bugs and confirm whether these features meet your requirements.
- Performance: The coding standards and file size of the theme template are important factors that affect the performance of an independent site. Although readers without a technical background may not be able to inspect the code directly, it's essential to at least check the size of the theme files and the loading speed of each page and JavaScript content in the demo preview.
- Cost: Cost refers to the price of purchasing the theme. The amount depends on the budget of the cross-border e-commerce independent website business. If the theme is a one-time purchase and can create more relevant value for the business, the cost-performance ratio should be comprehensively considered rather than focusing solely on the price factor.
- Theme Licensing Model: When purchasing a WordPress or Shopify theme, it’s also important to clearly understand the licensing model after purchase. The licensing models are generally divided into two types: annual subscription and one-time payment for lifetime use. An annual subscription means that after one year from the date of purchase, you’ll need to renew each year to continue using the theme. A one-time payment for lifetime use means that after purchasing the theme, you can use it permanently without additional payments. Between the two, themes with a one-time lifetime license are naturally more popular.
- Browser Compatibility: Check the theme’s documentation or description to ensure it supports major browsers such as Firefox, Safari, Opera, Chrome, and Edge. The theme should be compatible with all mainstream browsers. If a theme is not compatible with a particular browser, it may display layout or functional issues when run in that browser.
- Compatible Page Builder Types: If it's a WordPress theme, it’s important to confirm whether the theme supports the page builder you’re familiar with—such as whether the theme is compatible with Gutenberg or Elementor. This is because Gutenberg and Elementor are two different types of page builders, and most themes are not compatible with both. If the theme user is accustomed to using Elementor for page editing, they should choose a theme template that specifically supports Elementor.
- Technical Support Service Duration: Theme developers typically provide a limited period of technical support for the themes they sell. This support helps users resolve any issues encountered during theme installation or operation. The duration of technical support is usually specified in the theme’s product description. Naturally, the longer the support period, the more beneficial it is for users.
- Theme Popularity: The popularity of a theme is a selection criterion that depends on specific circumstances, such as regional language communication and the timeliness of technical support services. If the theme is developed by a foreign technical company, there may be language barriers and delayed support. In cases of technical issues, relying on the theme’s original developers may result in unacceptable delays. More often, we end up troubleshooting and resolving the problem ourselves, which is where community resources become essential. Theme popularity refers to how widely the theme is used—if it's widely adopted, it becomes easier to find solutions to common problems online. However, if the theme is developed by a domestic (local) company, popularity is less of a concern, as local companies typically provide technical support during business hours, ensuring timely issue resolution.
二、WordPress Theme Installation Tutorial

There are two methods for installing WordPress themes, and these installation methods are directly related to the source of the theme. If the theme is selected directly from the WordPress theme marketplace, it can be installed with just one click and activated immediately. On the other hand, if the theme is purchased from a third-party marketplace, the theme file package needs to be downloaded and extracted locally, then uploaded to the WordPress admin panel for installation. Below, both installation methods will be demonstrated separately.
Method 1: Install the theme directly from the WordPress theme market
The WordPress theme marketplace differs from third-party theme marketplaces in that themes in the WordPress marketplace mainly consist of simple blog-style themes. These simple blog themes are characterized by basic page layout design, with only one or a few pre-designed pages. Because of this, such themes are considered lightweight in design, and typically perform very well immediately after installation. However, strictly speaking, this type of blog theme can only be considered an empty shell or a semi-finished product—it lacks a complete visual and functional setup, and almost all pages need to be manually created and edited. These themes are more suitable as a foundational framework for website development companies when building custom sites, but they are not recommended for beginners. For new users looking to create an independent site, it is best to choose a theme that is as close as possible to a complete solution in terms of both appearance and functionality.
Step 1: Enter the WordPress Theme Marketplace
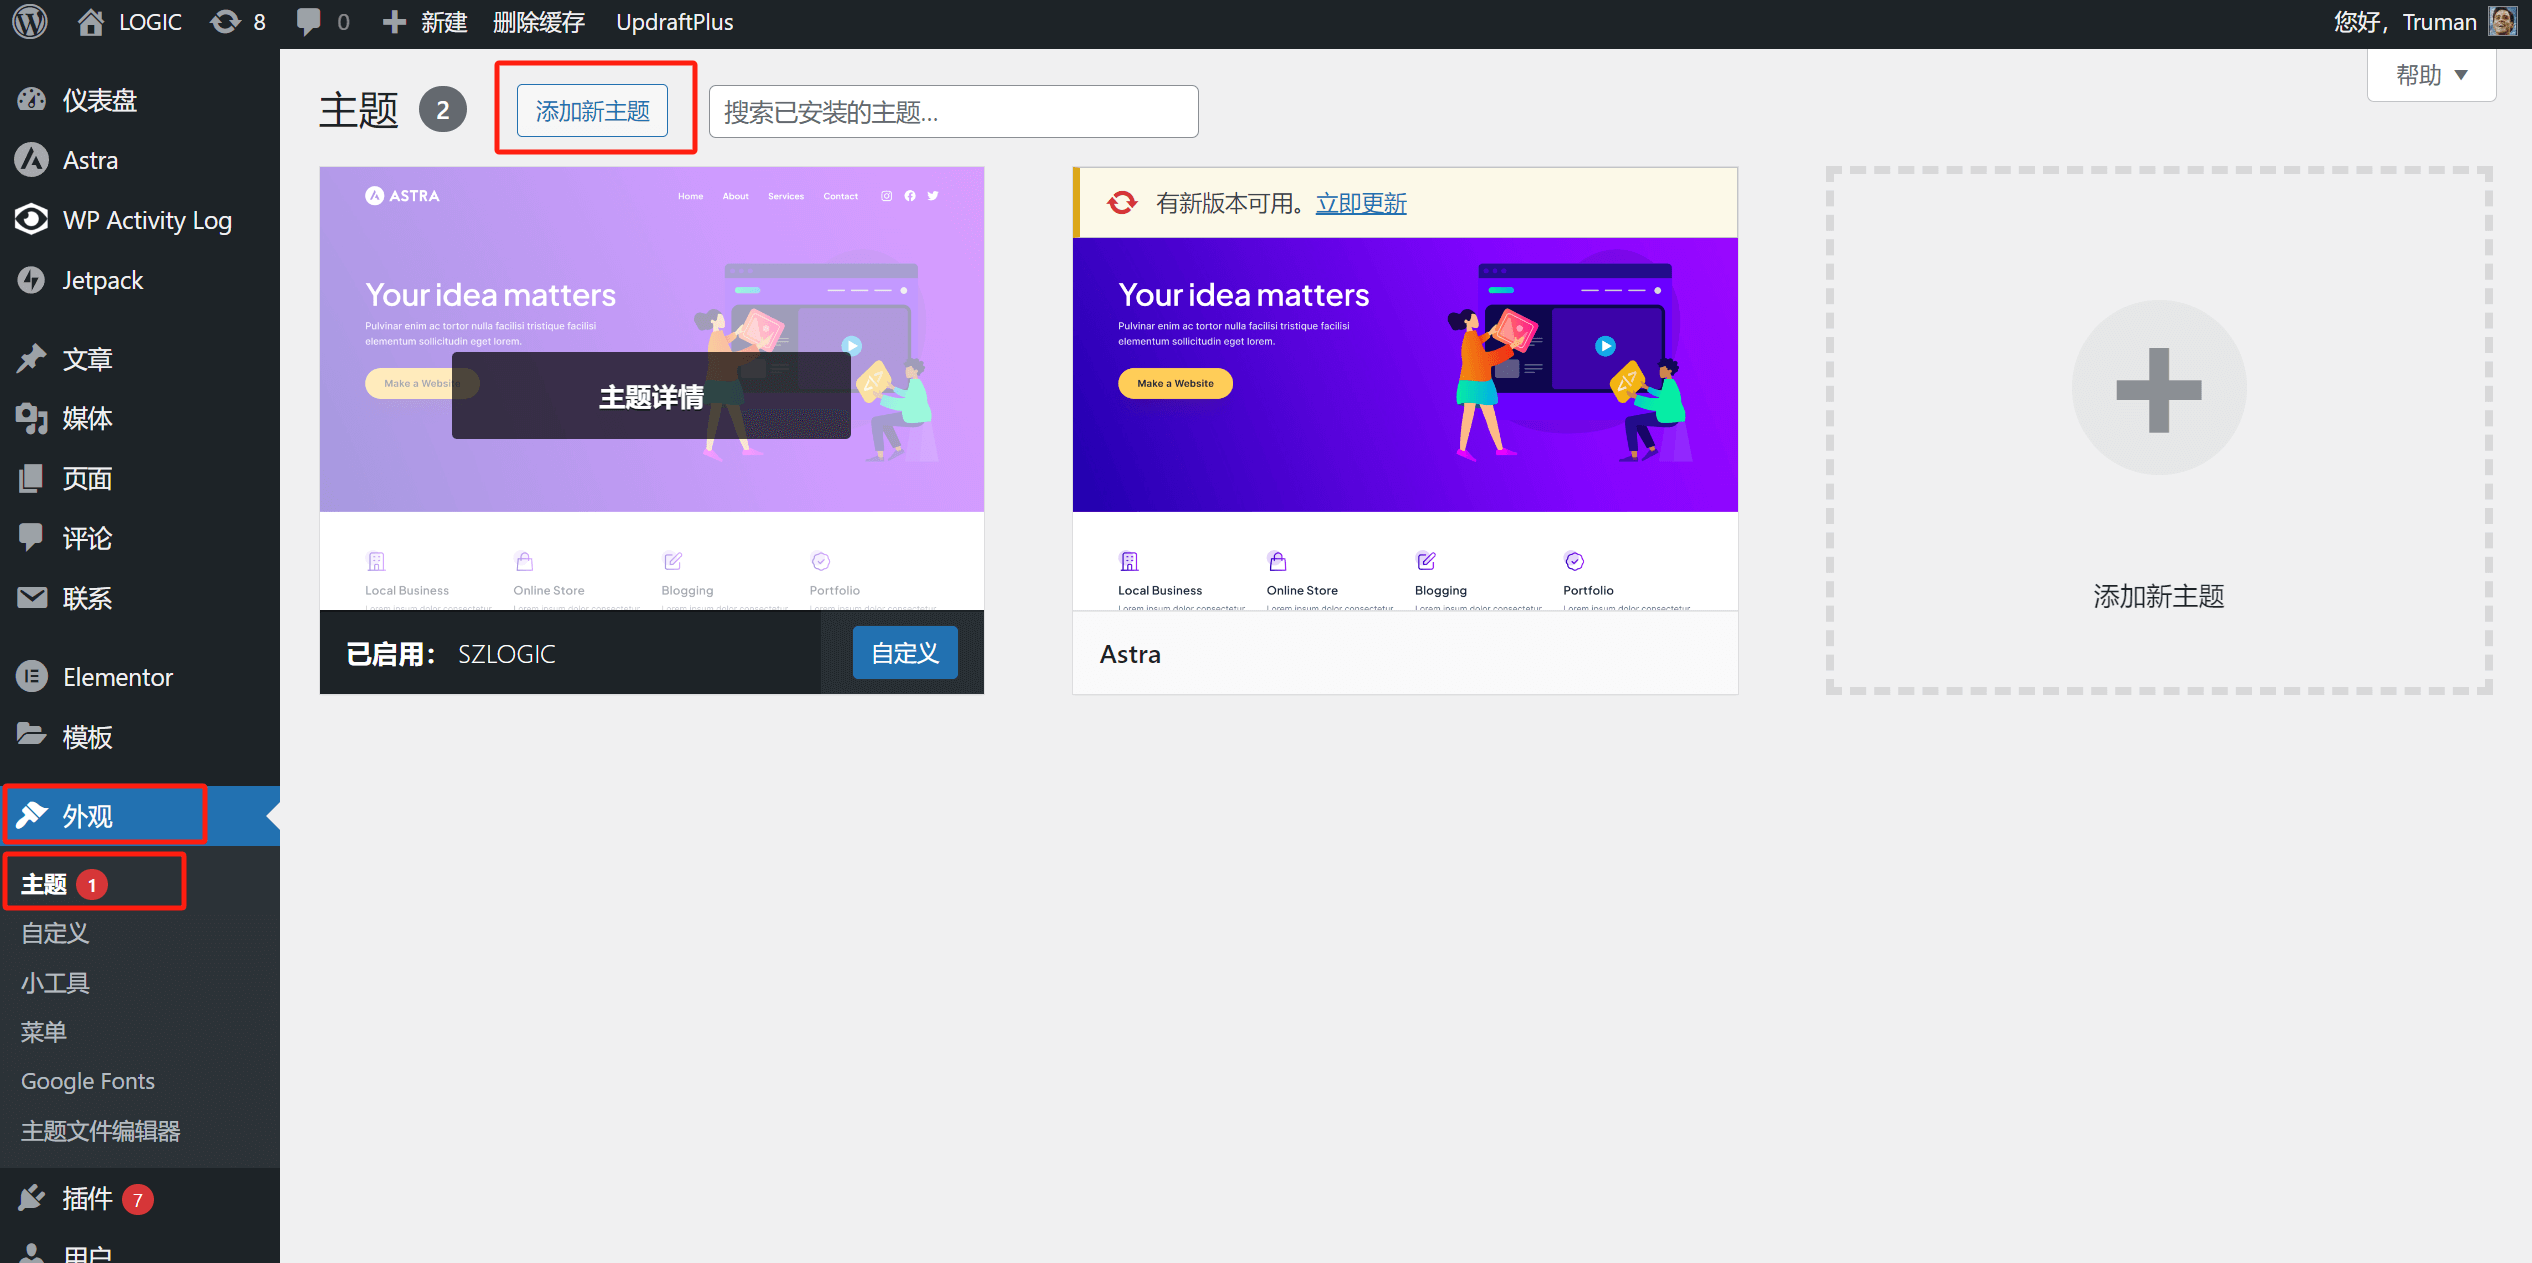
To install, follow the path indicated by the red box in the image (WordPress admin panel > Appearance > Themes). Click the "Add New Theme" button on the page, and it will take you to the WordPress theme marketplace, as shown in the image below. Currently, there are a total of 6,275 themes in the WordPress theme marketplace, many of which are free.
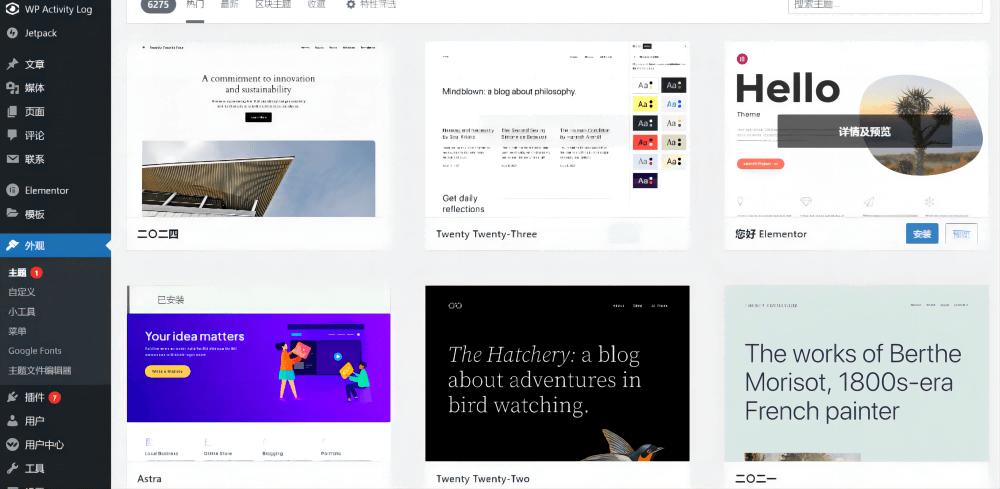
Step 2: Preview and Install WordPress Theme
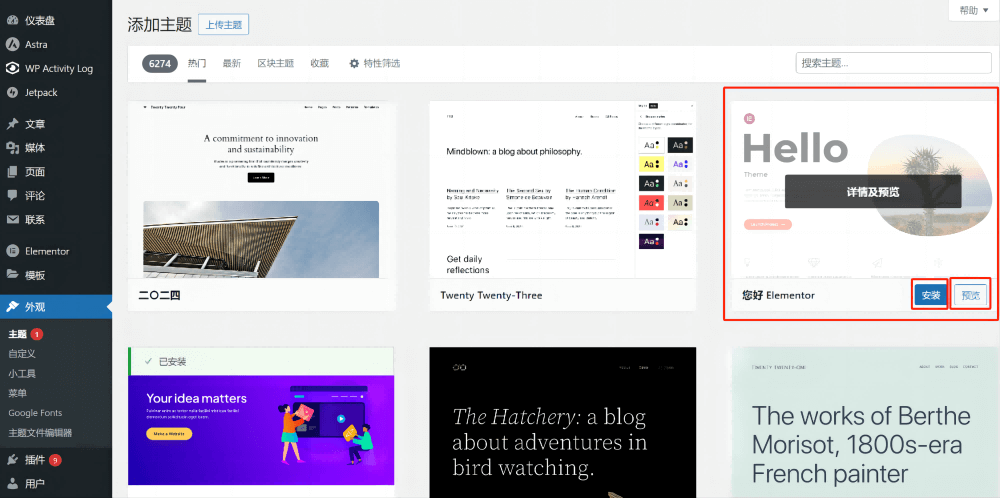
When you hover the mouse over the selected theme, as shown in the figure above, buttons for "Install" and "Preview" will appear on the theme. Click Preview as shown in the figure below, and you will enter the preview mode of the actual style of the theme, as shown in the figure below:
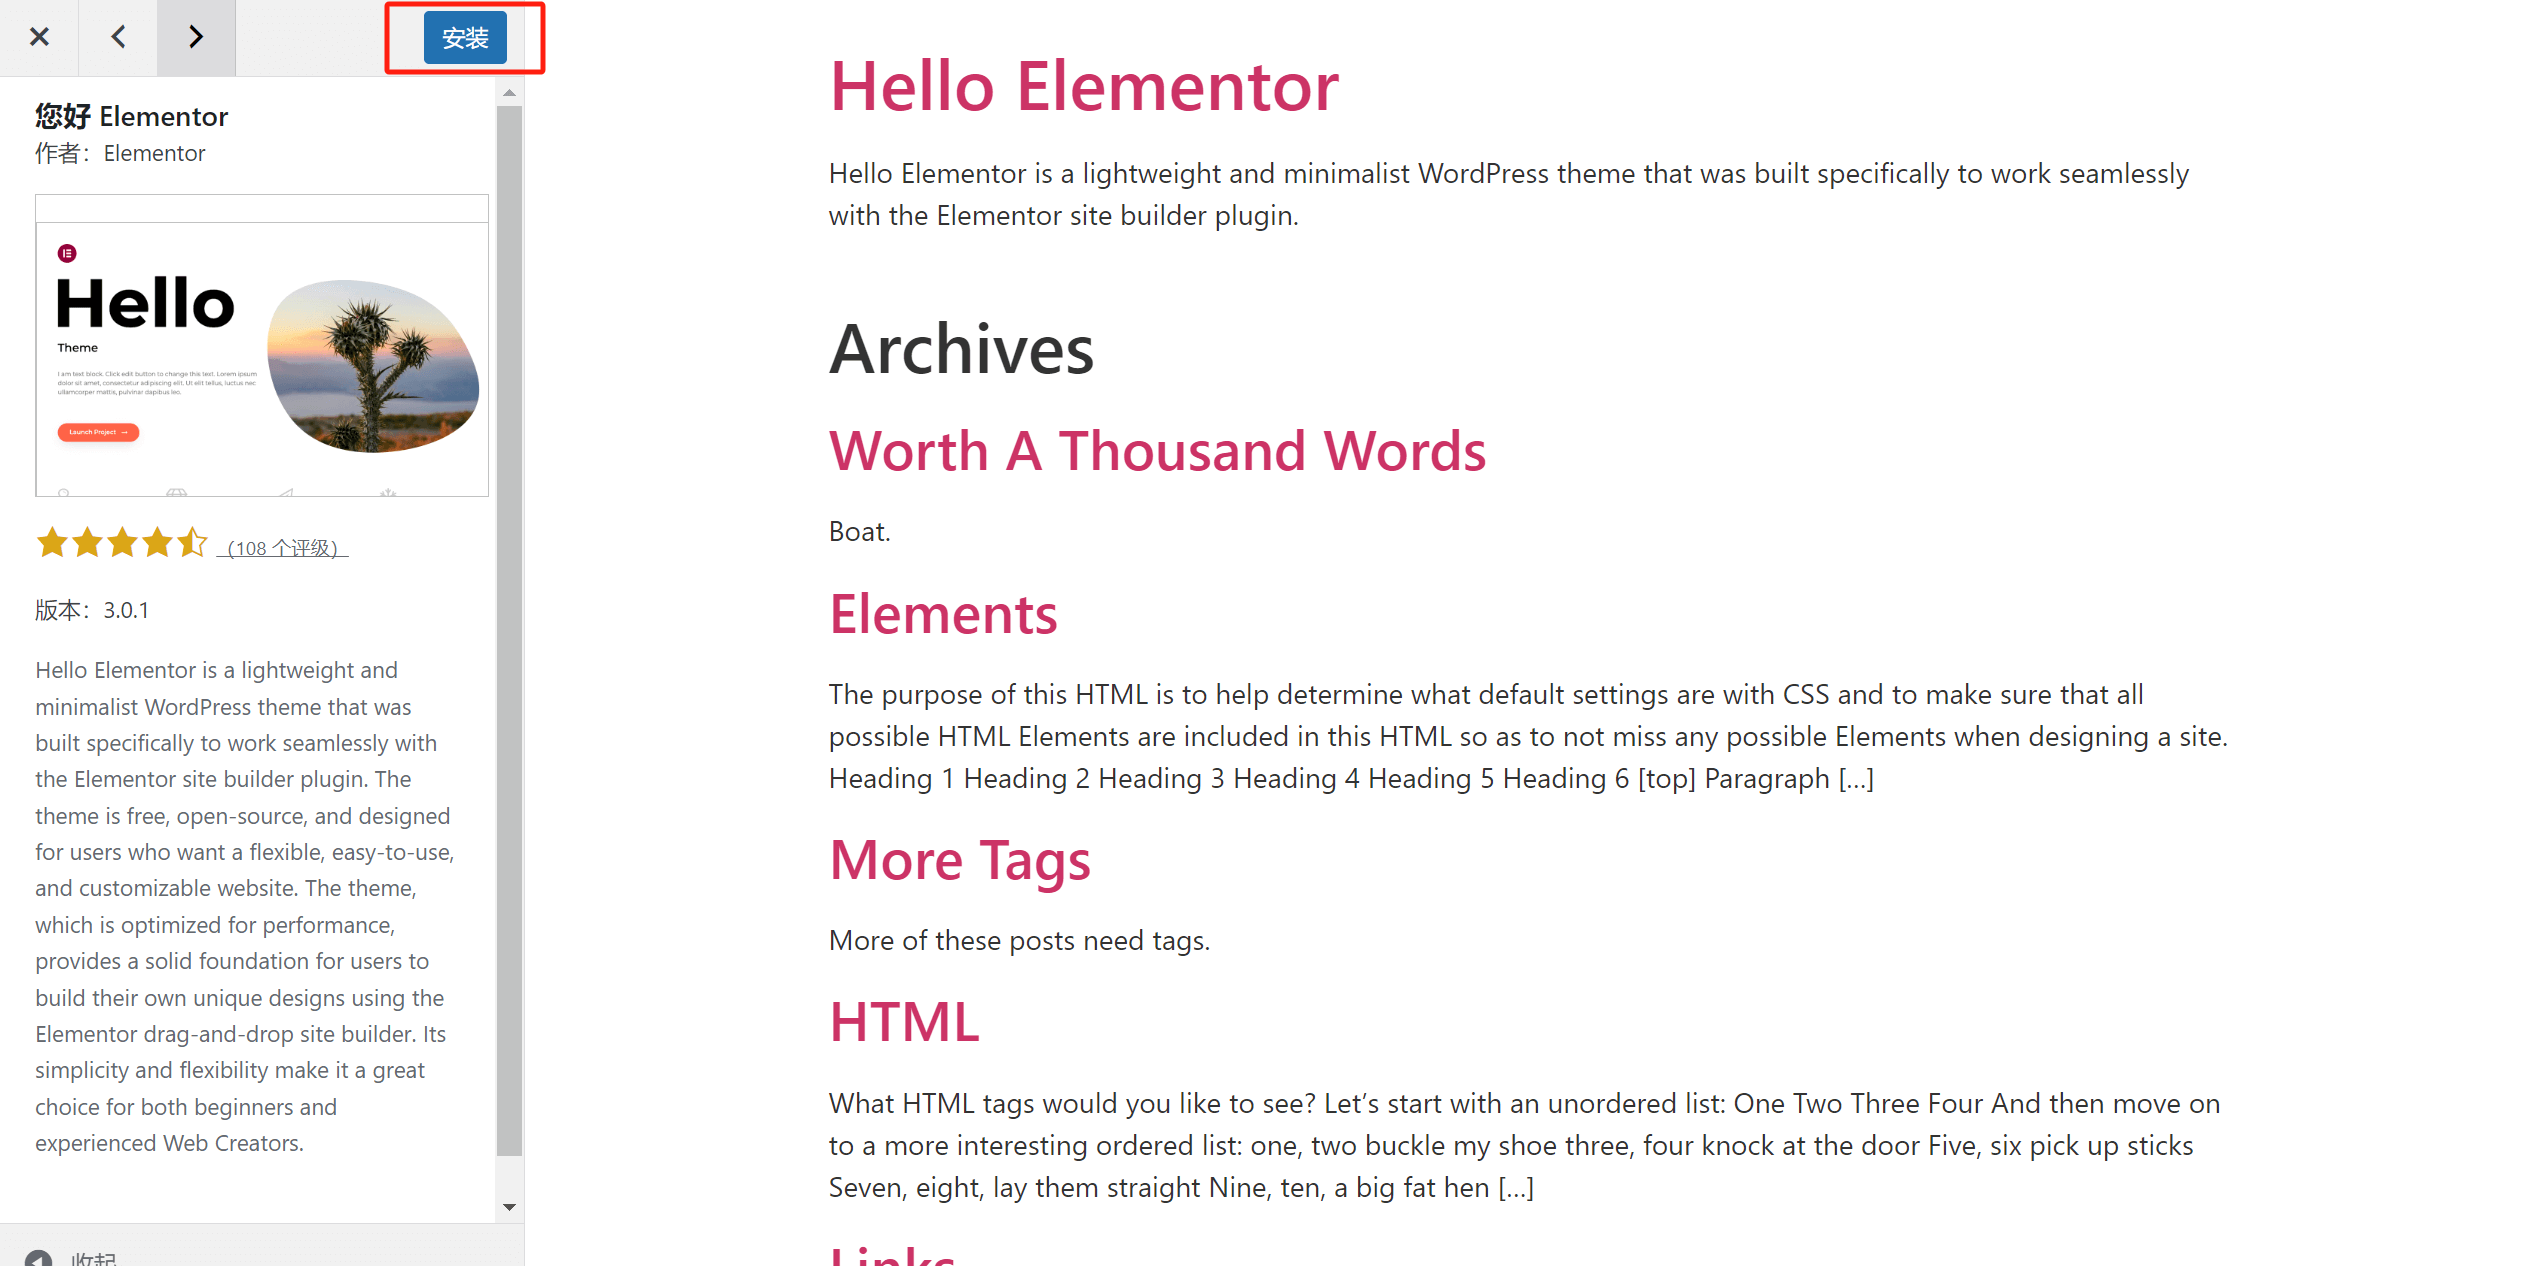
As shown in the above picture, after clicking the "Preview" button, after confirming the style of the theme in preview mode, you can directly click the "Install" button marked with a red box in the above picture to install the theme, or you can return to the homepage of the previous level WordPress theme market and hover your mouse over the theme and click the "Install" button to install the theme.
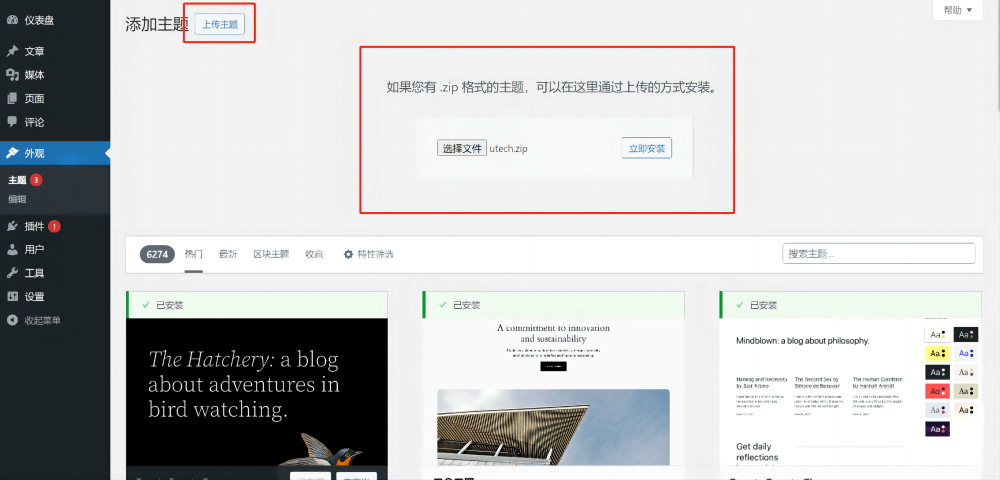
Method 2: Upload a third-party theme file installation package and install a WordPress theme
After downloading the theme installation file package from a third-party theme market or theme developer to your local computer, follow the path marked in the red box in the figure below (Appearance - Theme - Add New Theme in the left sidebar) and use the WordPress function to upload the theme file for installation.
The page after clicking the "Add New Theme" button is as shown in the figure below. After continuing to click the "Upload Theme" button marked with a red box in the figure below, a window for selecting the theme file and installing the theme as shown in the red box in the figure below will pop up. After clicking "Choose File" to upload the theme file, continue to click the "Install Now" button for the theme.
The page after the theme file package is successfully installed is as shown in the figure below. Confirm whether the page prompts "Theme Installation Successful" as shown in the red box in the figure below, and finally click the Activate button. At this point, the operation of uploading a third-party theme file installation package to install the WordPress theme has been completed.

三、How to Delete a WordPress Theme
Enter the WordPress theme management interface as shown in the path below (Appearance-Theme in the left sidebar), hover the mouse over the theme to be deleted, and click "Theme Details" to enter the details page of the theme to be deleted. As shown in the figure below:
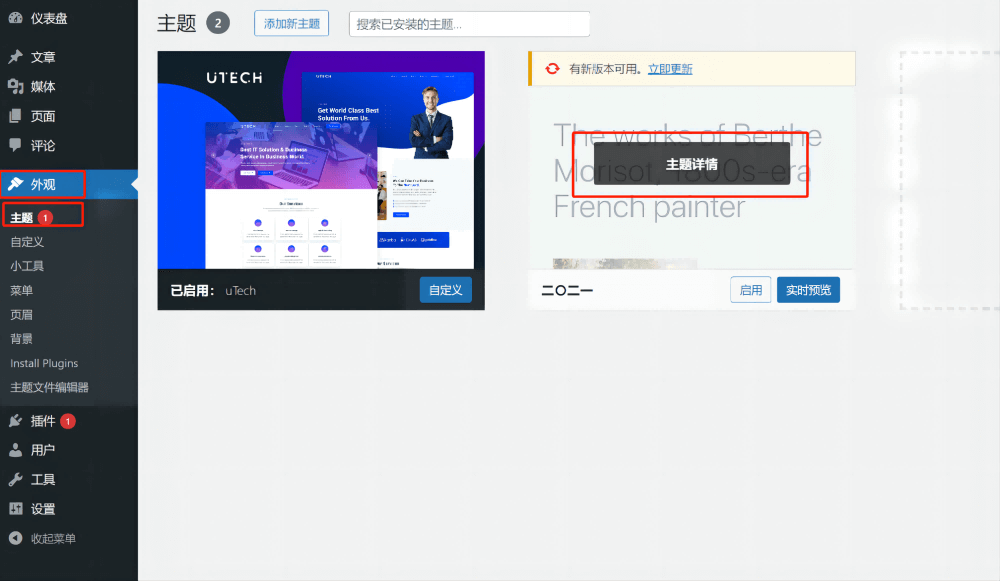
The details page of a WordPress theme is shown below:
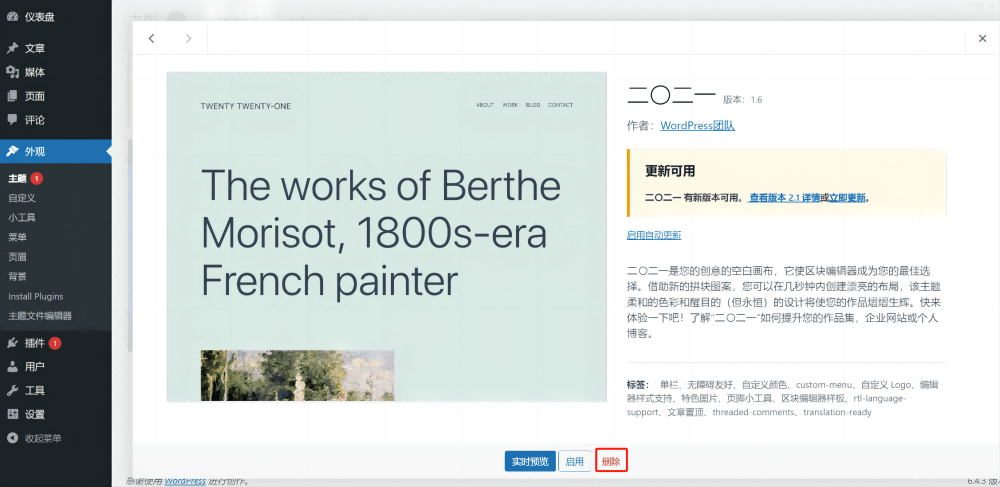
Click the "Delete" button highlighted in the red box in the image above to remove the theme from WordPress. Please note that once a theme is deleted, it cannot be recovered, so proceed with caution. If you simply want to deactivate a theme, you can do so by activating a new theme—WordPress will automatically set the previously active theme to inactive.
四、Shopify Theme Installation Tutorial
Shopify’s theme installation process is similar to WordPress, with two methods available for installing Shopify themes: directly from the Shopify Theme Store or by using a theme file package from a third-party theme developer. The method you use to install a theme on your Shopify store depends on the source of the theme you choose. Without further ado, let's begin demonstrating the two installation methods for Shopify themes.
Method 1: Purchase a theme from the Shopify theme market and install it
Step 1: Go to the Shopify Theme Marketplace to find a theme
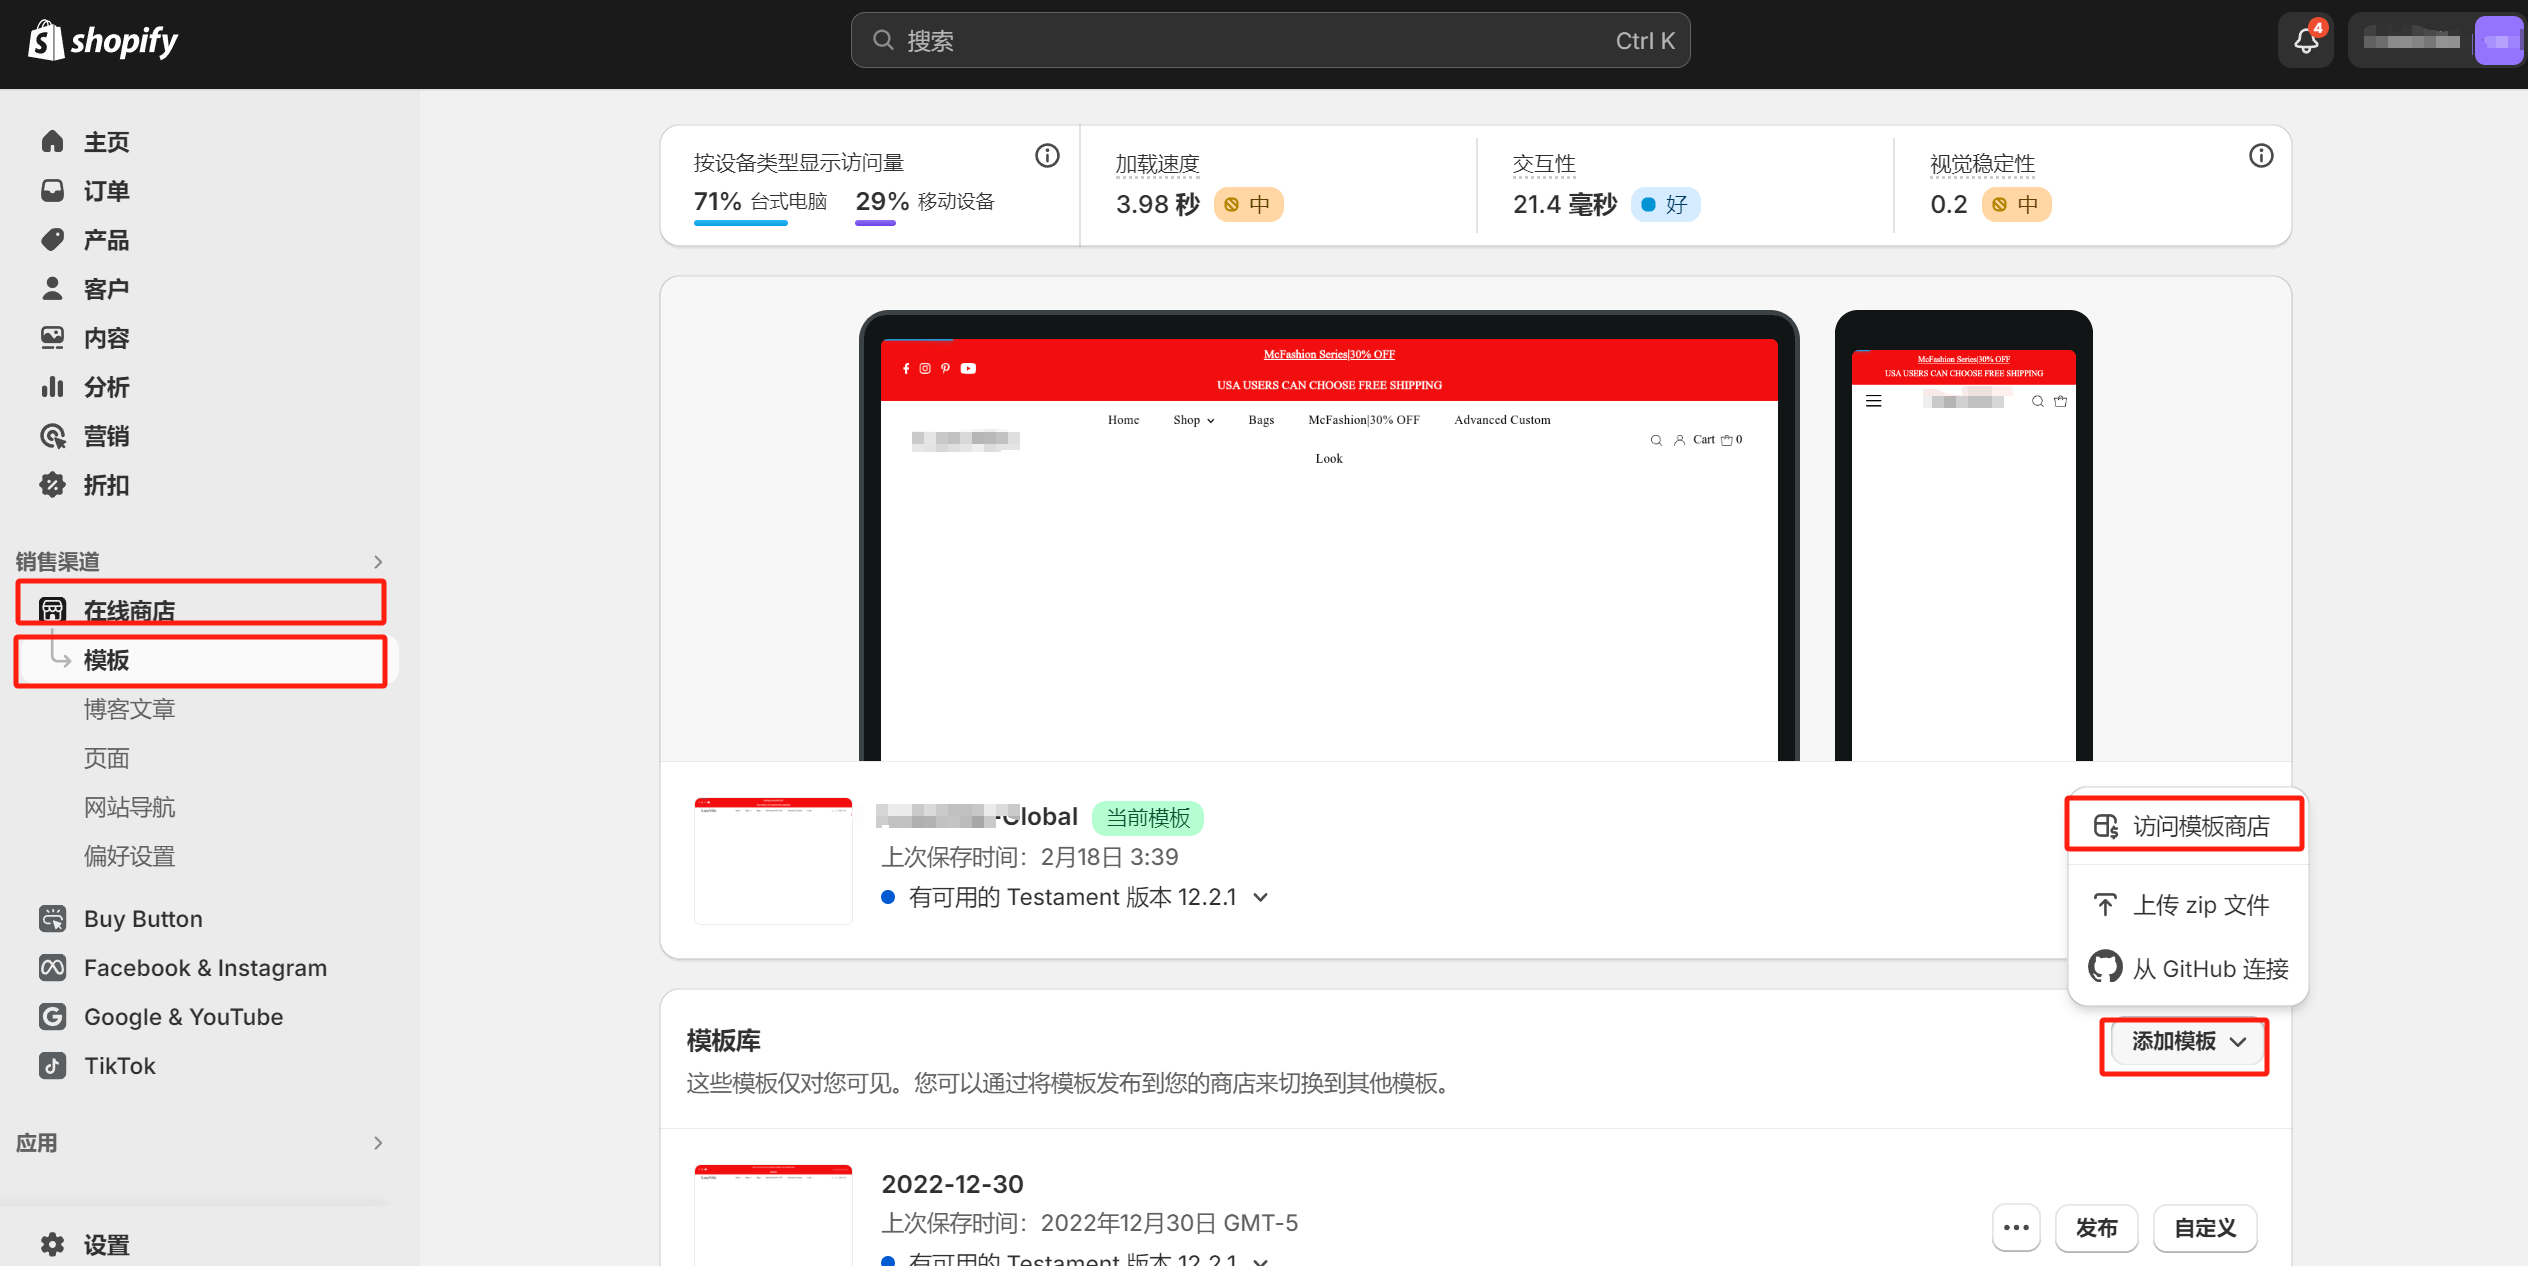
As shown in the image below, in the Shopify admin dashboard, navigate to the path (Sidebar > Online Store > Themes) and click the "Add Theme" button on the right. A menu will pop up with available options. Click on the "Visit Theme Store" button to enter the Shopify Theme Store page.
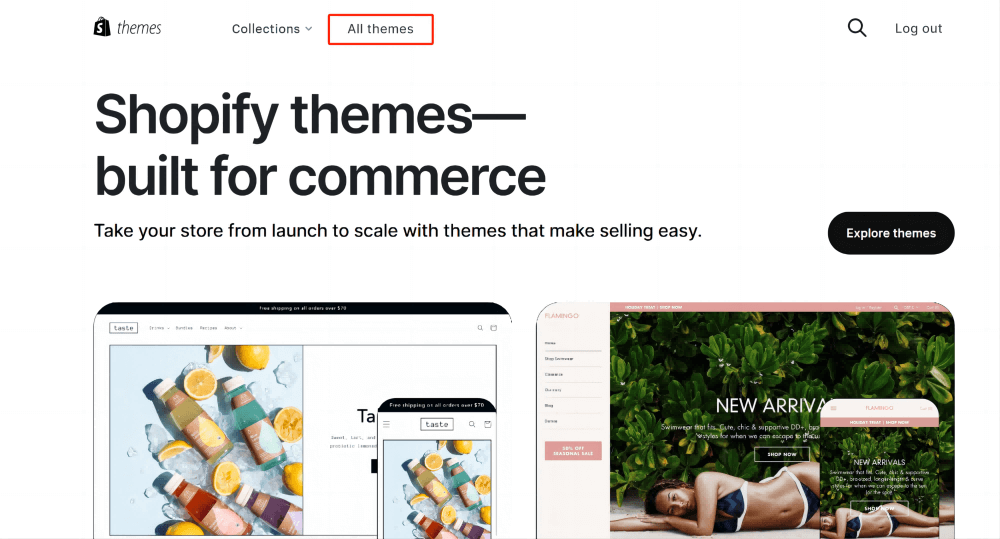
In the Shopify Theme Store page, as shown in the image below, click the "All themes" hyperlink to view all the themes available in the Shopify Theme Store.
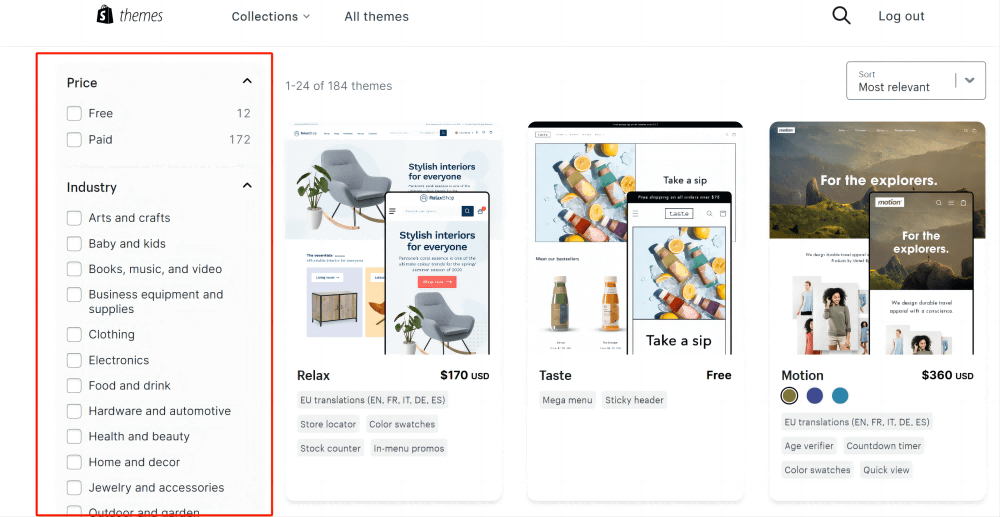
The archive page of all theme products in the Shopify theme market is shown in the figure below. You can use the filter on the left to select the corresponding parameters to find the required theme.
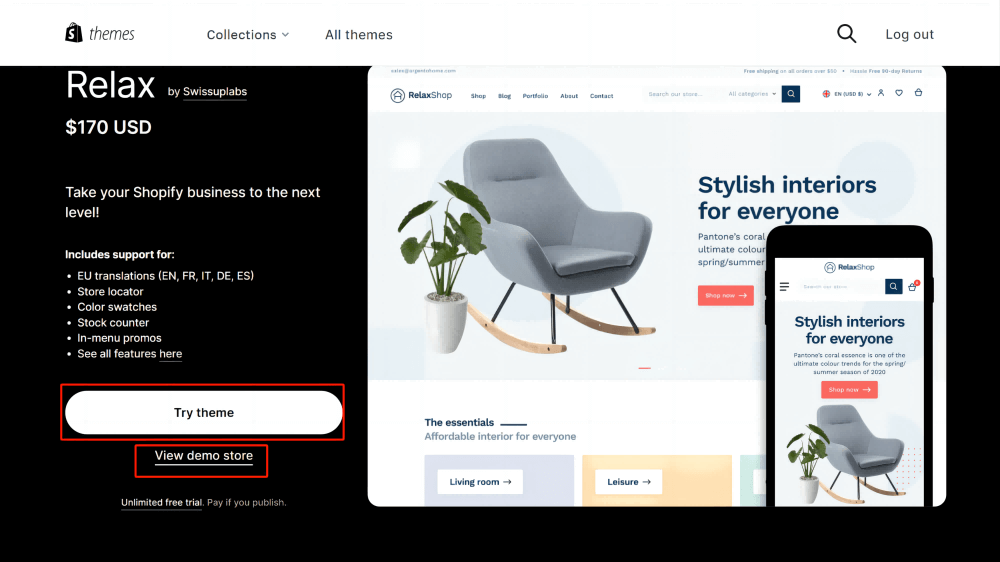
Step 2: Preview and Try Out Your Shopify Theme
In the Shopify Theme Store, after clicking on the selected theme, you will be directed to the theme's detail page, as shown in the image below. On this page, click the "View demo store" hyperlink to see the live demo of the theme. Once you've confirmed the theme you want to purchase, click the "Try theme" button to install the theme. Unlike WordPress, Shopify themes do not require a purchase to install, but you need to purchase them before they can be published. Only published themes will appear on the front end of your Shopify store. This means that even after installing the theme, you must follow the steps in the next section to publish the theme and make it live.
Step 3: Purchase and publish the theme
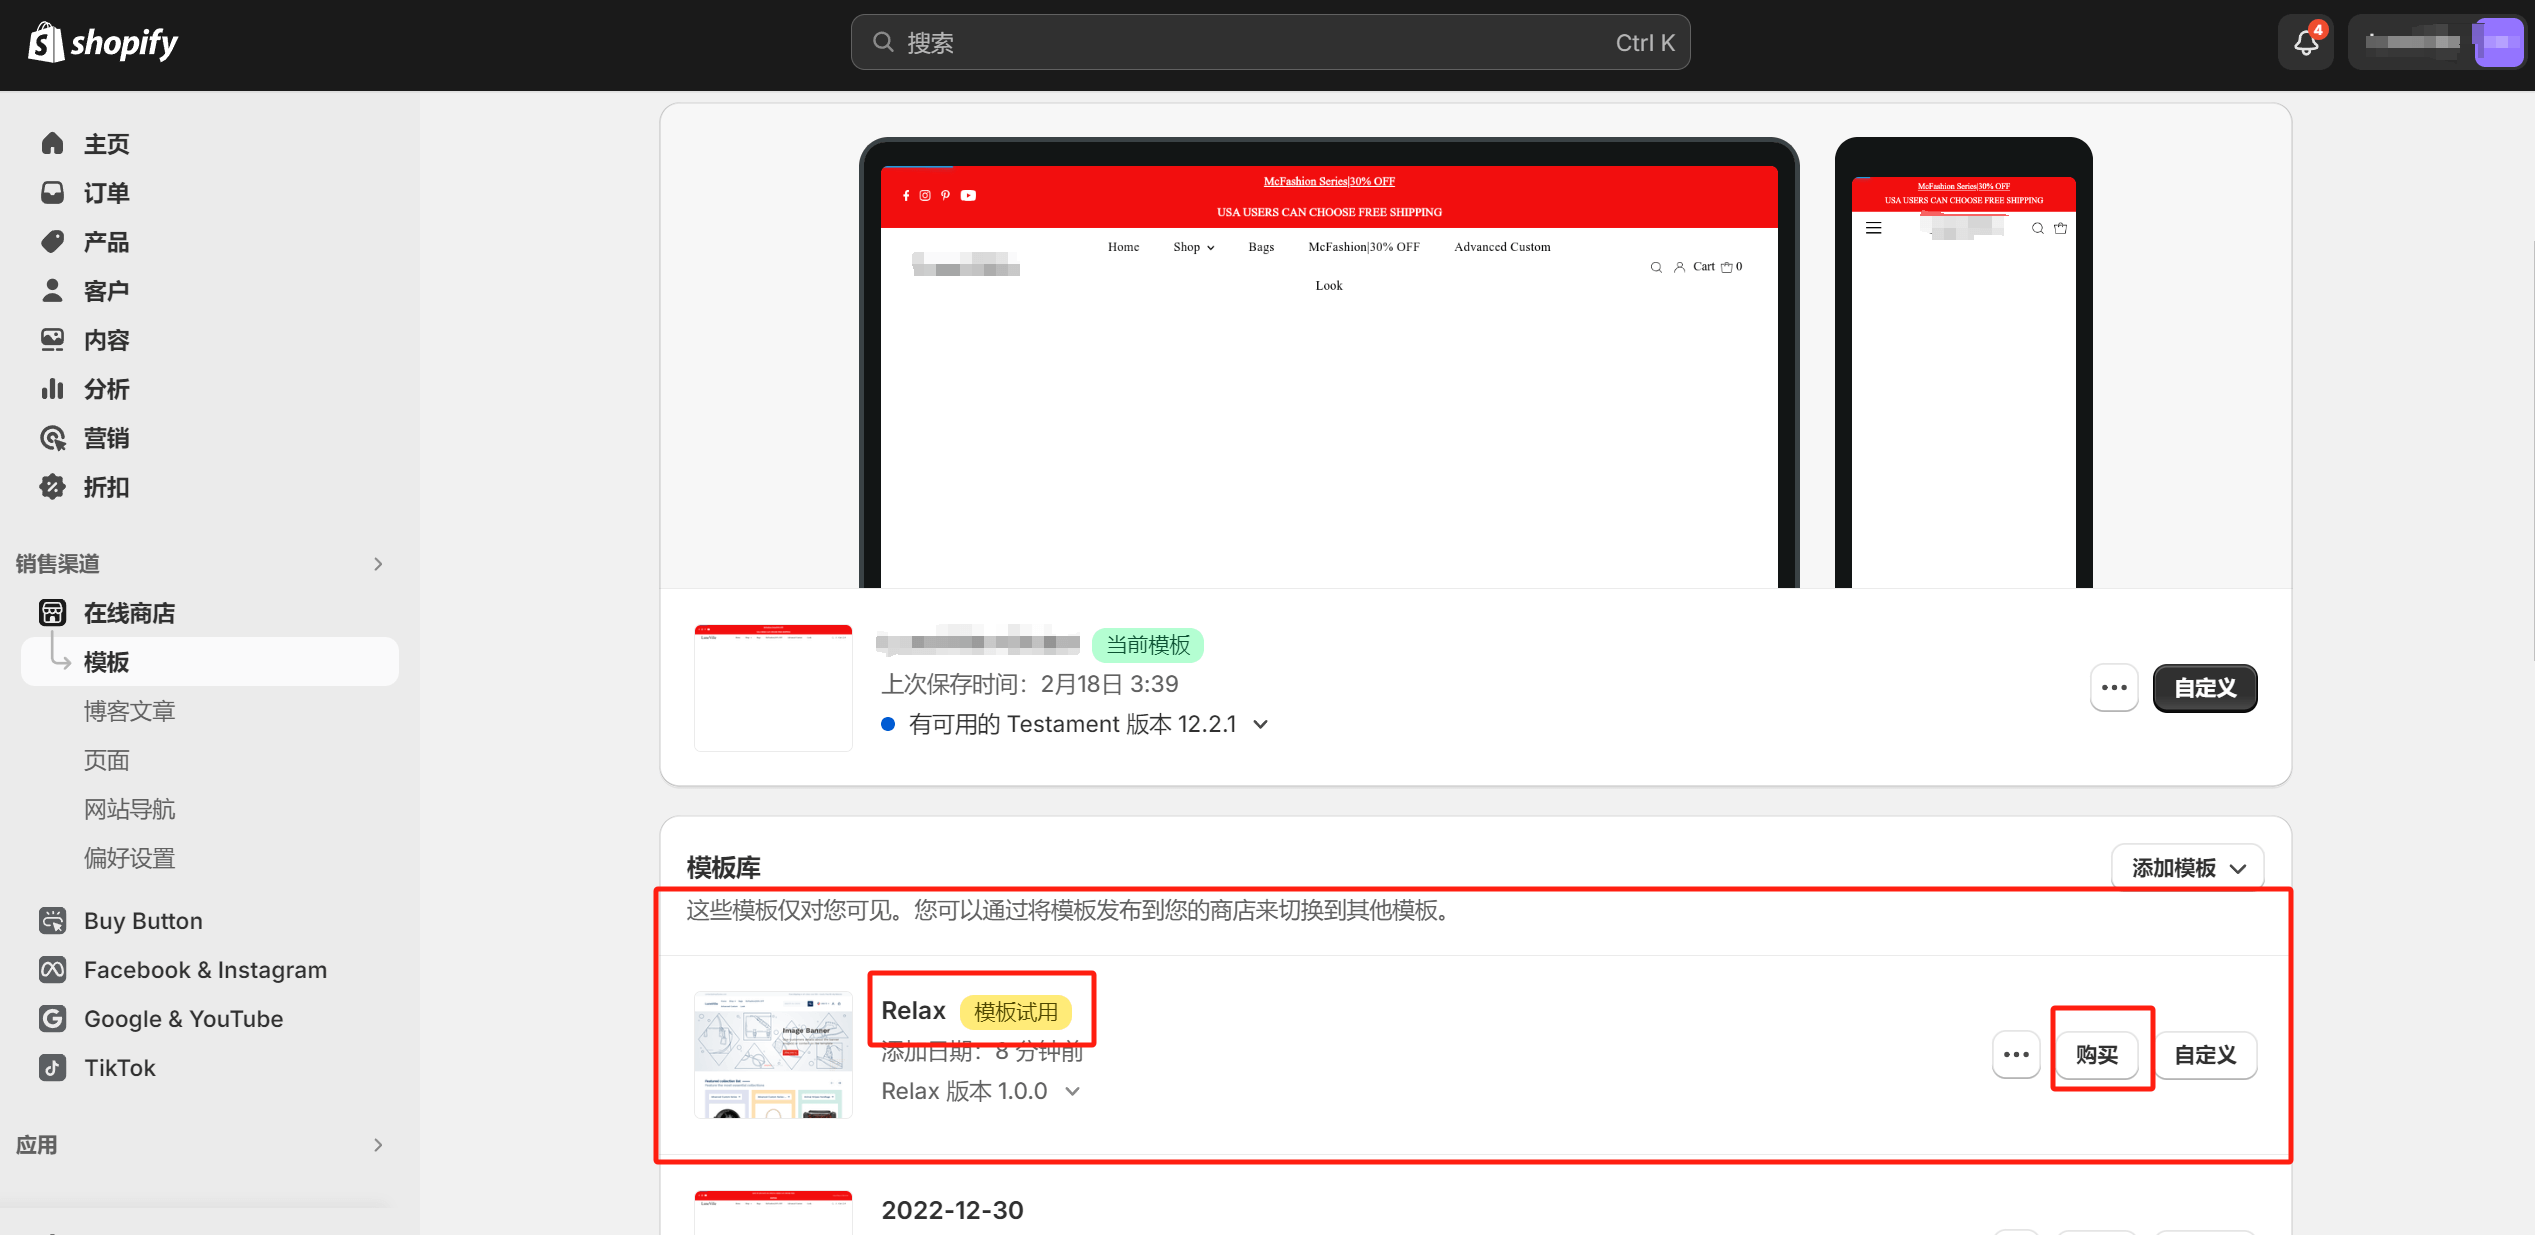
Following the previous step, after the theme is installed, as shown in the image below, you will see the newly installed theme listed under the "Online Store > Themes" section in Shopify. At this point, the newly installed theme will be in trial mode, as indicated by the red box. To proceed, click the "Buy" button on the right and follow the payment prompts to complete the purchase of the theme.
After completing the purchase of the Shopify theme, the "Buy" button in the theme management interface (as shown above) will be updated to a "Publish" button. By clicking the "Publish" button, the front-end of your Shopify site will be updated with the features and styles of the newly installed theme. At this point, the process of installing a theme directly from the Shopify Theme Store is complete.
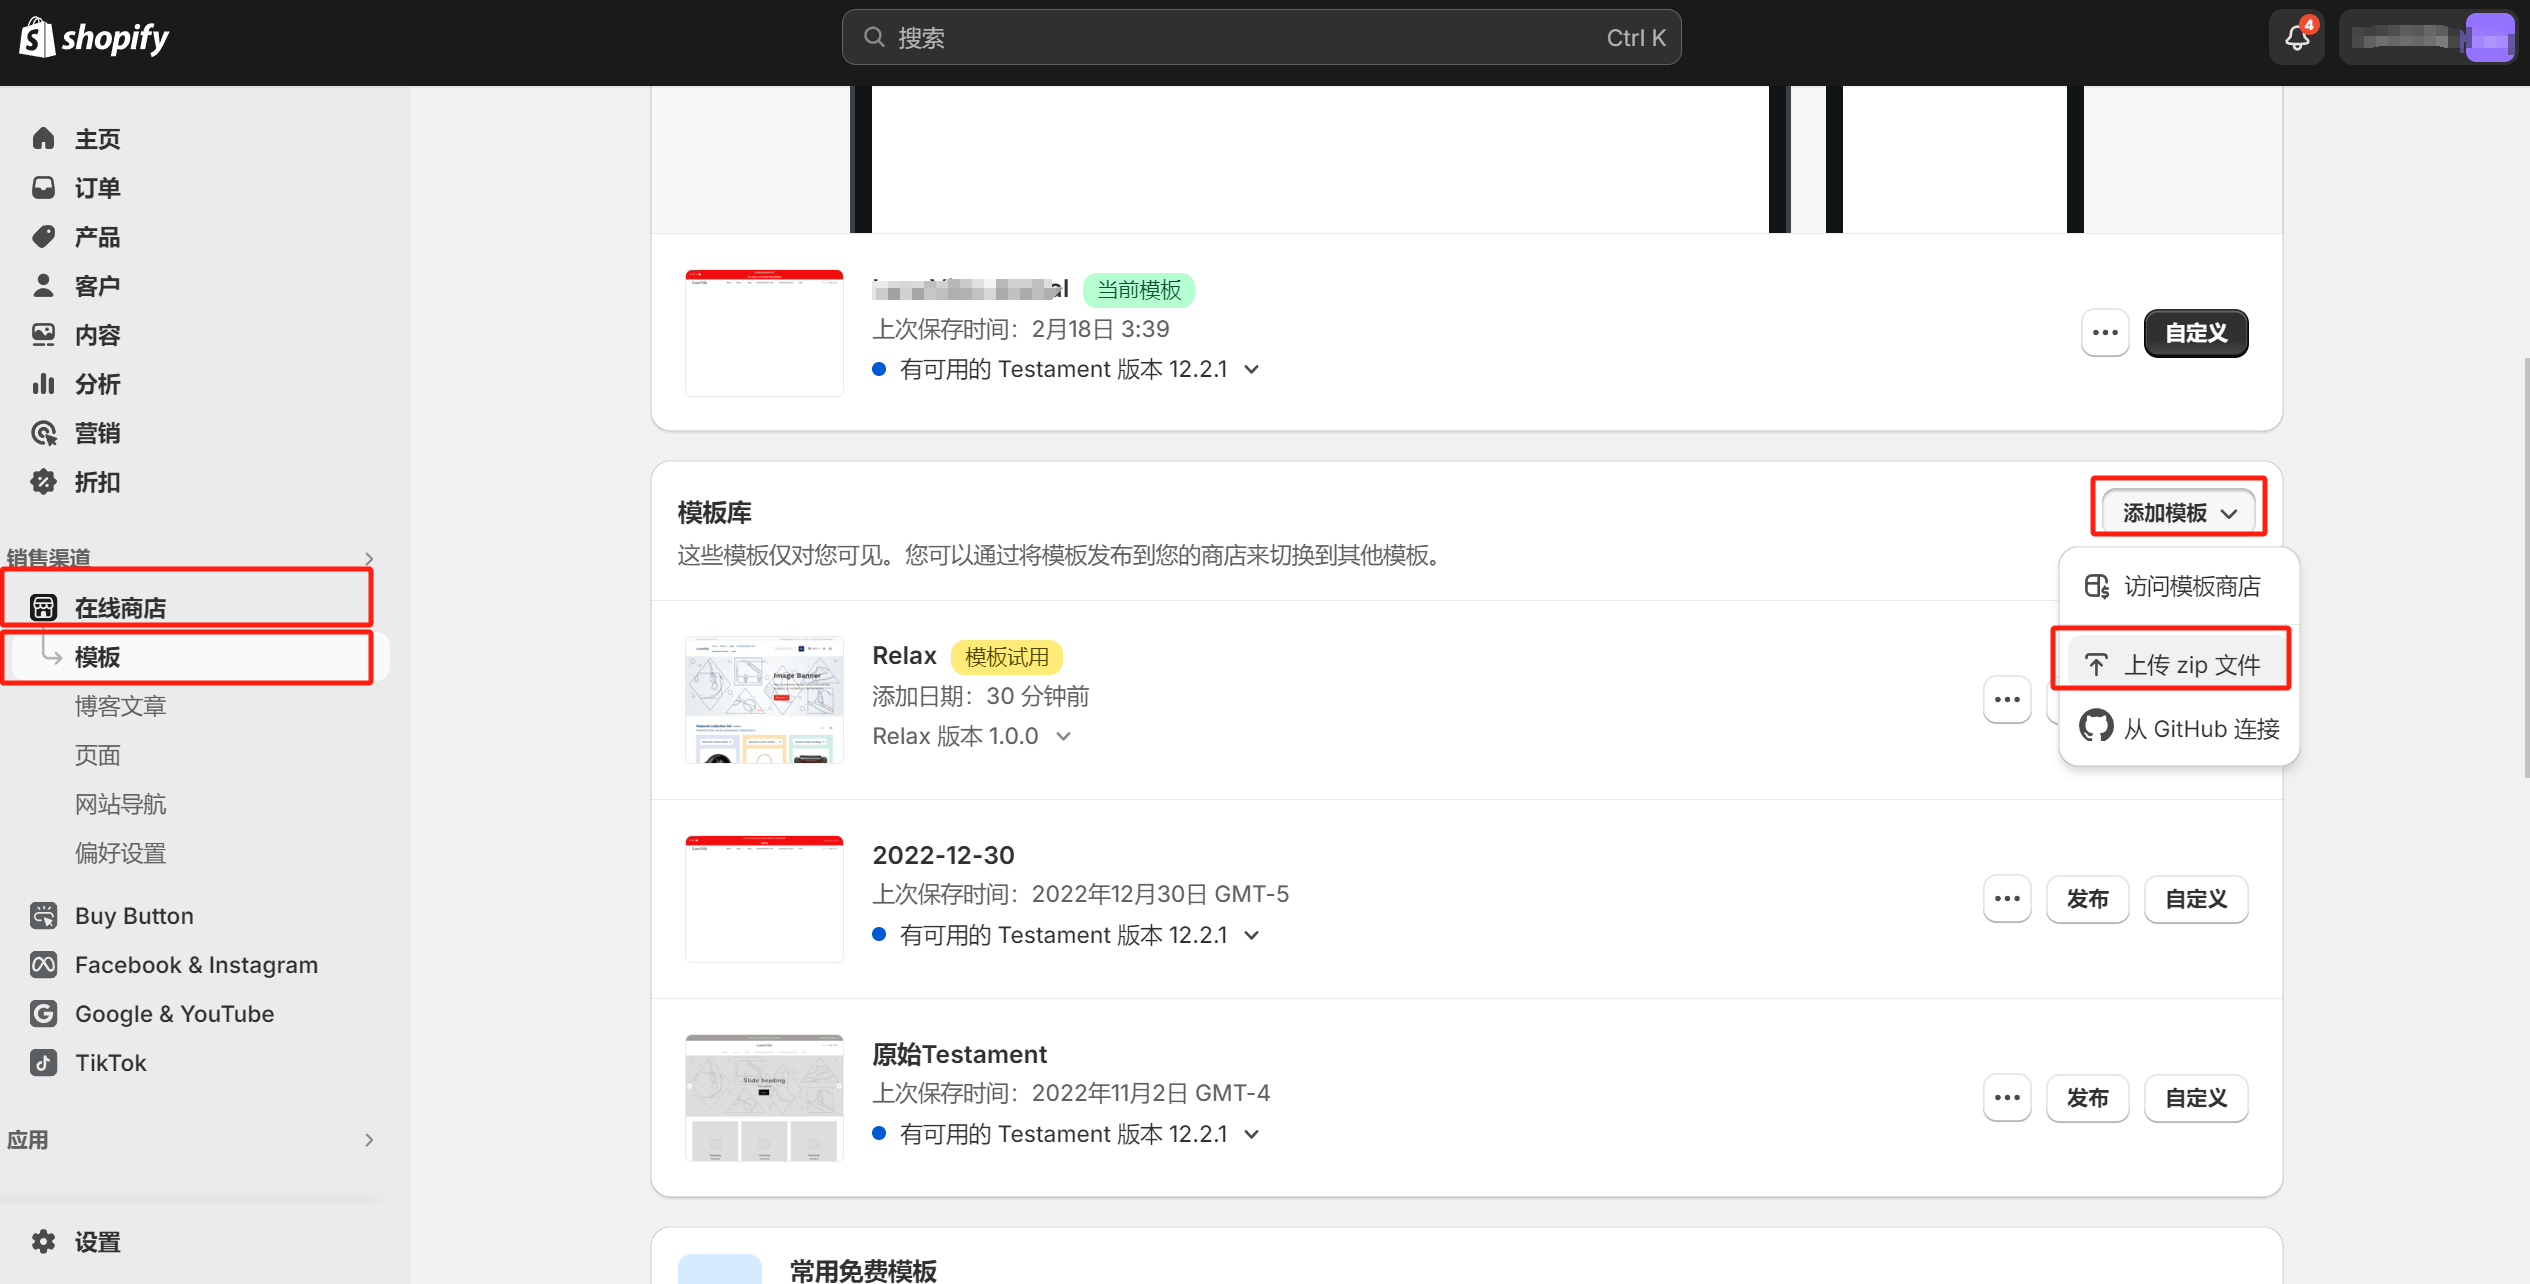
Method 2: Upload the Shopify theme file to install the theme
After downloading the theme installation package from the third-party Shopify theme market to your local computer, the process is similar to accessing the Shopify Theme Store. In the same "Online Store - Themes" section in the sidebar, click the "Add Theme" button. However, instead of clicking "Visit Theme Store," you will click the "Upload ZIP file" button to upload your Shopify theme installation package. It's important to note that Shopify only accepts ZIP format for the theme installation package, so make sure the file format is ZIP, otherwise, the installation will fail.
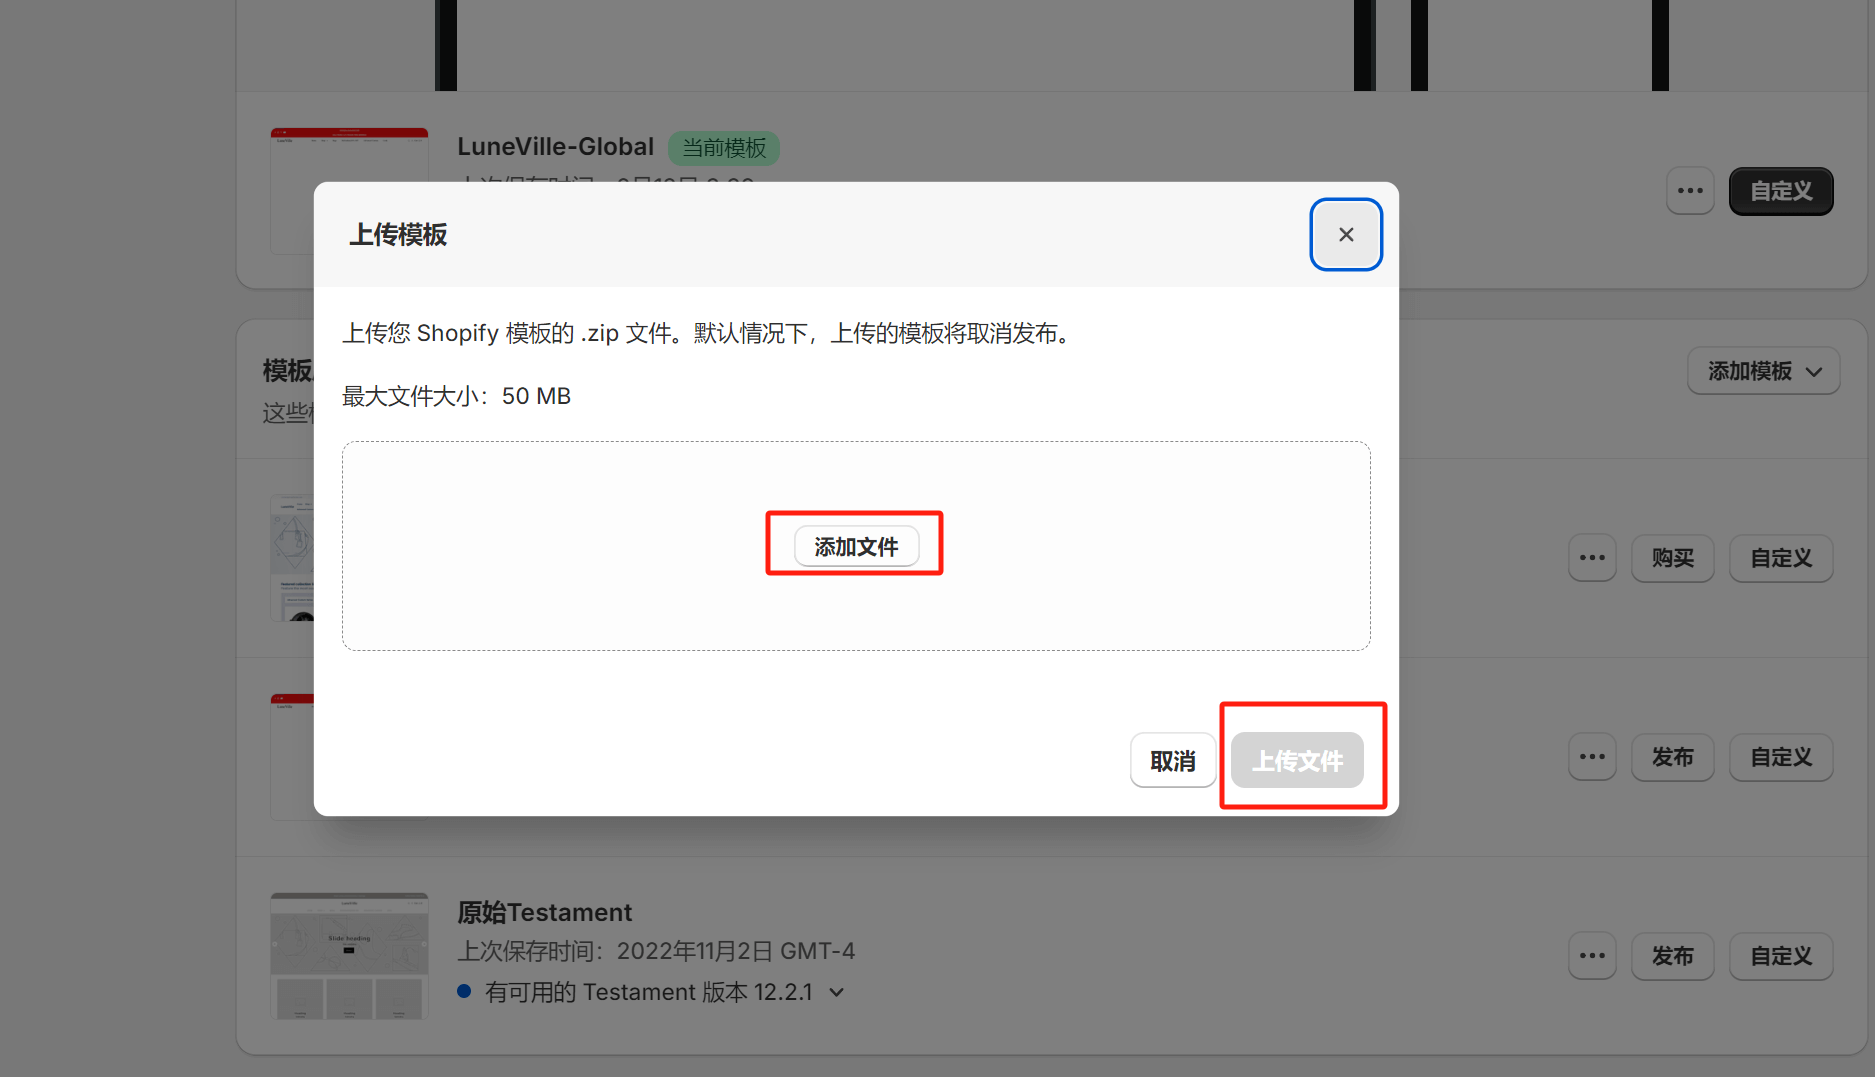
After clicking the "Upload ZIP file" button, a window like the one shown below will pop up. In this window, continue by clicking the "Add files" button to select your Shopify theme installation package. Once the file is selected, the "Upload file" button on the lower-right side will become active. Click "Upload file," and after the upload is complete, the newly uploaded theme will appear in the theme list. Click the "Publish" button next to the theme, and your theme will be installed and published. At this point, the process of installing a theme in Shopify through uploading the theme file installation package is complete.
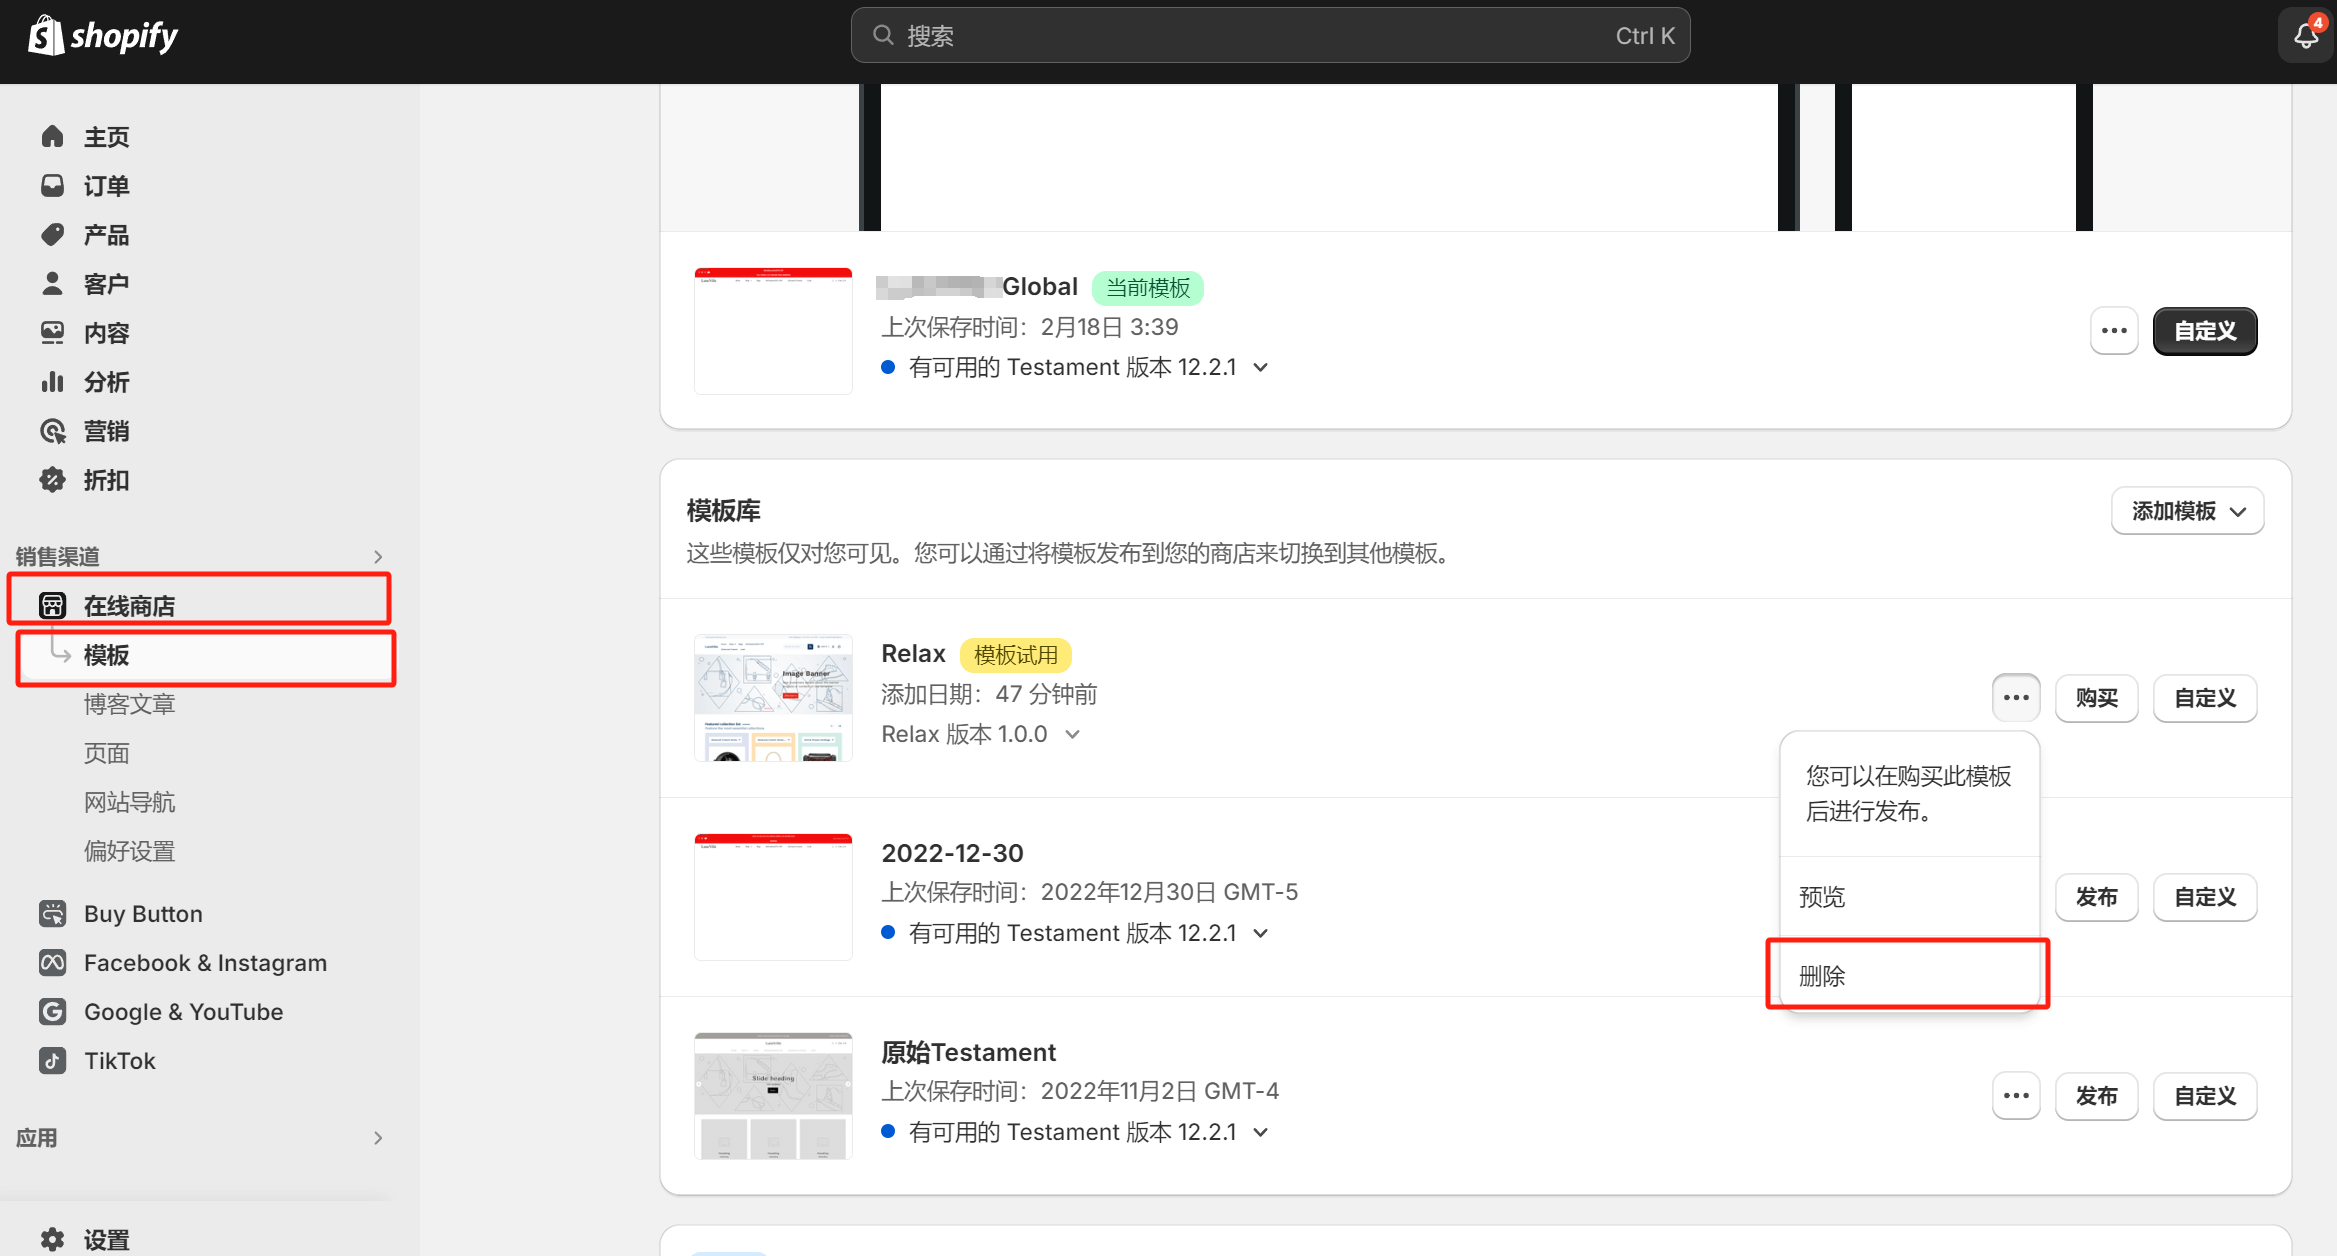
五、How to Delete a Theme in Shopify
Consistent with the path for installing the theme, in the visualization window of "Online Store-Template", click the more function button of the theme that needs to be deleted. The specific operations are as shown in the red box in the figure below. Just click Delete.
Conclusion: The above content concludes the article "How to Select and Install WordPress and Shopify Themes." For independent websites, the theme is a crucial component. Selecting a theme should be based on a multidimensional and multi-criteria evaluation that aligns with the site's overall plan. Depending on the platform where the theme is purchased, readers can choose one of the installation methods mentioned above and follow each step accordingly. Even beginners who are new to building independent websites should be able to complete the theme installation process for WordPress or Shopify on their own.
Finally, choosing to build a website using a commercial theme through template-based installation offers the advantage of requiring minimal effort in page design, making it especially suitable for users who do not have high demands for Web Design. Commercial themes provide preset general page layouts, and purchasing a theme essentially means acquiring these ready-made design solutions, allowing you to quickly create a website with a professional appearance. However, during the actual process, if you encounter questions about template-based site building or require further customized design and functional development, feel free to Contact the Logic Digital Technology Team. We specialize in WordPress Website Development, design, and programming, and we will provide you with efficient and professional solutions to ensure the smooth implementation of your project.
Logic Digital Technology (SZLOGIC) All rights reserved. Reproduction is prohibited.


