WordPress Development: Global Settings Before Building
Before starting WordPress website development, we must first perform a series of global configurations. These configurations are not independent but are interconnected and follow a certain sequence. Proper global configuration not only optimizes the development process and improves efficiency but also lays a solid foundation for the long-term stable operation of the website. On the other hand, if these key settings are ignored, unexpected issues may arise during development, such as being unable to upload materials, routing errors, page style issues, and plugin malfunctions, which could even lead to the website crashing and affect overall operations. Worse still, if the code is overwritten by unknown factors, the entire website may need to be rebuilt, wasting a significant amount of time and resources, and damaging confidence in the website's operation. Therefore, at the beginning of WordPress website development, we need to follow clear steps to complete the four core configurations: WordPress server environment configuration, WordPress backend settings, WordPress theme settings, and Elementor global settings. These configurations not only affect the website's security, performance, and scalability but also determine the smoothness of subsequent development work. Proper preparation for these early tasks will make WordPress development more efficient and organized, ensuring that the website remains stable and continuously operates after launch.
In order to make it easier for readers to read and find content, the author has specially organized this WordPress tutorial in a systematic way. The directory structure of the entire tutorial strictly corresponds to the main content, ensuring clear logic and a well-defined hierarchy, helping readers gradually master the global settings and best practices before developing a WordPress website. Additionally, all major and minor headings include clickable anchor links, so if readers are unable to finish reading in one go or need to review a specific chapter during actual development, they can directly click the links in the directory to quickly jump to the corresponding section, avoiding repetitive searches and improving reading and learning efficiency. The directory of this tutorial is as follows:
- WordPress Server Environment Configuration
- WordPress Backend Settings
- WordPress Theme Settings
- Elementor Global Settings (Site Settings)
Next, we will explain in detail according to this directory to help you successfully complete the global configuration before WordPress website development and lay a solid foundation for subsequent development.
Ⅰ、WordPress Server Environment Configuration

In the process of WordPress website development, PHP parameter configuration, pseudo-static settings, and the application and installation of SSL certificates are crucial global settings. Their proper optimization directly affects the website's stability, security, SEO performance, and user experience. PHP parameter configuration determines the website's operating efficiency and stability, pseudo-static optimization helps improve search engine rankings and enhances the user browsing experience, while the installation of SSL certificates strengthens data security and website credibility. Proper configuration of these key elements not only makes the WordPress website run more smoothly, securely, and manageably, but also improves overall operational effectiveness, giving it a competitive edge in the fierce online environment. Below, the blogger will explain these critical WordPress server environment configurations in detail one by one.
1、PHP Configuration
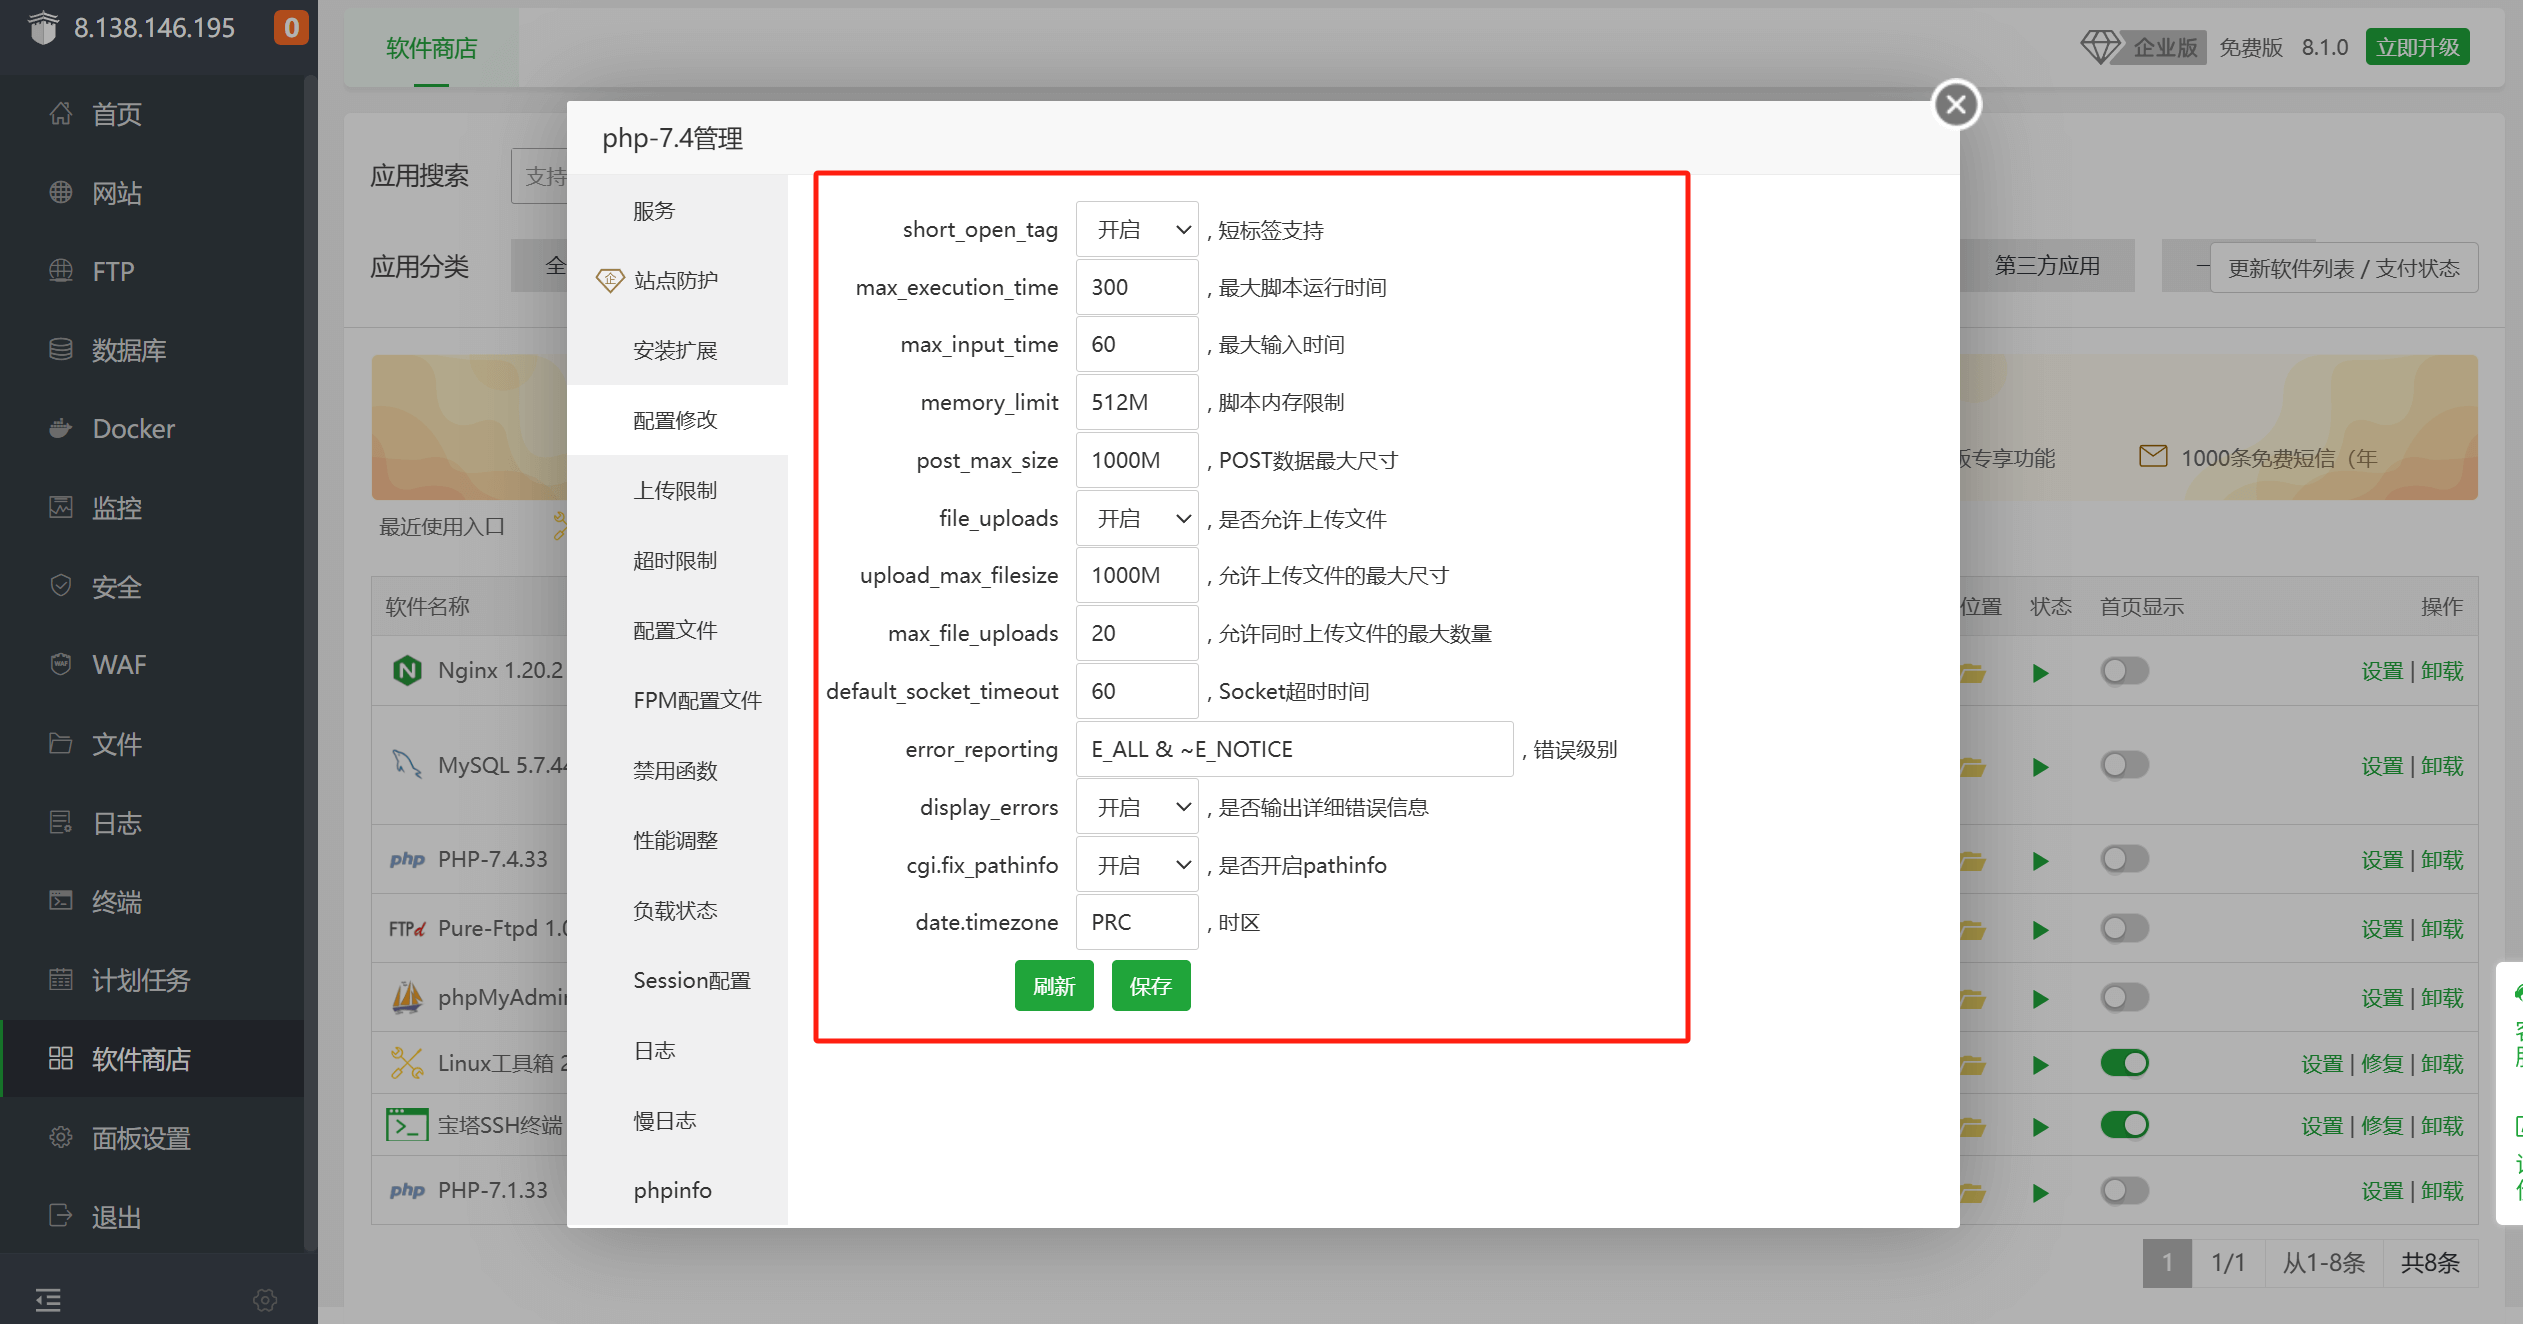
The image above shows the location of configuring key PHP parameters in the Linux control panel (BT). PHP parameter configuration determines whether the WordPress site's operating environment is stable and efficient enough. WordPress and its plugins rely on PHP to execute various tasks, including database queries, page rendering, file uploads, etc. If PHP parameters are set improperly, such as setting the memory_limit (PHP memory limit) too low, it may cause the website to crash when running large plugins (such as WooCommerce, Elementor), or even result in a "memory exhausted" error. Adjusting upload_max_filesize and post_max_size can resolve the file upload size limitation, ensuring that users can smoothly upload large images, videos, or data files. This is especially important when the site needs to import product information, backup and restore, or upload multimedia content. Proper configuration of these parameters can effectively prevent limitations caused by server resources from affecting website functionality and improve the efficiency of WordPress operations. Below are the specific parameter values for these key PHP configuration items:
(1) Set PHP memory limit (memory_limit) to 512MB or higher
memory_limit specifies the maximum amount of memory a PHP script is allowed to use during execution. WordPress relies on PHP to perform various operations, such as processing dynamic requests, executing plugin and theme functions, etc. If the memory limit is too low, it may cause a white screen (Fatal error: Allowed memory size exhausted), especially when running complex plugins (such as WooCommerce, Elementor) or importing large amounts of data.
(2) Set PHP maximum file upload size (upload_max_filesize) to 500MB or higher
upload_max_filesize controls the maximum size for a single file upload. WordPress allows users to upload files like images, videos, plugins, and themes. The default PHP limit may be too small, preventing large files (such as high-resolution videos or complete backup files) from being uploaded.
(3) Set the maximum post size (post_max_size) to 100MB or higher
post_max_size affects the maximum size of the entire POST request, including form data, file uploads, etc. It needs to be at least larger than upload_max_filesize; otherwise, uploading large files will still fail. For WordPress, this parameter is particularly important when importing large data (such as CSV, XML) or uploading multiple images.
2、Pseudo-Static Configuration
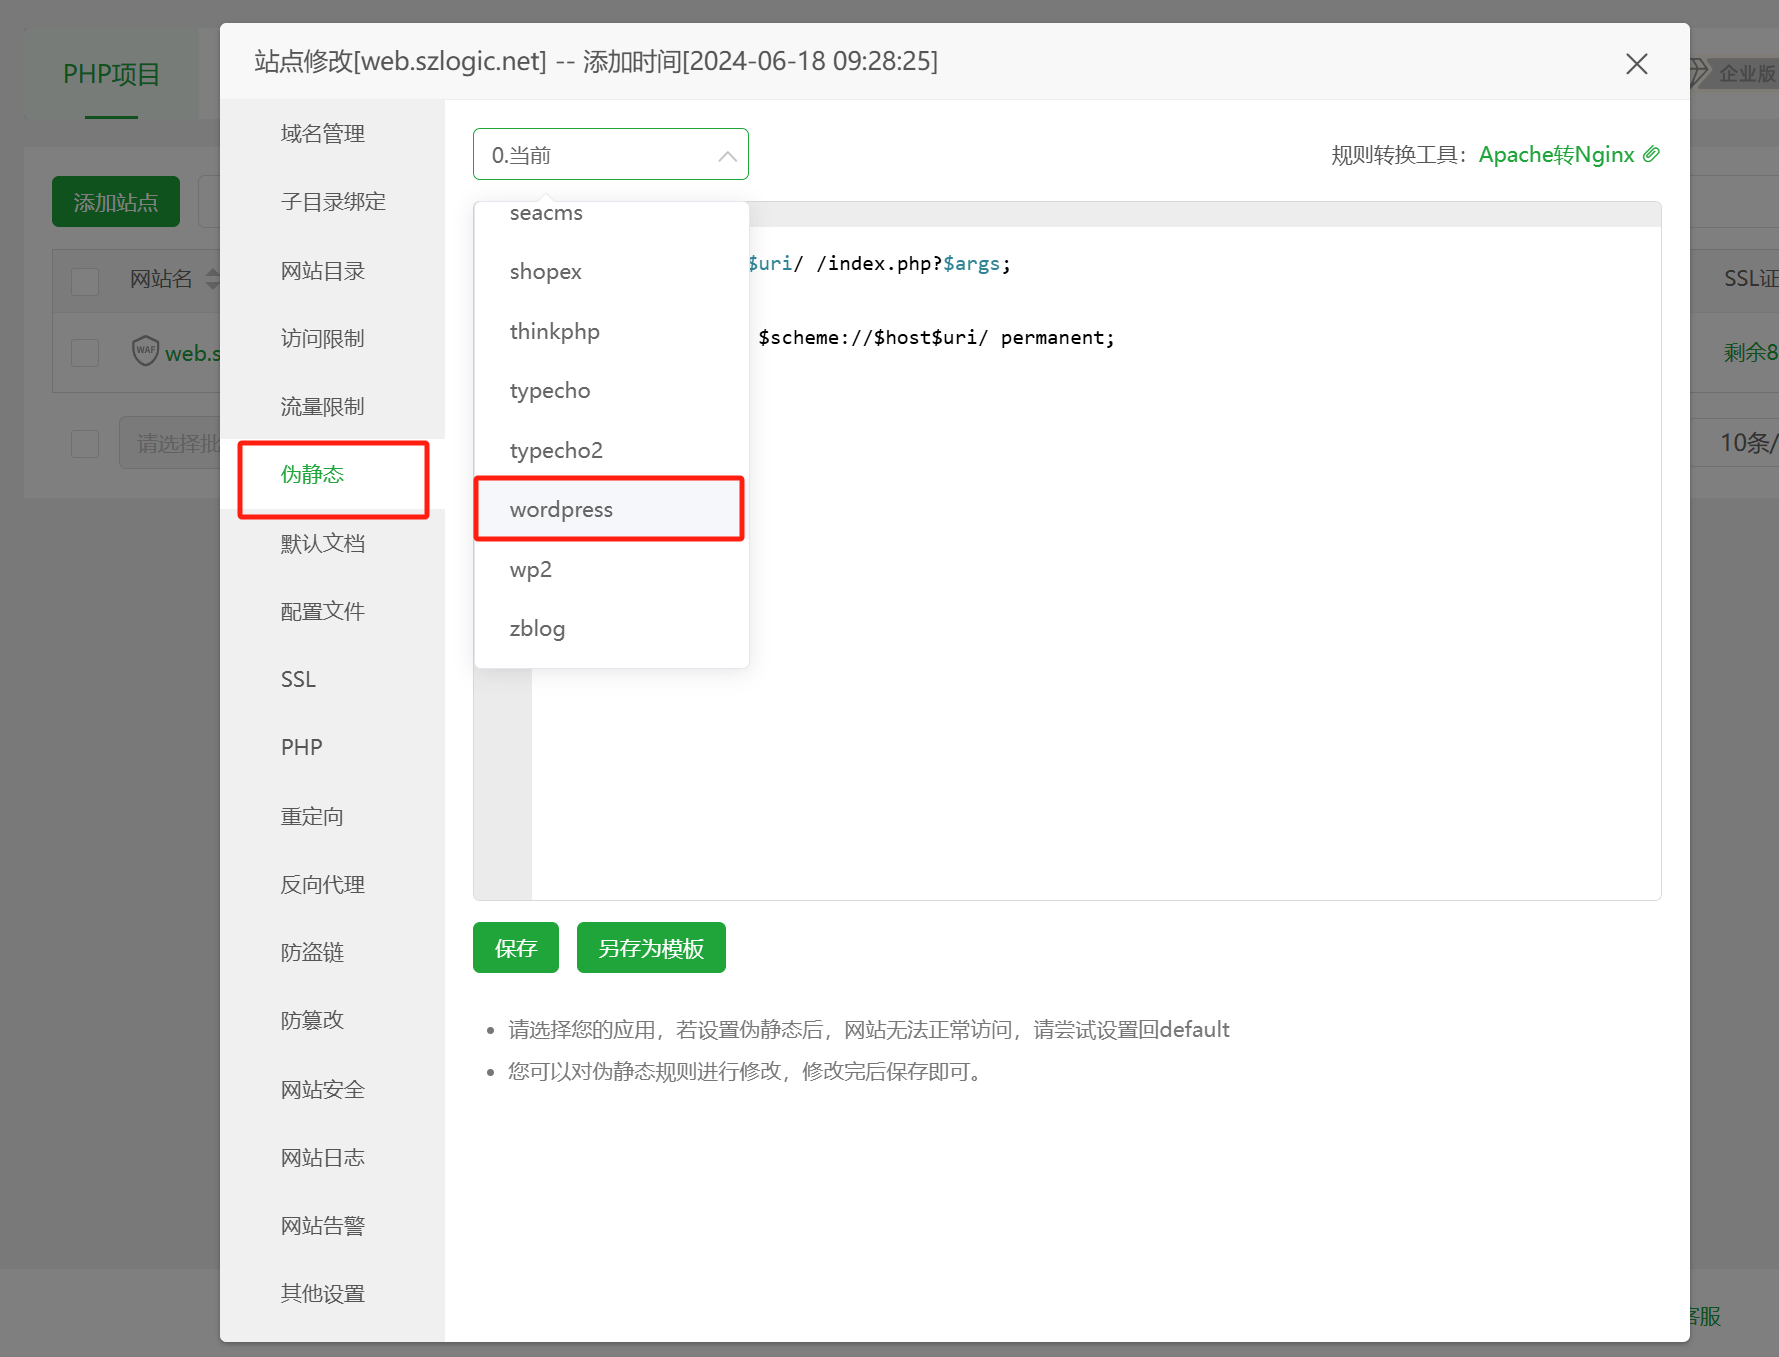
The red box in the image marks the location of the WordPress pseudo-static configuration in the BT panel. Pseudo-static configuration plays an important role in the SEO optimization and access speed of a WordPress website. The default URL structure in WordPress usually includes parameterized links like ?p=123, which is not only unfavorable for search engine optimization but also not intuitive, making it hard for users to remember and share. By configuring pseudo-static rules in the server (such as Apache's .htaccess or Nginx's rewrite rules), the URL can be beautified into a form like /category/post-name/, making the page links clearer, more SEO-friendly, and improving user experience. In addition, pseudo-static can reduce dynamic queries, improve page load speed, and lower server load, making the website more responsive.
3、Apply and Install SSL Certificates
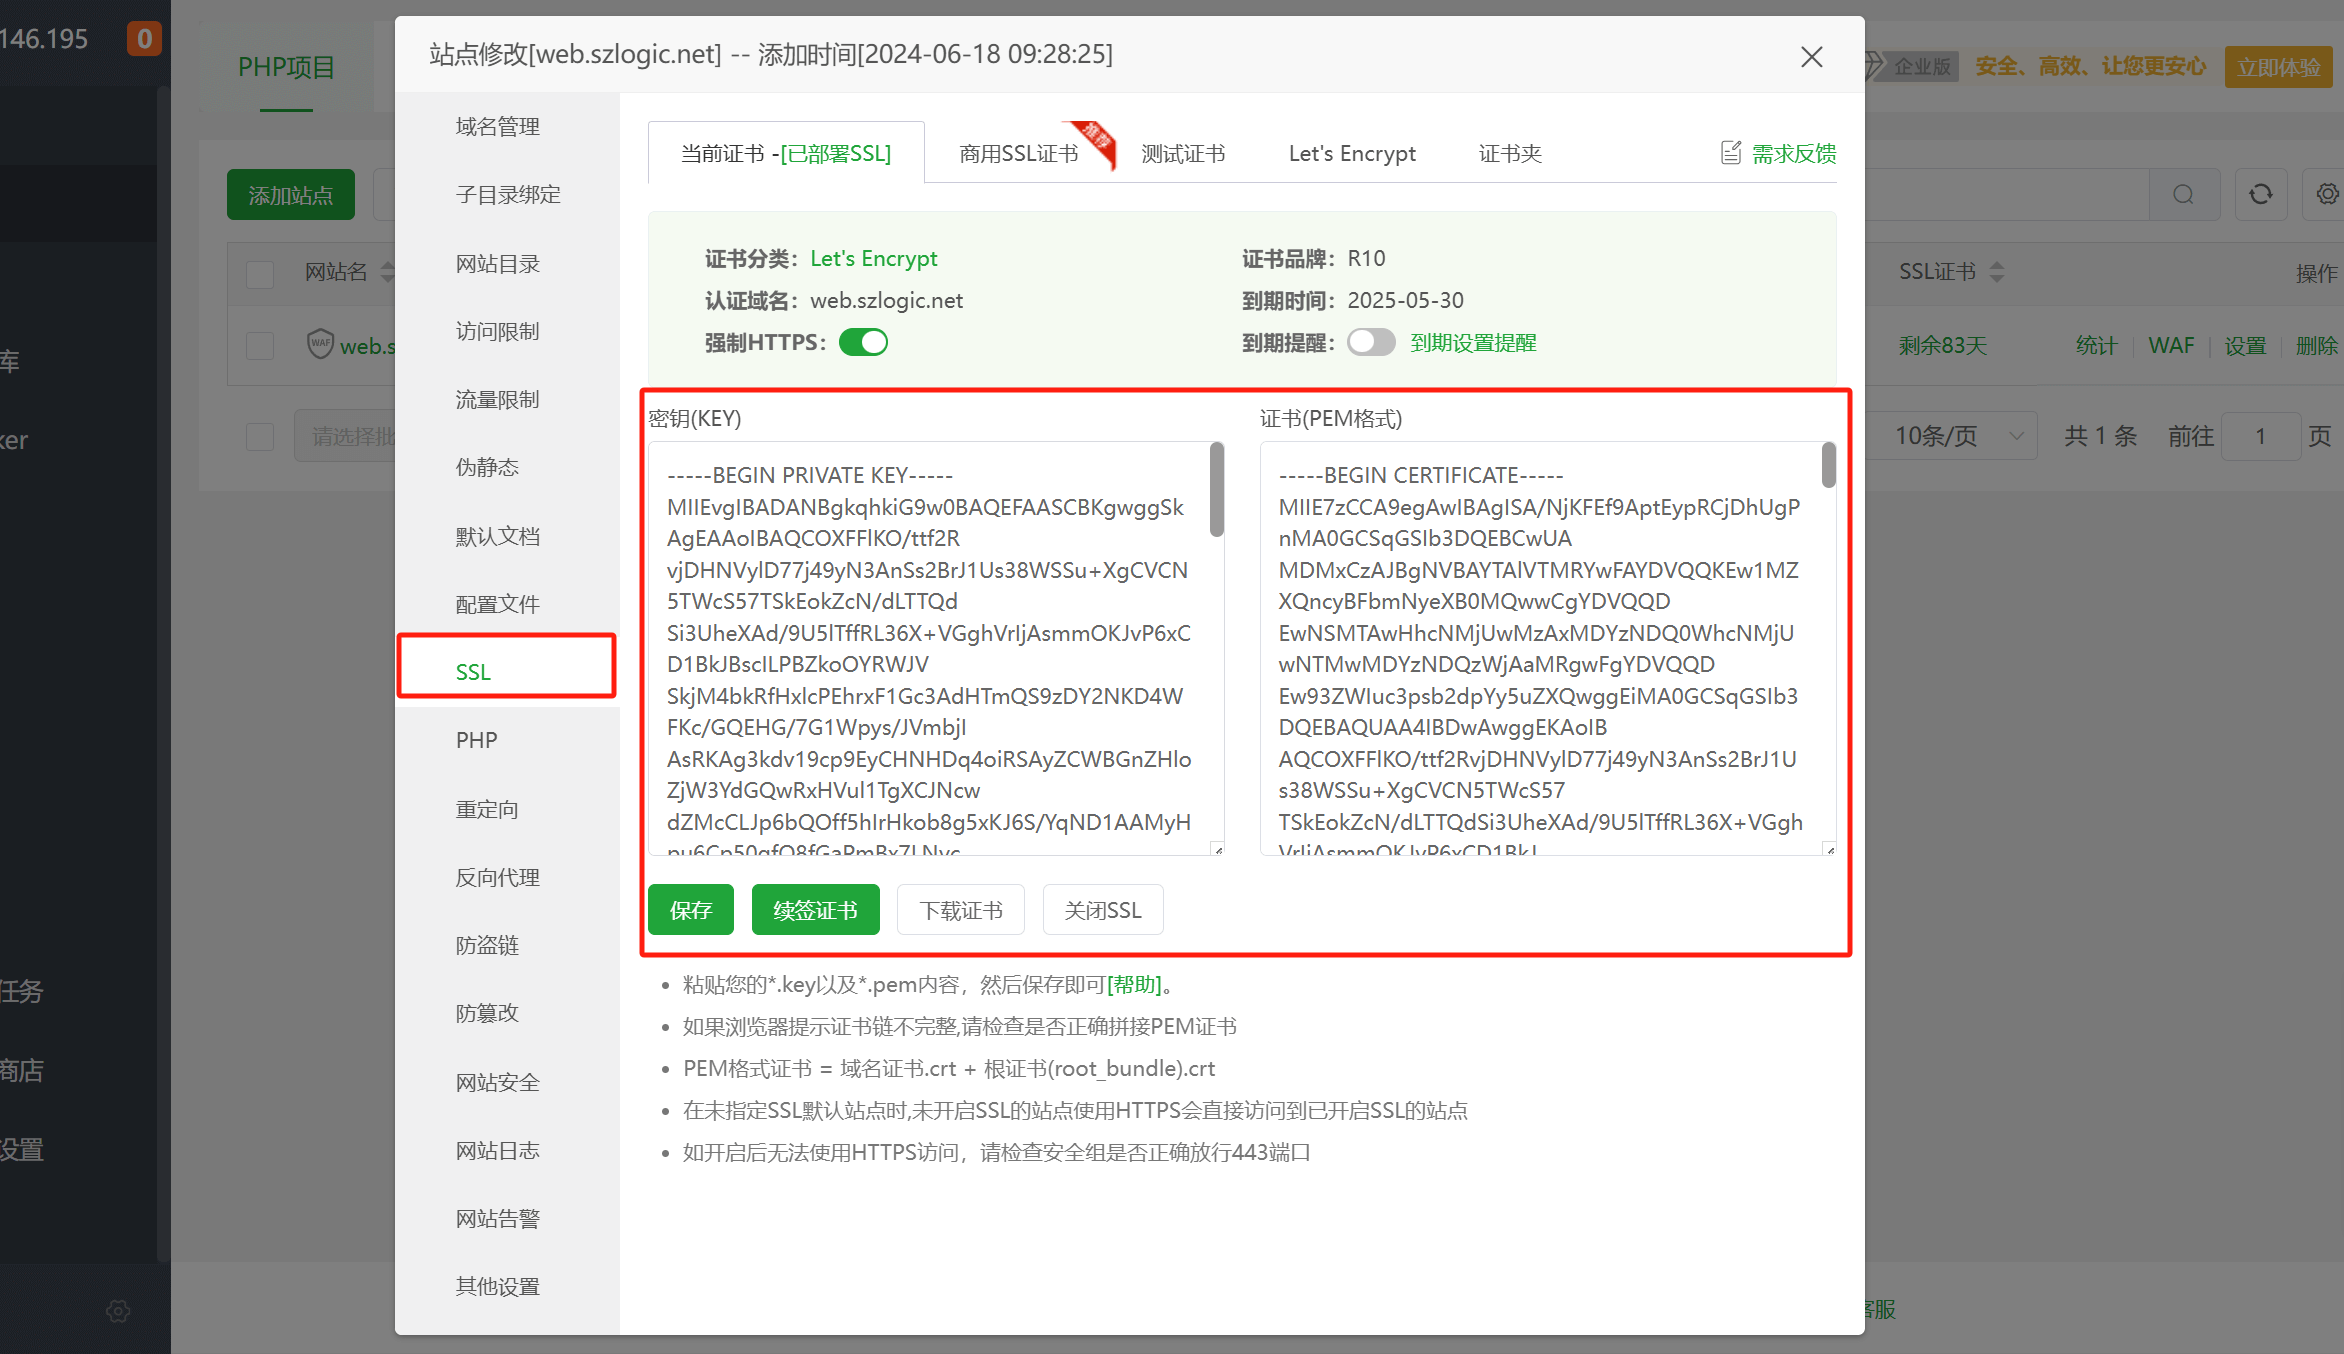
In the image above, the blogger has highlighted the location in the BT panel where you can apply for and install an SSL certificate for a WordPress website domain. The application and installation of an SSL certificate is crucial for the security and trustworthiness of the website. Modern browsers now require websites to use HTTPS connections by default, or else they will be marked as "not secure," affecting user trust. By installing an SSL certificate, a WordPress website can enable HTTPS encrypted communication, protecting the data submitted by users (such as login and payment information) from being stolen. It also boosts search engine rankings, as search engines like Google have clearly stated that HTTPS is an important factor in their ranking algorithms. Additionally, enabling SSL can prevent some features from being restricted for security reasons, such as certain API interfaces, social media sharing, and embedded content, which may require HTTPS to function properly. SSL certificates are mainly divided into commercial SSL certificates and free SSL certificates, and they differ in terms of security, certification methods, functionality, and applicable scenarios. Below are explanations and recommendations for choosing between the two.
(1) Commercial SSL Certificate
Commercial SSL certificates are paid certificates issued by authoritative SSL Certificate Authorities (CA), usually providing higher levels of encryption protection, identity verification, and after-sales support. They are suitable for business websites, e-commerce platforms, financial institutions, and websites involving the transmission of sensitive information. These certificates are mainly divided into the following types:
- DV Certificate (Domain Validation): Only verifies domain ownership, is issued quickly, and is suitable for general websites or personal blogs.
- OV Certificate (Organization Validation): Requires verification of business identity information, suitable for small and medium-sized businesses or websites that need to enhance user trust.
- EV Certificate (Extended Validation): The most stringent verification, displays a green lock symbol and company name in the browser address bar, suitable for websites with high security requirements such as banking and e-commerce.
(2) Free SSL Certificates
Free SSL certificates are usually provided by non-profit organizations such as Let’s Encrypt, ZeroSSL, and Cloudflare SSL, and are suitable for personal websites, small blogs, or testing environments. Compared to commercial certificates, free SSL certificates have simpler identity verification methods, typically only offering DV-level domain verification without conducting business identity reviews, but they require renewal every 90 days.
(3) Suggestions for Choosing Between the Two
Personal blogs, small websites, and test sites: Use free SSL certificates (such as Let’s Encrypt) for quick deployment of HTTPS and basic security enhancement. Corporate websites, e-commerce sites, and websites involving payments and user privacy data: It is recommended to choose commercial SSL certificates, especially OV or EV certificates, to enhance user trust, improve brand credibility, and receive stronger technical support.
Ⅱ、WordPress Backend Settings
Before starting the development of a WordPress website, it is essential to correctly configure the core options in the WordPress admin "Settings," especially the "WordPress Address (URL) and Site Address (URL) settings," "Homepage and Post Page settings," and "Permalink settings." These three configurations not only affect the website's infrastructure but also directly determine the proper functioning of plugins, the activation of URL routing rules, and the overall stability of the website's access. If these settings are not correctly adjusted, it may lead to plugin malfunctions, pages not loading properly, and even negatively impact SEO optimization and user experience. Properly configuring these core options in the WordPress admin ensures the stable operation of the website, prevents unexpected issues during the later development stages, and improves work efficiency. At the same time, it forms the foundation for long-term site operation and SEO optimization, ensuring the website performs well in search engines and provides a smoother browsing experience for users. Therefore, at the early stage of WordPress website development, it is crucial to carefully check and correctly set these key parameters to ensure the website can launch and run smoothly.
1、WordPress Address (URL) and Site Address (URL) Settings
和站点地址(URL)设置.png)
After completing the SSL certificate application and installation mentioned in the "WordPress Server Environment Configuration" section, the next critical step is to adjust the protocol for the WordPress Address (URL) and Site Address (URL) by changing the initial http:// to https:// as indicated in the screenshot above. This change is crucial because the SSL certificate will only take effect when HTTPS is correctly configured in the WordPress admin, ensuring encrypted data transmission during access, thus improving the website's security and credibility. Enabling HTTPS not only prevents data from being intercepted or tampered with during transmission but also boosts SEO rankings, as search engines (like Google) prioritize indexing websites using HTTPS. Furthermore, modern browsers (such as Chrome, Firefox) will display an "insecure" warning for websites not using HTTPS, which may reduce user trust in the site, impacting traffic and conversion rates. Therefore, after the SSL certificate installation is complete, it is essential to promptly update the WordPress address and site address protocols. Otherwise, even though the SSL certificate is successfully installed, the site may still load over HTTP, failing to implement encrypted transmission.
When making this configuration, it is important to pay attention to the difference between WordPress Address (URL) and Site Address (URL). WordPress Address (URL) refers to the path where the core files of WordPress are located, and it determines the environment in which the website's program operates. On the other hand, Site Address (URL) is the main URL used by users to access the website, and it affects the entry point for the front-end pages. In most cases, these two URLs should be consistent to avoid unnecessary redirects or access issues. If the two settings are different, it may cause problems with the WordPress admin functionality, static resources (such as images, CSS, and JS) loading incorrectly, or even prevent you from logging into the admin panel. Therefore, when adjusting the WordPress Address and Site Address, you need to ensure that both have the same protocol, using https://, and that the domain name remains the same. For example, if the WordPress Address is https://example.com/wp, the Site Address should be set to https://example.com (if the site is installed in the root directory). After making the changes and saving them, it is recommended to clear the browser cache and check if the website can be accessed via HTTPS. Also, check the WordPress admin panel to ensure that resources (such as images and CSS files) are no longer being loaded via HTTP, to avoid a "mixed content" warning.
2、WordPress Homepage and Post Page Settings
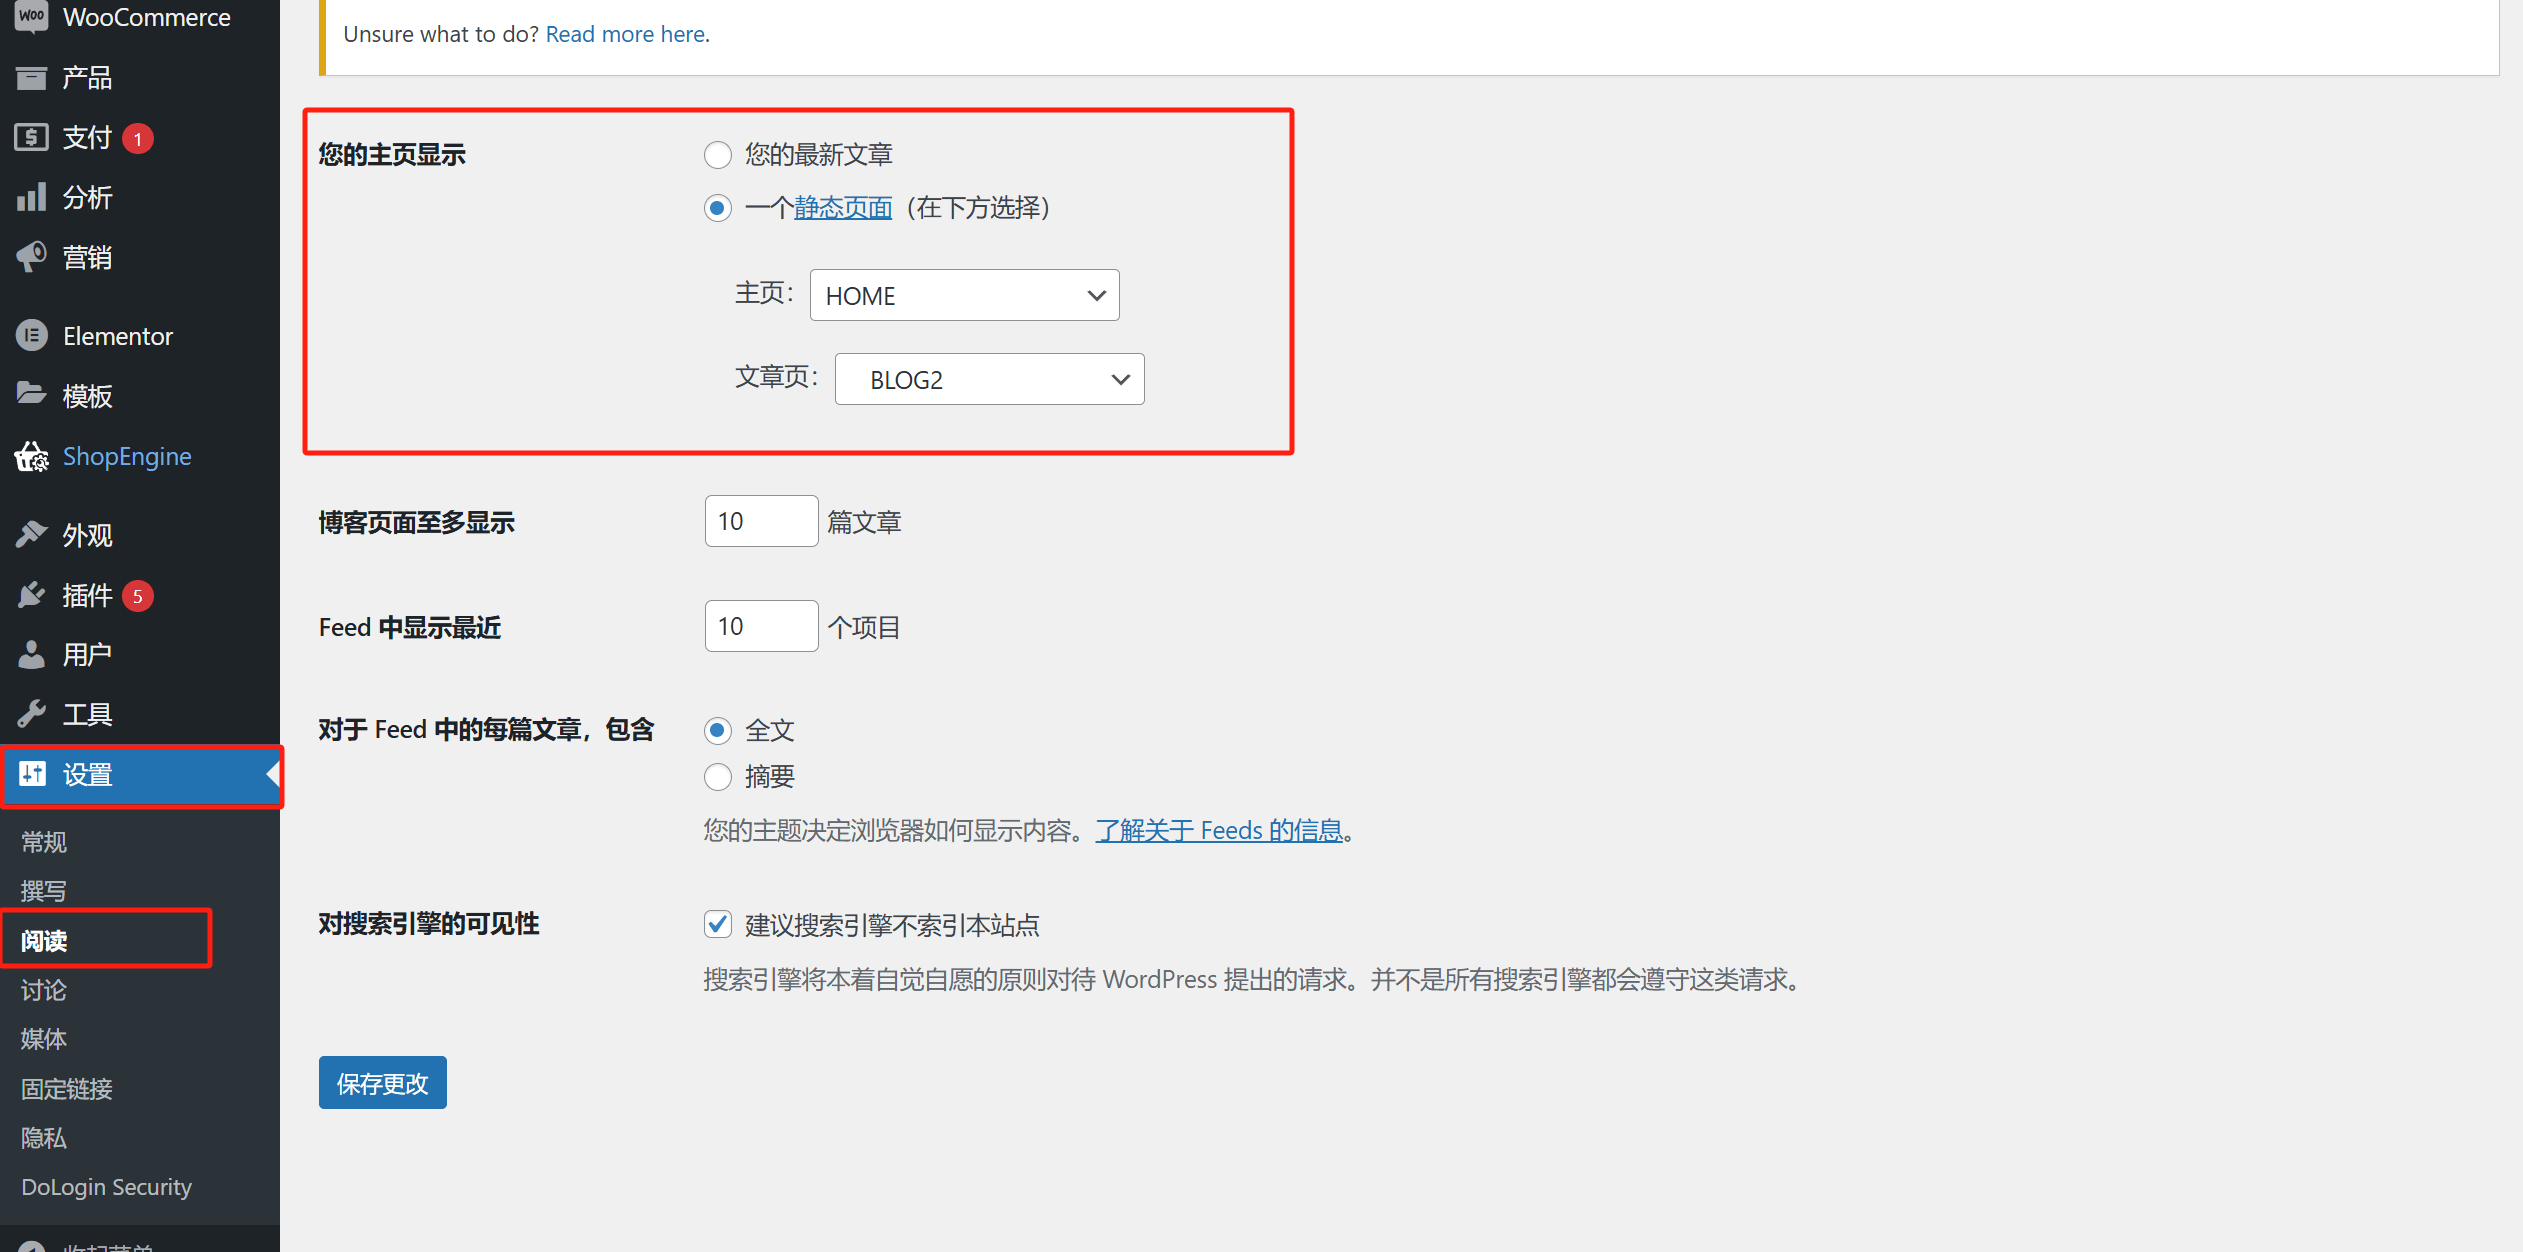
In the WordPress "Your Homepage Displays" setting, users can decide how the homepage of the website is displayed, which is crucial for starting website development. This setting is located under "Settings" -> "Reading" (as indicated in the image above), offering the following two options:
(1) Your latest article
Selecting this option will make the WordPress homepage dynamically display the latest published articles, suitable for blogs, news sites, or websites that display content in chronological order. In this mode, the homepage will automatically update, and the latest published article page will become the homepage of the WordPress site. This mode helps users see the latest content every time they visit the website. However, because this mode is only suitable for blog sites, it is generally not used for general website development needs.
(2) A static page
This is the option chosen by 99% of WordPress developers. After selecting this option, users can specify a custom page as the homepage (e.g., "HOME") and another page as the posts page (e.g., "BLOG"). This method is more suitable for corporate websites, international trade sites, or independent sites, providing a more fixed and controllable homepage content, offering a more professional user experience.
3、Enable Suggested Search Engines to Not Index This Site
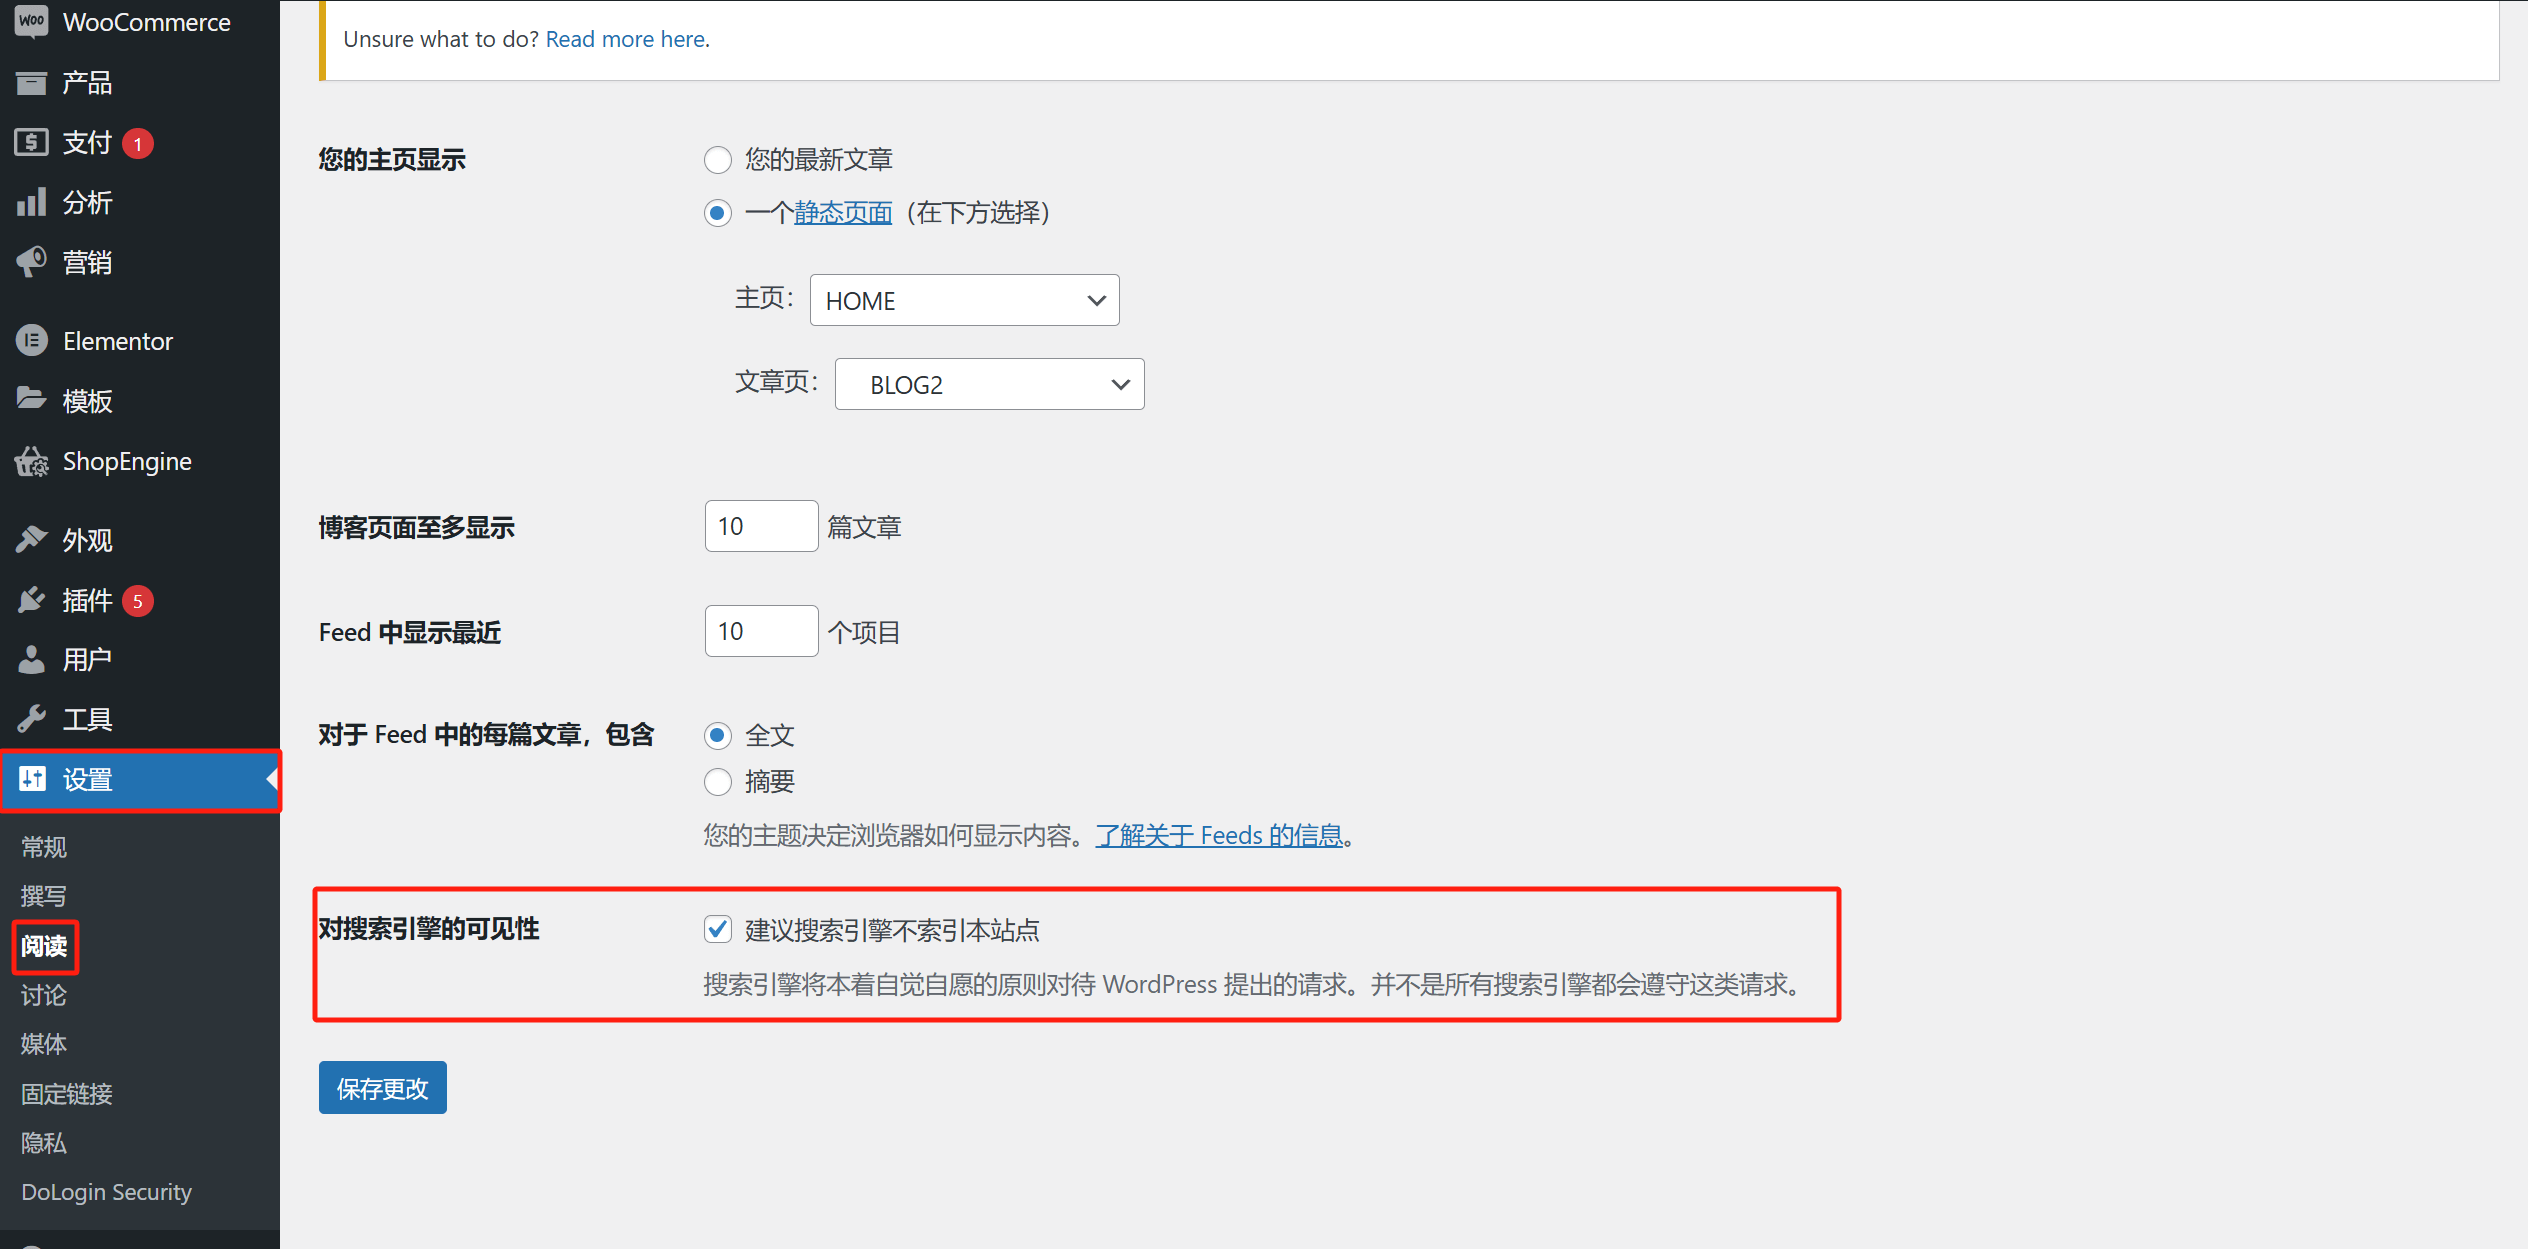
The "Discourage search engines from indexing this site" feature in WordPress is located on the same settings page as the "WordPress Homepage and Post Page Settings" mentioned above. As shown in the red box in the image above, the "Discourage search engines from indexing this site" setting is located at the bottom of the "Settings" -> "Reading" page. This feature plays a crucial role during the website development stage and directly affects the website's search engine optimization (SEO) performance. In the early stages of WordPress website development, the page content is often incomplete, may still be in the debugging phase, and could contain large amounts of test data, temporary placeholder text, or unoptimized structures. If the "Discourage search engines from indexing this site" option is not checked at this stage, search engines might prematurely crawl these incomplete pages and include them in their index. Once search engines index this content, even if the website is later optimized, old versions of the pages may remain in search results, impacting the website's authority and professionalism, and potentially causing incorrect pages to be accessed by users, damaging the website's brand image. Additionally, incomplete content may be flagged by search engines as low-quality pages, affecting the overall SEO score, making it harder for the website to achieve good rankings when officially launched.
It is important to note that this WordPress feature is merely a request to search engines, not a directive. Major search engines typically follow such requests, but it cannot be guaranteed that all search engines will fully comply. Therefore, during the website development phase, in addition to enabling the "Discourage search engines from indexing this site" option, it is also advisable to set a password for the site to further restrict search engine crawling, ensuring that unfinished content does not impact the website's long-term SEO performance. Only after the website is complete and content has been optimized should this restriction be lifted, allowing search engines to index the site properly. This ensures the best possible SEO results and avoids issues during promotion and operation due to mistakes made during the development phase.
4、WordPress Permalink Settings

In the WordPress admin panel, the permalink settings path is "Settings" > "Permalinks", as shown in the image above. In this settings interface, users can choose different URL structures to optimize the website's link performance. Among them, the "Custom Structure" marked by the blogger uses a combination of "postname" and "category". This permalink structure is the result of years of practice and is considered the best structure, as it not only complies with search engine standards but also enhances user experience.
A clear and standardized permalink structure is crucial for SEO optimization. Setting the URL in the form of "postname" and "category" not only allows users to easily understand the content of the page but also helps search engines more accurately crawl and categorize website information. For example, a well-structured URL like example.com/tech/web-development clearly conveys that the page belongs to the "Tech" category and discusses "Web Development" related content. This structure follows search engine best practices and helps improve the website's ranking for relevant keywords. Additionally, a concise and logical URL structure helps increase user trust, enhances click-through intent, and makes it easier for visitors to remember and share the link. In contrast, using non-standard permalink structures, such as the default ?p=123 or year/month/day/post-name formats, could have an adverse impact on the website's performance. For instance, dynamic URLs with numeric IDs (like example.com/?p=456) are not intuitive and fail to convey any semantic information to both users and search engines, reducing the page's readability in search results. Meanwhile, permalinks that include timestamps (such as example.com/2025/03/07/sample-post) may work well for news sites, but for most content sites, this could lead to a decrease in the page's search engine weight. Search engines tend to prioritize "new" content, and URLs with dates may make the article seem outdated, impacting its long-term ranking. Additionally, unreasonable URL structures may lead to numerous broken links during website migration or content adjustments, affecting the user experience and even damaging the website's authority.
Therefore, choosing the appropriate permalink structure not only optimizes search engine crawling and indexing but also enhances the user experience and promotes the long-term development of the website. For content-driven blogs or marketing-oriented sites, the "postname" and "category" URL format is an ideal solution that balances SEO and user-friendliness, helping to create a clear, stable, and modern link system that aligns with contemporary website architecture.
Ⅲ、WordPress Theme Settings
Before officially launching WordPress website development, fully utilizing child themes, the theme’s global settings, and custom styling options for pages can ensure the stability of the website's structure, visual consistency, and the scalability of its functionality. This not only reduces the cost of subsequent adjustments and maintenance but also lays a solid foundation for the website's long-term operation. Therefore, properly configuring these features is an important aspect that every WordPress developer must carefully consider before starting website development. The blogger will now introduce these key WordPress theme settings to readers one by one.
1、Enable Child Theme
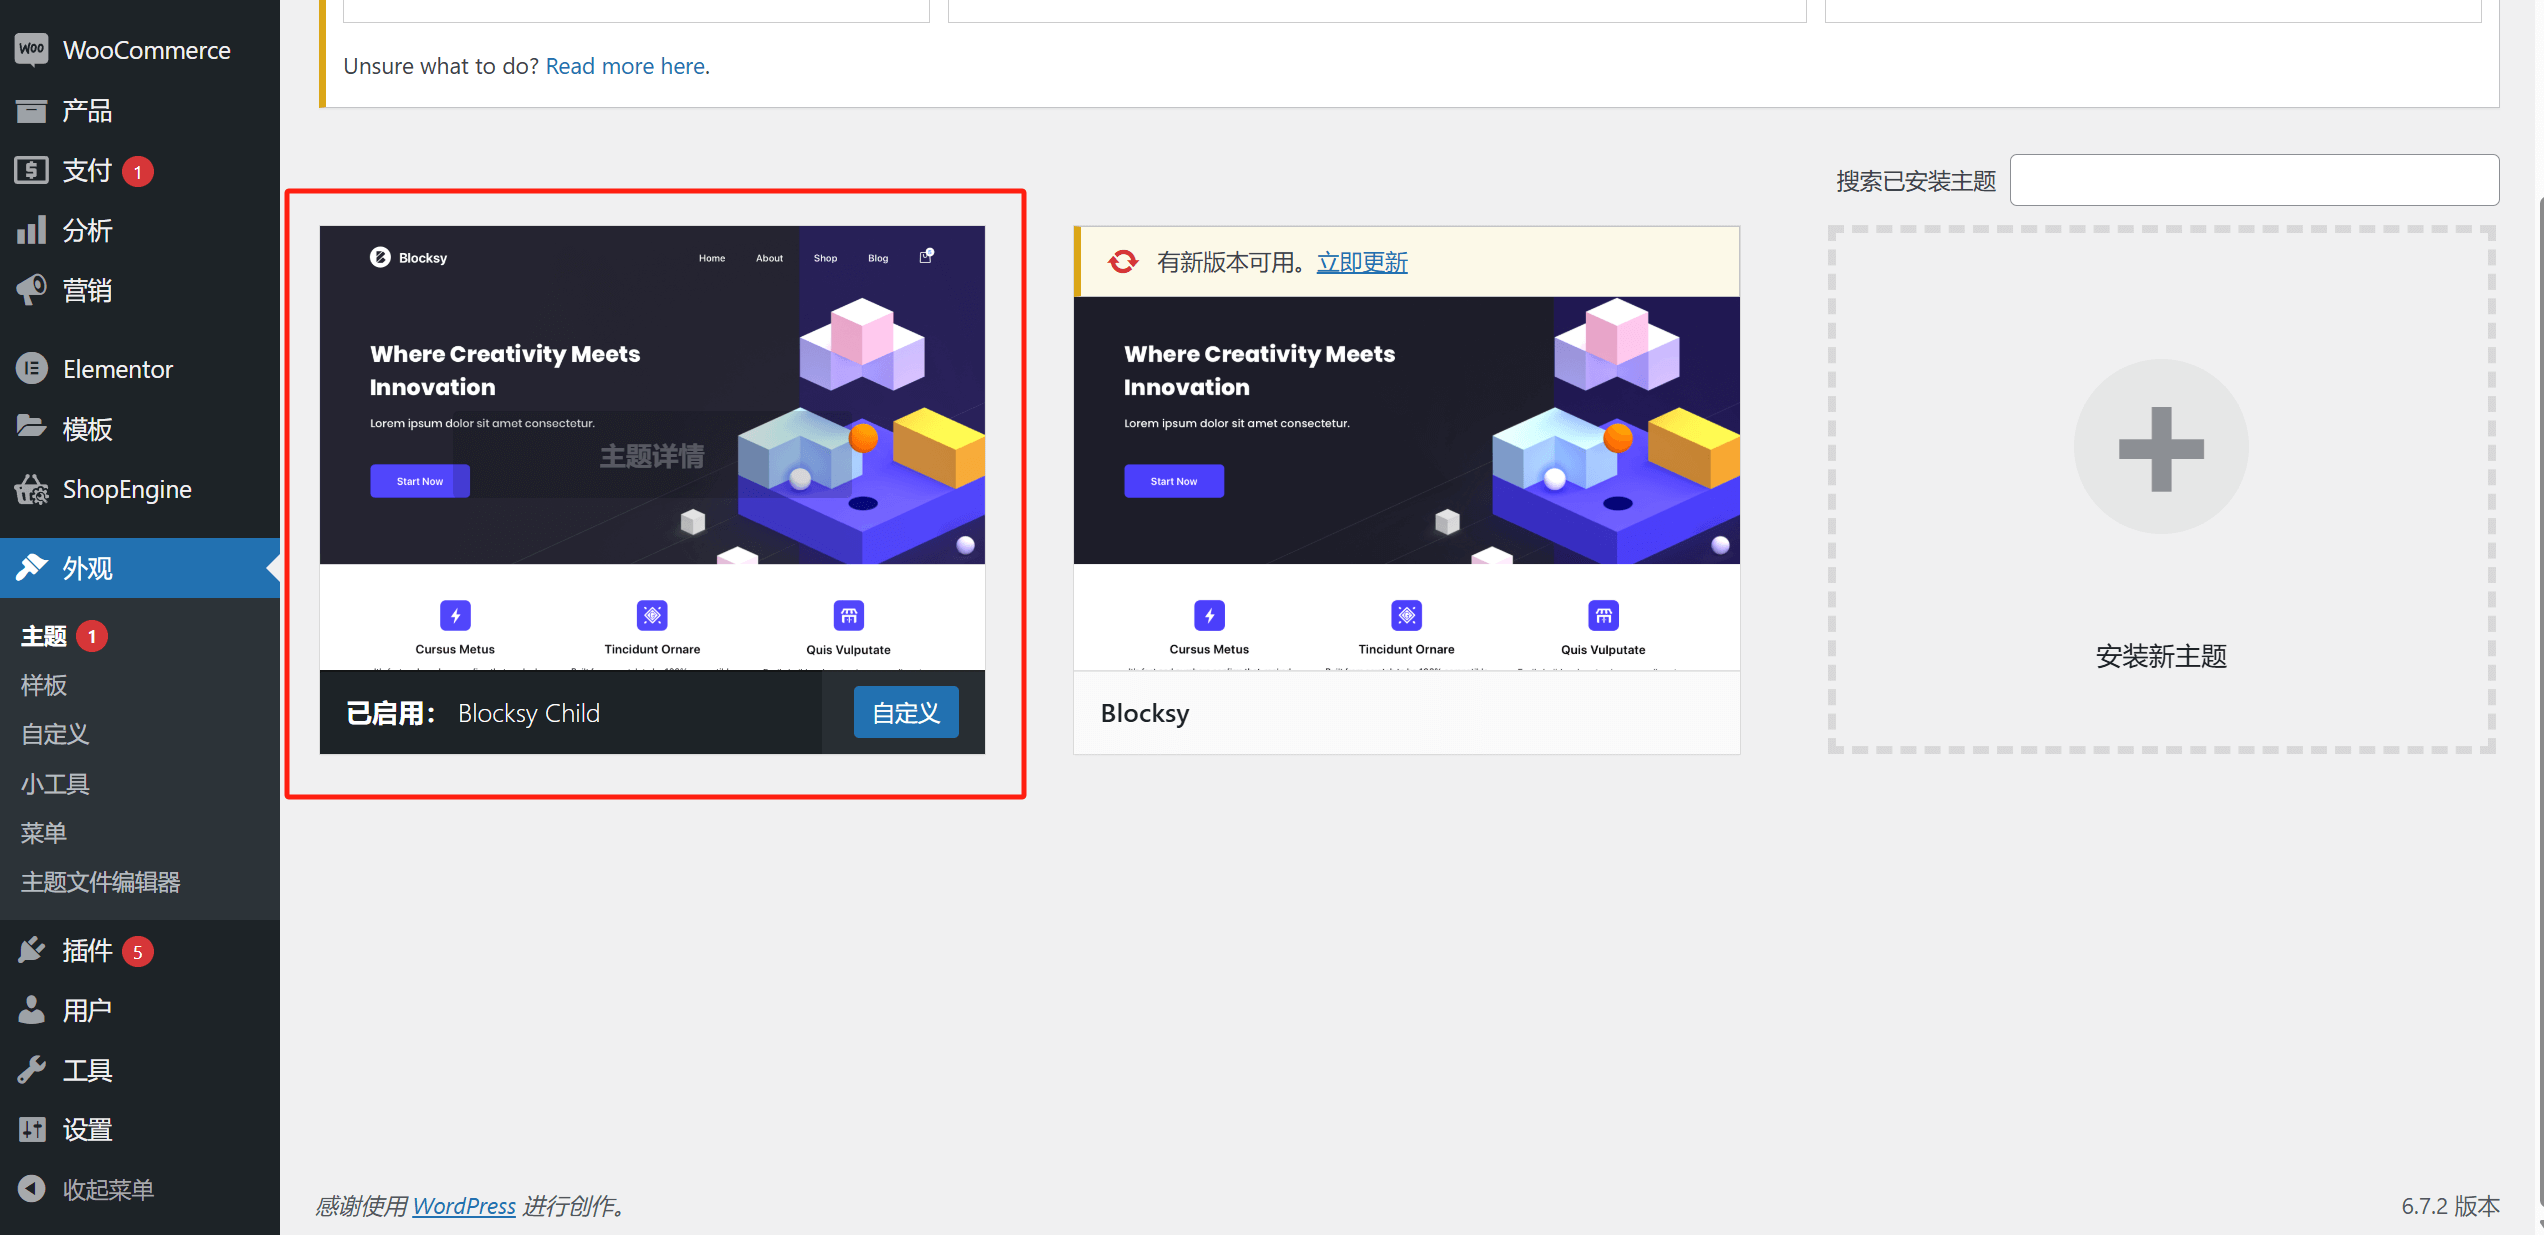
In the process of building a WordPress website, the theme plays a crucial role as it determines the overall appearance, structure, and some functional implementations of the site. Therefore, it is particularly important to plan and configure the WordPress theme properly before officially starting the website development. Among these, enabling a child theme, adjusting the theme's global settings, and setting custom styles for pages are important prerequisites for ensuring the website's maintainability, scalability, and consistency. WordPress themes typically follow the architecture of Parent Theme and Child Theme. The Parent Theme is the main theme framework, containing the core styles, template files, and functional code for the website, while the Child Theme is an extension and customization of the Parent Theme. The relationship between them can be compared to an operating system and user-defined settings. The greatest advantage of a Child Theme is that it allows developers to adjust the website's styles and functionality without modifying the core code of the Parent Theme, ensuring that any custom code developed will not be overwritten or lost when the Parent Theme or WordPress system is updated. This mechanism not only ensures the stability of the website but also provides great convenience for future maintenance and secondary development. Therefore, creating and enabling a Child Theme in the early stages of WordPress website development is one of the best practices, effectively avoiding the risks associated with directly modifying the Parent Theme code.
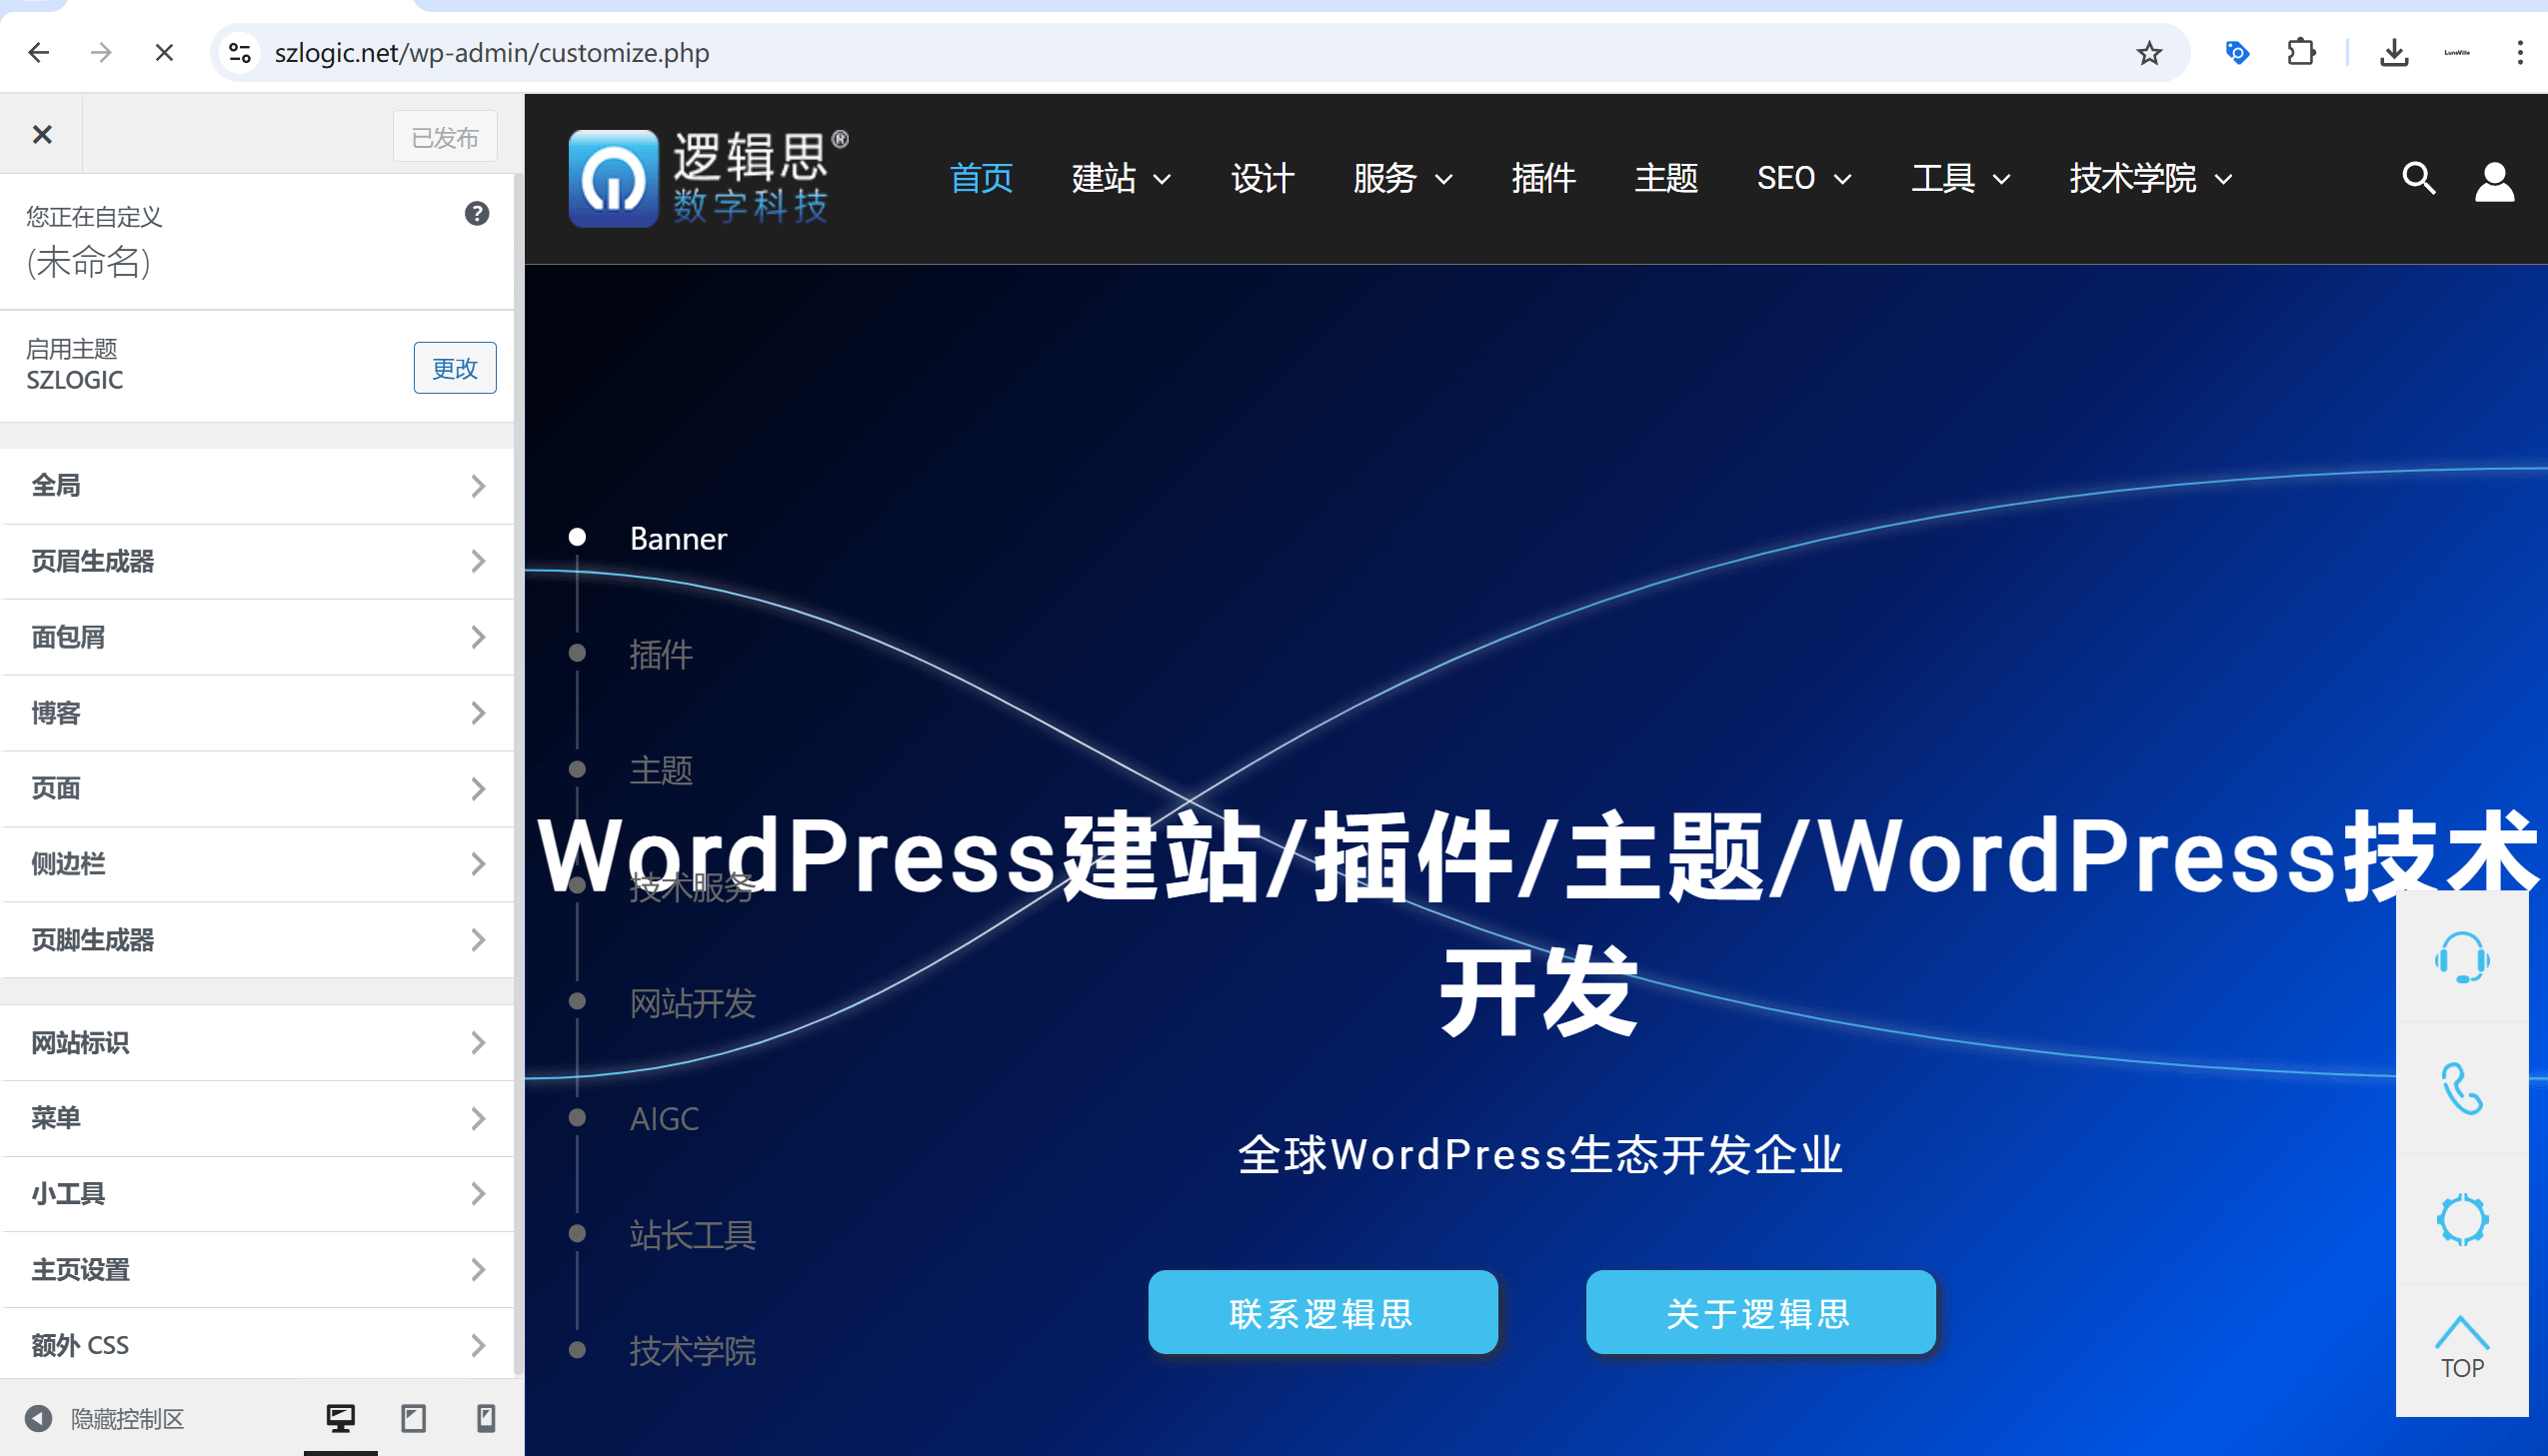
2、Theme Global Settings
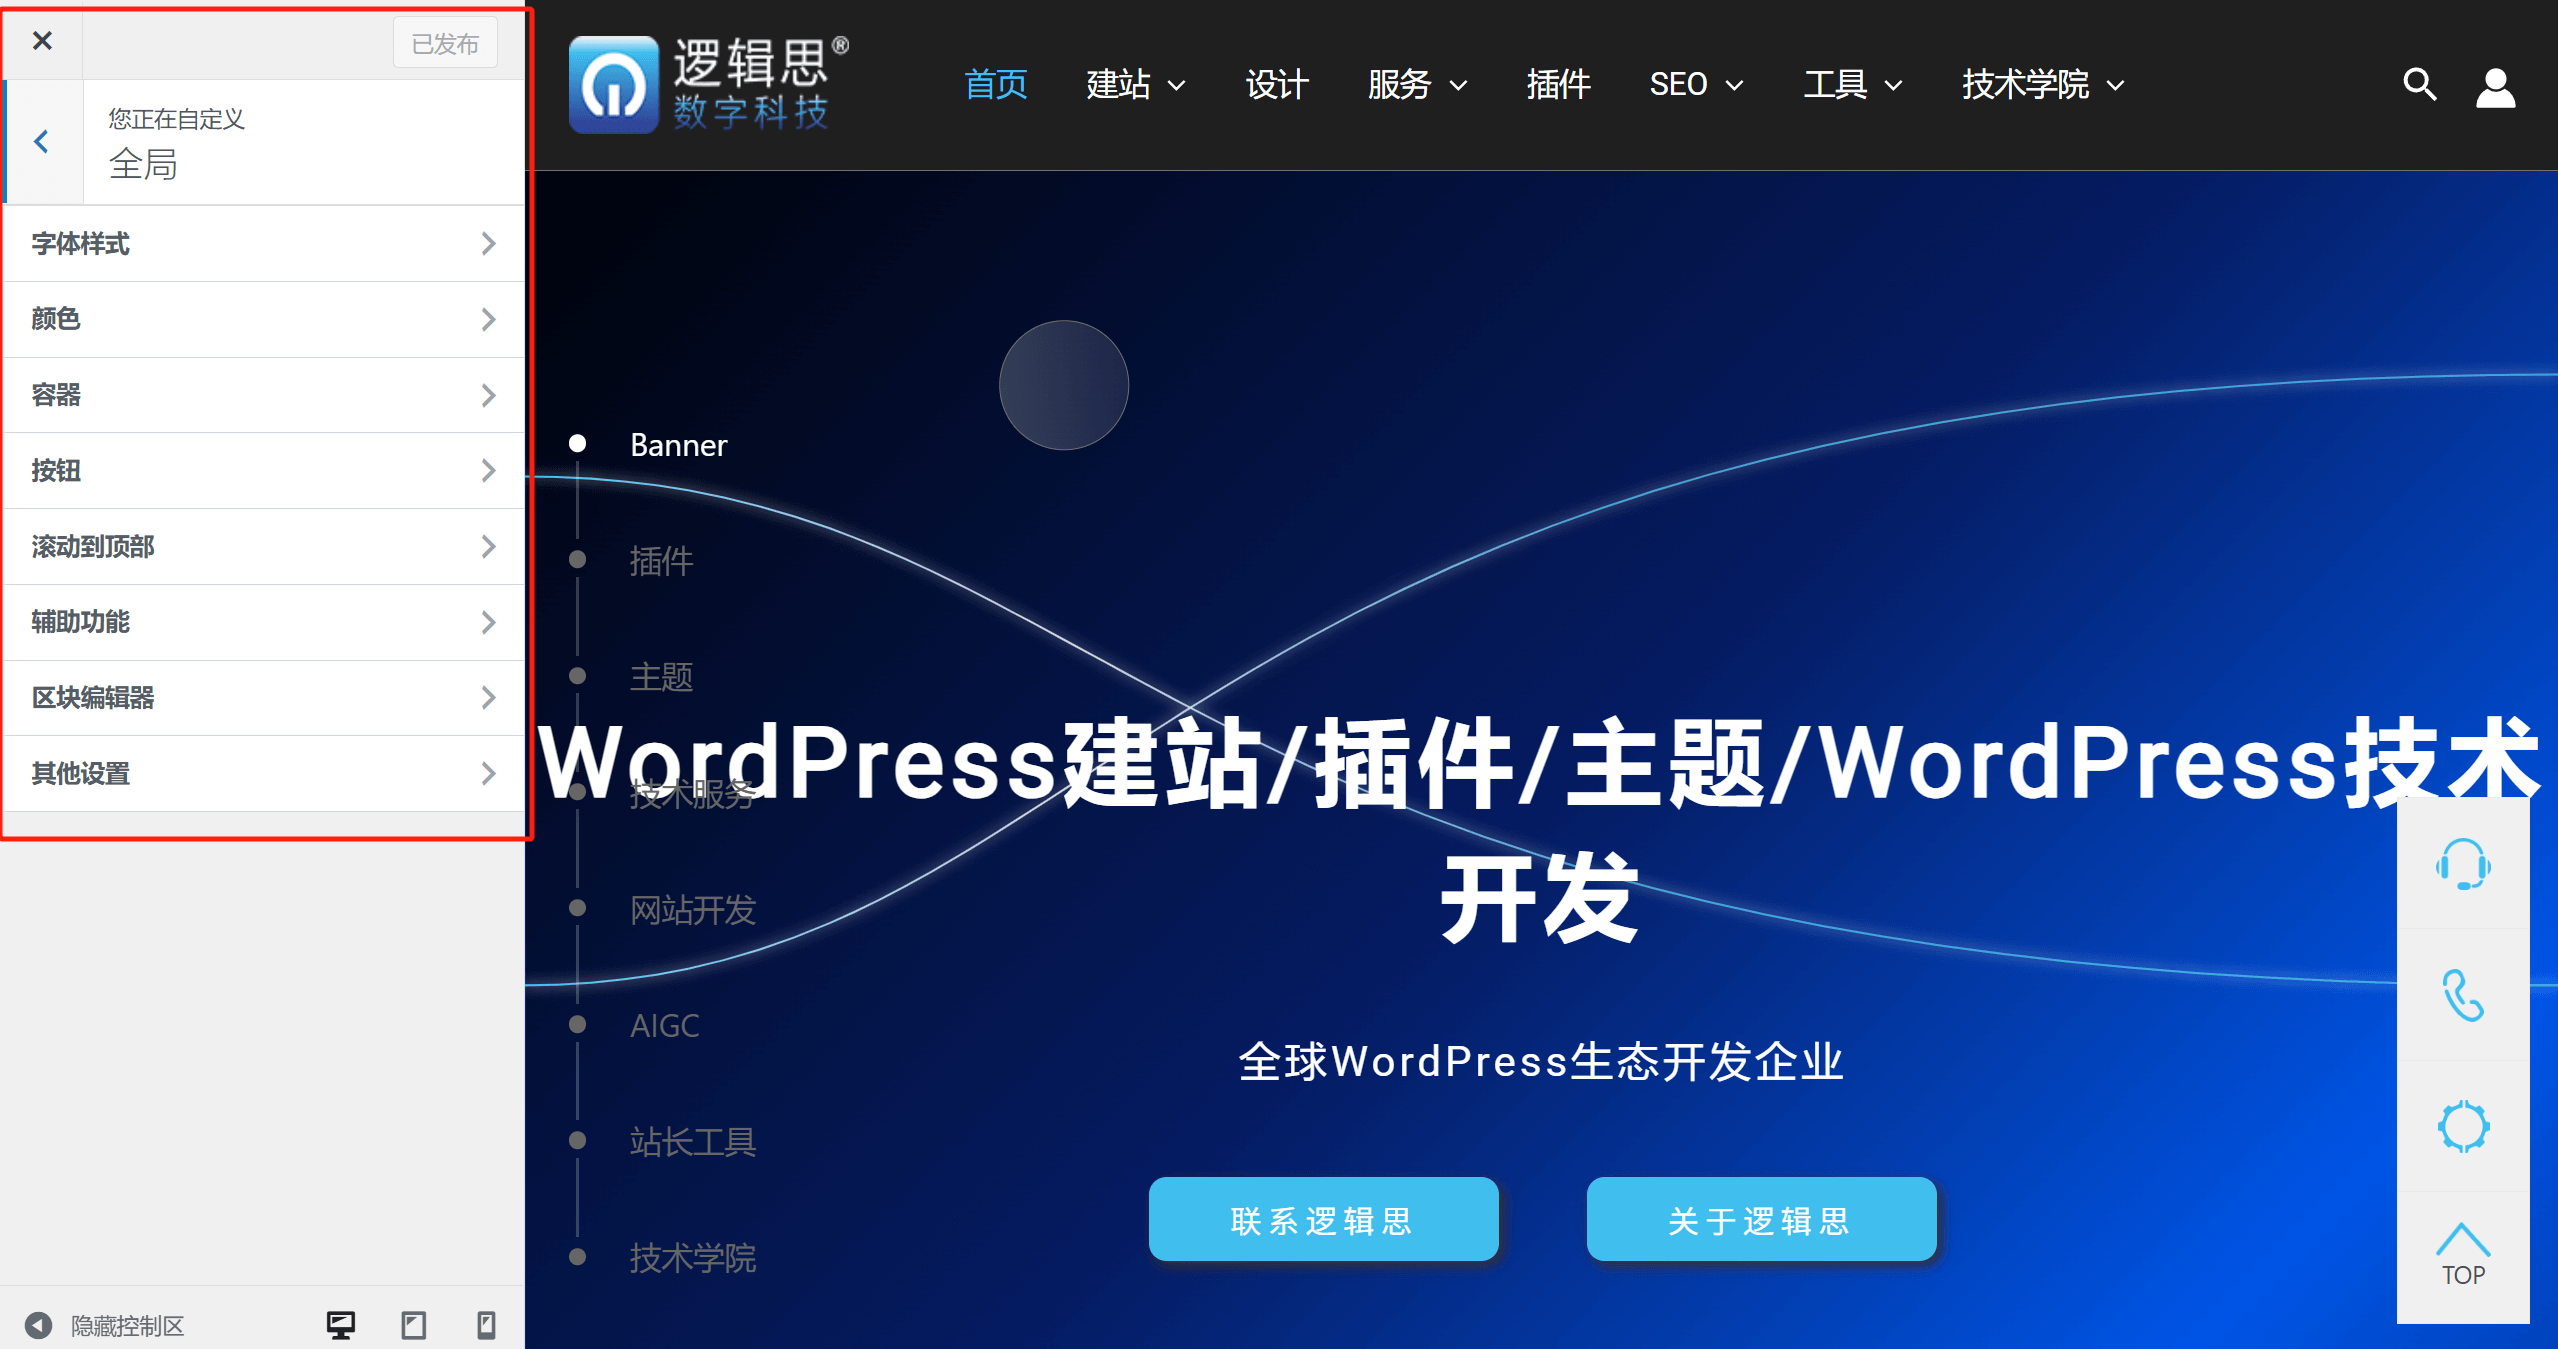
As shown in the image above, the items highlighted in the red box are the configurable options within the theme's global settings. WordPress themes typically also provide a control panel for global styles and functionality, such as the "Custom Settings" or "Theme Settings" interface. This settings panel plays a decisive role in the overall design style of the website, allowing developers to adjust key visual elements such as the default fonts, color schemes, page container layouts, and button styles. Since the code of the WordPress theme generally takes priority over plugins, these global settings ensure consistency across the entire website's style, preventing visual and interaction confusion caused by the installation of different plugins. Therefore, planning these global settings properly before starting development can reduce the cost of subsequent adjustments and enhance the overall coordination and user experience of the website.
For users who are using WordPress to develop a website for the first time or lack experience with different themes, the blogger would like to specifically remind you: different WordPress themes may have varying global options in the custom settings, and the specific interface layout, adjustable parameters, and customization options will differ depending on the theme. However, most themes that comply with WordPress development standards typically include the following basic global style settings:
- Font Settings: Includes options for the default font, heading fonts, body fonts, font sizes, line spacing, etc., to ensure readability and aesthetic appeal of the text.
- Color Settings: Supports adjustments to the website's primary color, background color, link colors, etc., to align with branding or design requirements.
- Container Layout: Allows setting the overall width of the website (full-width/boxed), content area margins, sidebar positioning, etc., to optimize page structure.
- Button Styles: Allows customization of button colors, border-radius, shadows, hover effects, etc., to ensure consistency in website interactions.
- Header and Footer: Provides adjustments for the navigation bar, logo position, social media icons, footer text, etc., to shape the overall framework of the website.
- Background and Images: Supports setting the site-wide background color, background image, and opacity, adding depth to the website's visual design.
- Custom CSS: Most themes provide an additional CSS input box, allowing developers to fine-tune the theme without modifying the core theme files.
Although different themes may vary in terms of naming settings, functional details, etc., the above basic global settings are almost always present in mainstream WordPress themes. Therefore, when selecting or configuring a theme, it is recommended that developers first familiarize themselves with these basic settings to efficiently create a website that meets their needs.
3、Theme Custom Page Style Settings
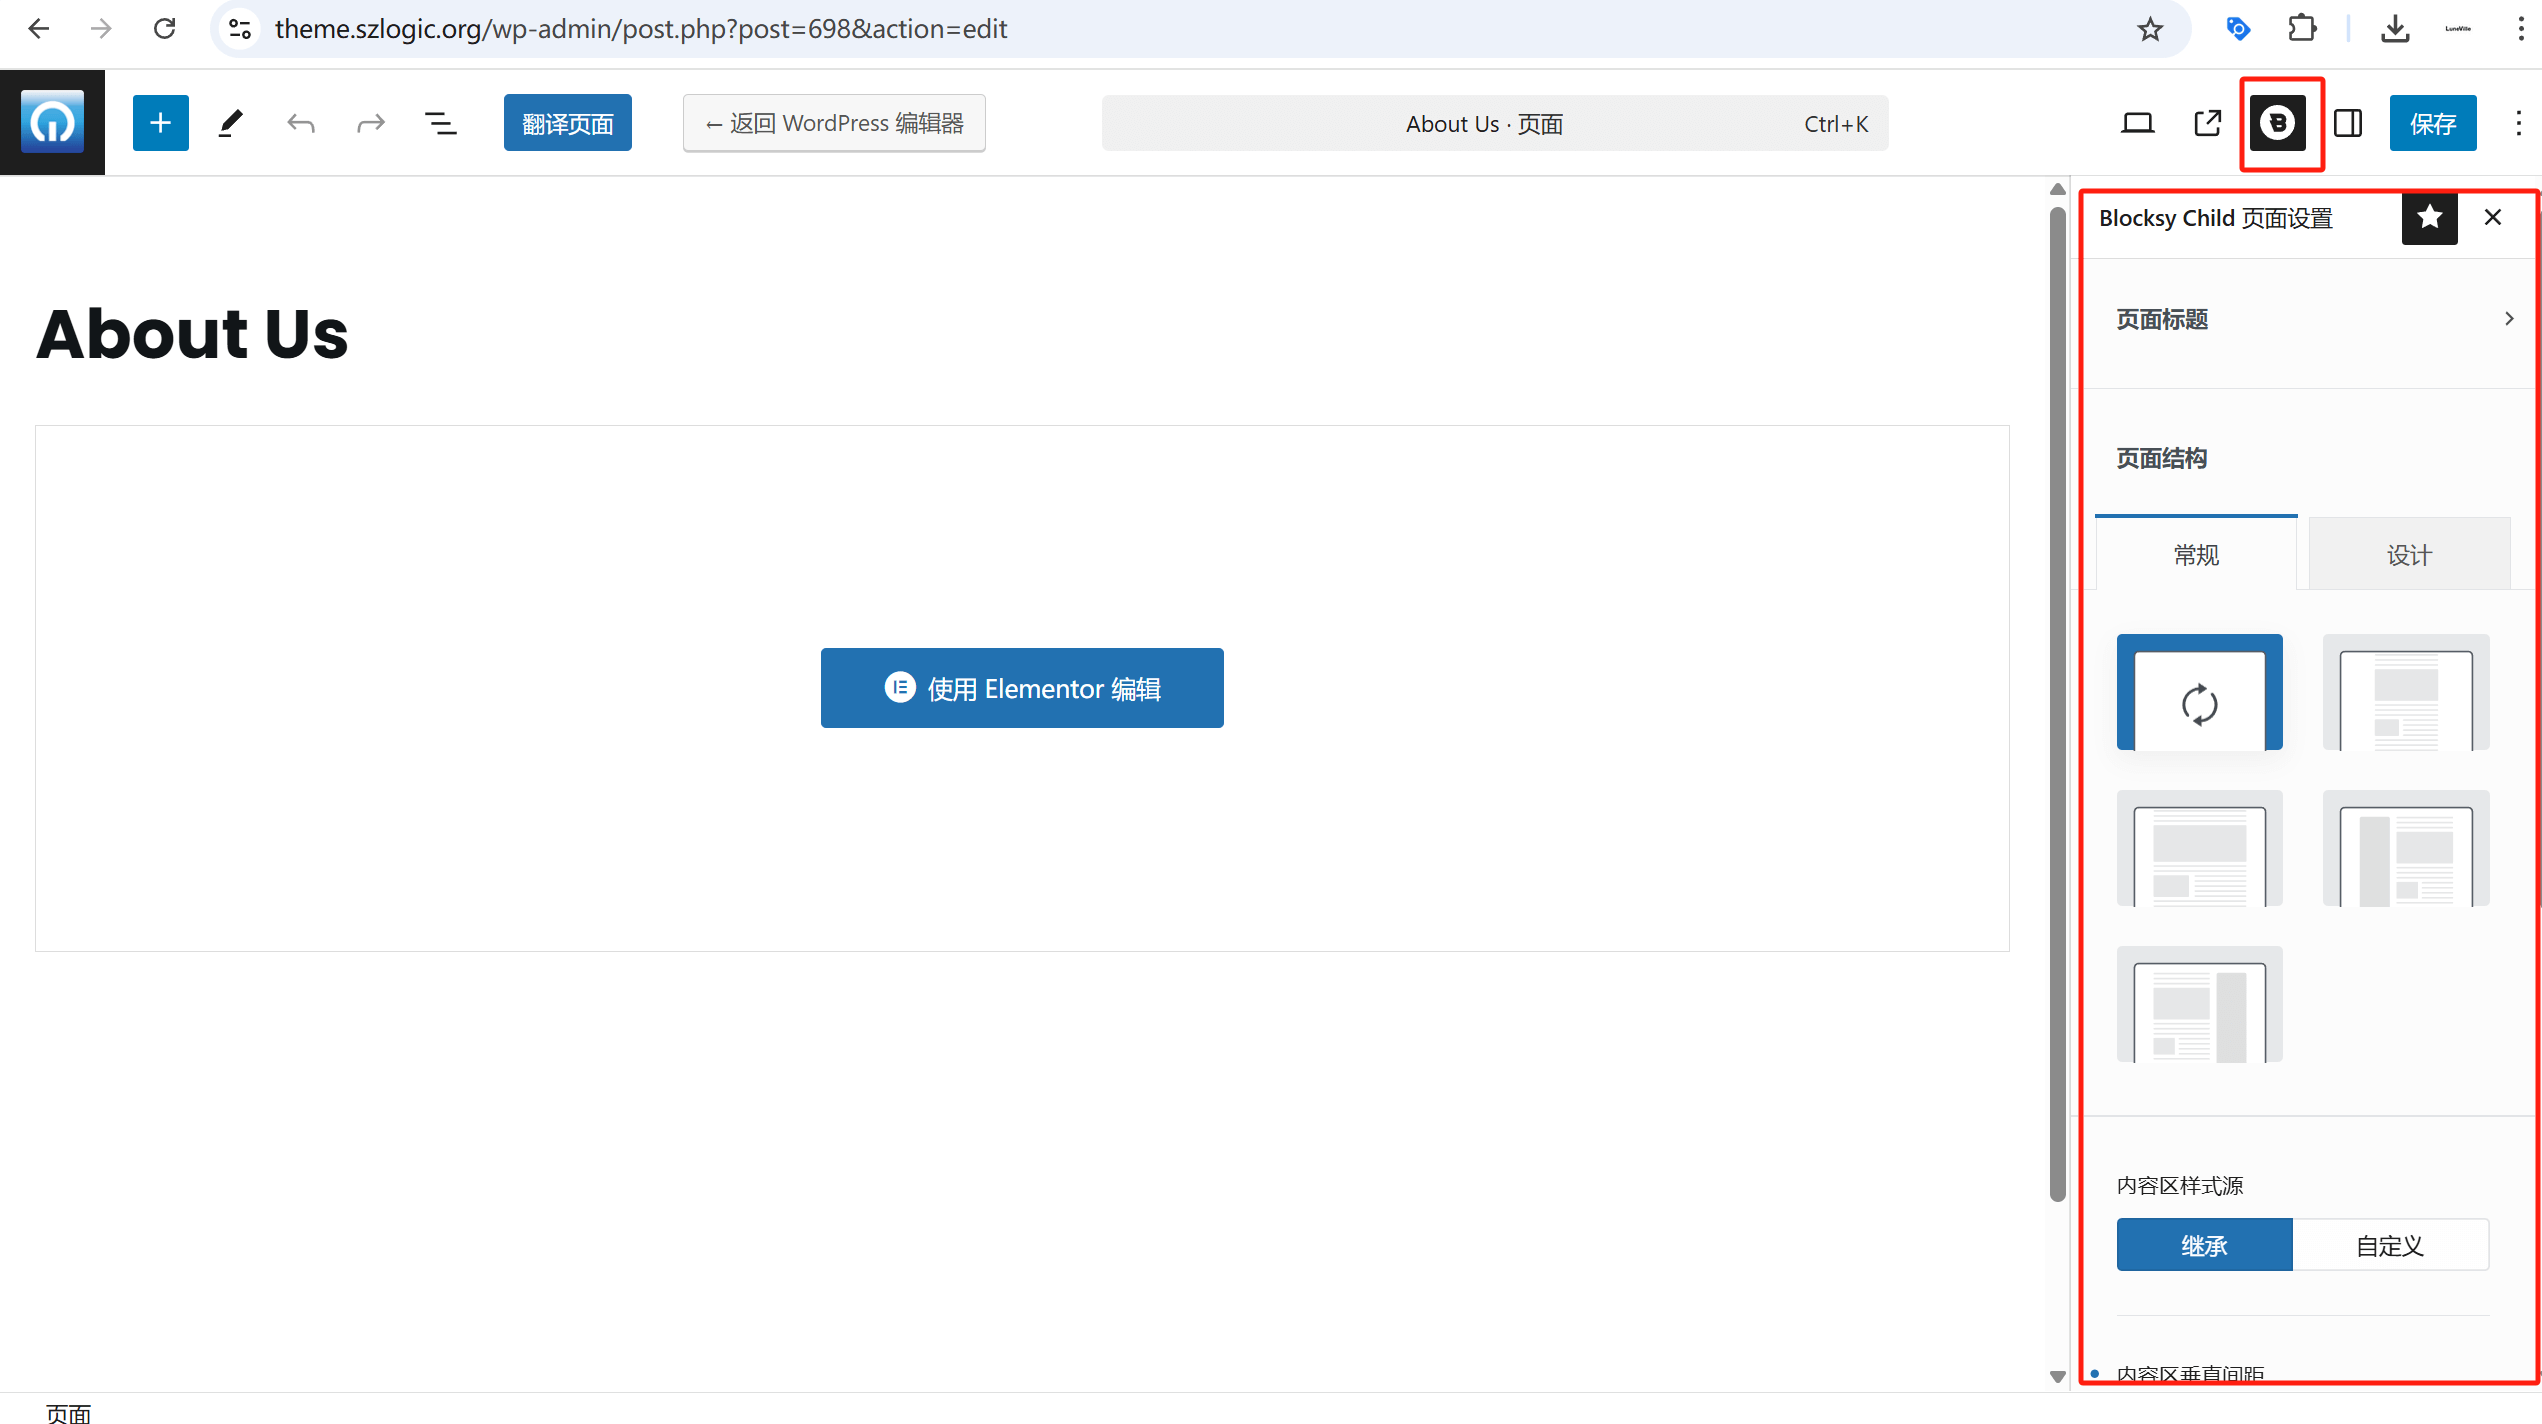
The items highlighted in the red box in the image above are the settings for the custom styles on WordPress themes and pages. In addition to the global style settings in its custom settings, WordPress themes also provide custom style and layout options for different pages, allowing developers to make more refined adjustments at specific page levels. For example, the website's container layout can determine how the content area is arranged, whether to choose a full-width layout or a boxed layout, and whether a sidebar is needed. Custom settings for the header and footer can affect the navigation style and brand presentation of the website, while the page title styles determine the content's sense of hierarchy and readability. The flexibility of these options allows developers to personalize and optimize pages according to their specific needs, while maintaining a consistent global style.
Ⅳ、Elementor Global Settings (Site Settings)
After determining the overall structure and page composition of a WordPress website, it is crucial to configure Elementor's global settings (site settings) before officially starting page editing. This not only helps improve development efficiency but also ensures that the web elements remain highly consistent with the design plan. By setting global styles in advance, such as fonts, colors, spacing, and button styles, developers can avoid repetitive adjustments on each page, improving efficiency while ensuring visual consistency and professionalism throughout the website. As a powerful visual page builder, Elementor provides a rich set of global settings options that allow developers to control the site's style and structure at an overall level, rather than repeatedly adjusting on each page or component. Through Elementor's global settings, developers can preset fonts, colors, spacing, button styles, and other core elements, ensuring a consistent visual style across different pages of the website. This not only reduces repetitive work during page design but also helps avoid style inconsistencies caused by manual adjustments. Moreover, global settings can facilitate more efficient teamwork, as multiple developers or designers can modify pages without redefining basic styles, reducing unnecessary communication costs.
Another important aspect is the flexibility of global settings. During development, if certain design elements need to be adjusted, such as brand colors or font styles, you only need to modify them once in the global settings, and all related pages will automatically update. This centralized management approach not only reduces errors caused by manual adjustments but also significantly enhances the efficiency of website iteration and upgrades. Especially when large-scale redesigns are required, it can substantially reduce maintenance costs. Therefore, in the early stages of WordPress website development, fully utilizing Elementor's global settings can not only speed up development, reduce repetitive work, but also improve the overall maintainability and scalability of the website. This is a key aspect that every developer using Elementor for website development should focus on.
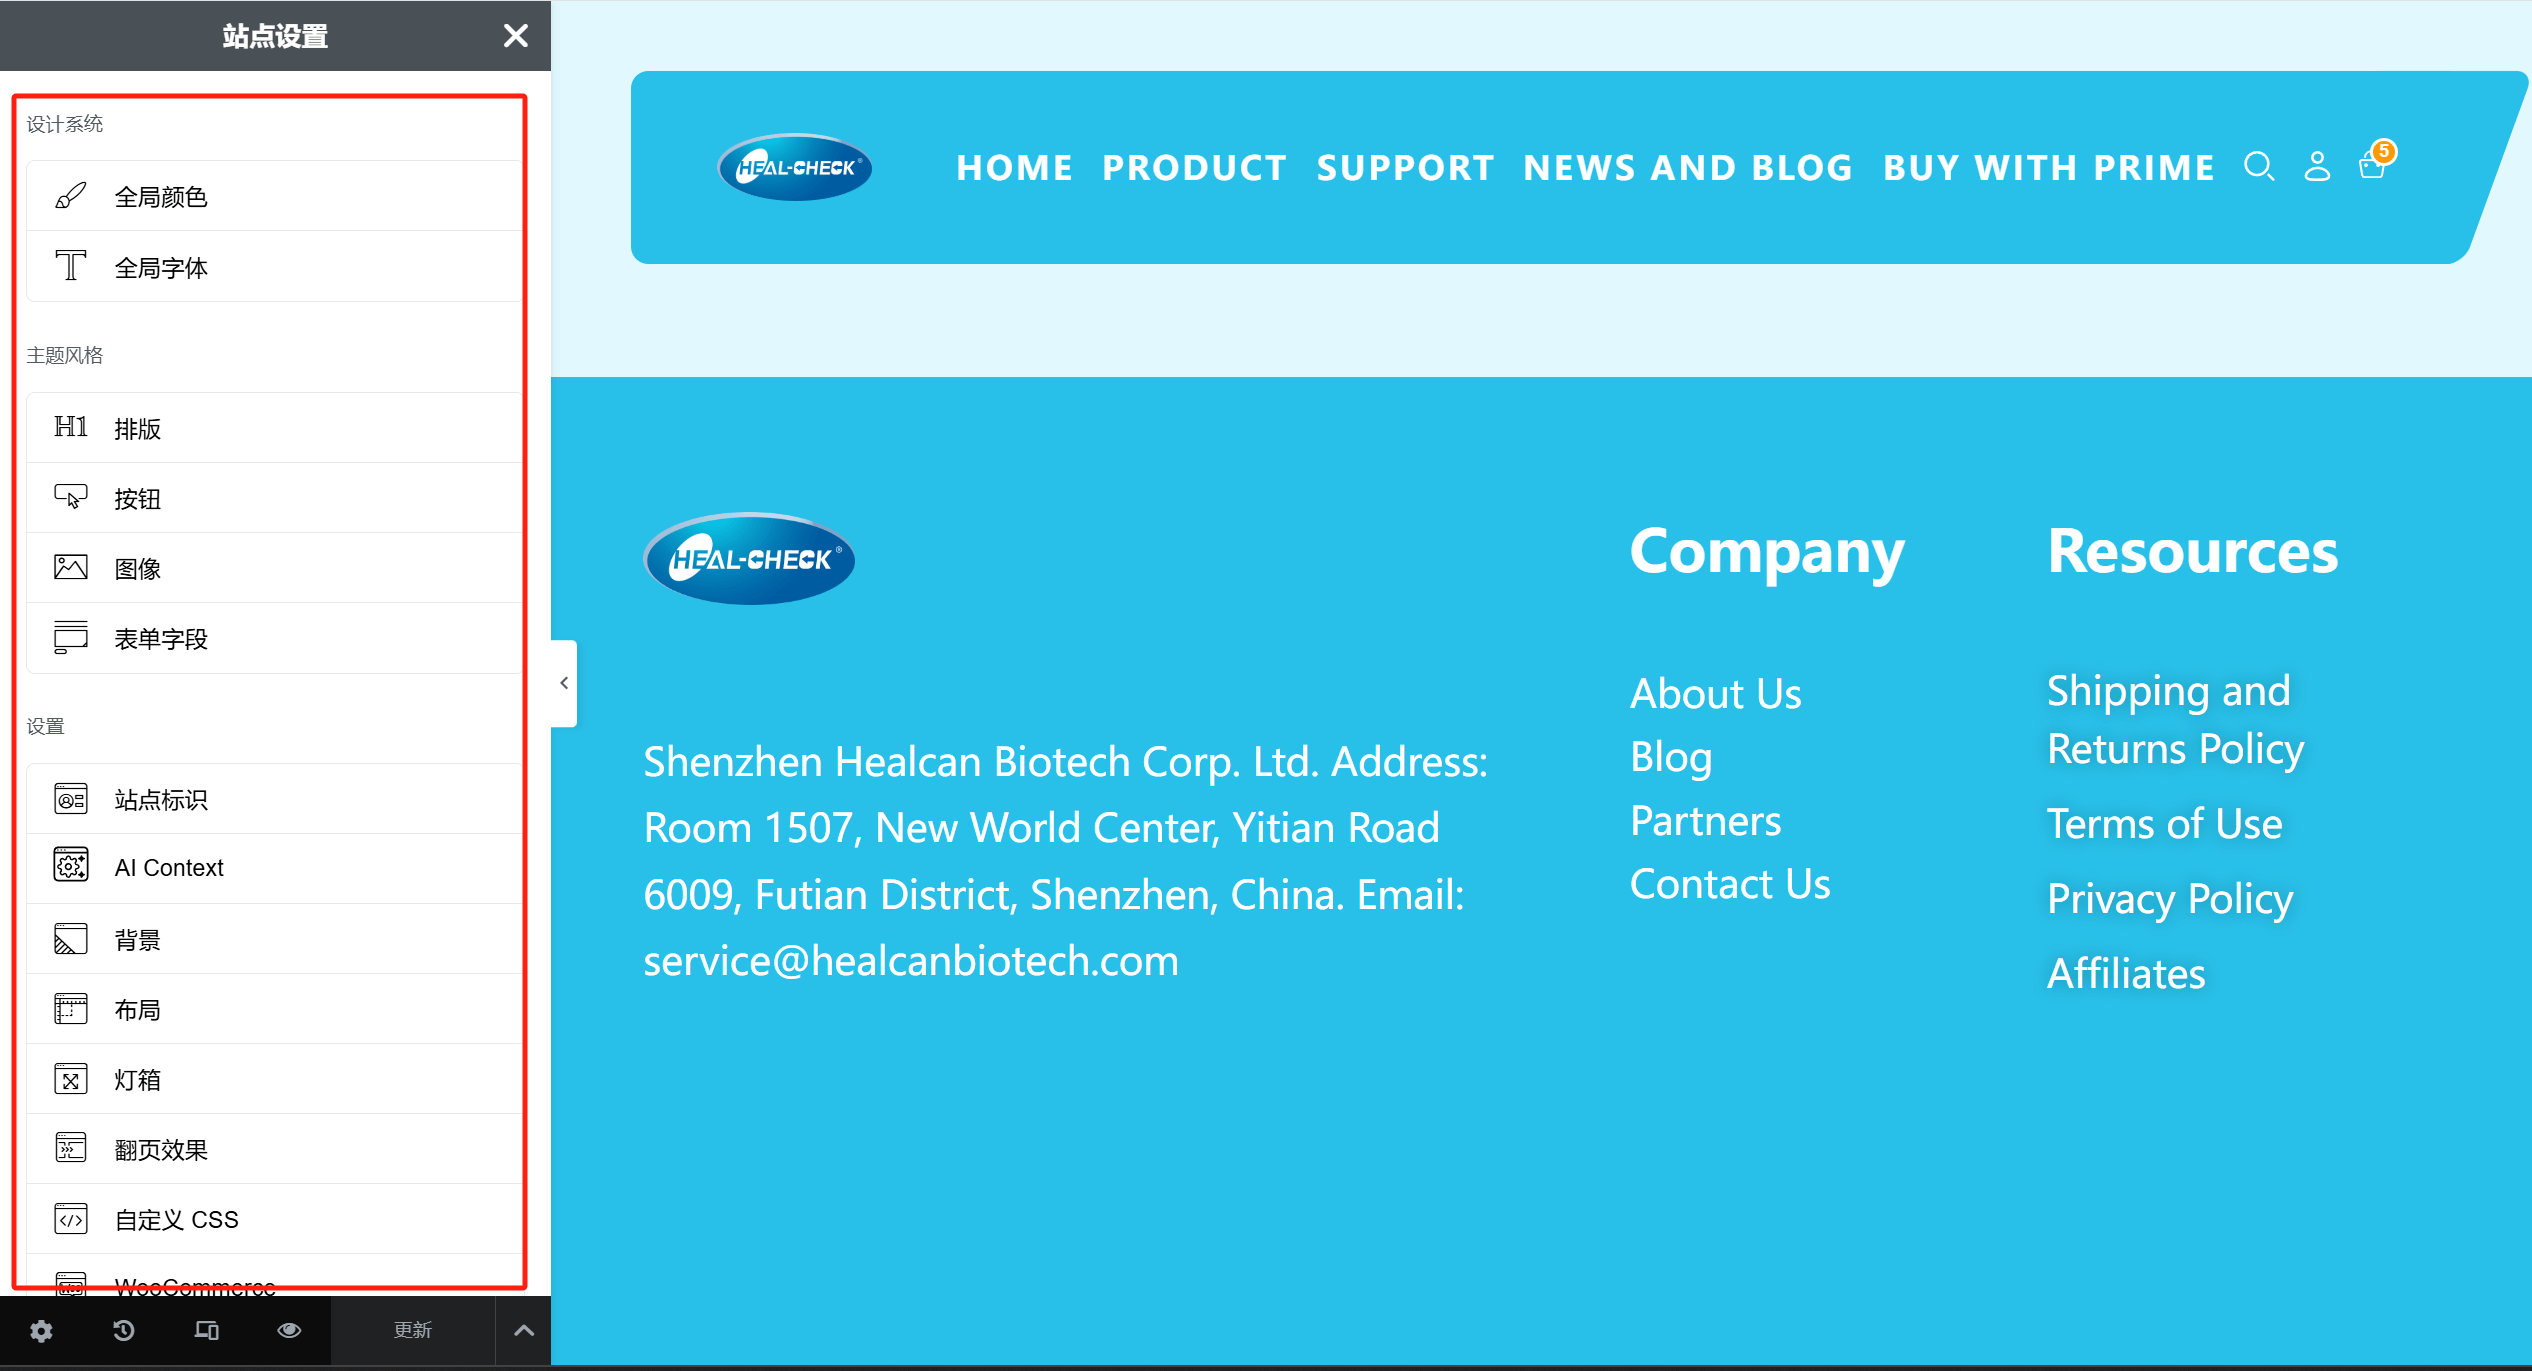
In Elementor edit mode, "Site Settings" is a global control center that allows developers to manage the design and styles of the entire WordPress website uniformly, without having to adjust each page individually. This feature enhances development efficiency, ensures design consistency, and provides a more convenient user experience.
1、Path to Access Elementor “Site Settings”
After entering the Elementor editor, click the hamburger menu (the three horizontal lines icon) in the top left corner. From the dropdown menu, select "Site Settings" to access the global settings interface. Here, you can customize the styles and layout across the entire site, and these settings will be automatically applied to all pages built with Elementor.
2、“Main Features in “Site Settings”
(1) Global Colors
Allows developers to define the main colors of the website, such as primary color, secondary color, text color, and accent color. These colors can be directly referenced in all Elementor components and can be automatically updated in subsequent adjustments to avoid repeated modifications to the colors of each page.
(2)Global Fonts
Used to set the font style of the website, including the main title, subtitle, body text, etc. After selecting parameters such as font, font size, line spacing, etc., all Elementor pages will inherit these settings to ensure consistency of text style.
(3)Typography
Further customization options are provided for the entire site's fonts, supporting adjustments to font size, weight, line height, letter spacing, etc., to ensure that the text layout between different content blocks meets design requirements.
(4)Buttons
Set the default style for all buttons on the website, including color, border, rounded corners, padding, etc. In this way, whether on the homepage, article page or landing page, the buttons can maintain a consistent visual style.
(5)Images & Backgrounds
Control the website's default background color, background image, transparency, and image display method to ensure the uniformity of the website's visual design.
(6)Layout
Here you can adjust the content width, default container layout, paragraph spacing, etc. of the entire website to ensure that the structure of the entire website is clear and aligned correctly.
(7)Custom CSS
It allows developers to add global CSS styles. It is suitable for advanced users. When special customization of certain elements is required, you can write CSS code here directly and affect the Elementor page of the entire website.
Conclusion: Before starting the development of a WordPress website, thoroughly understanding and properly configuring global settings can not only improve development efficiency but also ensure the website's stability, scalability, and visual consistency. From the child theme settings of the WordPress theme, global style adjustments, to the site settings in Elementor, each step affects the final performance of the website. The correct permalink structure contributes to SEO optimization, ensuring that content is efficiently indexed by search engines. The global settings of the theme and custom style adjustments help developers establish unified design standards, reducing the complexity of future maintenance. Whether you are a beginner or an experienced developer, making these preparations in advance will significantly improve the efficiency of website development and operation in the future. I hope the content of this article provides practical references for your WordPress website development, helping you build an efficient, professional website that follows best practices. Finally, if you are considering time costs during your learning and practice process and seeking professional WordPress website development support, feel free to contact the Logic Digital Technology team. We will provide you with professional technical solutions to help your WordPress website project be implemented efficiently, achieving the best functionality and user experience.
This article is copyrighted by Logic Digital Technology (SZLOGIC) . Personal sharing and learning are welcome. Unauthorized use for any commercial purposes or reproduction of this article is strictly prohibited.