


WordPress E-commerce: Building Your First Online Store

In today's increasingly competitive global environment, foreign trade companies must have a fully functional and user-friendly website to secure a stable market share. Among the various solutions for building e-commerce websites, WordPress has become the most common choice for building foreign trade websites. This is due to its open-source CMS (Content Management System) nature, along with its powerful plugin ecosystem and theme library, which allows businesses to quickly build professional foreign trade websites with a low technical threshold and cost. CMS, short for Content Management System, provides an intuitive and convenient way for managing website content, enabling businesses to easily publish product information, manage customer feedback, and attract potential customers by integrating marketing strategies. For foreign trade enterprises, an efficient CMS not only reduces the complexity of operations and maintenance but also helps businesses continuously manage website content and accumulate organic traffic.
The reason WordPress has become the top choice for foreign trade enterprises lies mainly in its mature ecosystem, with two key advantages: the richness of themes and the extensibility of plugins. First, WordPress offers a large number of free and paid themes, covering various foreign trade business scenarios such as B2B, B2C, and cross-border e-commerce. For foreign trade businesses choosing to use template-based website building, there is no need to start from scratch in website design. Simply selecting the right theme allows them to quickly build a foreign trade website. This highly flexible template-based website building method not only reduces development costs but also greatly shortens the website's launch time. Secondly, WordPress’s powerful plugin ecosystem makes extending the functionality of foreign trade websites extremely convenient. With efficient plugins like WooCommerce, TranslatePress, and Elementor, websites can achieve critical features like product management, multilingual support, and page customization, meeting the operational needs of foreign trade enterprises in global markets. This wide range of plugin options allows WordPress foreign trade websites to be continuously upgraded and optimized as the business evolves, ensuring the company remains competitive in cross-border trade. If this is your first time using WordPress to build a foreign trade website, you may face many questions such as choosing a domain and server, configuring themes and plugins, etc. In the following sections of this article, I will address these issues one by one to help you out.
The table of contents for this WordPress tutorial article, "Building a WordPress Foreign Trade Website (WP Foreign Trade Website Beginner's Guide)," is listed below. To help readers quickly find the relevant content based on their needs, each chapter and subchapter includes anchor text links. Clicking on these links will take you directly to the corresponding section, providing precise information. This directory design is not only suitable for readers who are reading through the entire article but also meets the needs of those who wish to quickly look up a specific issue or bookmark the article for future reference, enhancing reading efficiency and flexibility.
- Pre-Work for Building a WordPress Foreign Trade Website
- Deploy WordPress.org Program
- Install WordPress Theme
- Key Function Settings in WordPress Backend
- WordPress Foreign Trade Website Editing Pages
Ⅰ、Pre-Work for Building a WordPress Foreign Trade Website

Before officially building a WordPress foreign trade website, there are two fundamental and crucial preparatory tasks that need to be completed: registering a domain name and selecting a suitable server. These two elements are the foundation of the website's operation and are indispensable. Only when the domain name registration and server selection are properly prepared can the installation of WordPress and the official website setup proceed smoothly. In the following sections, the blogger will introduce how to choose a suitable domain name and server, and provide detailed step-by-step guides for each.
1、Register a Suitable Domain Name

Before building a WordPress foreign trade website, registering a suitable and easy-to-remember domain name is crucial. A good domain name not only makes it easier for customers to find you, but also enhances brand influence and improves search engine optimization (SEO) performance. Below are the complete steps for registering a domain name, helping you successfully complete this key task.
(1) Key Points for Choosing a Suitable Domain Name
- Short and Memorable: Try to choose a domain name with 10 characters or fewer, and avoid using difficult-to-spell or complex words.
- Brand-Related: Ensure the domain name is related to your brand name or business, such as YourBrand.com.
- Use Popular Extensions: It is recommended to use international extensions like .com, .net, or specific country codes to enhance credibility.
- Avoid Special Characters: Avoid using hyphens (-) or numbers, as they can confuse customers.
- Check Domain Availability: Before registering, make sure the domain has not already been taken by someone else.
- Alternative for Registered Domain: If the domain "logic" and its common extensions are already taken, the blogger chose to register "szlogic." This is an alternative by adding a custom prefix, and another option is to add a suffix, such as "logictech."
(2) Use a Domain Registration Platform to Check and Register
Once you have decided on a domain, you need to check its availability and complete the purchase on a domain registrar platform. The blogger frequently uses Namecheap and GoDaddy, which are also the most commonly used domain registrars for foreign trade websites. The blogger has already demonstrated the registration steps for GoDaddy in the previously published article "Preparatory Work for Building a Foreign Trade Independent Site." In this article, we'll use Namecheap to explain the registration steps. Readers can follow the steps below to register a domain for a WordPress foreign trade website.
Domain Search and Registration Step 1: Visit Namecheap and Search for the Domain
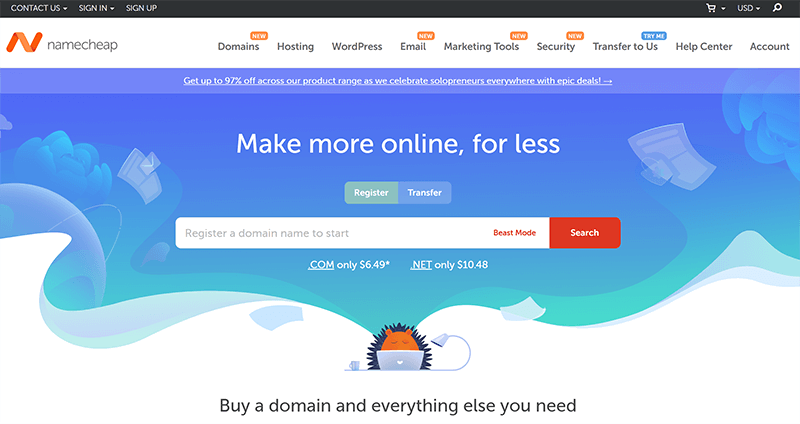
The image above shows the homepage interface of Namecheap, a domain registrar. In the domain search input box on the page, enter the domain name you have planned, and click the "Search" button on the right side of the input box to access the domain search results page.
Domain Search and Registration Step 2: Complete the Registration or Use an Alternative Solution
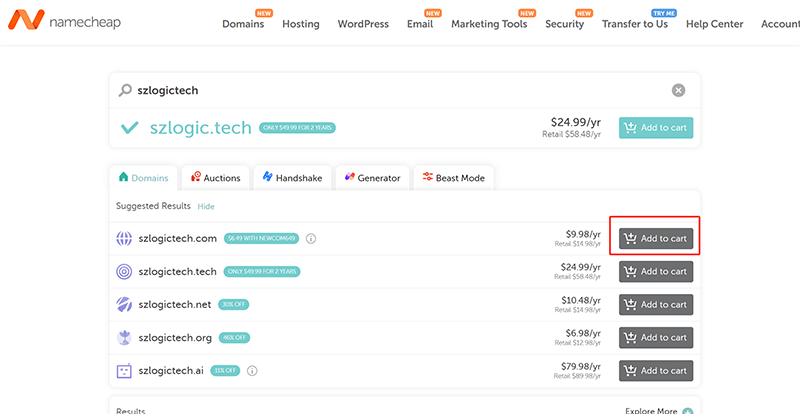
On the domain search results page, if there are still available suffix types for registration, click the "Add to Cart" button on the right side of the corresponding domain (as marked in the red box in the image). The system will then redirect you to the domain registration checkout page. Follow the prompts to complete the checkout process, and the domain will be successfully registered. If the search results show that all suffixes are unavailable, you will need to adjust the domain spelling, try different suffixes, or use brand-related alternatives until you find a suitable domain. Additionally, it is important to remind readers that when selecting the registration duration, you can usually choose 1 to 5 years, but it is recommended to register for at least 2 years to improve SEO friendliness. A shorter registration period is often seen by search engines as a common characteristic of spam or low-quality websites, which could affect the site's ranking and trustworthiness. Therefore, a longer registration period not only helps enhance the site's credibility in search engines but also reduces the hassle of frequent renewals, ensuring the long-term stable operation of your foreign trade website.
2、Choose a Server Suitable for WordPress Foreign Trade Sites

In the process of building a WordPress foreign trade website, selecting the right server is crucial. It directly impacts the website's loading speed, stability, security, and the experience of users globally. An efficient server ensures fast response times for your foreign trade website, improves customer retention rates, and enhances the performance of SEO core page metrics (Core Web Vitals). So, how do you correctly choose the right server for a WordPress foreign trade website and what is the process for purchasing a server? The blogger has listed the parameters of several popular server brands commonly used for WordPress foreign trade websites in the table below. Readers can choose based on the positioning of their WordPress foreign trade site. When making a purchase, you can use Bluehost as an example to refer to the specific steps to complete the server purchase process.
(1) Comparison table of recommended WordPress server brands and manufacturers
| Server Provider | Recommended Type | Key Benefits |
| Bluehost | Shared Hosting / VPS | Officially recommended WordPress hosting, easy to operate and cheap |
| SiteGround | Shared Hosting / VPS | High-speed servers, CDN support, recommended for European market |
| Vultr | VPS | Low cost, high performance, flexible expansion |
(2) Server purchasing process
Step 1: Visit Bluehost and select the server product type

After successfully accessing the Bluehost official website (https://www.bluehost.hk/), select the "Cloud Hosting" product from the navigation bar on the Bluehost homepage, as indicated in the red box in the image above. This will take you to the page for selecting WordPress hosting plans. Continue with the next step as instructed.
Step 2: Choose a Bluehost WordPress hosting plan
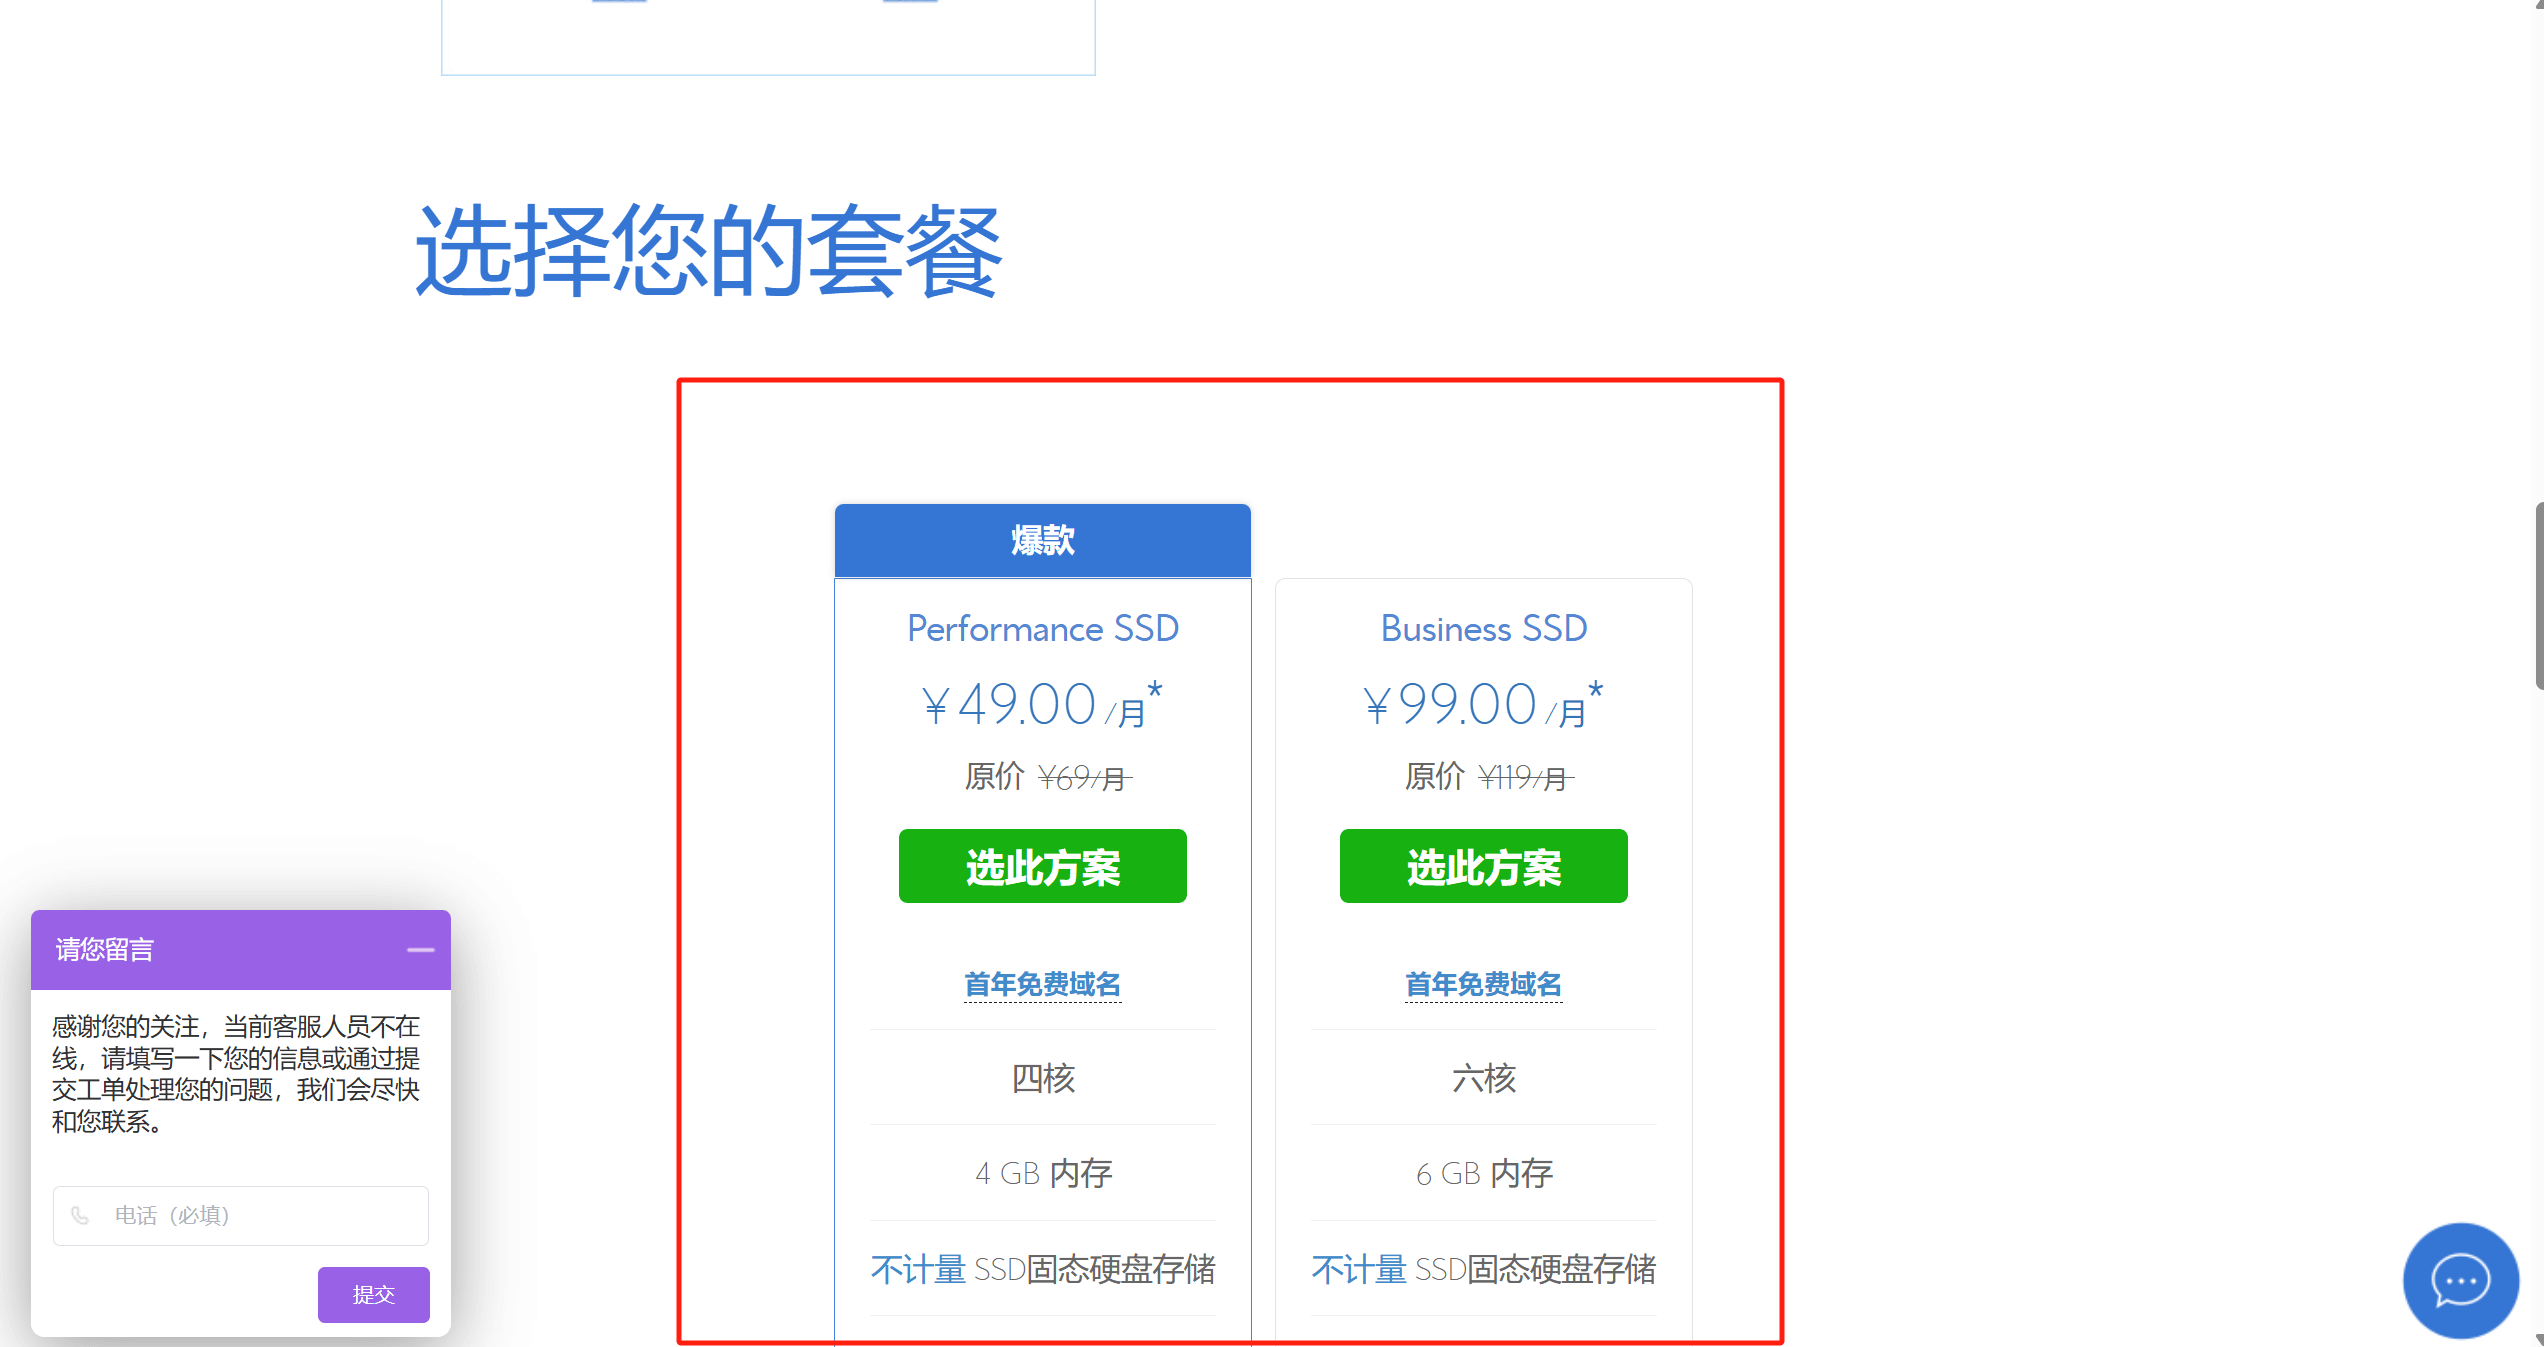
As shown in the picture above, on the WordPress server package selection page, scroll down to the "Select your package" section. Among the multiple package options provided by Bluehost, find and select the VPS server package that suits your needs. Click the "Select this plan" button in the selected package, and then the system will guide you to the next step of the purchase process to continue to complete the server ordering operation.
Step 3: Domain Name Options
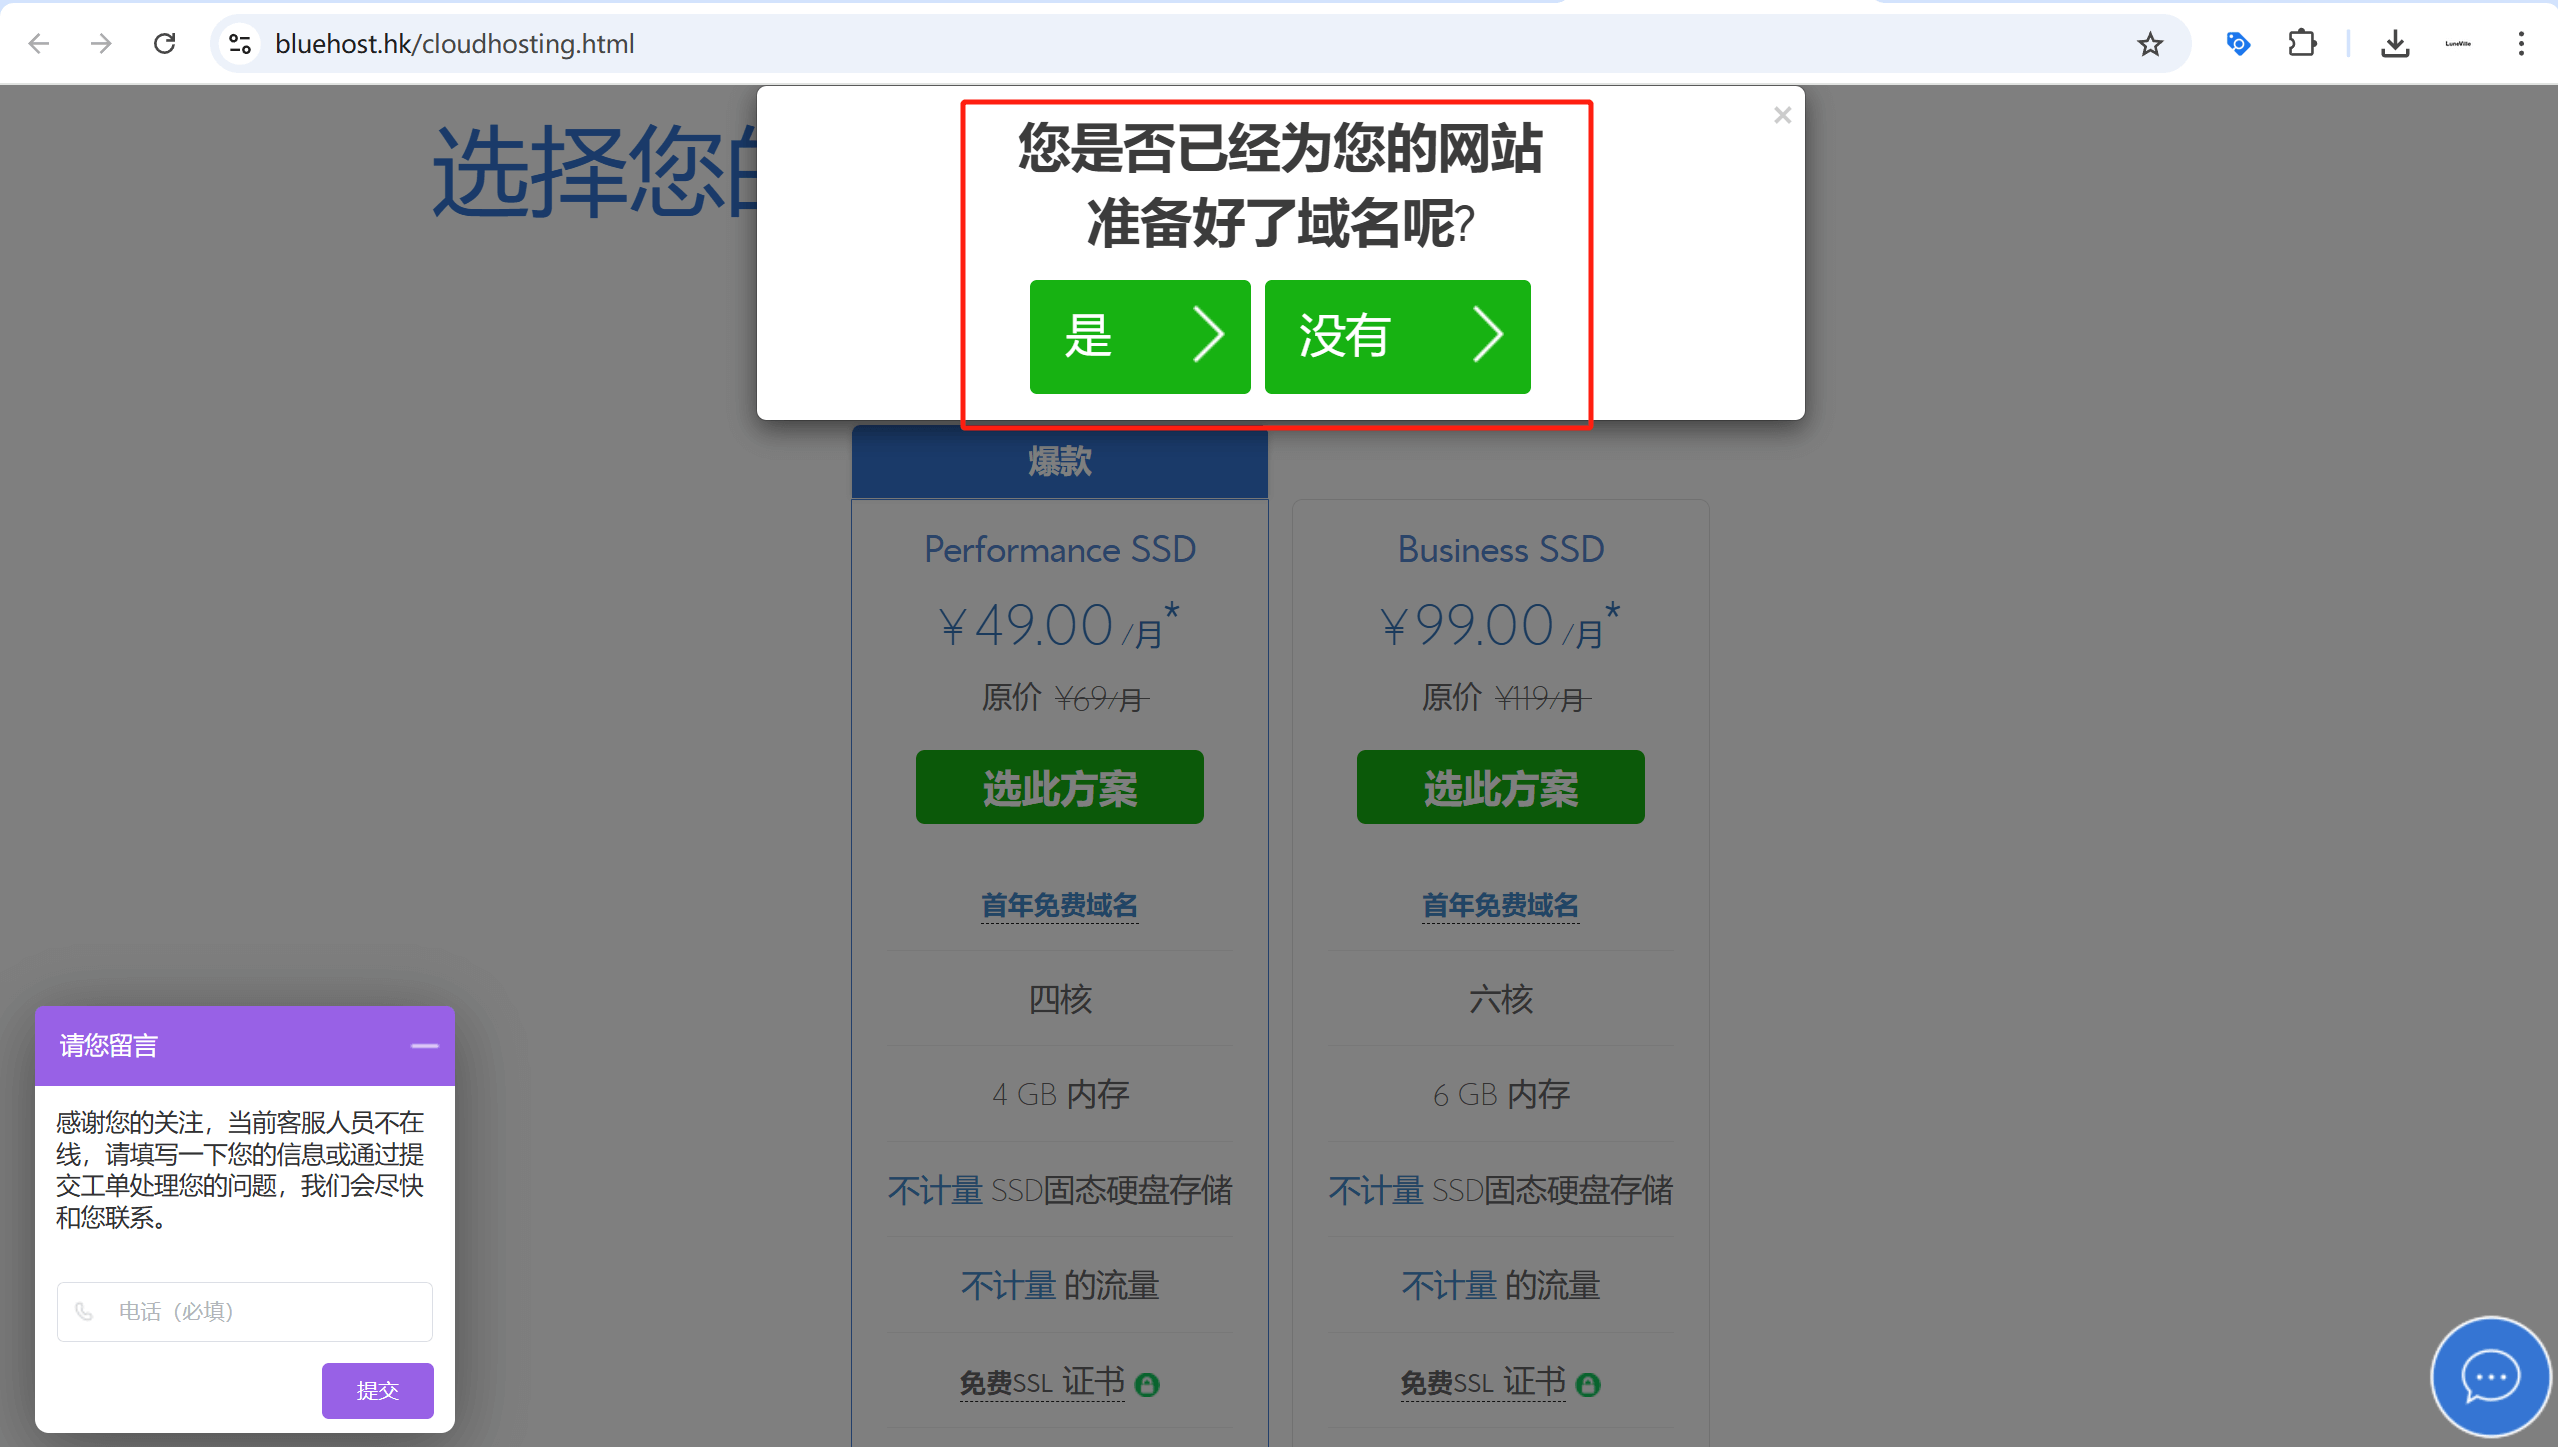
As shown in the image above, after selecting the VPS plan on Bluehost and confirming the server configuration, click the "Select Plan" button. This will pop up a rather unexpected domain-related window. This is because Bluehost not only provides WordPress hosting services, but is also a domain registrar. The intention behind this is to encourage users to register a domain while purchasing their VPS service, making it a cross-selling marketing strategy by Bluehost. If you have already registered a domain, select the "Yes" button to proceed to the domain input window. If you do not have a domain, you can click the "No" button to go to Bluehost's domain registration page and register a domain before purchasing the server.
Step 4: Enter the domain name
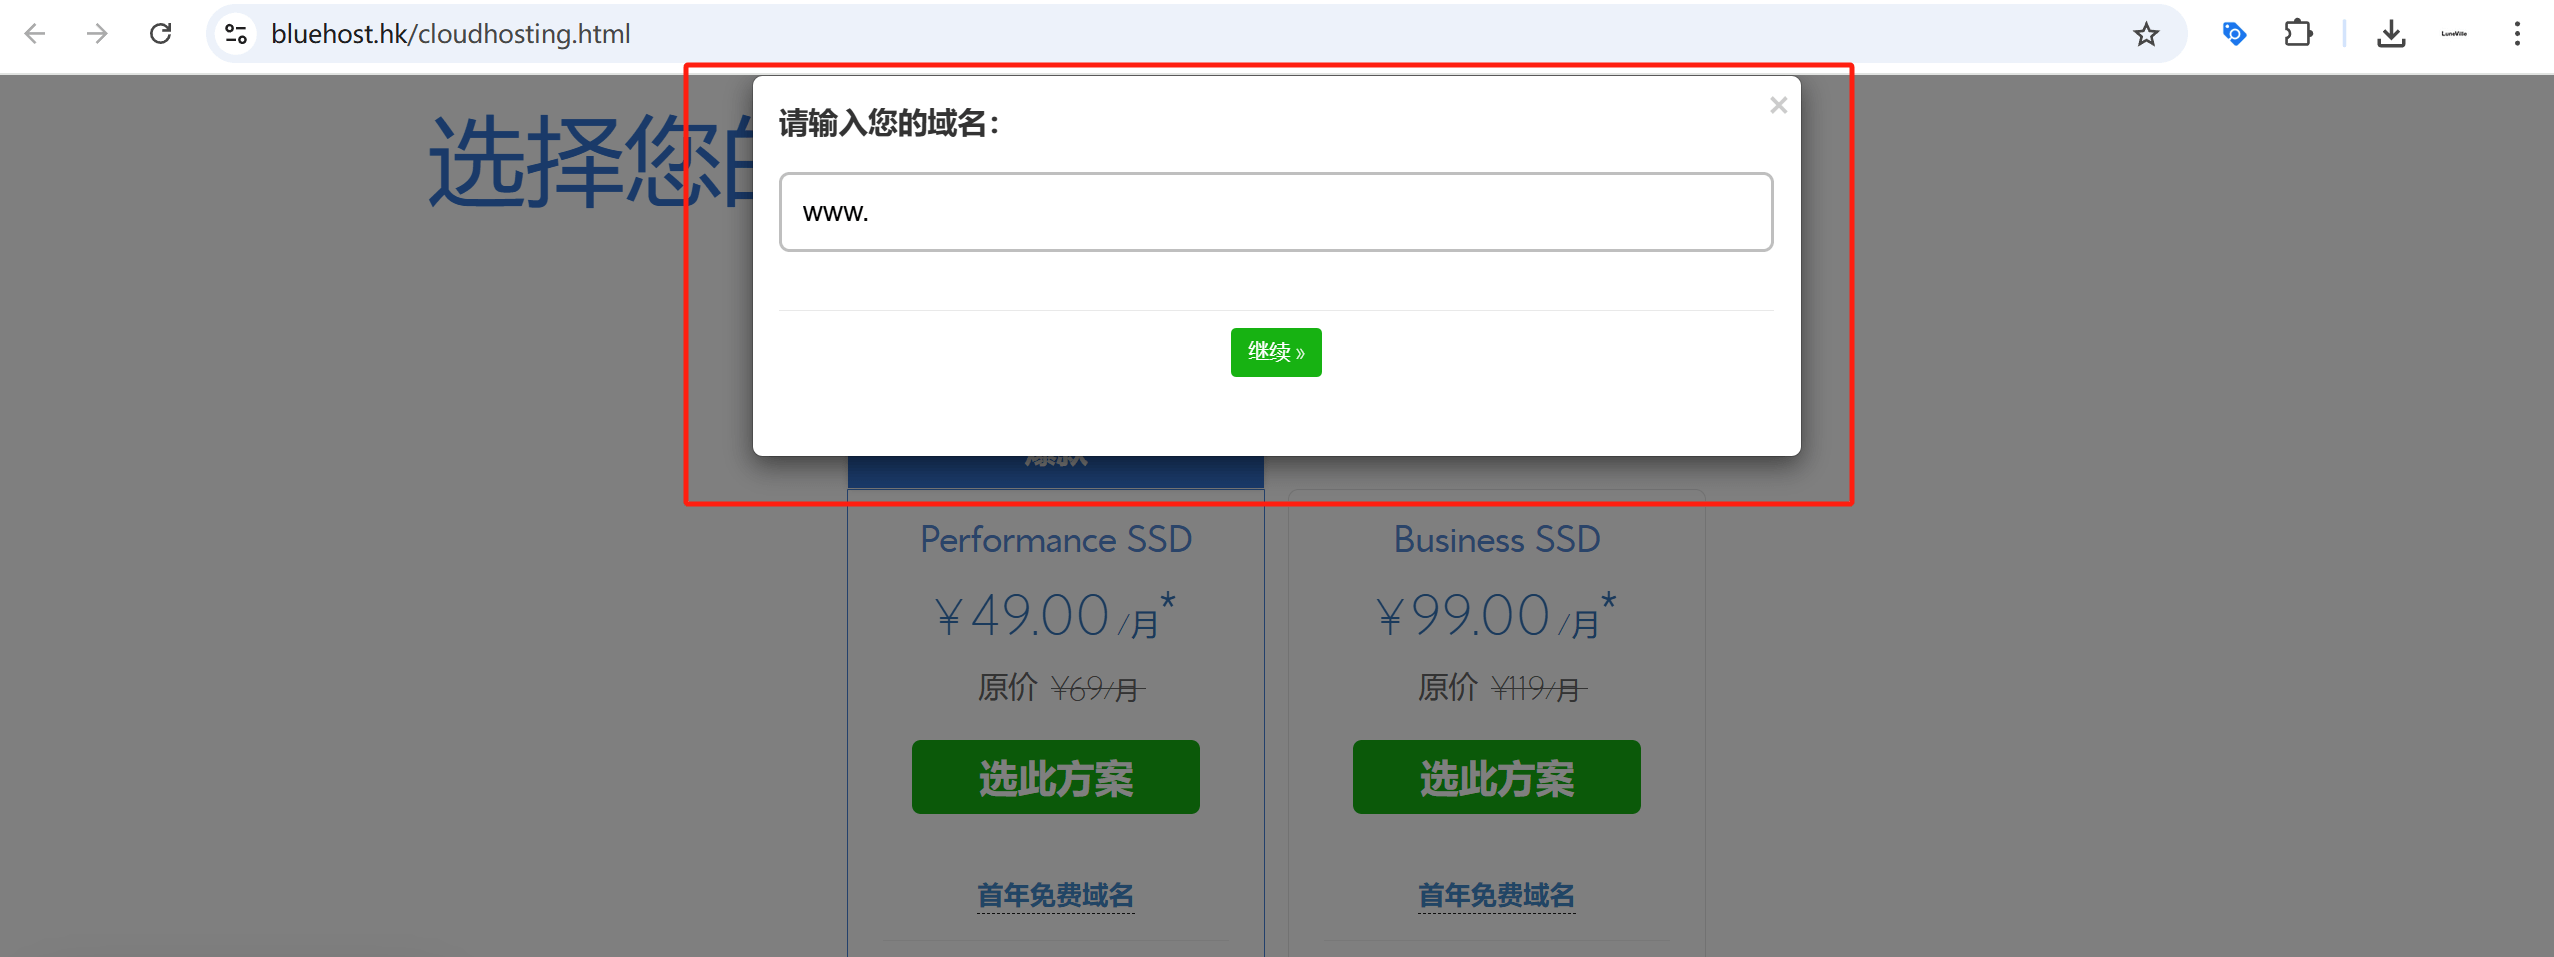
If you have already registered a domain with GoDaddy or Namecheap, there is no need to register a domain again with Bluehost. When prompted on the previous Bluehost page with the message "Do you already have a domain for your website?", select the "Yes" button. This will pop up a domain input box (as shown in the image above). After entering the registered domain in the box, click the "Continue" button to proceed to the next shopping cart page and complete the following purchasing process.
Step 5: Create an account and complete payment in the Bluehost shopping cart
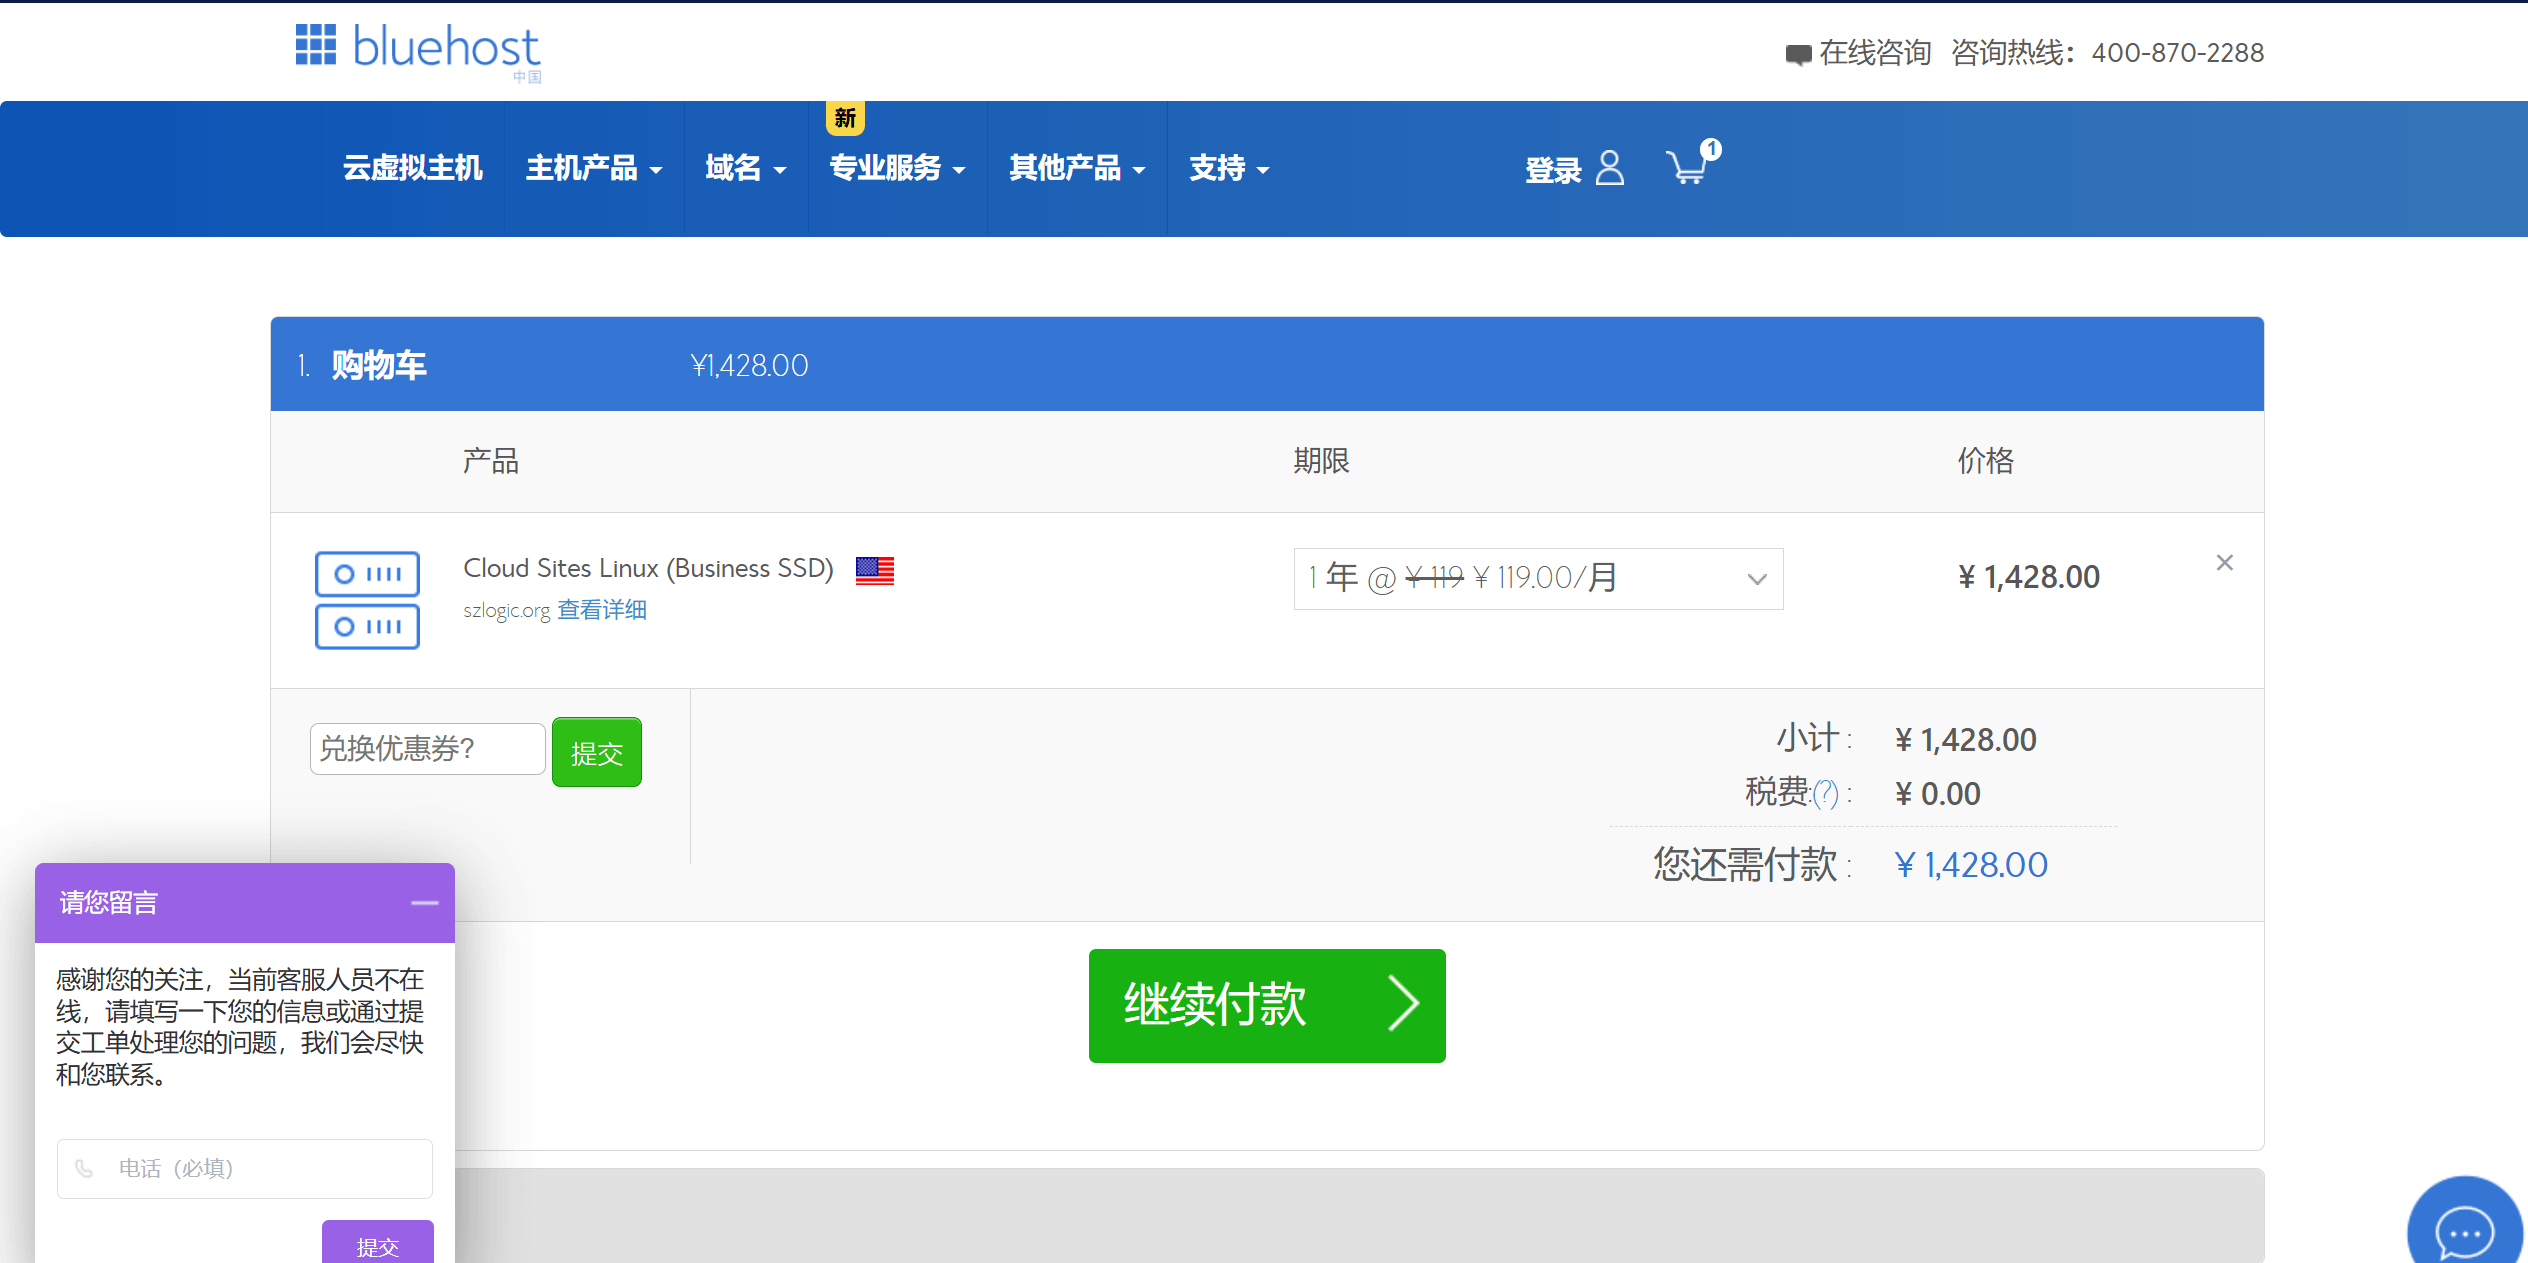
On the shopping cart page of Bluehost, as shown in the image above, after clicking the "Proceed to Payment" button, you will be directed to the user registration page. On the registration page, follow the system's prompts and instructions to complete the Bluehost user registration. After creating your Bluehost account, you can choose to pay via credit card, PayPal, or Alipay to complete the purchase and payment for the WordPress foreign trade website hosting server.
Ⅱ、Deploy WordPress.org Program

Once the WordPress environment is ready, deploying the Linux panel to install the WordPress.org core program is an efficient and convenient way. In a Linux server environment, WordPress installation not only enables the quick deployment of the website's core program but also creates the necessary MySQL database, providing stable support for the data storage of the foreign trade website. During the deployment process, domain binding is also required to ensure that the website can be accessed via the registered domain name. Additionally, the PHP and MySQL versions on the server must be compatible with WordPress to ensure the stable operation of the program. The commonly used panels on Linux servers include cPanel and BT Panel. These visual panels not only simplify the entire WordPress installation and configuration process but also provide key functions such as database management, SSL certificate deployment, and file permission settings, making it easier for beginners to get started. In the following content, the blogger will detail how to install and configure WordPress.org using the Linux panel, helping you successfully build your foreign trade website.
1、Find and Execute WordPress.org One-Click Deployment
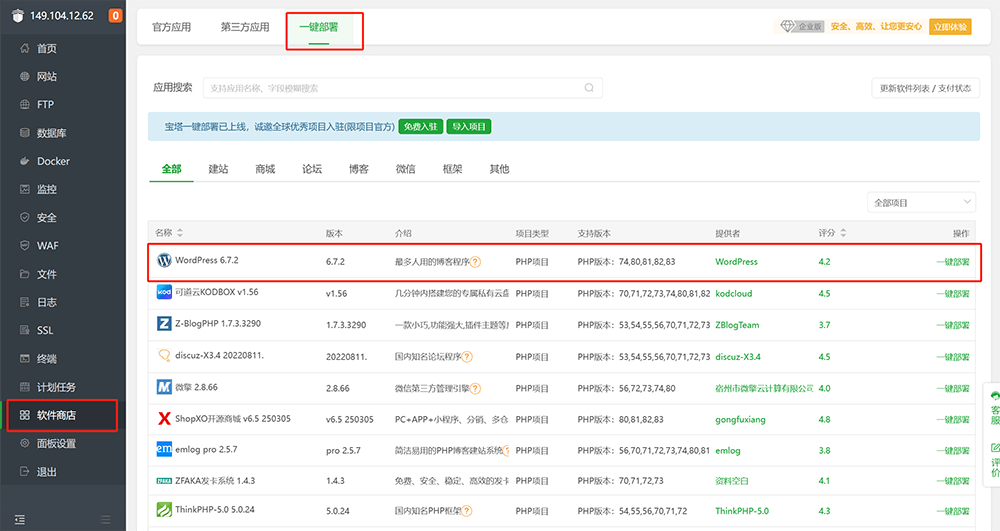
In the "Software Store" interface of the BT Panel, follow the path marked by the red box in the above picture to find the WordPress program option. Then, click the "One-click Deployment" button on the right side, and the system will execute the WordPress configuration and installation process to achieve rapid deployment.
2、Enter the Domain Name for the WordPress Foreign Trade Website and Create a Database
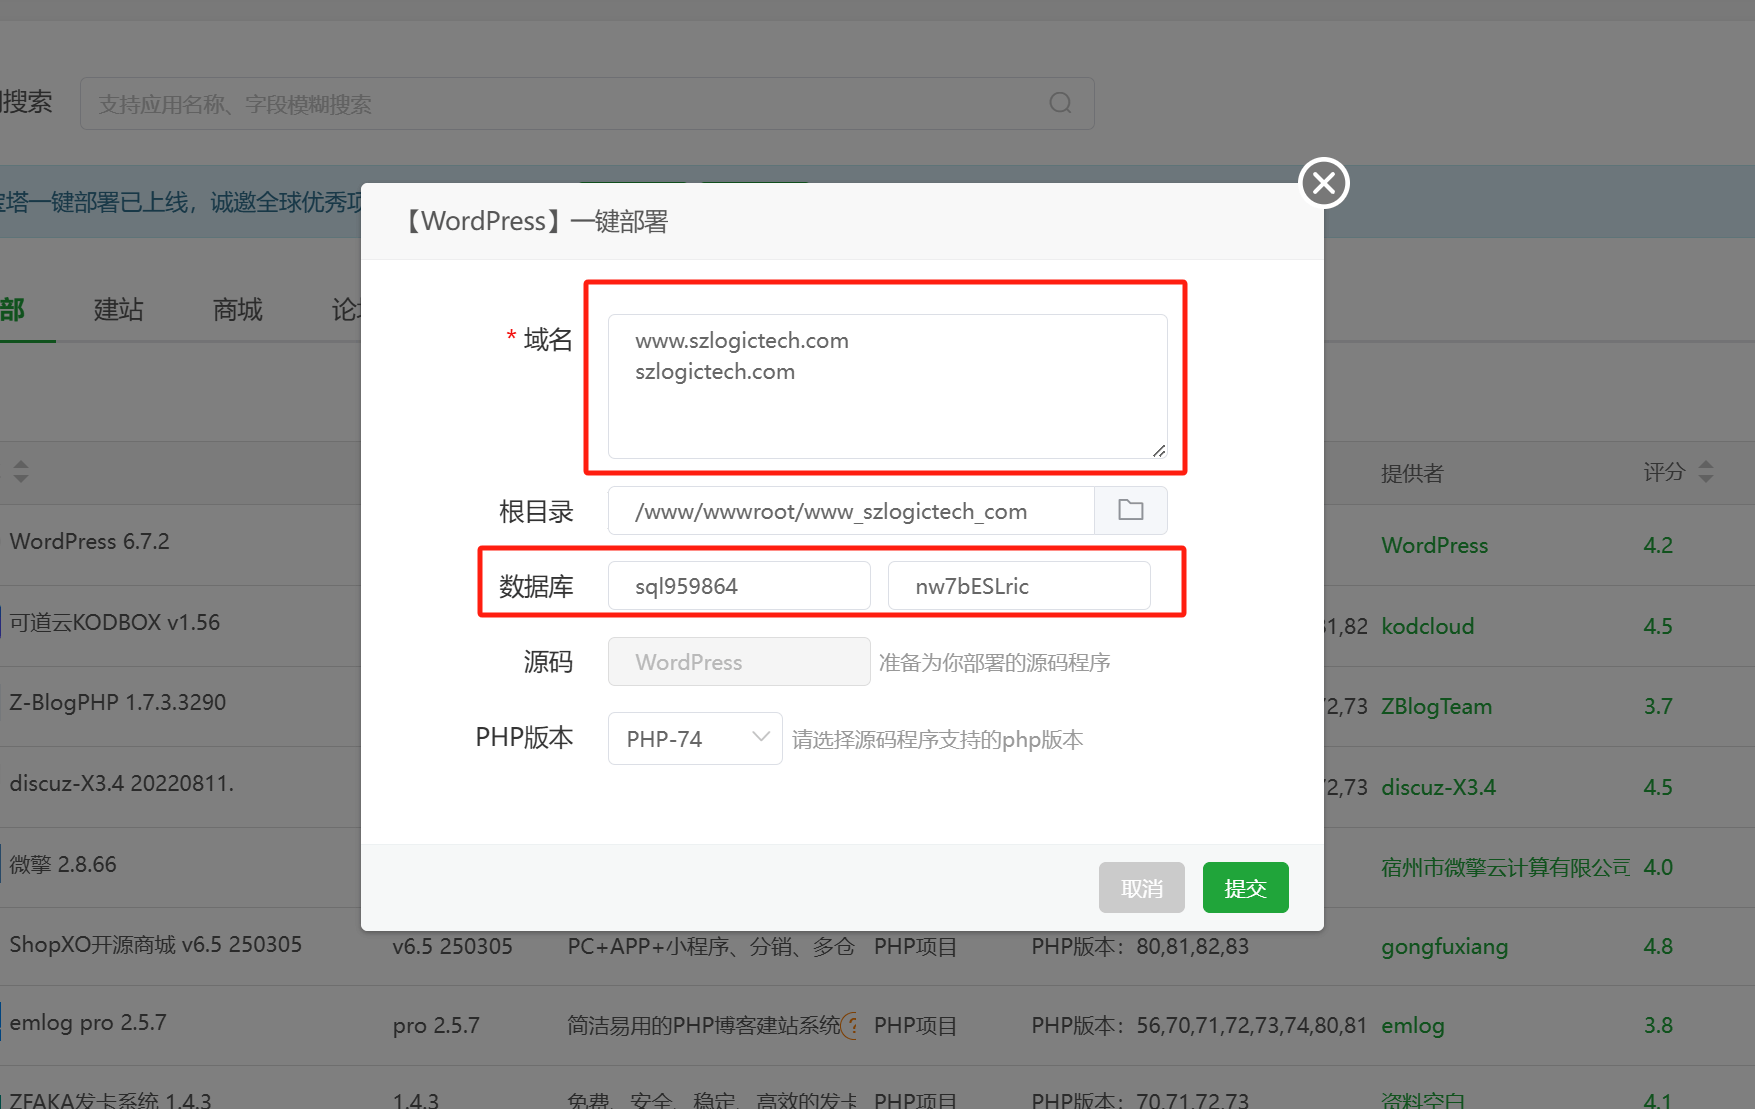
After clicking the "One-Click Deployment" button for the WordPress program, the BT Panel (BT Panel) will pop up a WordPress configuration window to set the basic information for the website. In the "Domain Name" input box (as shown in the red box in the image above), you need to enter the main domain name for the foreign trade website, including both the with www and without www versions, to ensure the website can be properly resolved and accessed. Additionally, the database username and password are critical items that must be configured. These can be customized, but if you're not familiar with MySQL database user password creation guidelines, it's recommended to use the system-generated secure password to reduce the risk of configuration errors. It's important to note here: the database username and password must be properly saved, as these details will still be needed during the subsequent WordPress configuration process.
In addition to the options highlighted by the blogger above, the "PHP Version" and "Root Directory" shown in the image above, which are not highlighted, are also important parameters for WordPress deployment. The system will automatically select the appropriate PHP version based on the current server environment. If multiple PHP versions are not installed in the Linux system, it is recommended to keep the default selection to ensure WordPress compatibility and stable operation. As for the "Root Directory," which refers to the Web directory on the Linux server, WordPress is deployed in the wwwroot directory by default. This directory is the standard location for storing websites and usually does not need to be modified to avoid access anomalies or permission errors. After completing all configurations, click the "Submit" button, and the BT Panel will automatically execute the WordPress installation program and deploy the files to the specified directory.
3. Configuration steps after downloading the WordPress.org system installation package
(1) WordPress configuration step 1: Enter the WordPress configuration process
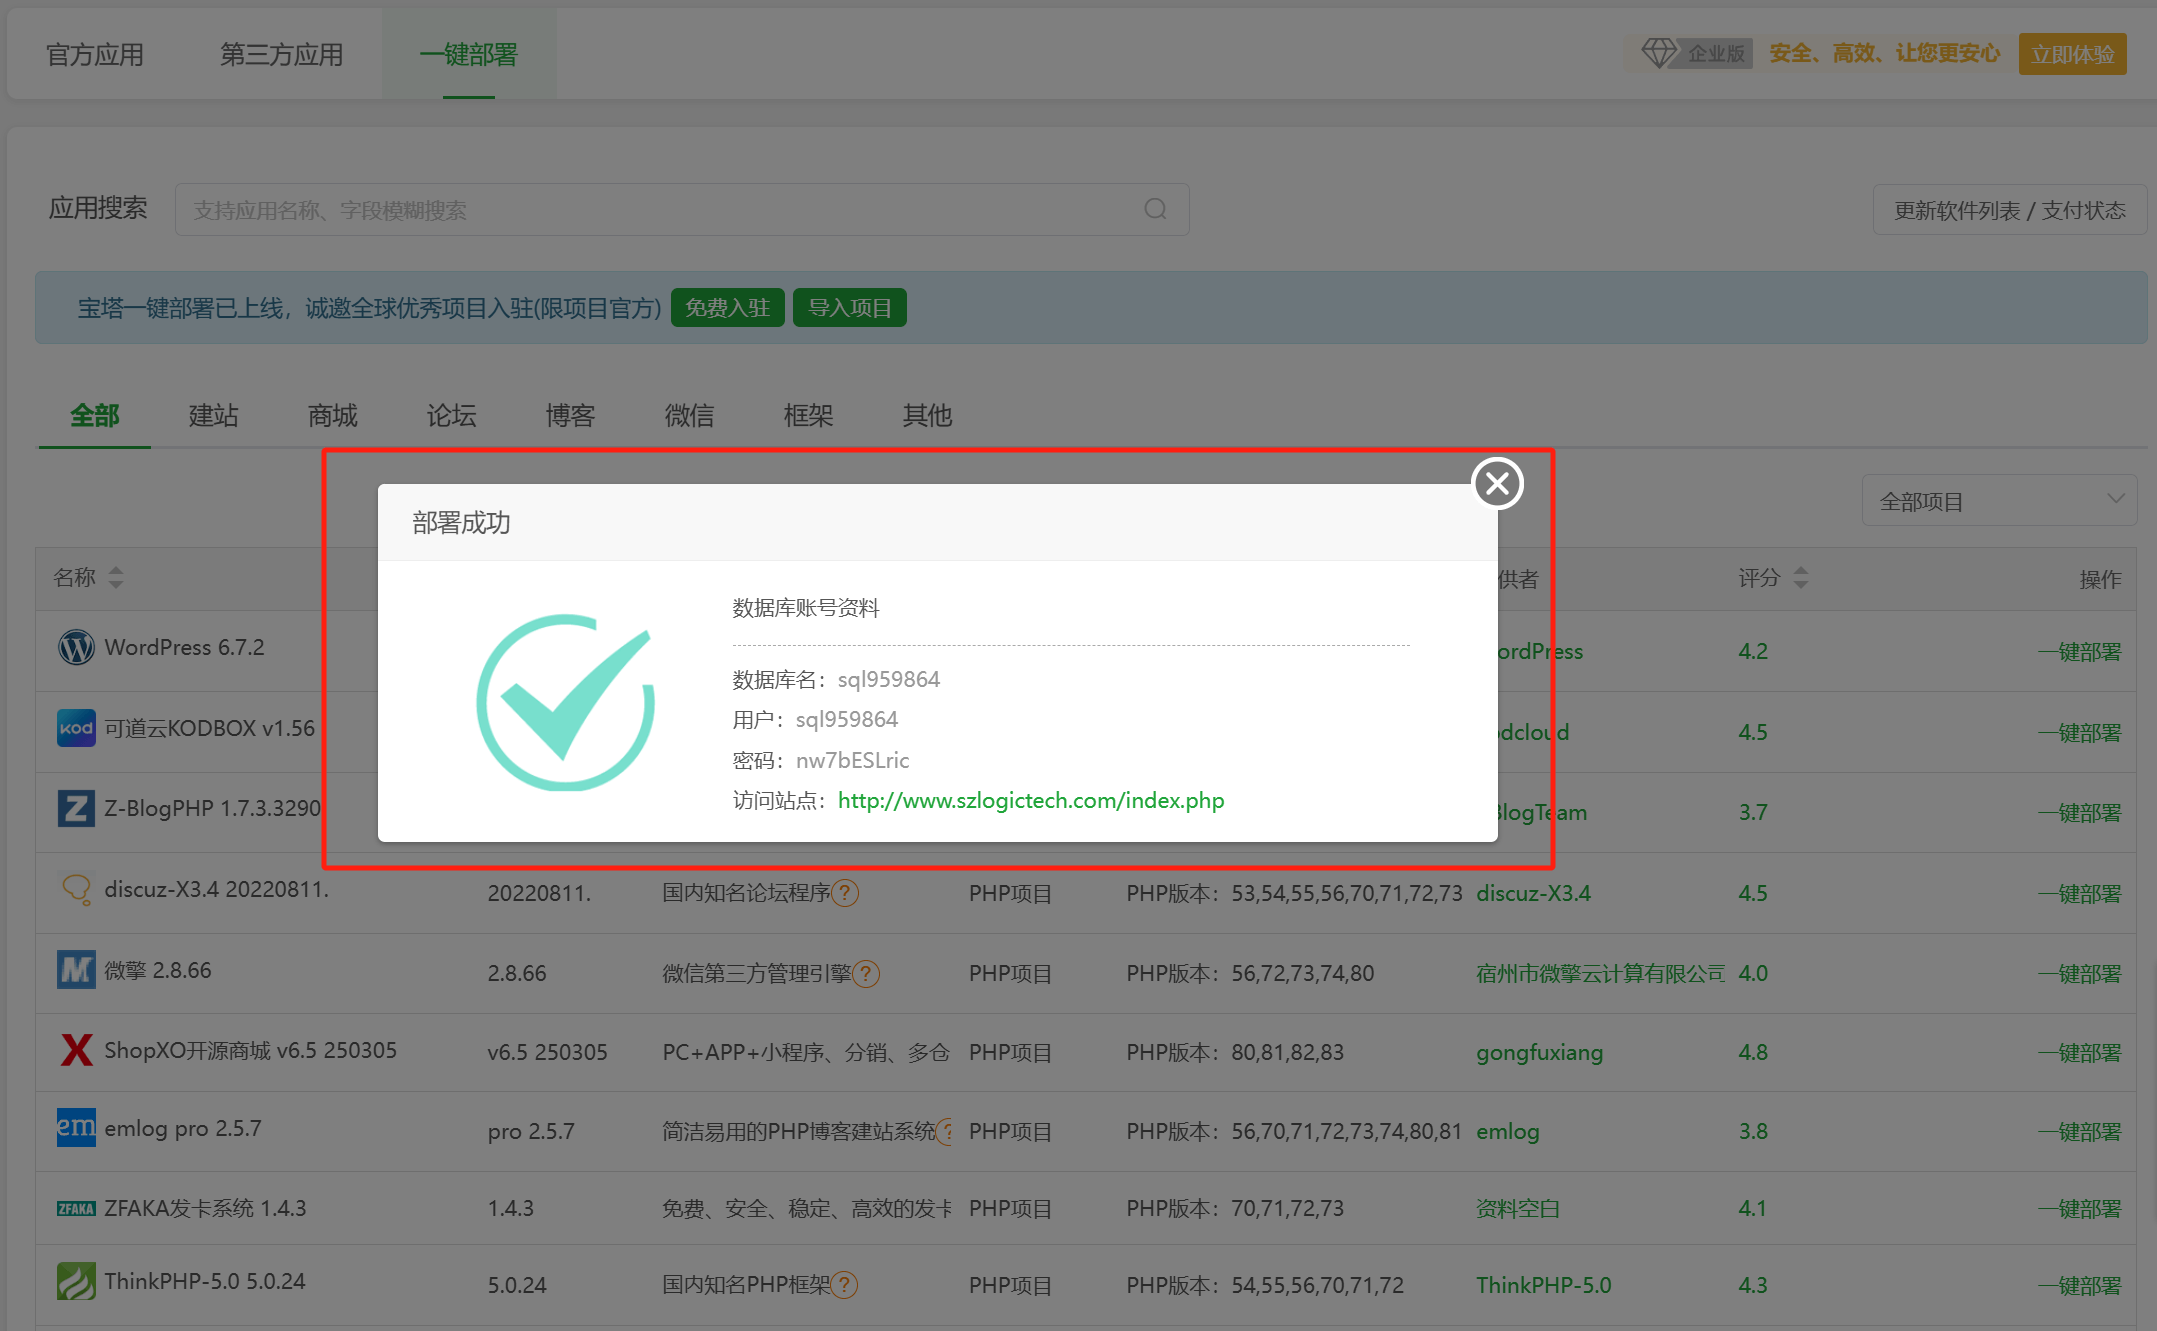
After the Linux system completes the download of the WordPress installation package, the BT panel will pop up a "Deployment Successful" prompt window as shown above. Click the "Visit Site" link at the bottom of the window to proceed to the following WordPress configuration process.
(2) WordPress configuration step 2: Start configuring WordPress
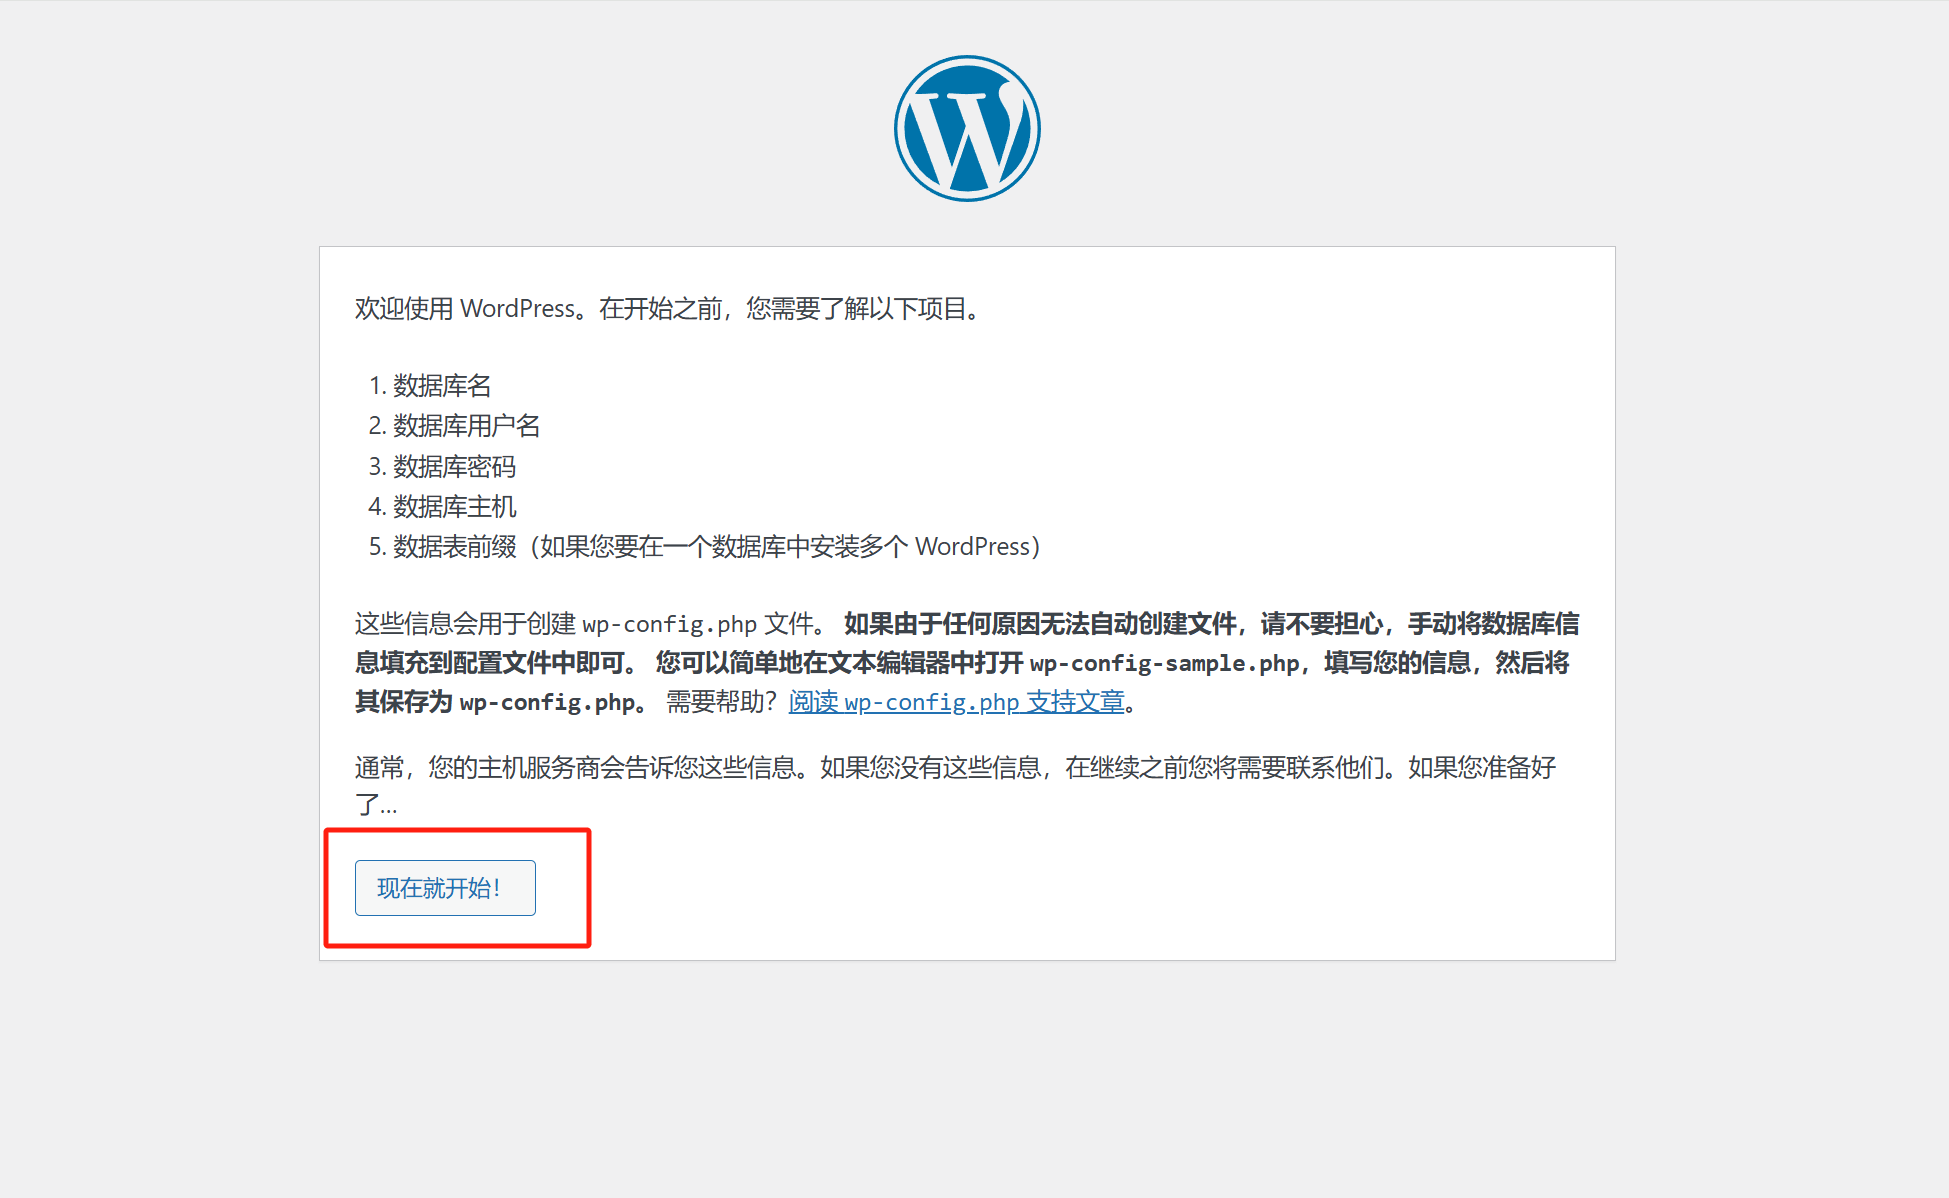
The first interface of the WordPress configuration process is the WordPress configuration declaration page as shown in the figure above. Click the "Start Now!" button marked with a red box on the page to continue the next configuration operation.
(3) WordPress configuration step 3: database configuration

As shown in the image above, in this step's form, you need to correctly fill in the database name, account, and password information. Copy and paste the database username and password that we saved in the previous step, "Fill in the domain for the WordPress foreign trade website and create the database," into the corresponding input fields (the database name and username are the same). The "Database Host" field, which was not highlighted with a red box, can be left as the default. The last field is the "Table Prefix," which is the prefix for the database tables. It is recommended to customize it, as encrypting the table prefix helps prevent the database from being brute-forced. After filling in all the form fields, click the "Submit" button below to complete the current operation and continue with the next configuration step.
(4) WordPress configuration step 4: Run the WordPress installer
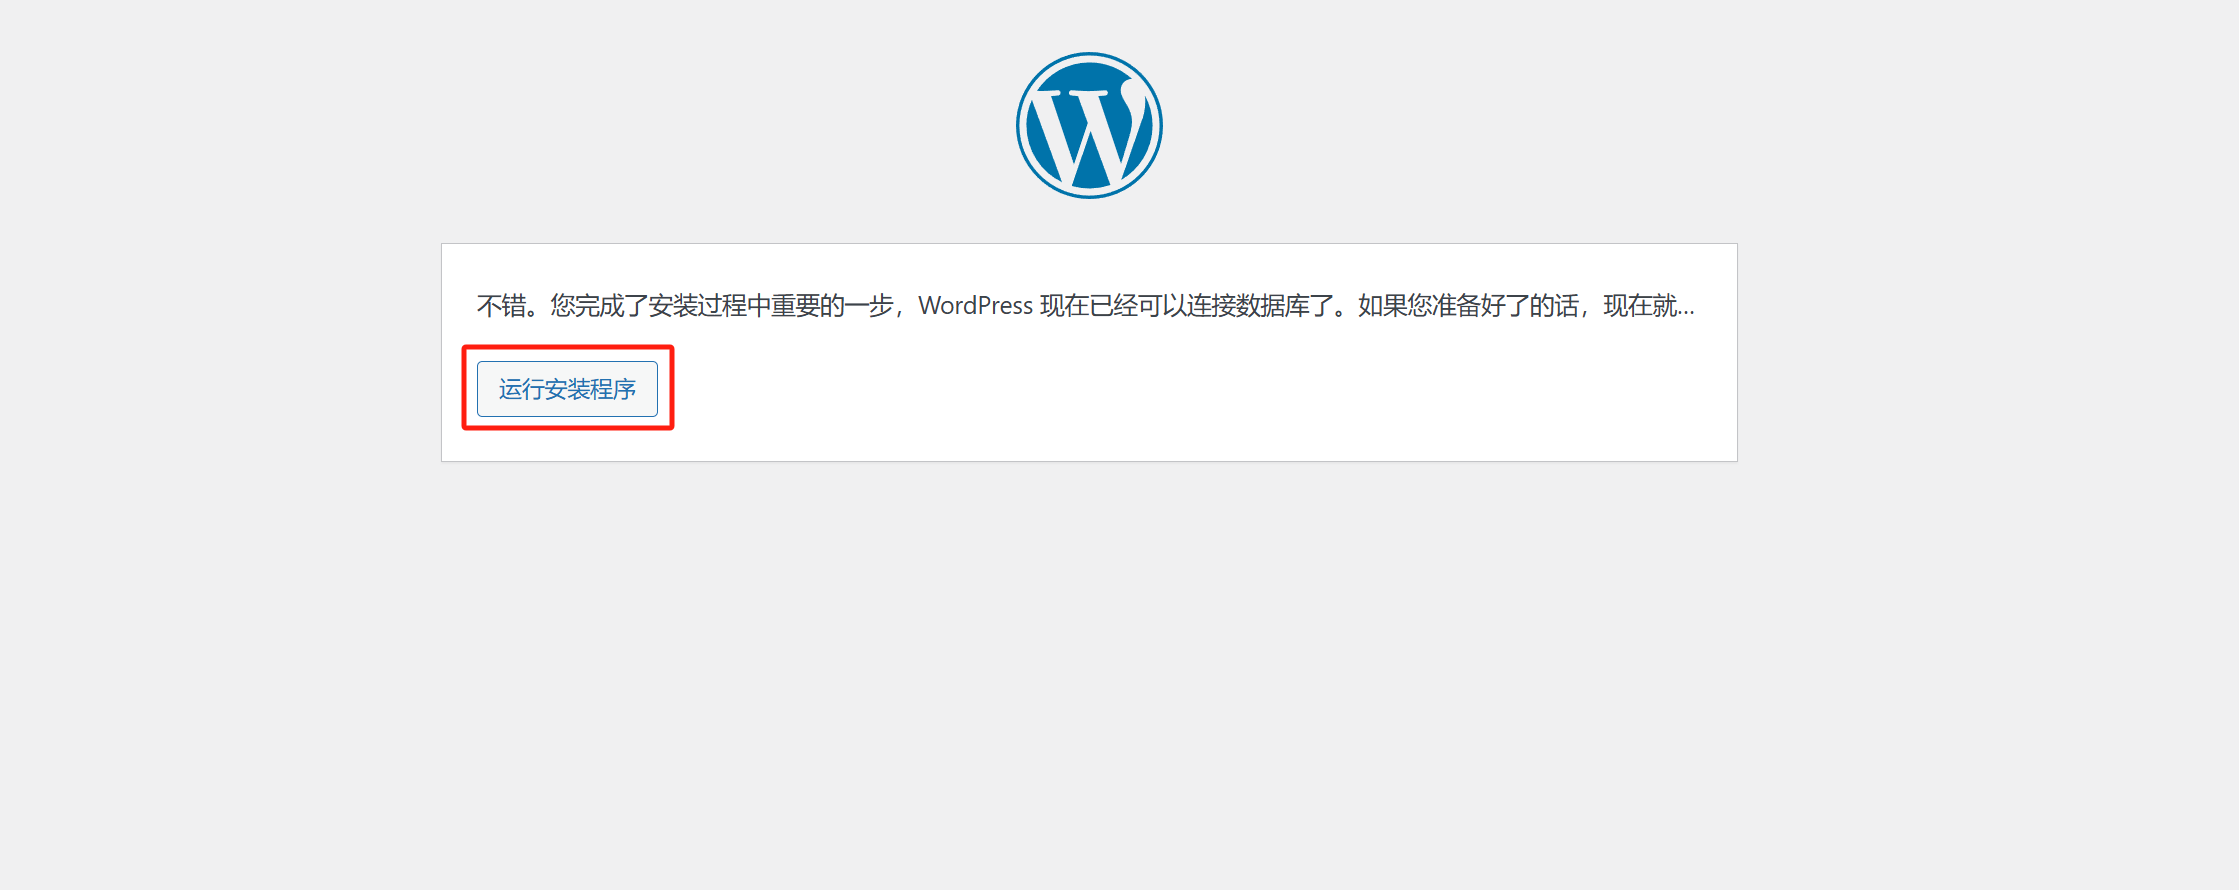
After successfully submitting the database connection information in the previous step and clicking the "Submit" button, the system will verify the database login credentials. When the database information passes the verification, the WordPress installation process will display the message shown in the image above: "Great, you've completed an important step in the installation process...". Seeing this message means that the database information we entered in the previous stage is correct, and WordPress has successfully connected to the database. At this point, simply click the "Run the Installation" button to proceed to the next step, continue configuring WordPress's initial settings, and complete the website's basic information and administrator account creation.
(5) WordPress configuration step 5: Fill in the basic information of the WordPress website and create an administrator account
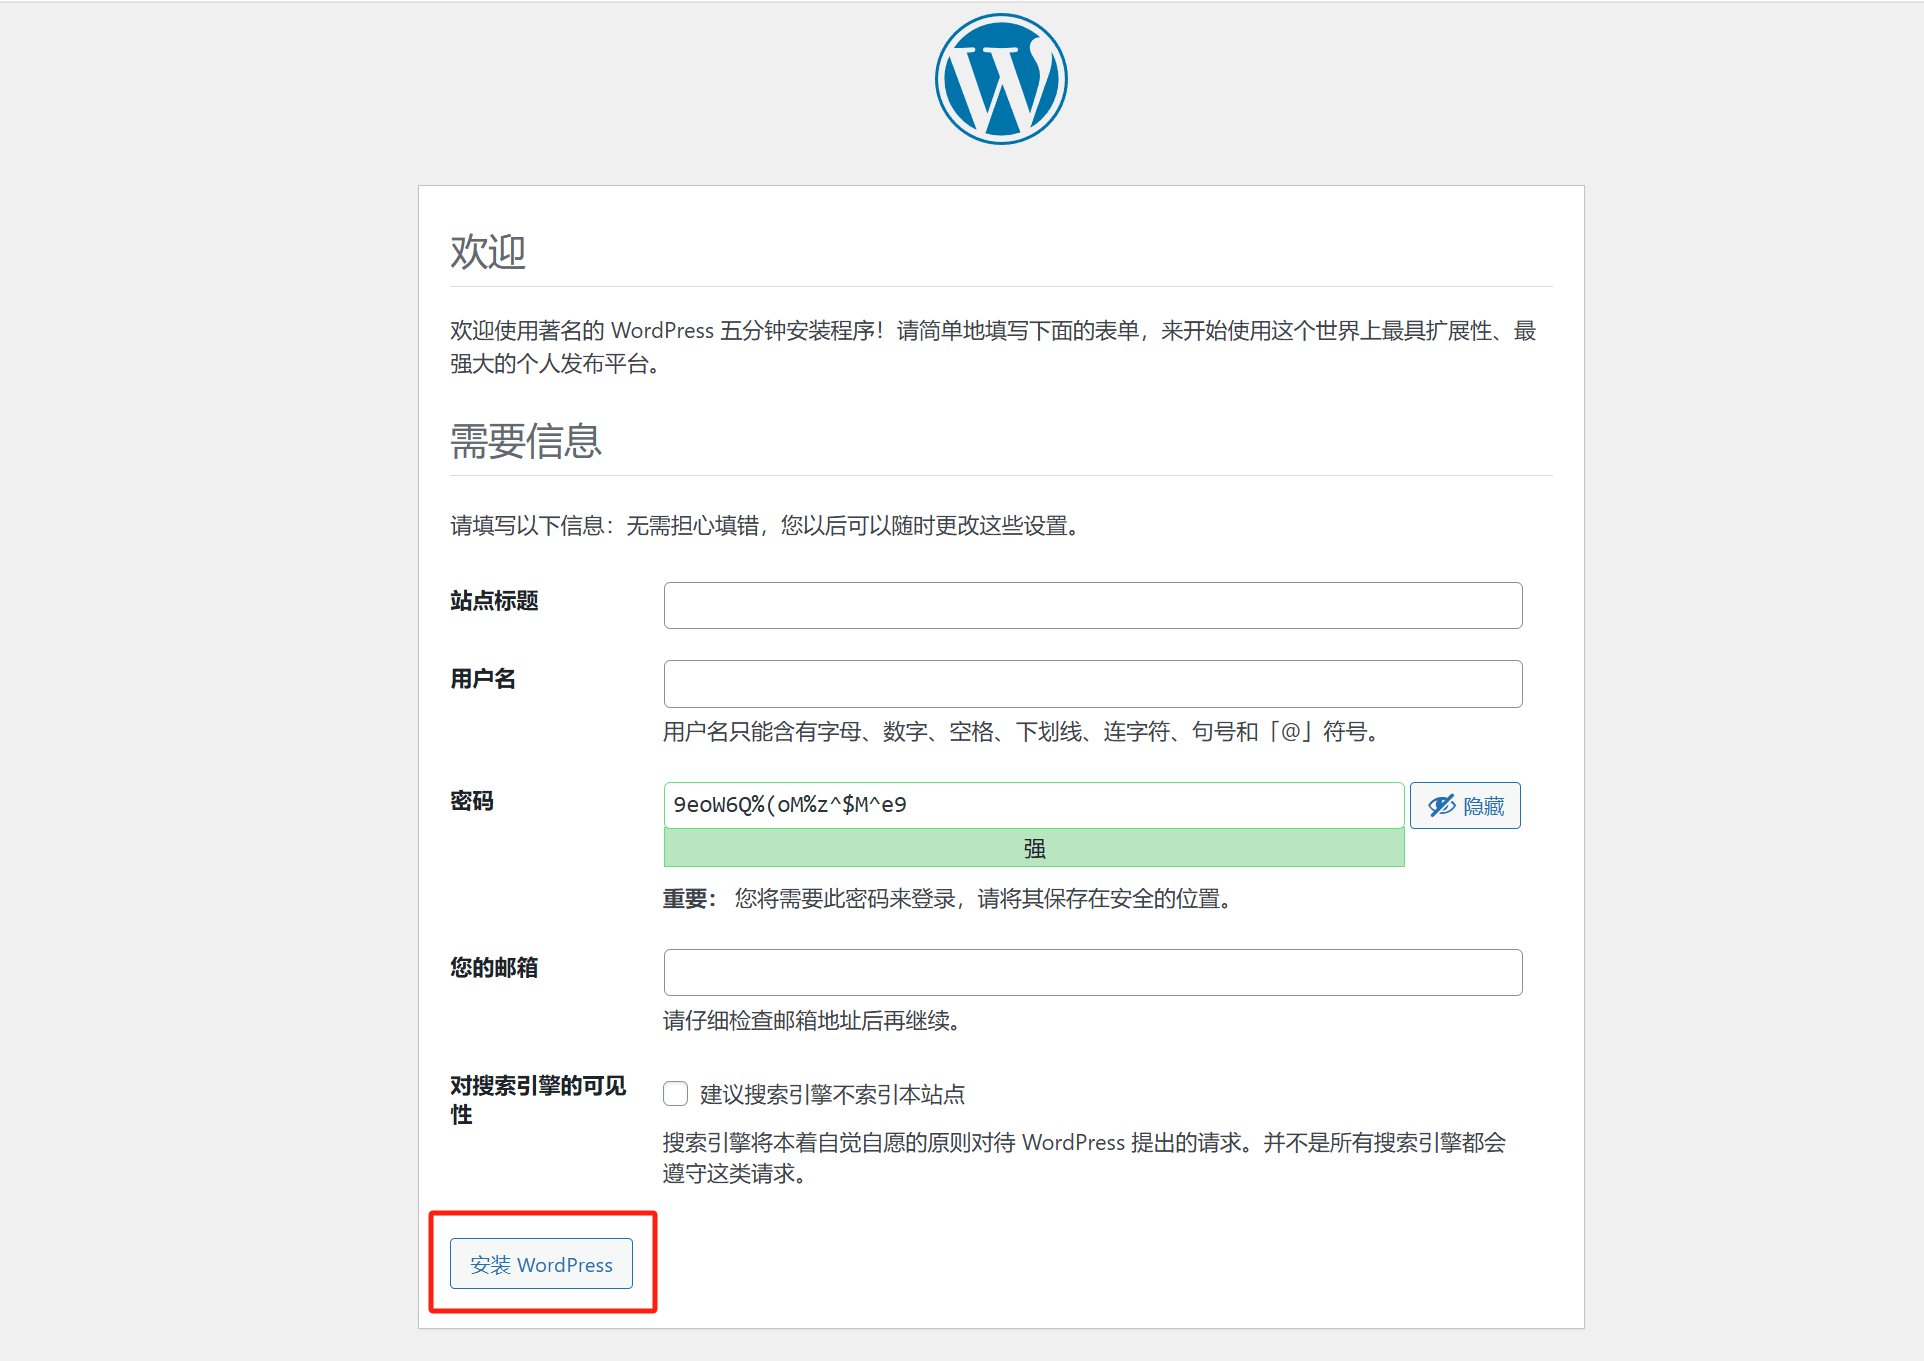
In the WordPress installation process, after entering the website's basic information and creating the administrator account, we need to complete the following key settings to ensure the site runs properly and has management permissions. First, in the "Site Title" input box, enter the website's name, which usually represents the brand or business name and can be modified later in the WordPress settings. Next, in the "Username" section, create an administrator account. It is recommended to use a unique and memorable username, avoiding common names like admin to enhance security. In the "Password" field, the system will automatically generate a high-security random password (as shown in the green encryption box in the image). If you prefer to use a custom password, you can manually input it, but it is recommended to set a strong password and save it properly to avoid losing administrator access in the future.
Then, in the "Your Email" option, enter a valid email address that will be used to receive system notifications and recover passwords. This email is crucial for resetting passwords or receiving important site information in the future, so make sure to enter a correct and frequently used email address. At the bottom of the page, there is an option for "Search Engine Visibility." By checking this option, you can prevent search engines from indexing the site content, which is useful if the site is still in development. If you want the site to be indexed by search engines and gain traffic once it goes live, ensure this option is unchecked. After completing all the information, click the "Install WordPress" button at the bottom of the page (as shown in the red box in the image), and the system will automatically create the website and complete the final installation process. After a few seconds, the WordPress website will be successfully installed, and you can access the backend admin panel to perform subsequent configurations and content publishing.
(6) Complete WordPress deployment and log in to the WordPress management backend
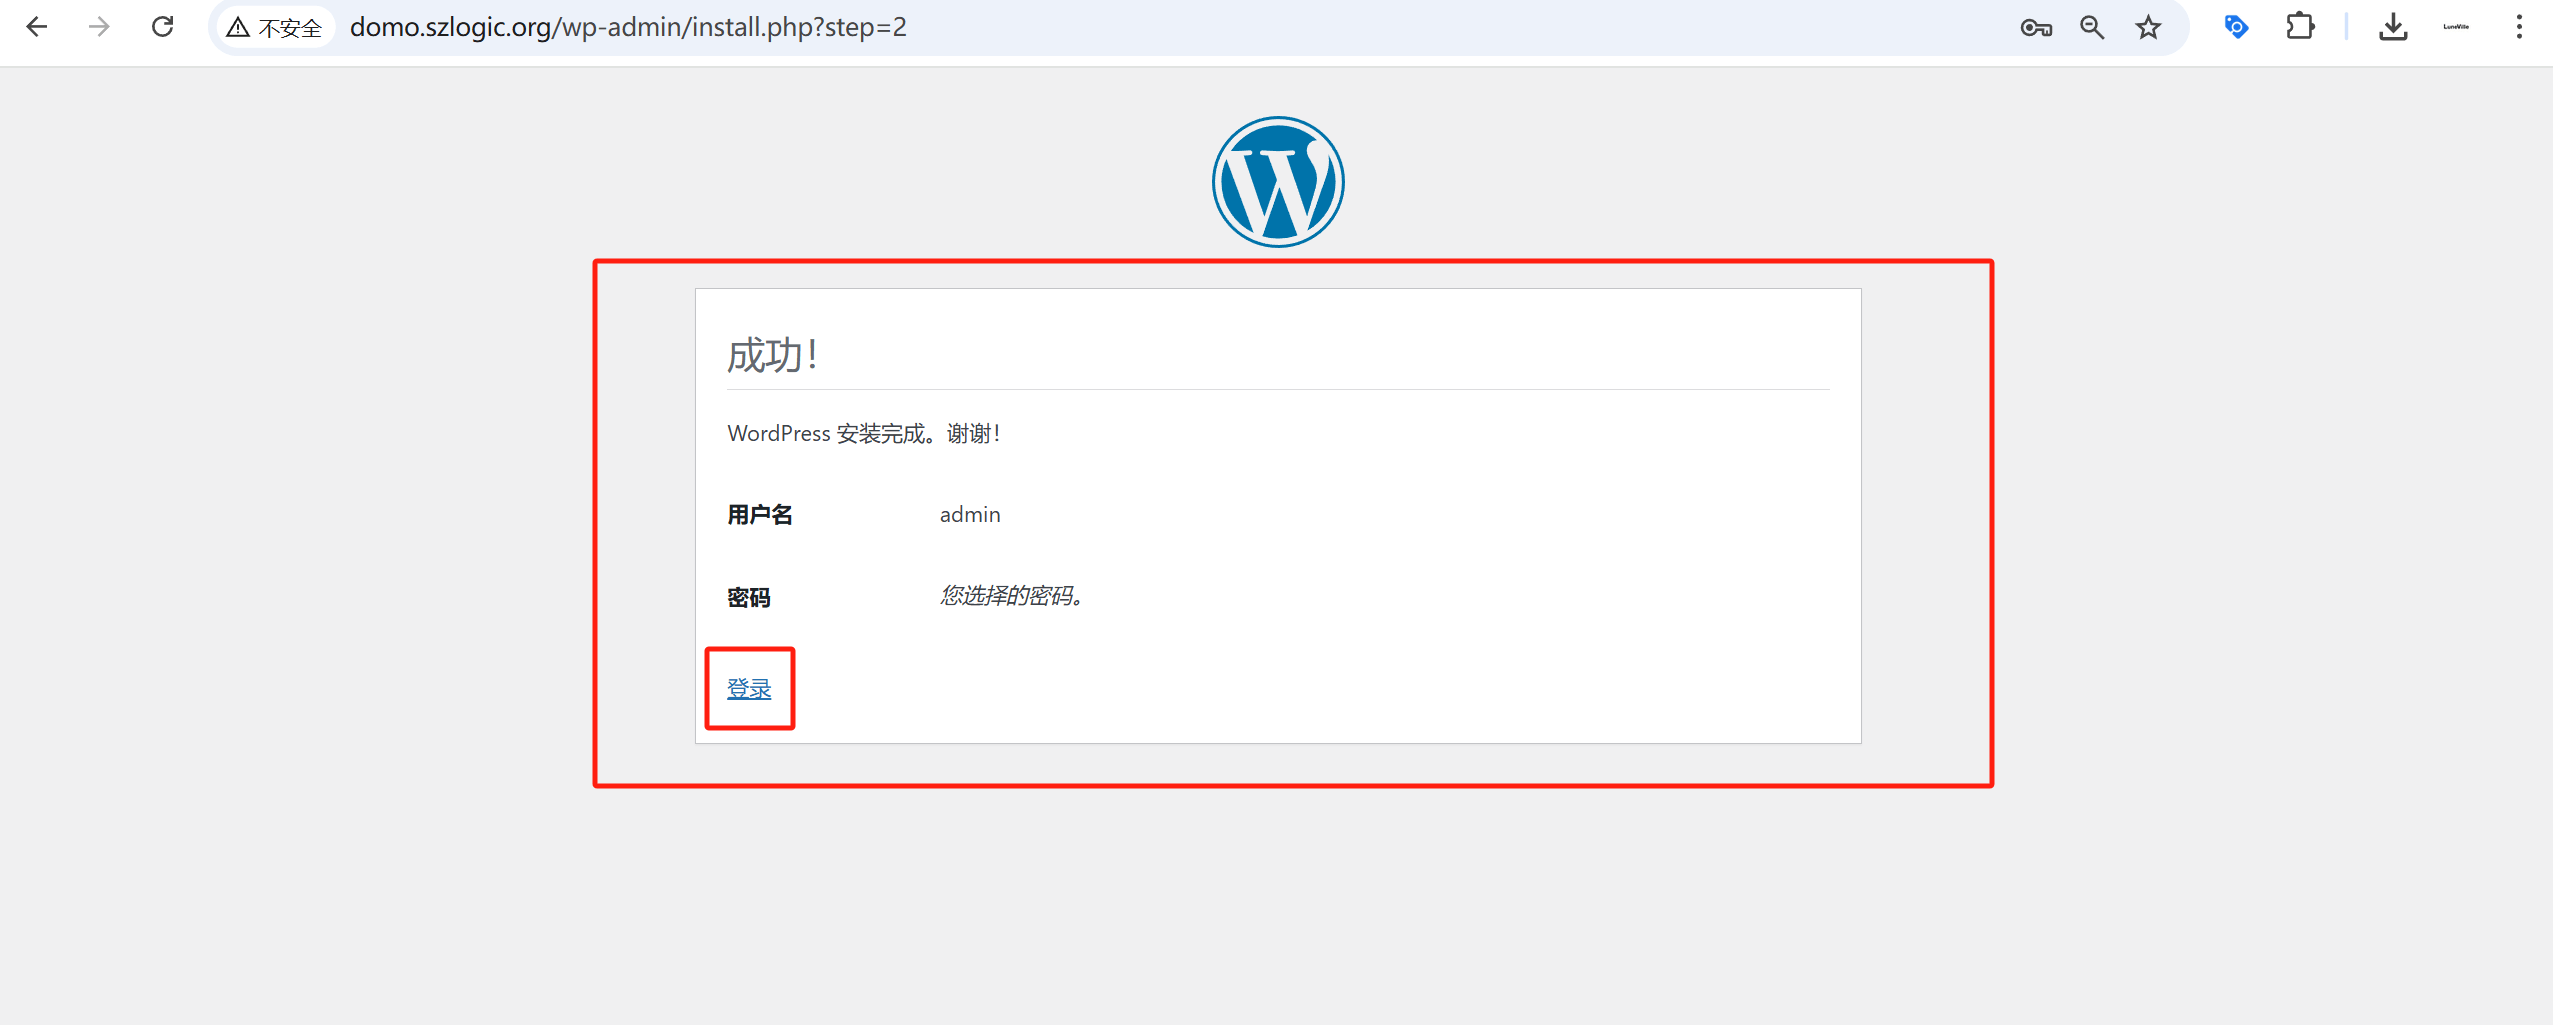
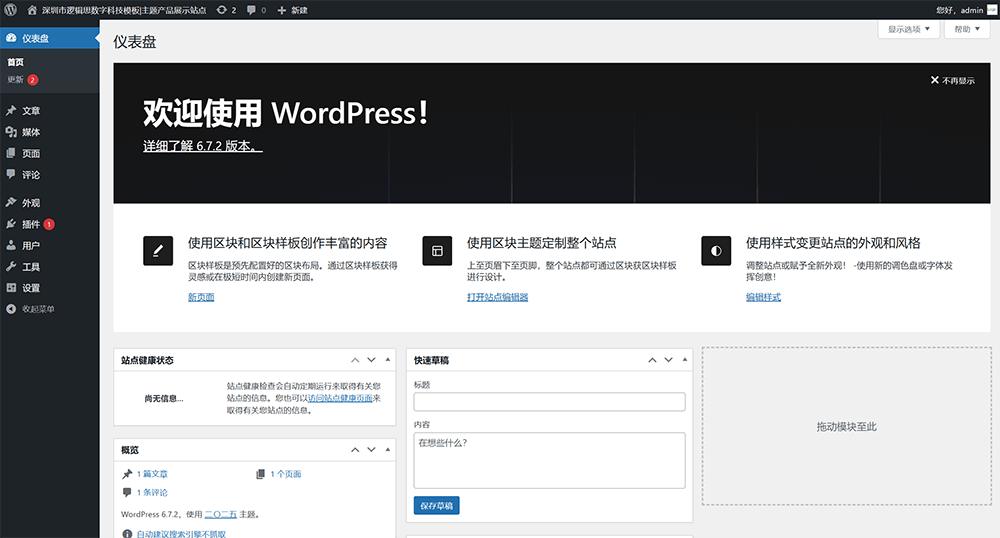
Once all the installation and configuration steps are successfully completed, WordPress will display a "Success!" prompt page, as shown in the image above. This means that the deployment of the WordPress website has been successfully completed, with key steps such as database connection, site information setup, and administrator account creation all properly executed. On this page, the system will clearly list the administrator username but will not directly show the password, so make sure to properly record the administrator password set earlier for future logins. To access the WordPress website backend management panel, simply click the "Login" button (as marked in the red box in the image). The system will then redirect to the WordPress login page, where you can enter the administrator account and password just created to access the WordPress Dashboard. From here, you can start installing themes to customize the site appearance, publish content, install plugins, and make various optimization settings. At this point, the basic WordPress installation is complete, and you can further improve the site content and functionality according to your needs to create a professional website that meets the demands of international trade.
Ⅲ、Install WordPress Theme

1、Install a Theme from the WordPress Theme Directory
(1) Entrance to the WordPress theme directory
Readers can click the corresponding links and buttons in the order shown in the red box in the above picture to enter the WordPress theme directory, and select the theme required for the WordPress foreign trade website in the theme directory.
(2) Select and install a WordPress theme
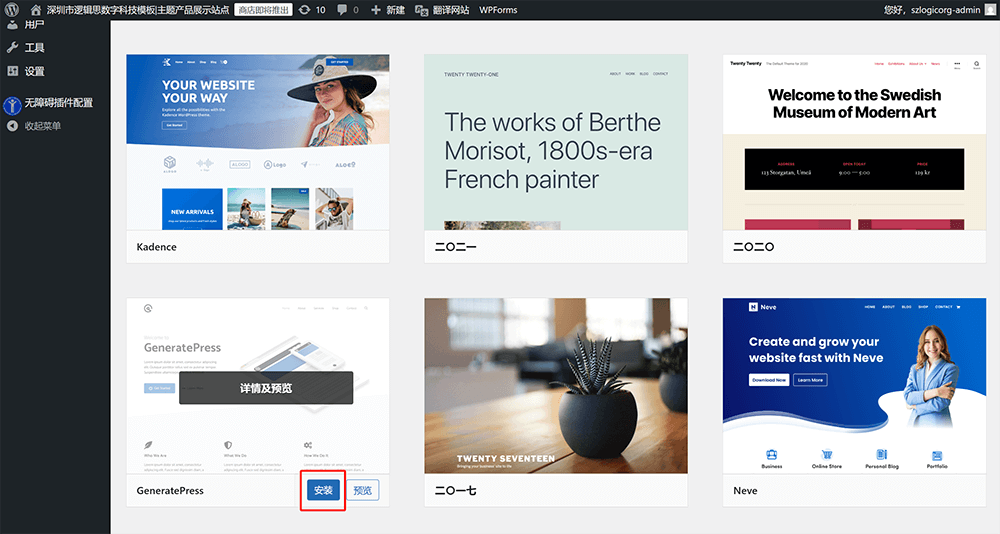
The WordPress theme directory offers a wide range of themes for international trade businesses, allowing them to choose the most suitable one based on their brand image, business needs, and user experience standards. After entering the theme directory, businesses can search, filter, and browse categories to find themes that match their industry characteristics and design preferences. Each theme comes with a preview feature, allowing businesses to visually check its layout, color scheme, typography, and various interactive effects before installation, ensuring it aligns with the website’s overall style and functionality requirements. After previewing, if a theme meets the business's expectations, clicking the "Install" button as marked in the red box in the image above will allow for direct installation.
(3) Enable WordPress theme
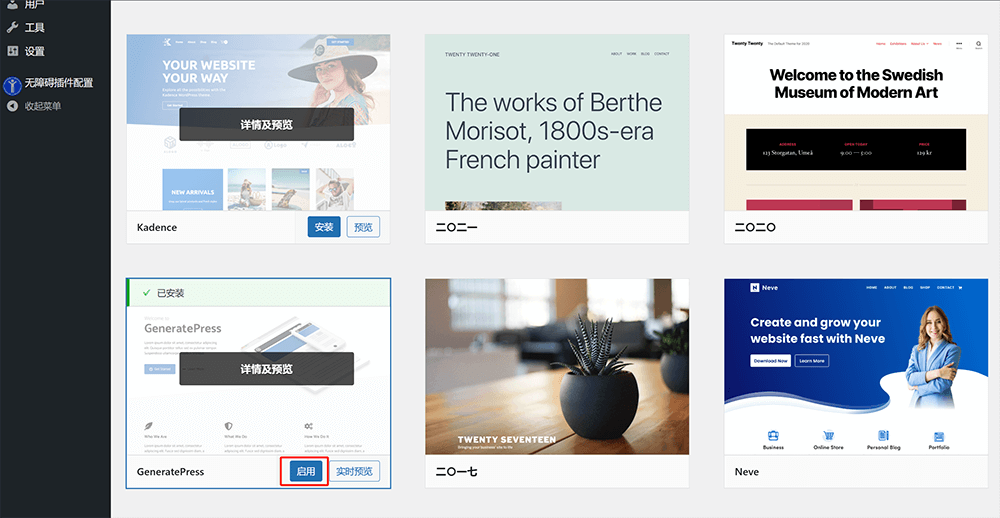
Once the selected theme is successfully installed, its status in the WordPress theme directory will change. The original "Install" button will be replaced with the "Activate" button, indicating that the theme is ready and can be applied to the website at any time. At this point, users simply need to click the "Activate" button, and WordPress will immediately set the theme as the current website's appearance style, updating the overall design, layout, and visual elements across all pages. After activating the theme, users can preview the actual effect on the website’s front-end to ensure the new theme matches the website’s content while maintaining a good user experience. If any details need adjustment, WordPress also offers powerful customization features, allowing users to further optimize the theme through the "Appearance" > "Customize" menu. For example, users can modify the website's color scheme, font styles, navigation structure, and even adjust the homepage layout to meet brand image or business needs.
2、Upload and Install a Third-Party Commercial Theme
Readers with experience in building WordPress websites for international trade know that in most cases, when using templates to build a foreign trade website, themes are not directly selected from the WordPress theme directory. This is because most themes in the theme directory tend to be lightweight and suitable for secondary development, focusing more on the framework and basic layout rather than providing rich industry application scenarios and preset styles. Therefore, if you want to directly import a demo and apply it to a business scenario, you would typically choose a professional theme from a third-party developer rather than one from the official WordPress theme directory. When using third-party themes, these themes are usually not included in the WordPress theme directory, so they cannot be installed directly through the directory. Instead, the theme files need to be manually uploaded for installation. WordPress offers a special "Upload Theme" feature, allowing users to upload theme files (usually a .zip compressed package) downloaded from third-party platforms directly for installation. Next, the blogger will demonstrate the detailed steps of installing a theme by uploading the theme package to WordPress.
(1) Upload and install third-party commercial themes Step 1: Use the WordPress "Upload Theme" function
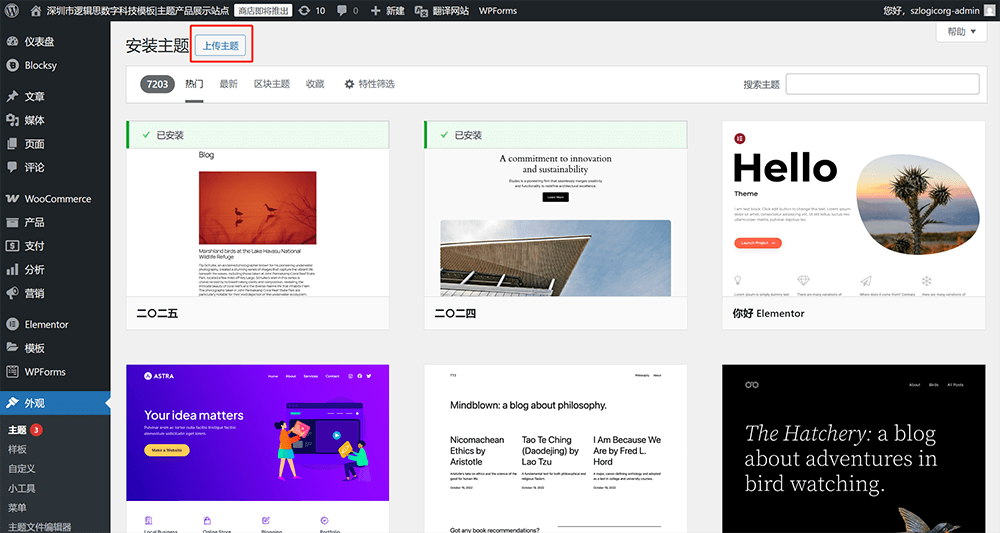
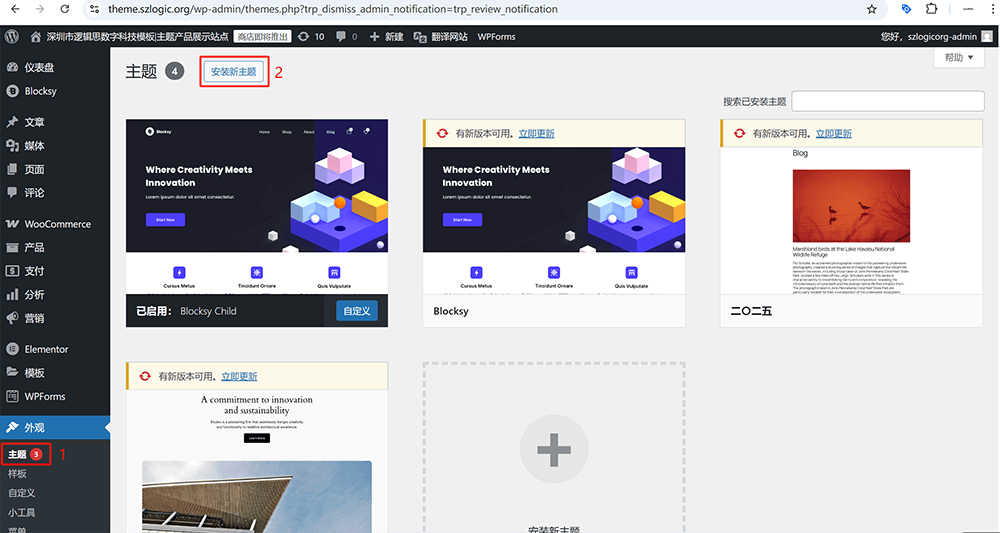
In the theme directory interface as shown in the figure above, click the "Upload Theme" button at the top of the content area (the button marked with a red box in the figure above) to upload the theme file.
(2) Upload and install a third-party commercial theme Step 2: Upload WordPress files and install
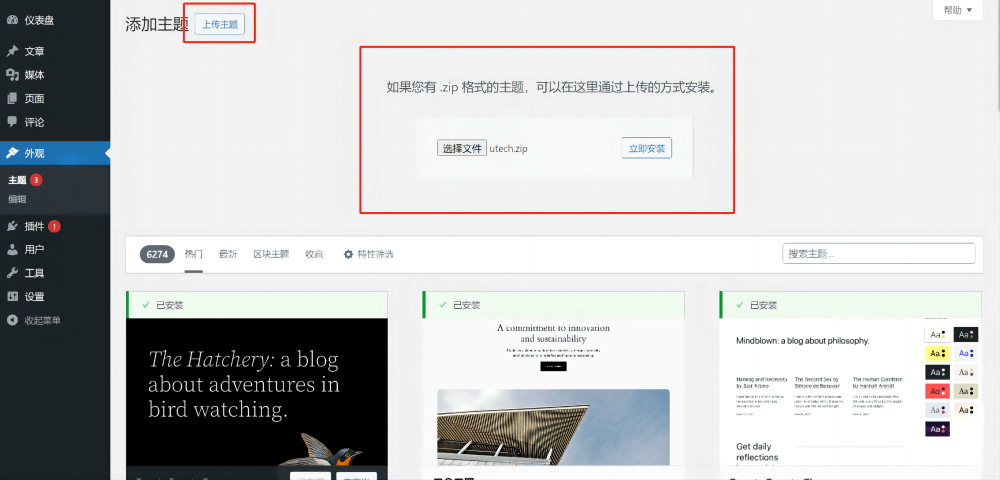
After selecting the WordPress theme file in the previous step, the WordPress theme upload interface will appear as shown in the above image. Click the "Install Now" button on the right, and WordPress will begin extracting and installing the theme.
(3) Upload and install a third-party commercial theme. Step 3: Enable the WordPress theme

After the WordPress theme is successfully installed, as shown in the feedback above, a prompt "Theme installed successfully" will appear on the interface as shown in a red box. Click "Enable" as shown in the red box to apply the new theme to the website.
Ⅳ、Key Function Settings in WordPress Backend
After successfully deploying WordPress.org and installing a theme suitable for foreign trade websites, we need to enter the WordPress admin dashboard to perform necessary initialization settings to ensure that the website runs stably and fully utilizes its features. The WordPress dashboard offers a wealth of configuration options, covering site configuration, feature settings, content management, SEO optimization, security policies, and more. A few years ago, I specifically wrote an article titled "WordPress Admin Dashboard User Guide," which provides a detailed explanation of each feature in the sidebar and includes a full operational demonstration. Interested readers can save the "WordPress Admin Dashboard User Guide" for reference when needed. In this article, I will focus on the core functional settings of the WordPress admin dashboard, helping you quickly master the essential configuration points to manage and optimize your foreign trade website more efficiently. Below are the key functional settings in the WordPress admin dashboard:
1、Set or Modify Site Title
(1) The difference between site title and page title
In a WordPress website, the site title and page title are two different types of titles. The site title is used to identify the entire website, while the page title refers to the title of a specific page. The site title is not directly displayed in the visible elements of the webpage, but it is reflected in the browser tab and search engine results, playing a significant role in the website's brand image and SEO friendliness.
(2) How to set the site title
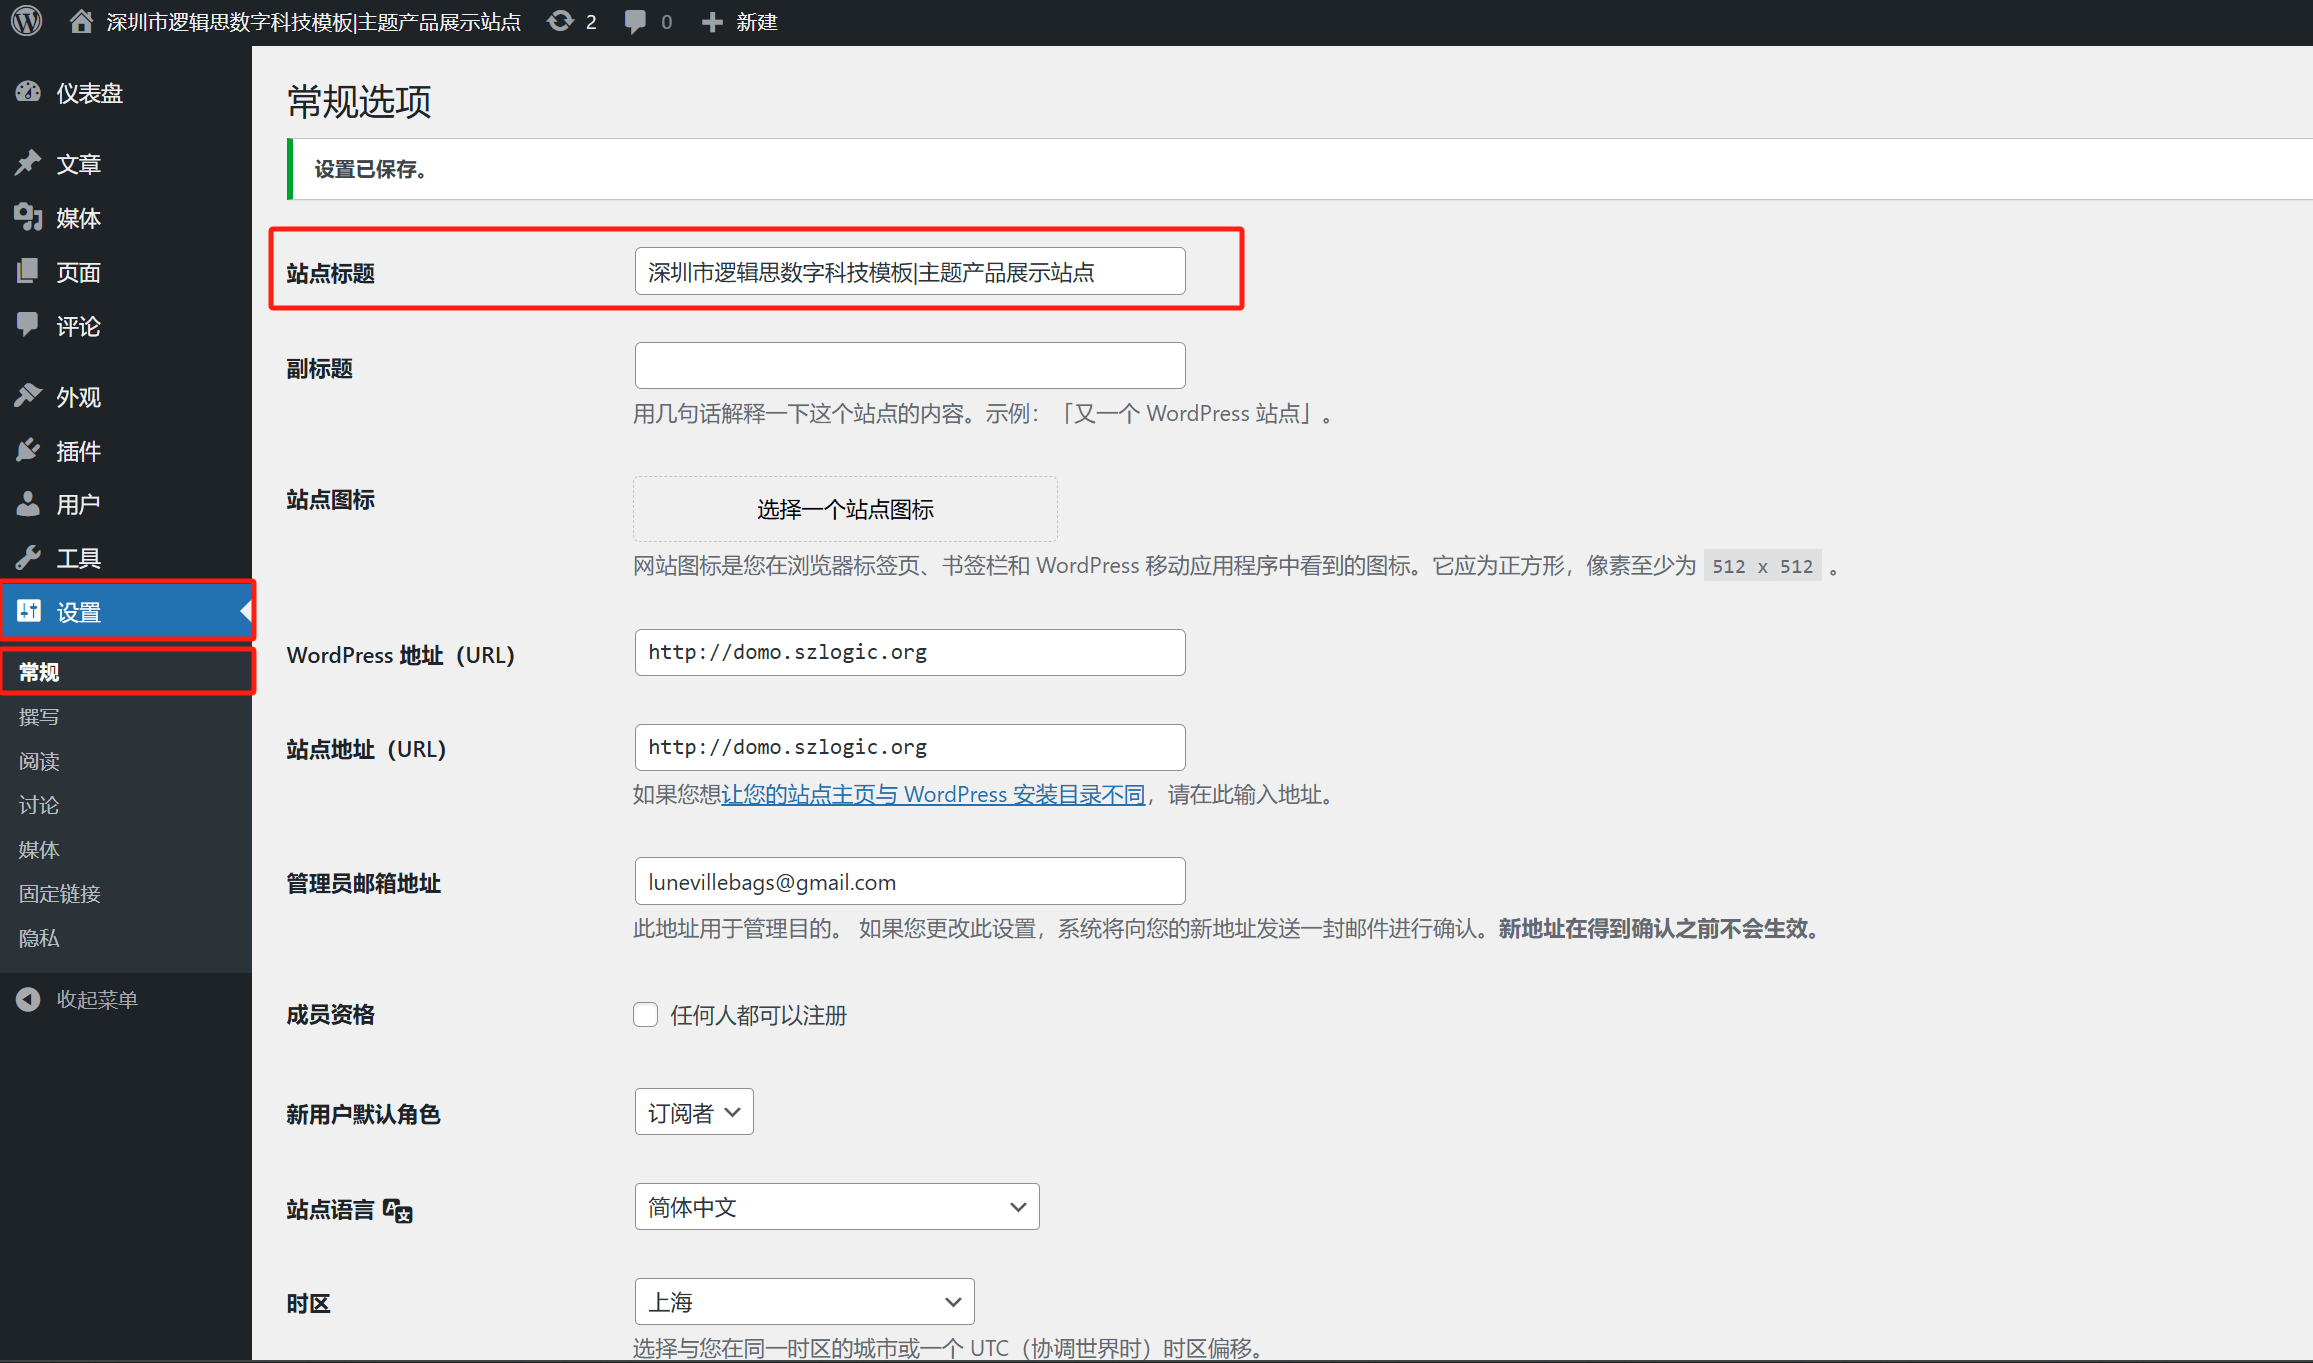
As shown in the image above, the setting path for the site title in the WordPress admin dashboard is located under the “Settings” > “General” option in the left sidebar. Many of WordPress's initialization settings are concentrated in the “Settings” tool's various interfaces, and the site title is one of the key options. In the “Settings” > “General” interface, at the top of the content area, you will see an input box for “Site Title”. After entering or modifying your desired site title here, make sure to click the "Save Changes" button at the bottom of the page so that the new site title setting will take effect.
2、Set Site Icon
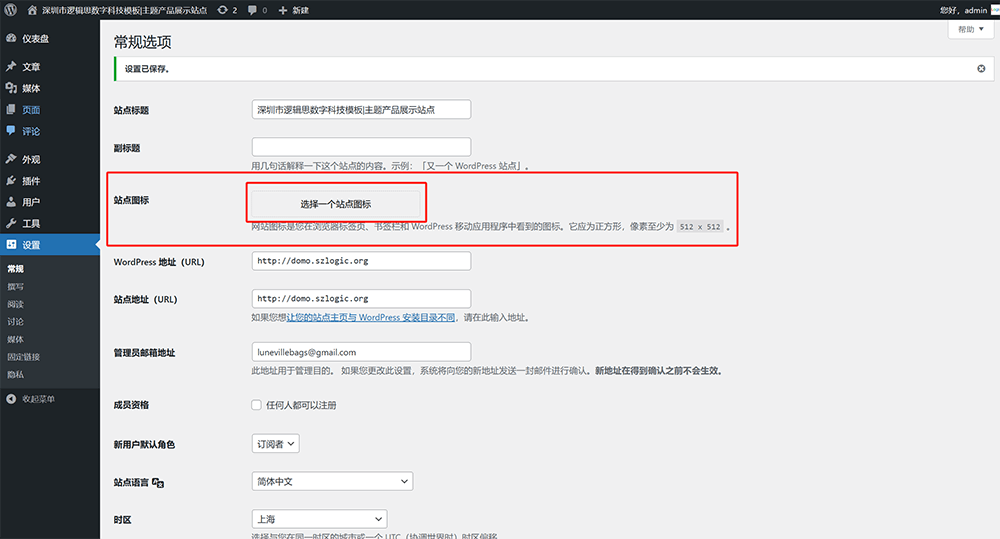
The display location of the site icon is the same as the site title, appearing only in the browser tab and search engine results. The interface for setting the site icon is located in the same area as the “Setting or Modifying the Site Title”, and the upload button for the site icon is located directly below the “Site Title” (as highlighted in the red box in the image above). By clicking the “Select a Site Icon” button, you can browse and upload the site icon file from your local computer folder.
3、Change HTTP to HTTPS
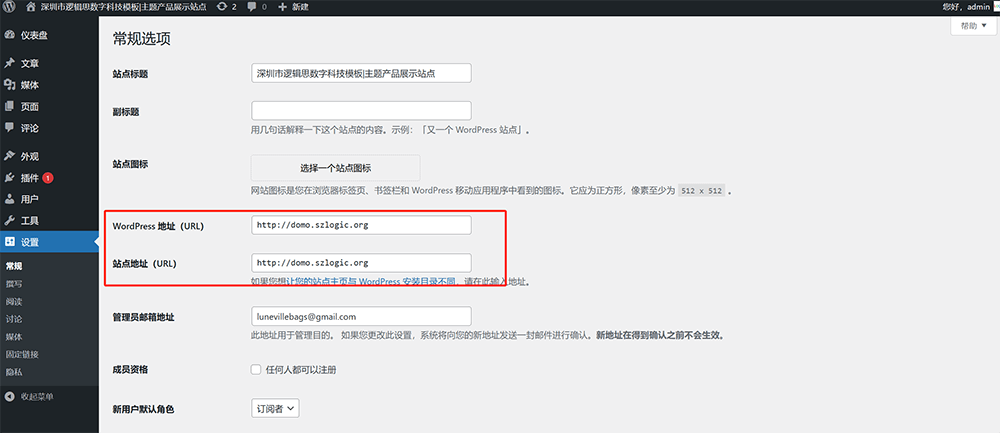
After installing the SSL certificate on the Linux system, you need to change the "WordPress Address (URL)" and "Site Address (URL)" from HTTP to HTTPS in the WordPress backend to activate the SSL certificate. The location for modifying the "WordPress Address (URL)" and "Site Address (URL)" to use HTTPS is the same as the previous settings, found under the “Settings” > “General” option in the left sidebar (as shown in the red box in the image above). After changing the "http" to "https" for both the "WordPress Address (URL)" and "Site Address (URL)", click "Save Changes" to apply the updates.
4、Modify Site Language and Backend Display Language

In the operating environment of a WordPress website, the site language and the admin panel display language are two important settings. They not only affect the language presentation of the website but are also closely related to SEO standards and user experience. While the text content on the page is mainly edited and entered by users, the site language setting determines the `lang` attribute in the website's HTML code. For example, when the site language is set to Simplified Chinese, WordPress will automatically add `lang="zh-CN"` in the webpage's `` tag. If set to English, it will become `lang="en-US"`. This setting is crucial for search engines as it helps them correctly identify the primary language of the site, ensuring that the website can achieve better rankings in the target audience's country or region. Additionally, the correct site language setting can improve website accessibility, allowing voice assistance tools to accurately read the site content. In addition to the site language, WordPress also allows administrators to independently modify the admin panel's display language, enabling operators of foreign trade website operations in different languages to use the backend functions more smoothly. For example, even if the website is targeted at the overseas market and set to English, administrators can still choose to display the backend interface in Chinese, thus improving management efficiency. This flexible language setting is particularly useful for cross-border e-commerce websites or international enterprise sites with multilingual teams.
(1) How to modify the site language
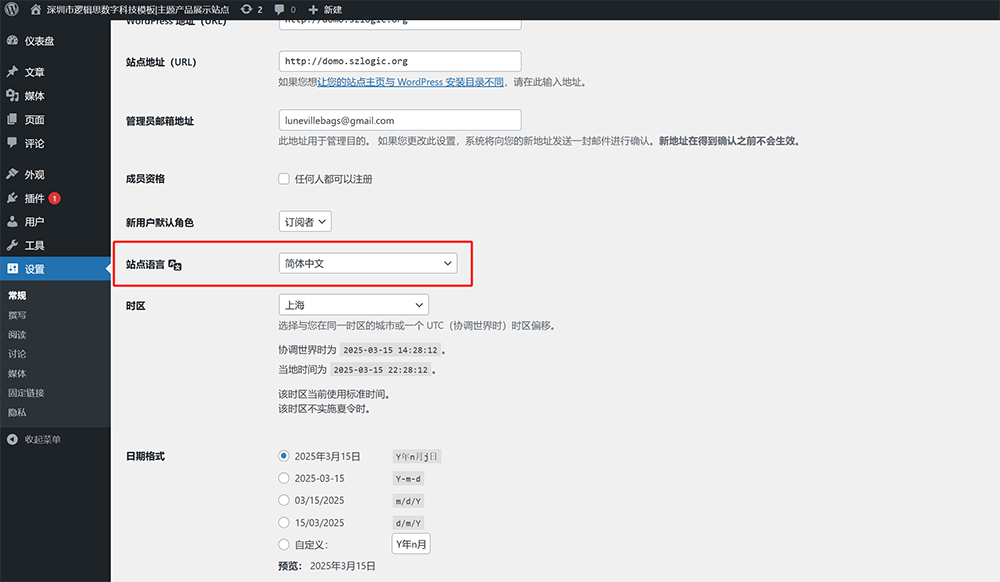
The interface for modifying the site language settings is as shown in the image above, under the left sidebar 'Settings' > 'General' option. Click the expand icon of the 'Site Language' dropdown menu, highlighted in the red box in the image above. In the dropdown menu, select the appropriate language (e.g., Simplified Chinese (zh-CN) or English (United States)). After selecting the site language, click 'Save Changes' to apply the settings.
(2) Change the display language of the management backend
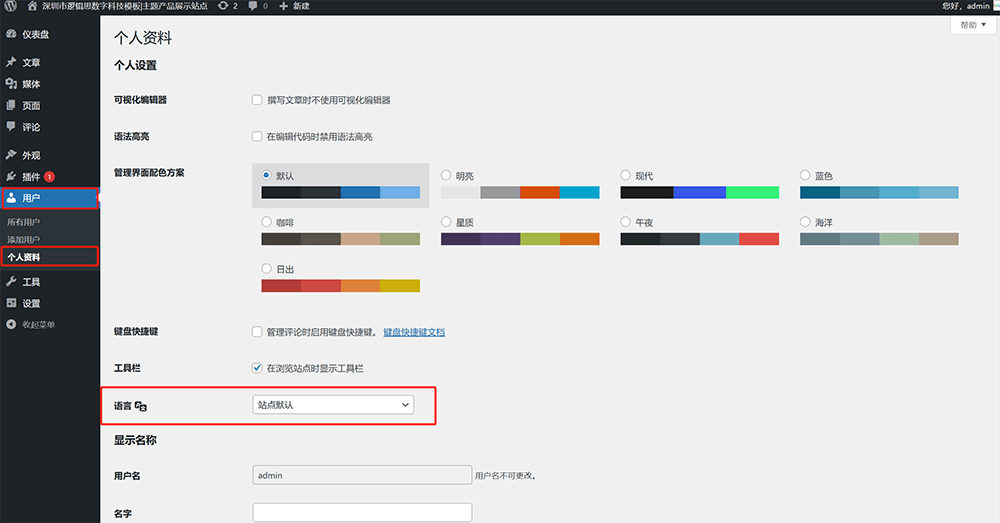
The display language of the WordPress admin dashboard, or the user language of the WordPress website, is a concept that many beginners confuse when setting the site language. Many people mistakenly think that the site language and admin dashboard language are the same setting, but in fact, they can be set independently.
The specific steps to modify the admin dashboard display language are as follows: enter the user management interface (as shown in the image above, the editing interface of the WordPress user profile), find the 'Language' option. This option allows you to choose the display language of the WordPress admin dashboard. WordPress supports multiple languages by default, and users can select the interface language that suits their personal preferences. This setting will only affect the admin dashboard interface for the current user and will not impact the frontend display of the site. After selecting the language, scroll down the page and click the 'Update User' button to save the changes. After the update is successful, the user will have the admin dashboard automatically switch to the newly set language upon their next login, further enhancing ease of use.
5、Homepage and Post Display Settings
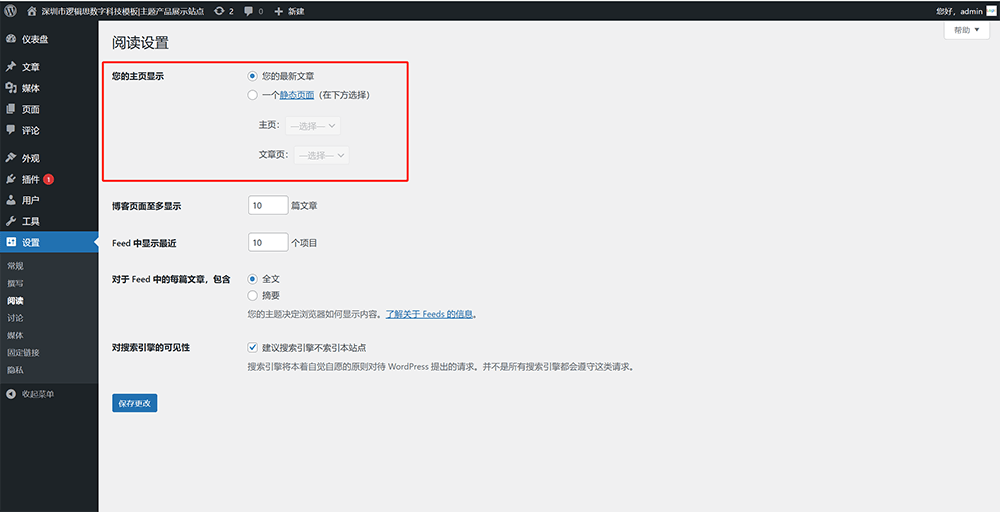
In the 'Reading Settings' interface of WordPress, the 'Your homepage displays' section, marked with a red box, is the 'Homepage and Posts Display Settings' that we need to configure. This setting will determine how the content is displayed on the homepage of the foreign trade website. This option decides whether users will see a dynamically updated list of posts or a static page when visiting the homepage of the foreign trade website. This section provides two homepage display options to choose from:
(1) Your latest article
If you choose this option, the WordPress homepage will display a list of the latest posts published on the website, arranged in chronological order. This setting is suitable for blog-type websites, allowing visitors to directly see the latest content updates.
(2) A static page
If you choose the 'A static page' option, the website homepage will display a specific static page instead of a list of posts. This setting is suitable for corporate websites, e-commerce sites, foreign trade websites, etc., to provide a fixed page as the homepage of the site. After enabling this option, you will also need to select specific pages in the two dropdown menus below:
- "Homepage: Choose a static page to be used as the homepage of the website.
- Posts page: If the website still has a blog feature, you can select a page here to be used as the post archive page, where all blog posts will be displayed together."
6、Change Administrator Account Password
(1) Modify the administrator account password Step 1: Enter the administrator account profile editing page
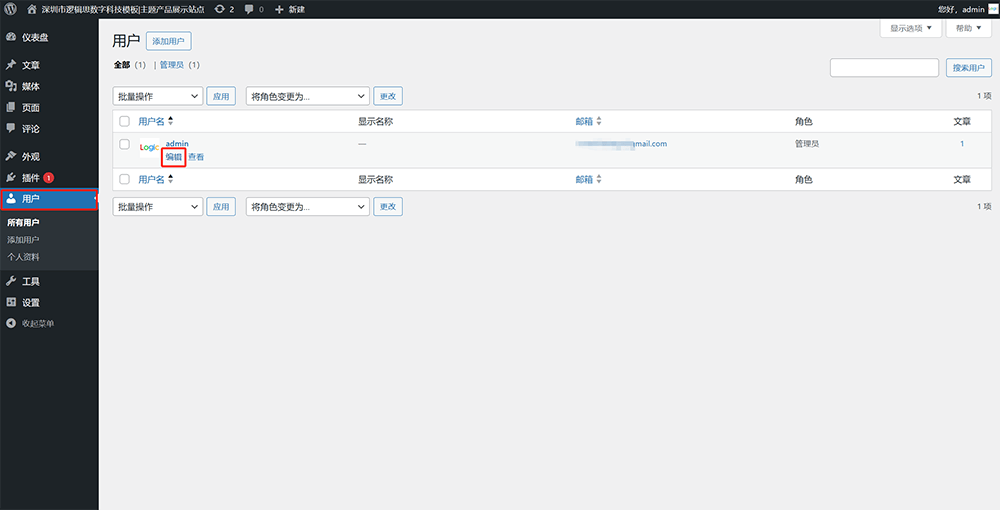
According to the path marked in the image above, go to the WordPress user list, find the admin account, hover the mouse over the admin account, and click the 'Edit' button as highlighted in the red box. This will lead to the personal profile editing page of the admin account, where you can change the account password.
(2) Step two to change the admin account password: Set a new password in the admin account's personal profile
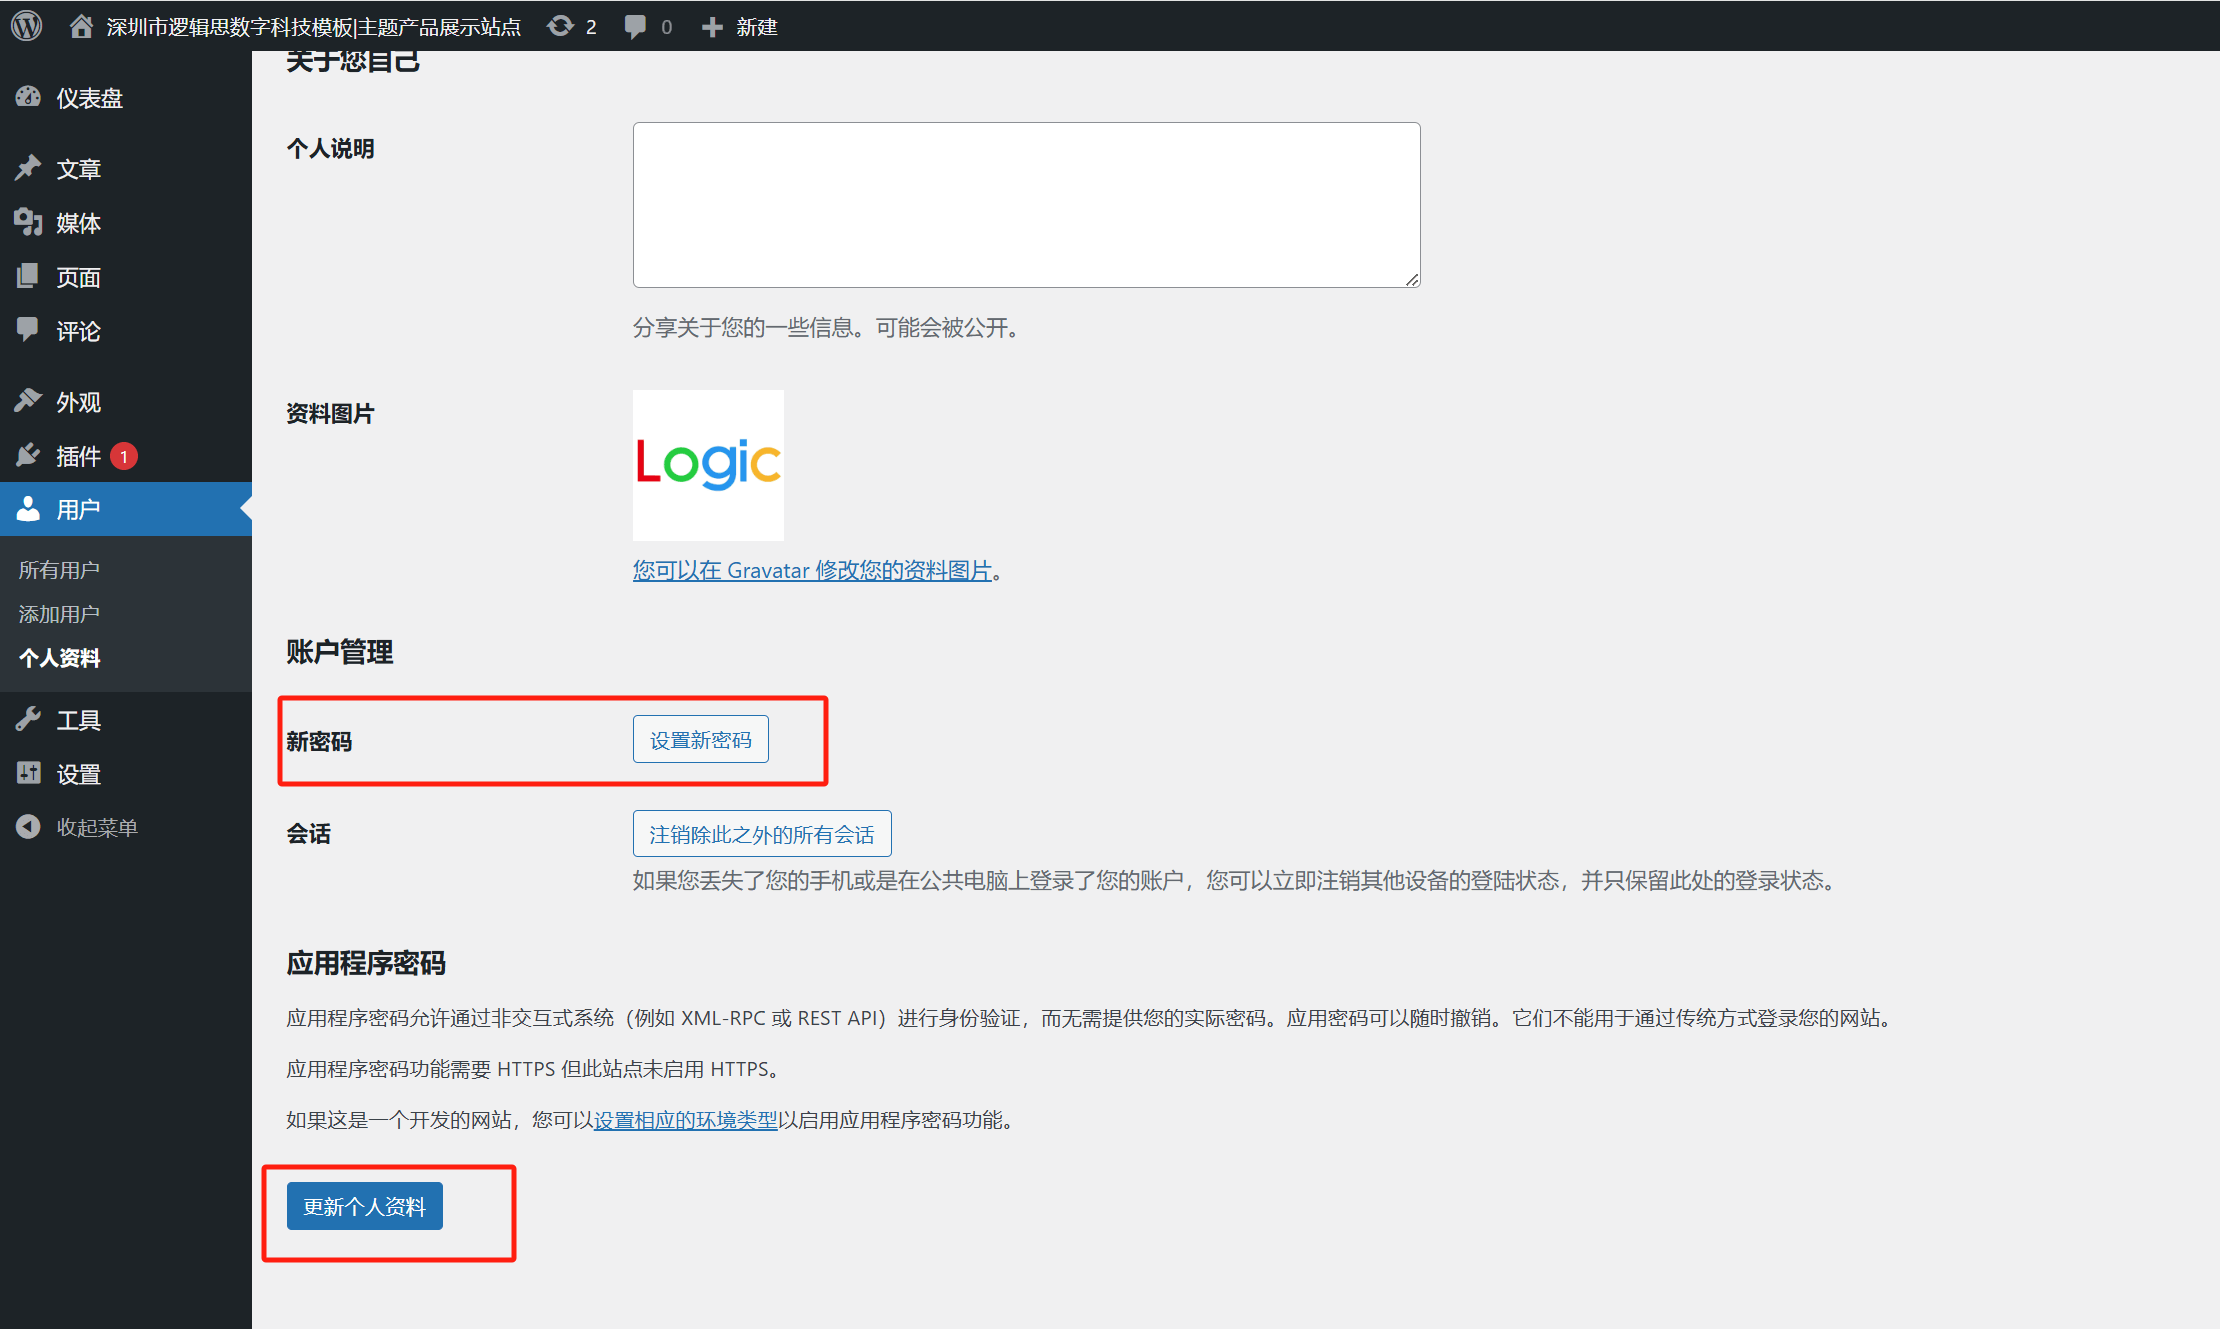
The image above shows the admin account's personal profile editing page. After clicking the 'Set New Password' button highlighted in the red box, a new password input field will appear. After entering the custom password, click the 'Update Profile' button at the bottom of the page to save the changes.
7、Create a new WordPress user.
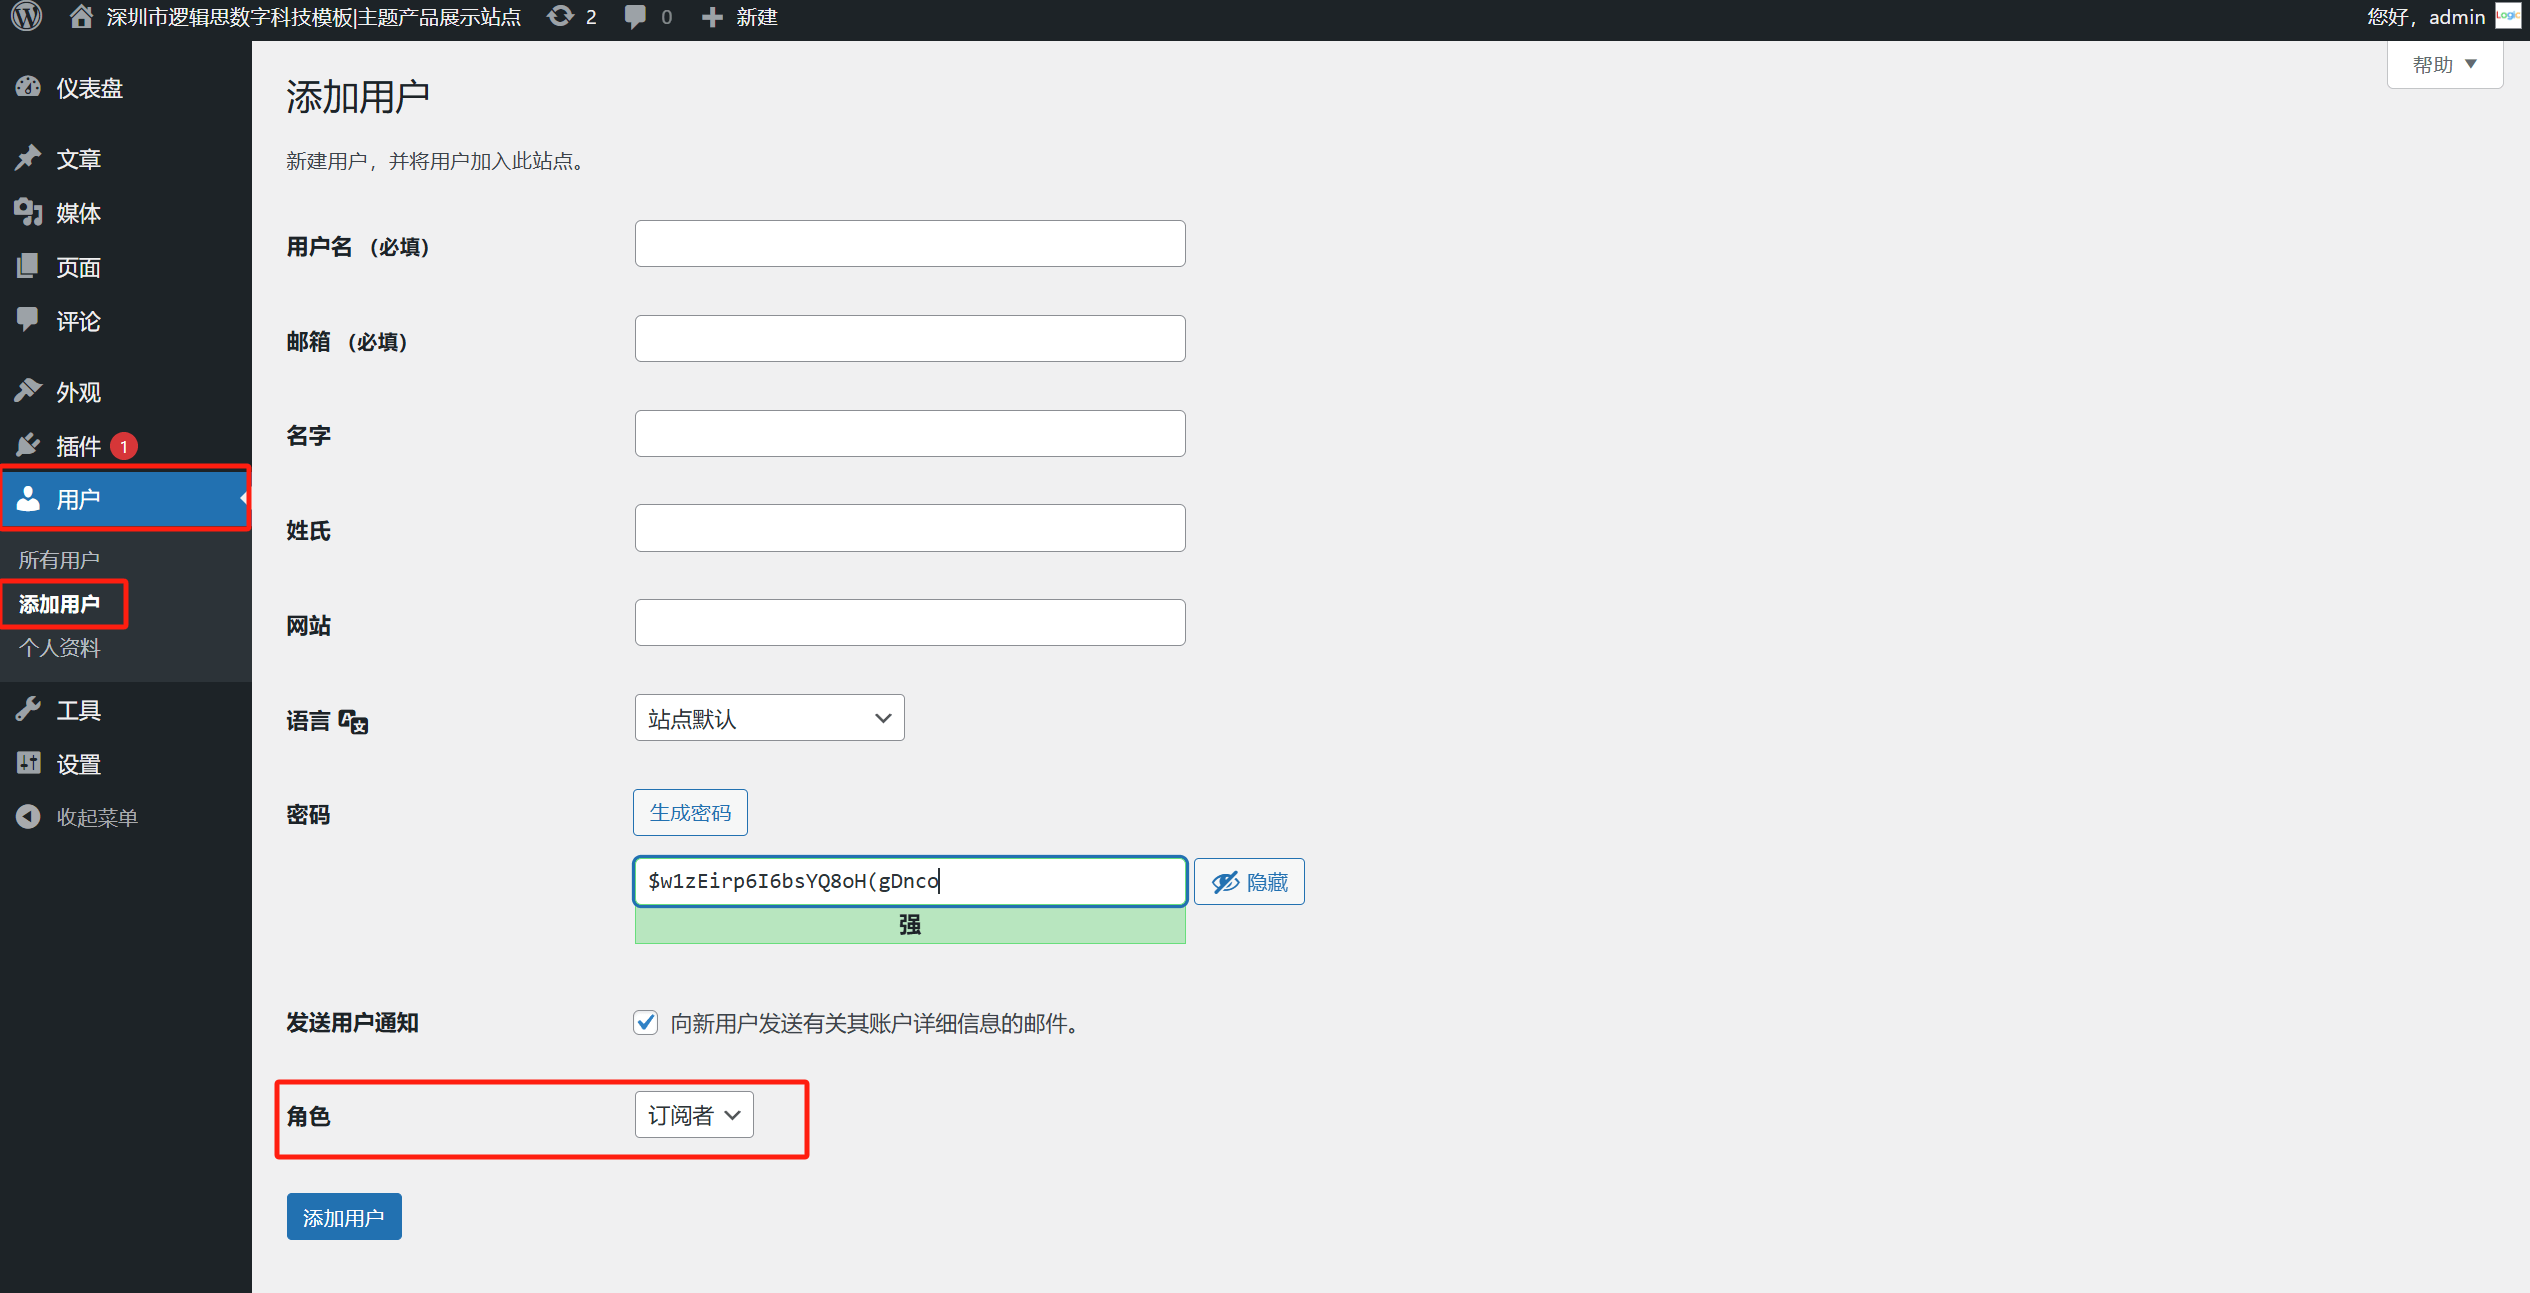
In the WordPress admin dashboard, the functionality to add a new user is accessed through the 'Users' menu on the left sidebar, similar to the path for 'Changing Admin Account Password' mentioned earlier. However, their locations are different; the specific entry for adding users is located under the 'Add New' submenu under the 'Users' option. After clicking 'Users' > 'Add New' on the left sidebar, the system will redirect to a new user information form, as shown in the image above. In this form, in addition to filling in basic information such as username, email, and password, one of the most important settings is the 'Role' option, highlighted in the red box below. Many users who are new to WordPress may not be familiar with the concept of 'Roles.' In fact, WordPress has a very flexible user management system, and through different user roles, it is possible to precisely control each user's permissions and operational scope on the website. WordPress provides several default roles, each corresponding to different permissions and user types, as follows:
- Administrator is the highest-privileged role, possessing full control over the website, including the ability to install plugins and themes, manage other users, and modify site settings. Typically, this role is assigned to site owners or website developers and maintainers to ensure that core configurations of the website are not altered arbitrarily.
- Editor focuses on content management, with the ability to publish, edit, approve, and delete all posts and pages on the website. They can also manage categories, tags, and comments. This role is suitable for content managers or team editors who need to have complete control over the content publishing process.
- Author has more limited permissions, being able to publish and manage only their own posts. They cannot interfere with others' content or modify overall site settings. This role is appropriate for content creators or external contributors on corporate websites, ensuring they focus on content production.
- Contributor has the ability to write and edit their own posts, but lacks the right to publish them directly. Submitted posts must be reviewed and published by an editor or administrator. This role is suitable for freelance writers, intern editors, and other users who need to undergo an approval process.
- Subscriber is the role with the least permissions, only allowing users to manage their own profiles. It is typically used for websites where users must register to access specific content or leave comments. This role is suitable for regular visitors or membership-based users.
8、Permalinks

In the WordPress admin dashboard, the "Permalink" settings are a very important feature, as they directly determine the URL structure of your website's pages and posts. This not only affects the user experience but also has a significant impact on the site's SEO performance. To access this settings page, the path is as follows: click on "Settings" in the left sidebar of the WordPress admin dashboard, and then select the "Permalinks" subitem. This will bring you to the configuration options for permalinks. On this page, WordPress provides several default link structure formats, including "Plain," "Day and Name," "Month and Name," "Numeric," "Post Name," and Custom Structure.
For website administrators who want their sites to perform well in SEO, it is recommended to use the "Post Name" for the custom structure of the permalink. This structure is simple and intuitive, making it easy for users to remember and share, and it is also more favorable for search engines to crawl and index. For example, a website that uses the post name permalink structure will typically have article links in the format of https://yourdomain.com/sample-post/, which results in clean and concise URLs that include keywords. This helps improve page relevance and click-through rates. Additionally, in the custom structure, you can include category directories (tegory%) or other tags that aid in content hierarchy, but it is advised not to make the URL too long or include meaningless parameters, as this could confuse search engines and users. Once you have chosen the permalink structure, don't forget to click the "Save Changes" button at the bottom of the page to apply the settings. Configuring a permalink structure that follows SEO best practices not only improves your site's performance in search engines but also enhances the user browsing experience, making it a crucial step in building a WordPress-based foreign trade website.
Ⅴ、WordPress Foreign Trade Website Editing Page (Changing Page Fill Material with Elementor Editor)
When building various types of websites with WordPress, whether it's a corporate website, a blog, or a foreign trade site, the elements on the website pages heavily rely on the assistance of editors. Especially for readers without programming experience, the editor provides a visual and drag-and-drop operation mode, which greatly reduces the barriers to content layout. Generally speaking, except for parts that require custom CSS or JavaScript to achieve special styles and functions, most regular page elements on a website, including text, images, buttons, forms, etc., can be accomplished using the editor.
Among the many WordPress editors, Elementor is undoubtedly the most popular and widely used one. As a powerful and easy-to-use visual page editor, Elementor offers an intuitive WYSIWYG (What You See Is What You Get) interface. When there are no custom style requirements, users can build beautiful pages freely just by simple drag-and-drop adjustments without needing code. Elementor has a rich set of built-in elements, such as headings, paragraphs, images, buttons, carousels, icon boxes, etc. It also supports custom layouts, animations, and responsive design, allowing users to flexibly meet various page design needs. In addition, it is highly compatible with various WordPress themes and plugins, making it especially suitable for foreign trade website development, where flexible page layout and content presentation adjustments are needed. Next, the blogger will demonstrate how to use the Elementor editor to add and adjust page elements in template-building mode during the process of WordPress website building. This will help you familiarize yourself with Elementor's basic functions and operation process, making foreign trade website page design more intuitive and allowing you to fully leverage the editor's powerful features.
1、Change Page Banner in Elementor Editor

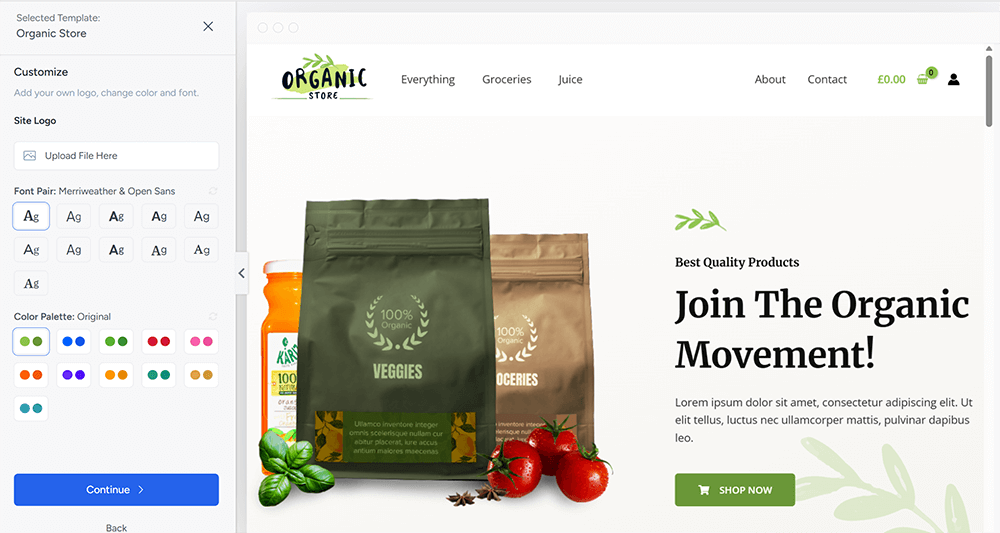
In the visual editing interface of the Elementor editor, we can intuitively customize the various elements on the page. As shown in the image above, after enabling the Elementor PRO version, the Banner on the page is typically implemented using the Slides widget component. To change the Banner image, simply click on the image selection area marked with a red box on the right side of the component, which corresponds to the background image setting for each slide item. After clicking, the media library window will pop up, where the user can choose to upload a new Banner image from their local files or select an appropriate image from the existing media library files for replacement. Once the image is uploaded or selected, the new Banner will immediately appear in the page preview area, allowing the user to check if the overall visual effect meets the requirements.
2、Change Page Title in Elementor Editor
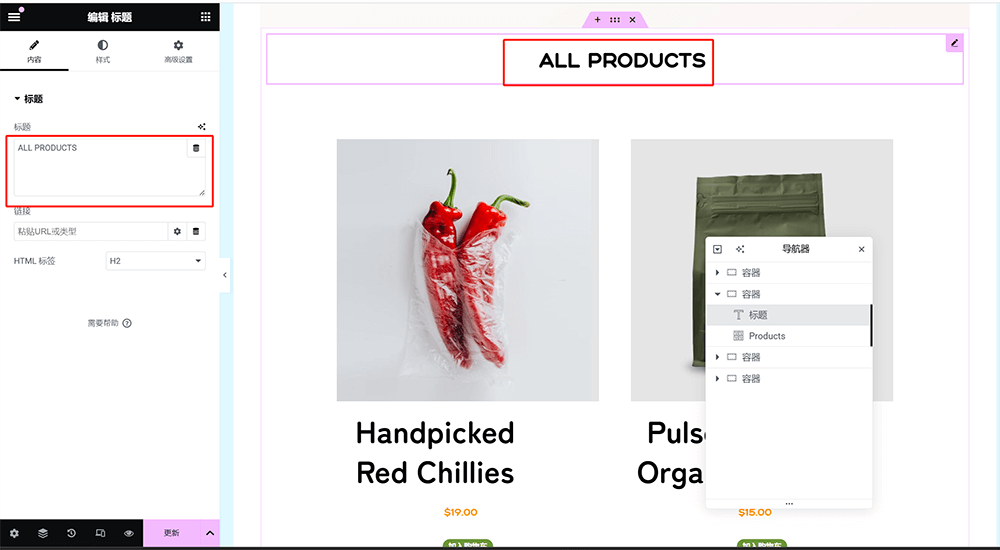
As shown in the image above, in Elementor's editing mode, first use the mouse to click and select the heading component on the page that we need to modify. Once selected, the left side of the Elementor editor interface will automatically switch to the editing area of that heading component. In the settings panel on the left, we will see a text input box for editing the heading text, which is the area marked in the red box in the image above. Simply enter or replace it with the new heading content we want to display, and the heading text on the page will update in real-time, allowing for an intuitive view of the modification effect.
3. Changing Page Copy in the Elementor Editor

The operation method for changing page copy in the Elementor editor is essentially the same as the steps for changing the heading text described above. Specifically, first use the mouse to click and select the text component on the page that contains the copy we want to modify (usually the "Text Editor" component). Once selected, the left side of the Elementor editing interface will automatically switch to the settings panel for that text component. In the left functionality operation area, we can see a text input box, which is the area for editing and updating the page copy. Simply modify or paste the new copy content into this text box, and the text on the right page preview area will change synchronously, making it easy to view the adjustment effect at any time.
4. Changing Social Media Links in the Elementor Editor
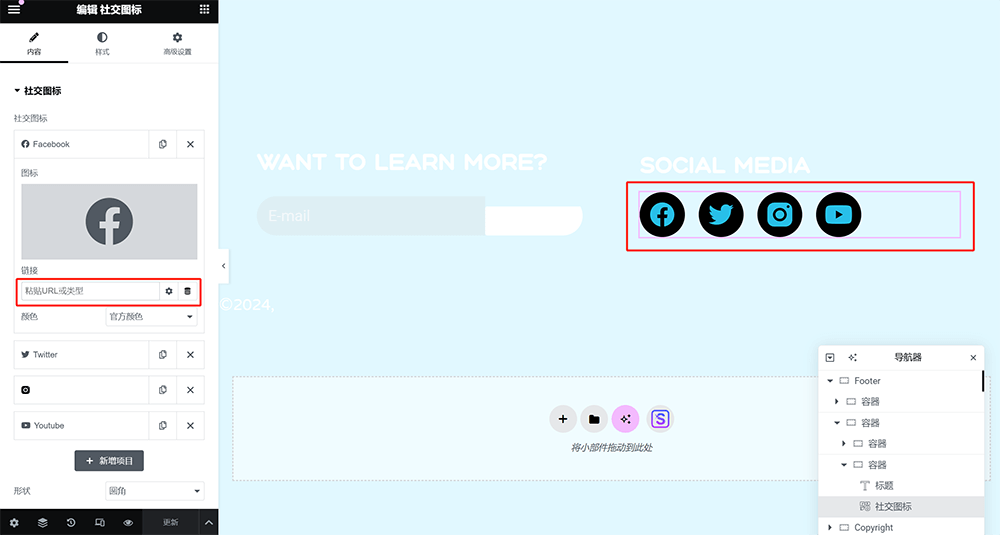
The specific operation for changing social media links on the page in Elementor is to select the social icon component. In the functionality editing area on the right, select the social media whose link you want to change. The selected social media will expand the relevant settings, including the "Link" input box marked with a red box in the image above. In this input box, simply copy and paste the corresponding URL.
5. Changing Copyright Information on the Page in the Elementor Editor
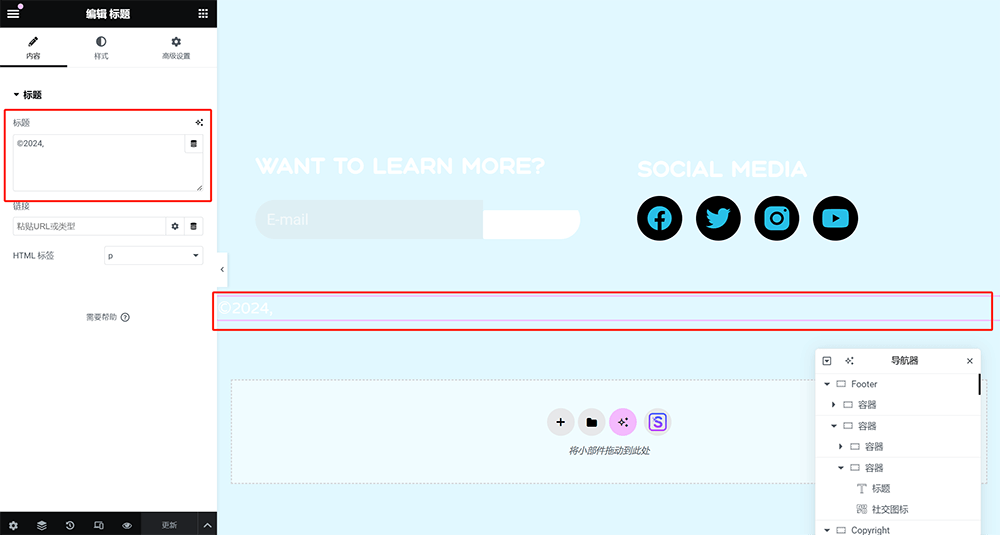
The page's copyright information can be implemented using Elementor's heading component or text editor component. The operation method is the same as the "Changing Page Title in Elementor Editor" and "Changing Page Copy in Elementor Editor" described above. It is done by selecting the component and then replacing the text content in the left editing area.
Conclusion: Through this detailed guide, "Building a WordPress Foreign Trade Website: A Beginner’s Guide to WP Foreign Trade Website Setup," I believe readers now have a clear understanding of how to build a fully functional and easy-to-manage WordPress foreign trade website from scratch. From the basics of WordPress installation and configuration to the setup of key backend functions, and the page design and editor operations, the author has broken down each step progressively, helping beginners clear up common doubts and obstacles in the website building process. Especially in the backend configuration section, we focused on key settings such as site language, user permissions, and permalink structure, which directly affect the website’s SEO and user experience, laying a solid foundation for the website’s stable operation and marketing promotion. At the same time, through practical demonstrations of the Elementor editor, whether it is changing the heading text, copy content, or Banner images, readers can master intuitive and easy page editing methods, greatly improving the efficiency of building foreign trade websites. In the future, you can further explore more advanced features according to your business development, such as multi-language support, cross-border payments, customer management, etc., making your WordPress foreign trade site an important platform to support your brand’s global expansion. Finally, although using WordPress's template-based website building method for creating foreign trade sites is quicker and easier, with a low technical entry barrier, developing a good foreign trade website still requires solid knowledge of computer science to improve efficiency and solve problems encountered during the website building process. If readers of this article are only looking to understand the principles of building a WordPress foreign trade website, and considering their own learning costs, they are not prepared to do it themselves and need to entrust a professional WordPress foreign trade website development team to complete the project, feel free to contact the Logic Digital Technology team. We will provide you with a comprehensive solution from project planning to development and launch.
This article is copyrighted by Logic Digital Technology (SZLOGIC) . Personal sharing and learning are welcome. Unauthorized use for any commercial purposes or reproduction of this article is strictly prohibited.


