


WooCommerce Website Setup: E-commerce on WordPress

WooCommerce is an e-commerce solution integrated as a plugin within the WordPress website system. Although today WooCommerce and WordPress both belong to Automattic, the default version provided by WordPress.org does not include this feature, and users need to manually install and enable it according to their needs. When we dive into understanding how WooCommerce operates and its relationship with WordPress, we will realize that the essence of building a WooCommerce website is actually an extension of building a WordPress website. Therefore, the process of building a WooCommerce website is closely tied to the process of building a WordPress website.
Before setting up a WooCommerce e-commerce website, it is essential to first deploy WordPress to ensure the website has a stable operating environment. Next, during the development phase, you need to download and install the WooCommerce plugin and enable it in the backend to provide e-commerce functionality for WordPress. After installation, the website development can be further refined, typically dividing the content into general pages and e-commerce pages, and configuring or customizing core functions such as the shopping cart, order management, and payment system. This article will demonstrate the WooCommerce setup process through a step-by-step guide with images and clear instructions. Each step, from downloading and enabling the WooCommerce plugin, integrating payment systems, managing products, to editing product pages, will be presented with intuitive screenshots and concise explanations to help readers understand and complete the process smoothly.
The article "WooCommerce Site Building (Practical Process of Building a WooCommerce E-commerce System on WP)" will be gradually unfolded through the following directory chapters, providing readers with detailed demonstrations and explanations. The directory includes both main and sub-chapter titles, each with embedded anchor links for easy navigation. For readers who already have some experience or have completed parts of the process in practice, you can choose to skip the basics and directly click on the relevant chapter titles to quickly jump to the content you need to reference.
- Installing WooCommerce from the WordPress Plugin Directory
- WooCommerce Payment System Integration
- WooCommerce Product Management
- Editing WooCommerce Product Pages
一、Installing WooCommerce from the WordPress Plugin Directory
To transform a standard WordPress website into a fully functional e-commerce platform, the first key technical step is to install and activate WooCommerce through the WordPress plugin directory. Only after successfully installing the WooCommerce plugin can you add e-commerce features to the website and proceed with product page editing and feature configuration. Once WooCommerce is activated, your website will be equipped with core e-commerce features such as product display, shopping cart, checkout, and order management, while also laying the foundation for integrating advanced features like payment systems, tax settings, and shipping options. In this section, I will guide readers step by step through the process of finding and installing WooCommerce from the WordPress plugin directory, as well as how to activate the plugin from the plugin list. Just follow the steps outlined below to complete the setup.
1、Searching for and installing WooCommerce from the WordPress plugin directory
(1) Enter the WordPress plugin directory
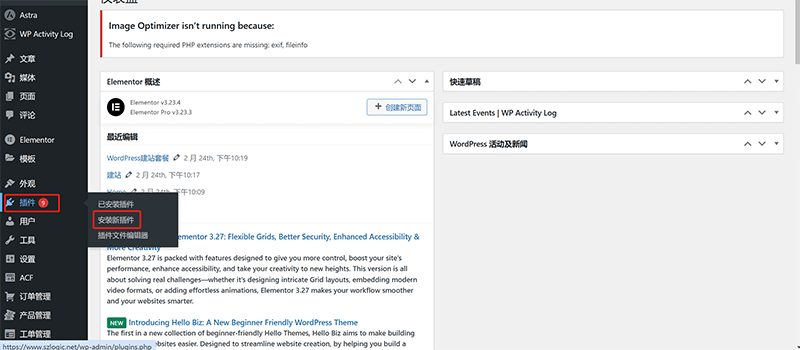
As shown in the area highlighted by the red box in the image above, hover the mouse over the WordPress management backend left sidebar tool and click on “Plugins”. In the dropdown menu, click on “Add New Plugin” to enter the WordPress plugin directory operation interface, as shown below.
(2) Find and install the WooCommerce plugin
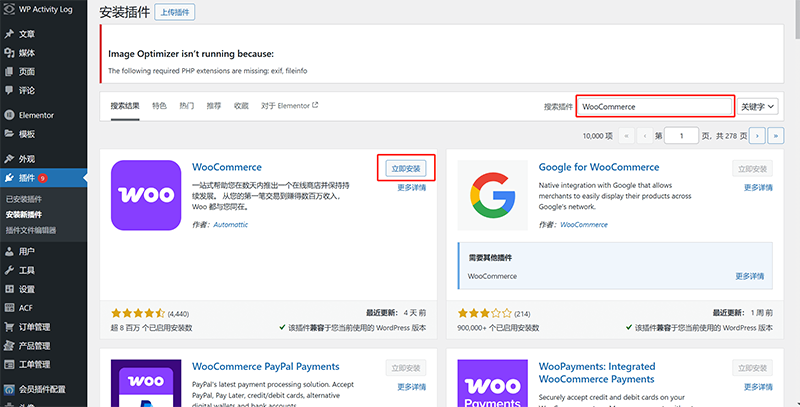
In the top-right corner of the WordPress plugin directory interface, locate the search box highlighted in the red box as shown above. Type the name of the plugin we want to find—WooCommerce. After entering the name, press the Enter key, and the system will display the search results. In the results, click the "Install Now" button on the right side of the WooCommerce plugin, as shown in the image, to install WooCommerce into your WordPress system.
2、Activating WooCommerce
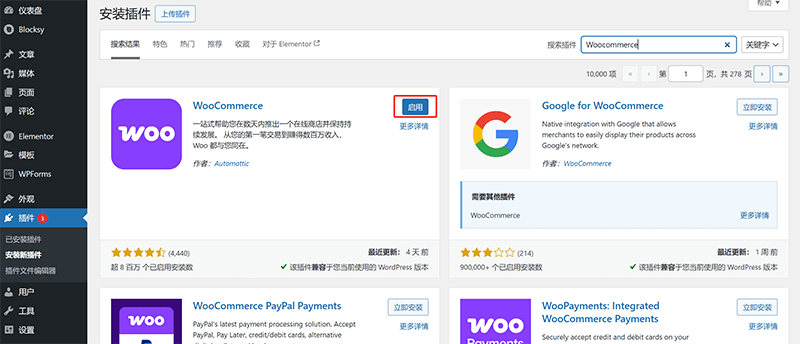
After the WooCommerce plugin is installed and successfully activated, attentive readers may have noticed that the button next to the WooCommerce plugin has changed from "Install Now" to "Activate." At this point, simply click the "Activate" button, and WooCommerce will be activated, ready for further configuration and use.
二、WooCommerce Payment System Integration
For those who do not solely rely on WooCommerce for product management on their B2C sites, integrating a suitable payment system is a crucial step to achieve online sales. Generally, PayPal and internationally accepted credit card payment systems are the two most common payment methods, offering website visitors a convenient and secure payment experience. In B2C sites, the completeness of the payment system directly impacts the ease of user payment, which in turn plays a decisive role in conversion rates. A smooth payment process not only enhances user experience but also reduces cart abandonment rates, thereby effectively improving the site's sales performance. In this section, the blogger will explain in detail how to integrate these two important payment systems—PayPal and international credit card payments—into the WooCommerce system. Through clear steps and practical demonstrations, readers will learn how to configure these payment methods, providing a seamless online payment solution for their B2C independent sites, and helping their e-commerce websites achieve higher conversion rates in the global market.
1、Integrating PayPal for WooCommerce
Tip: Before starting the process of integrating PayPal payment with WooCommerce, you need to ensure that you have a PayPal business account for e-commerce website payments. This is a prerequisite for successfully integrating PayPal payment with WooCommerce, as personal PayPal accounts cannot be used for e-commerce website payment systems. If you have not yet completed the registration and configuration of a PayPal business account, it is recommended to first refer to the blogger's previous post "How to Register a PayPal Business Account / How to Set Up a PayPal Business Account", follow the steps to apply for a business account, and ensure that the payment functionality is properly enabled before proceeding with the integration.
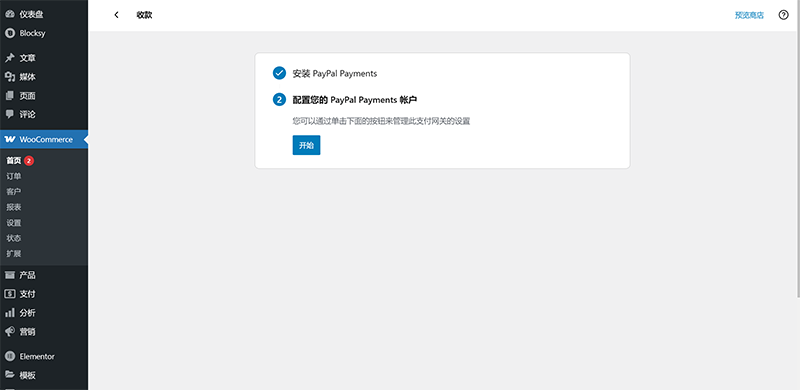
(1) Enter the PayPal payment process on the initial interface of WooCommerce payment settings
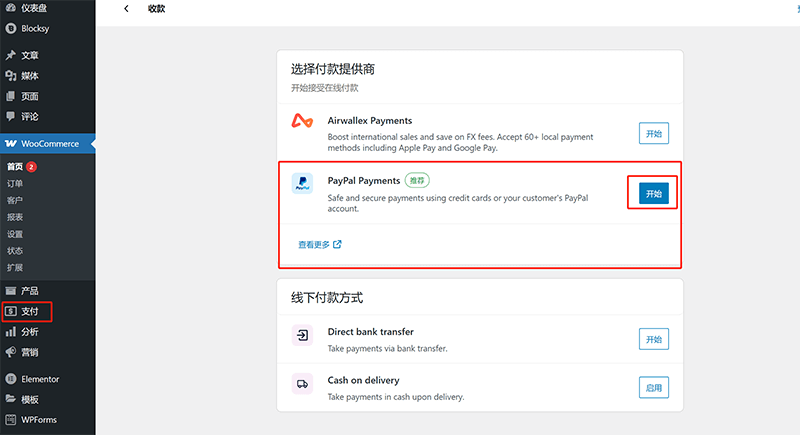
As shown in the image above, after successfully installing and activating WooCommerce, a new "Payments" entry will appear in the left toolbar of the WordPress admin dashboard, as highlighted in the red box. Clicking the "Payments" button will bring up the initial setup screen for WooCommerce payment settings on the right-hand side. On this screen, click the "Get Started" button next to the "PayPal Payments" section, and you will begin the configuration process for integrating PayPal as a payment method in WooCommerce.
(2) PayPal Payments configuration step 1: Install PayPal Payments
Following the previous step, after clicking the "Get Started" button for PayPal Payments in the WooCommerce payment settings initialization screen, the right-hand side of the screen will redirect to the PayPal Payments installation process, as shown in the image above. The installation of PayPal Payments is fully automated, so no additional actions are required from our side. Once the installation is complete, you can click the "Get Started" button on the interface to proceed with further configuration.
(3) PayPal Payments configuration step 2: Activate PayPal Payments
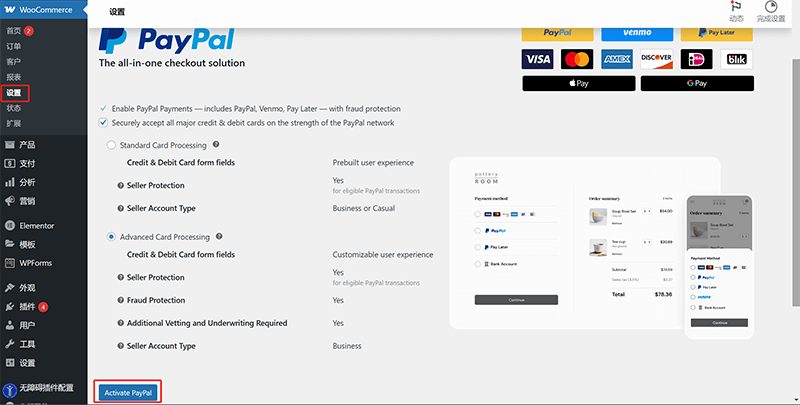
After clicking the "Get Started" button in the previous step, the interface will be redirected to the WooCommerce payment options tab as shown in the image above. By scrolling down the browser's scrollbar, you'll see the "Activate PayPal" button (marked with a red box in the image). Click the "Activate PayPal" button to proceed with the remaining steps for configuring PayPal as a payment method.
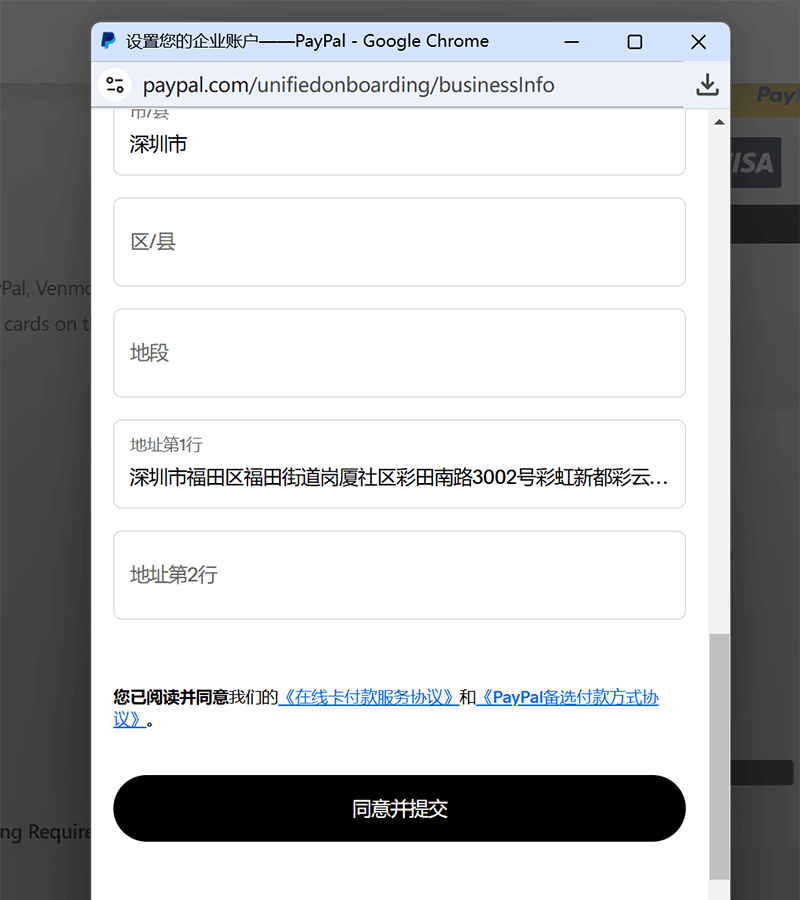
(4) PayPal Payments configuration step 3: Enter PayPal login information
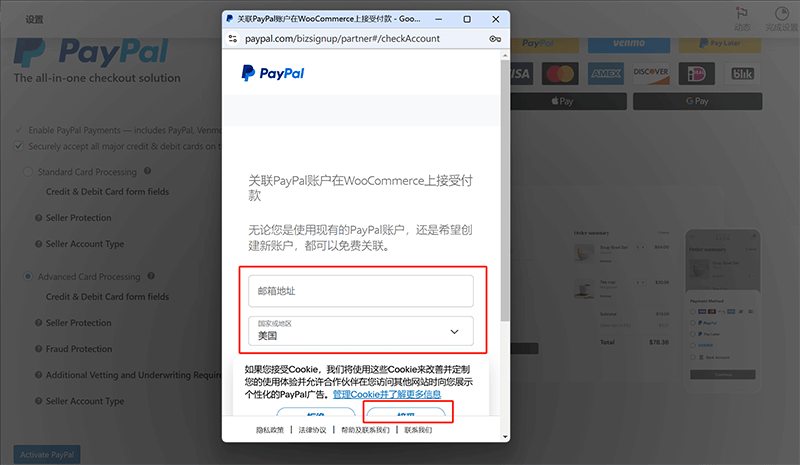
As shown in the image above, this step requires you to accurately enter your business PayPal account information in the pop-up PayPal login window. To avoid any interruptions during the process, first click the "Accept" button (marked with a red box) to confirm the cookie settings and close any related prompts, ensuring a smooth operation. Then, enter the registered email address of your business PayPal account in the email address field, which will serve as your PayPal login ID. Additionally, ensure that the "Country/Region" field matches the region selected when registering your business PayPal account, as any discrepancies may lead to login failures or other account verification errors.
(5) PayPal Payments configuration step 4: Enter the login password of your PayPal account
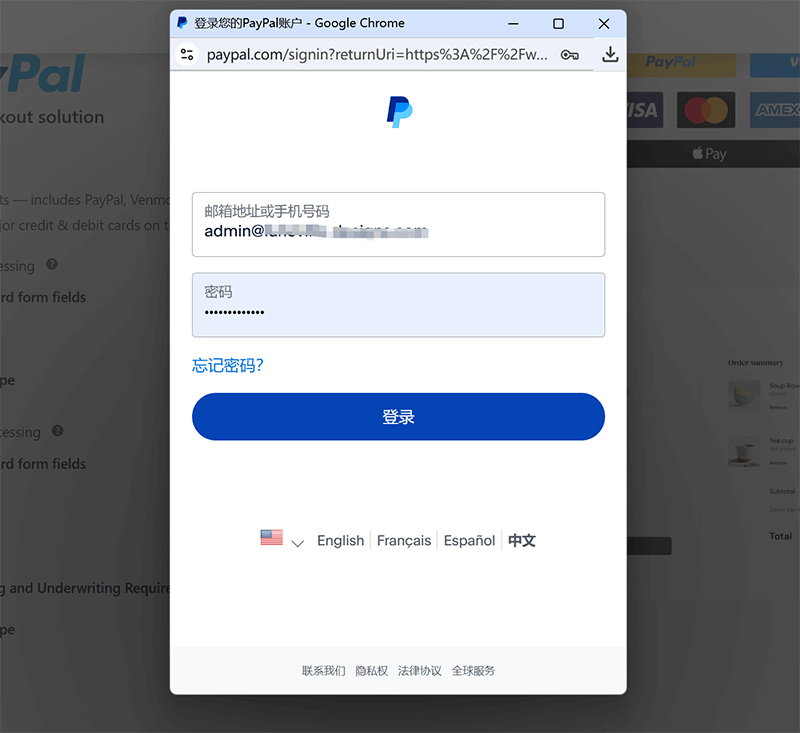
As shown in the image above, after entering the PayPal login email and correctly selecting the country/region that was chosen during the account registration, you will need to enter the login password for your PayPal account in the PayPal password input field. Once the password is correctly entered, click the "Log In" button to proceed with the PayPal login verification process.
(6) PayPal Payments configuration step 5: Provide the company or organization information required by PayPal
As shown in the image above, during the PayPal login verification step in the WooCommerce PayPal payment integration process, the system will automatically retrieve the registered information from your PayPal business account and require submission of business details for verification. If your PayPal business account information is complete, there is no need to fill out additional fields—simply click the "Agree and Submit" button to complete this step. If the system prompts that some information is missing, you will need to provide the required details. Once all necessary fields are completed correctly, click "Agree and Submit" to successfully complete the integration with PayPal’s payment system. After the verification of your PayPal business account and business details is successful, you have completed the integration of PayPal with WooCommerce. At this point, return to the WooCommerce payment settings initialization interface and check if the PayPal Payments status is enabled. If the status shows as disabled, simply click the "Enable" button to activate it.
2、Integrating Credit Card Payment for WooCommerce
In the process of integrating a credit card payment system into WooCommerce, cross-border e-commerce enterprises in China typically sign a cooperation agreement with the credit card payment system provider, who then provides technical support to guide how to complete the installation and configuration of the plugin. Generally, this installation process is completed by engineers from the WordPress website development team in collaboration with technical staff from the payment system provider. However, not all credit card payment system plugins can be found in the WooCommerce official plugin directory; some service providers will directly provide the plugin files or download links, which need to be manually uploaded for installation and activation. Regardless of the installation method, with the support of the provider’s technical team, it can ensure that the credit card payment system is successfully enabled and the online payment function works. If you choose to use an international credit card payment system provider (such as Stripe, Checkout, etc.), you will first need to register for an account and obtain the corresponding API ID and key. These credentials are used for authentication and payment interface integration in WooCommerce. Due to geographic and language differences, the installation and configuration process for using international credit card payment system provider plugins usually requires users to complete the entire process on their own. If you are not yet familiar with mainstream domestic and international credit card payment system providers, you can first refer to the blogger's previous post "International Credit Card Payment Channels for Independent Websites" to get detailed information about different credit card payment system brands, so you can choose the payment service provider that best suits your business needs.
(1) Enter the credit card payment system provider directory on the initial interface of WooCommerce payment settings
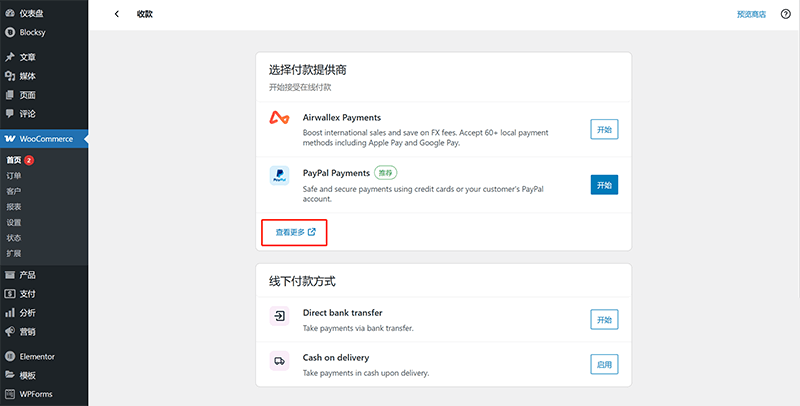
As shown in the image above, in the initial payment settings interface, select "See More" to enter the directory of credit card payment system providers. From there, you can search for the plugin for the credit card payment service provider you prefer or have already signed a partnership agreement with.
(2) Select the credit card payment system provider's plug-in from the WooCommerce credit card payment system provider directory and install it
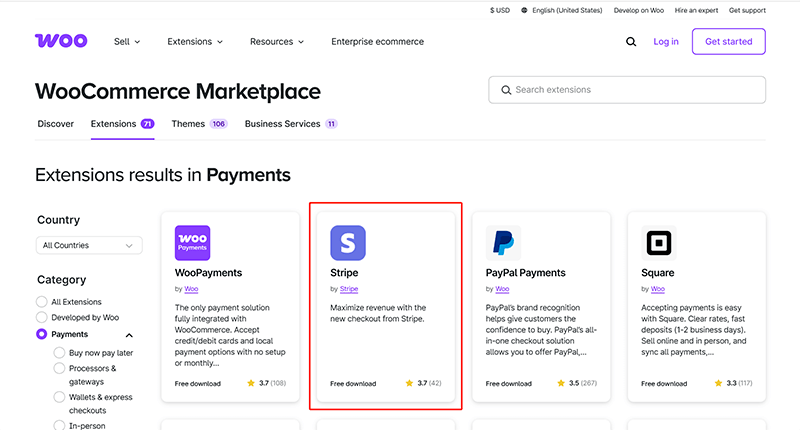
As shown in the red box in the image above, we choose to use Stripe as an example for installation. Click the "Free download" button located to the left of the rating in the Stripe section. This will redirect you to the Stripe plugin download page, as shown below.
Stripe installation step 1: Operate "Add to store" in the WooCommerce credit card payment provider directory
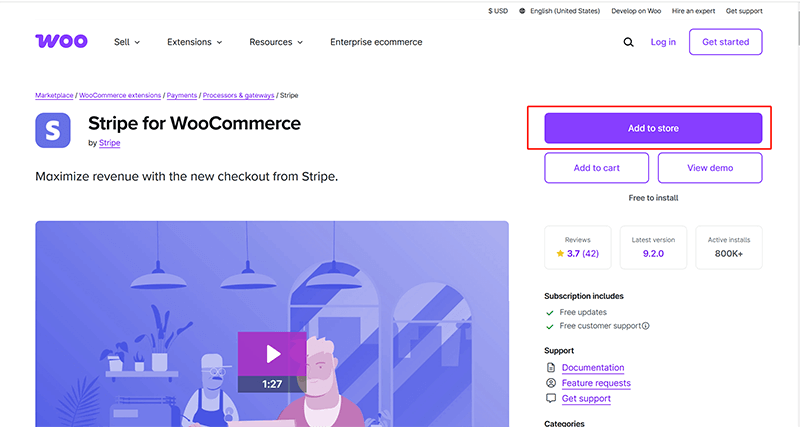
After clicking the "Free download" button in the previous step, you will be directed to the Stripe homepage in the WooCommerce credit card payment provider directory. As shown in the image above, find and click the "Add to store" button (highlighted in the red box) to add the Stripe plugin to your WooCommerce cart page. It's important to note that integrating Stripe with WooCommerce is not done directly in the WordPress backend like a typical plugin installation. Instead, the entire installation process is completed online through the WooCommerce credit card payment provider directory. During this process, you will add it to your WooCommerce account's cart, but this action does not incur any charges and is just part of the installation process.
Stripe installation step 2: Create a WooCommerce account and log in to the shopping cart
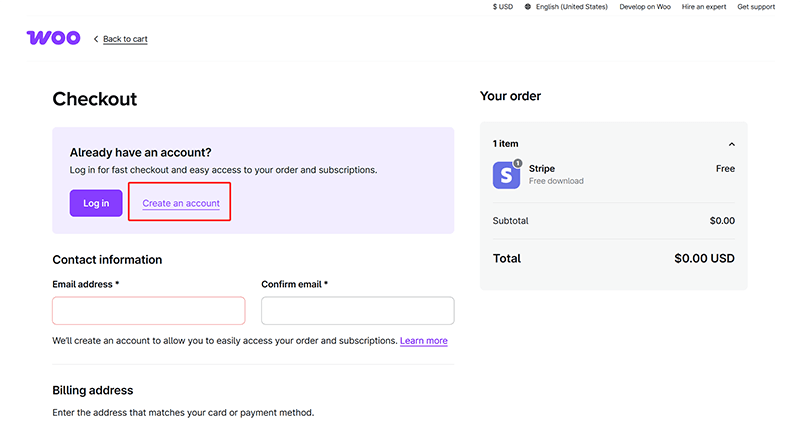
As shown in the image above, this is the WooCommerce cart page. On this page, you need to first create a WooCommerce account and fill in your website's relevant information in order to continue the Stripe integration. Click the "Create account" link (highlighted in the red box) to complete the WooCommerce account registration process. After logging in, the system will automatically return to the current cart page. Then, follow the prompts to fill in the required information in the input fields. Finally, click the "Confirm purchase" button at the bottom of the cart page to complete the process of acquiring the Stripe plugin.
Stripe installation step 3: Add Stripe to your WooCommerce store
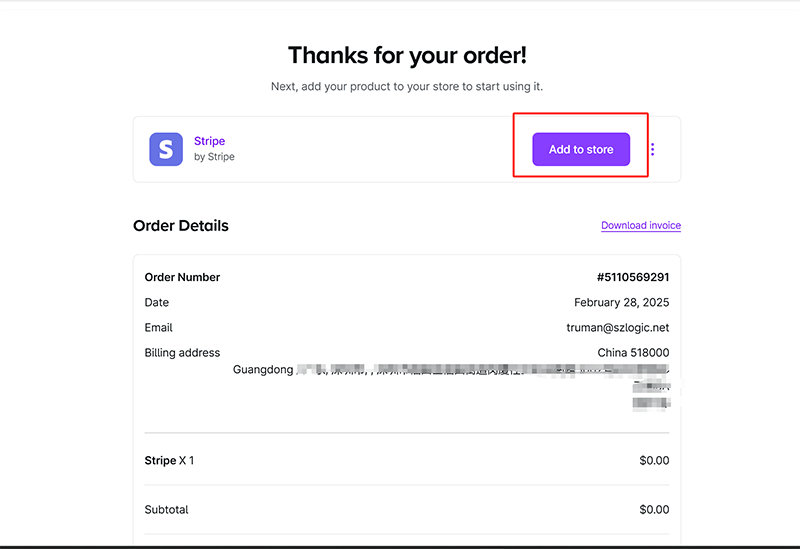
The next step is to add Stripe to WooCommerce, making Stripe your payment method in WooCommerce. Click the "Add to store" button at the top-right of the page (highlighted in the red box in the image above). Then proceed with the next steps.
Stripe installation step 4: Enter the domain name of the site where Stripe is installed
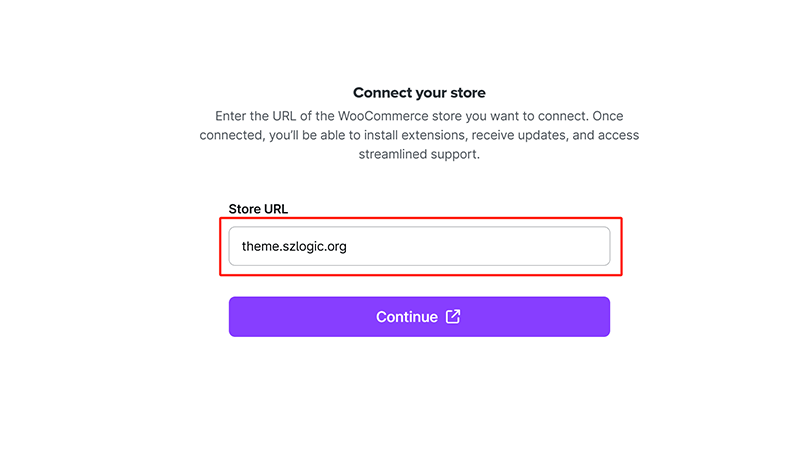
In the current operation window as shown in the image above, you need to enter the domain address of the site for the Stripe program installation in the input field marked in the red box. Once the information is completed, click confirm, and the Stripe plugin will be successfully installed into WooCommerce. This process will integrate Stripe with WooCommerce, ensuring that your e-commerce website can smoothly process payments via Stripe.
Stripe installation step 5: Authorize WooCommerce account to connect data with Stripe
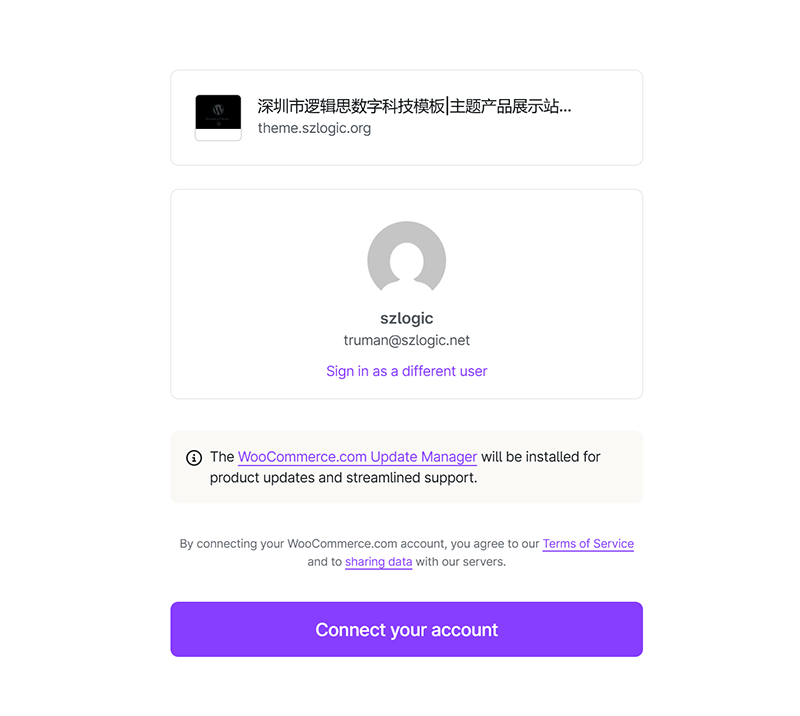
As shown in the image above, during the process of installing the Stripe plugin and connecting it with WooCommerce to enable credit card payment functionality, an authorization step is required to allow WooCommerce to establish a connection with Stripe. This is the final step in the Stripe installation process for WooCommerce. Once the authorization is completed, you can verify in WooCommerce's settings whether the plugin has been successfully installed and use the Stripe ID and key to configure the login, ensuring that the payment functionality operates smoothly.
Stripe installation step 6: Stripe is successfully installed
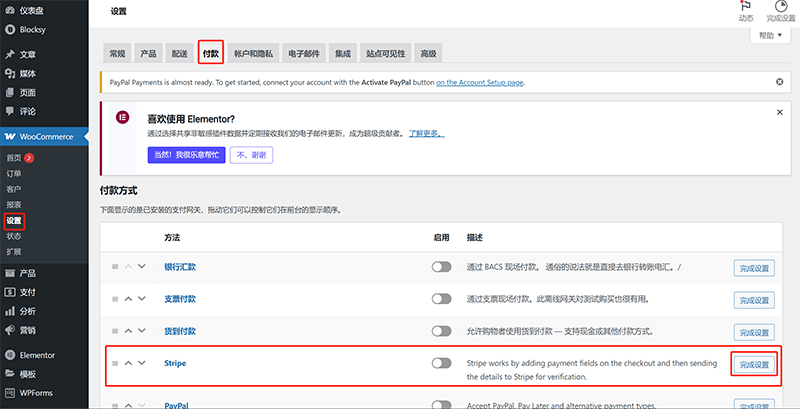
After completing the installation of the Stripe plugin from the WooCommerce credit card payment provider directory, we can verify if Stripe has been successfully installed by checking the "Payments" option in the WooCommerce settings (as shown in the red box in the image above). If Stripe payment method is listed under the "Payments" section, it indicates that the installation was successful. Next, simply click the "Finish Setup" button on the right. On the Stripe configuration page, follow the system's instructions and guidance to log in with the account you registered with Stripe. Gradually configure Stripe by entering the ID and keys. After completing the configuration, WooCommerce's product components and product pages will be able to support Stripe’s credit card payment service.
三、WooCommerce Product Management
WooCommerce's product management functionality is one of its most attractive and mature core advantages, covering all aspects required for e-commerce websites. Whether it is product listing, display content configuration, or product data settings and category management, WooCommerce offers powerful and flexible support. Users can easily set up product large images, thumbnails, video displays, detailed product descriptions, and other elements to ensure that the product presentation is both clear and attractive. Additionally, WooCommerce supports detailed settings for various product data, including pricing, inventory, weight, size, etc., helping merchants efficiently manage product information and optimize inventory management. More importantly, WooCommerce provides flexible product categories and tag features, allowing merchants to categorize products based on type, use, and other dimensions, making it easier for users to search and filter. For the URL settings of product pages, WooCommerce also provides a simple custom operation method, allowing merchants to create SEO-friendly link structures, effectively improving page search engine rankings and user experience. With these features, WooCommerce makes product management not only efficient but also highly operable, providing strong backend support for WordPress e-commerce websites.
1、Navigating to the WooCommerce product management section
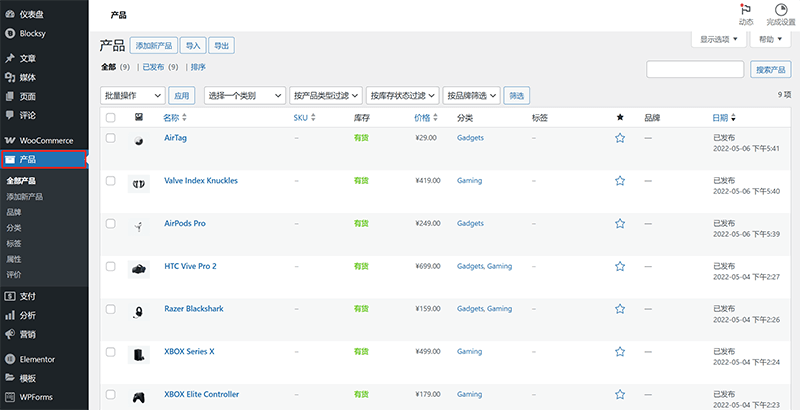
As shown in the red box in the image above, the way to access WooCommerce product management is by clicking the "Products" option in the left-hand toolbar of the WordPress admin dashboard. After this, the content area on the right will redirect to the product management initialization page, which is the WooCommerce product list management interface. Here, you can view, edit, add, or delete products.
2、How to list products on WooCommerce
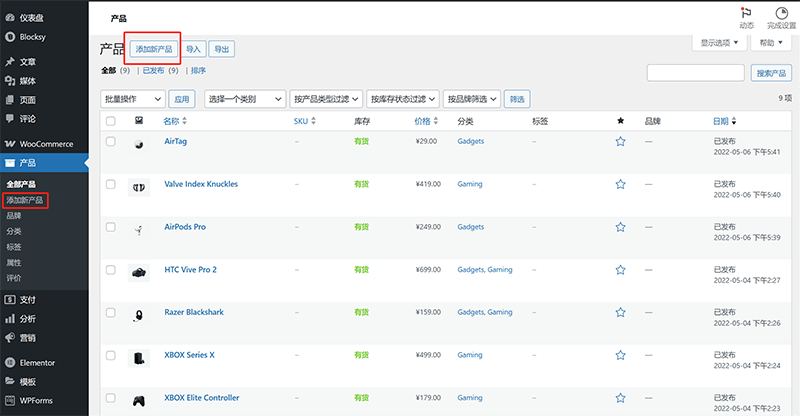
As shown in the red box in the image above, there are two ways to enter the "Add New Product" page in WooCommerce for adding a product: first, by clicking the "Add New Product" button under the "Products" section in the left-hand toolbar of the WordPress admin dashboard; second, by clicking the "Add New Product" button at the top of the WooCommerce product management initialization page. Both methods will lead to the product editing page where you can start adding a new product.
3、Editing product content in WooCommerce
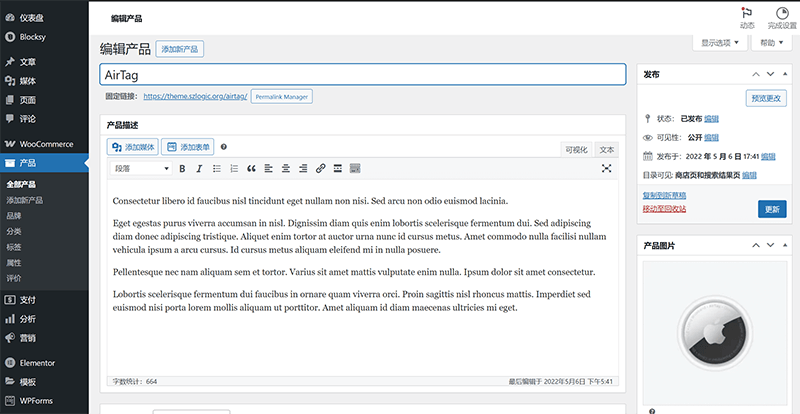
The image above shows the product editing mode in WooCommerce. On the initial page of WooCommerce product management (which is the product list page), you can enter the specific product editing page by clicking the product's list name or by hovering over the product list and clicking the "Edit" link that appears. On the WooCommerce product editing page, website operations personnel can add rich elements and materials to the products to enhance the product display and optimize the user experience. The following are key features for adding product elements and display materials on the product editing page:
(1) Product title
At the top of the editing page (the position marked with a red box in the image above), there is an input field for entering the product title. This title will be displayed directly on both the product detail page and the list page. It is recommended to use a concise and clear title that includes keywords to facilitate user search and understanding.
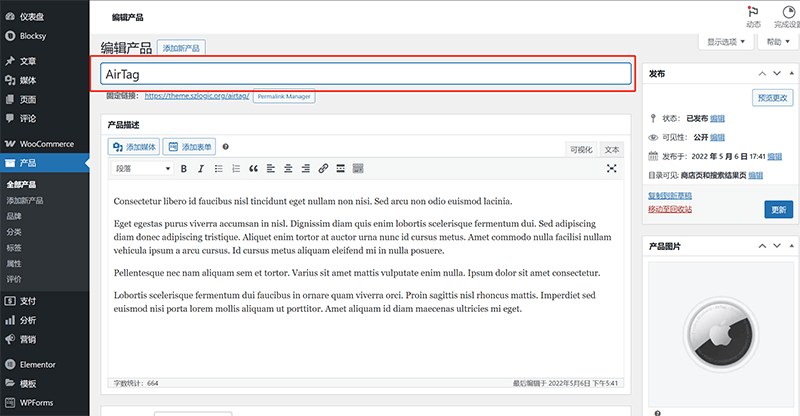
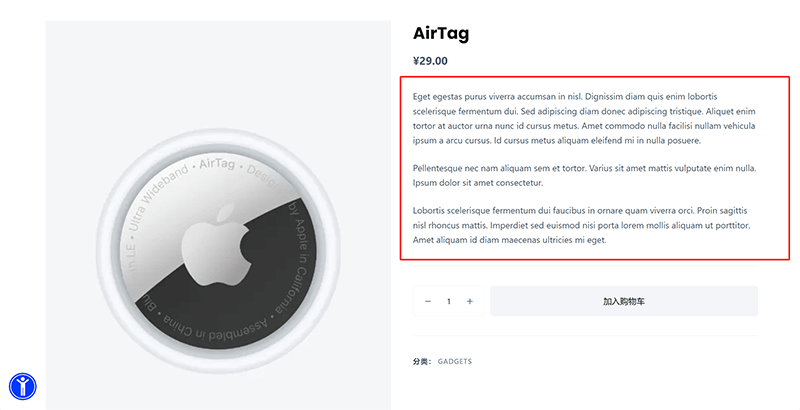
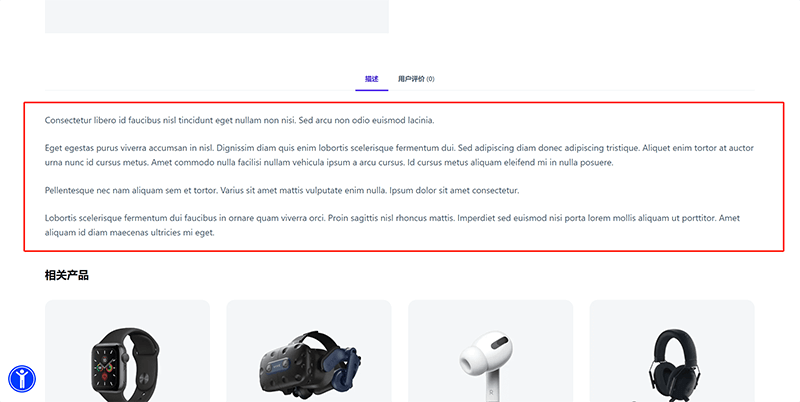
(2) Product description
WooCommerce product descriptions are divided into two types, as shown in the example images below: short description and full description. In the first example image, the text highlighted in red on the left is the short description; in the second example image, the text highlighted in red is the full description.
Short description example image:
Full description example image:
Short Description
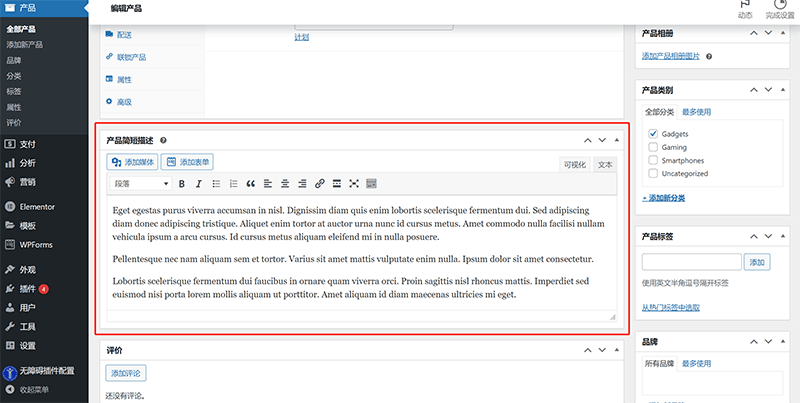
The editing area for the product short description is not at the top of the product edit page but is located closer to the bottom (as highlighted in the red box in the image). You will need to scroll down the browser window to near the bottom to see this section. WooCommerce provides a "Short Description" field, which is used to display the core features of the product in a prominent position on the product detail page.
Full Description
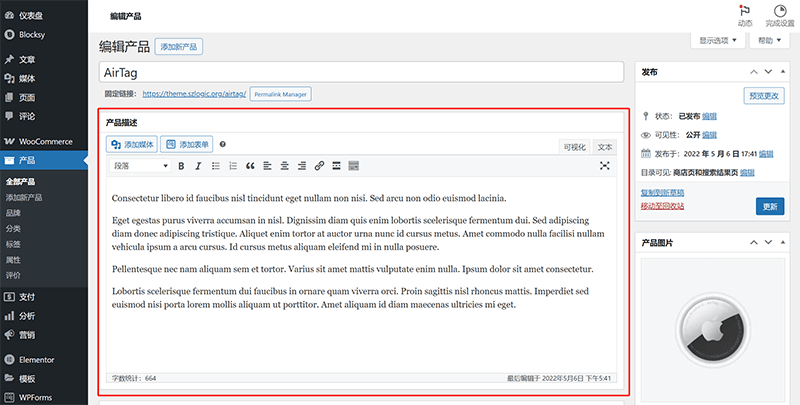
The full description, also known as the long description, is edited in a section located at the top of the page, just below the product title, as shown in the image. The full description is used to write more detailed product information, including usage instructions, specifications, advantages, features, and more. It supports rich text editing, allowing you to add images, lists, links, and formatted text, making the content more engaging and appealing.
(3) Product images
WooCommerce supports two types of product images: product images (i.e. product cover images) and product albums. Their editing locations and operation instructions are as follows:
Product image (i.e. product cover image)
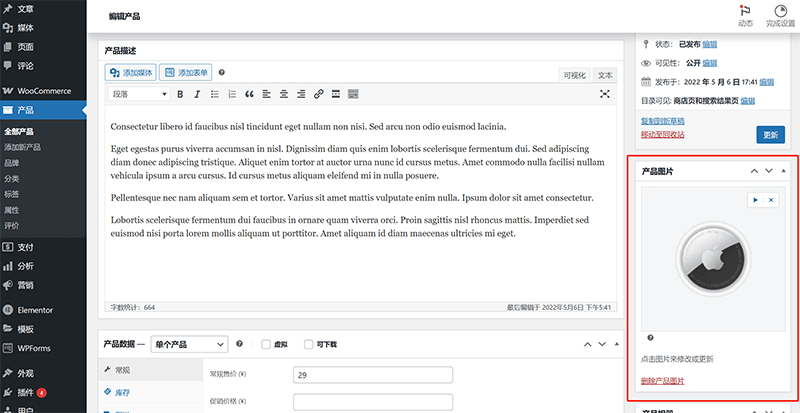
The product image (also known as the product cover image) is the main display image for the product, used as the featured image on the product detail page and the cover image for product components. The image editing function is located on the right side of the product edit page (as indicated in the image above), where you can directly click on the product image to modify and update it.
Product Album
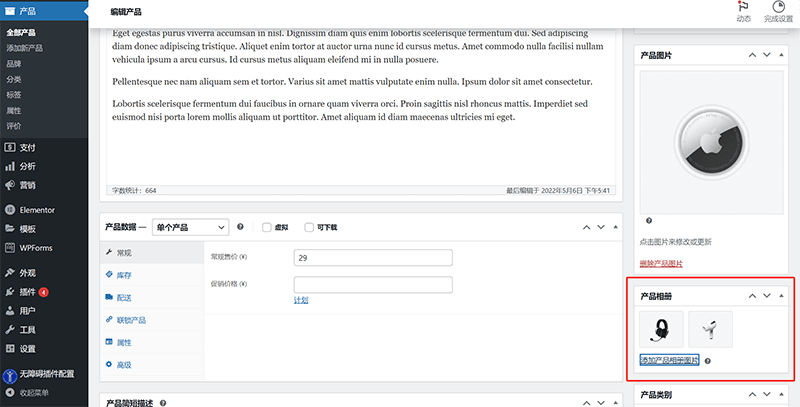
The "Product Album" function block is located below the "Product Pictures". By clicking "Add Product Album Pictures" below the product album, you can upload multiple product pictures as the album of the current product. The uploaded product pictures will be used for carousel in the display window of the product details page to show different angles or usage scenarios of the product, thereby improving the product display effect.
(4) Media insertion (adding media files)
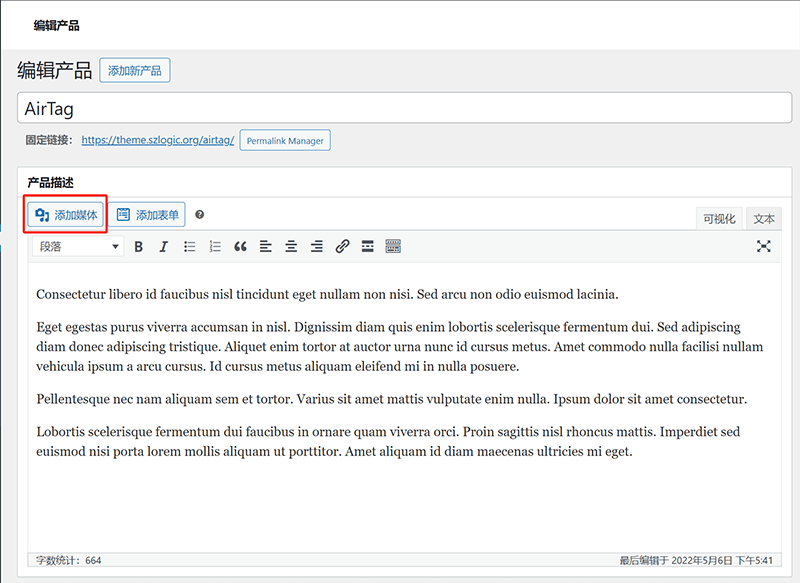
In the product description and product short description editing area, there is an "Add Media" operation button as shown in the red box in the figure above. Users can insert pictures, videos or other attachments by clicking the "Add Media" button to enhance the visual expression of the product introduction.
4、Configuring product data in WooCommerce
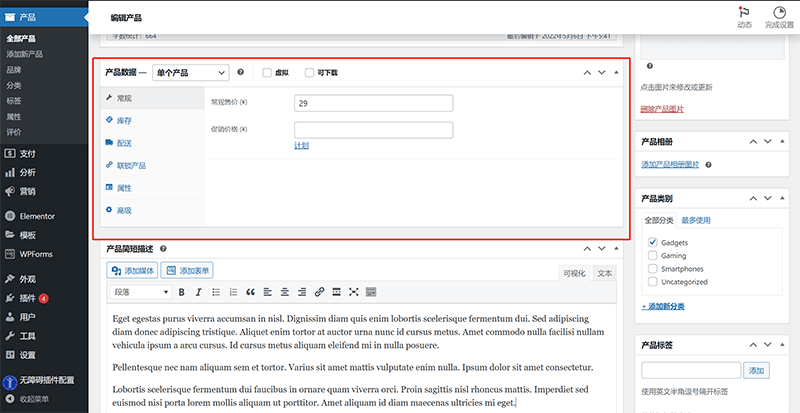
By scrolling the browser's scrollbar to the middle of the page, you can see the "Product Data" settings area highlighted in the red box in the image above. In the WooCommerce product edit page, this section includes several configurable options such as product price, inventory, shipping, and product attributes. Next, I will explain each of these settings in detail, covering their specific functions and how to use them.
(1) General
The "General" tab is used to set the basic sales information of the product, including setting the regular selling price and promotional price of the product:
- Regular Price: Enter the standard selling price of the product, which is the price the customer will pay without any discounts.
- Sale Price: Used to set the discounted or special sale price for a limited time. Merchants can also set a time range for the sale price, allowing WooCommerce to automatically enable or disable the discount price on the specified dates.
(2) Inventory
The Inventory tab allows merchants to manage inventory quantities and purchase limits for products:
- Inventory Management: By enabling this option, you can enter the available stock quantity for the product. WooCommerce will automatically stop selling the product when the stock runs out.
- Stock Quantity: Used to enter the current available stock quantity for sale, which will be automatically updated after each sale.
- Stock Status: Manually adjust the product's stock status, such as "In Stock", "Out of Stock", or "On Backorder".
- Sold Individually: Check this option to allow customers to purchase only one of this product per checkout, suitable for limited edition items or special sales strategies.
(3) Delivery
In the Shipping tab, merchants can set the weight, dimensions, and applicable shipping categories for their products:
- Weight (kg): Enter the actual weight of the product (the unit is determined by the WooCommerce settings, such as kilograms or pounds), used to calculate shipping costs.
- Dimensions (cm): Define the product's length, width, and height, which are used for calculating shipping costs or applicable to specific shipping rules.
- Shipping Class: WooCommerce supports creating custom shipping classes, mainly used for assigning specific shipping rules. After configuring the shipping templates in the WooCommerce settings, you can select the appropriate shipping class from the "Shipping Class" dropdown menu here for application.
(4) Interlocking products
The "Interlocking Products" tab is used to set the product's cross-selling strategy to increase the average order value and conversion rate:
- Cross-sells: Set products to be recommended on the cart page, usually used to suggest related or complementary products, such as recommending a memory card when purchasing a camera.
- Upsells: Set recommended products to display on the product detail page, usually higher-priced or premium options, such as recommending a more advanced version when purchasing a basic model.
(5) Attributes
The Attributes tab allows merchants to define product variations, such as color, size, material, etc.:
- Custom Attributes: You can manually add product features, such as "Color: Red, Blue" or "Material: Cotton, Polyester."
- Global Attributes: If the merchant has defined universal attributes in WooCommerce under "Products > Attributes," they can be directly applied here to ensure that multiple products share the same attribute settings.
- Variant Applicability: In variable products, attributes can be used to create different versions of a product. For example, "Size: S/M/L" can correspond to multiple SKUs.
(6) Advanced
The Advanced tab provides some additional product setup features:
- Purchase Note: Allows the merchant to enter a message that will be visible after purchase, such as "Thank you for your purchase! Expected shipping time is 3-5 days."
- Menu Order: Used to manually adjust the sorting of products in the WooCommerce catalog. The smaller the number, the higher the rank.
- Allow Reviews: Whether to allow customers to leave comments and ratings on the product page, suitable for social proof marketing strategies.
5、Managing product categories and tags in WooCommerce
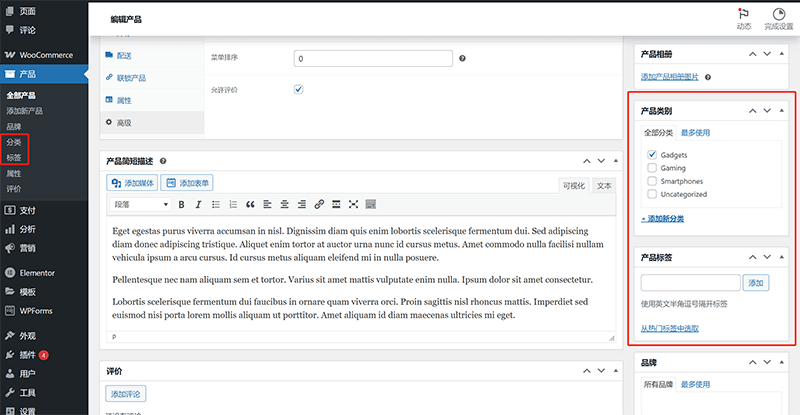
The product categories and tags management in WooCommerce are located as shown in the red boxes on the left and right sides of the image above. They can be managed either through the left sidebar by selecting “Products” > “Categories” or “Tags”, or via the “Product Categories” and “Product Tags” areas on the right side. After creating a product category, simply check the appropriate category to assign the current product to that category. It is important to note that each time a product tag is created, WooCommerce will dynamically generate a new URL similar to the product page. If SEO optimization is not performed, this could lead to duplicate pages in search engines, which could affect SEO performance. Therefore, when creating product categories and tags, it is crucial to also perform SEO optimization to avoid unnecessary negative impacts on search engine rankings.
6、Setting product URLs in WooCommerce
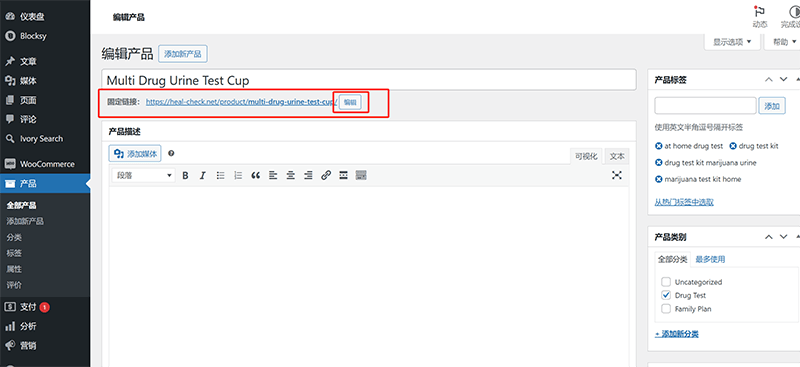
In the WooCommerce product edit page, the custom URL setting function is located just below the product title, closely adjacent to it, as shown in the red box in the image above. This feature allows users to personalize the URL suffix (slug) of the product detail page to optimize the website's URL structure. By clicking the "Edit" button on the right side of the URL, website administrators can manually modify the slug to make it more SEO-friendly and user-readable. Properly setting the product URL helps improve search engine crawling efficiency and enhances user experience. For example, the default WooCommerce product URL may include automatically generated IDs or other meaningless characters, but a custom slug makes the URL more concise, understandable, and keyword-rich, thus improving the page's readability and search ranking. Additionally, maintaining the stability of the URL is equally important. Once the product URL is established and indexed by search engines, it should not be frequently changed to avoid negatively impacting SEO or causing already indexed links to become broken.
四、Editing WooCommerce Product Pages
The WooCommerce product page supports the use of Elementor as the editor, offering great flexibility and customizability, making it easier for developers to design and develop styles based on brand needs and user experience. Through Elementor's Theme Builder, developers can create and customize “Products Archive” (product archive page) and “Single Product” (single product detail page) template files, thereby specifying the layout, interaction, and features of the WooCommerce product category page and individual product pages. Elementor’s template design rules are extremely flexible, allowing users to control every detail of the page precisely. Developers can not only quickly adjust page elements through a visual interface, but also use routing configuration rules to apply styles specifically to a single product page or a particular category page. Whether it's the display style, product images, button styles, or the layout of product descriptions and other information, Elementor allows independent site developers to customize in detail according to requirements, ensuring that every page perfectly matches the brand image and user needs.
1、Navigating to Elementor's Theme Builder
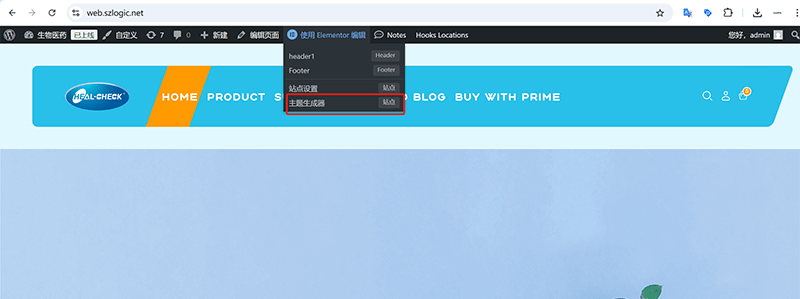
When we log into the WordPress admin backend using an administrator account, the default WordPress toolbar will appear at the top of the frontend page. By hovering the mouse over the "Edit with Elementor" option, an Elementor operation menu will pop up. From the menu, clicking on "Theme Builder" (as shown in the red box in the image above) will take us to the Elementor Theme Builder operation page. On this page, we can create and manage various page templates that are created by Elementor.
2、Editing WooCommerce product category pages
(1) Create a WooCommerce product category page template file
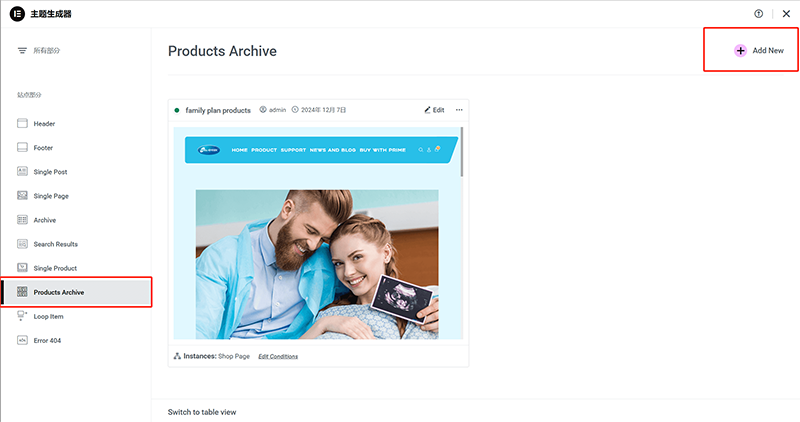
In the Elementor Theme Builder operation page, first, select the "Products Archive" option from the left menu as shown in the image above, to enter the template settings for the WooCommerce product archive page. Then, in the content area on the right side of the page, click the "Add New" button marked in the red box at the top-right corner to create a new WooCommerce product category page template file. The default behavior of Elementor is that, after clicking the "Add New" button, the page will automatically redirect to the product category page template editing interface.
(2) Edit the WooCommerce product category page template file

In the current Elementor editing interface, users can use the "Product Archive" and "WooCommerce" modules on the left to intuitively drag and drop the corresponding components to customize the layout and content of the WooCommerce product category page. In the "Product Archive" module, users can choose "Archive Title" to display the current category name, "Archive Products" to showcase the list of products within that category, and "Archive Description" to add a detailed introduction of the category. The combination of these components helps make the product category page more structured, enhancing the user browsing experience.
In addition, the "WooCommerce" module also provides functional components such as "Products," "Product Categories," and "Custom Add To Cart." Users can integrate these components with other page elements based on their needs. For example, the "WooCommerce Breadcrumbs" can enhance page navigability, while the "Menu Cart" component allows adding a cart button to the page, enabling users to easily view their selected products at any time. With Elementor's visual editing, users can freely adjust the layout and modify the style, ensuring that the product category page aligns with the brand's style and user experience requirements. Moreover, Elementor supports real-time previews, so users can immediately see the page effect during editing, ensuring that the final product category page meets the desired design objectives.
(3) Publish WooCommerce category page template files and set application rules for template files
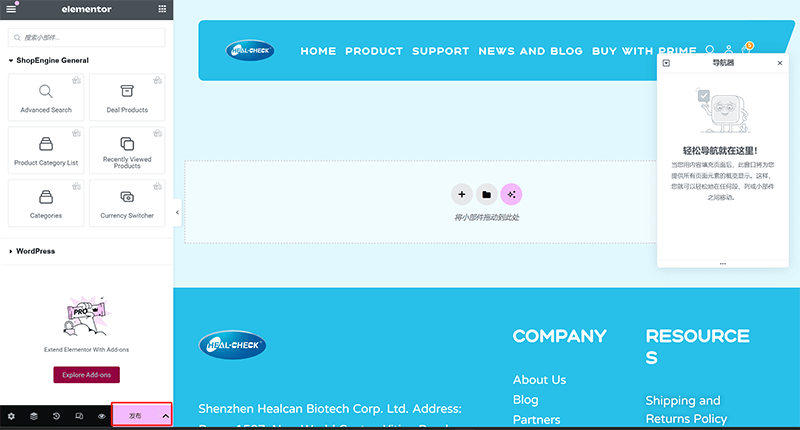
Publish the WooCommerce category page template file and set the application rules of the template file. Step 1:
Click the "Publish" button on the page as shown in the red box on the left side of the picture below.
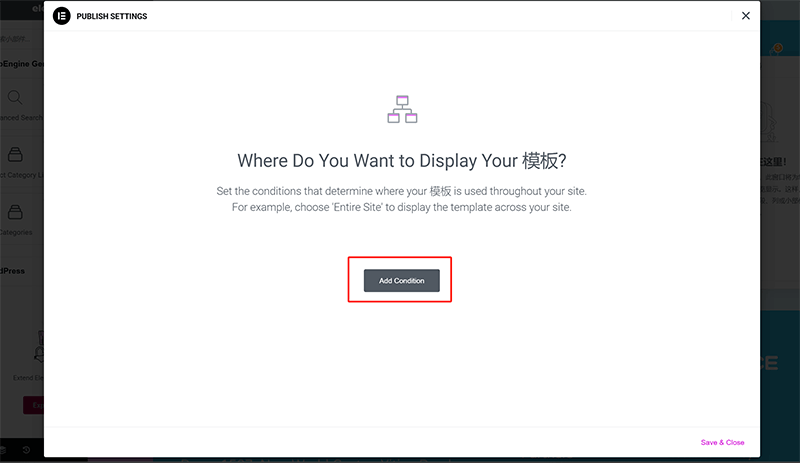
Publish the WooCommerce category page template file and set the application rules of the template file. Step 2:
Click the "Add Condition" button on the page as shown below to add the application conditions of the template file.
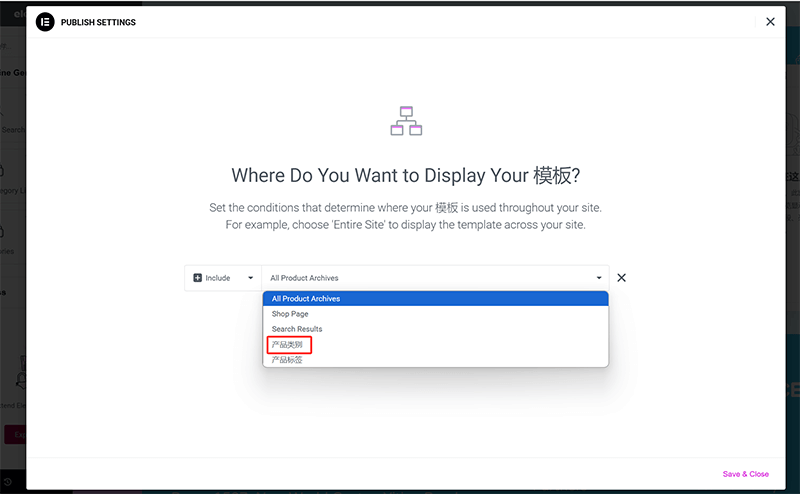
Publish the WooCommerce category page template file and set the application rules of the template file. Step 3:
Select Product Category from the drop-down list of the applicable conditions as shown in the figure below and enter the category name.
Publish the WooCommerce category page template file and set the application rules of the template file Step 4:
After completing the above operations, that is, publishing the WooCommerce category page template file and setting its application rules, click the "Save & Close" button in the lower right corner of the window to complete the publishing. Then, open the category page with the application rules set, and you can see that the style on the page has applied the layout we created and designed.

3、Editing WooCommerce product detail pages
(1) Create a WooCommerce product details page template file
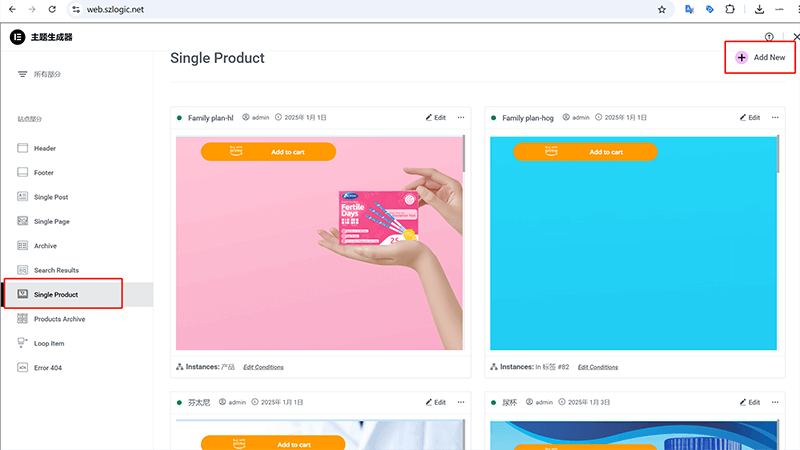
First, select the "Single Product" template type we need to create on the left side of the Elementor theme builder page as shown above. Then, click the "Add New" button above the content area on the right side of "Single Product" (the location marked with a red box in the above picture) to create a WooCommerce product details page template file and jump directly to the template file editing mode.
(2) Edit the WooCommerce product details page template file
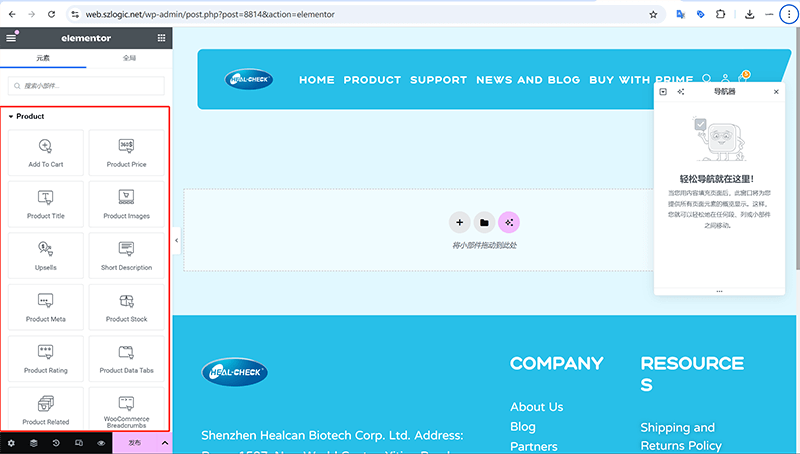
When using Elementor to edit the WooCommerce product detail page template, users can freely customize the layout and functionality of the product page by dragging and dropping widgets. As shown in the screenshot above, Elementor's sidebar provides a range of WooCommerce-related widgets, including "Add to Cart," "Product Price," "Product Title," "Product Images," and other key components. These widgets can be directly dragged into the editing area to create a personalized product display page, enhancing user experience and conversion rates.
During the editing process, users can flexibly adjust the style, layout, and interaction of each widget. For example, the product price can be customized with different fonts, colors, or backgrounds to make it stand out more. Product images can be displayed in various modes such as carousel, zoom, or 360° rotation view to enhance visual impact. Additionally, widgets like "Related Products" and "Upsells" help users make better product recommendations, increasing sales. Furthermore, Elementor’s navigation feature allows users to quickly switch between different layout sections, making the editing process more efficient. By effectively using these widgets and layout settings, users can create a professional and brand-consistent product detail page template, which can be applied to all or specific product categories. This enhances the overall visual appeal and user experience of the WooCommerce store.
(3) Publish WooCommerce product details page and set application rules for template files
The first step to publish the WooCommerce product details page and set the application rules of the template file:
Click the "Publish" button on the page as shown in the red box on the left side of the picture below.
Publish the WooCommerce product details page and set the application rules of the template file. Step 2:
In the operation window shown in the figure below, click the "Add Condition" button to enter the setting operation interface for adding template file application conditions.
Publish the WooCommerce product details page and set the application rules of the template file. Step 3:

In the Elementor product detail page template application rule settings, users can flexibly set the template's scope based on different needs. This step is crucial because it determines whether the product detail page styles will be correctly applied to the desired pages. To better understand the role of each application condition, we can break it down into the following common use cases:
① Apply to all product detail pages
If you want the newly created product details page template to be applied to all product pages in the entire WooCommerce store, you can select the "All Products" option. In this way, both newly added products and existing products will automatically use the template to maintain the consistency of the product details page of the entire site.
② Apply to specific product categories
Different product categories may require different detail page layouts. For example, the electronics category may require more complex specification displays, while apparel products may focus more on image display and color options. In this case, you can select "Product Category" as the application condition and specify a specific category, such as "Electronics" or "Apparel", to ensure that the template only applies to all product detail pages under that category.
③ Apply to specific subcategories
When the product classification system is more complex, the application scope of the template can be further refined. For example, under the "Apparel" category, there may be two subcategories: "Men's Clothing" and "Women's Clothing". If you want to design a separate template for "Men's Clothing" products, you can select "Product Subcategory" as the application condition and specify the "Men's Clothing" category, so that the template is only effective for products under the "Men's Clothing" category without affecting other categories.
④ Apply to specific product labels
WooCommerce supports using "Product Tags" to mark products, such as "New", "Hot Sale", "Discount", etc. In Elementor, you can also apply templates to all products under a specific product tag. For example, if you want all products with the "Limited Time Sale" tag to use a specific detail page template, you can select "Product Tags" as the application condition and enter the relevant tag name.
⑤ Apply to specific user roles (advanced application)
For membership or wholesale business websites, you may need to display different product detail pages for different user groups. For example, retail users and wholesalers may need different price display methods or product descriptions. In some advanced WooCommerce sites, you may use plugins to extend Elementor's functionality to enable it to apply different templates based on user roles.
Publish the WooCommerce product details page and set the application rules of the template file Step 4:

After completing the above application conditions, click the "Save & Close" button in the lower right corner as shown in the figure, and Elementor will automatically apply the product details page template to the specified page. Afterwards, the user can go to the front-end page test to ensure that the template file is effective, and further optimize the template layout and content according to actual needs.
Conclusion: Through this article, you have learned how to transform a regular WordPress website into a powerful e-commerce platform. We started with the installation and activation of the WooCommerce plugin, followed by an explanation of how to integrate payment systems like PayPal and credit cards to ensure the website has convenient payment functionality. Next, we delved into product management features, including product display, categorization, and data settings, and demonstrated how to customize product page styles using the Elementor editor. With these steps, you can successfully build and optimize your WooCommerce e-commerce site, enhancing user experience and driving sales growth. Since WooCommerce is a powerful and feature-rich e-commerce system, this article inevitably leaves out some functions. For more information on WooCommerce features and settings, readers can refer to the earlier article published by the author, "WooCommerce's Functional Parameter Configuration." By combining the two articles, you will gain a more comprehensive understanding of WooCommerce's technical practices, improving your e-commerce site development and management capabilities.
Finally, if your time is valuable and the time cost of learning and technical practice is high, and you are not interested in delving into technical learning and hands-on practice, but just want to understand the principles of building WooCommerce for e-commerce functionality and online sales of products on WordPress, without intending to complete this technical process yourself, it's best to leave the professional tasks to professionals. If you need WordPress website building and technical development services, feel free to contact Logic Digital Technology's team, and entrust us with completing the WooCommerce development.
This article is copyrighted by Logic Digital Technology (SZLOGIC) . Personal sharing and learning are welcome. Unauthorized use for any commercial purposes or reproduction of this article is strictly prohibited.


