WooCommerce Function Parameter Configuration
WooCommerce is the e-commerce ecosystem plugin for WordPress websites, and it can also be understood as the WordPress e-commerce system. Once WooCommerce is installed on WordPress, the backend will have a complete set of e-commerce features, including product management, online payment collection, product shipping, product data analysis, marketing, and more — a full suite of e-commerce functionalities. As professionals in the cross-border e-commerce industry often say, installing WooCommerce on WordPress is like installing Shopify on WordPress. If you'd like to learn more about the differences between WordPress and Shopify, please refer to our other article on the differences between WordPress and Shopify.
Through this technical article, you will be able to implement e-commerce functionality on your WordPress website to sell products and manage your store. You will also learn:
- How to correctly configure the store's address and product currency unit
- How to correctly set up product shipping policies
- How to properly integrate PayPal payment and learn the integration process for other payment gateway providers
- How to correctly configure the checkout page's relevant features
This tutorial will guide you step-by-step through the setup process after installing WooCommerce in the WordPress dashboard, following the structured content outline below. If the article addresses specific issues you've encountered, readers can also click the directory links below for selective reading.
- General Settings
- Product Settings
- Tax Settings
- Shipping Settings
- Payment Settings
- Account and Privacy Settings
- Email Settings
- Integration Settings
- Advanced Settings
一、General Settings
The General Settings page contains three main sections that need to be configured: Store Address, General Options, and Currency Options. We will explain each of these sections in detail. As shown in the image below (due to screen size limitations, the full image cannot be captured, but readers can scroll down the page on the WooCommerce General Settings page to match the corresponding sections):

Store Address
The settings for the store address are easy to understand. Just fill in your company's information by category according to the prompts on the page.
Comprehensive options
Sales location: Click the checkbox to select the country/region where your e-commerce site's products will be sold
Available delivery areas: Click the checkbox to select the countries/regions your delivery logistics service provider can deliver your products to.
Default Customer Location: This refers to the location of your e-commerce website’s target audience. It is recommended to select “No location by default” for this option, as the other choices are not very suitable for cross-border e-commerce websites. The default option is “Shop base address,” but for cross-border e-commerce businesses, the company’s physical location is usually different from the countries or regions where the products are actually sold.
Enable “Taxes” feature: This is a checkbox option rather than a dropdown selection. By checking the box labeled “Enable tax rates and calculations” on the right, you are activating the feature for calculating taxes related to product sales.
Use Coupons: This is a checkbox option rather than a dropdown selection. There are two checkbox options available for using coupons: “Enable the use of coupon codes” and “Calculate coupon discounts sequentially.” By checking “Enable the use of coupon codes,” users will be able to enter a promo code on the checkout page to receive a discount on the product. By checking “Calculate coupon discounts sequentially,” users can apply multiple different coupons to a single product during checkout. This feature should be enabled with caution, as it may cause overlapping discounts. It is recommended to thoroughly test it before setting it as a long-term active feature.
Currency Options
The currency option setting is to set the currency unit of the product and the specific display format of the currency.
Currency: Set the currency used for product sales. For example, select RMB when selling in China, and USD when selling in the United States. Choose the appropriate currency according to the country/region where your website operates.
Currency Position: This refers to the placement of the currency symbol when the product price is displayed on the front-end page. The default is on the left, but you can choose to place the currency symbol in another position based on your layout preference.
Thousand Separator: The default is "," which refers to the symbol used to separate the thousands in prices. You can set it according to your own preference, or keep the default.
Decimal Separator: This is the symbol used to separate decimals in prices. The default is "." You can customize it based on your own preference, or leave it as default.
Number of decimal places: The default is 2 digits, i.e. ¥1234.00, where .00 is the number of digits after the decimal point. The normal display standard for the price of general products is also 2 digits. It is recommended to keep the default value.
Tip: After configuring the items on each page, don't forget to click the "Save Changes" button at the bottom of the page. The configurations you make will only be saved if you click "Save Changes." If you exit the page or navigate to another settings page without clicking "Save Changes," your configurations will be lost.
二、Product Settings
WooCommerce's product settings are not about product management. The detailed WooCommerce product management features will be covered in a separate chapter in the later part of this tutorial. The product settings here more accurately refer to the settings for the product page URL and features. There are three main parts that need to be configured in the product settings page: the shop page, measurement settings, and review functionality. Let's explain these one by one.
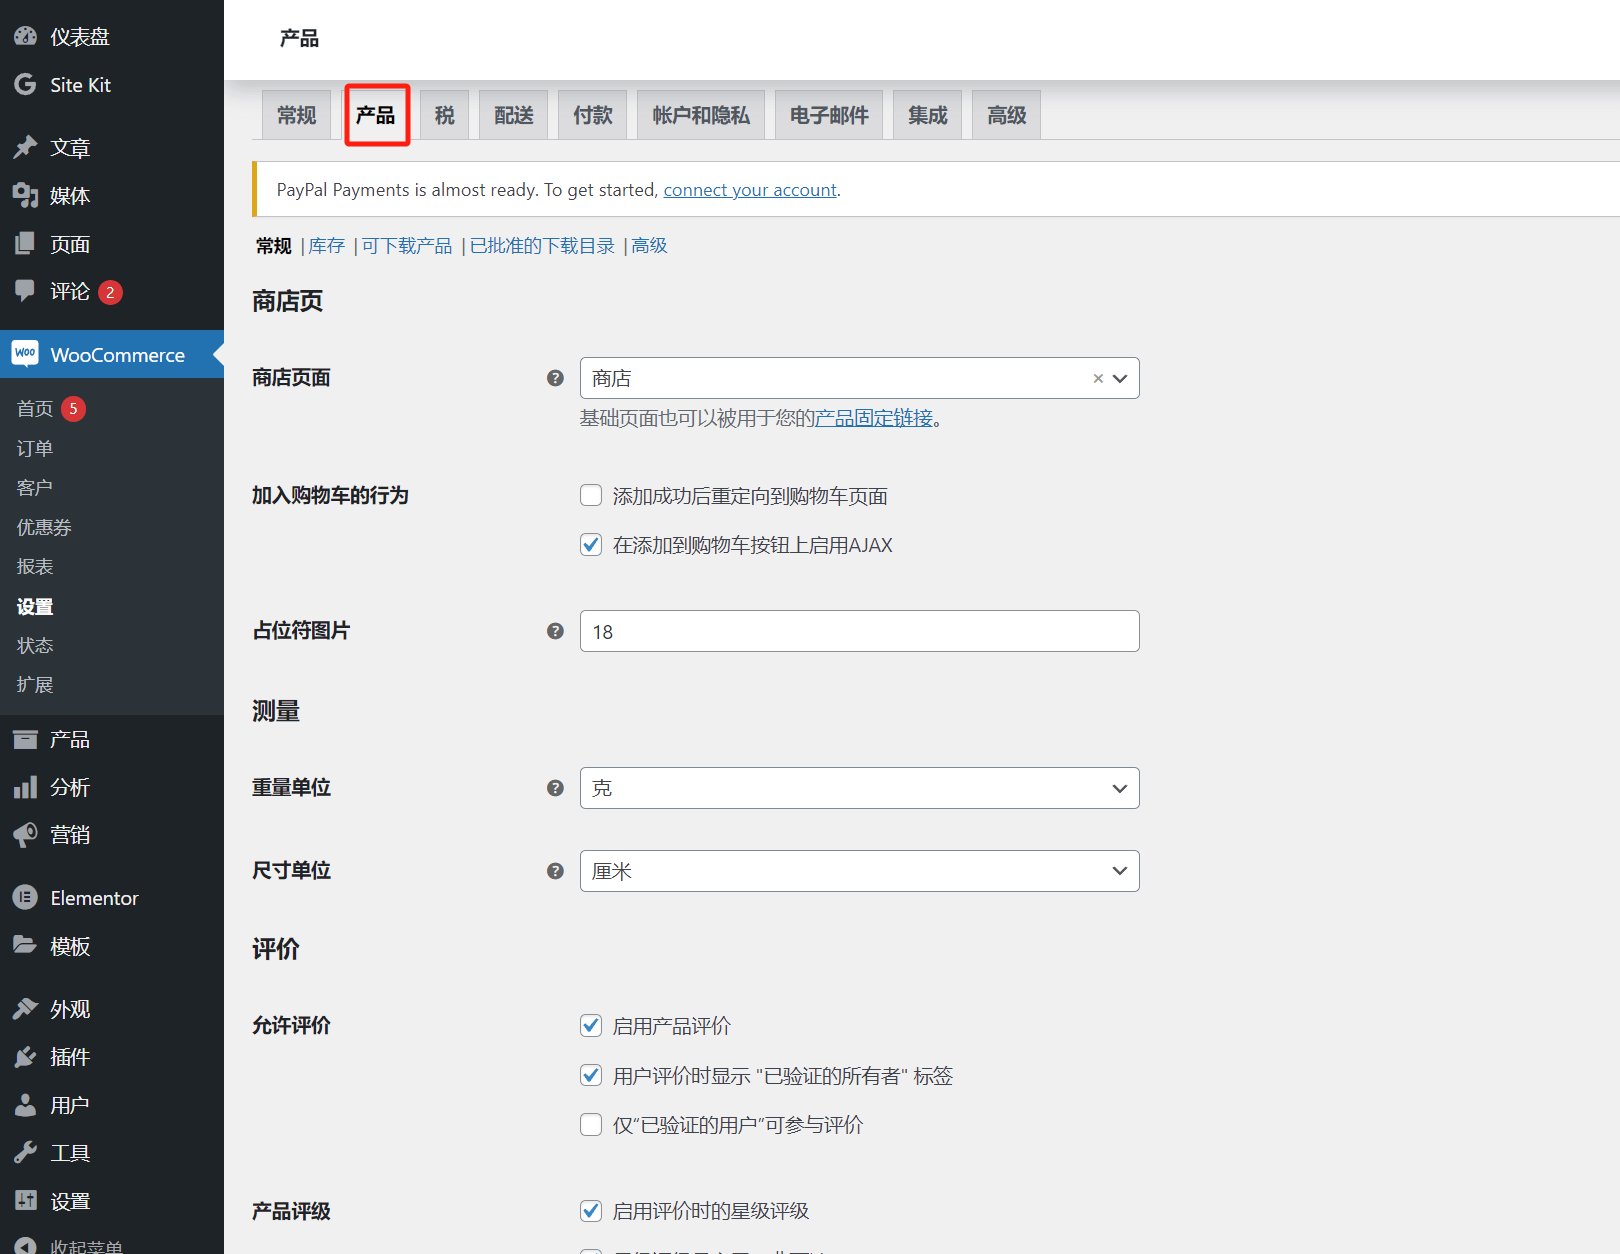
Store Page
Shop Page: After installing WooCommerce on WordPress, WooCommerce will automatically generate several pages for e-commerce functionalities. The shop page is one of them. Other pages generated by WooCommerce include the checkout page, account page, privacy policy page, and refund and return policy page. The default URL for the WooCommerce-generated shop page is yourdomain.com/shop. In the selection field for the “Shop Page” option, the default value is also the shop page generated by WooCommerce. If you have a need for a custom product page, click the selection box to choose a custom page you’ve already created for the product display. If no customization is needed, keep the default value.
Add to Cart Behavior: There are two options available here. “Redirect to the cart page after successful addition” means that when users click the "Add to Cart" button on the front-end page, the page will automatically redirect to the cart page, making it convenient for users to proceed with checkout. “Enable AJAX add to cart buttons on archives” means that when users click the "Add to Cart" button, the cart will update with the new item without reloading or redirecting the page. Although both options can be selected simultaneously, they may conflict in user experience. Therefore, choose the appropriate add to cart behavior based on your website’s marketing strategy.
Placeholder Image: When a product image is not uploaded (i.e., the product image is empty), this is the image that will be displayed on the front-end product page. This image is the default placeholder image automatically configured by WooCommerce. It is recommended to keep the default setting, as there is generally no need for custom configuration.
Measurement
Weight Unit: This refers to the unit used to measure the weight of products. This setting should not be based on personal preference, but rather on the commonly used weight unit in the target user’s country/region to make it easier for users to understand the product weight. Click the selection box on the right to choose the appropriate unit that aligns with your website users' habits.
Size unit: The setting method is the same as weight unit
Evaluate
The prompts for each function that can be checked have been expressed very clearly. Just check the function according to your understanding.
三、Tax Settings
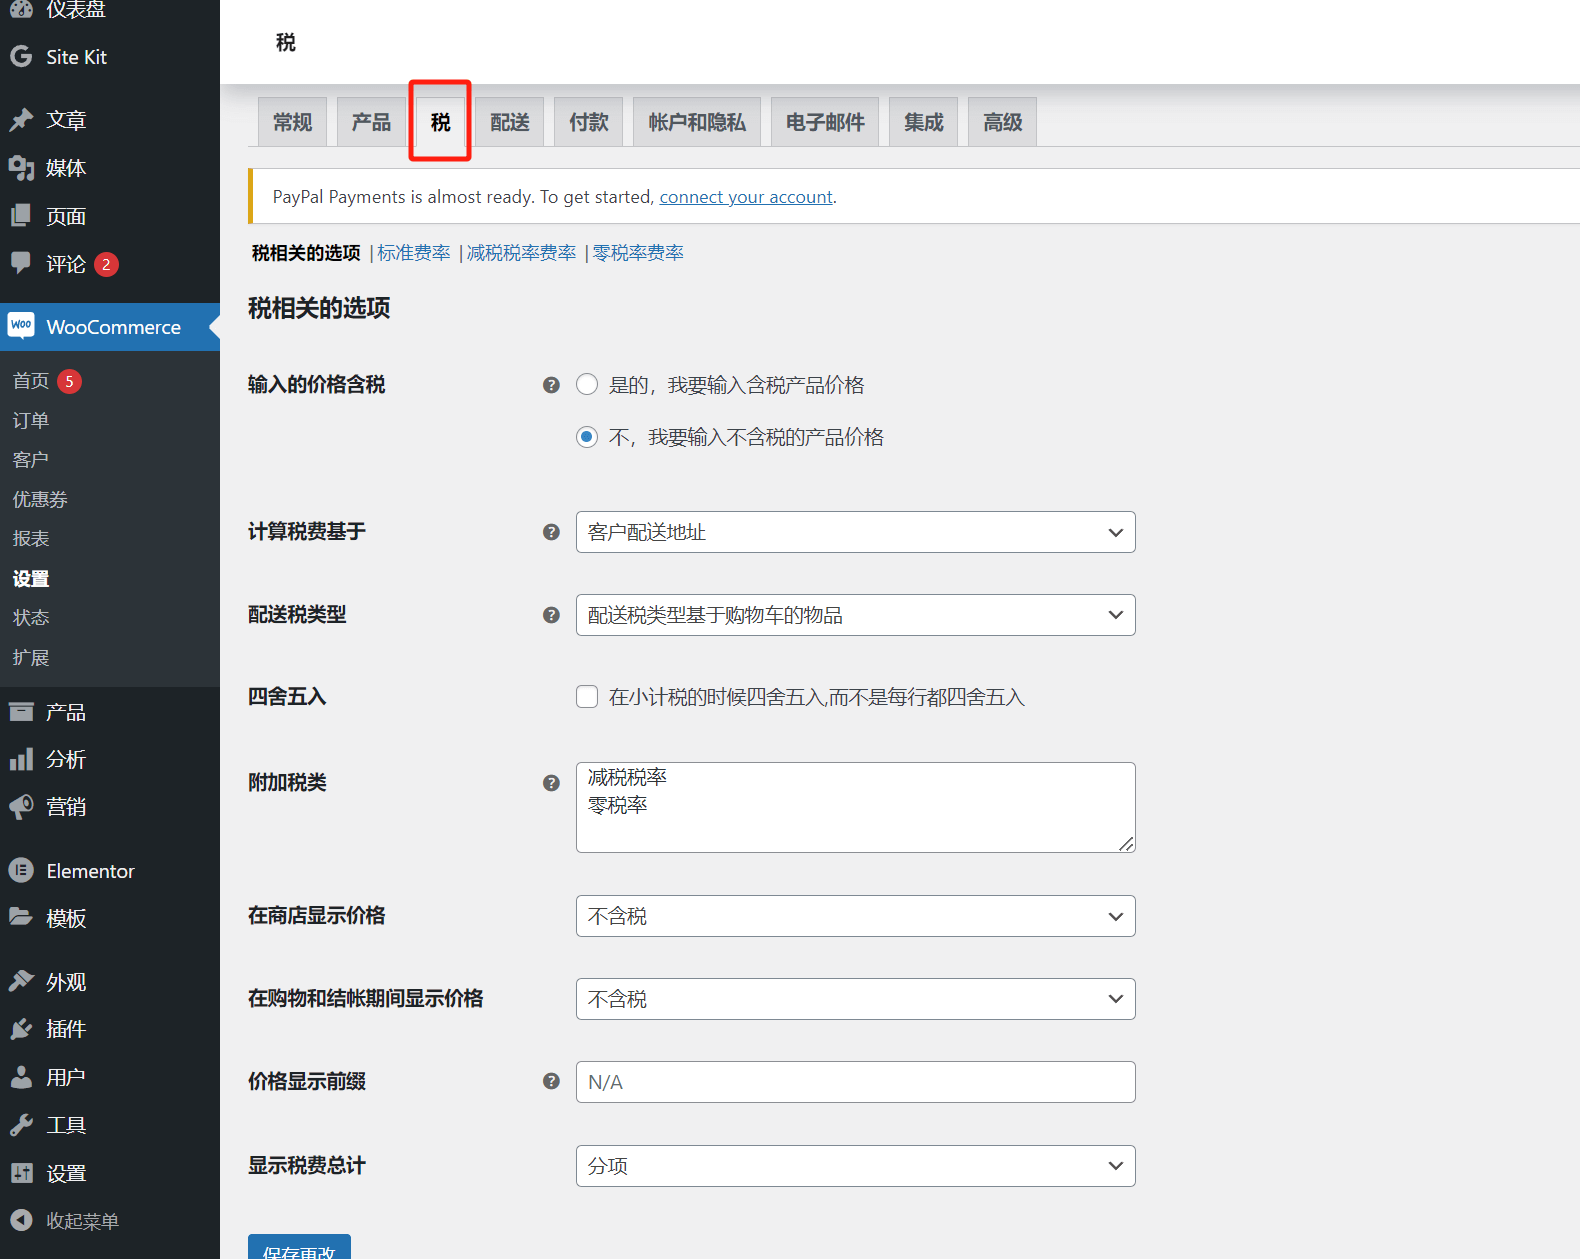
Price Entered With Tax: This refers to whether the product price you set includes tax or not. Choose the mode based on your actual business needs.
Calculate Tax Based On: This option determines which address will be used to calculate tax. There are three address types to choose from: Customer shipping address, Customer billing address, and Shop base address. It is generally recommended to keep the default setting, which is to use the customer's shipping address as the basis for tax calculation.
Shipping Tax Class: This is a tax-related area that the editor is not deeply familiar with. It is recommended to keep the default value: “Shipping tax class based on cart items.”
Rounding: If you check "Round tax at subtotal level, instead of rounding per line," the tax amount will be calculated using rounding at the subtotal level instead of rounding each line individually.
Additional tax category: You can delete tax types and add custom tax types here
Show prices in store: Whether to display taxes when displaying prices on product pages
Show prices during shopping and checkout: Whether to display taxes during checkout
Price Display Suffix: Whether to display the tax label next to the price on the product page. The default value is empty, meaning no tax label is shown. If you want to display the tax type on the product page, enter a custom tax label here, and it will be shown on the frontend next to the product price.
Display Tax Totals: The format for displaying tax amounts. There are two options: "Itemized" and "As a single total." You can choose the one that fits your needs.
四、Shipping Settings
The shipping settings page defines the physical areas where products can be shipped. Typically, the operating countries/regions of the eCommerce website should align with the shipping zones; otherwise, users may encounter issues during checkout where they cannot complete payment. The shipping settings consist of three main parts that need to be configured in detail: shipping zones, shipping methods, and classes (shipping cost templates). Let's start by discussing the settings within shipping zones.
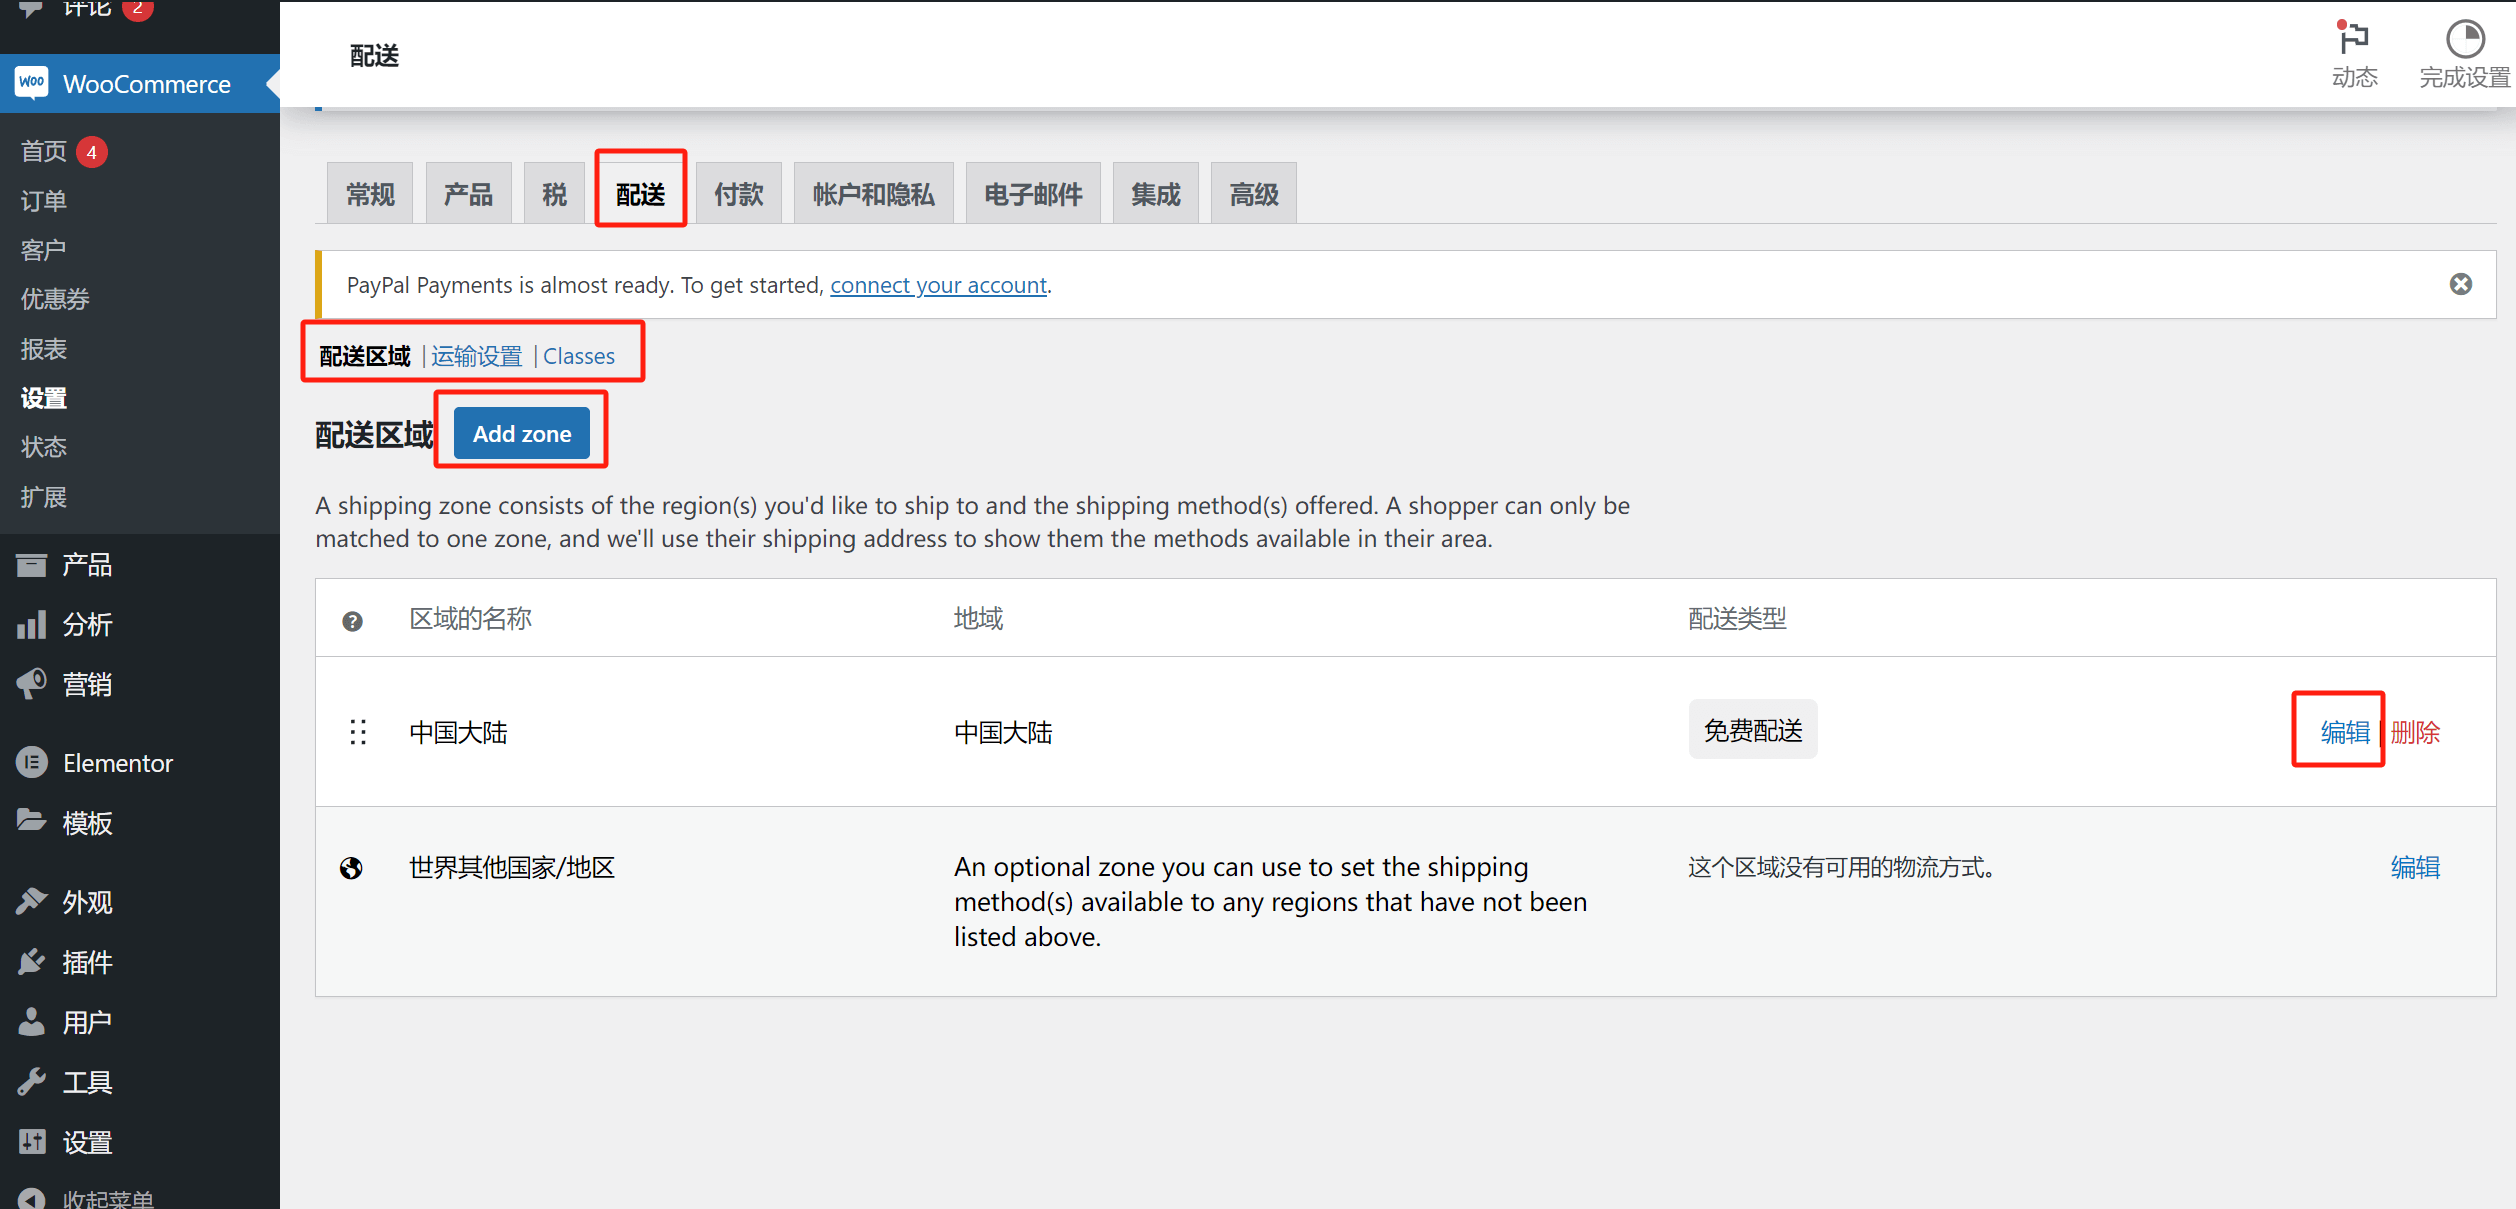
Delivery Area
Add zone, click the button to enter the interface shown in the figure below
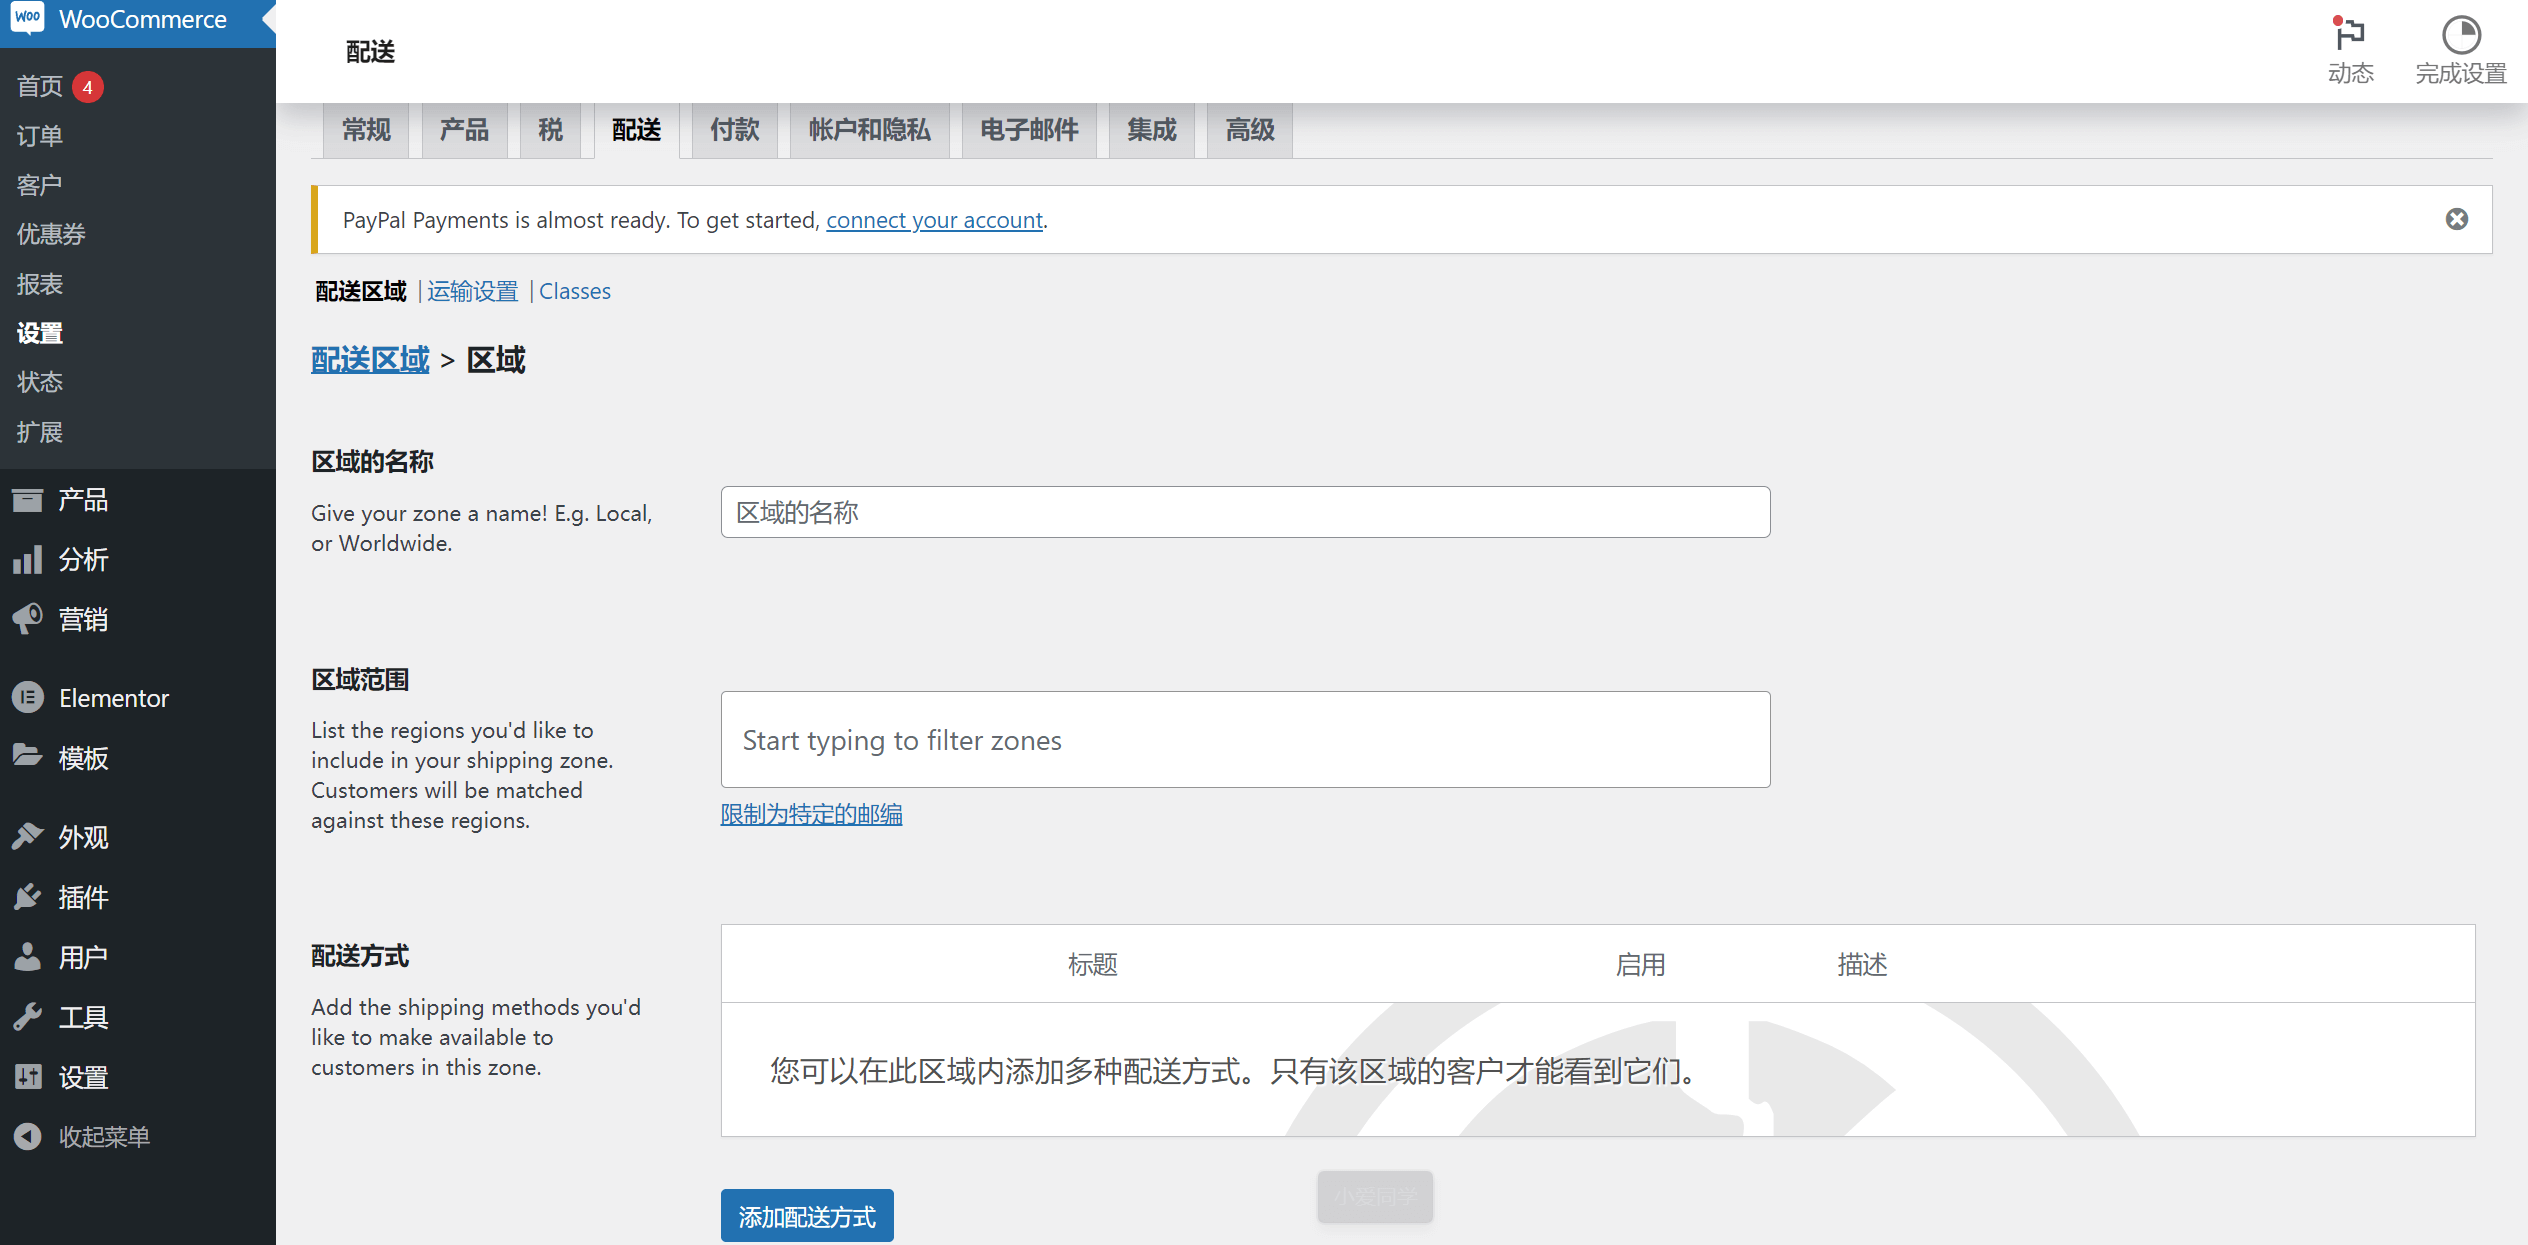
Region name: Fill in the new operating region of your website here, usually named after the country/region
Regional range: You can limit the postal code range for delivery here. If you do not limit it, keep the default empty value.
Delivery method: There are three delivery methods: free delivery, flat rate and local pick-up. You can choose according to your own situation. If you choose a flat rate, fill in the delivery amount according to the pop-up prompt box.
After adding the delivery area, the information of the created delivery area will be displayed on the delivery area page. If you need to modify a delivery area, click the edit button of the corresponding area to modify and save it again.
Transport Settings
Click the Shipping Settings link next to the delivery area to enter the Shipping Settings interface as shown below:
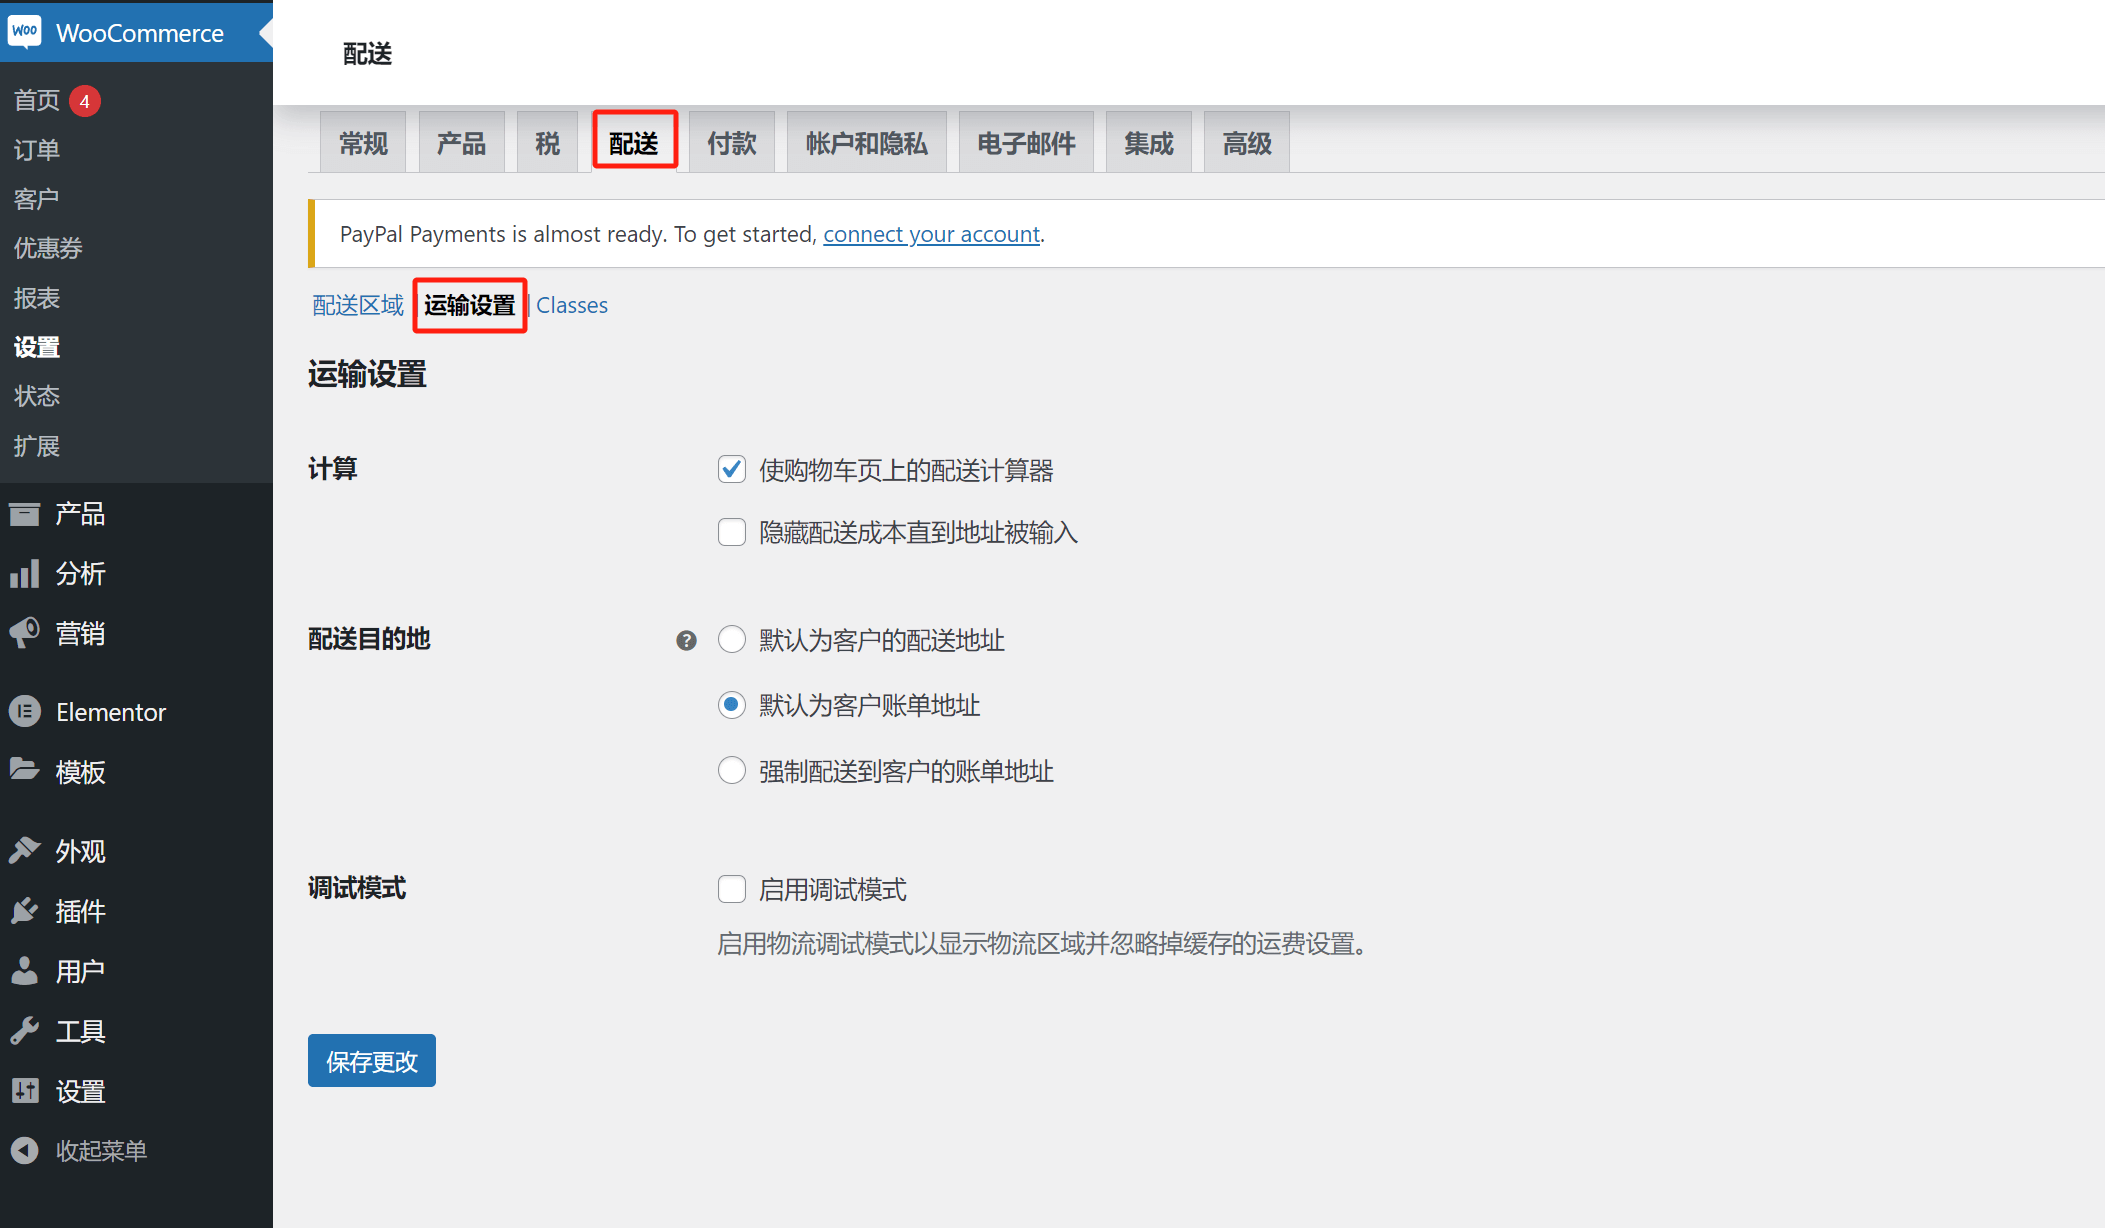
Calculate: You can choose whether to display the shipping calculator on the shopping cart page or when the customer enters the shipping address on the checkout page.
Delivery destination: It is recommended to select "Default to customer's delivery address" here, because the customer's billing address may not be the same as the delivery address they enter. It is the least error-prone to deliver products to the delivery address entered by the customer.
Debug mode: This function is used for debugging logistics functions and generally does not need to be enabled.
Classes
Freight settings. This function can add custom freight templates. Different countries/regions can create and use corresponding freight templates.
五、Payment Settings
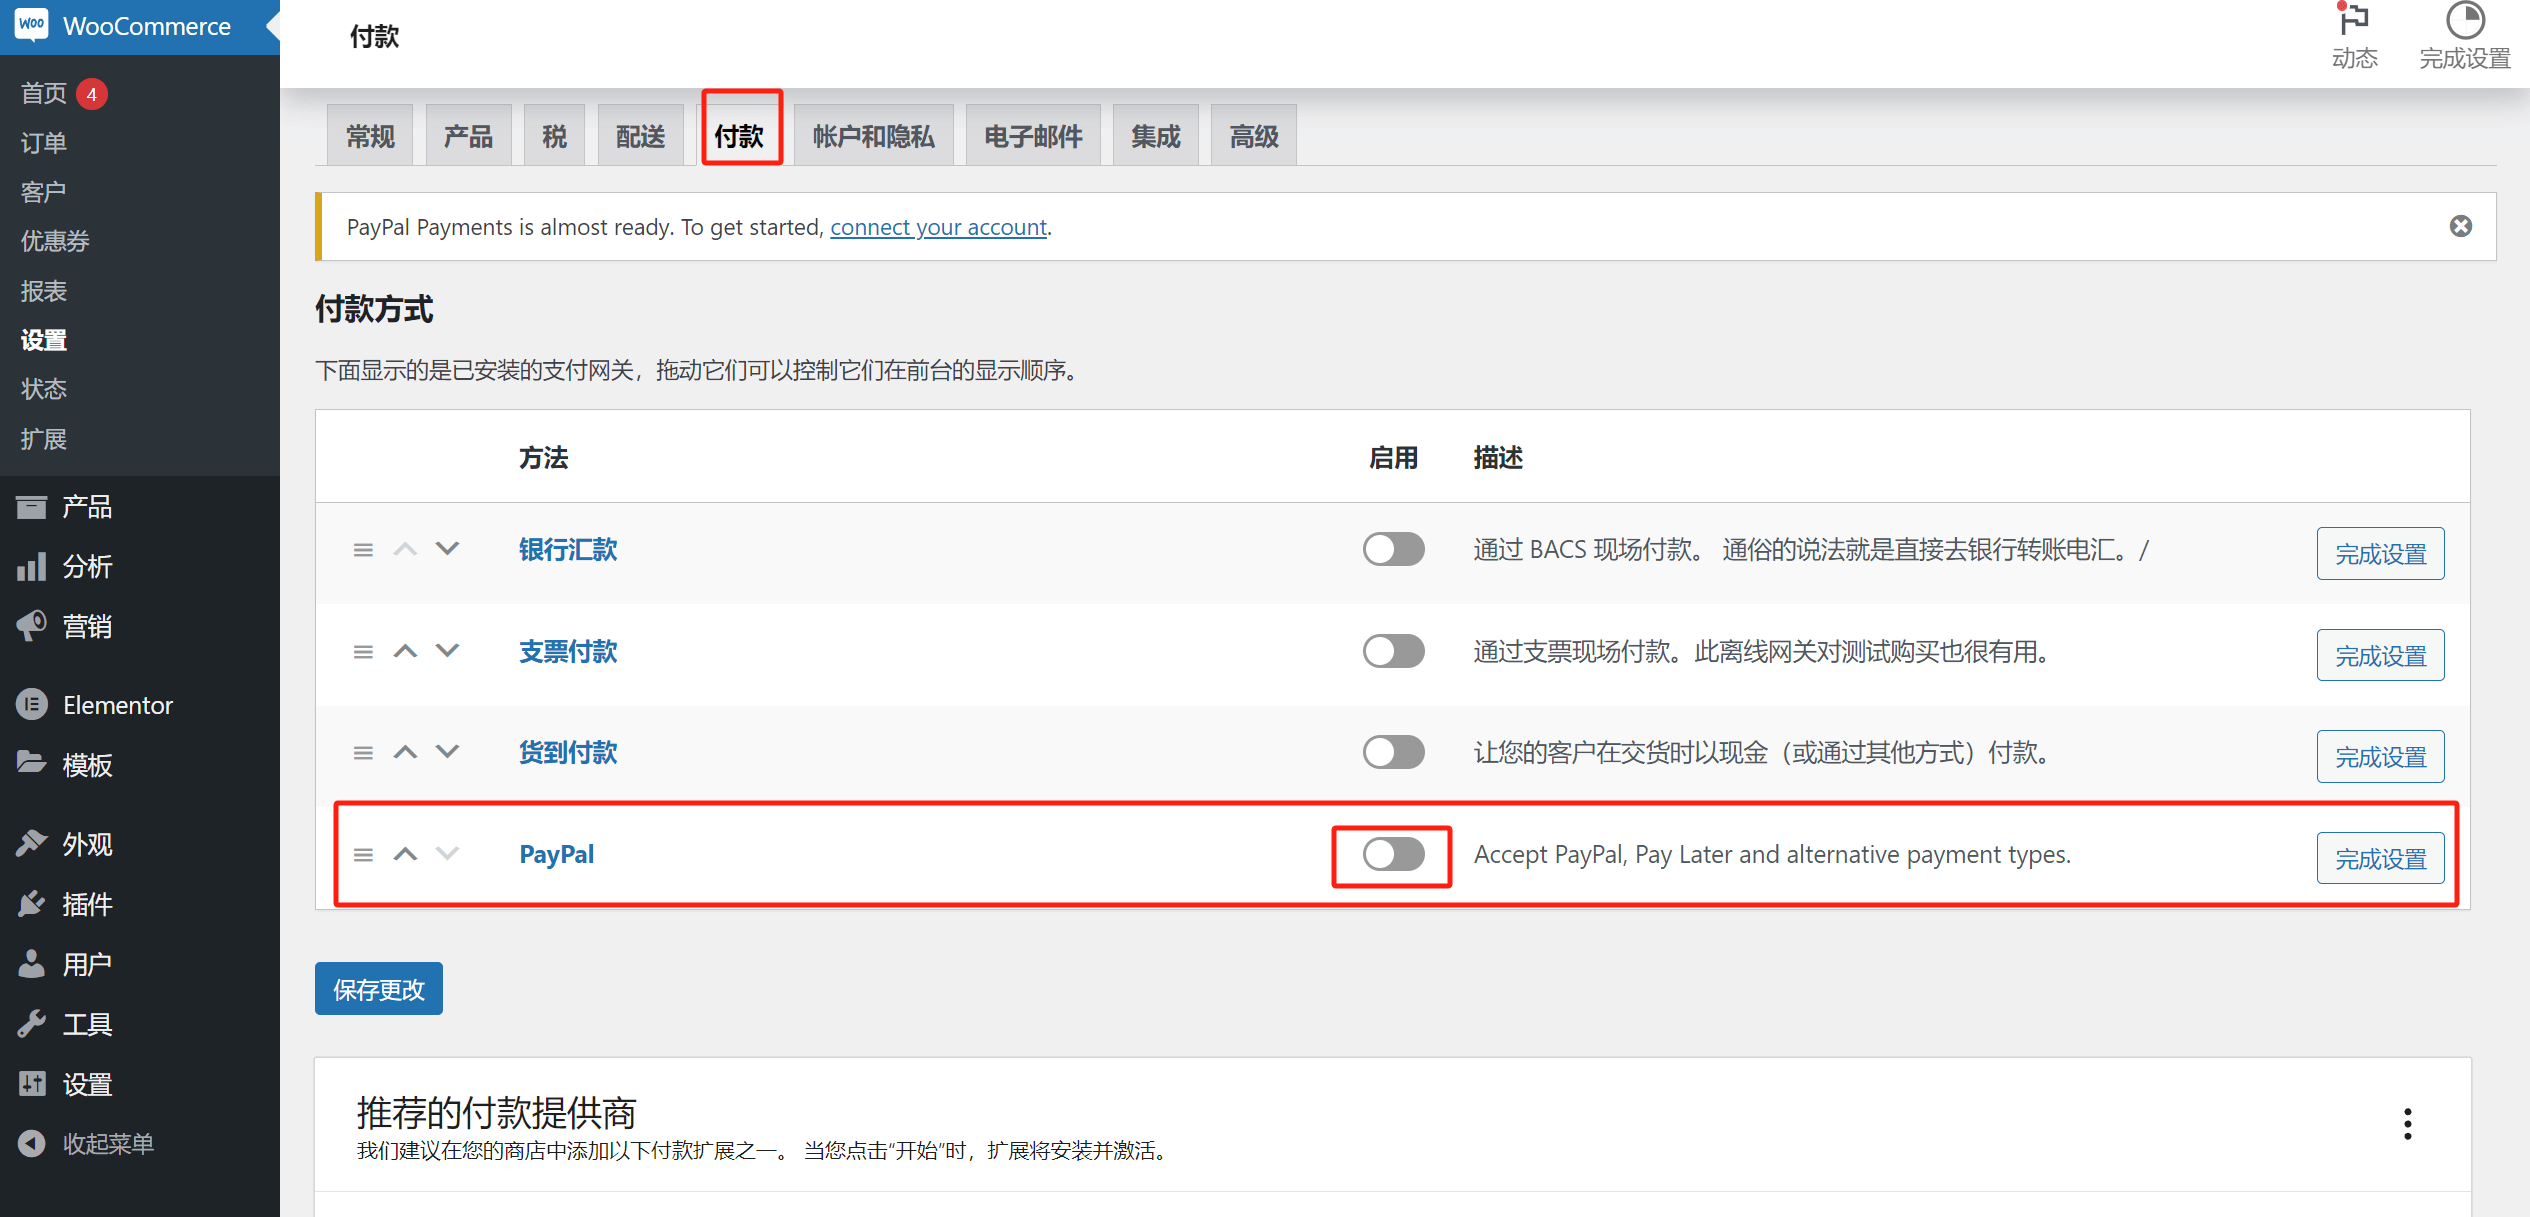
Payment Methods Settings: This is the settings page for enabling payment methods for cross-border e-commerce websites. The configuration for enabling PayPal and credit card payment gateways in WooCommerce is done here.
How to open PayPal in WooCommerce and connect to PayPal for payment?
As shown in the two screenshots below, after clicking the "Enable" button for the PayPal payment type on the checkout page, you will be redirected to the PayPal activation page. On this page, click the "Activate PayPal" button to complete the PayPal activation.
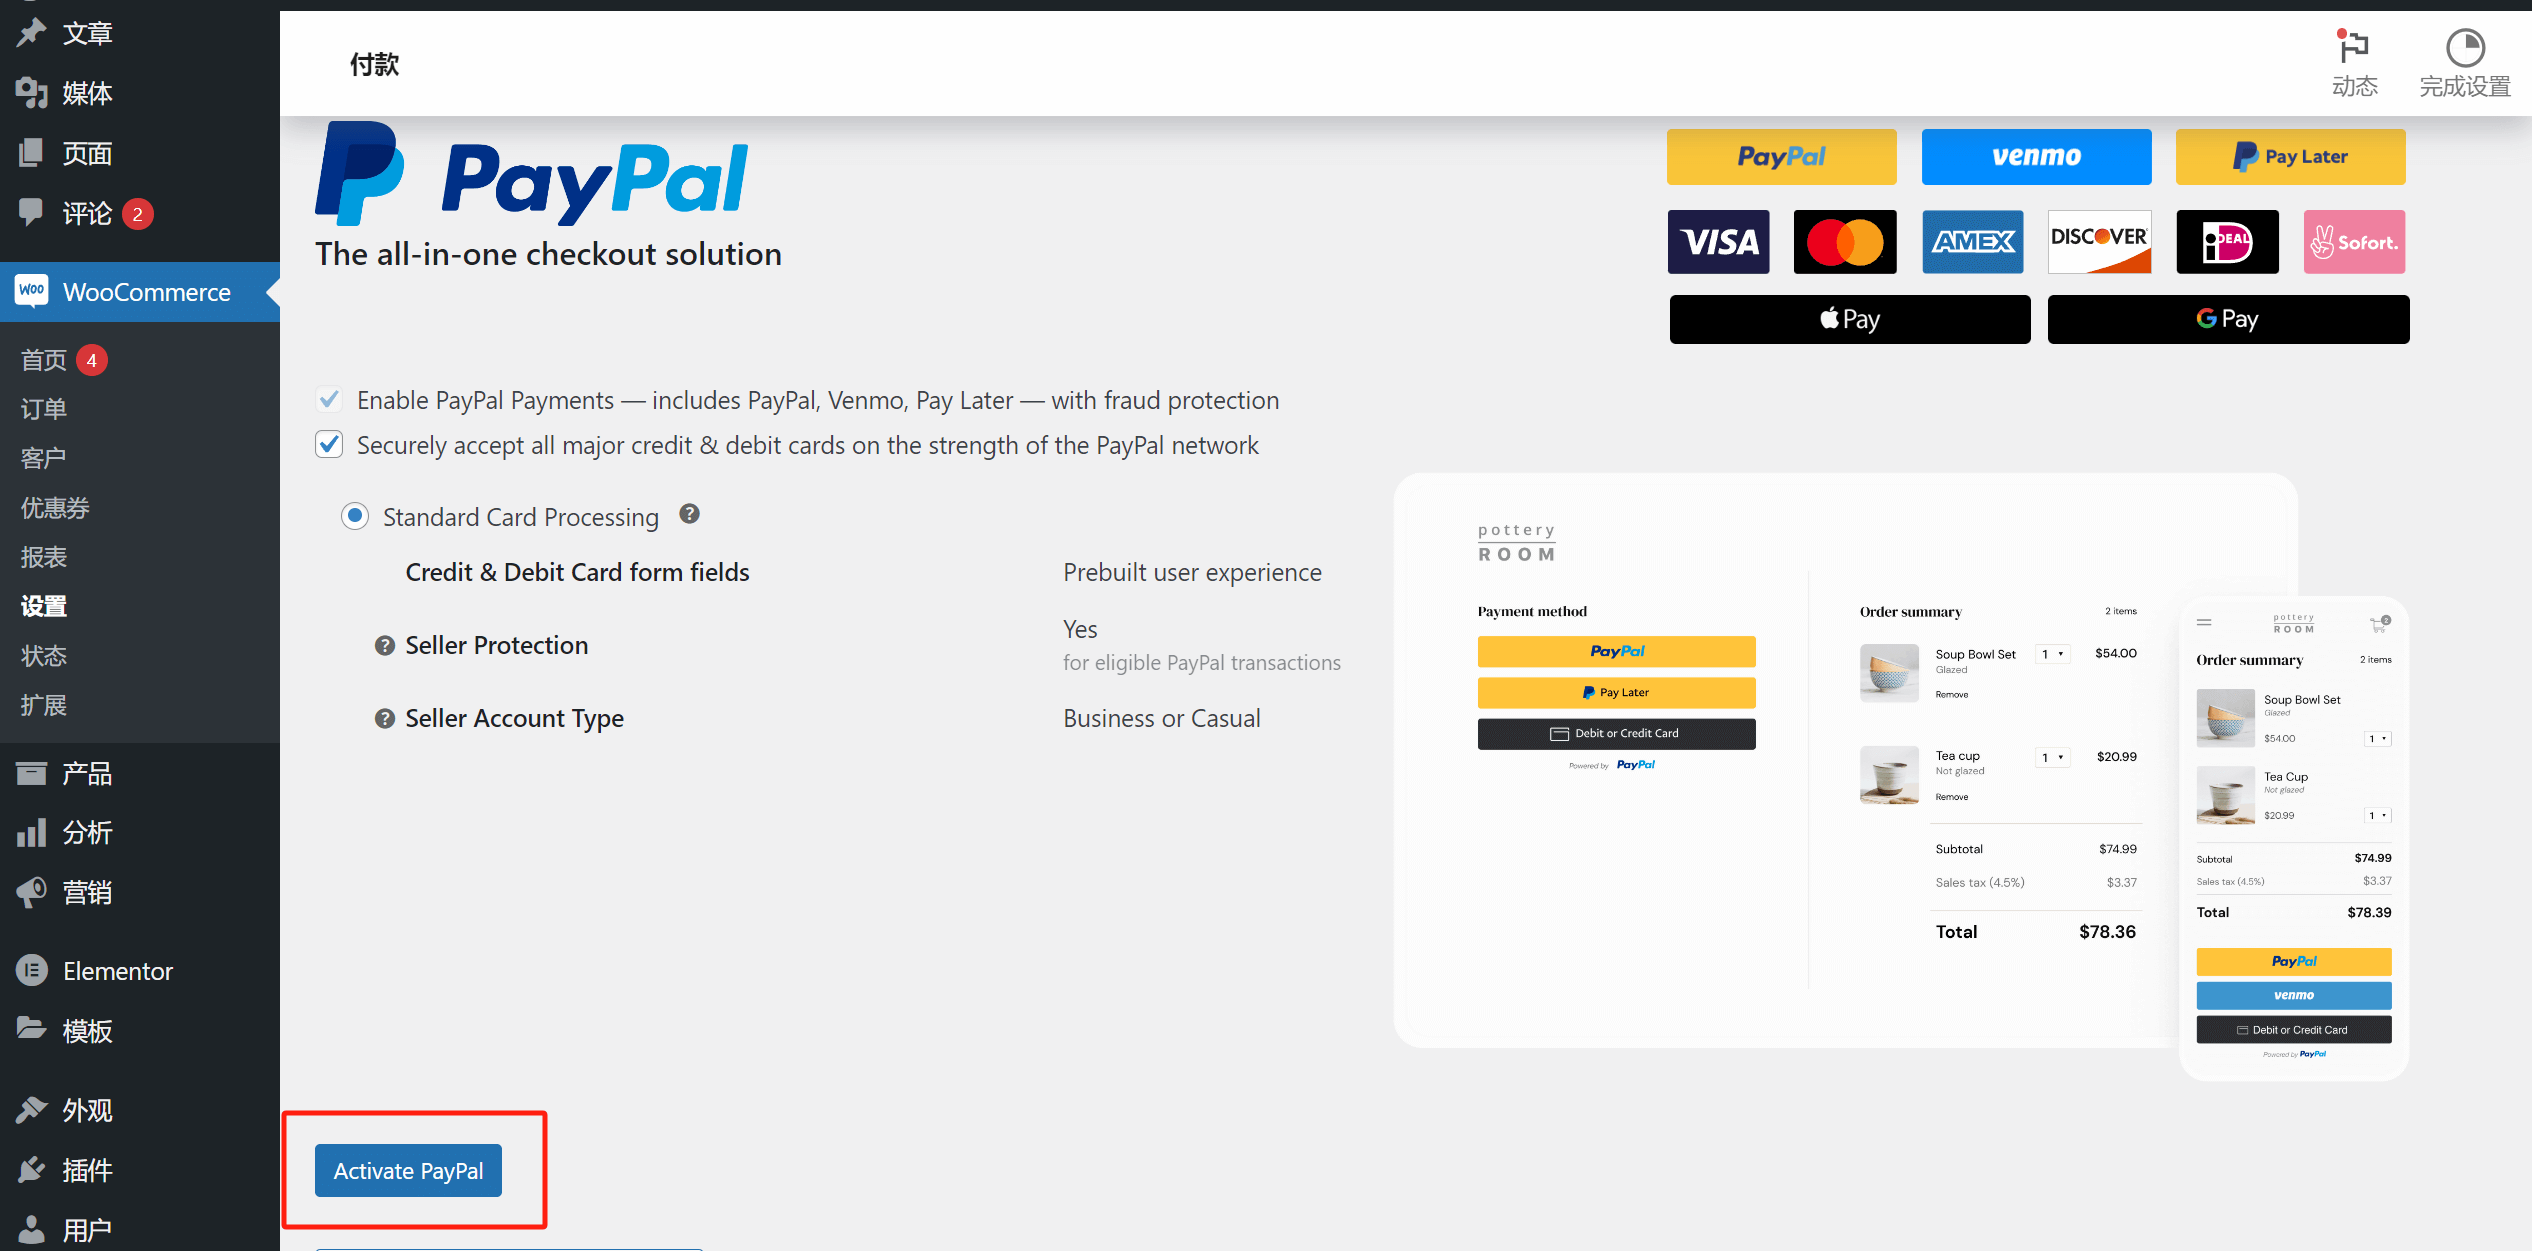
Click the "Activate PayPal" button, and in the pop-up PayPal input box, enter the PayPal business account information to activate PayPal. Note: The account type must be a business account. This is not a requirement of WooCommerce but a requirement by PayPal. A few years ago, PayPal implemented a policy that only business accounts are allowed for eCommerce transactions, and personal accounts are no longer supported for eCommerce payments. When selecting the country/region for your PayPal account, it must match the information provided when the account was created, otherwise, an error will occur. If you're unsure about the country/region of your PayPal account, you can find it in your PayPal account information, or you can also deduce it from the PayPal login domain suffix.
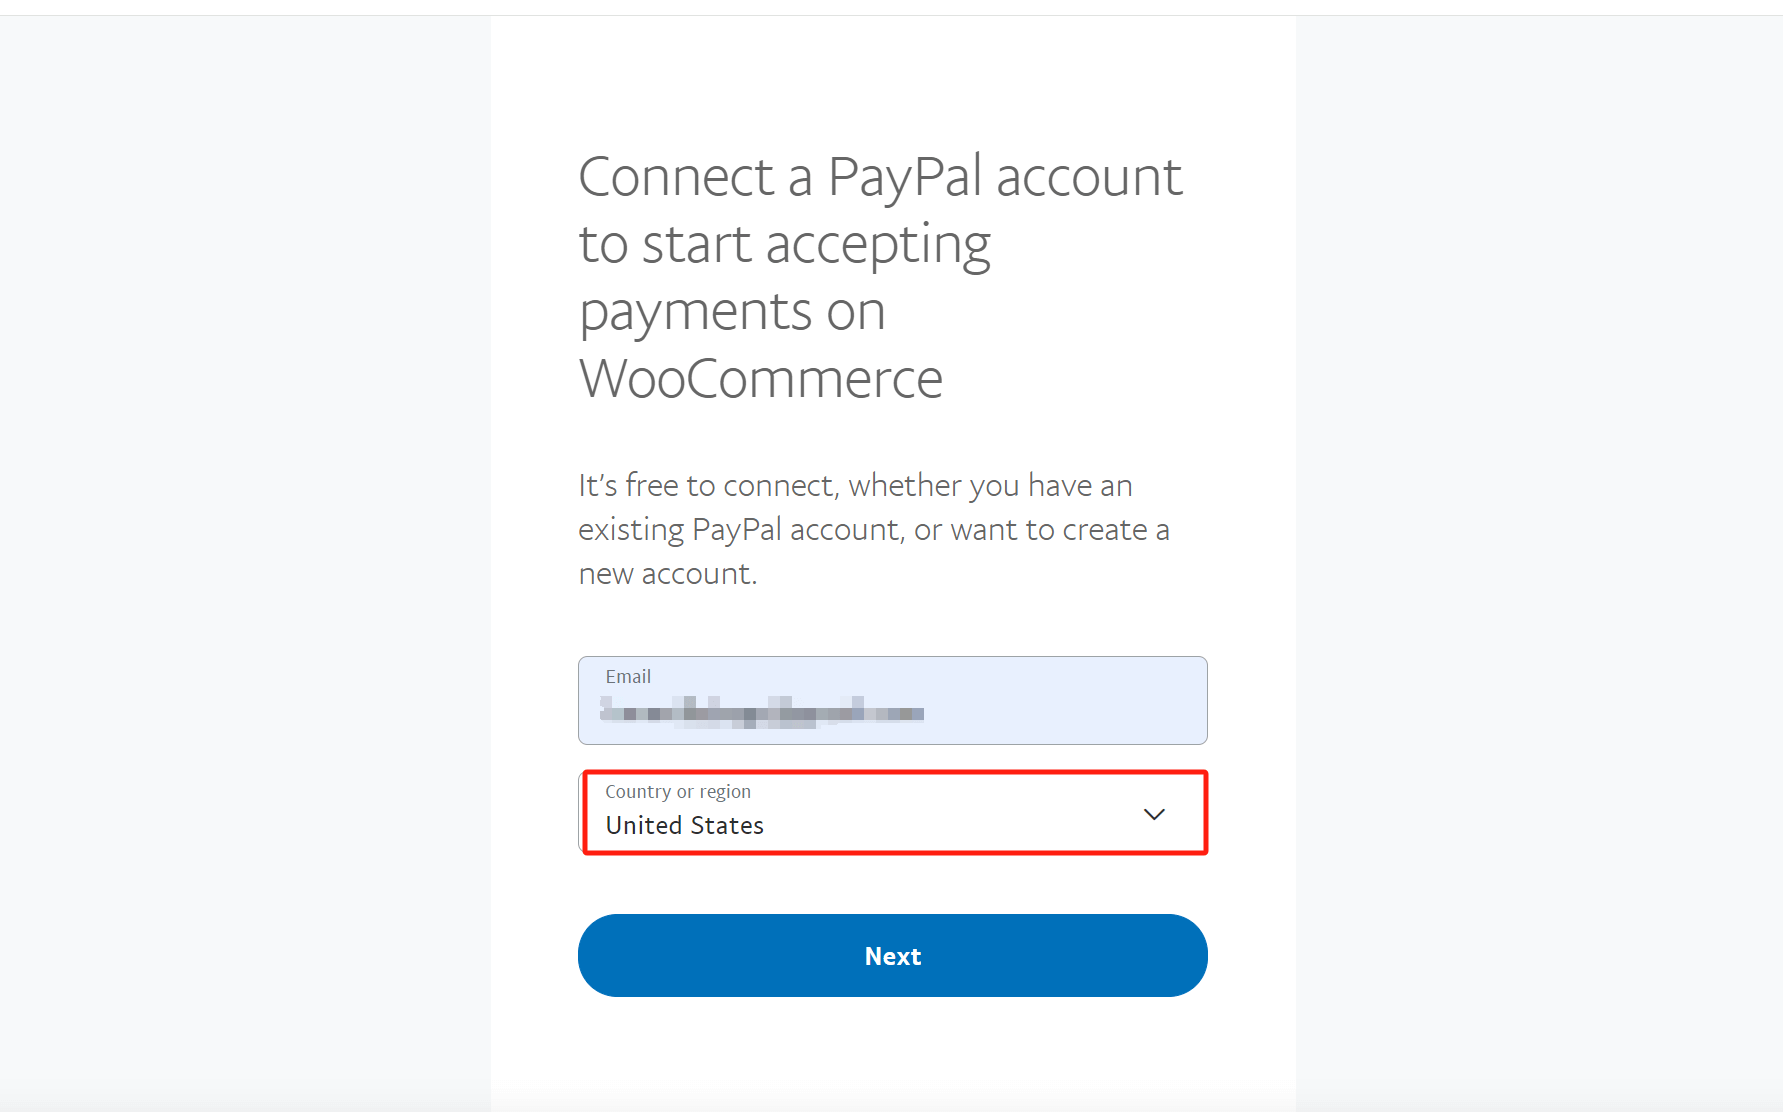
After correctly filling in the account and country/region information, click the "Next" button to proceed. Enter the PayPal business account password, and the PayPal payment gateway integration will be completed.
How to enable credit card payment in WooCommerce?
First, you need to choose an international credit card payment gateway provider. Then, follow the installation and integration instructions provided by their technical team. Generally, international credit card payment gateway providers have developed plugins compatible with WooCommerce. After downloading and installing the plugin as instructed, the payment gateway option from the provider will appear on the payment settings page. Similar to enabling PayPal, enable the payment method from the provider. Once the provider provides the necessary API keys or their technical team directly inputs the keys, the international credit card payment functionality will be fully operational.
六、Account and Privacy Settings
The Account and Privacy Settings page is used to set the user account functions generated by WooCommerce and the information data processing method of website visitors, set the account form in which website visitors check out, and explain the policy to protect the privacy of website visitors.
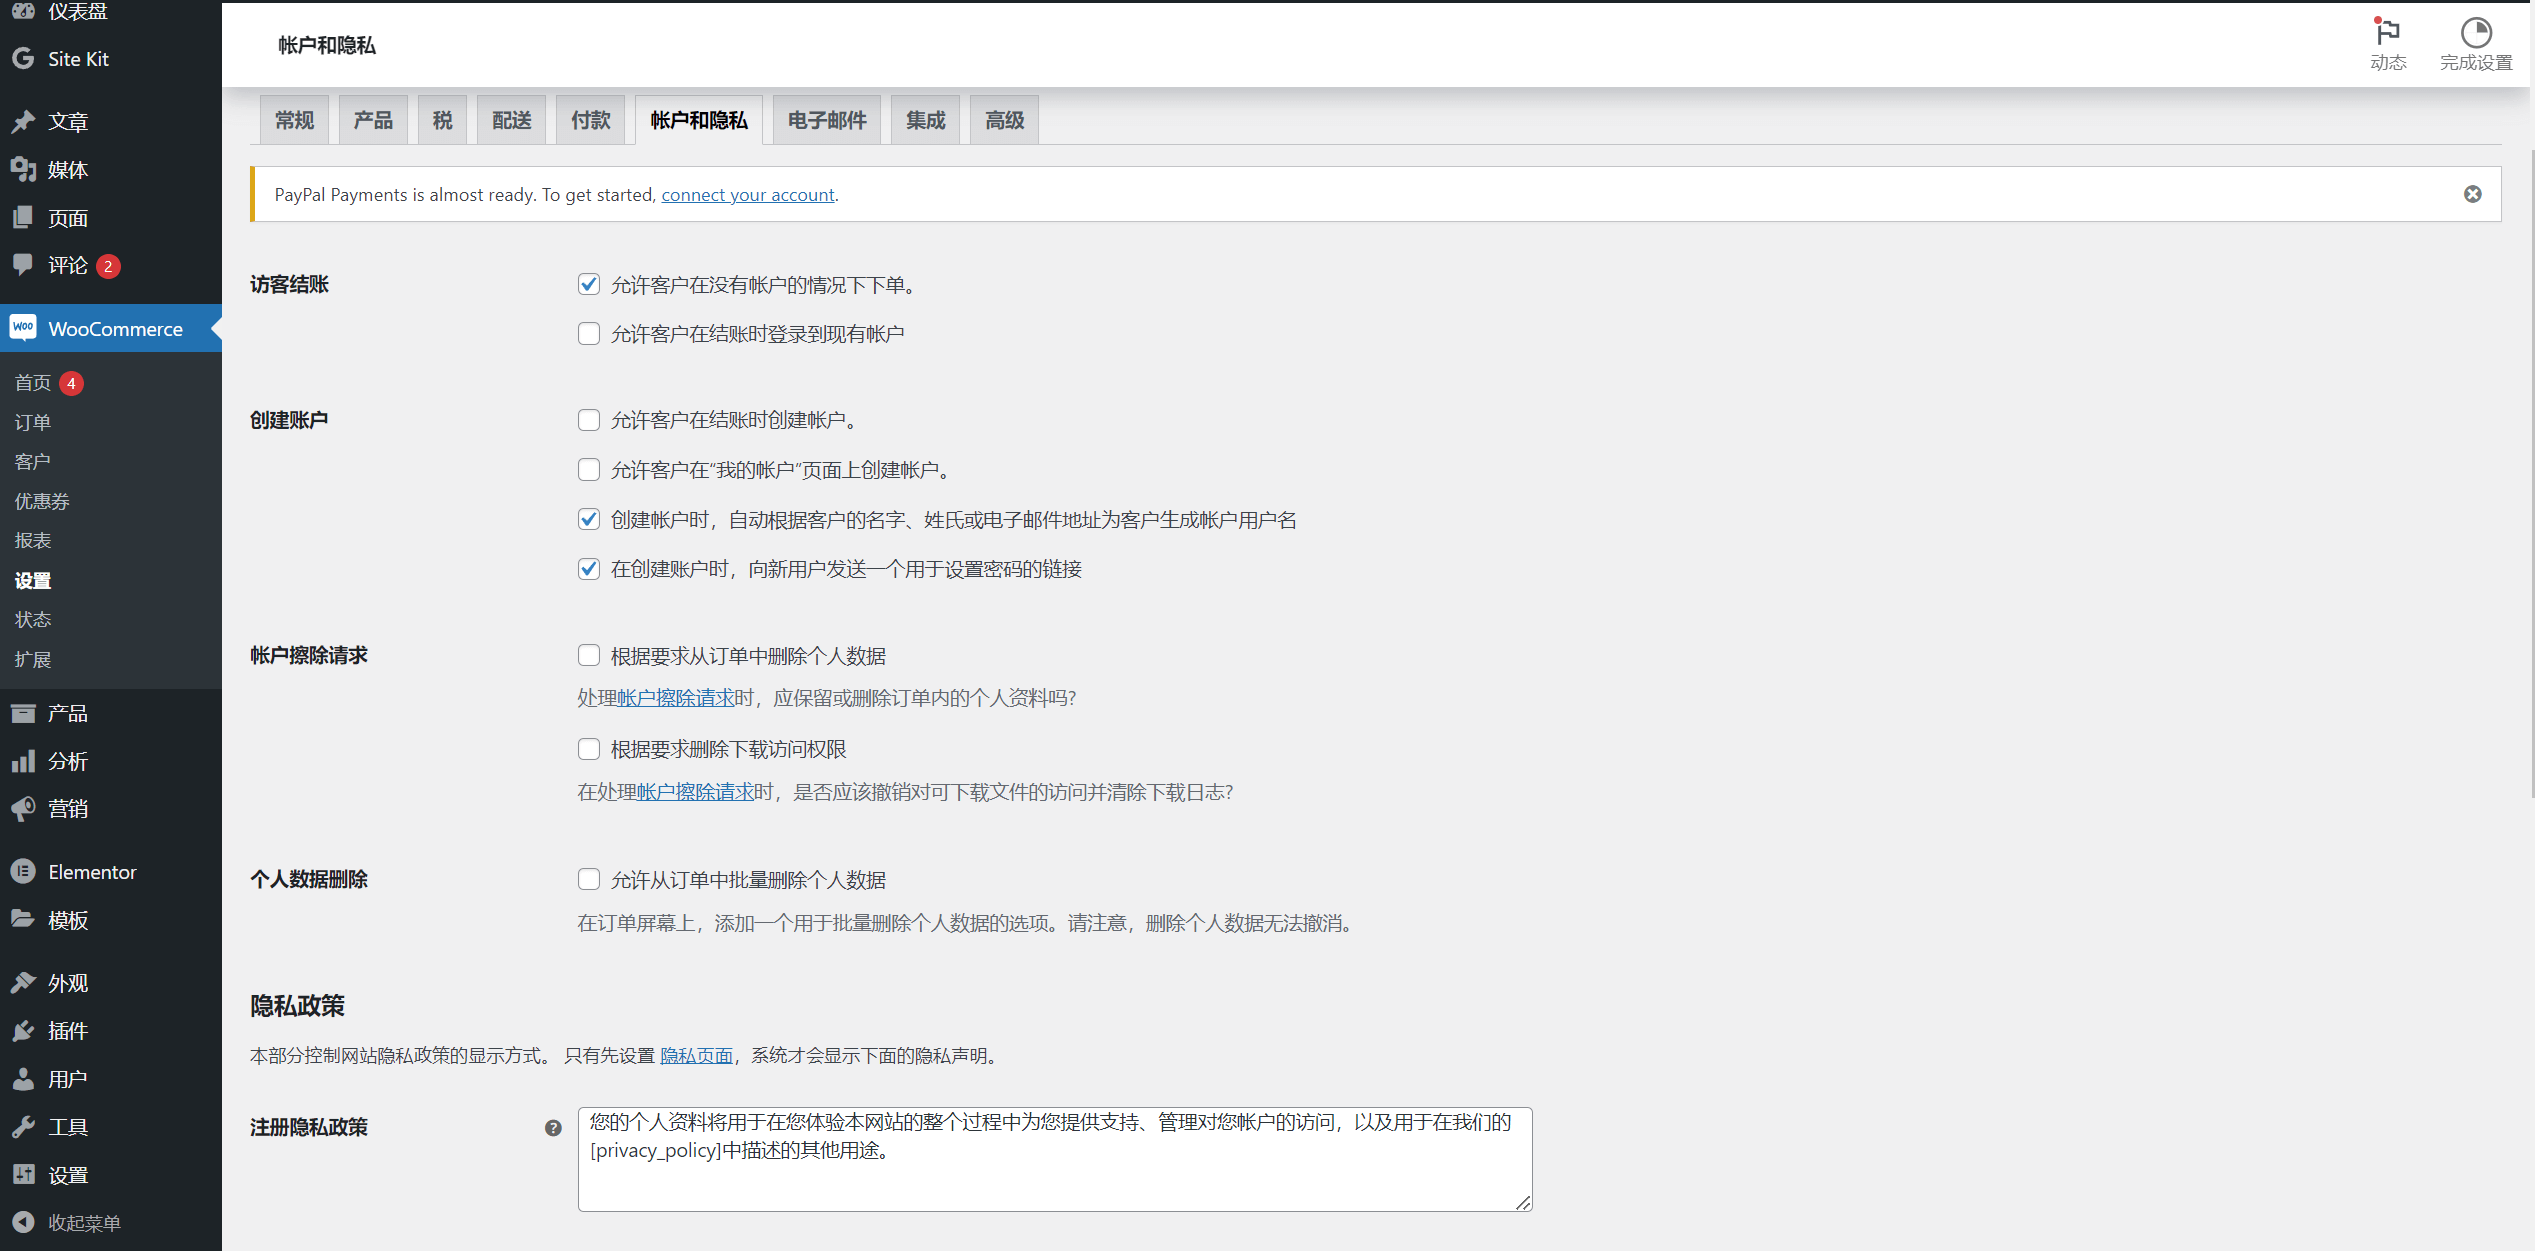
Guest Checkout: This setting controls the account requirement when website visitors make a purchase. It is recommended to use the default option, which is “Allow customers to place orders without an account.” As the goal of an e-commerce website is to maximize conversions, it's important not to create obstacles for visitors during the checkout process.
Account Creation: This refers to where customers are allowed to create accounts and what default information is required during account creation. You can check the options according to your needs or simply keep the default settings.
Personal Data Erasure: It is recommended not to check this option and keep the default setting. Enabling “Allow personal data to be removed in bulk from orders” may result in user data no longer being stored in WooCommerce, which is not conducive to business analysis or customer remarketing efforts.
Registration Privacy Policy: This is the privacy policy displayed to customers when they register for an account. If there is no need for a custom policy, it is recommended to keep the default value generated by WooCommerce.
Checkout Privacy Policy: This is the privacy policy displayed to customers on the checkout page during checkout. If there is no need for a custom policy, it is recommended to keep the default value generated by WooCommerce.
Note: The privacy policies for registration and checkout need to be set up first. The [privacy_policy] placeholder in the privacy policy generated by WooCommerce will automatically create a clickable link to the privacy policy page.
Personal Data Retention: The default value is blank, and it is recommended to keep it that way. Leaving it blank means the data will be retained indefinitely. Customer data is one of the most important assets of any business, so it is not recommended to set a timed deletion.
七、Email Settings
WooCommerce settings for marketing email sending functionality and email style customization. Note: These settings will only take effect after WooCommerce is integrated with an email marketing system such as MailChimp. The email settings page consists of two parts: Email Notifications and Email Sender Options.
Email Notification Settings
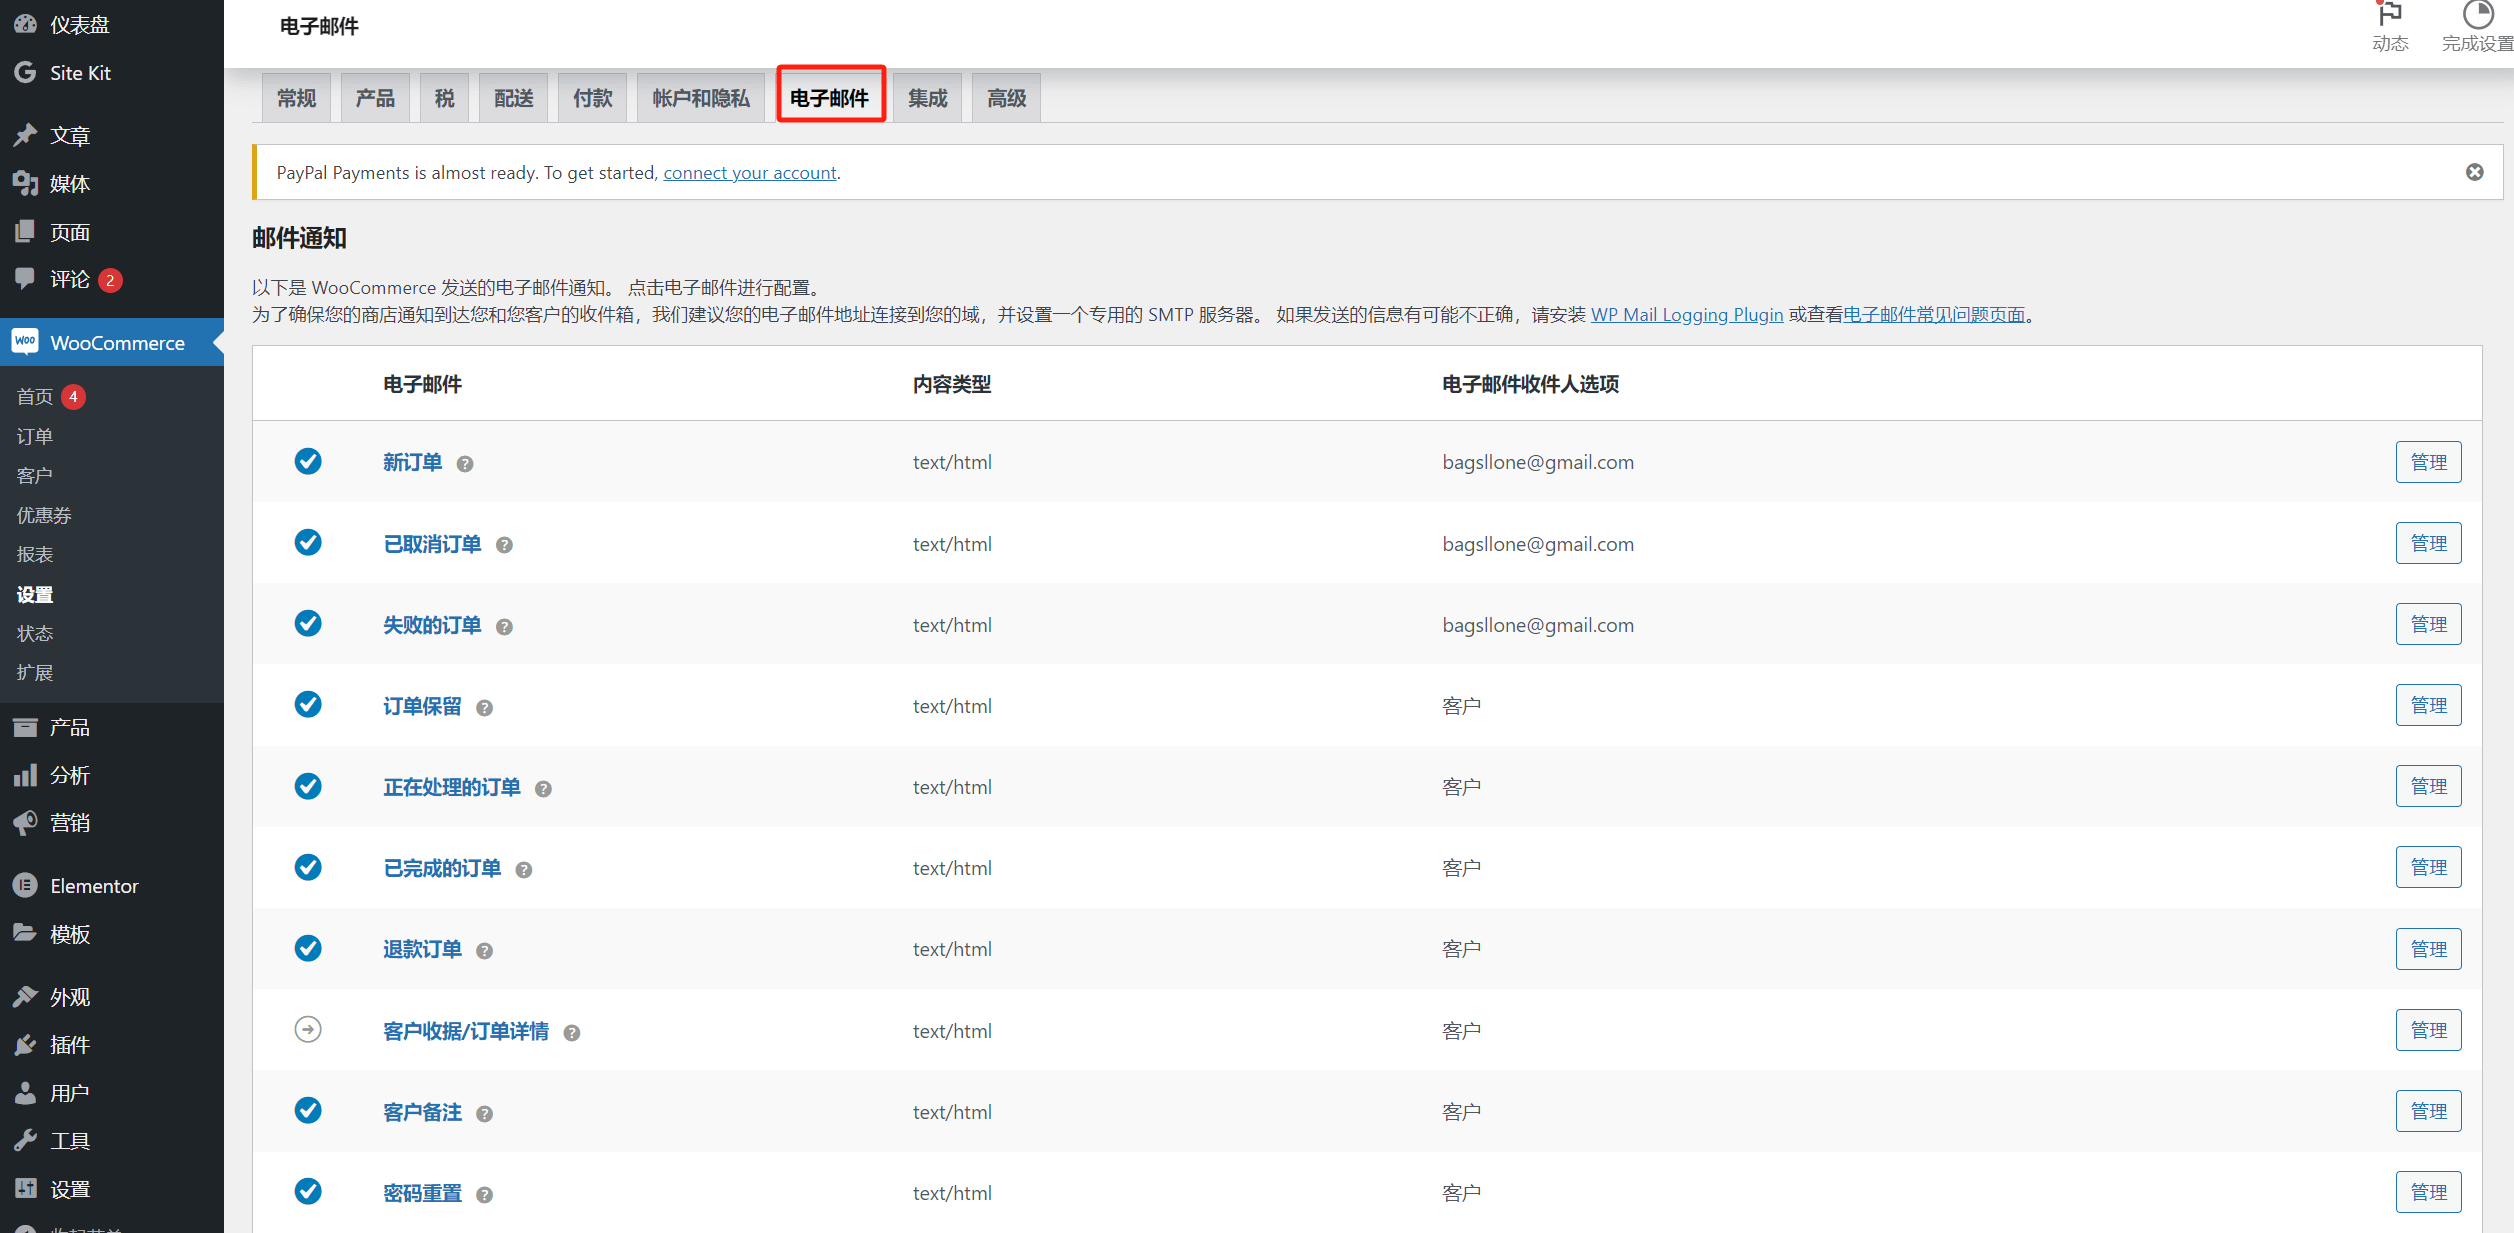
For each type of email notification, you can click the "Manage" button on the right to enter the customization page, as shown below:
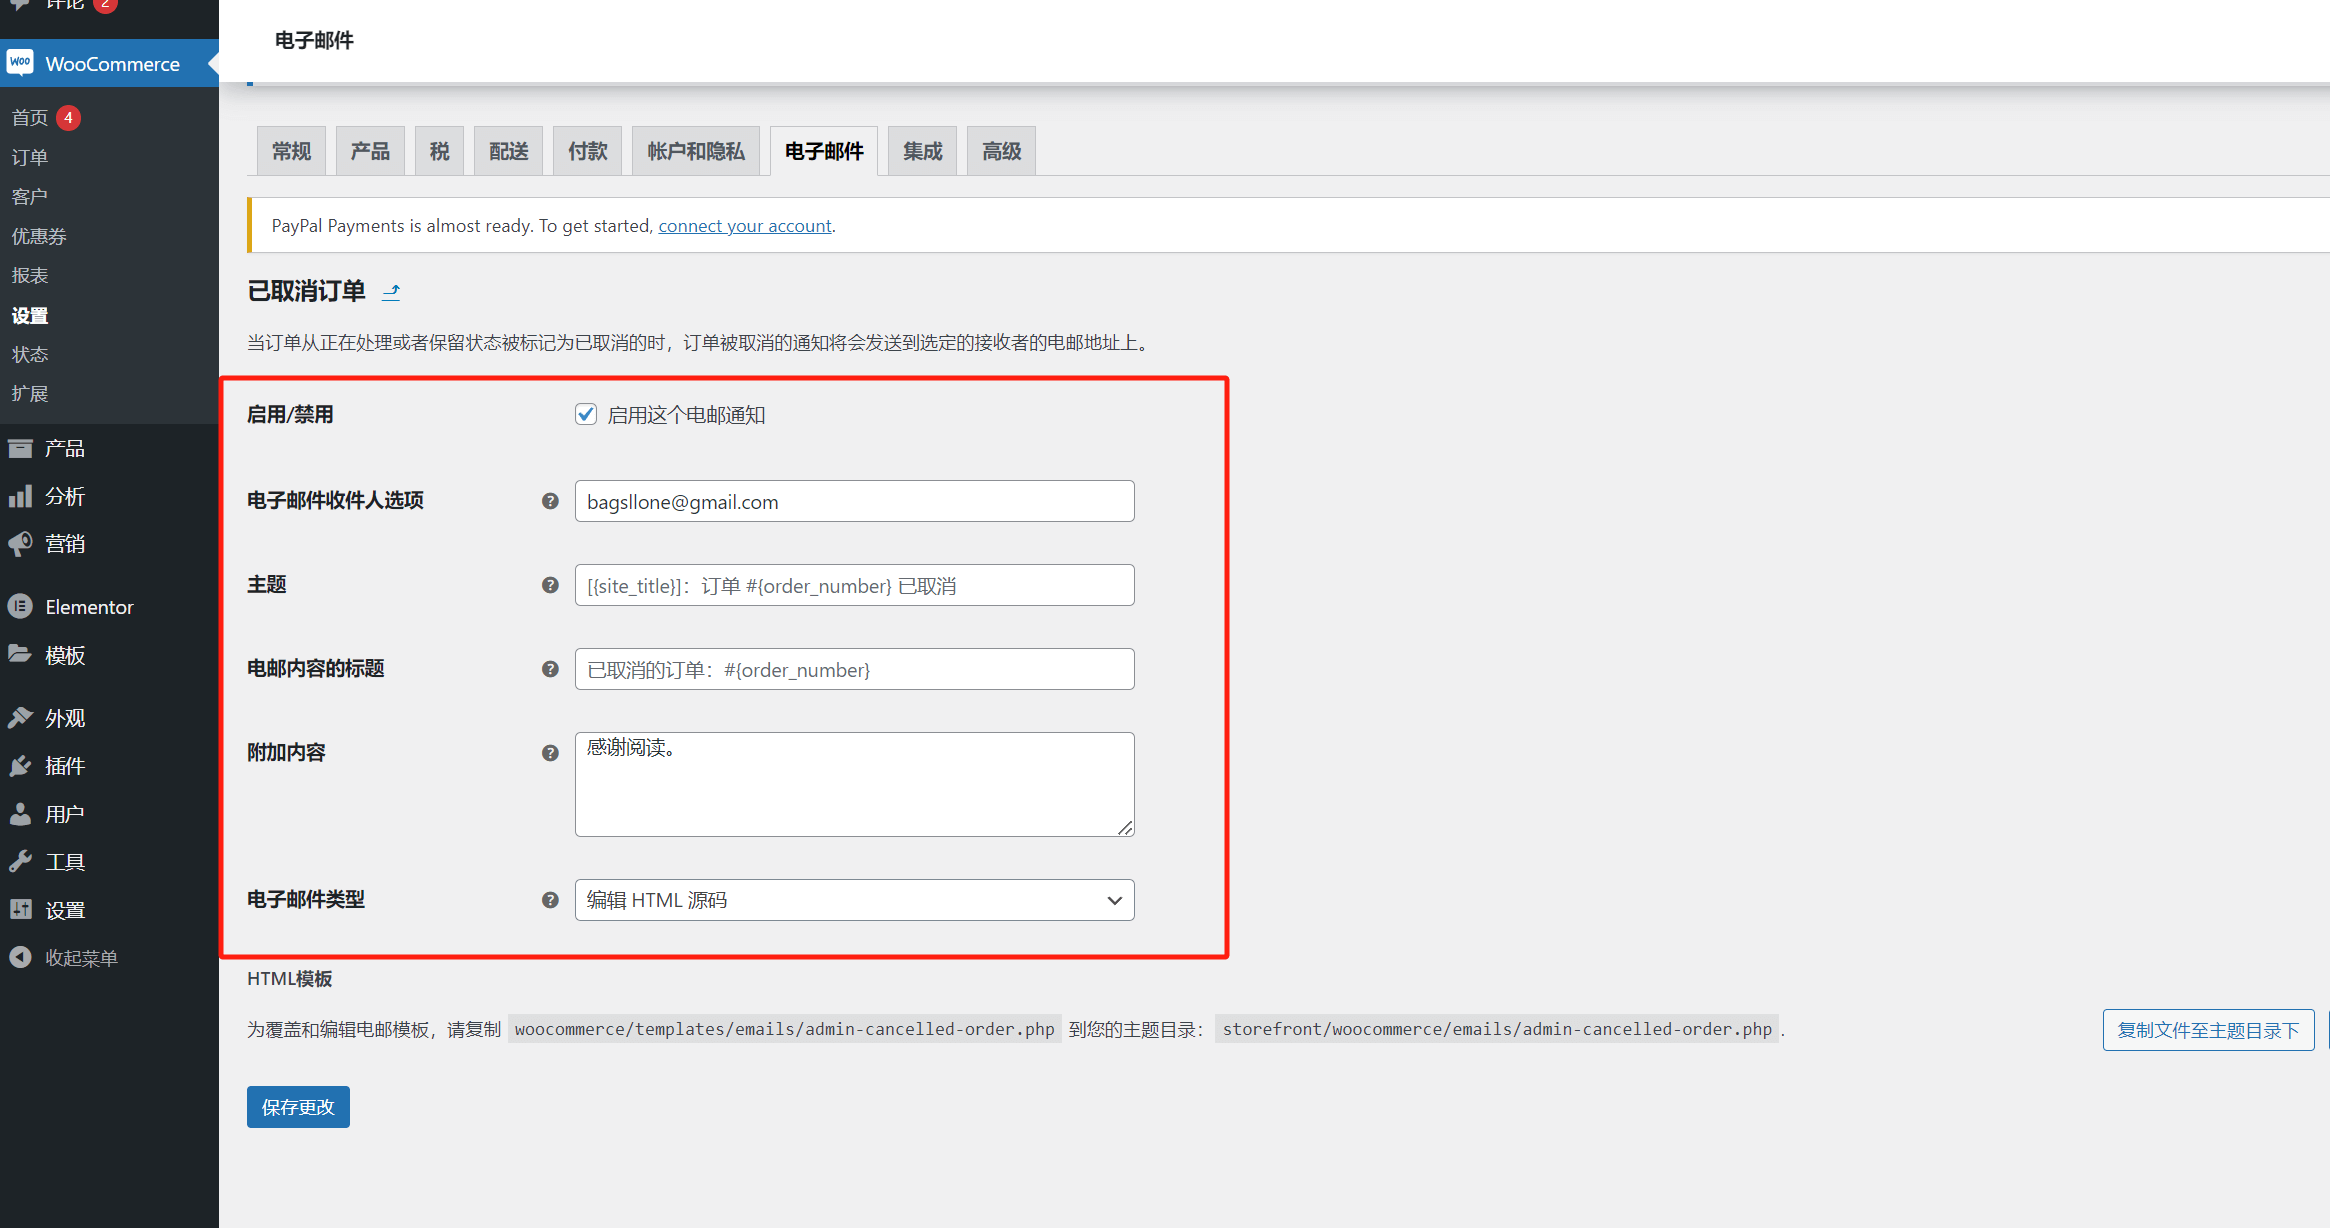
For each type of email sent, WooCommerce will by default configure the recipient, subject, and content parameters. These default placeholders are WooCommerce’s PHP key values, and it is not recommended to modify them if you do not have a programming background. The additional content items are in text format and can be freely modified to your desired custom content.
Email Sender Options

The email sender options section allows you to configure the email's styling, including the sender's name, primary color, background color, and text color. These can be customized according to your personal or brand's color scheme and style guidelines.
八、WooCommerce Integration Settings
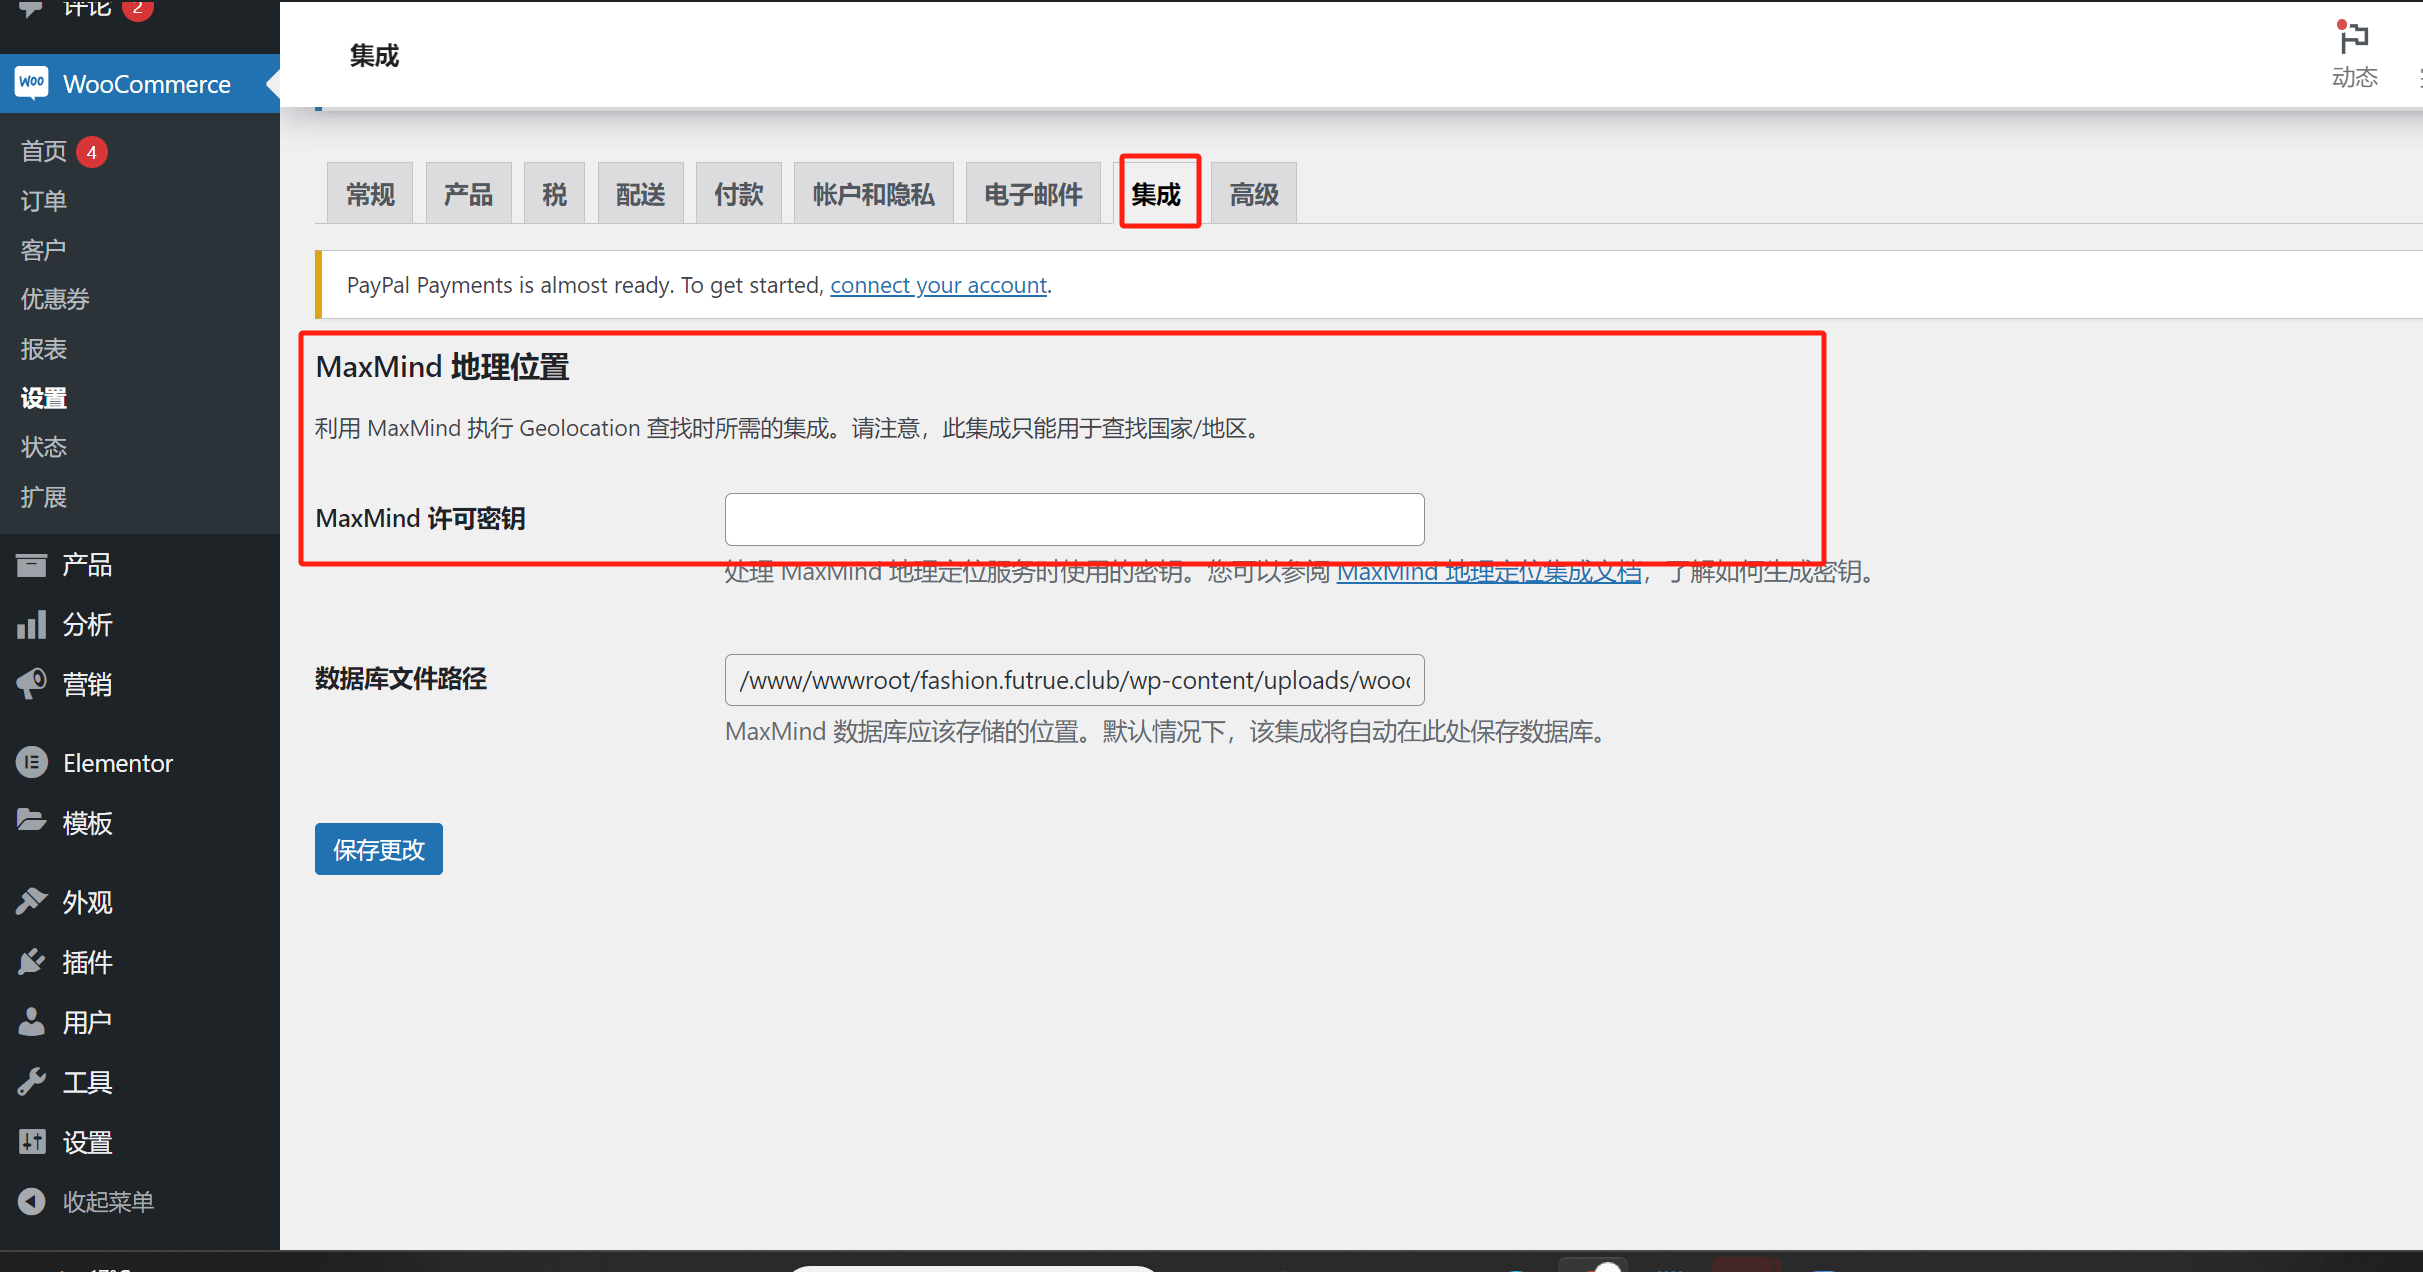
The integration settings of WooCommerce's core plugin are relatively limited, allowing integration with only MaxMind. Here is a brief explanation of what MaxMind is: MaxMind is a company that provides geolocation services, determining a user’s geographic location based on their IP address. This information is typically used to display relevant country/region-specific data, enabling eCommerce websites to offer customized services or show region-specific content.
Tip: WooCommerce integrations largely rely on plugins within its ecosystem. To integrate more features and applications, you can search for and install the corresponding plugins from the plugin marketplace.
九、Advanced Settings
The Advanced Settings Page is where WooCommerce, as an open-source platform, allows for custom functionality through programming. Considering that most readers may not have a computer science background, this section will not be covered in detail. It is recommended to leave the settings in this section at their default values and make changes with caution.
Conclusion: The above is the complete tutorial on setting up the WooCommerce plugin for cross-border eCommerce on a WordPress website. By following the specific steps outlined in this article, you will be able to launch and operate your own eCommerce website.
Finally, if your time is limited and the cost of learning and practicing technical skills is high—and you have no intention of diving deep into technical work—then the value of this article may lie in helping you understand the functions and setup principles of WooCommerce, rather than completing the entire technical implementation yourself. If you do not plan to build a WordPress site from scratch and set up WooCommerce for online product sales, but would prefer to leave this professional technical work to a more experienced team, we recommend choosing a specialized service. The team at Logic Digital Technology focuses on WordPress Website Development and technical services. If you need to outsource WooCommerce Development and implementation, feel free to Contact the Logic Digital Technology Team. We will provide you with efficient and professional solutions to help your eCommerce business launch quickly and successfully.
Logic Digital Technology (SZLOGIC) All rights reserved. Reproduction is prohibited.