WordPress Website Management All-in-One Plugin Setup Tutorial
The WordPress Site Management All-in-One Plugin by Logic Digital Technology integrates features such as a member center, customer service toolbar, paid memberships, product sales, order management, ticket management, and access to WeChat Pay and Alipay. The member center supports user login and registration via email, phone number, and WeChat QR code scanning. To activate these features, you need to enter the correct API parameters for each function in the main settings interface of the plugin. The relevant features integrated in the WordPress Site Management All-in-One Plugin require APIs from third-party vendors, such as those for registration and payment in the member center. Therefore, Logic Digital Technology has compiled a directory of all supporting tutorials for the Site Management All-in-One Plugin. If readers have questions about specific settings, they can visit the Plugin Tutorial Directory to find and follow the corresponding tutorial articles.
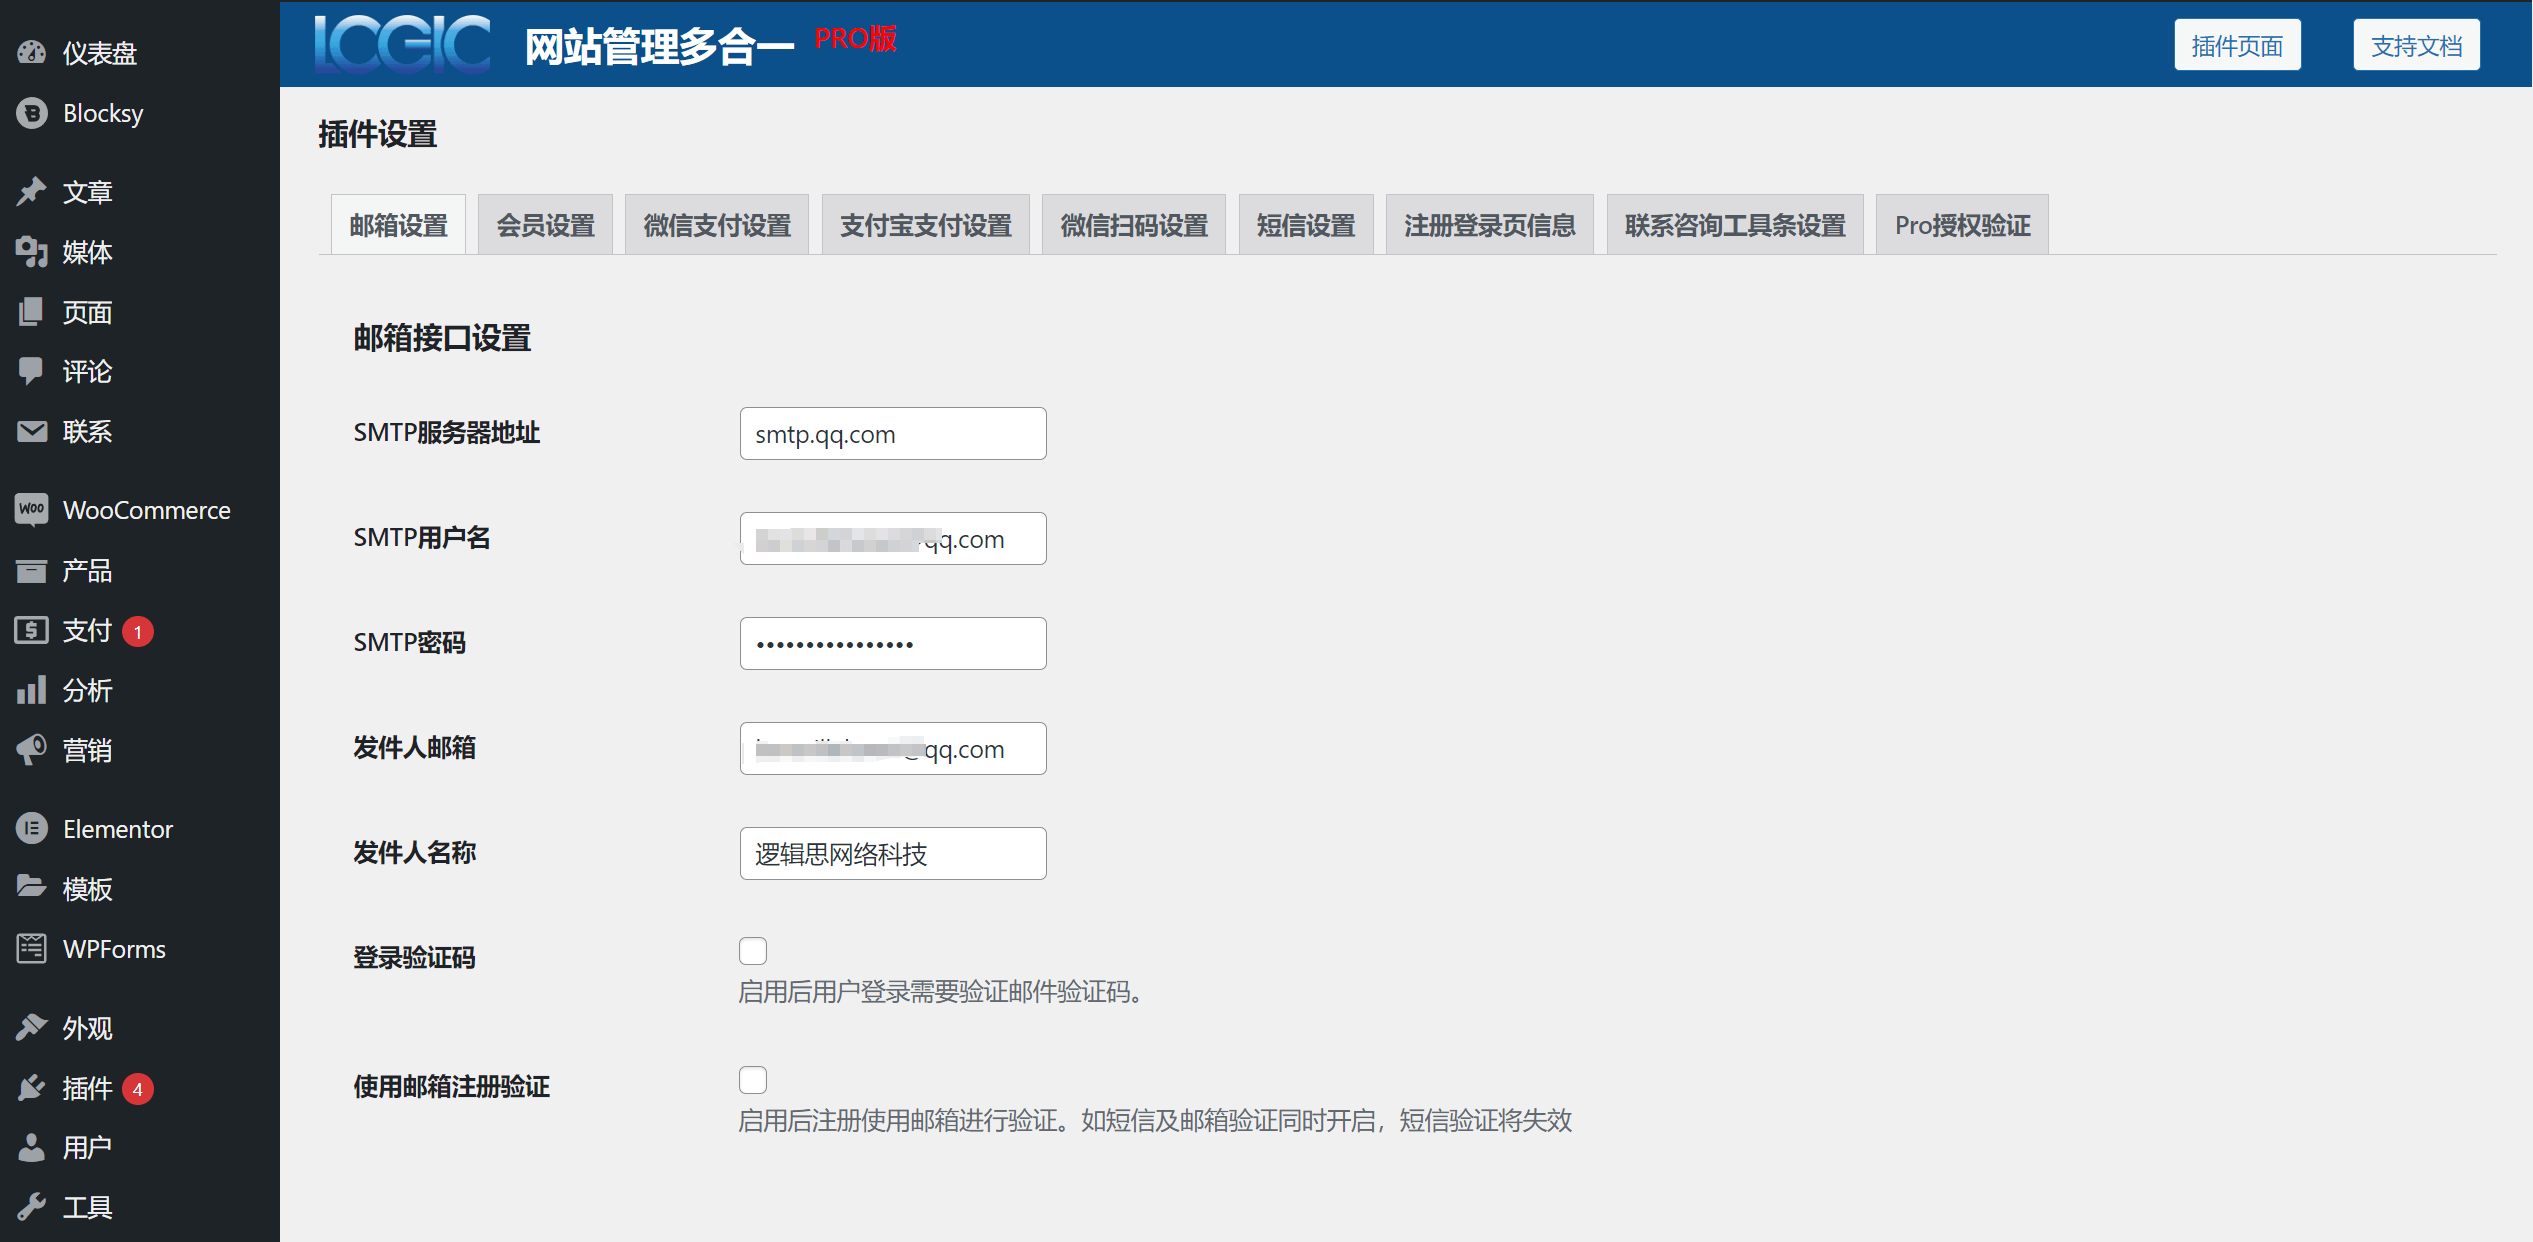
The main settings interface of the Site Management All-in-One Plugin is shown in the figure below. The settings options from left to right are: Email Settings - Member Settings - WeChat Pay Settings - Alipay Settings - WeChat QR Code Settings - SMS Settings - Registration/Login Page Info - Contact Toolbar Settings - Pro Authorization Validation. The following sections will explain each setting in detail.
This article, “WordPress Site Management All-in-One Plugin Setup Tutorial,” is divided into nine parts, corresponding to each settings section of the plugin. If users of the Site Management All-in-One Plugin only need information on specific functionality, they can selectively read the relevant section instead of the entire article. Please refer to the directory below to navigate to the desired section.
- WordPress Plugin - Email Settings
- WordPress Plugin - Member Settings
- WordPress Plugin - WeChat Pay Settings
- WordPress Plugin - Alipay Settings
- WordPress Plugin - WeChat QR Code Payment Settings
- WordPress Plugin - SMS Settings
- WordPress Plugin - Registration and Login Page Information
- WordPress Plugin - Contact and Consultation Toolbar Settings
- WordPress Plugin - Pro Authorization Verification
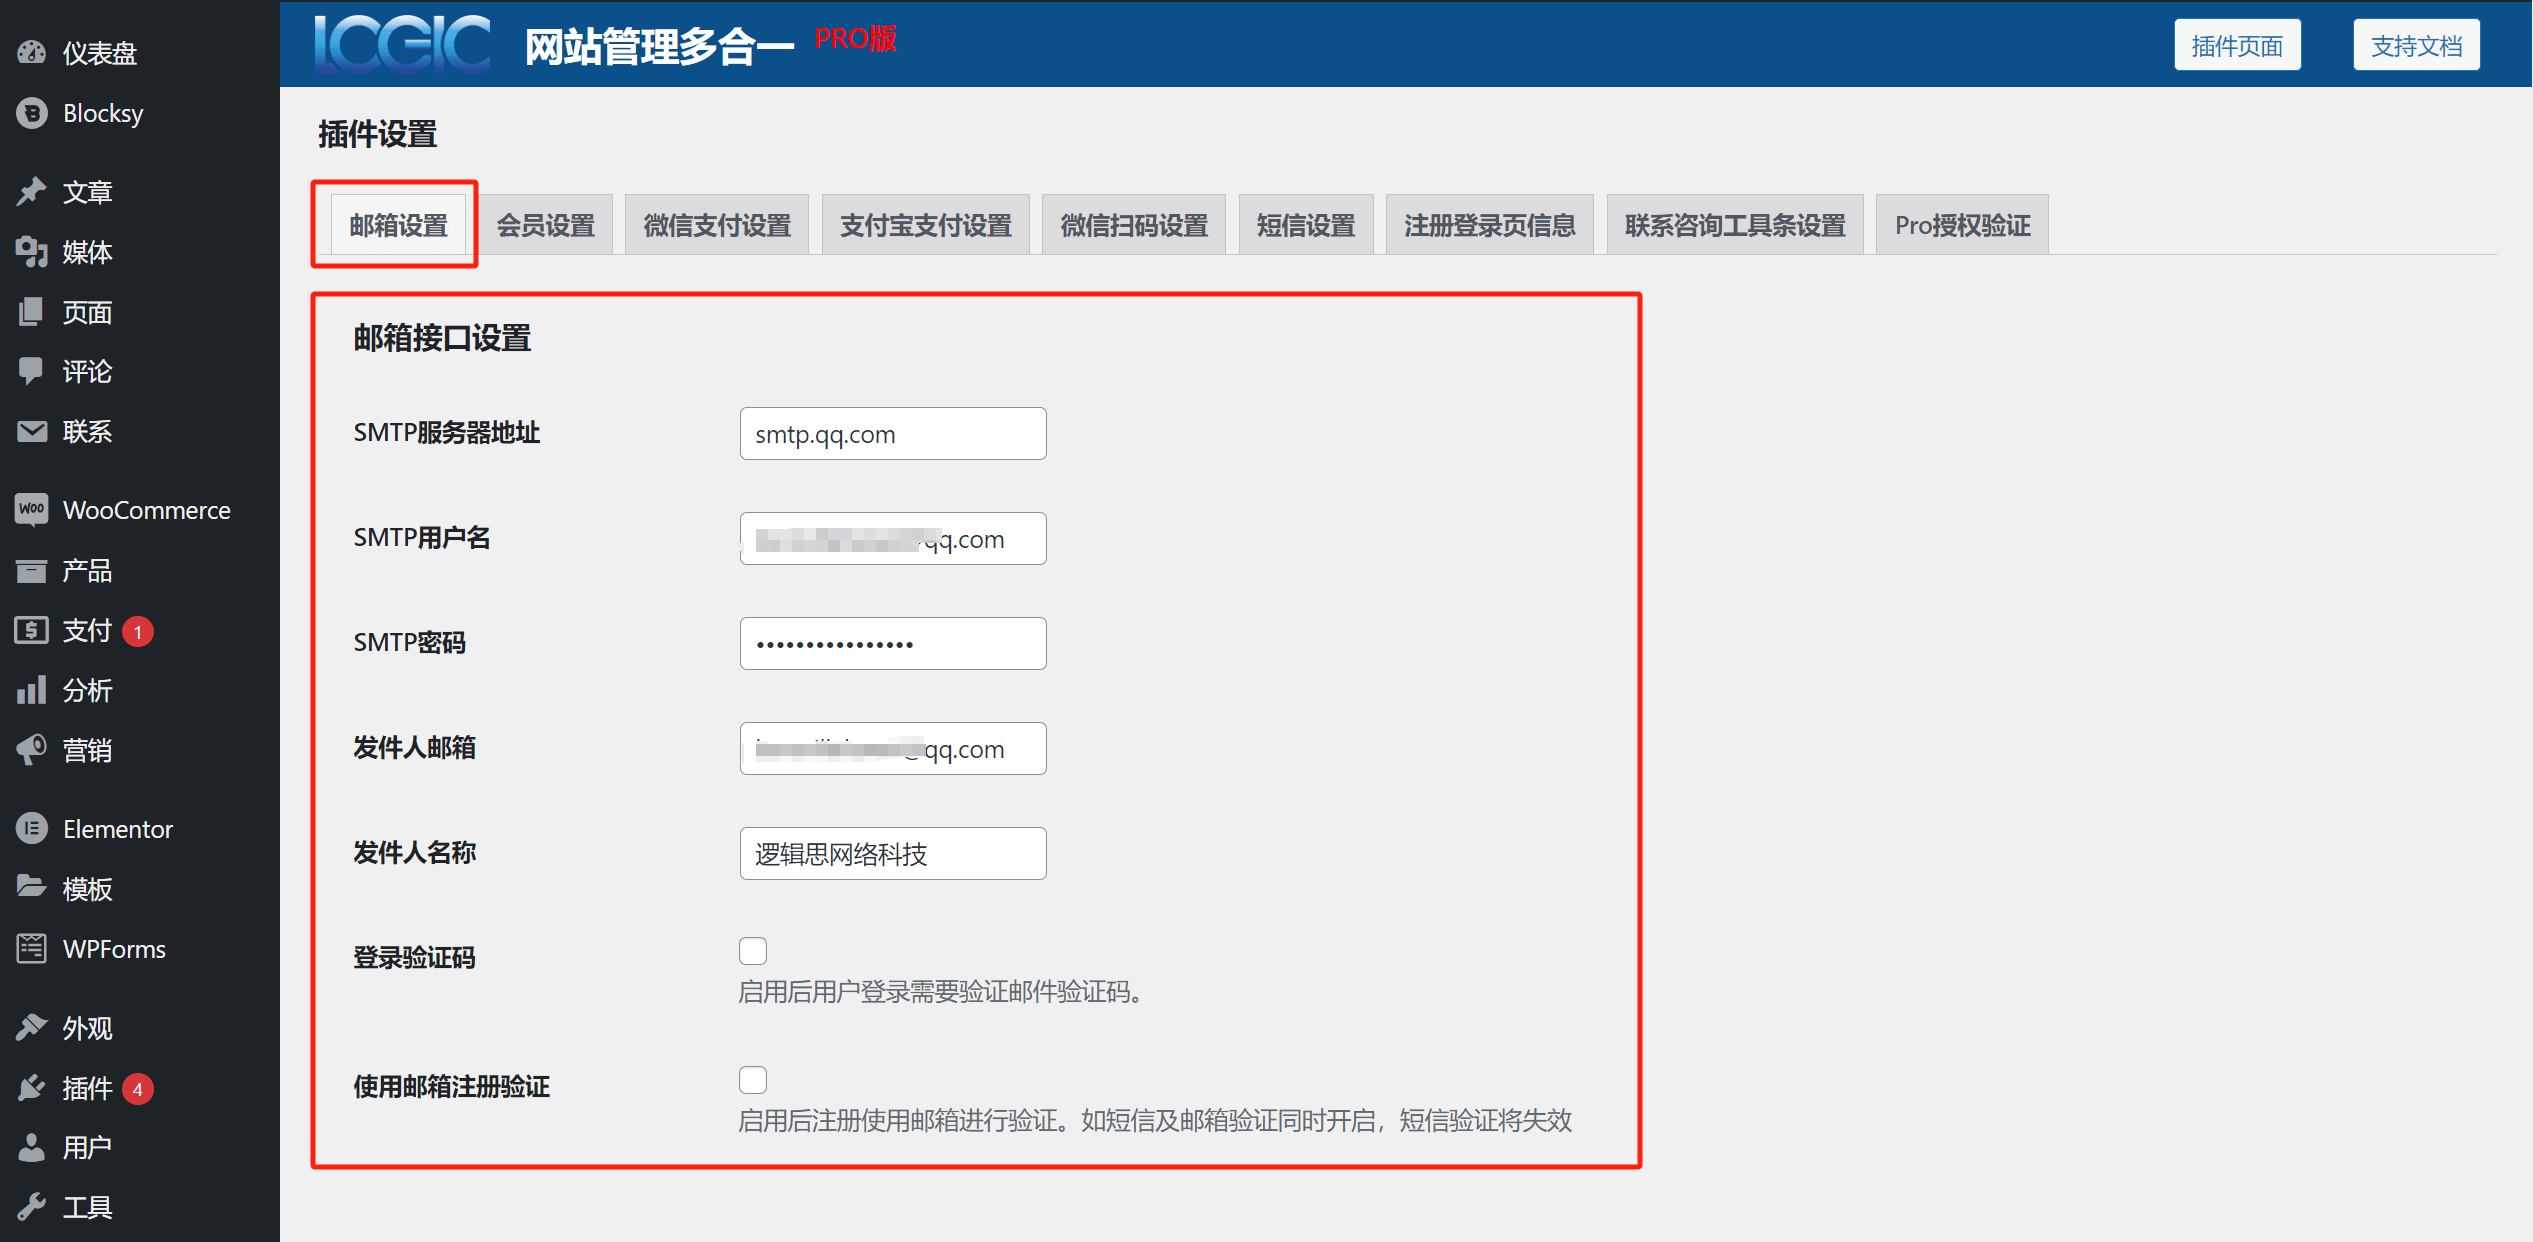
Ⅰ、WordPress Plugin - Email Settings
As shown in the red box in the figure below, entering the plugin homepage leads to the “Email Settings” for registration and login. In the “Email API Settings” section, input the complete SMTP forwarding parameters and check the box to enable the verification code login mode. The last checkbox enables “Email Registration Verification,” which locks the member center registration method to email-based verification. If this is enabled, SMS-based registration and login will be disabled. If you do not yet have SMTP forwarding or are unsure how to activate SMTP and get the authorization password, please refer to the tutorial titled “Enabling IMAP/SMTP for Personal Email and Obtaining Authorization Password” in the plugin tutorial directory. Follow the steps to enable SMTP for your personal email, obtain the SMTP authorization password, and get the SMTP server address.
Ⅱ、WordPress Plugin - Member Settings
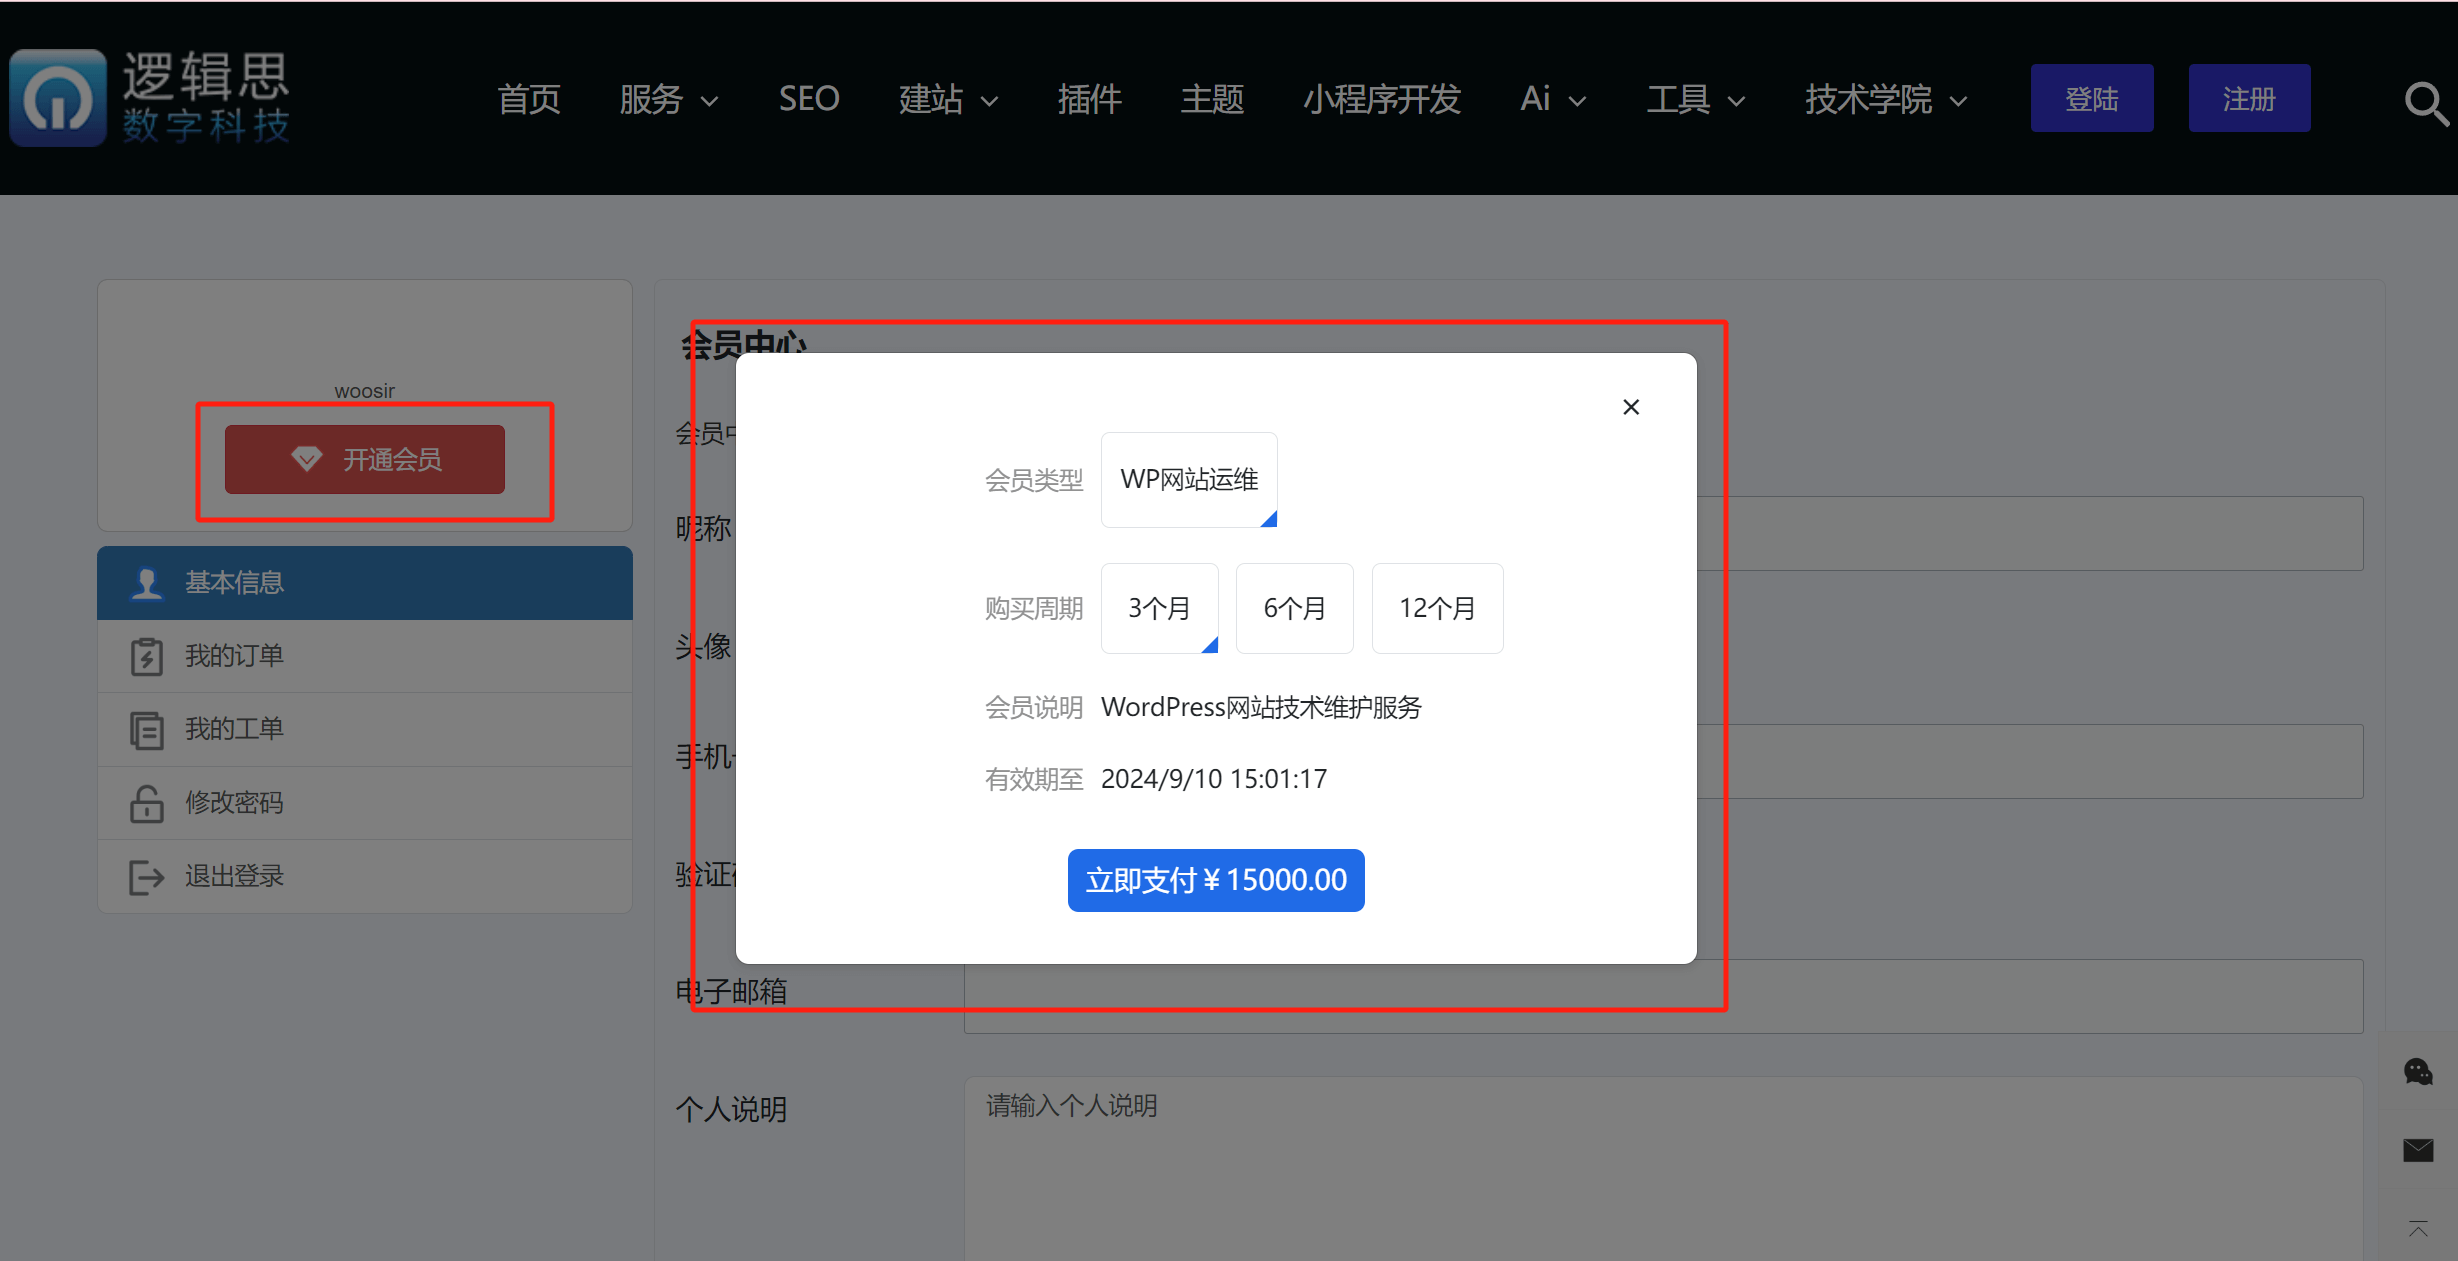
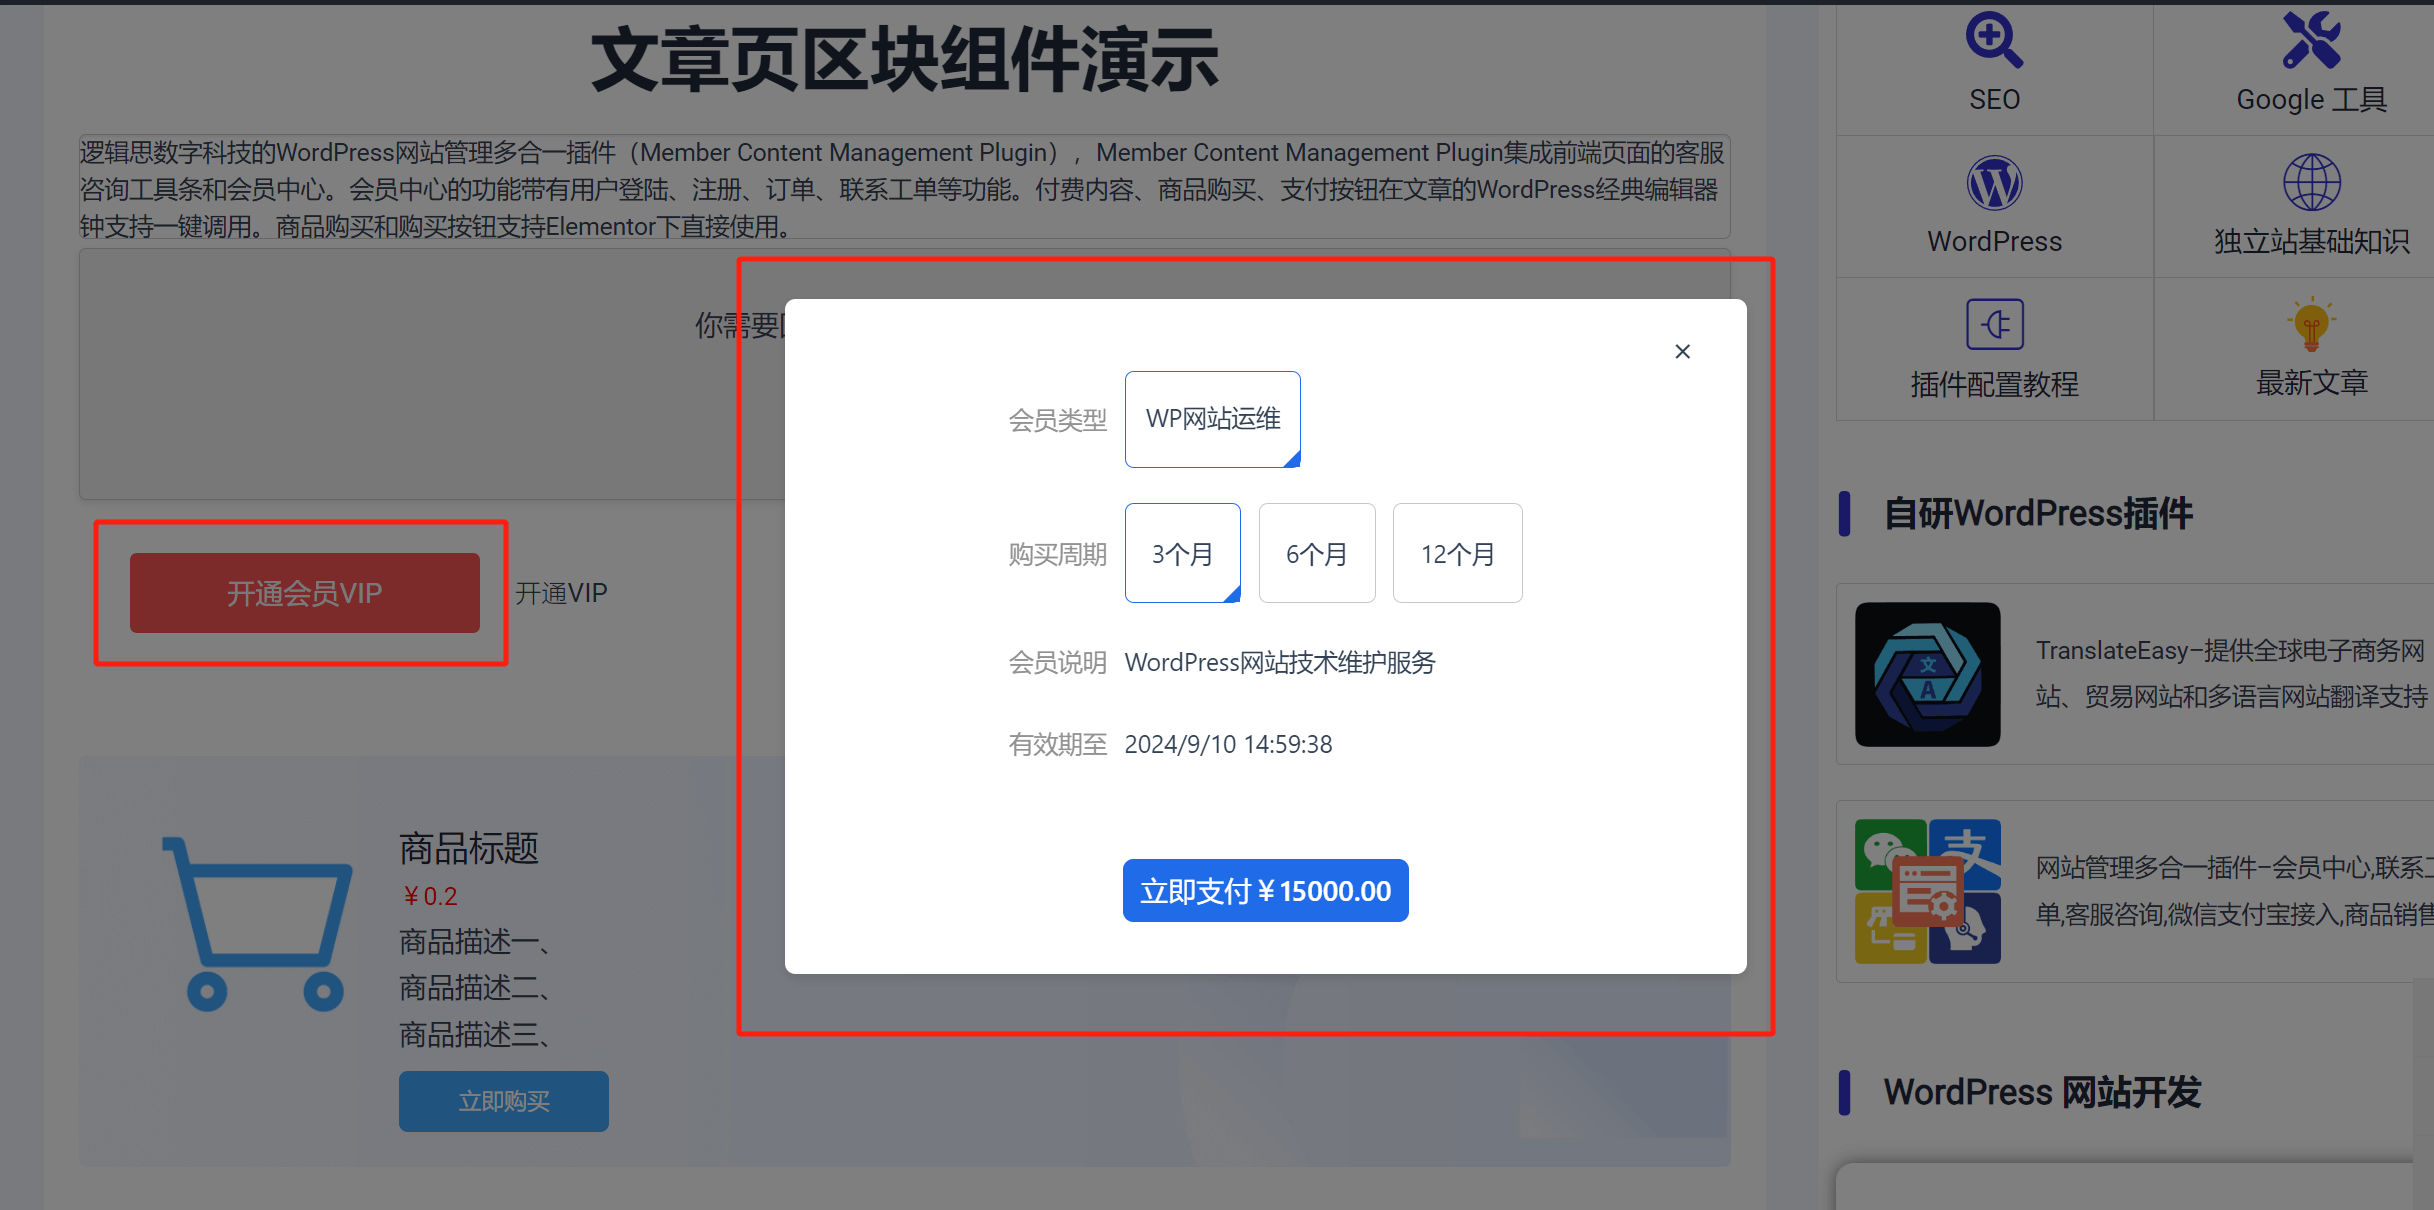
As shown in the red box below, the Member Settings section of the WordPress Site Management All-in-One Plugin allows you to enable 1-3 types of memberships. Once selected, the corresponding configuration options for each type will appear below. Based on your site's paid membership setup, define the name, description, and price of each type.
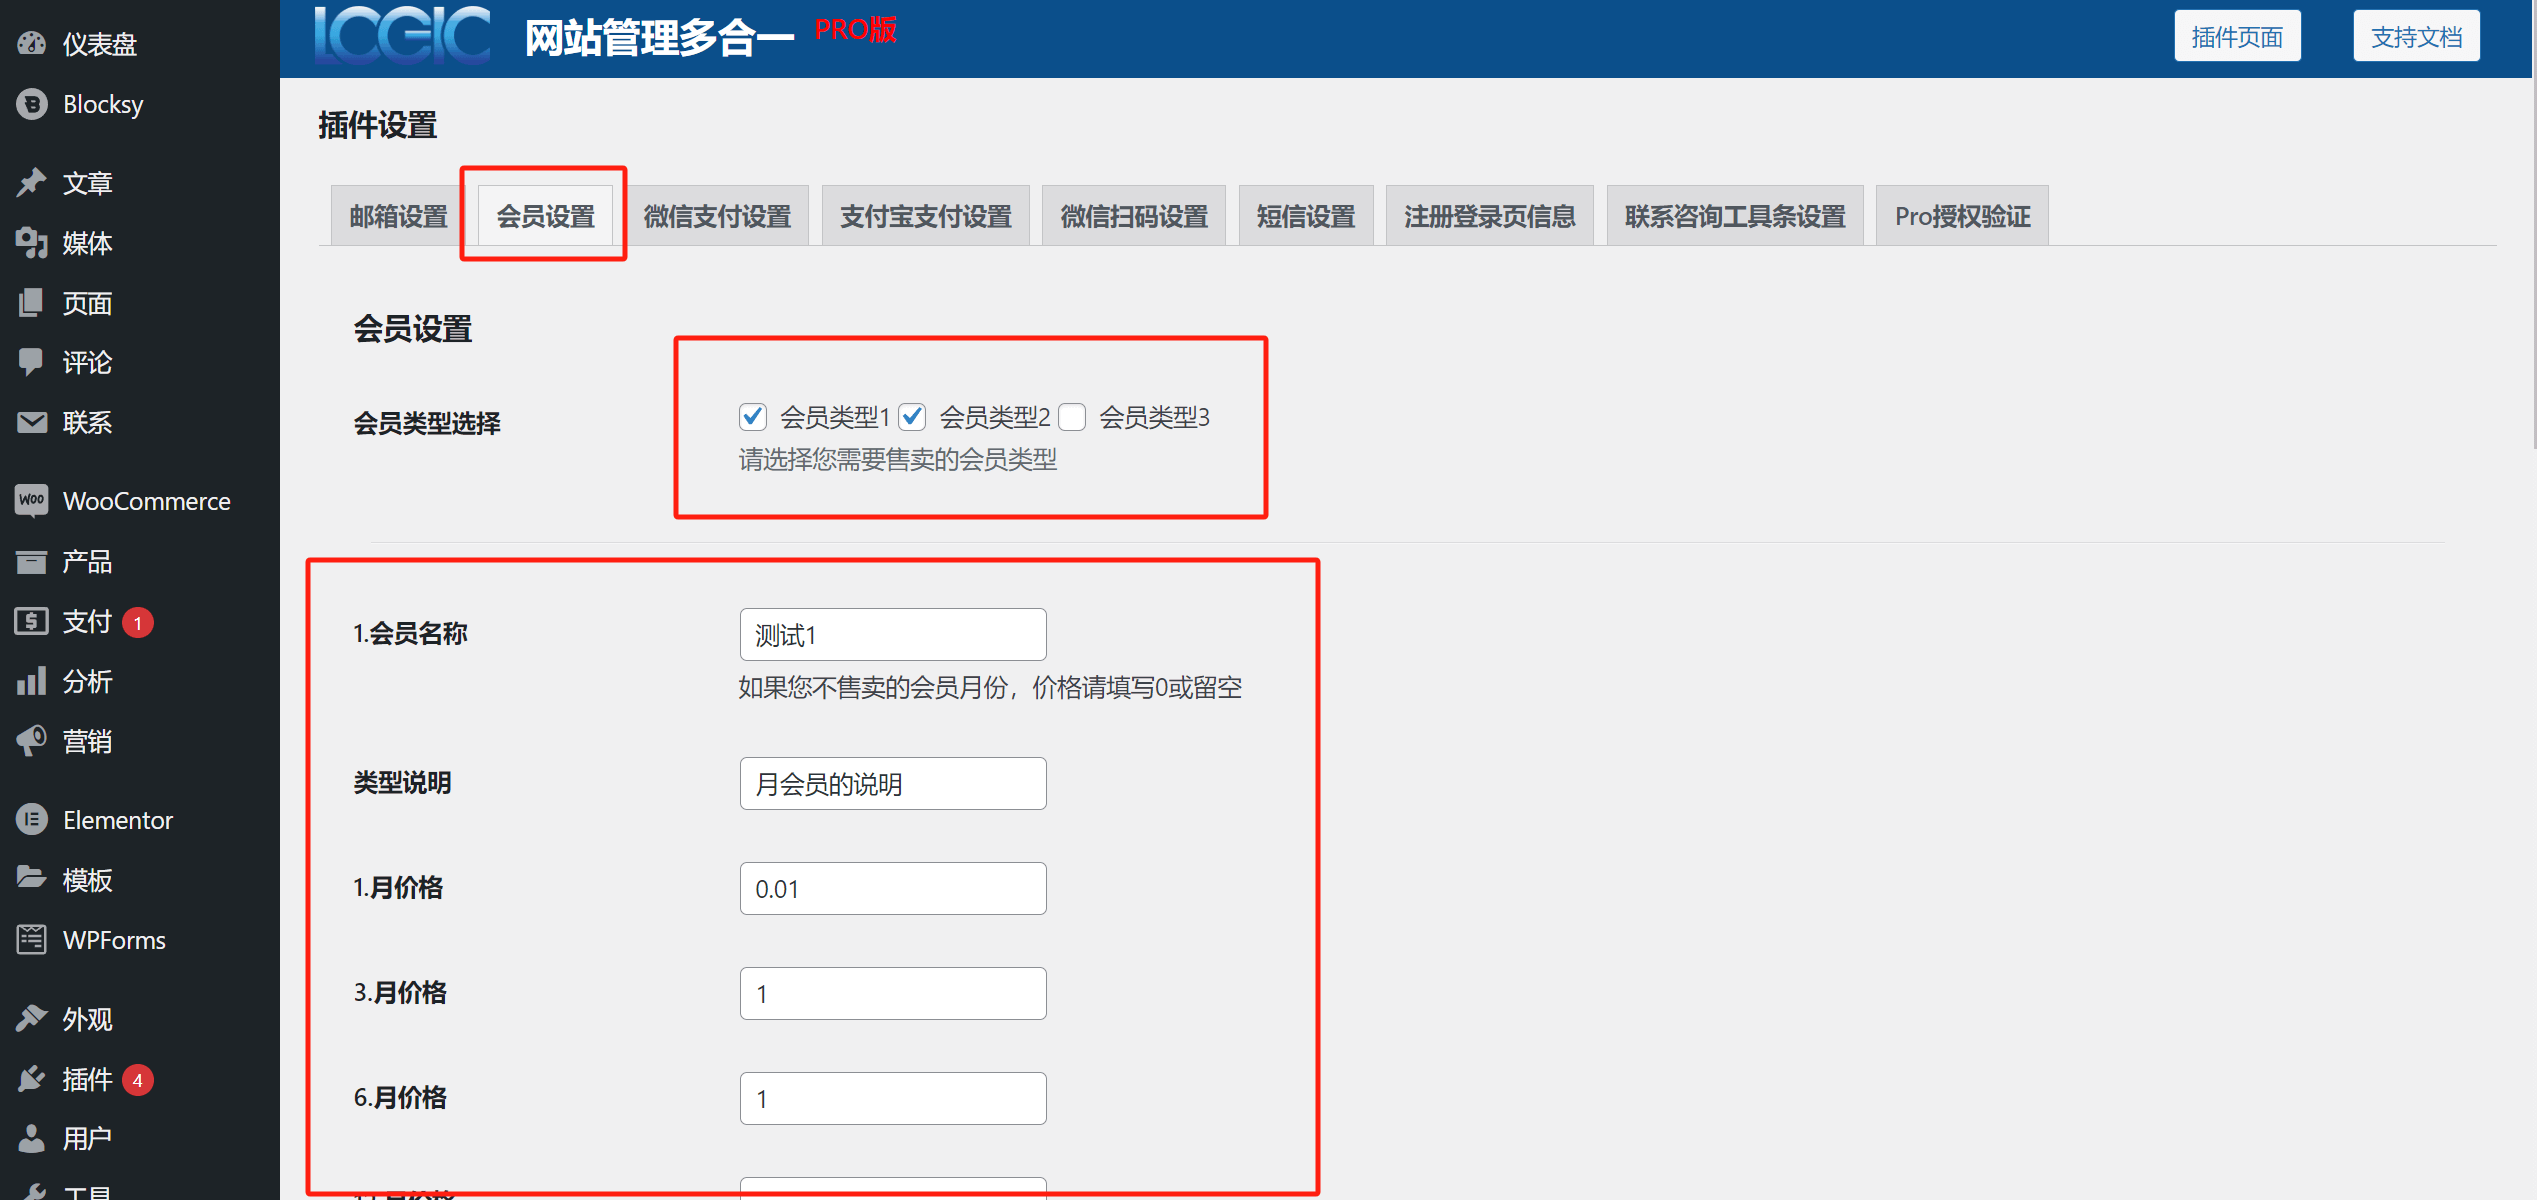
Website Management All-in-One Plugin - Member Settings Configuration:
- Member Type Selection: You can select up to three paid membership types.
- Member Name: The title name displayed for the paid membership package.
- Type Description: A description of the paid membership package.
- 1-Month Price: The price for the paid membership package for one month. If the input box is left empty and no price is set, this item’s name and price will not be displayed.
- 3-Month Price: The price for the paid membership package for three months. If the input box is left empty and no price is set, this item’s name and price will not be displayed.
- 6-Month Price: The price for the paid membership package for six months. If the input box is left empty and no price is set, this item’s name and price will not be displayed.
- 12-Month Price: The price for the paid membership package for one year. If the input box is left empty and no price is set, this item’s name and price will not be displayed.
Once the paid membership package configuration is set in the website management all-in-one plugin, when users click on "Activate Membership" in the member center or on the "Buy VIP" button placed on the page, the paid membership selection window will appear. As shown in the image below, the information in the paid membership selection window is customized in the member settings.
Ⅲ、WordPress Plugin - WeChat Pay Settings
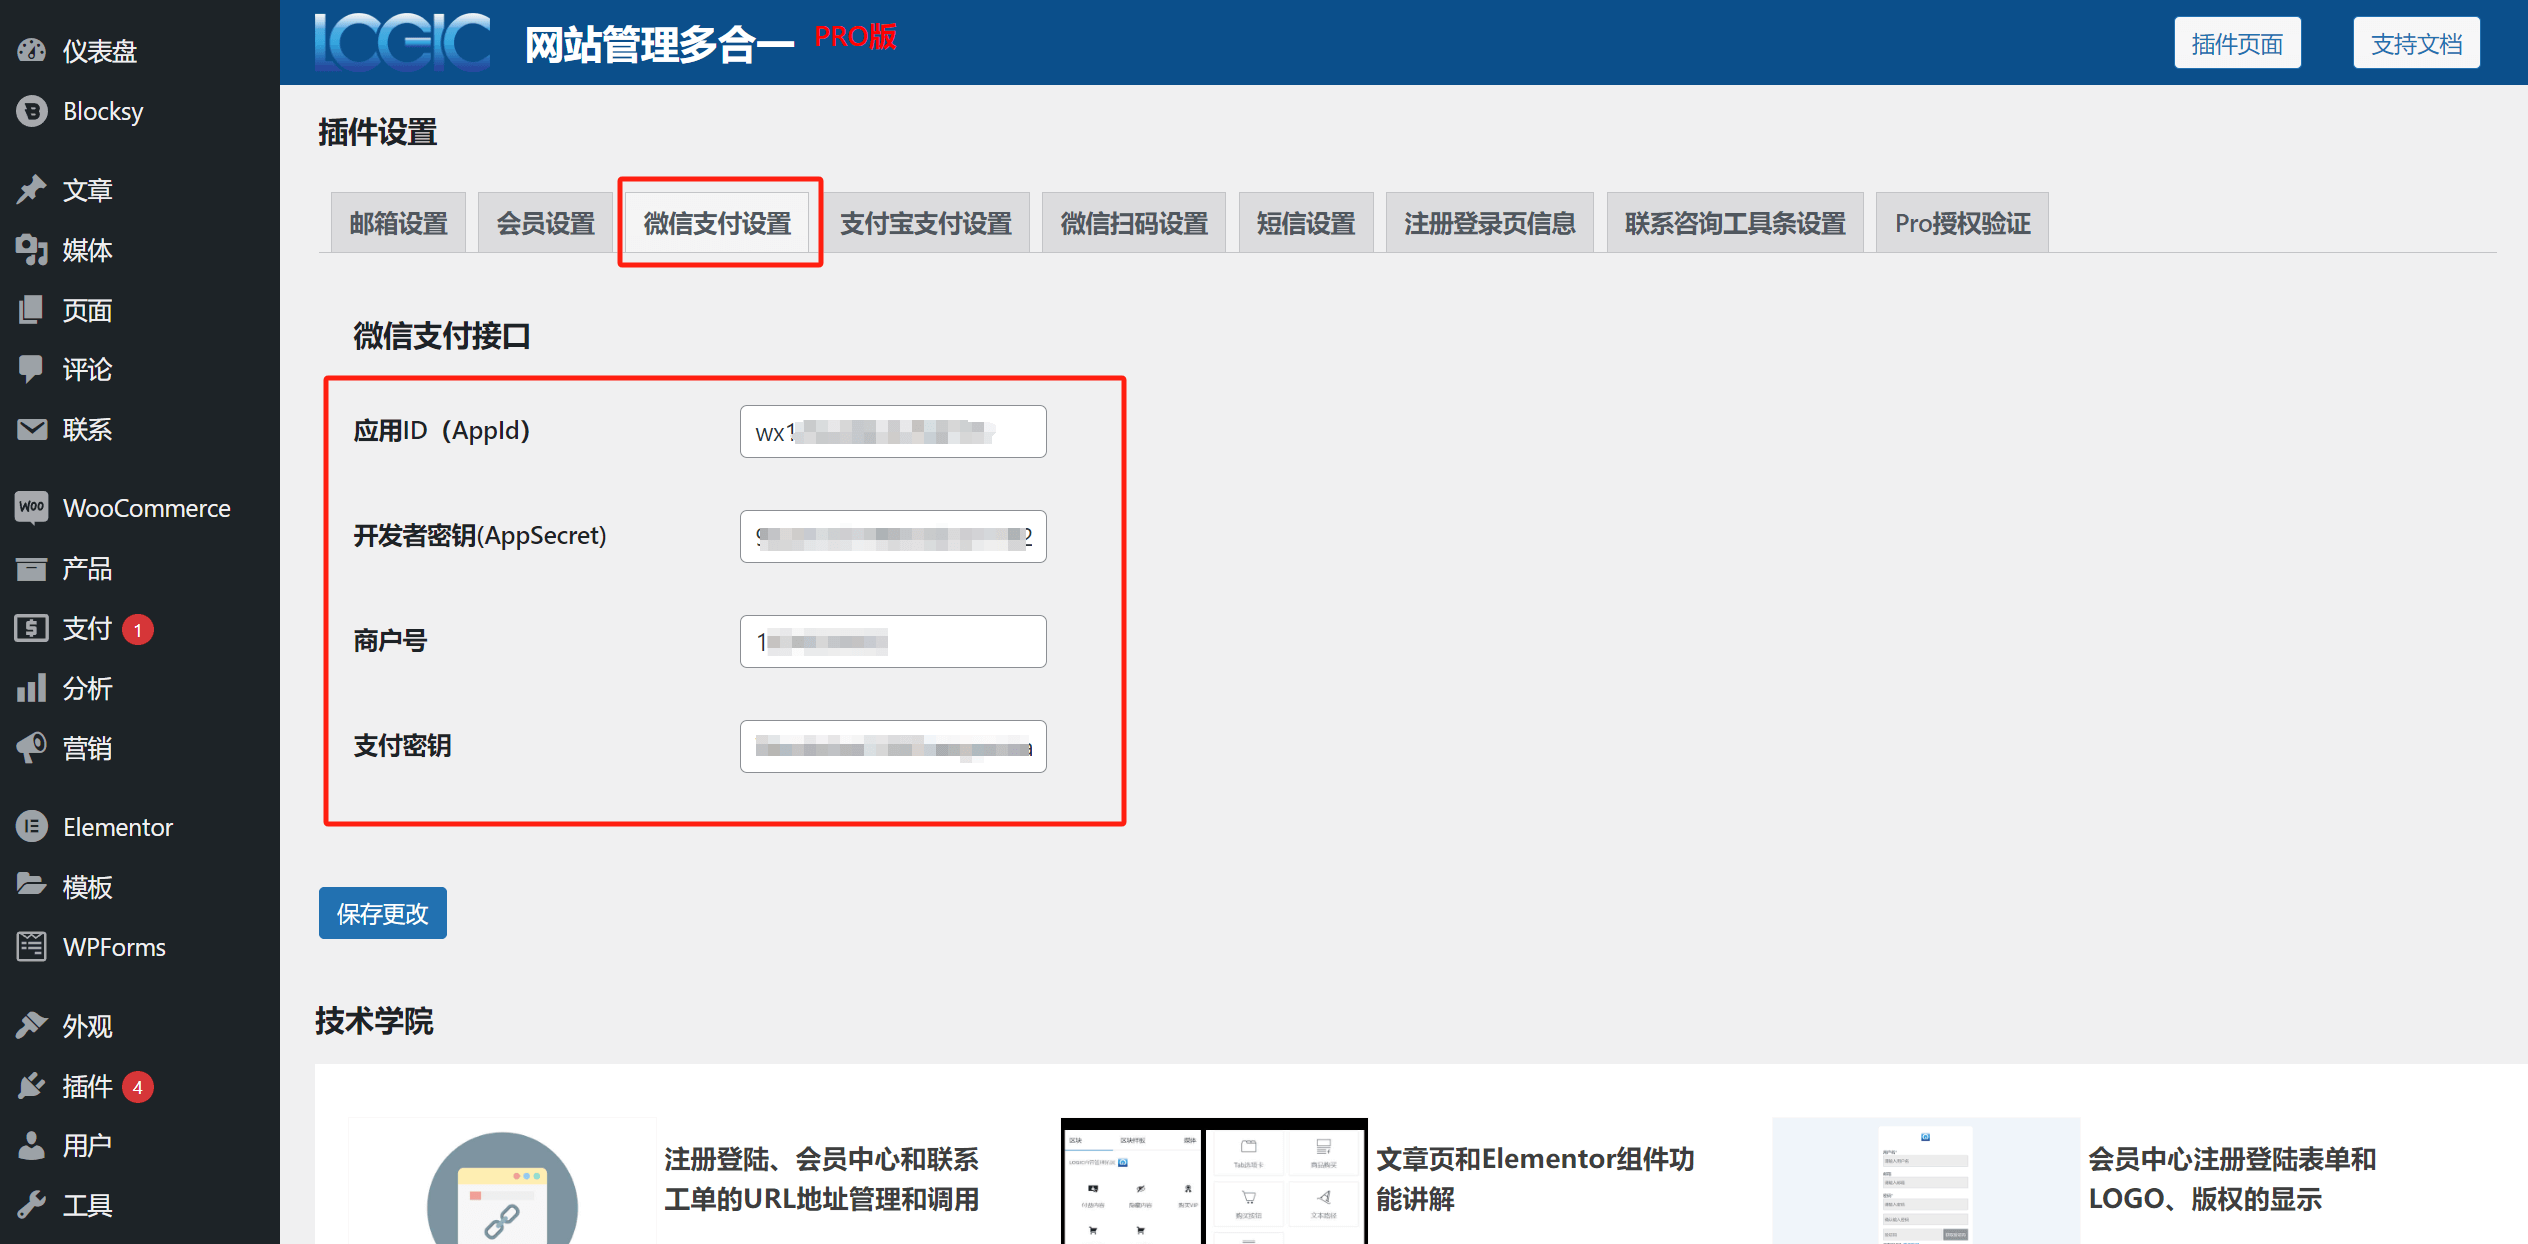
The “WeChat Pay Settings” section integrates WeChat Pay into WordPress Development sites. This allows users to complete purchases through WeChat QR code scanning when interacting with purchasing components from the plugin. To enable WeChat Pay, input the full API details in the settings: App ID (AppId), Developer Secret (AppSecret), Merchant ID, and Payment Key. If you haven’t yet created a WeChat Pay account or obtained these credentials, refer to the tutorial “WeChat Pay – Applying for a Merchant Account and Obtaining Payment API Keys” to complete setup.
As shown in the figure below, correctly enter the WeChat Pay information into the four input fields required by the plugin for WeChat Pay API, including Application ID (AppId), Developer Secret (AppSecret), Merchant ID, and Payment Key.
Ⅳ、WordPress Plugin - Alipay Settings
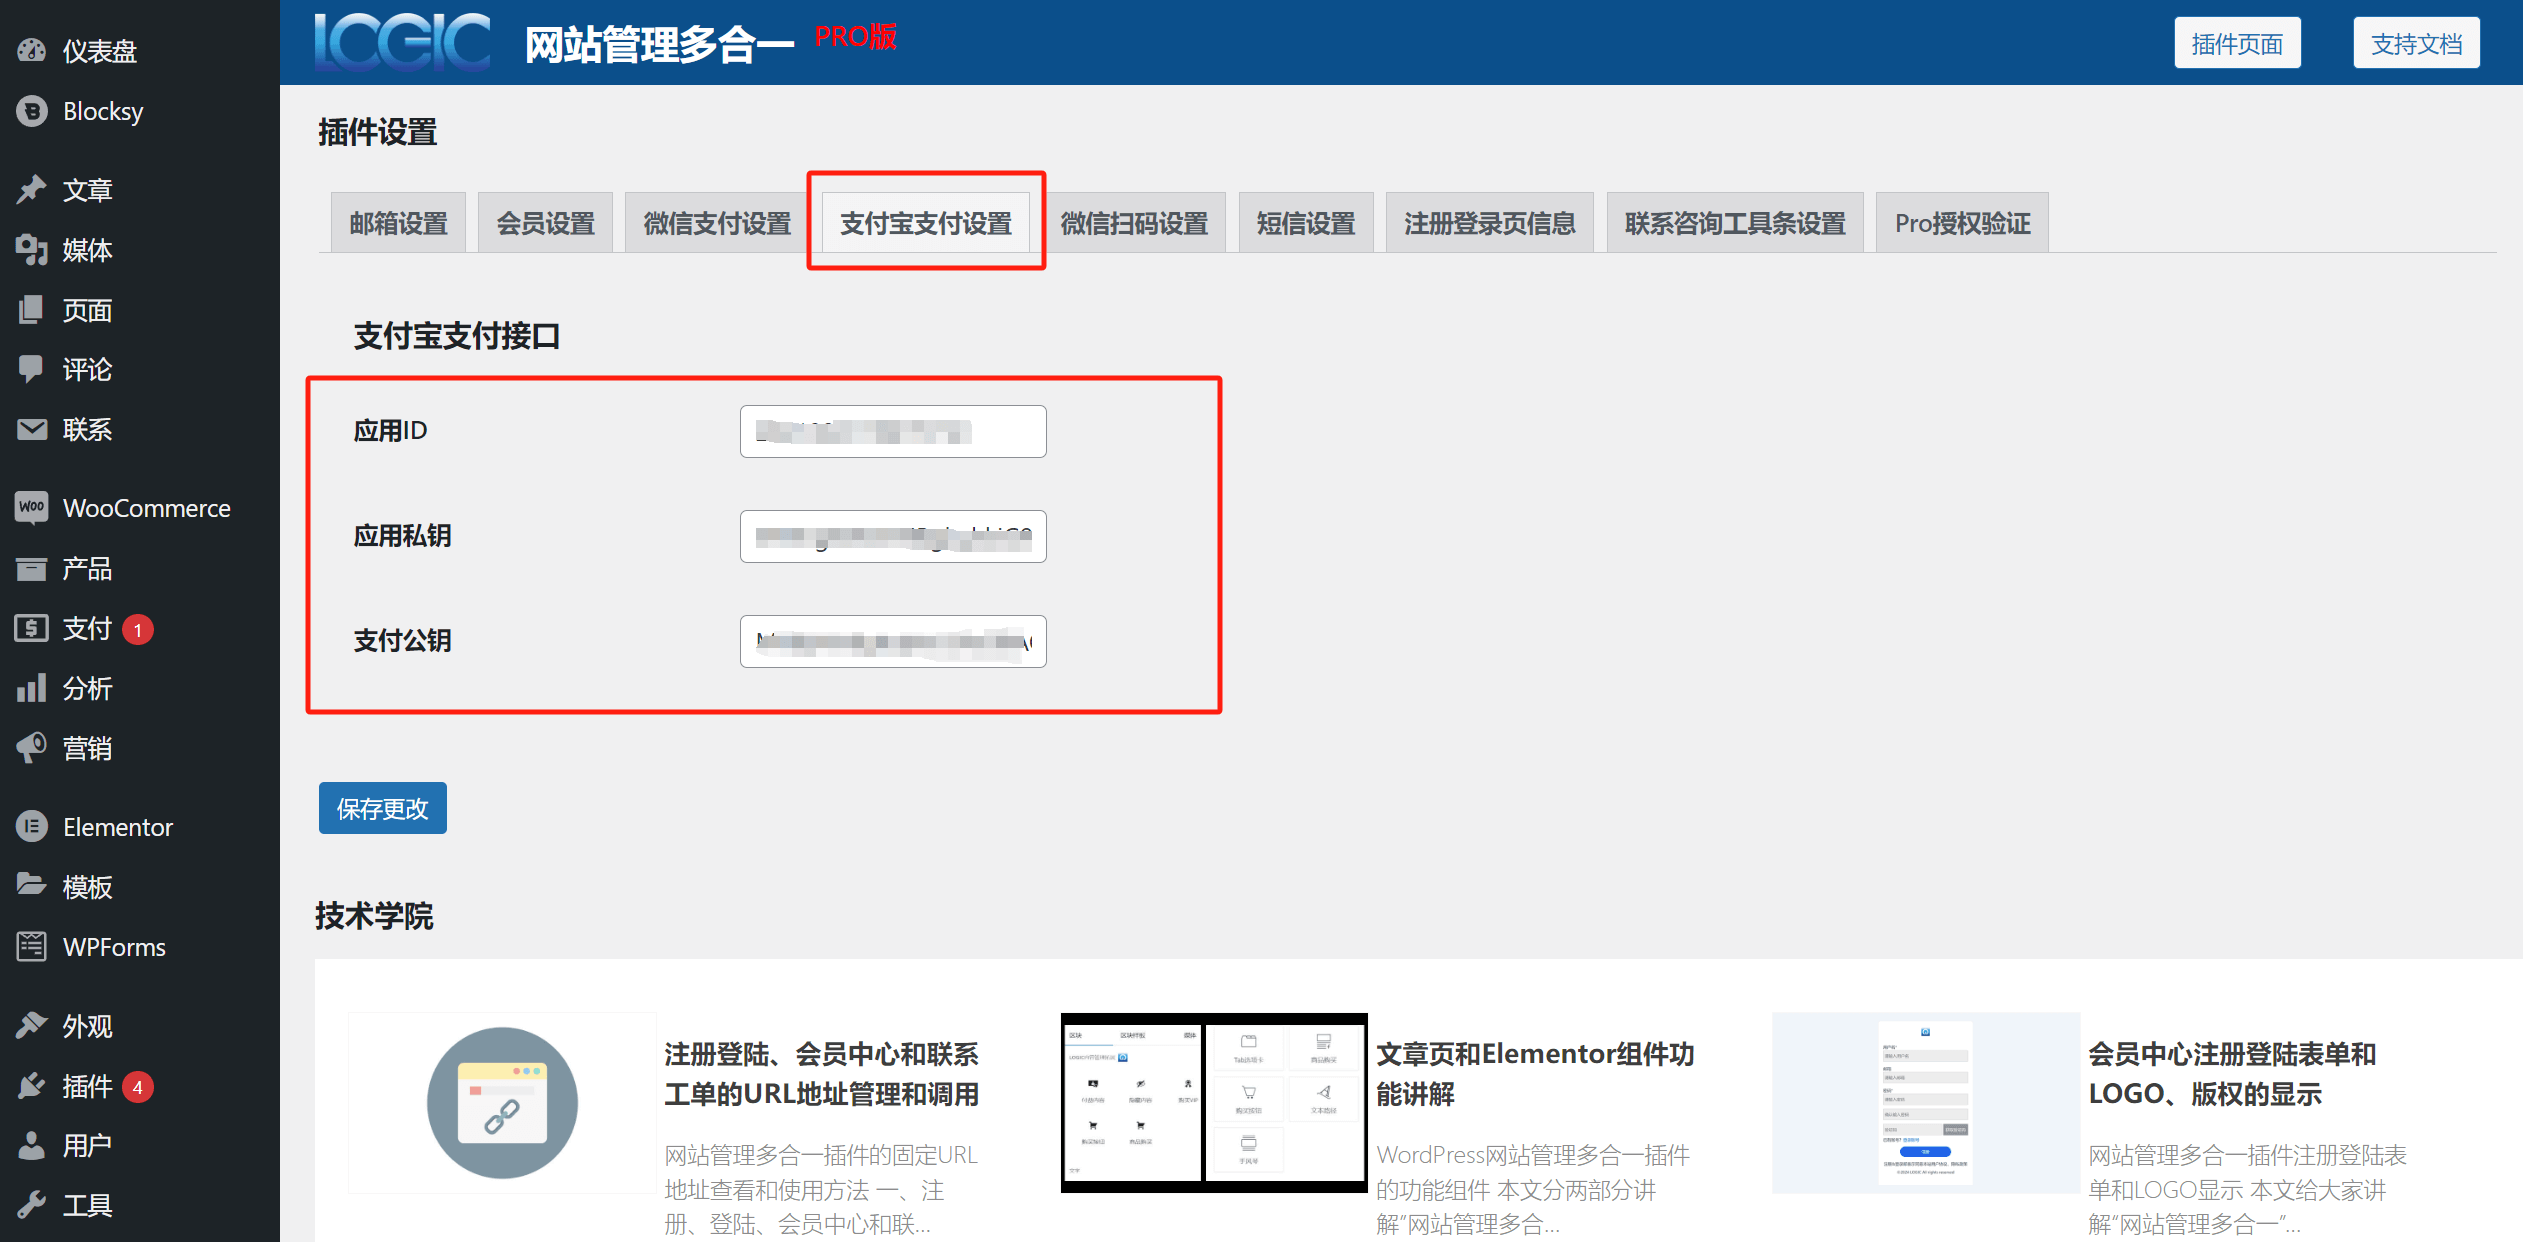
The “Alipay Settings” section of the Site Management All-in-One Plugin integrates the Enterprise Alipay web payment solution, enabling front-end users to complete purchases through Alipay QR code scanning when using the plugin's purchasing components. To activate Alipay payments, input the full set of enterprise Alipay API credentials in the plugin settings, including App ID, App Private Key, and Payment Public Key.
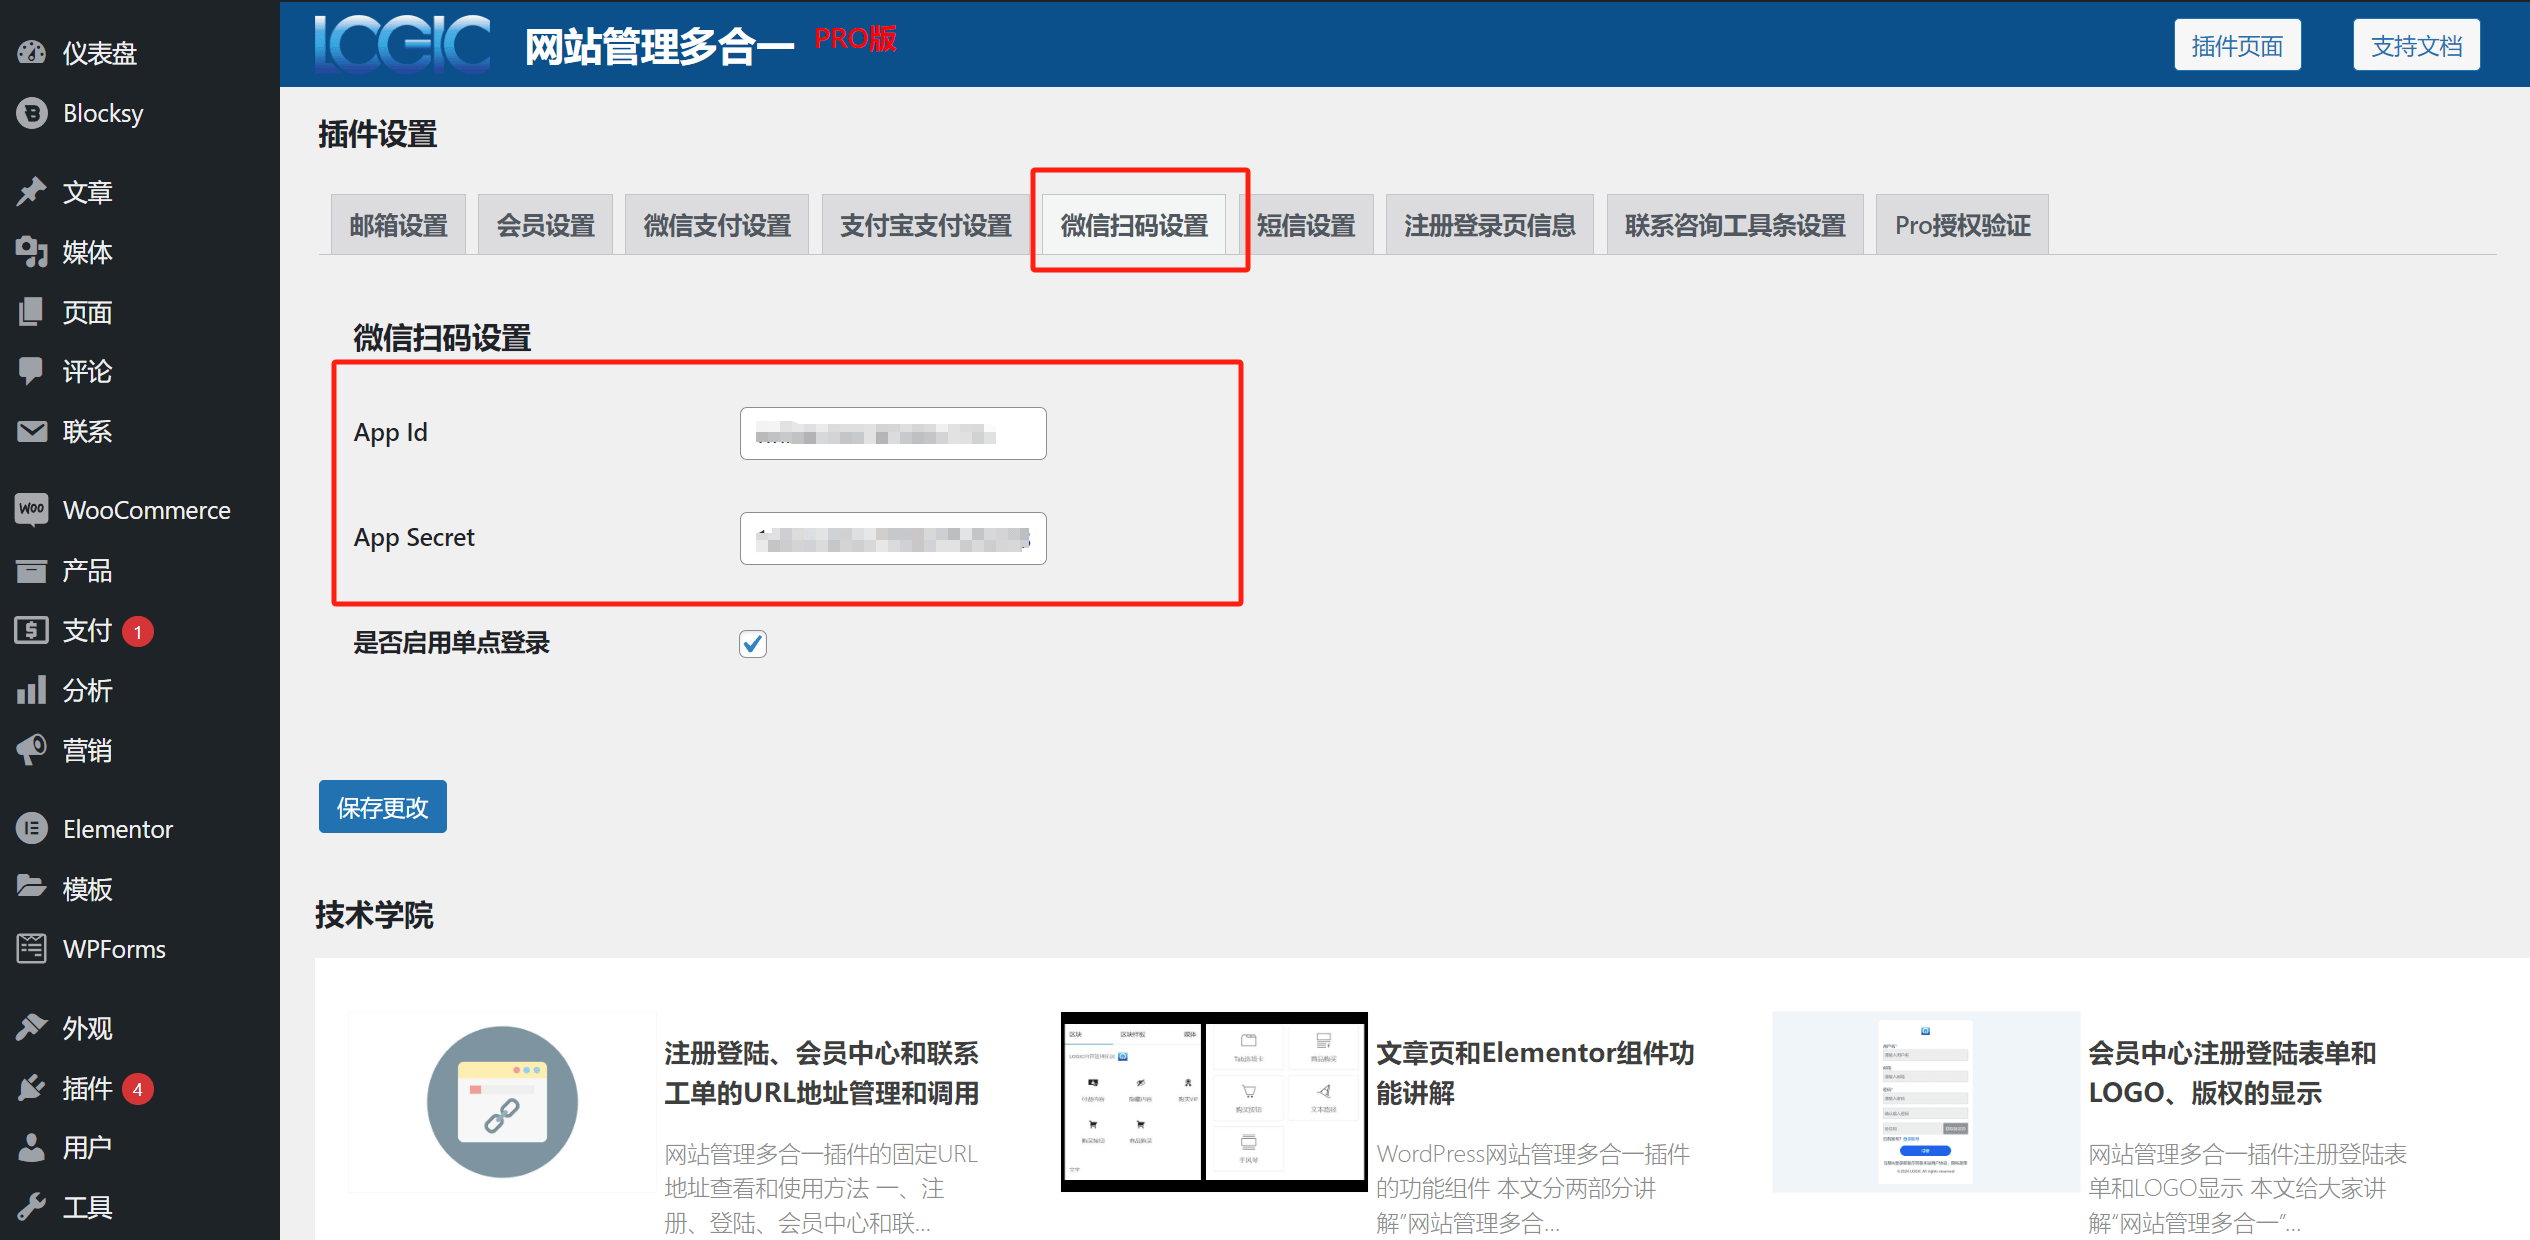
Ⅴ、WordPress Plugin - WeChat QR Code Payment Settings
The “WeChat QR Code Settings” enable single sign-on via WeChat QR code (WeChat QR Code Login) in the member center. Enter the AppId and App Secret from the website app you created on the WeChat Open Platform, check the box to enable this feature, and save changes. If you’re unsure how to create a WeChat website application or obtain its AppId and App Secret, refer to the tutorial “Applying for WeChat Open Platform AppID and AppSecret” and follow the instructions provided.
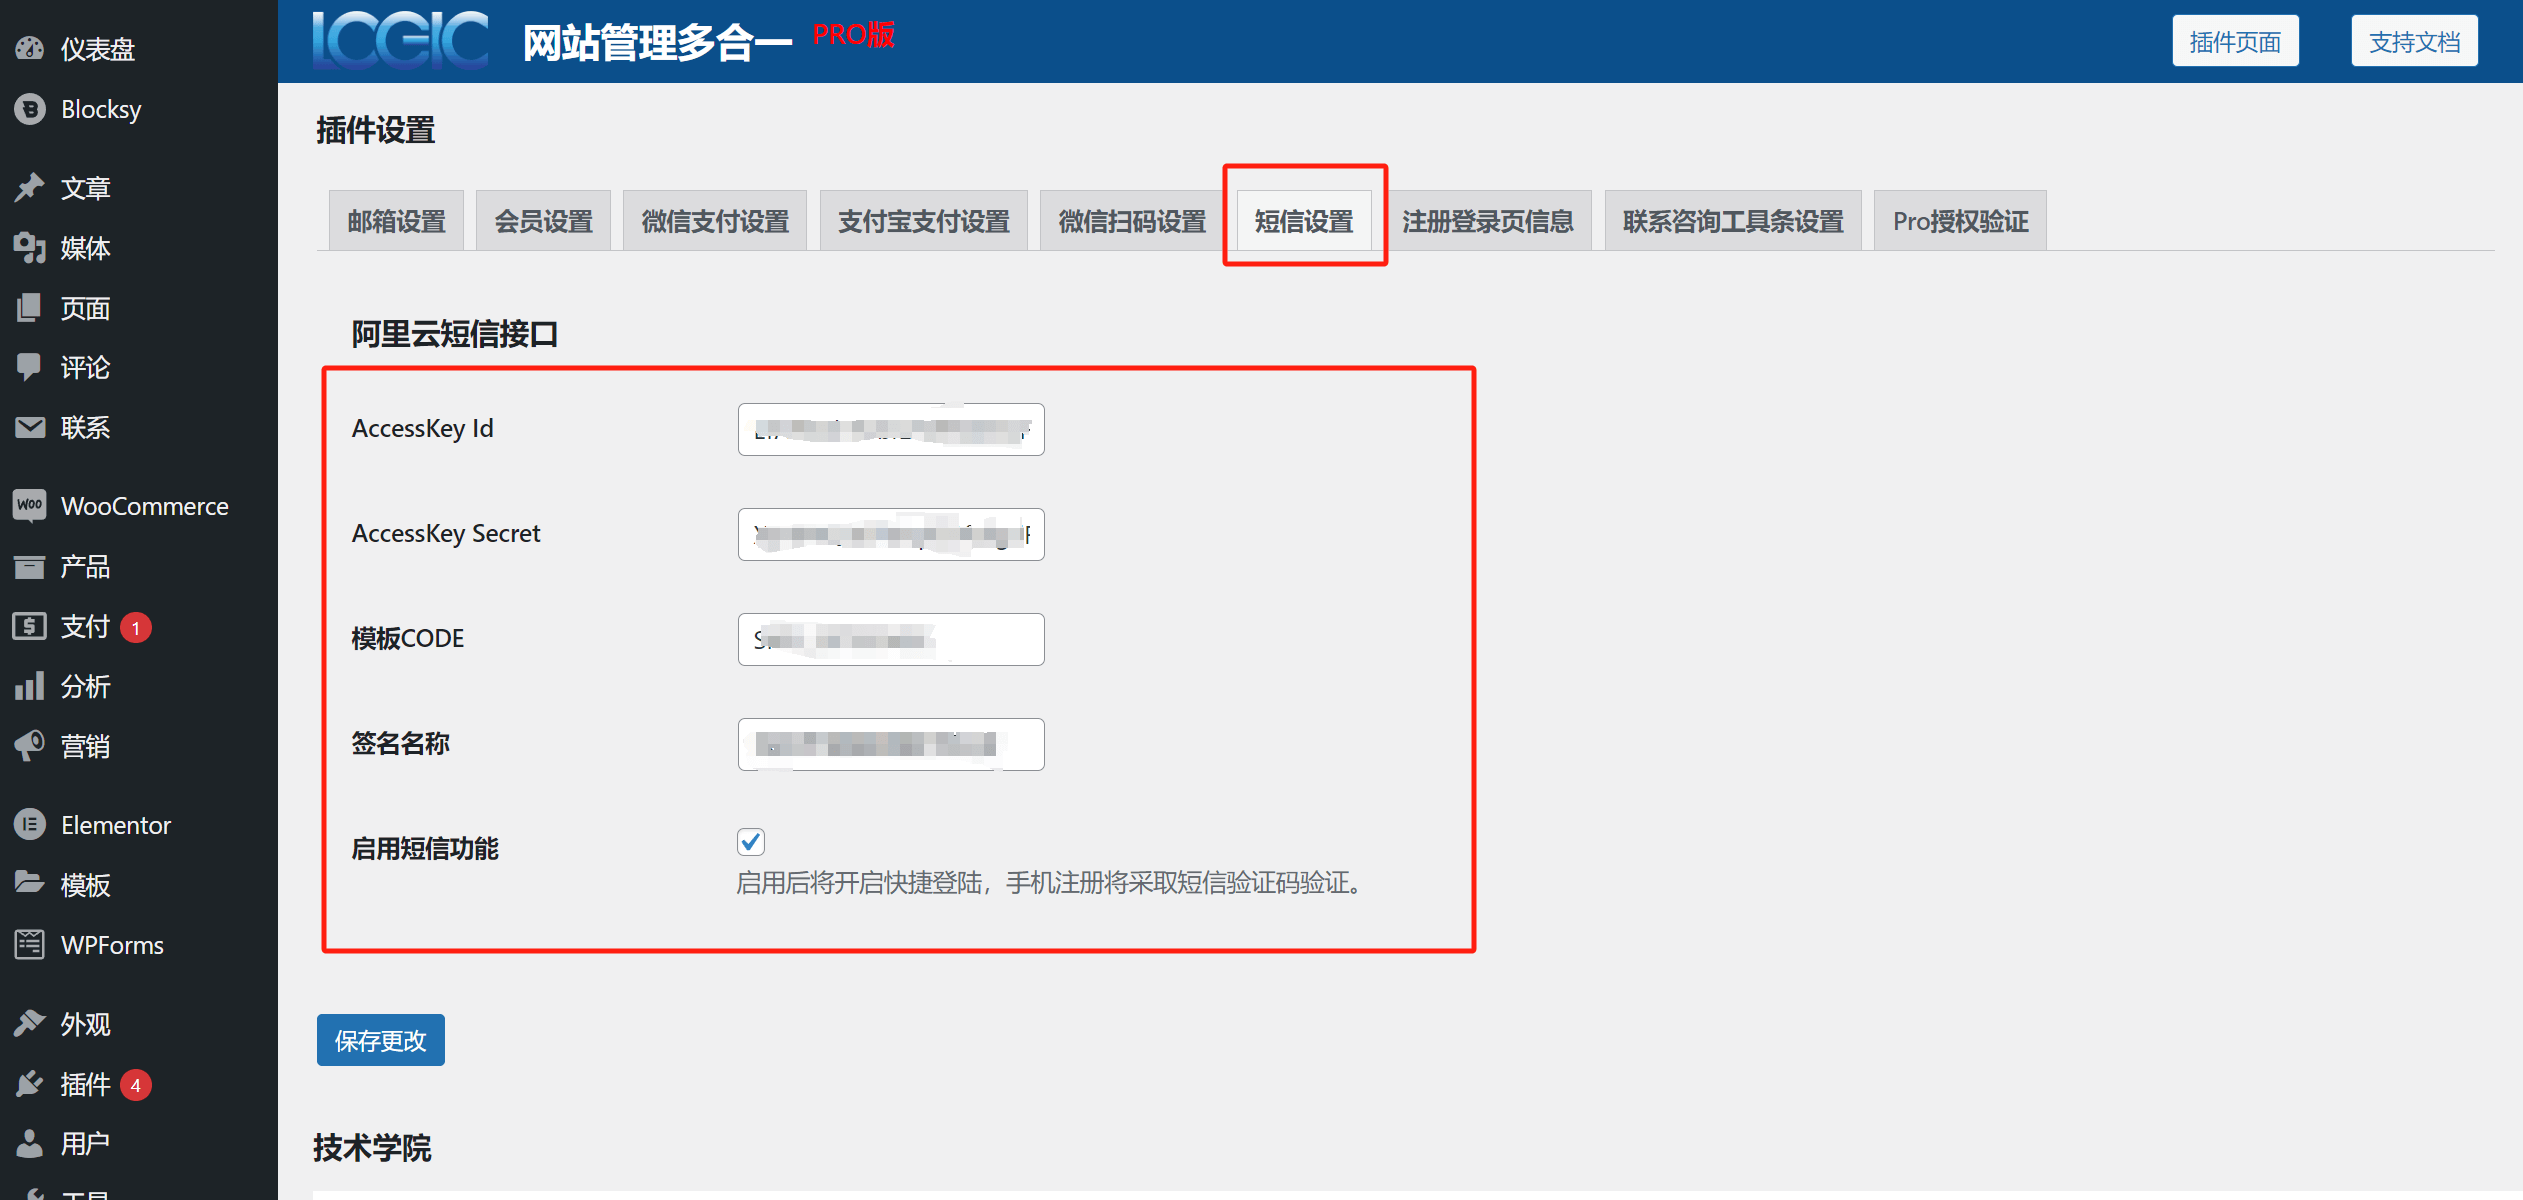
Ⅵ、WordPress Plugin - SMS Settings
The “SMS Settings” section enables phone number verification via SMS code for member center registration. The plugin currently only supports integration with the Alibaba Cloud SMS Package. Enter the corresponding configuration details in each input field. For purchasing and setting up Alibaba Cloud SMS, please consult the official technical documentation provided by Alibaba Clou
Ⅶ、WordPress Plugin - Registration and Login Page Information
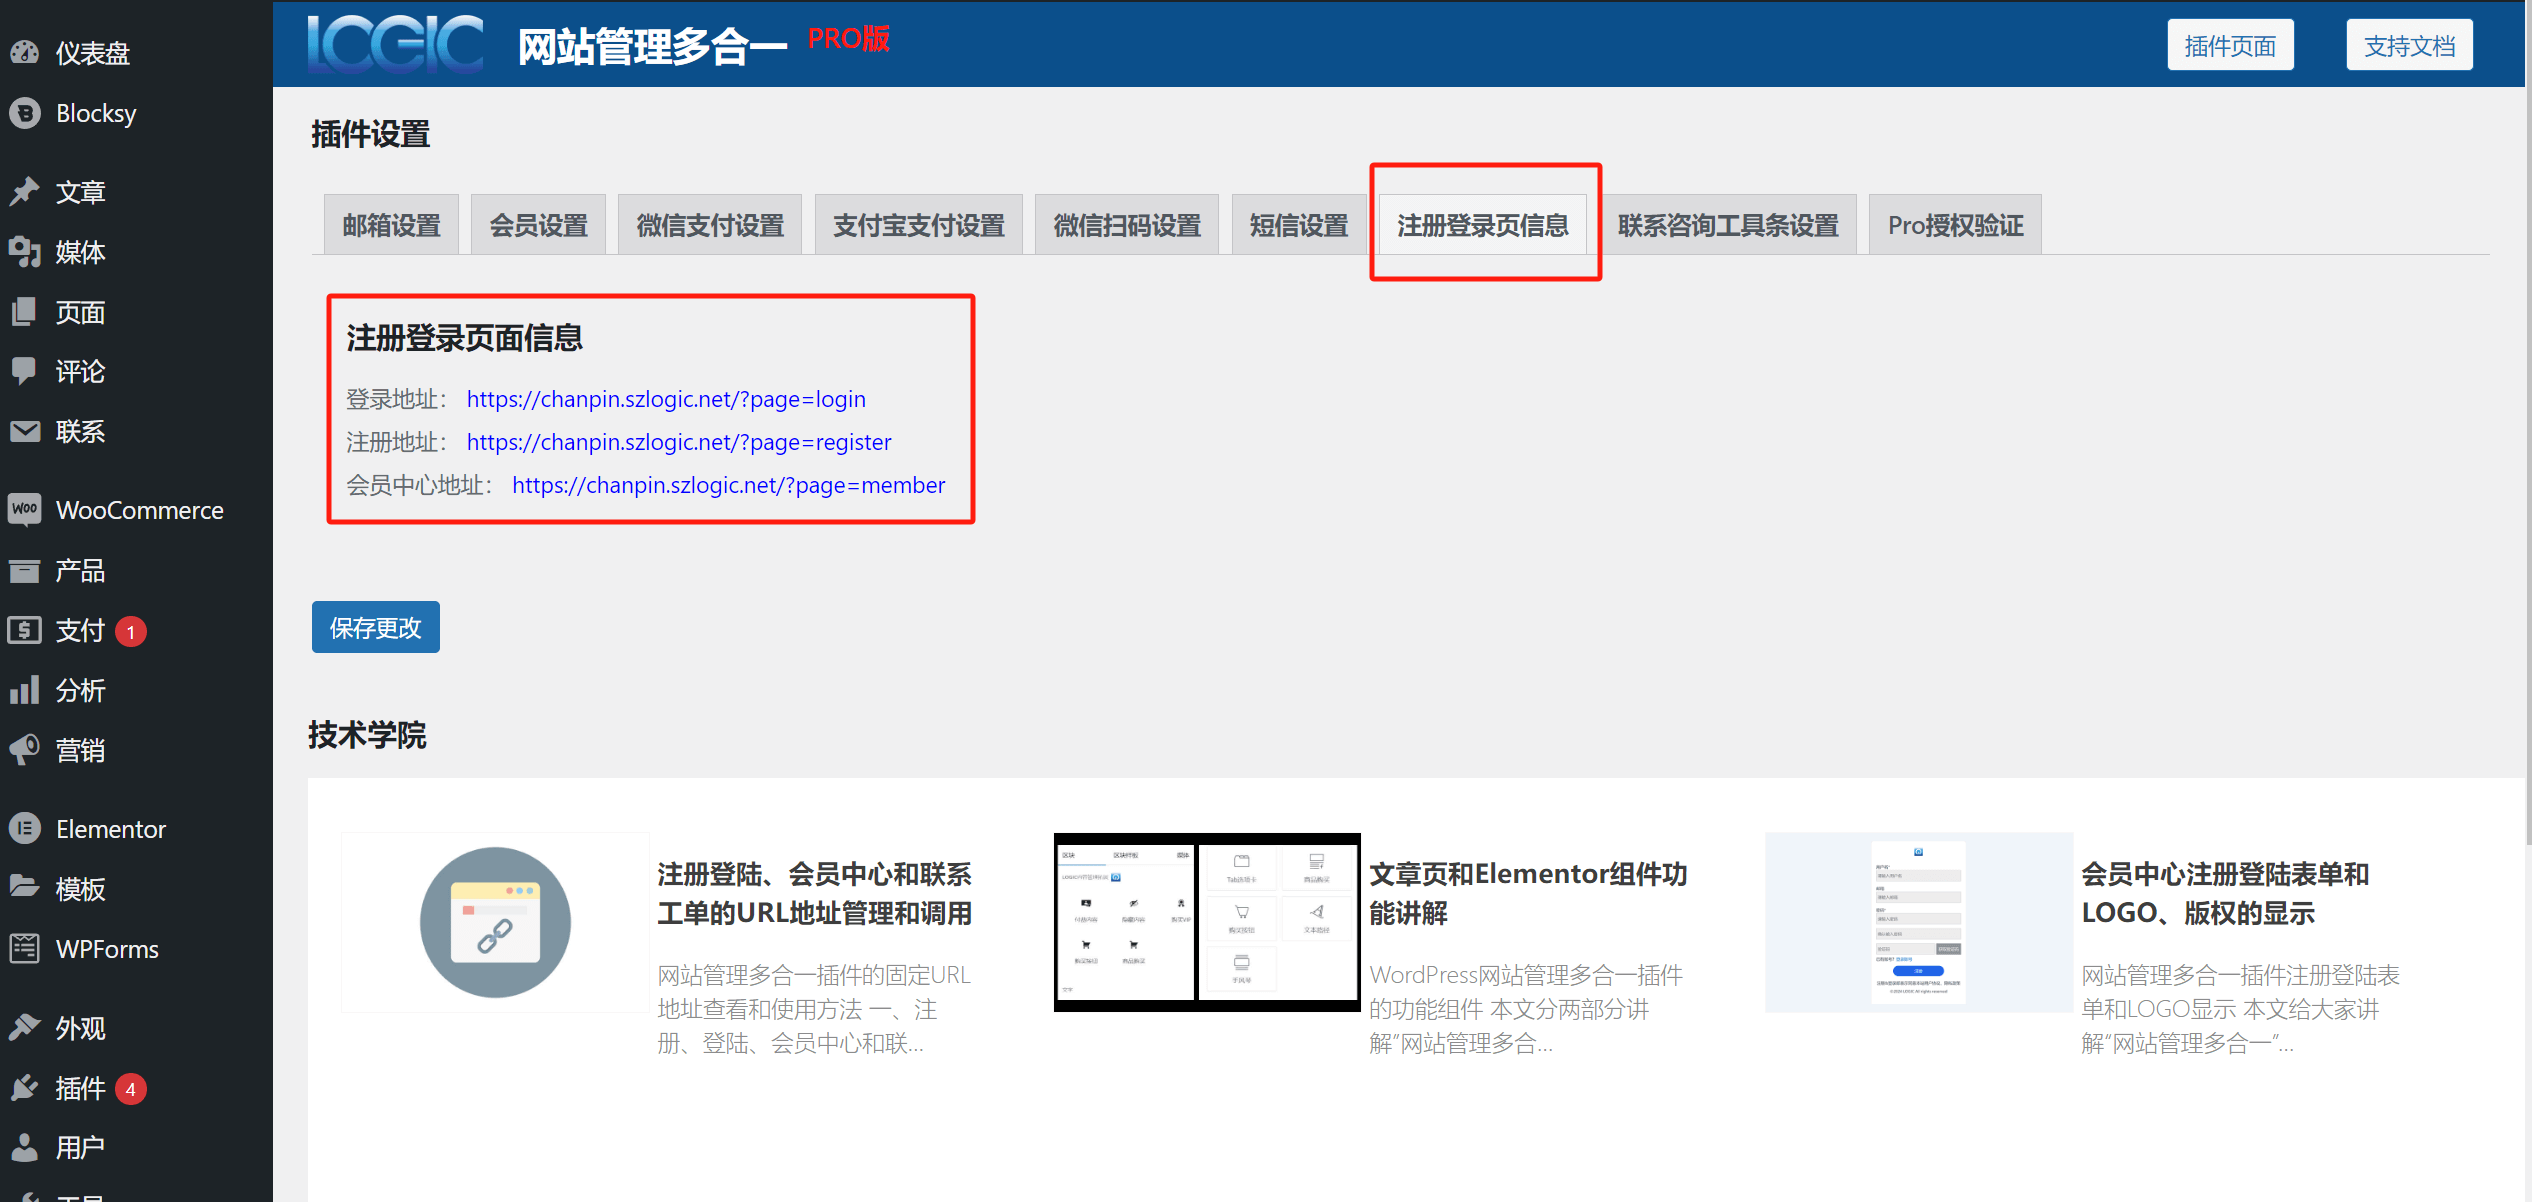
As shown in the image below, for easier access to the member center pages, the “Registration/Login Page Info” section displays automatically generated URLs for the member homepage and registration/login pages. Simply copy and paste these URLs to use them as links for new buttons or anchor texts. Additionally, the contact ticket URL follows a fixed format generated by the plugin. For more details, refer to the tutorial “Managing and Using URLs for Registration, Member Center, and Contact Tickets” which includes illustrated step-by-step instructions.
Ⅷ、WordPress Plugin - Contact and Consultation Toolbar Settings
The WordPress Site Management All-in-One Plugin includes a customer service toolbar. As shown in the red box below, the toolbar is fixed at the bottom-right corner of the site page. In the Contact Toolbar Settings, you can integrate customer service links for WeChat Work and Tencent Qidian (Enterprise QQ). When users click the buttons on the toolbar, it opens a chat window for consultation. You can also upload a QR code image to guide users to follow your account.
The contact and consultation toolbar integrates a contact ticket button, which requires no additional setup. The button will automatically pull the contact ticket URL from the member center. At the very bottom of the contact consultation toolbar is a "Back to Top" component, a useful feature for website users to quickly return to the top of the page with one click. In addition, the website management all-in-one plugin's contact consultation toolbar also includes customizable features such as the ability to "display page, toolbar background color, and button combinations." The following content will explain the configuration methods for these customizable features.
An example of the customer service contact toolbar page style for the website management all-in-one plug-in:

The function setting items of the customer service consultation and contact toolbar of the website management all-in-one plug-in are as shown in the red box in the figure below:

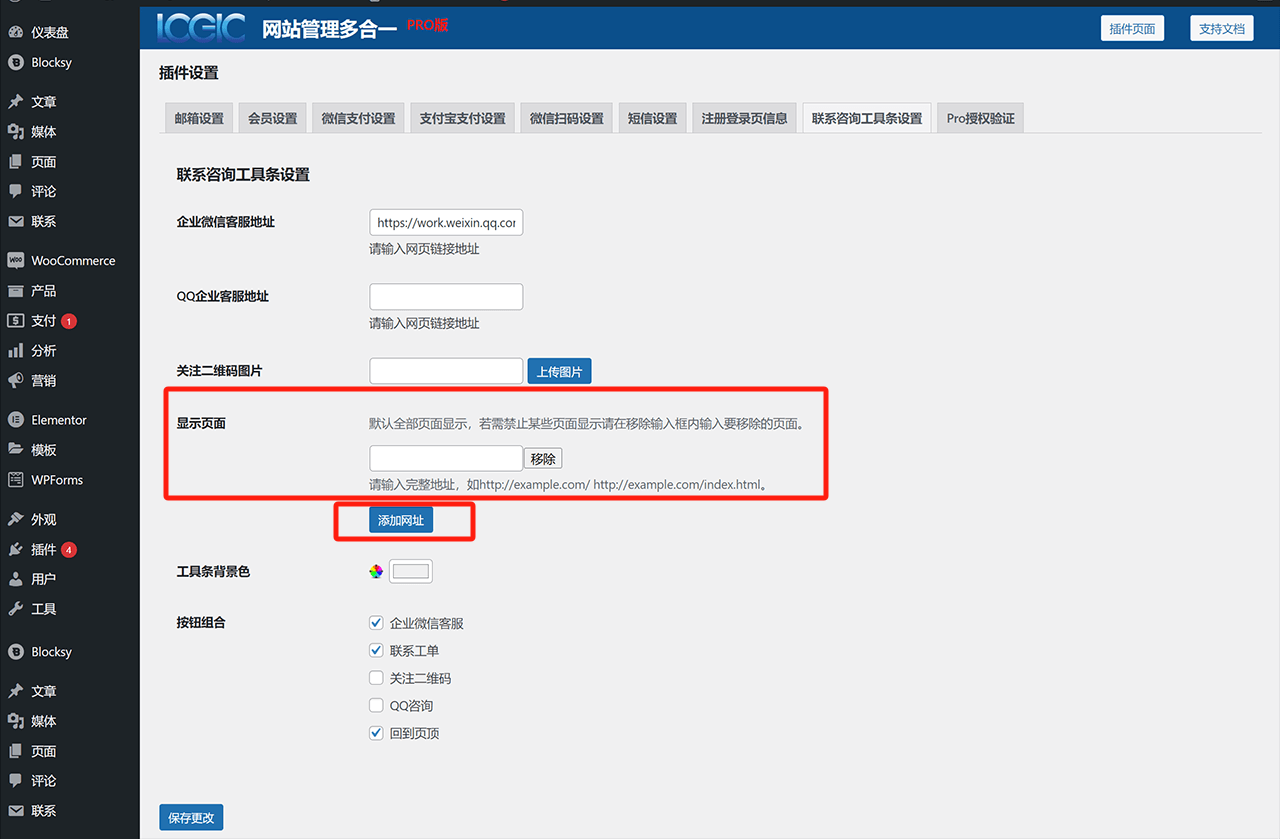
1、Custom Display Page Settings for the Contact Consultation Toolbar
The custom display page function for the contact consultation toolbar in the website management all-in-one plugin is shown in the red box in the image below. Under the "Display Page" section, you can enter the URL of the page where you want to remove the contact consultation toolbar. After saving the changes, the toolbar will no longer appear on that page. If you need to disable the toolbar on more than one page, click the "Add URL" button, as indicated in the red box in the image below, and continue adding the URLs of the pages where the toolbar should not be displayed.
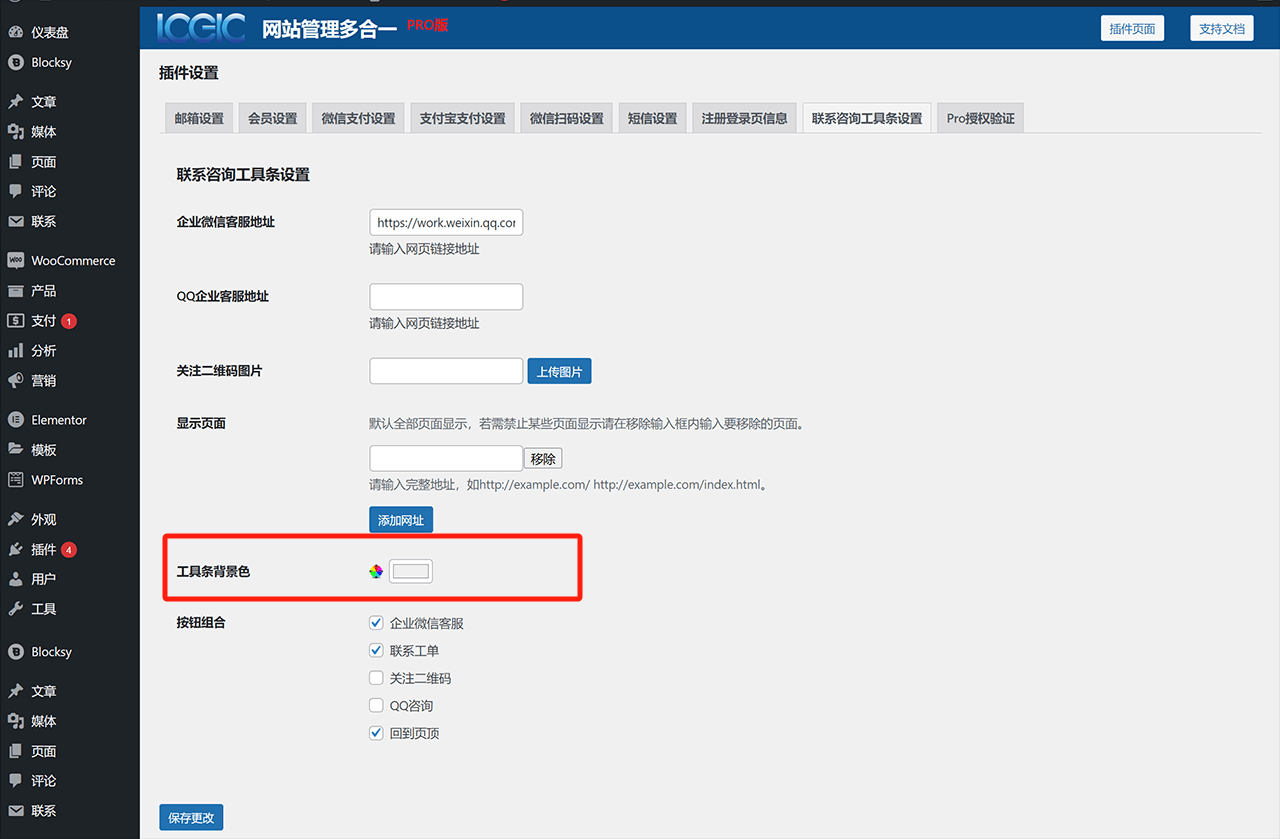
2、Custom Background Color Settings for the Contact Consultation Toolbar
As shown in the red box in the image below, click on the "Toolbar Background Color" component to the right. Within this component, you can use the color picker tool or directly enter the hexadecimal RGB color value to customize the background color of the contact consultation toolbar displayed on the frontend page. Finally, don't forget to click the "Save Changes" button to apply the custom background color.
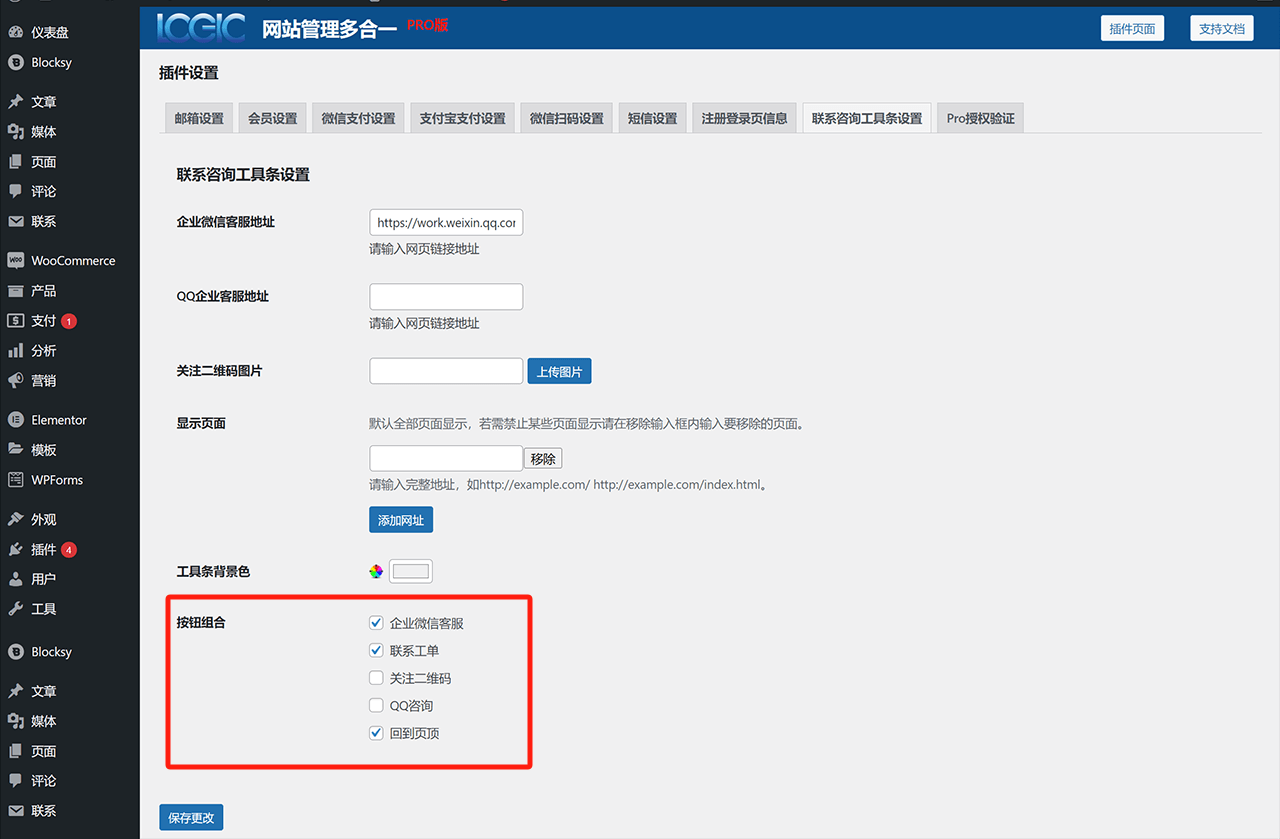
3、Custom Button Combination Settings for the Contact Consultation Toolbar
The website management all-in-one plugin’s contact consultation toolbar allows users to customize the combination of buttons displayed in the toolbar. As shown in the red box below, the toolbar integrates five buttons: Corporate WeChat, Contact Ticket, Follow QR Code, QQ Consultation, and Back to Top. Plugin users can toggle the visibility of these buttons by selecting or deselecting them, determining whether they are displayed on the frontend page.
Ⅸ、WordPress Plugin - Pro Authorization Verification
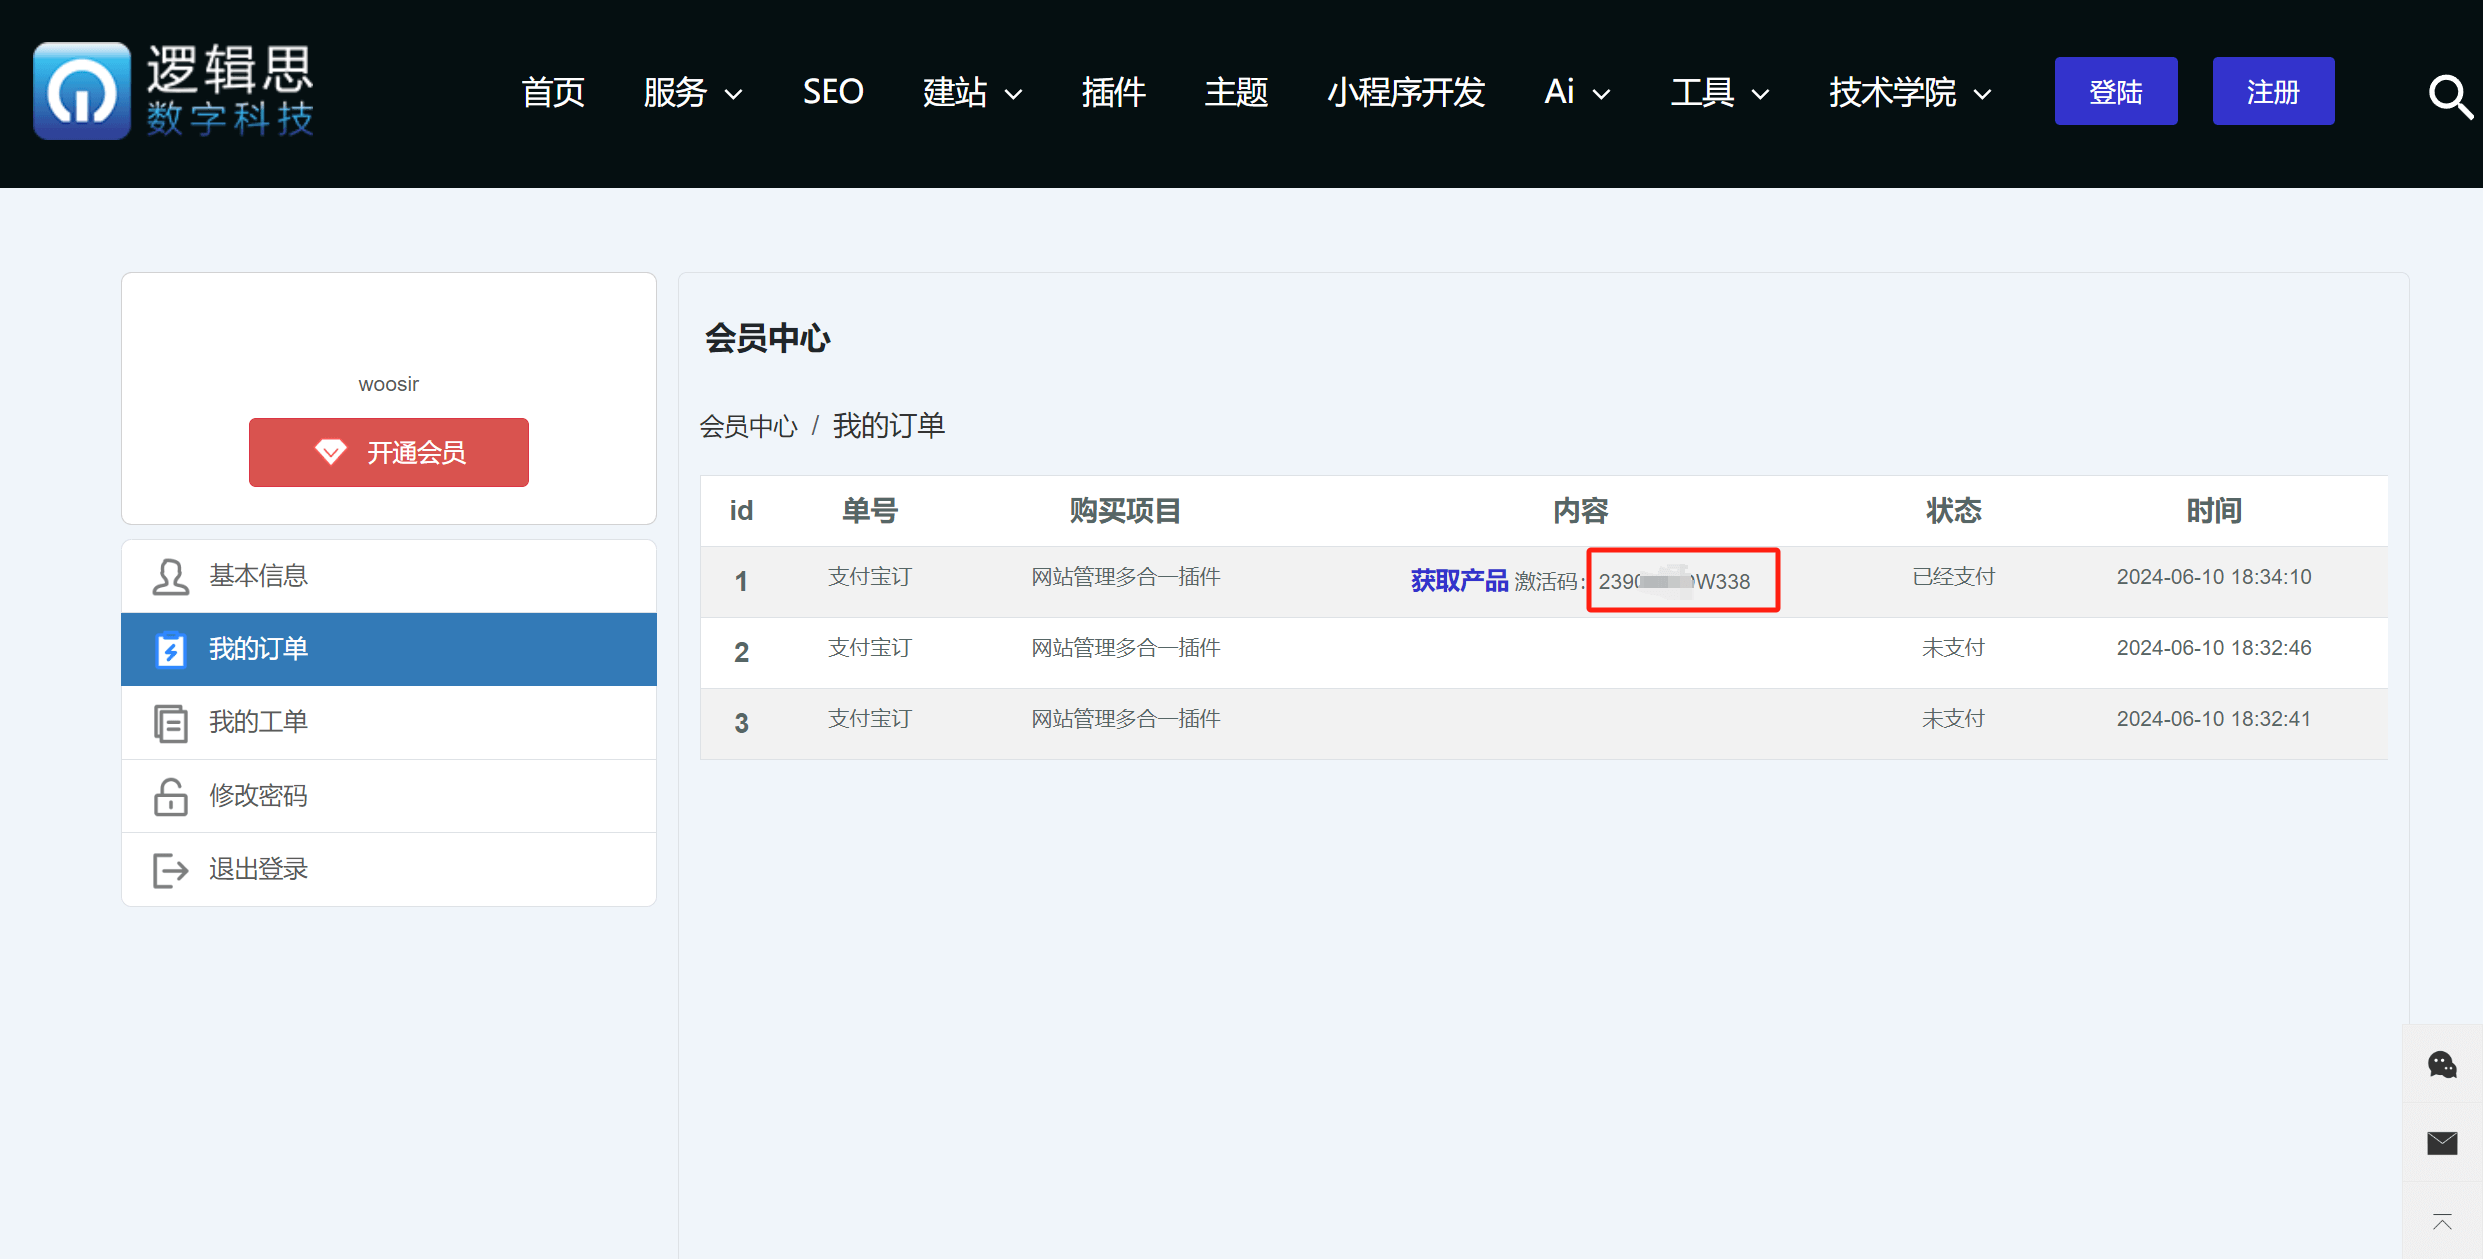
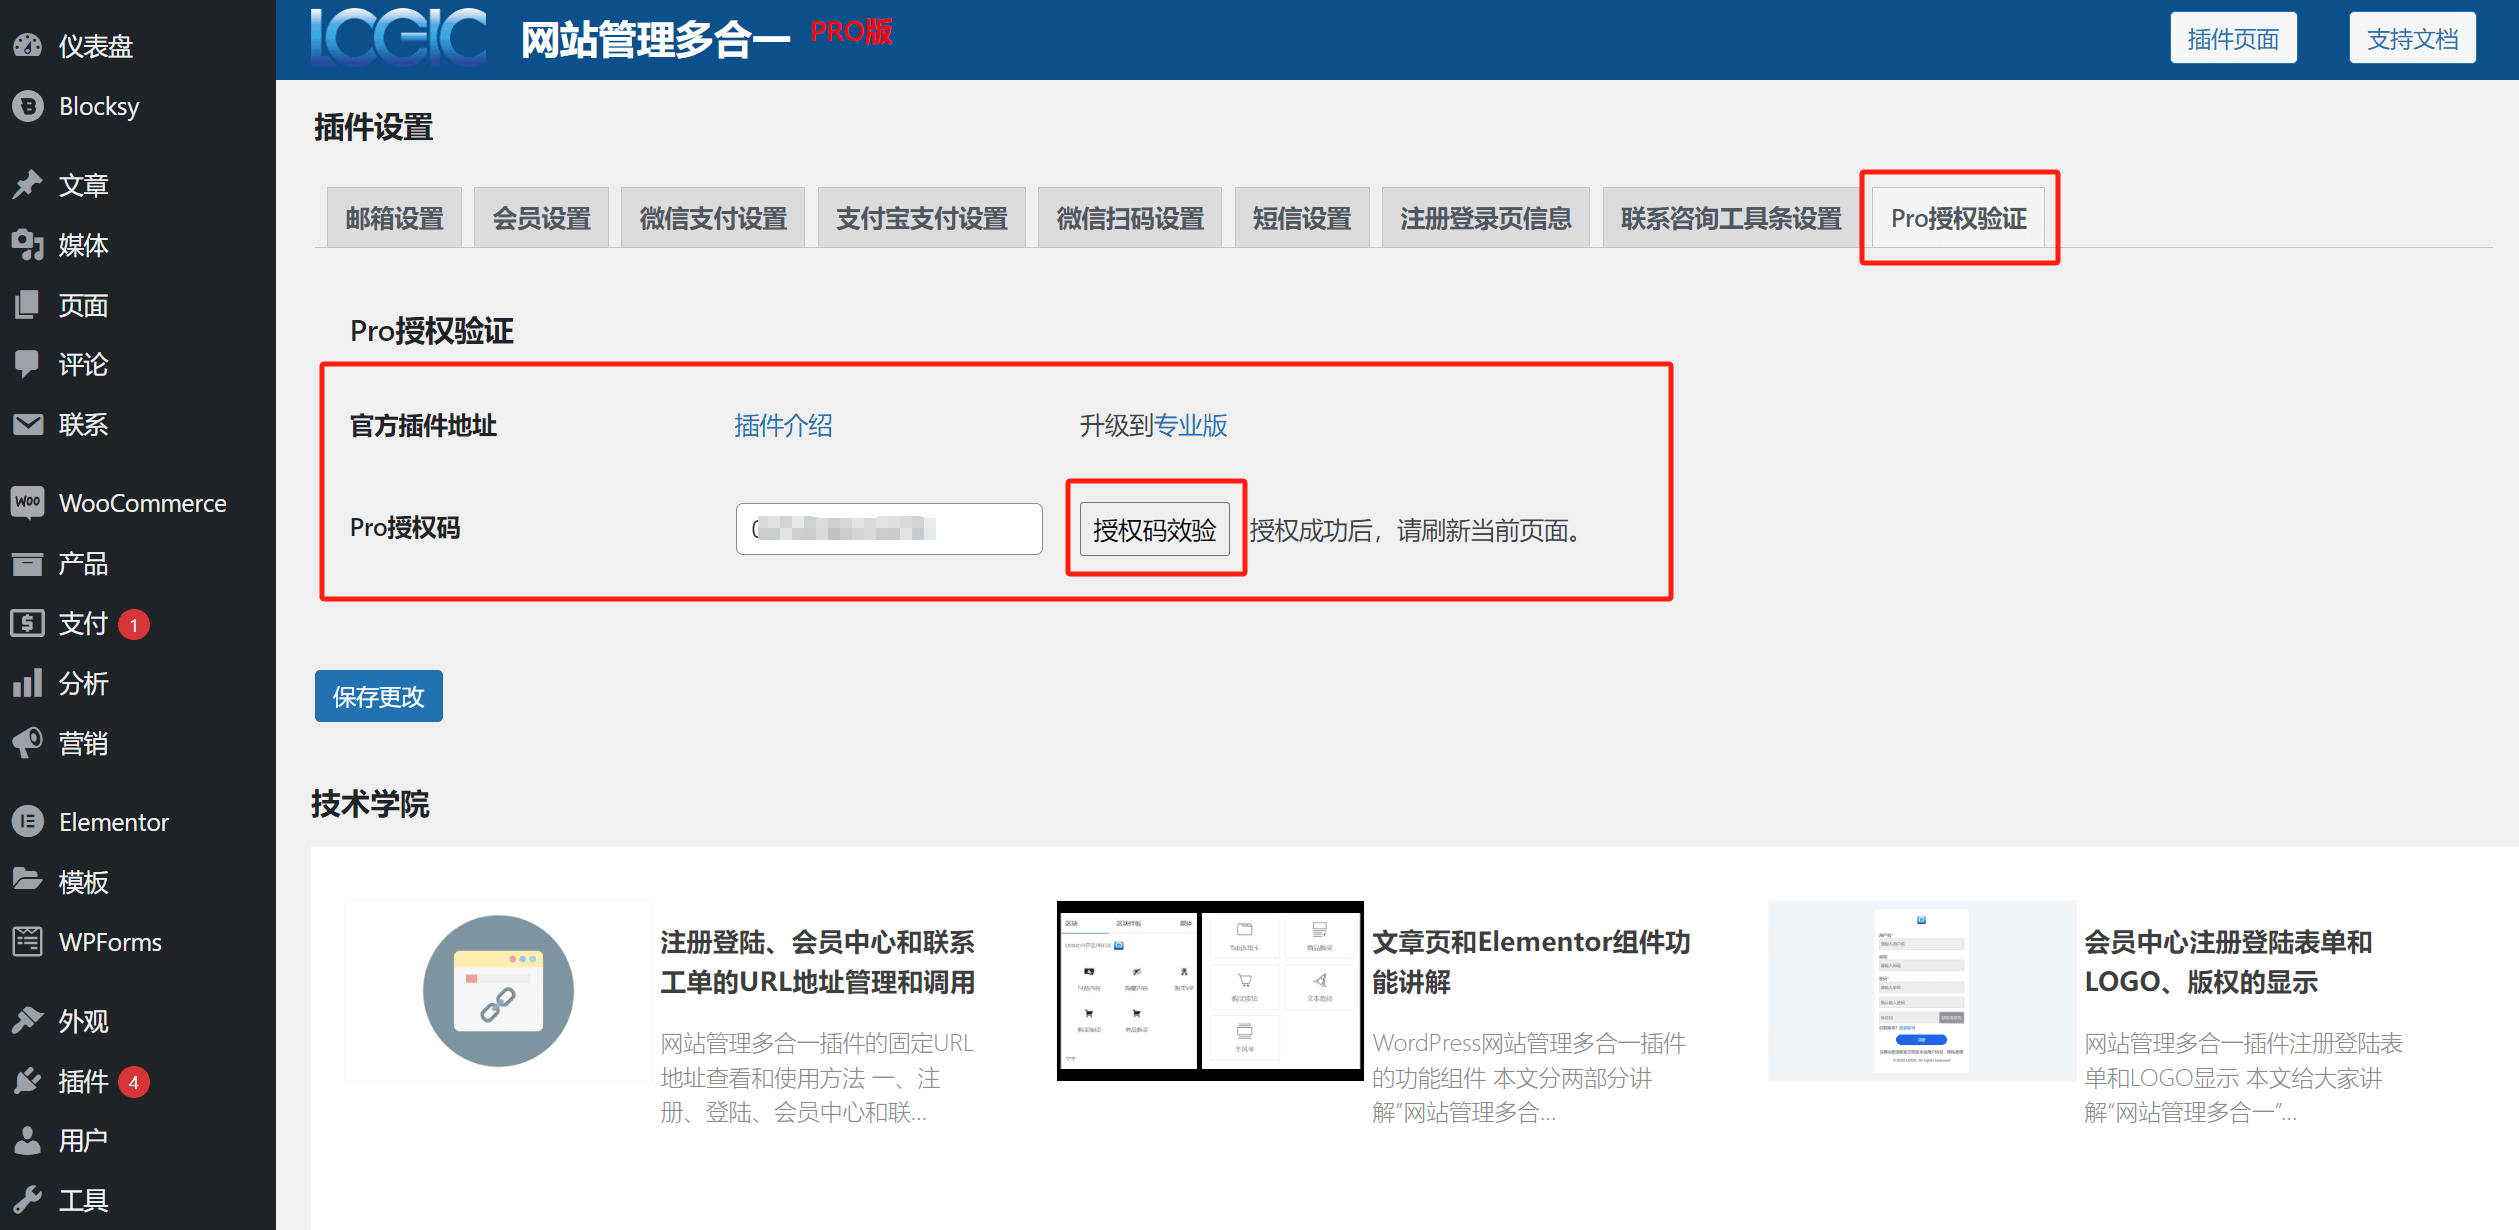
"Pro License Verification" is the final setting in the website management all-in-one plugin as per the article’s order, but it should actually be set immediately after the plugin is installed. This is because only after the Pro version upgrade is verified will all the features of the website management all-in-one plugin be unlocked. The Pro license verification process is straightforward. As shown in the image below, copy the "activation code" you received when purchasing the plugin from Logic Think Digital Technology’s website and paste it into the "Pro License Key" input field in the plugin's Pro License Verification settings. Then, click the "Verify License Key" button highlighted in the red box in the image to validate it. Finally, don't forget to click the "Save Changes" button at the bottom to apply the settings.
Conclusion: This concludes the full explanation of the settings in Logic Digital Technology’s WordPress Site Management All-in-One Plugin. If you are using the Pro version and still cannot successfully configure the desired features after reading this article, you may submit a ticket via the Logic Digital Technology website or directly add our technical support on WeChat. We will help diagnose and resolve issues on your site.
Logic Digital Technology (SZLOGIC) All rights reserved. Reproduction is prohibited.