


WooCommerce & Shopify Payment Integration Guide

Cross-border e-commerce websites serve as an important platform for product sales, and the ultimate goal of a website is to achieve product sales conversion. To accomplish this goal, it is essential to integrate a checkout and payment function into the website, allowing users to complete payment for items in their shopping cart while browsing products on the front-end pages. However, for readers who are building a website for the first time or planning to create their own site, there may be many questions regarding how to integrate the payment function into the site. Without clear answers to these questions, concerns and uncertainties about how to set up and connect the payment system can hinder the overall progress of website planning. In reality, these concerns mainly stem from unfamiliarity due to a lack of experience in building a website for the first time. From a technical perspective, this is not difficult to implement. The purpose of this article by Logic Digital Technology, titled “How to Set Up Payments on a Website? A Step-by-Step Guide to Integrating Payment Functionality,” is to clear up these doubts and guide you step-by-step in integrating a payment system into your website, enabling actual product sales and payments on your independent site.
Before proceeding with the following steps, cross-border e-commerce businesses need to first apply for a PayPal business account and an account with a global credit card acquiring service provider, along with the necessary technical support. You will need the business account credentials from PayPal and the API key from the global credit card acquiring provider in order to integrate these cross-border payment systems into your website via plugins or custom code. If you have not yet applied for a PayPal business account or selected a global credit card acquiring provider, you can refer to Logic Digital Technology’s previously published tutorial articles: “How to Register a Business PayPal Account / How to Set Up a Business PayPal Account” and “Website International Credit Card Payment Channels”, and follow the steps outlined in those articles to complete your account setup first.
The article “How to Set Up Payment on a Website? A Tutorial on Integrating Payment Functionality into a Website” is designed to help readers who are creating their first website learn how to implement payment features by following the content presented. Whether you are about to launch or have already created a WordPress website or a Shopify website, this tutorial will guide you on how to enable product sales payment functionality by linking a PayPal account and a credit card payment gateway. The article “How to Set Up Payment on a Website? A Tutorial on Integrating Payment Functionality into a Website” will provide a detailed demonstration of the setup process through the following four sections. In addition to reading through the entire content sequentially, readers can also choose to focus on the sections relevant to their specific website platform and follow the corresponding operational steps for practical implementation.
- Integrating PayPal for WooCommerce
- Integrating Credit Card Payment for WooCommerce
- Shopify integrates PayPal payment
- Shopify integrates credit card payment
Ⅰ、Integrating PayPal for WooCommerce
WooCommerce is the eCommerce plugin within the WordPress CMS website building system. The setup for integrating a PayPal Business Account with WooCommerce is essentially the same as integrating a PayPal Business Account with WordPress. After installing the WooCommerce plugin on your WordPress site, if you want PayPal payment buttons to appear on your product pages and allow users to check out using PayPal, you need to link the PayPal Business Account within the WooCommerce plugin settings in the WordPress admin dashboard. Below are the detailed steps for this setup. Follow these instructions step by step to successfully integrate PayPal payments into WooCommerce.
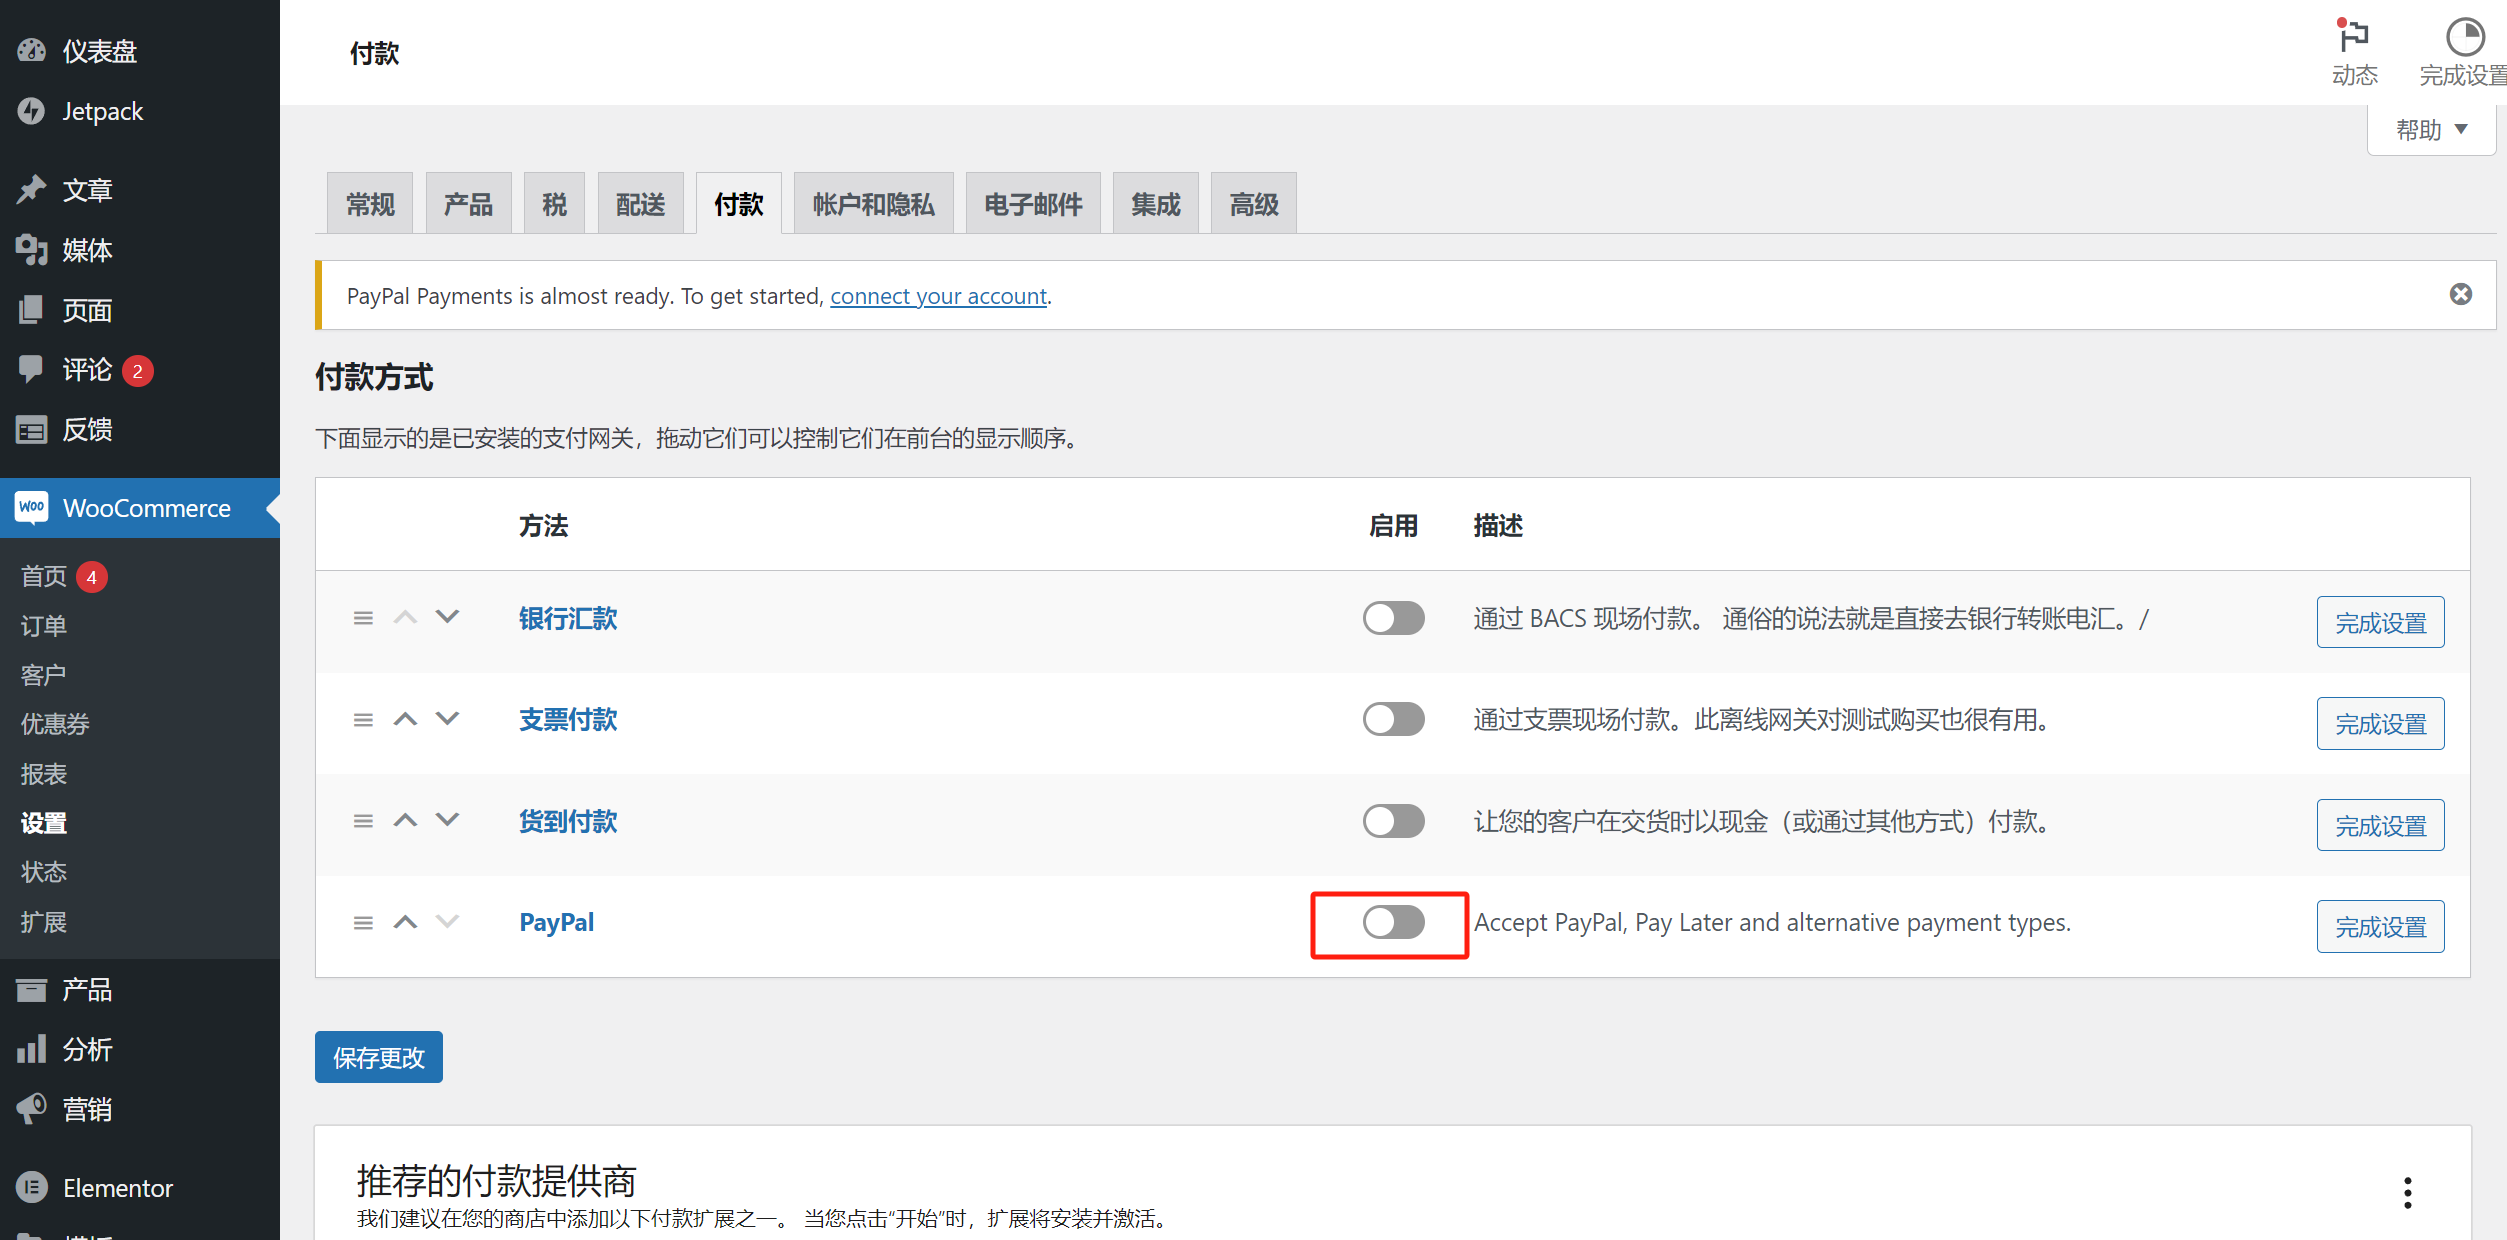
Step 1: Go to the payment settings page of the WooCommerce plugin

Follow the path indicated in the red box in the image above (WordPress backend sidebar - WooCommerce plugin - Settings - Payments) to access the WooCommerce plugin's payment settings page. Continue with the steps as outlined in step two below.
Step Two: Enable PayPal payments and complete the PayPal setup.
As shown in the image below, activate the PayPal button by clicking it.
After enabling PayPal, the page will redirect to the PayPal settings interface, as shown below. Scroll down until you see the "Activate PayPal" button, which is highlighted in the red box. Click the button to activate PayPal.
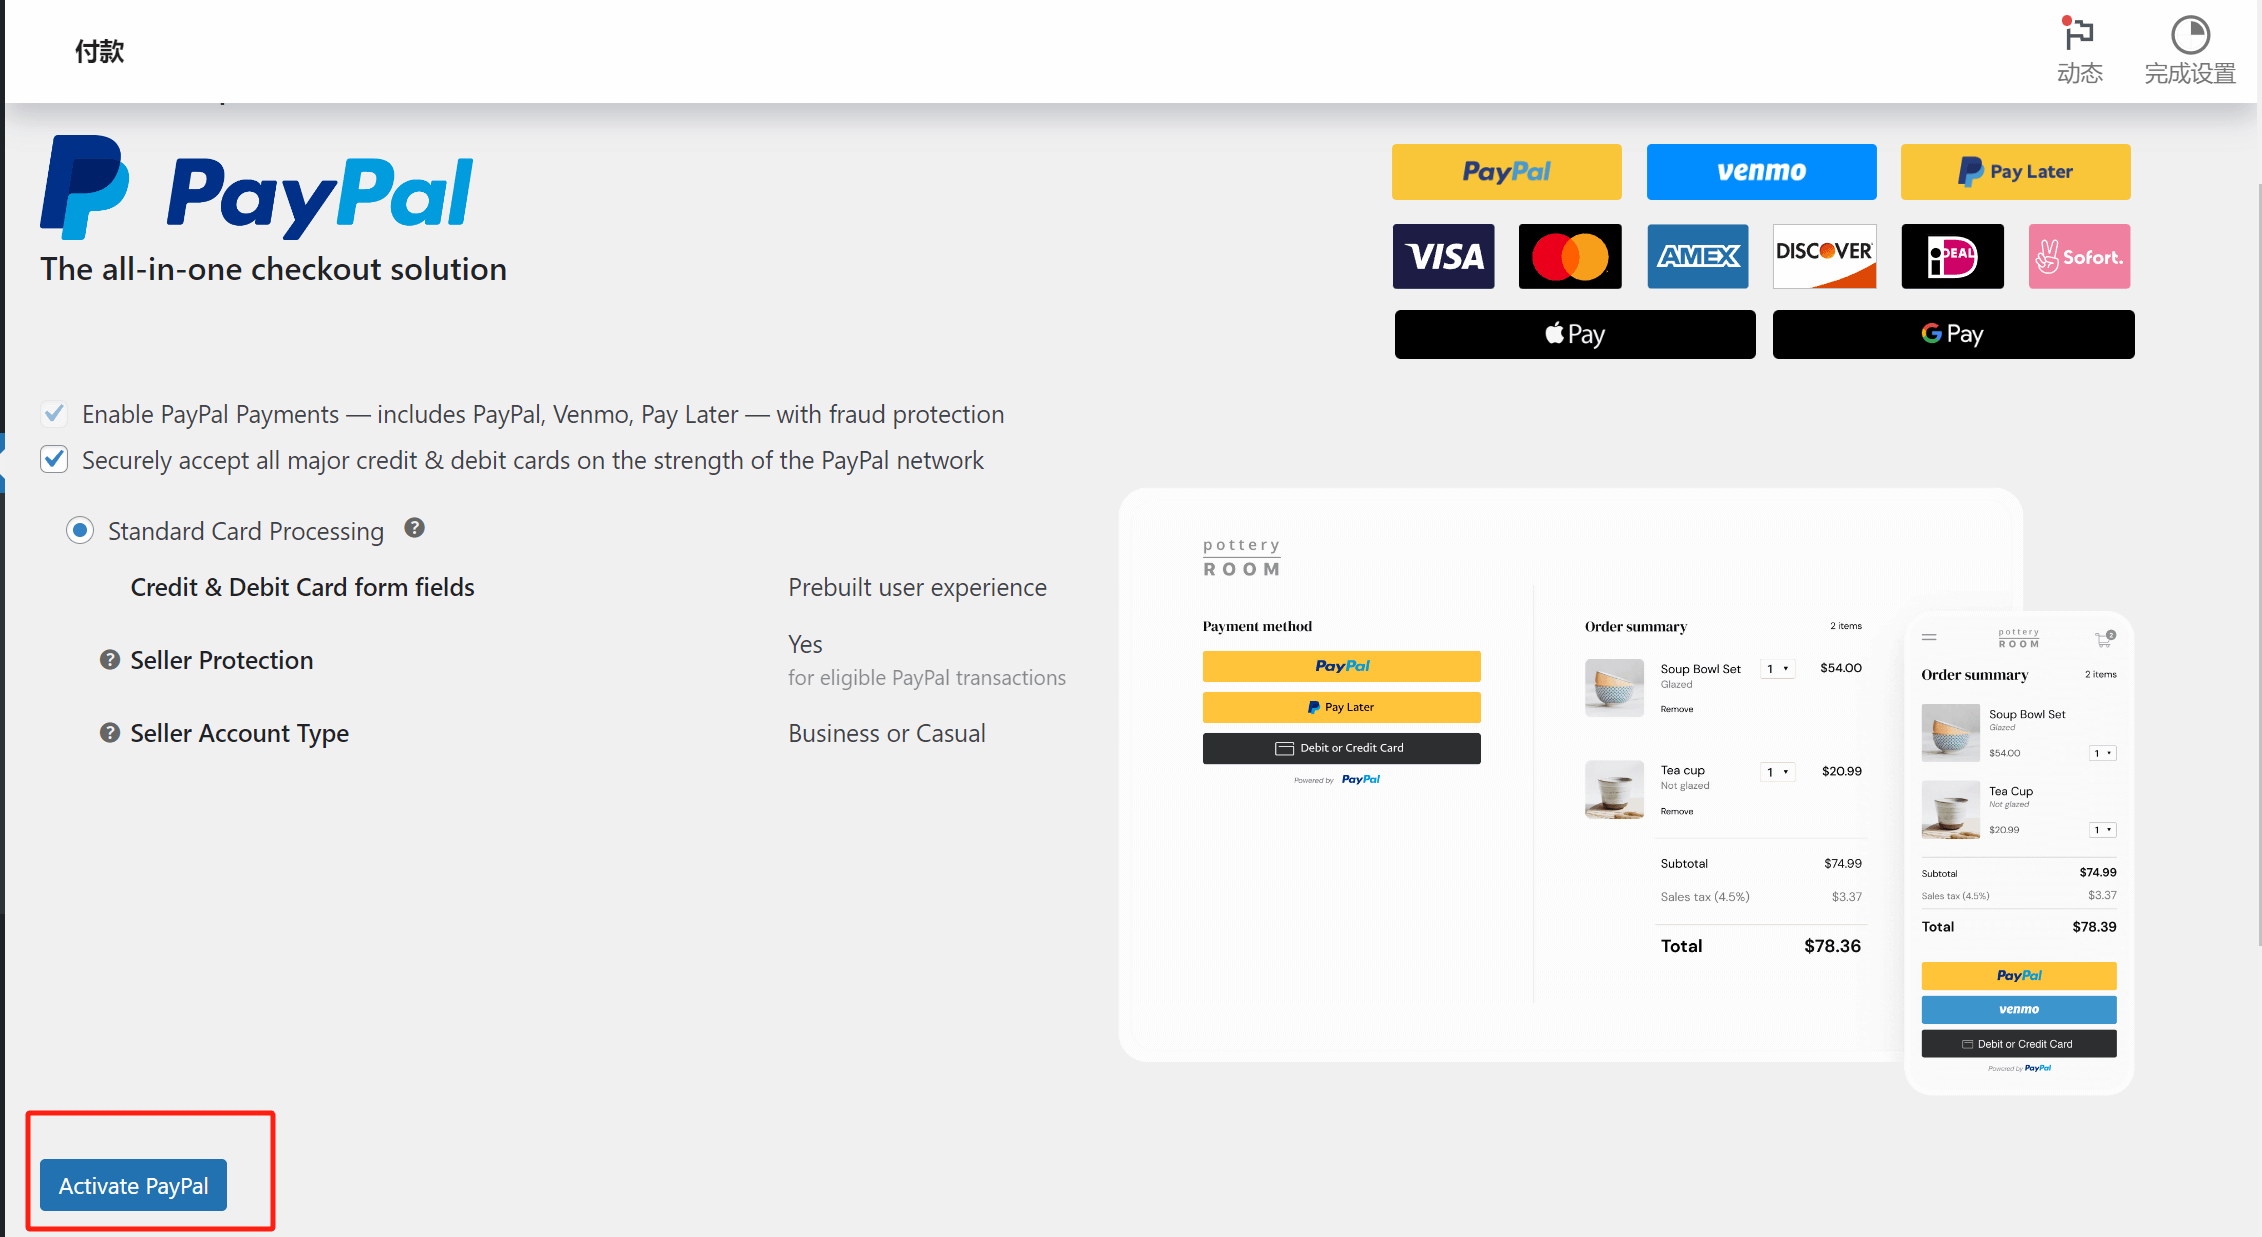
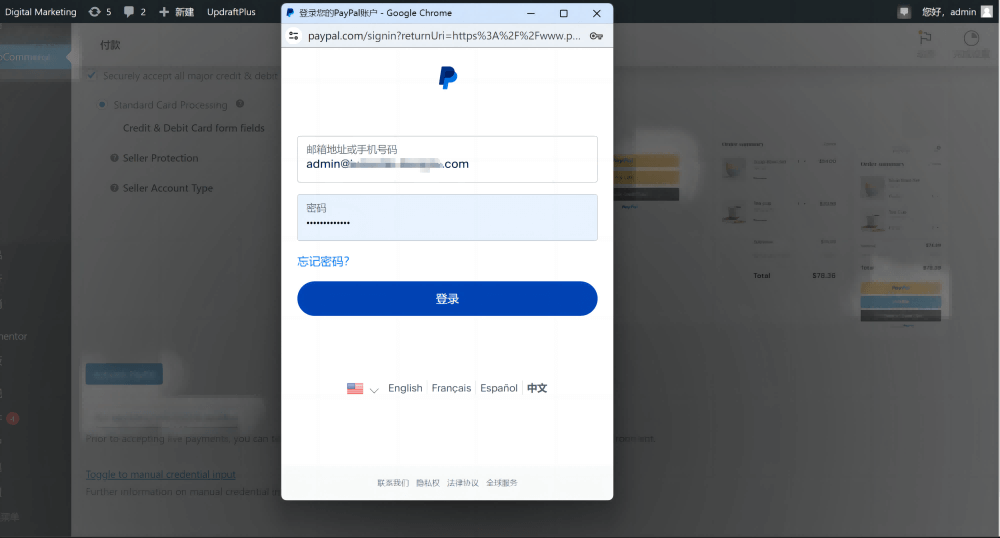
After clicking the "Activate PayPal" button, a window will pop up asking for WooCommerce to link to your PayPal account information. In the account input field, enter your business PayPal account information. In the "Country or Region" field, select the country where your PayPal business account is registered from the dropdown menu. Be sure to select the correct country, as choosing an incorrect one will result in an error and prevent you from continuing the PayPal activation. Once the information is filled in correctly, click the "Next" button to continue, which will take you to the PayPal login screen.

After entering your PayPal business account credentials, click the "Login" button to proceed with the PayPal activation.
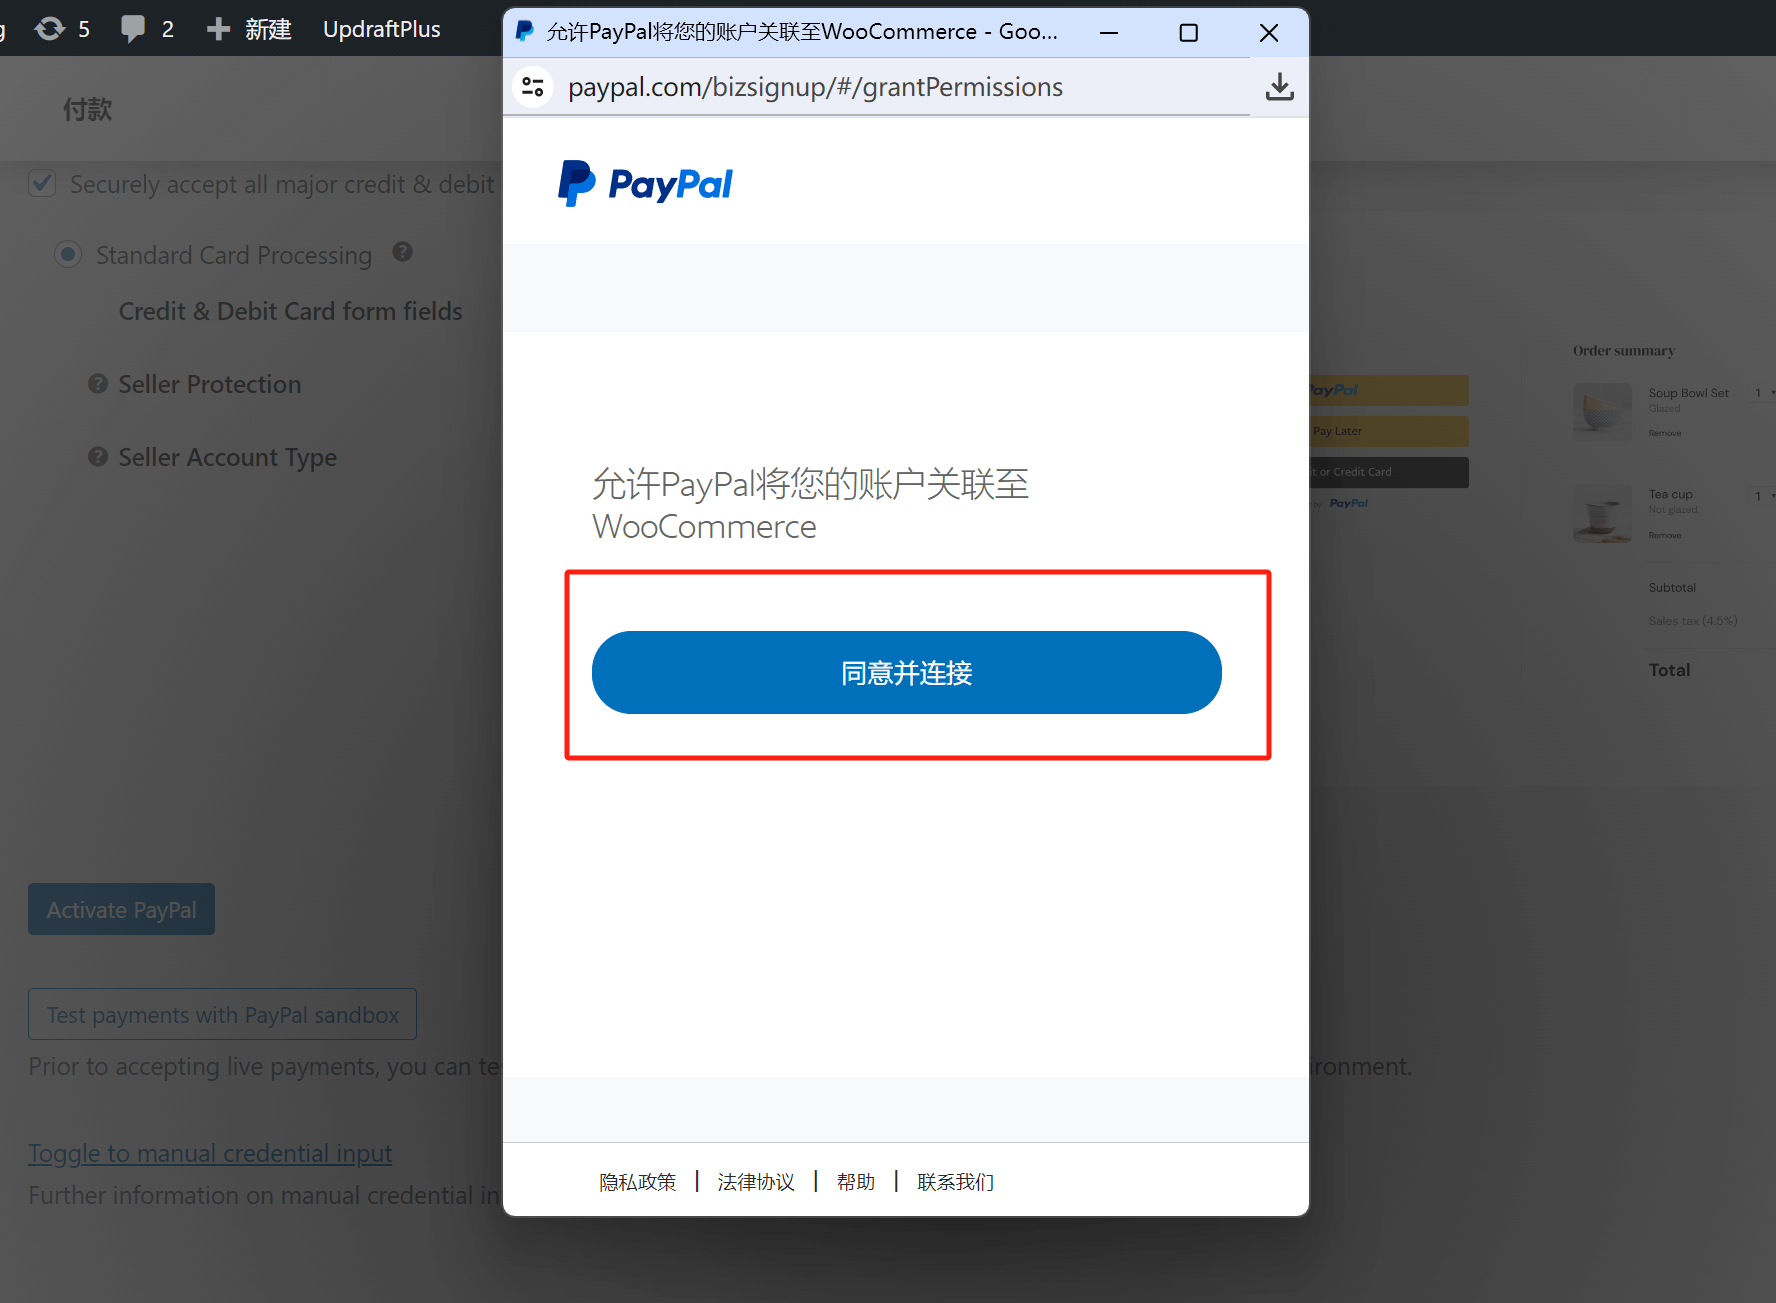
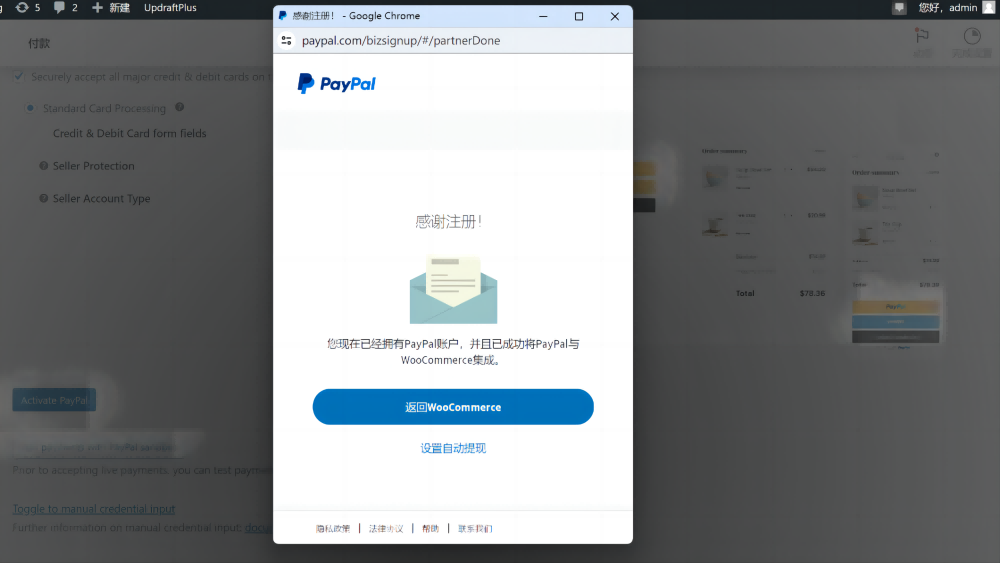
After completing the steps above, a window will pop up to complete the final step of linking PayPal to WooCommerce, as shown below. Click the "Agree and Connect" button to confirm the connection between WooCommerce and your PayPal account. At this point, PayPal has been successfully linked to WooCommerce, and PayPal has been activated on your WordPress site.
Ⅱ、Integrating Credit Card Payment for WooCommerce
We will use the domestic global credit card payment service provider Oceanpayment as an example to demonstrate the integration of credit card payment functionality. The installation principles for other domestic and international global cross-border payment service providers are essentially the same, and the actual implementation process is also quite similar. Additionally, the service providers usually offer installation guidance or provide technical documentation for the integration. Even technical personnel with basic operations and maintenance skills can complete the setup by simply following the documentation.
Step 1: Add a credit card payment logo to the footer of your website
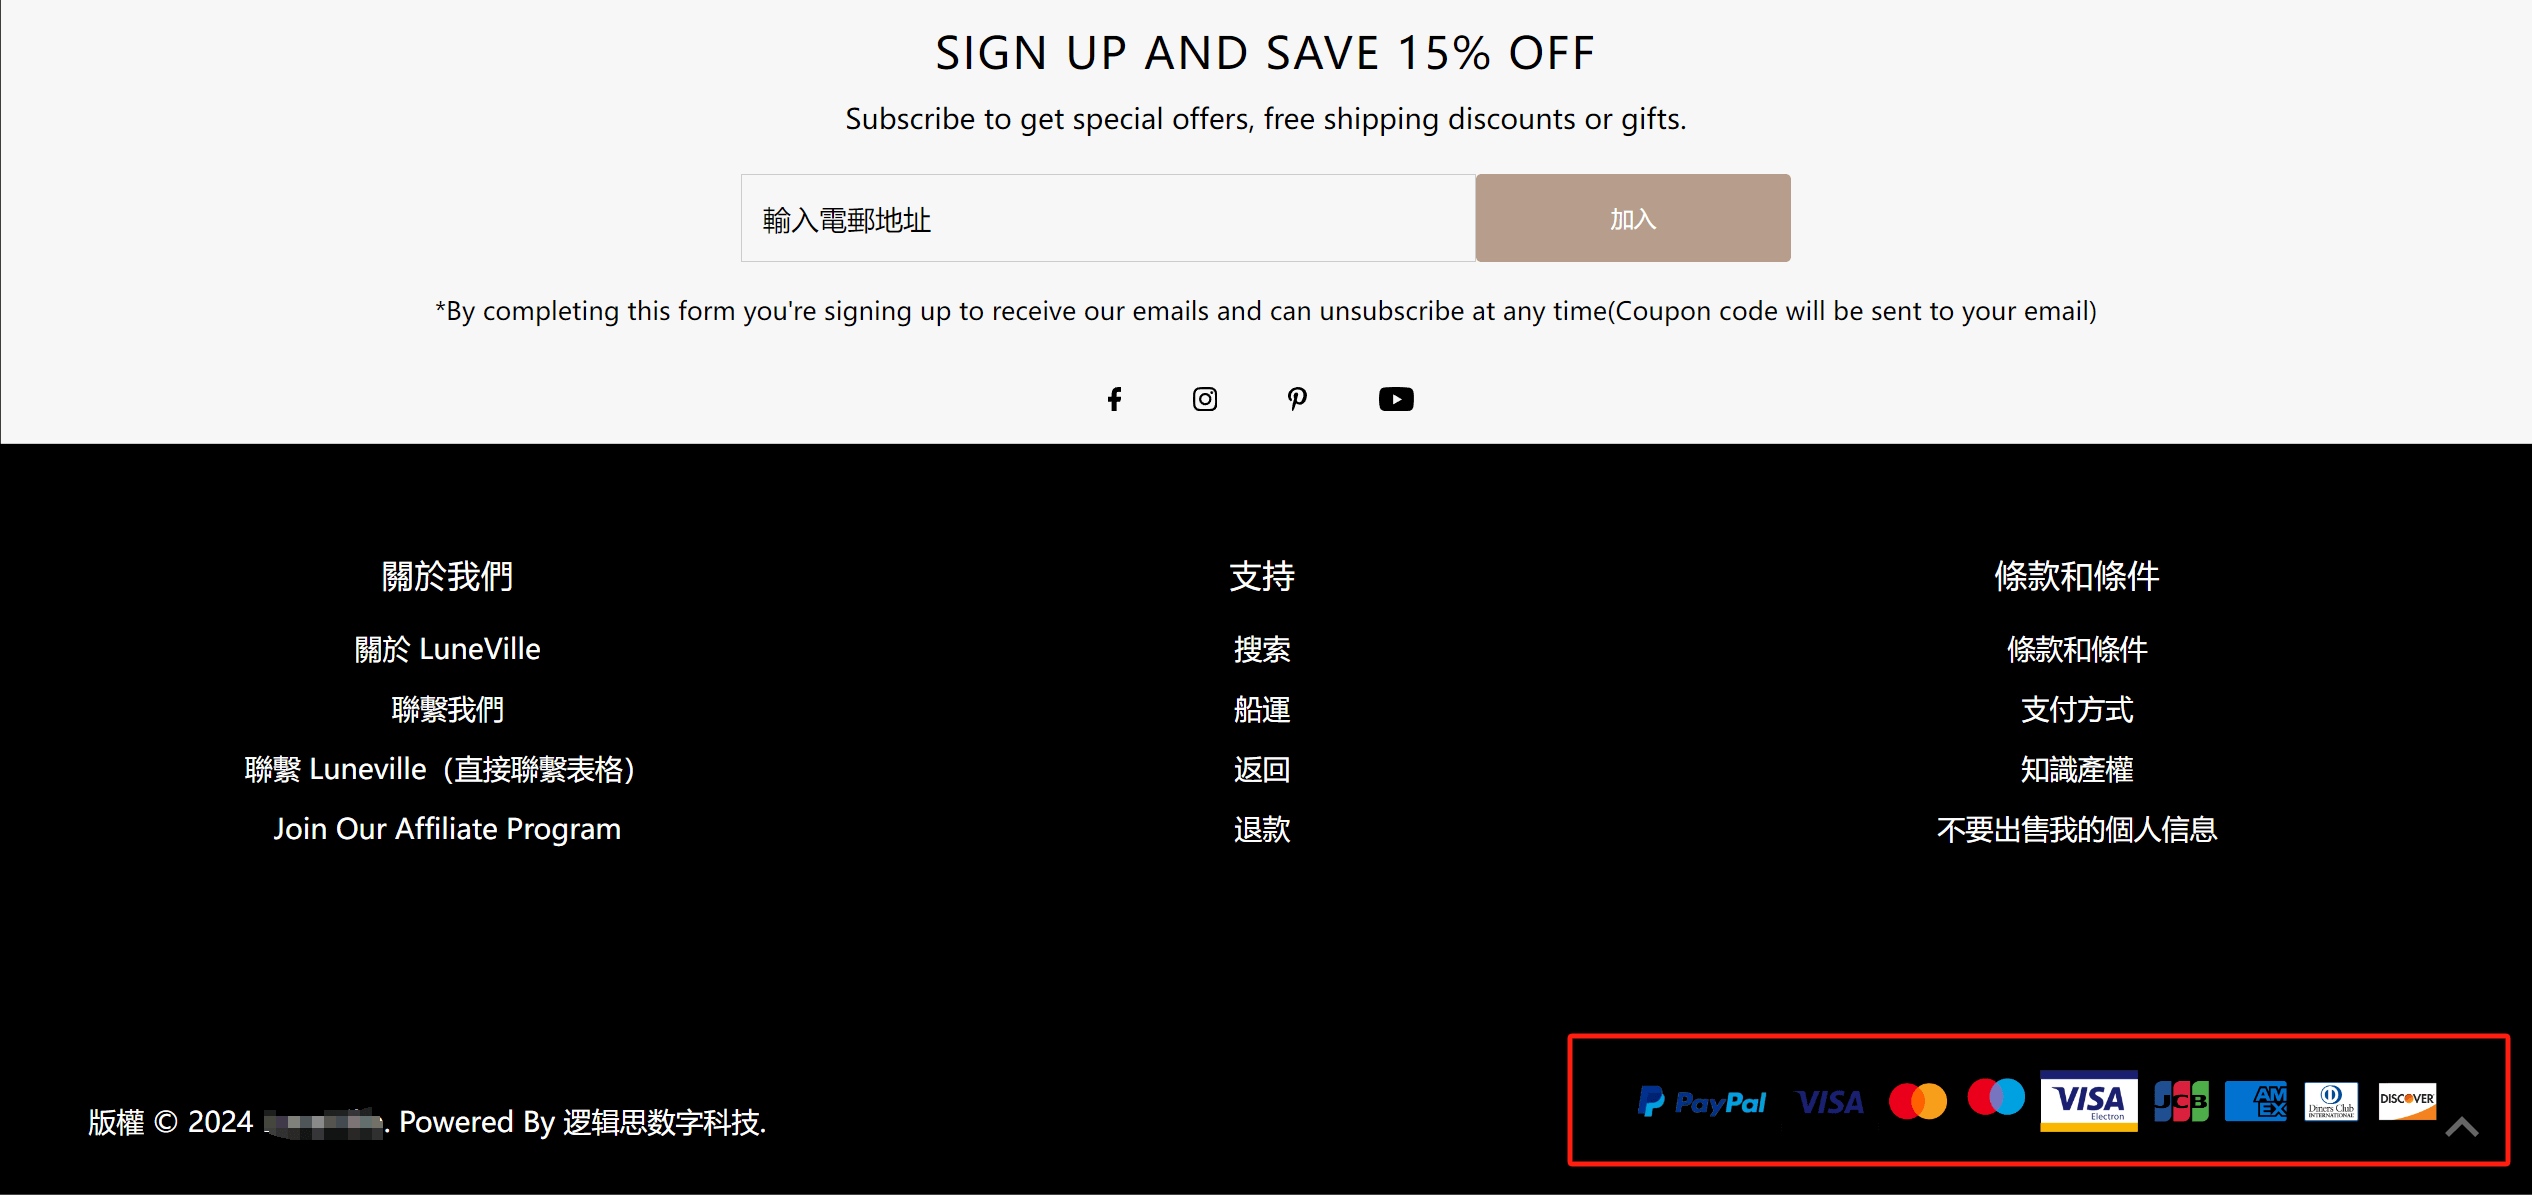
Adding a credit card logo to the footer of an independent website involves editing the footer, which can be completed by the technical staff of the website building company or credit card acquiring service provider.
Step 2: Modify page information and add a new policy page according to Oceanpayment's policy requirements
Oceanpayment has many details that need to be modified for the page information of the connected independent station. Policy pages including return and exchange policy, payment method, terms and conditions, intellectual property rights, etc. need to be made according to its specifications. For specific requirements, the Oceanpayment customer service responsible for the connection will provide relevant documents, and these policy pages need to be made according to the specifications described in the documents.
Step 3: Install the credit card acquiring service provider’s plugin
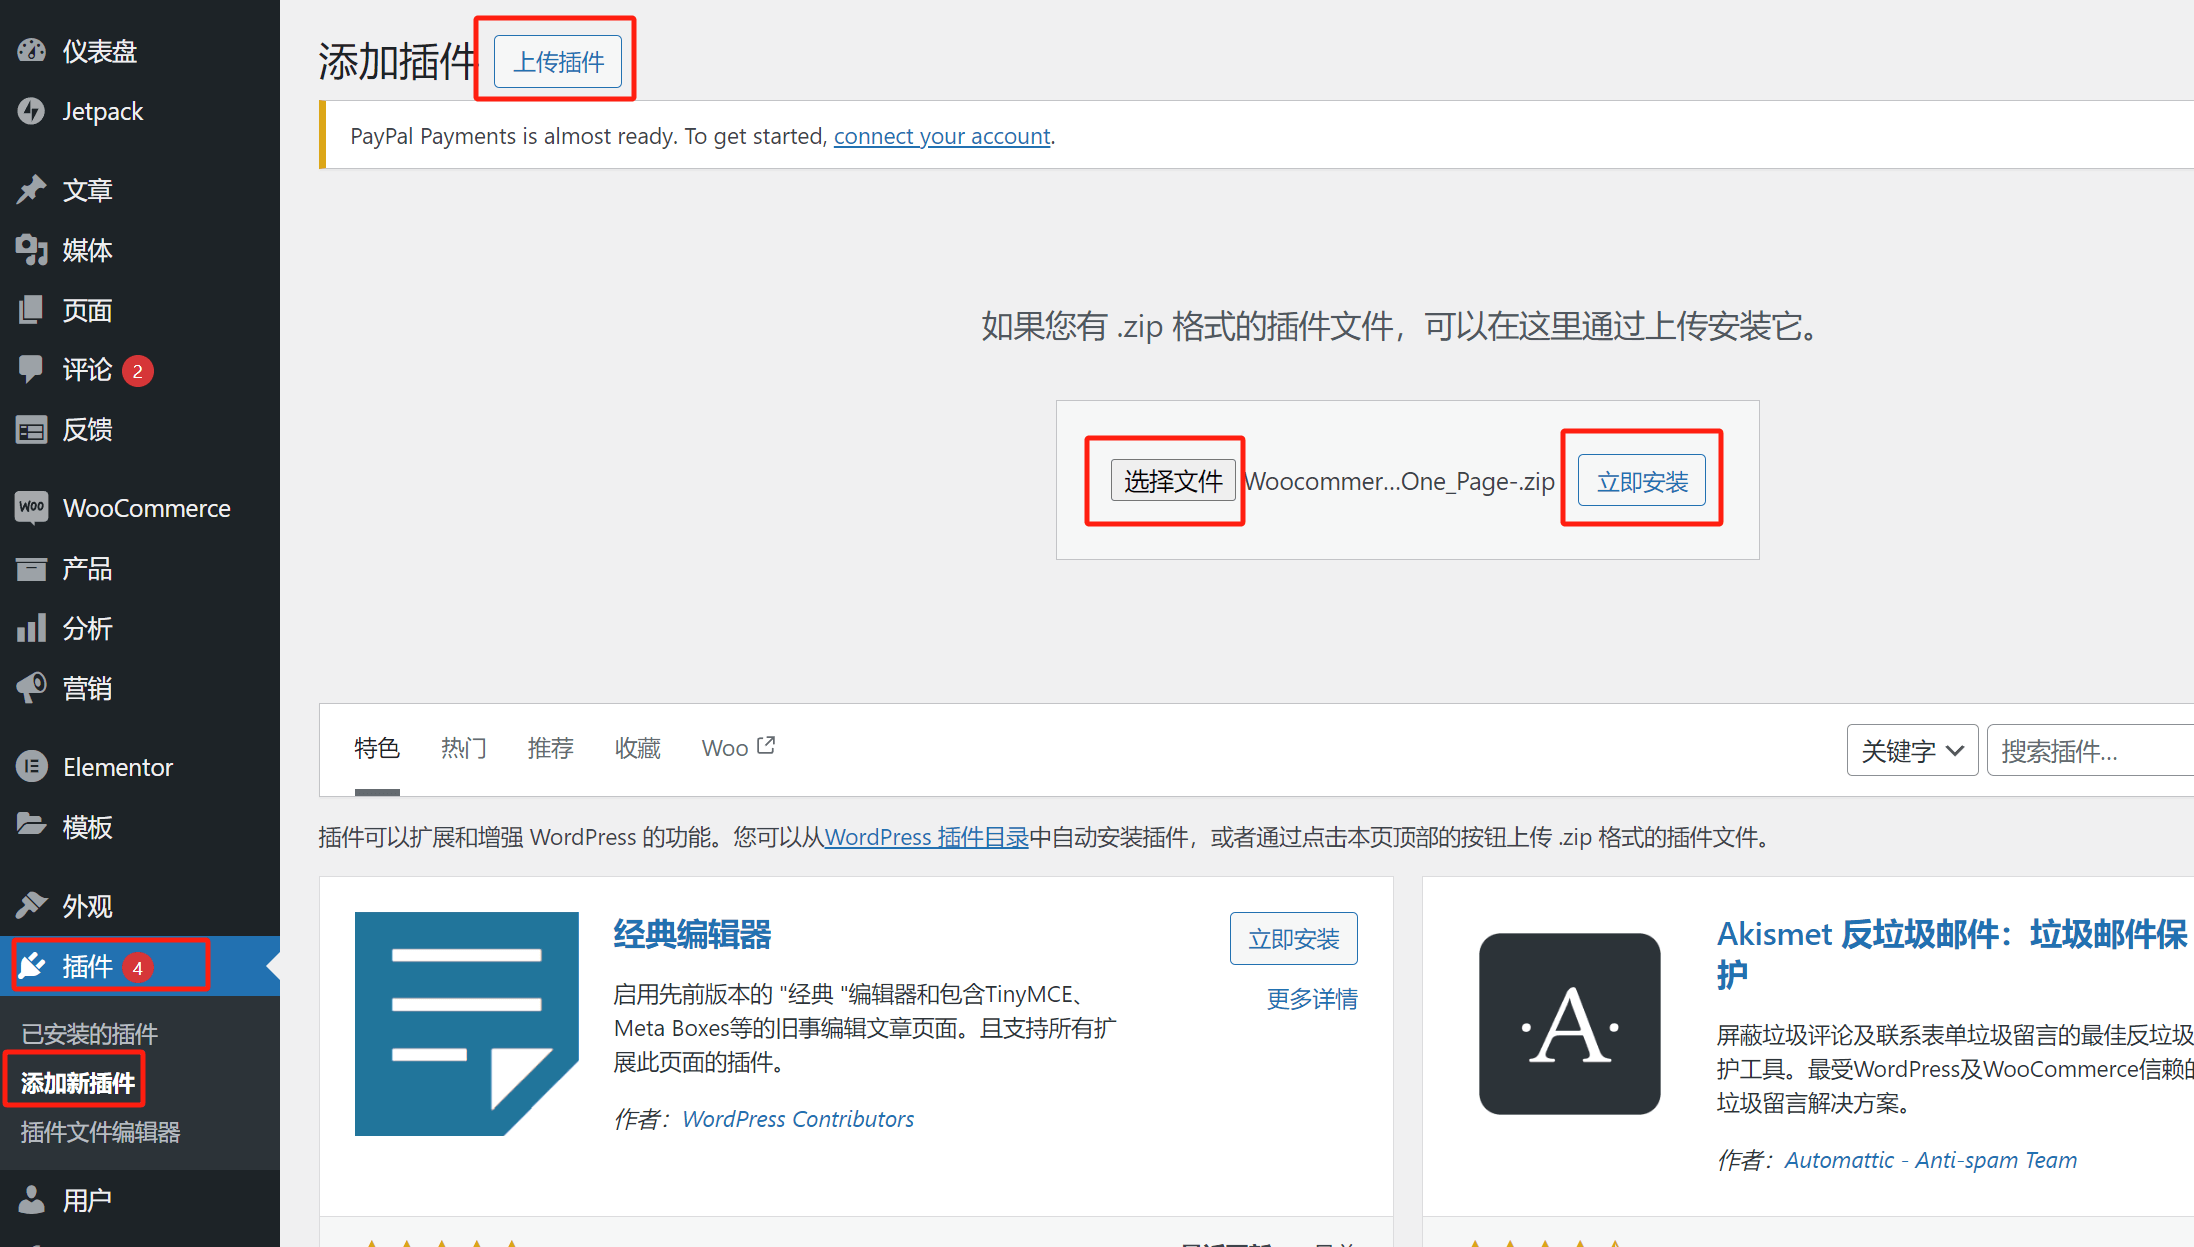
Oceanpayment will provide the plugin installation package or a download link to the cross-border e-commerce independent site owner. After saving or downloading the plugin installation package, go to the WordPress site admin dashboard and follow the path shown in the image (Left Sidebar – Plugins – Add New Plugin). Click the "Upload Plugin" button, then click "Choose File" to upload the Oceanpayment plugin installation package. Finally, click the "Install Now" button to install the Oceanpayment plugin. After the plugin is successfully installed, follow the prompt in the plugin list to set it as enabled.
Step 4: Enable credit card payment in WooCommerce plugin and complete credit card payment settings
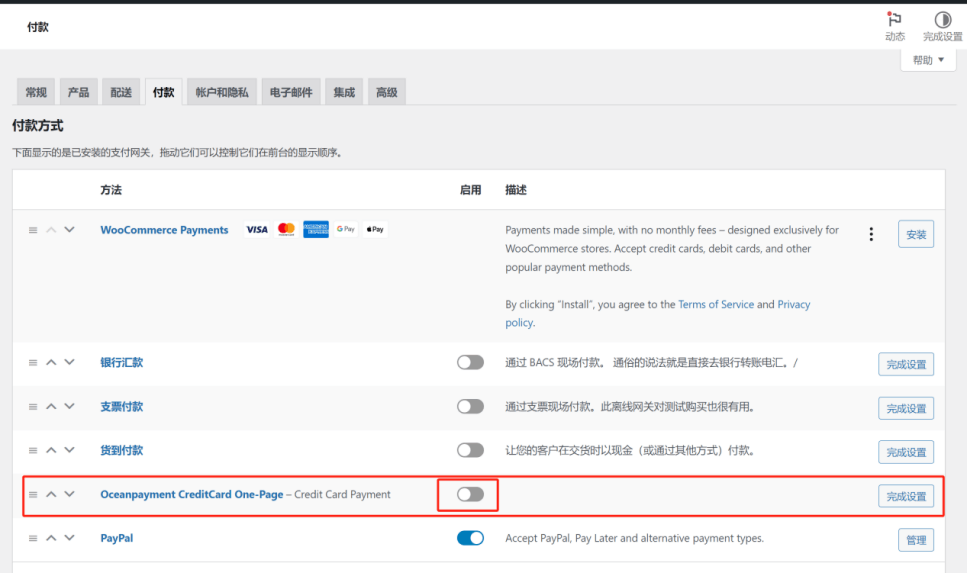
After installing and activating the Oceanpayment plugin, follow the path of WooCommerce Plugin-Settings-Payment on the left sidebar of the WordPress backend to enter the WooCommerce payment function setting interface. As shown in the figure above, in addition to PayPal that has been enabled and activated just now, there is also an Oceanpayment list. Open the enable button marked with a red box in the figure above and click the "Finish Setup" button on the right to continue activating Oceanpayment's credit card acquiring function.
Step 5: Fill in the API key of the credit card acquiring service provider (Oceanpayment) to activate the credit card acquiring function
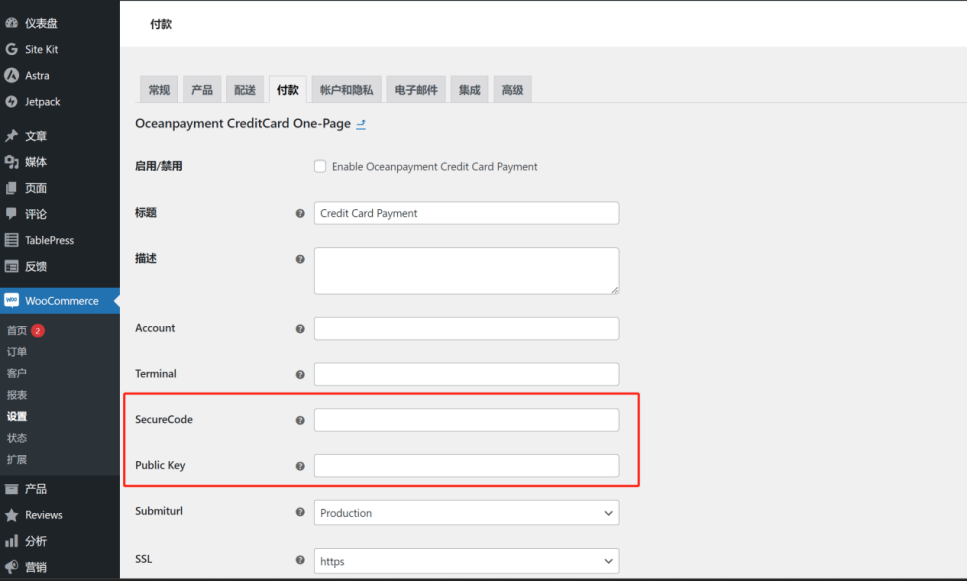
The API key refers to the plugin's usage key, which is a standard procedure for any paid version plugin. You need to enter the relevant key to use the plugin or unlock certain features of the plugin. To activate the Oceanpayment plugin, there are two types of key information to be filled in: SecureCode and Public Key. These keys are provided by Oceanpayment. Simply copy and paste the obtained keys according to their types. Once this is done, the installation of Oceanpayment for WooCommerce as a global credit card payment solution is complete. Users can now choose from the credit card types supported by Oceanpayment on the checkout page of the independent site to complete the payment for their products.
Ⅲ、Shopify integrates PayPal payment

Shopify does not require any additional third-party plugins to integrate PayPal. As a SaaS platform for cross-border e-commerce, Shopify has already built-in the functionality to integrate PayPal for product payments. Within the settings section of the Shopify dashboard, users can easily and quickly link a PayPal account to Shopify. Below are the specific steps for linking a PayPal account to Shopify. Readers can follow each step accordingly to configure the settings themselves and complete the integration of PayPal as the payment system for their independent site. Once the integration is complete, the PayPal payment button will appear on the product detail pages and checkout pages of the independent site, allowing users to pay for their purchases using their PayPal accounts.
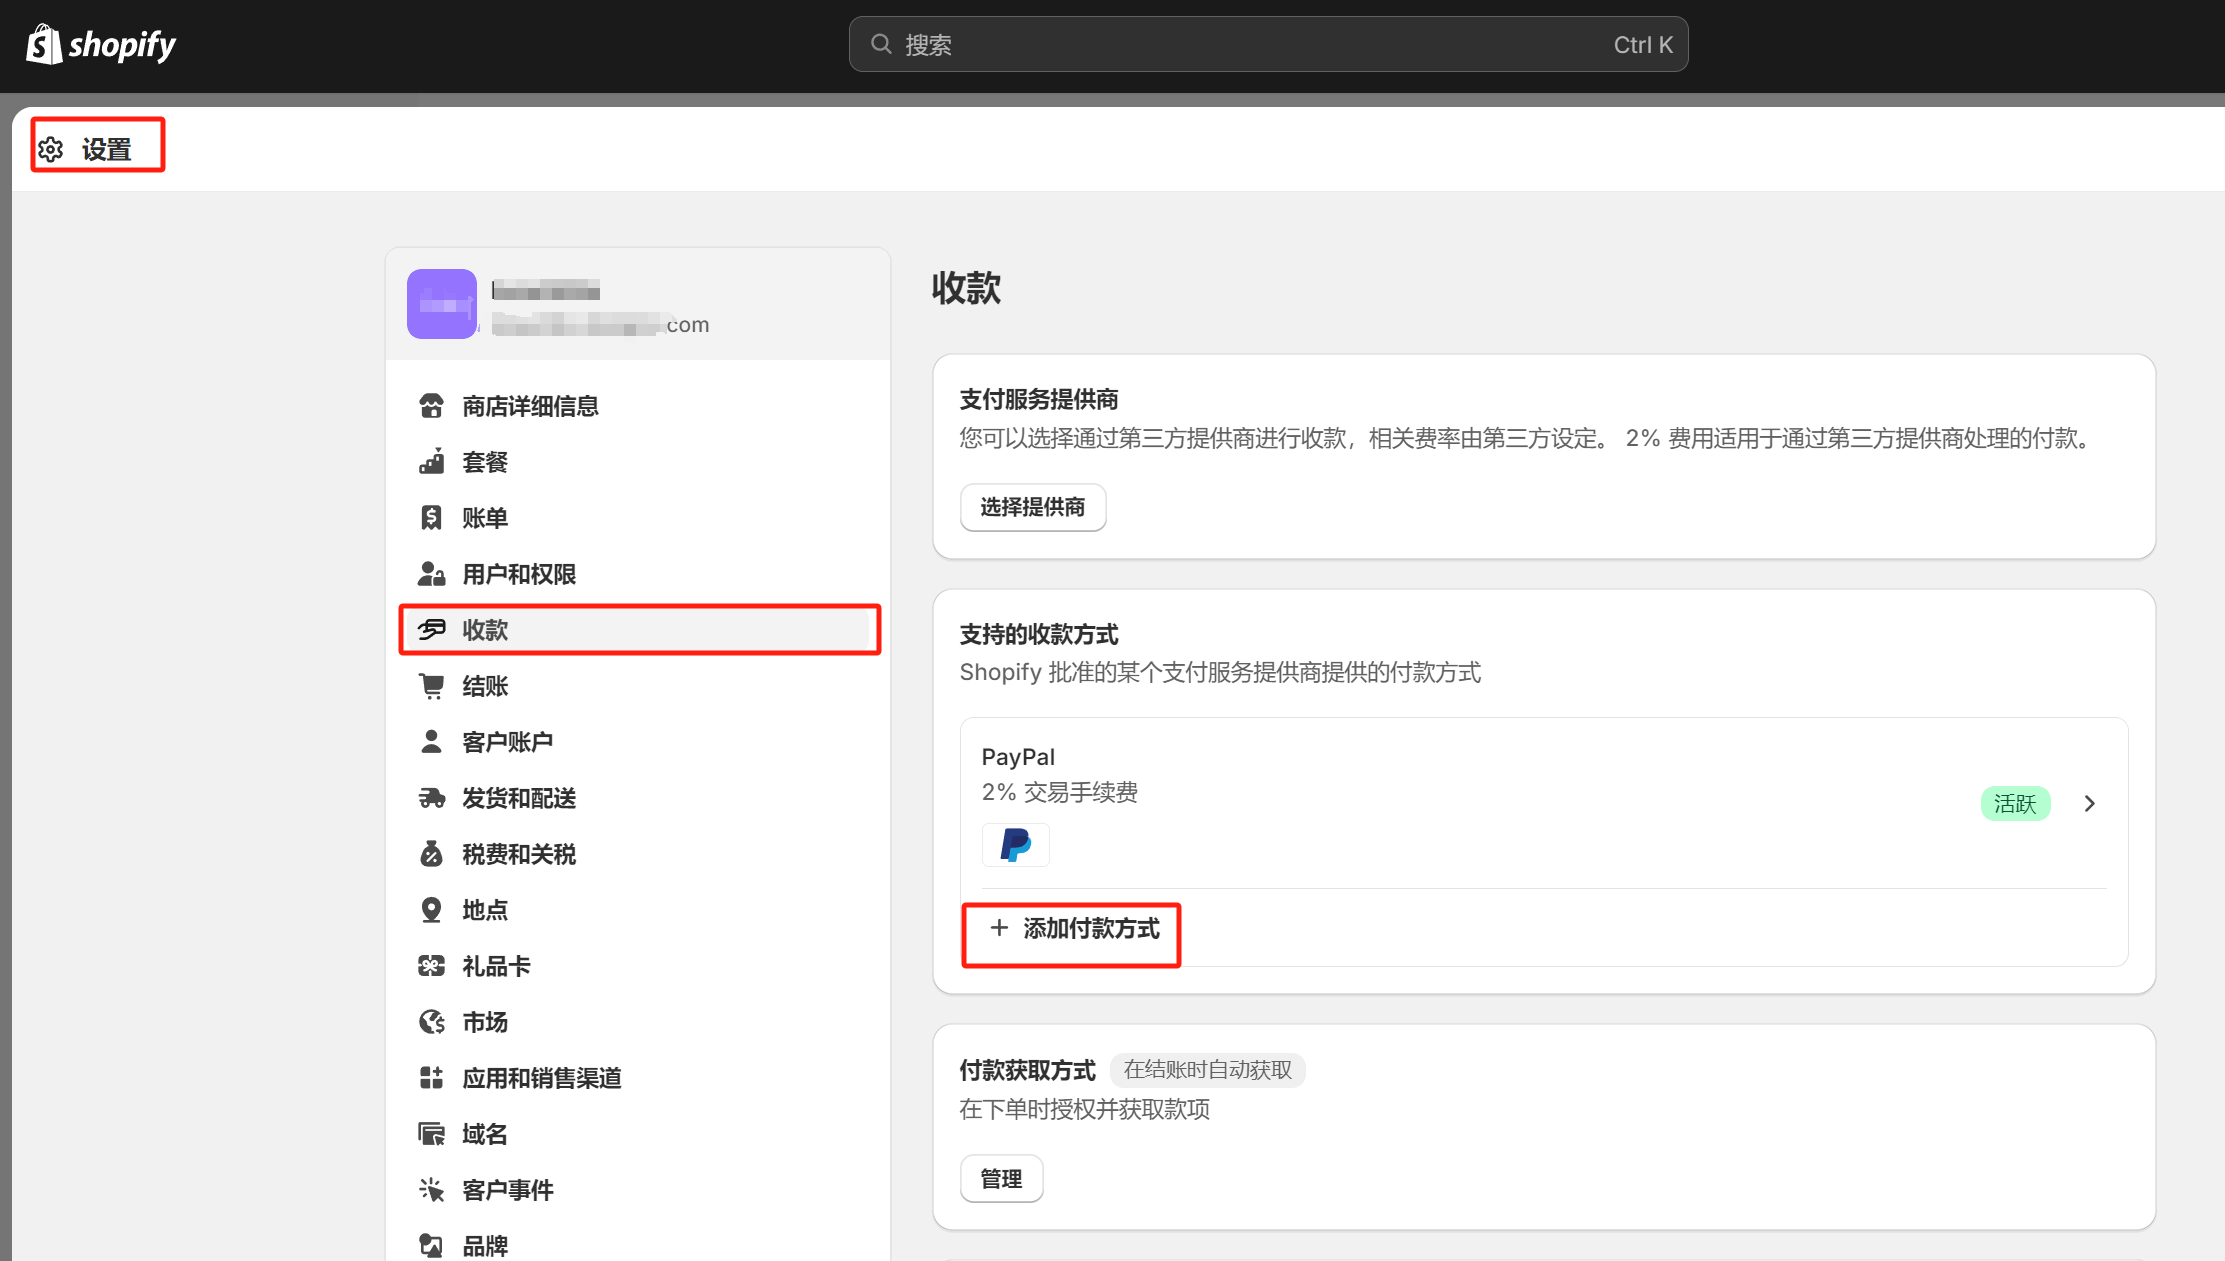
Step 1: Enter the payment settings interface of the Shopify site backend
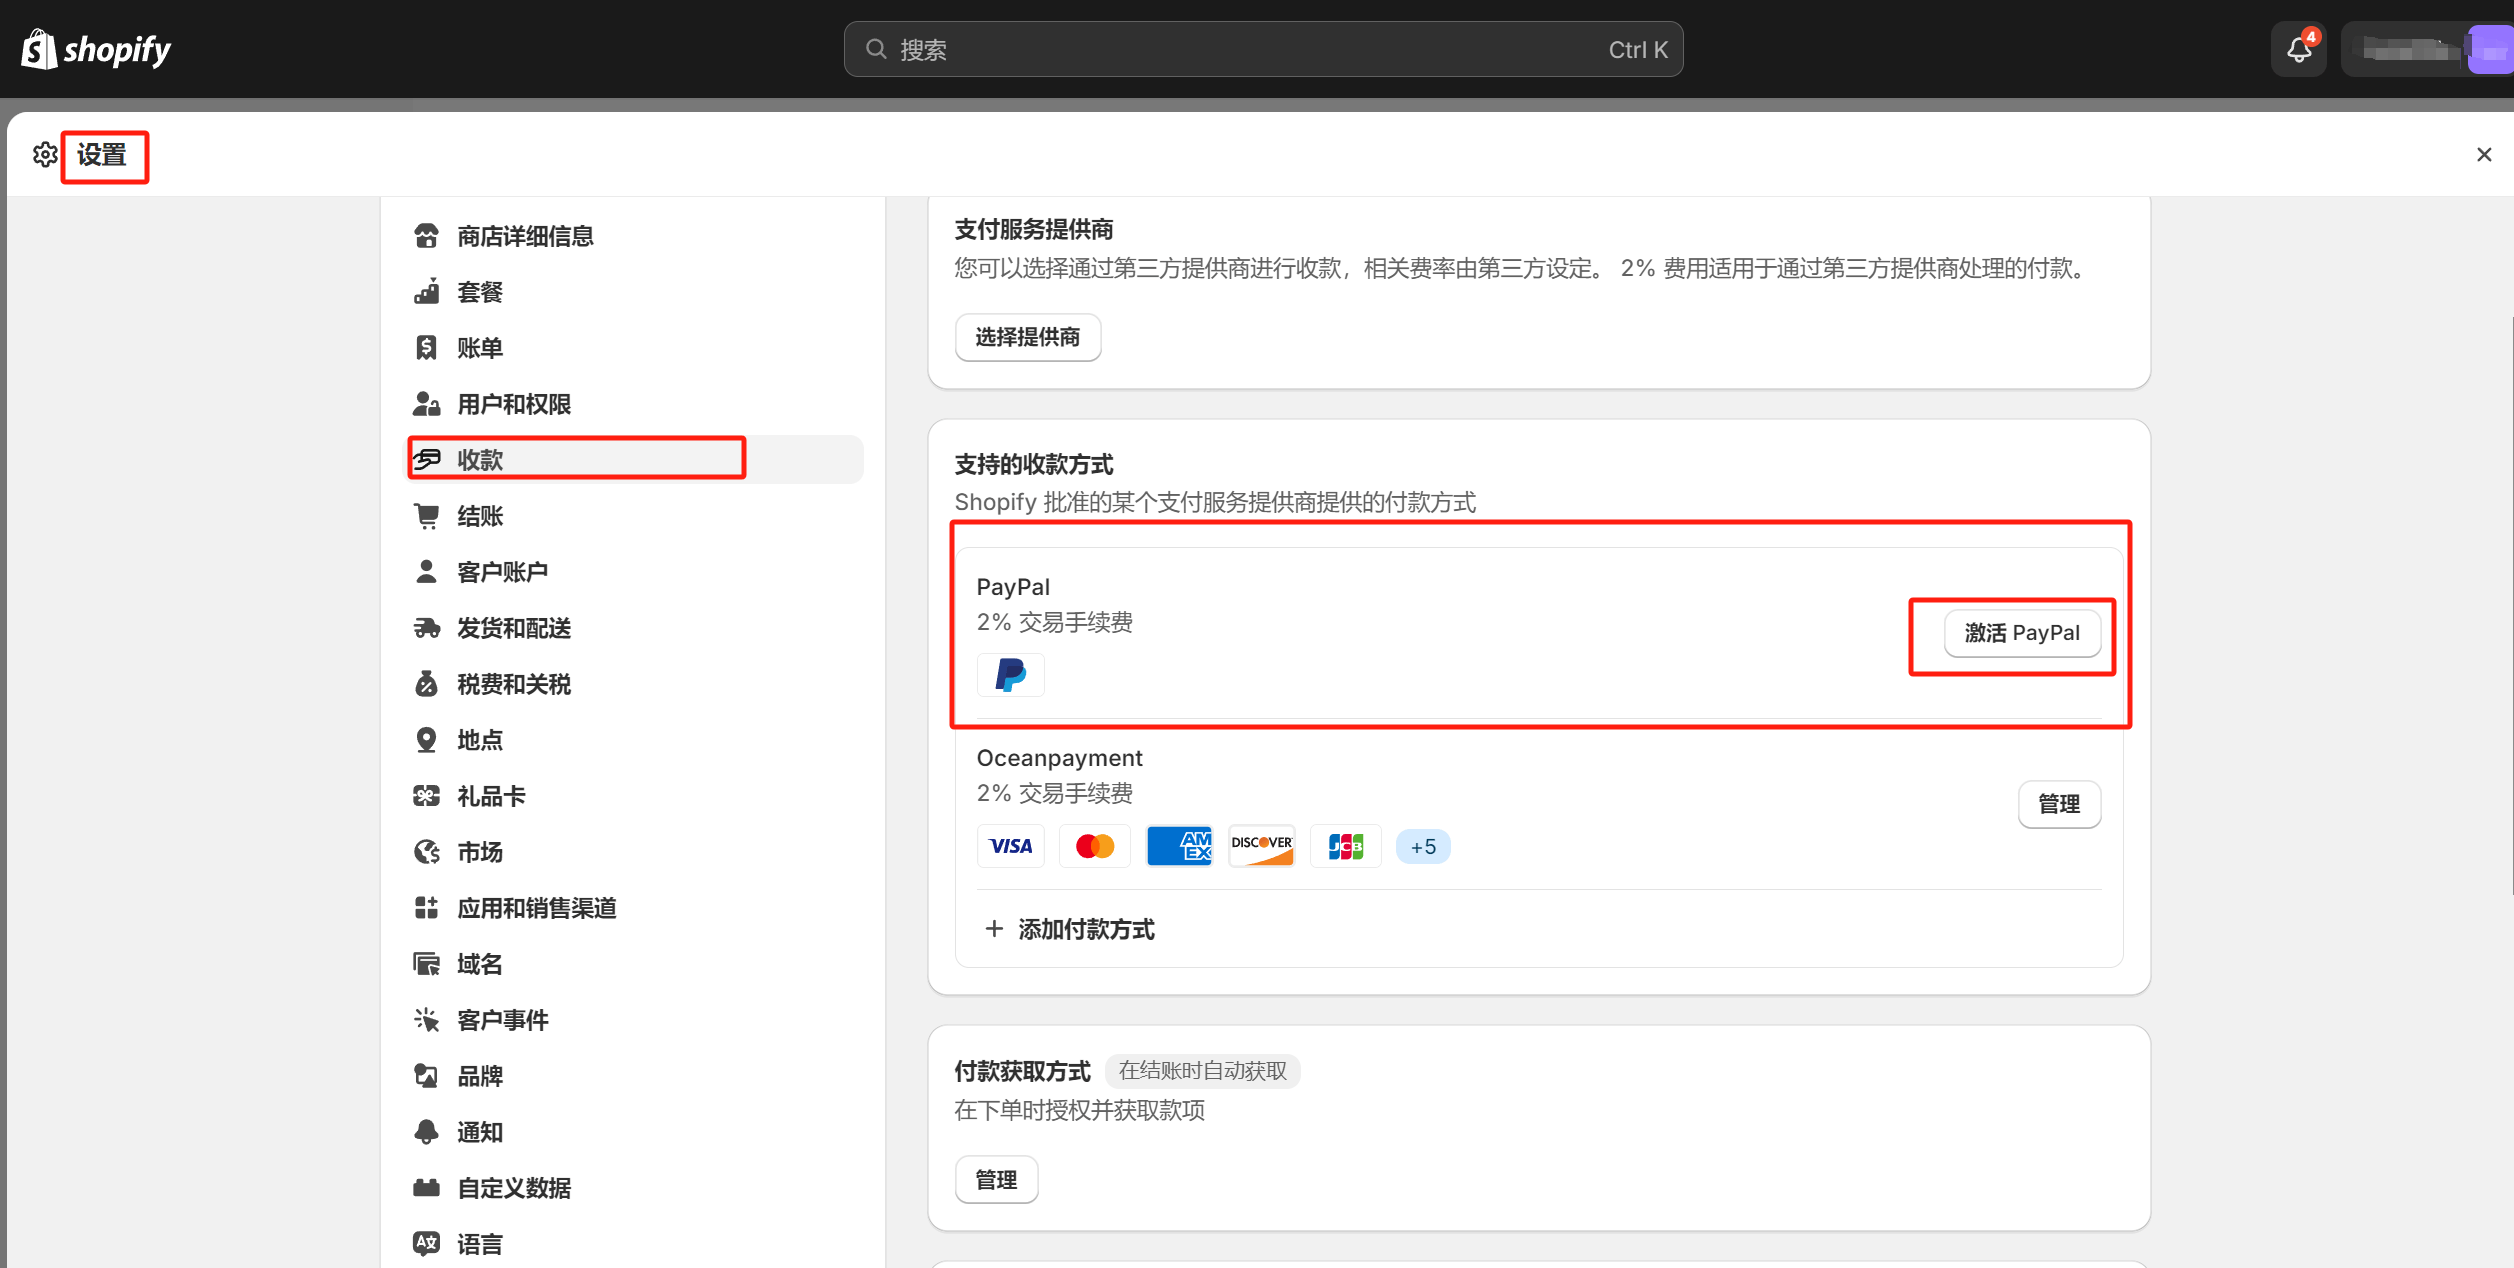
In the Shopify console, follow the path marked by the red box in the image (Settings button at the bottom of the left sidebar > Payments) to enter the Shopify payment settings page. PayPal is already integrated by default in Shopify, and no additional installation is required. Even for a brand-new Shopify independent site, the PayPal payment feature is pre-configured. All that is needed is to activate PayPal. Click the "Activate PayPal" button to proceed with the PayPal activation process.
Step 2: Log in to your PayPal account - activate PayPal and complete the Shopify connection with PayPal
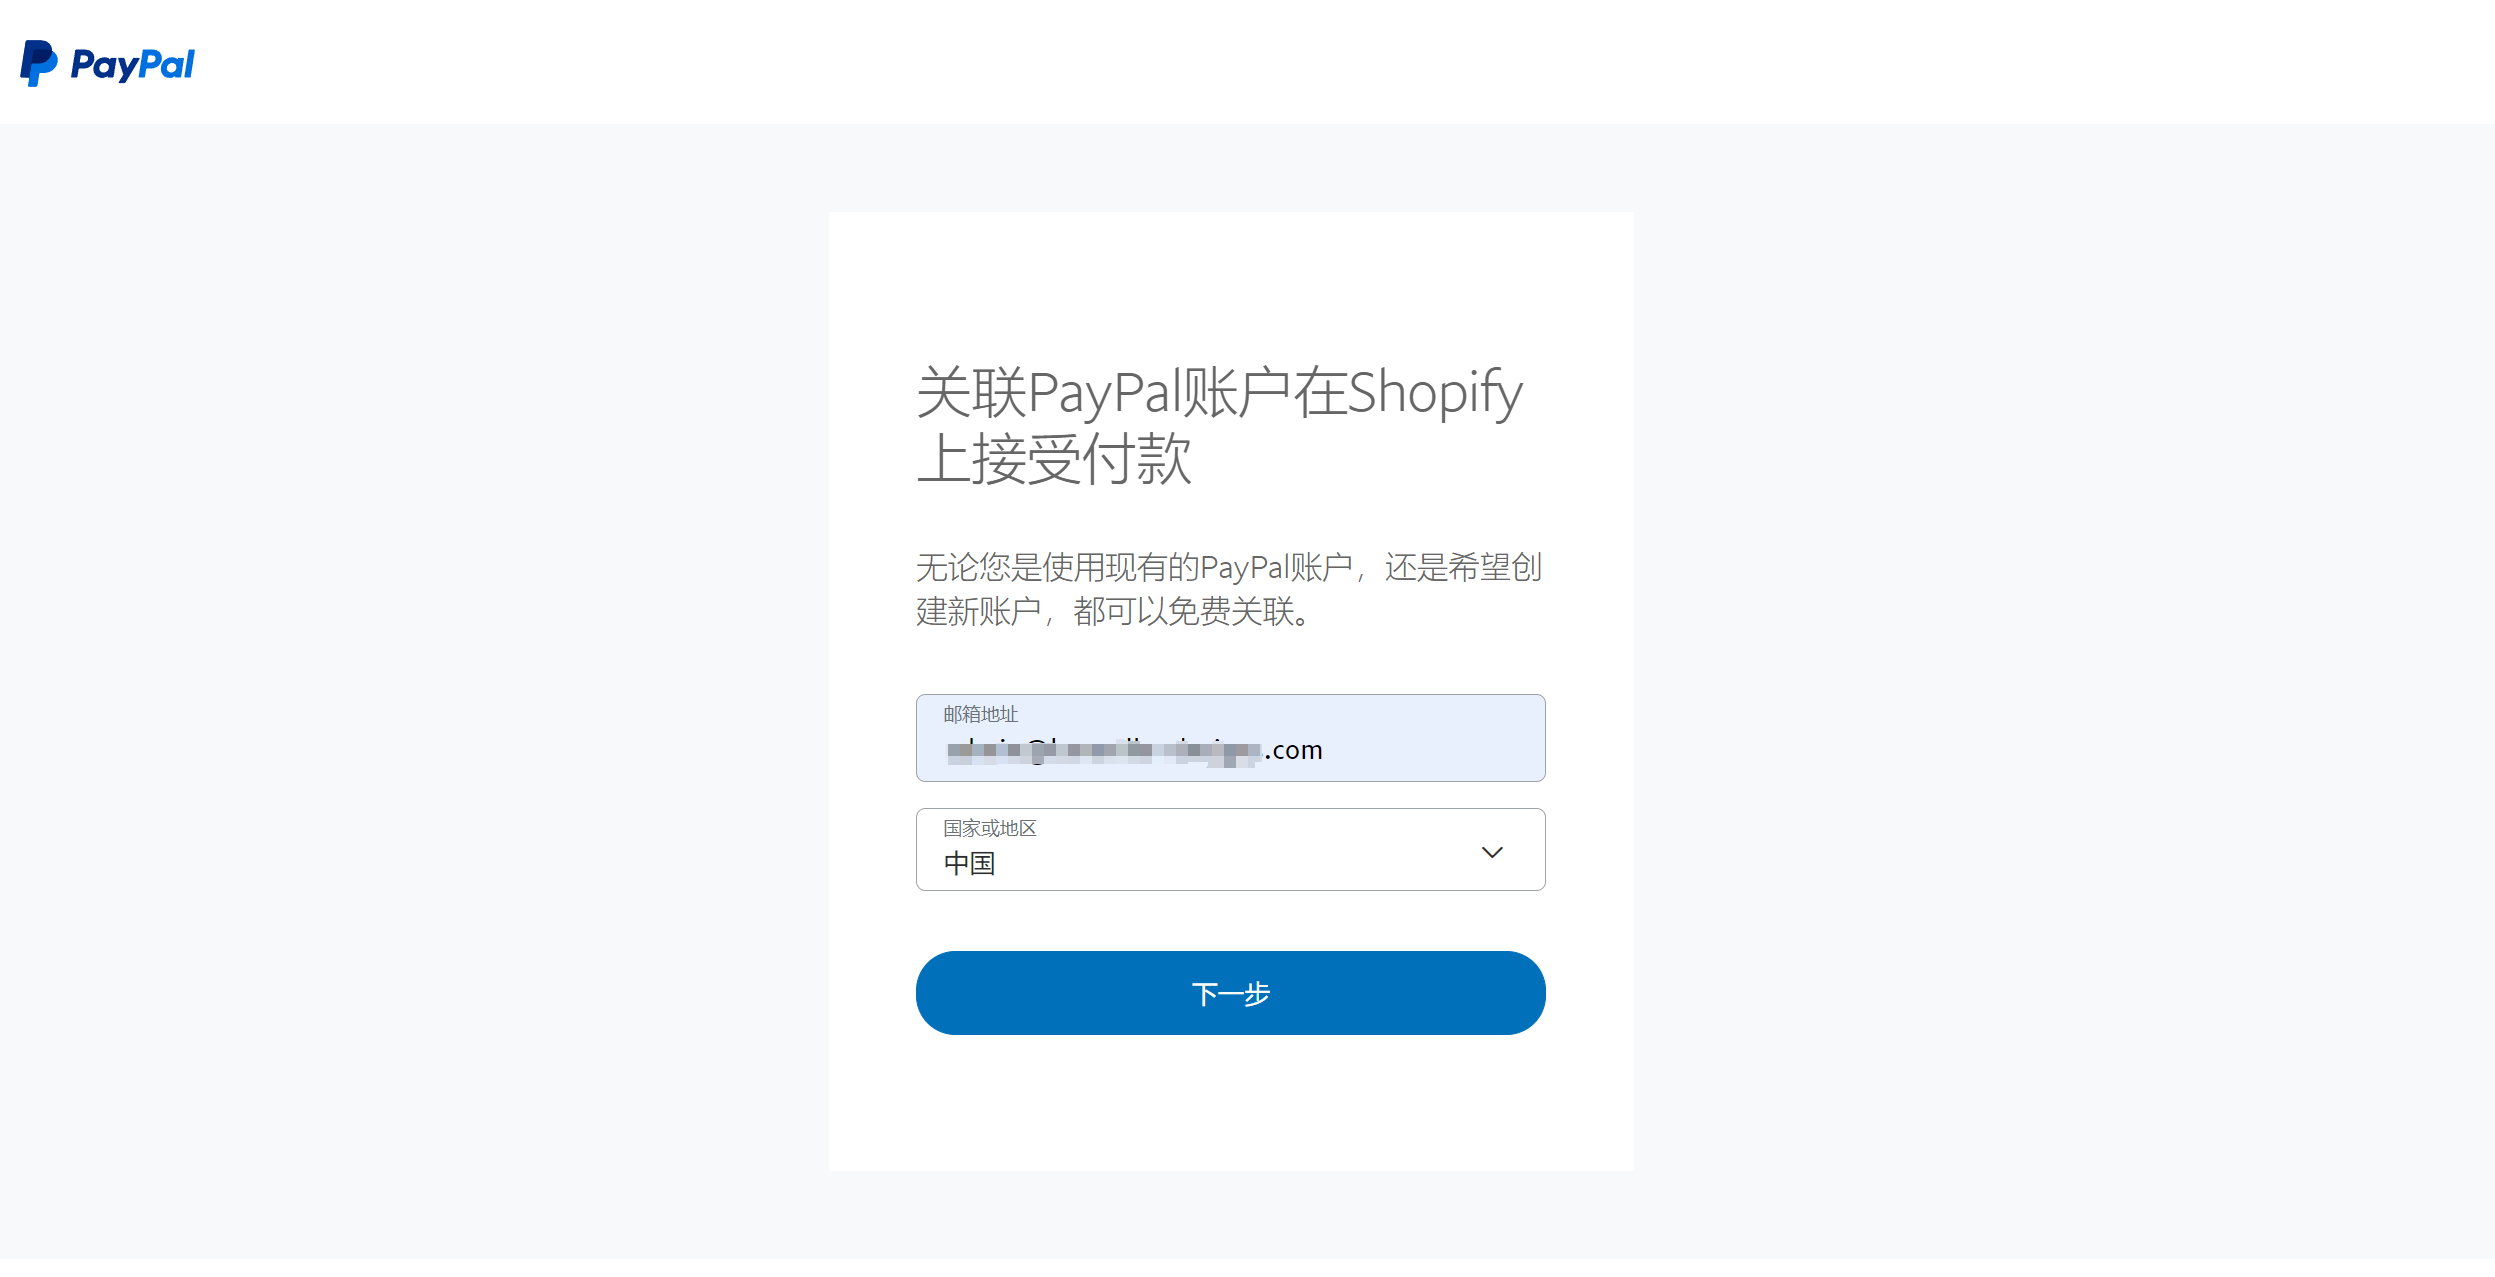
After clicking the "Activate PayPal" button, the next step is to enter the PayPal account you want to link to Shopify and select the country associated with that PayPal account. It is crucial to choose the correct country; otherwise, an error will occur, preventing further action. The "Country or Region" in PayPal refers to the country where the PayPal account was originally registered. For example, if the PayPal account was created on the PayPal China website, and you select the United States during this process, an error will occur because the account and country information do not match. After entering the information, click the "Next" button to proceed with the PayPal activation and Shopify linkage process.
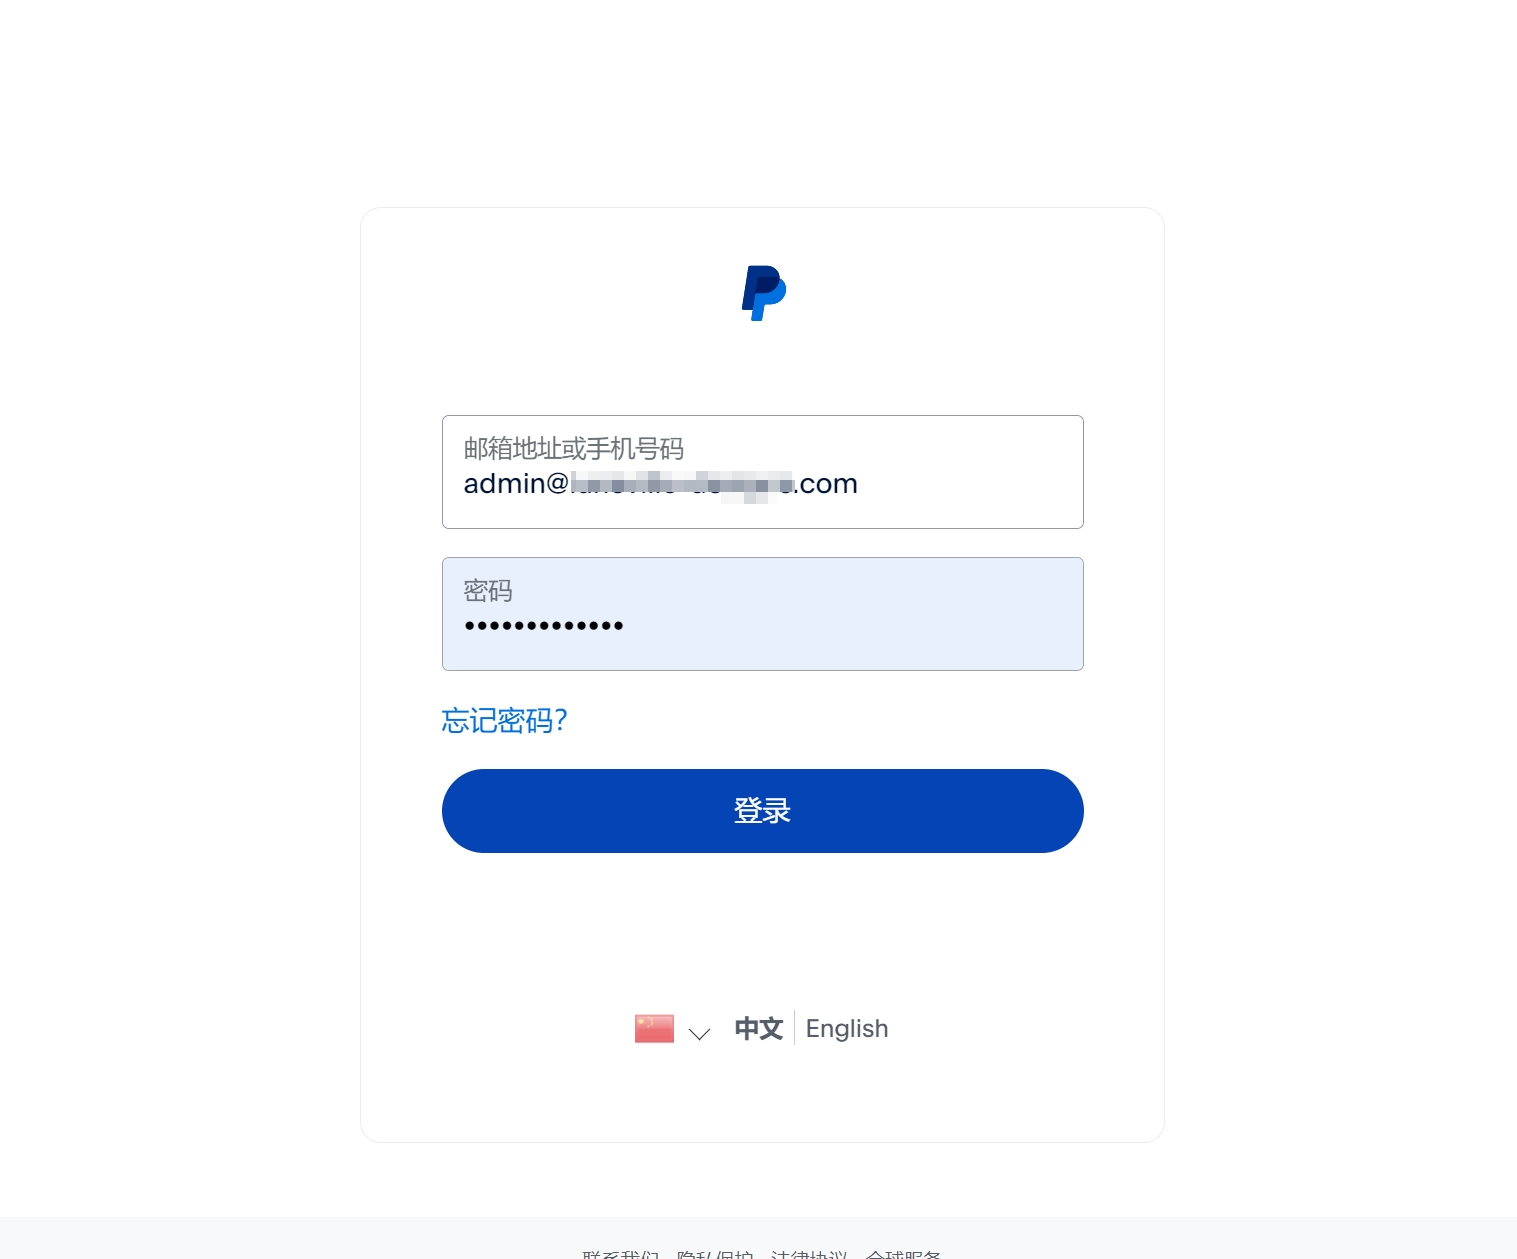
After clicking the "Next" button in the previous step, you will be redirected to the page where you need to enter the login credentials for your business PayPal account, as shown in the image above. Once you have entered your account and password, click the "Login" button to continue the process.

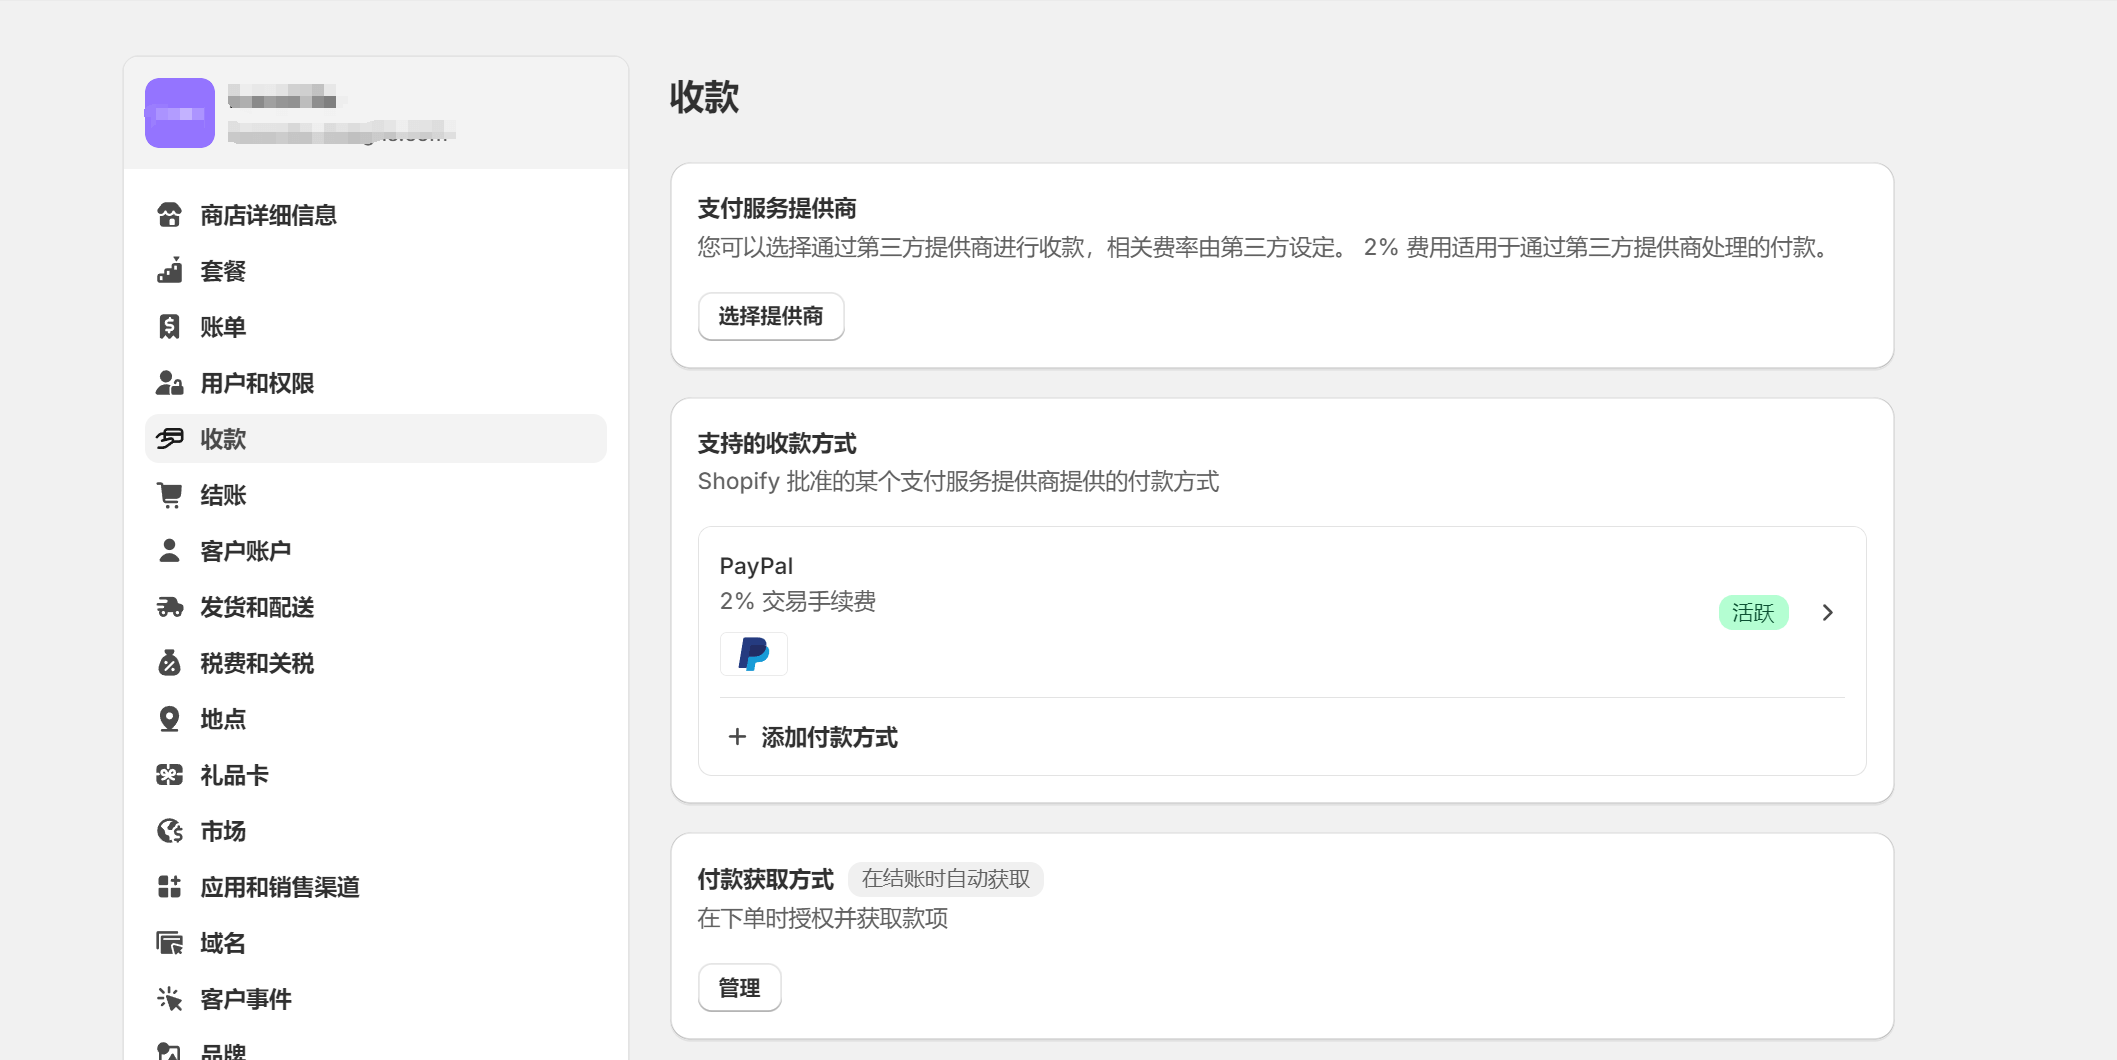
At this point, as shown in the image above, the PayPal activation and the process of linking the PayPal account to Shopify have been successfully completed. As shown in the next image, the PayPal payment method in the Shopify payment settings is now updated to an active status.
Ⅳ、Shopify integrates credit card payment
Shopify B2B sites can ignore credit card payment channels, but for C2C sites, in addition to PayPal, credit card payment integration is also essential to facilitate product sales conversions. For the demonstration of integrating credit card payments in Shopify, we will continue to use the same credit card payment service provider as mentioned in the WooCommerce integration above—Oceanpayment—as the example for explanation. Logic Digital Technology does not intend to make a recommendation here; it is just that we have used Oceanpayment frequently in our website development projects and have had multiple interactions with their customer service and technical support teams, making us very familiar with every detail of the Oceanpayment installation process. In order to help readers understand each step involved in setting up credit card payments, we chose Oceanpayment as the demonstration case. However, the installation process of credit card acquiring services should never be the sole basis for choosing a partner. These installation processes are essentially just plugin-based implementations. There are generally no significant differences among the plugins provided by credit card acquiring service providers, whether domestic or international. Even if you choose a foreign service provider and encounter language barriers, the installation and use of these plugins only require basic DevOps technical skills to complete. Therefore, choosing a credit card service provider should be based on a multi-dimensional comparison of metrics, and it's necessary to understand their data and performance. Readers who are interested in this knowledge can refer to Logic Digital Technology’s previously published article, “Cross-Border E-commerce Website International Credit Card Payment Channels.”
Step 1: Add a credit card logo to the footer of the independent website
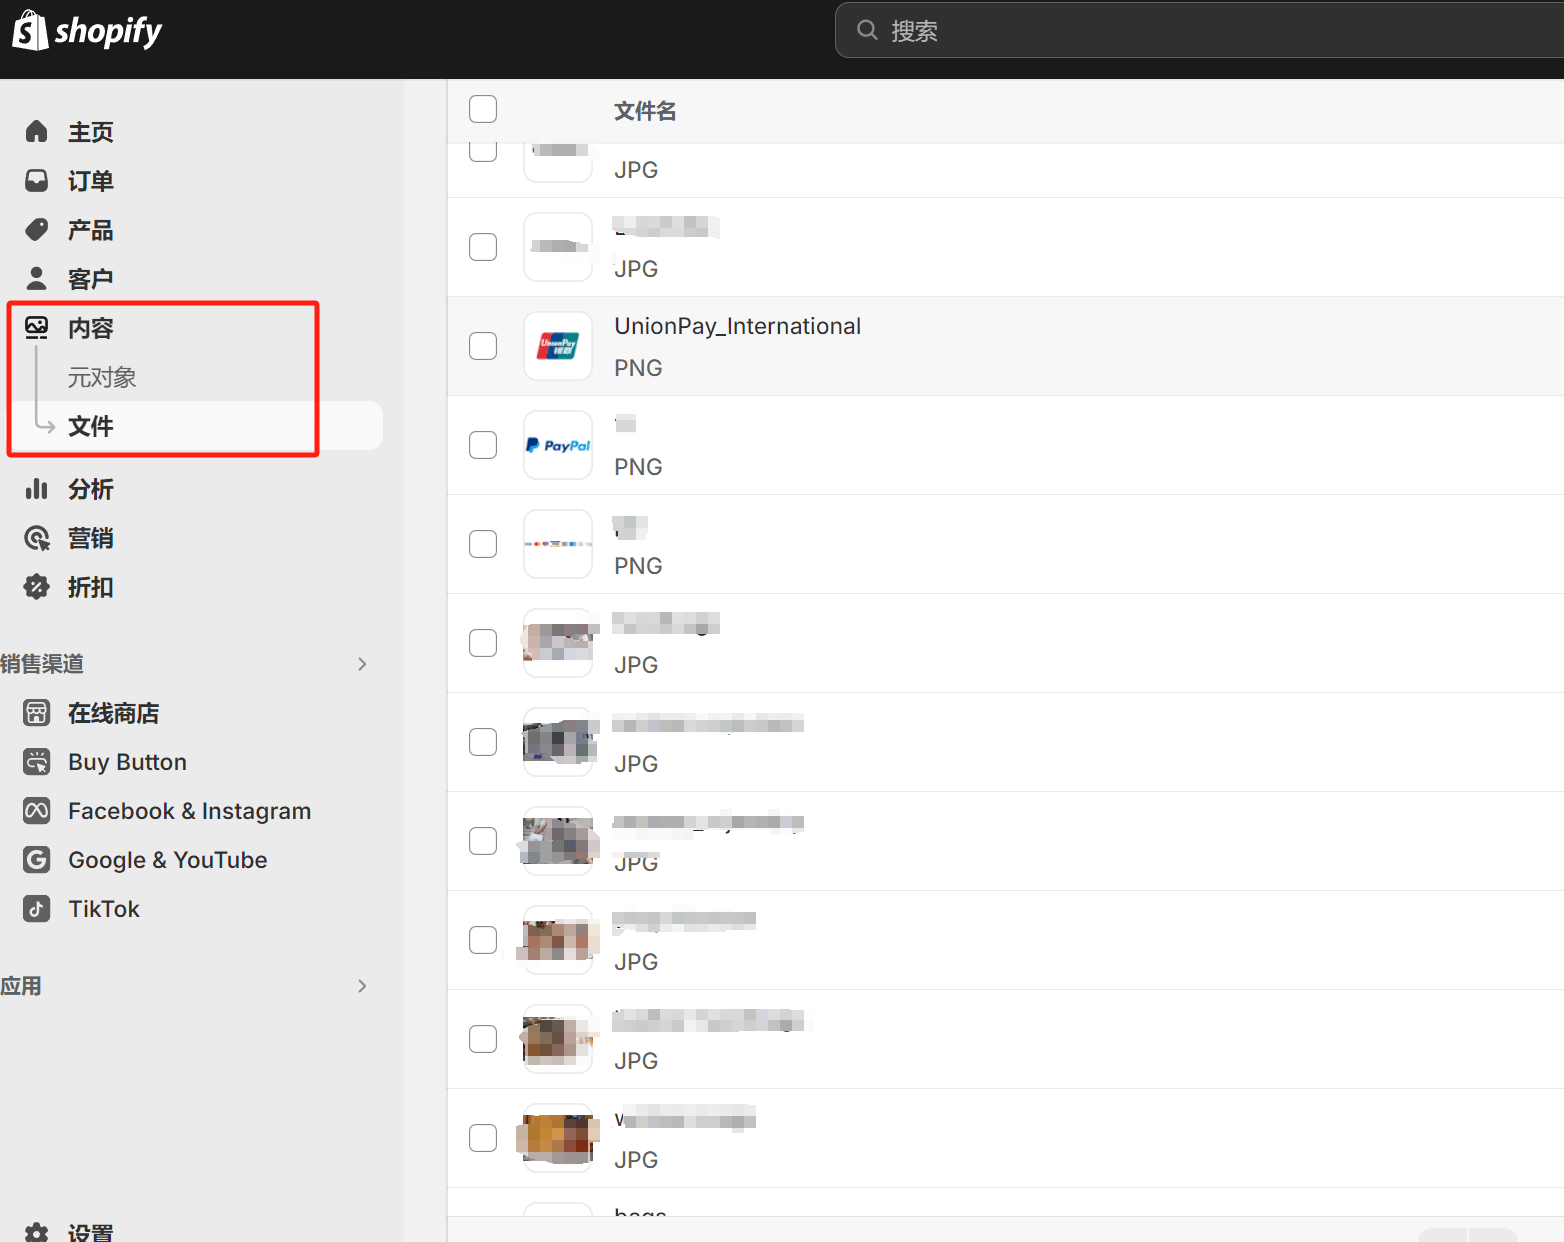
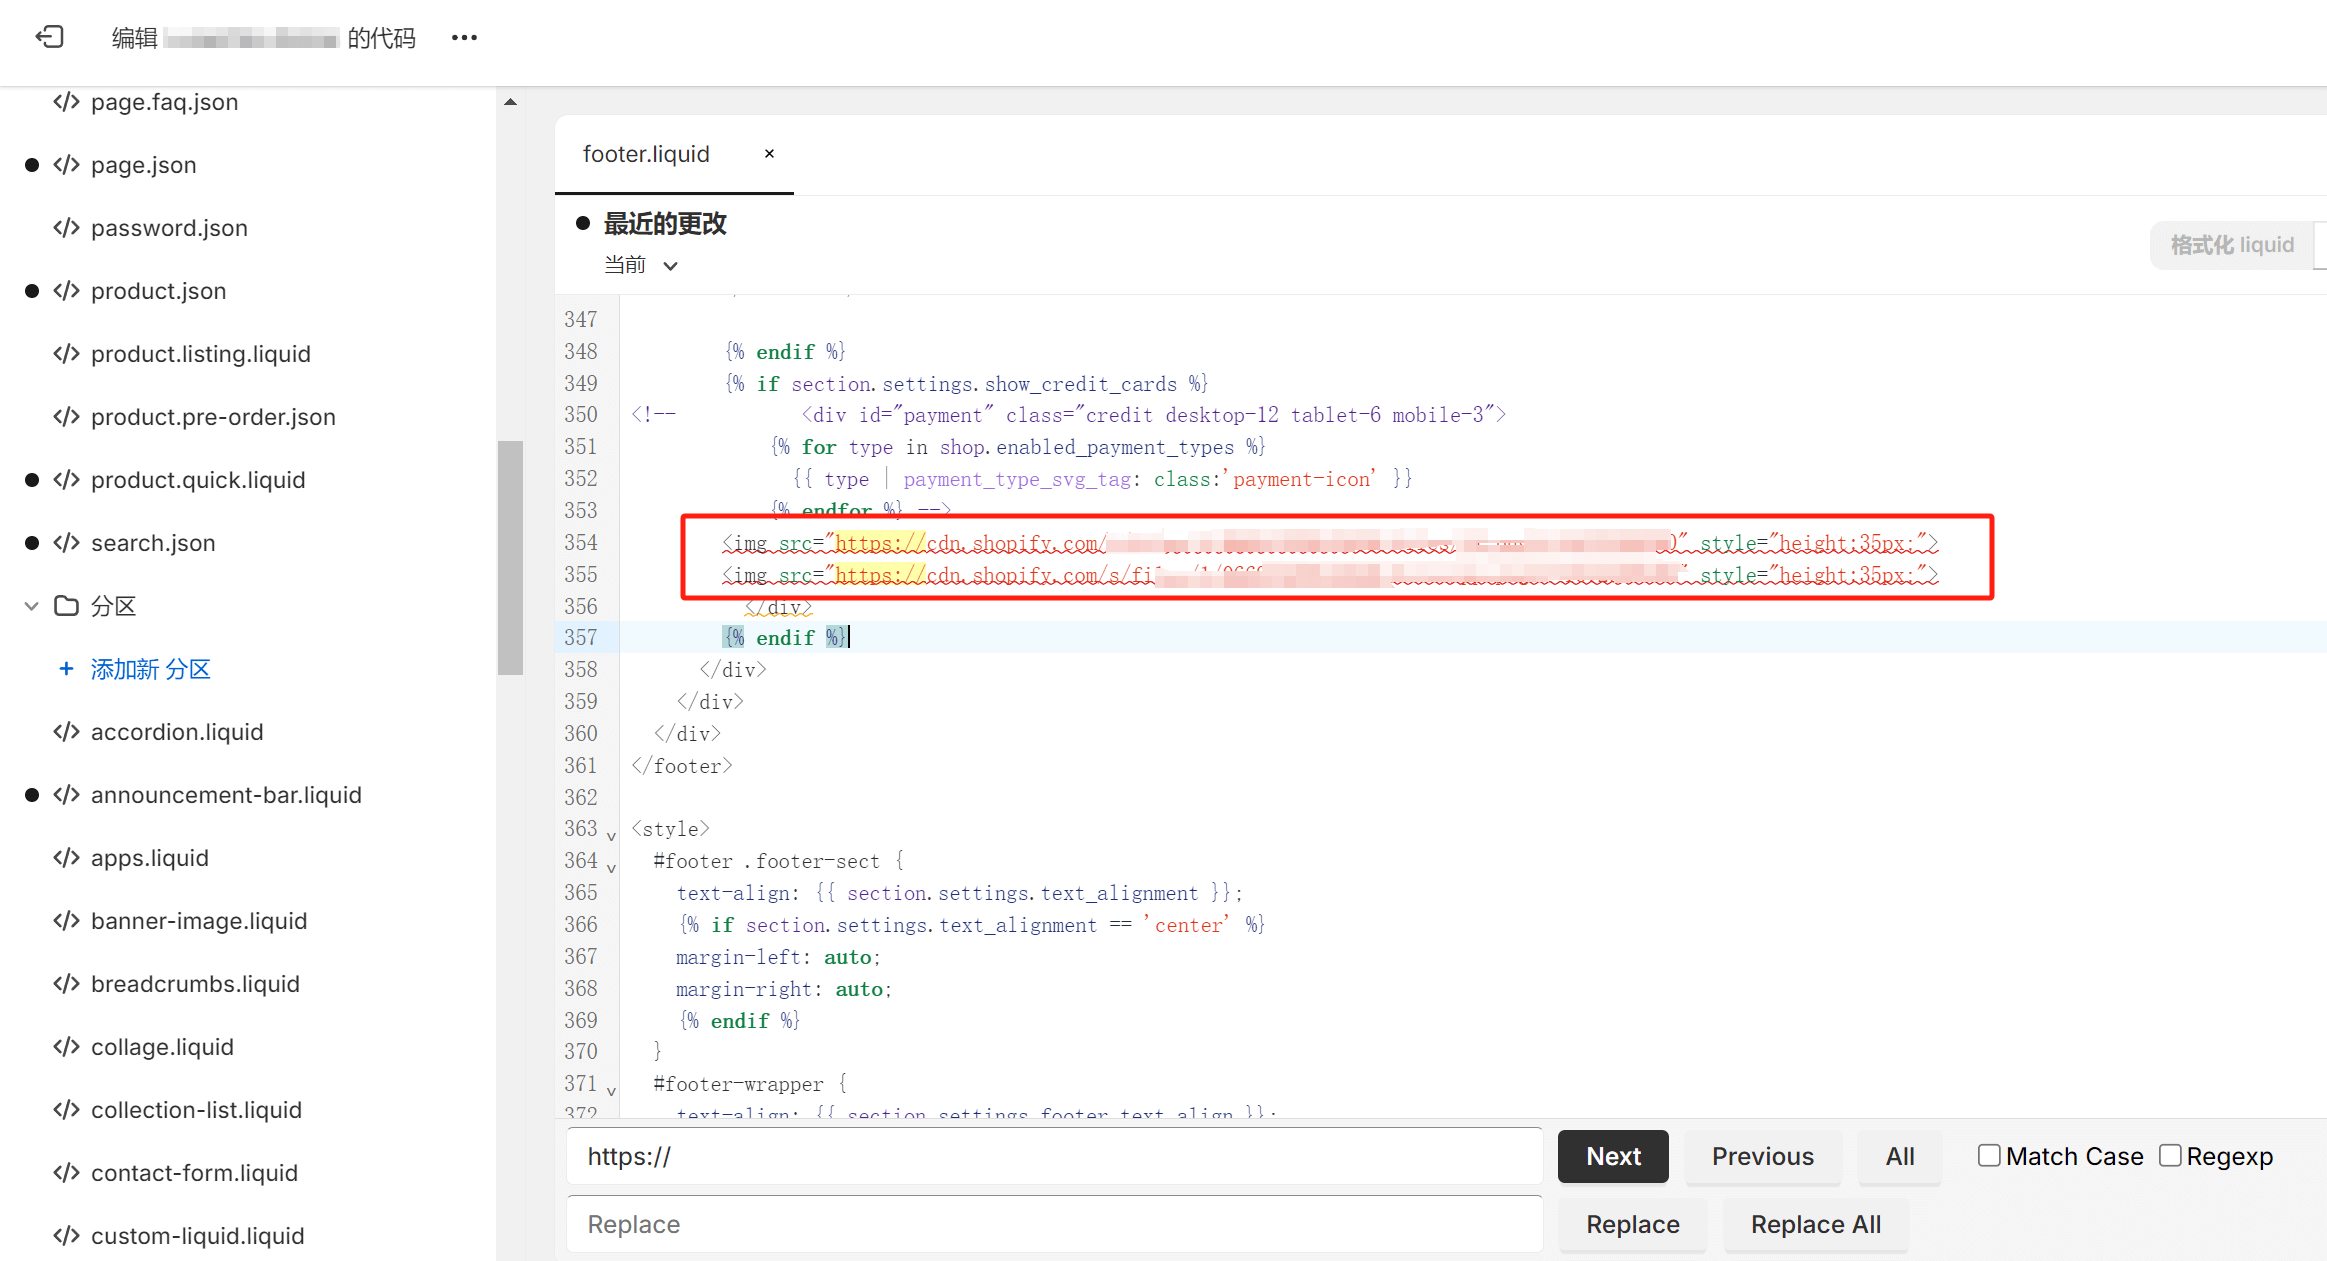
After downloading the payment card organization images provided by Oceanpayment to your local computer, upload them to the "Content" section of the Shopify admin panel for storage. Then, load the payment card organization URLs into the "footer.liquid" theme code file. This will allow the footer of the independent site to display the logos of credit cards supported by Oceanpayment. This step requires some coding skills. If the cross-border e-commerce business cannot complete it themselves, it can be handed over to a website development service provider or Oceanpayment's technical staff to finish.
Shopify's content file storage function is shown below:
Write Shopify's footer.liquid file using the img tag to display the available credit card logo images, as shown below:
Step 2: Modify the website details and policy page according to Oceanpayment's access requirements
Oceanpayment's policy requirements do not change based on the website platform. Similar to WooCommerce, the page details and policy pages of a Shopify independent site need to be modified and new policy pages added according to the specifications outlined in the documents provided by Oceanpayment. Oceanpayment's customer service will provide the documents, and you can modify and add the policy pages according to the instructions in those documents.
Step 3: Add Oceanpayment payment method on Shopify (install Oceanpayment plugin)
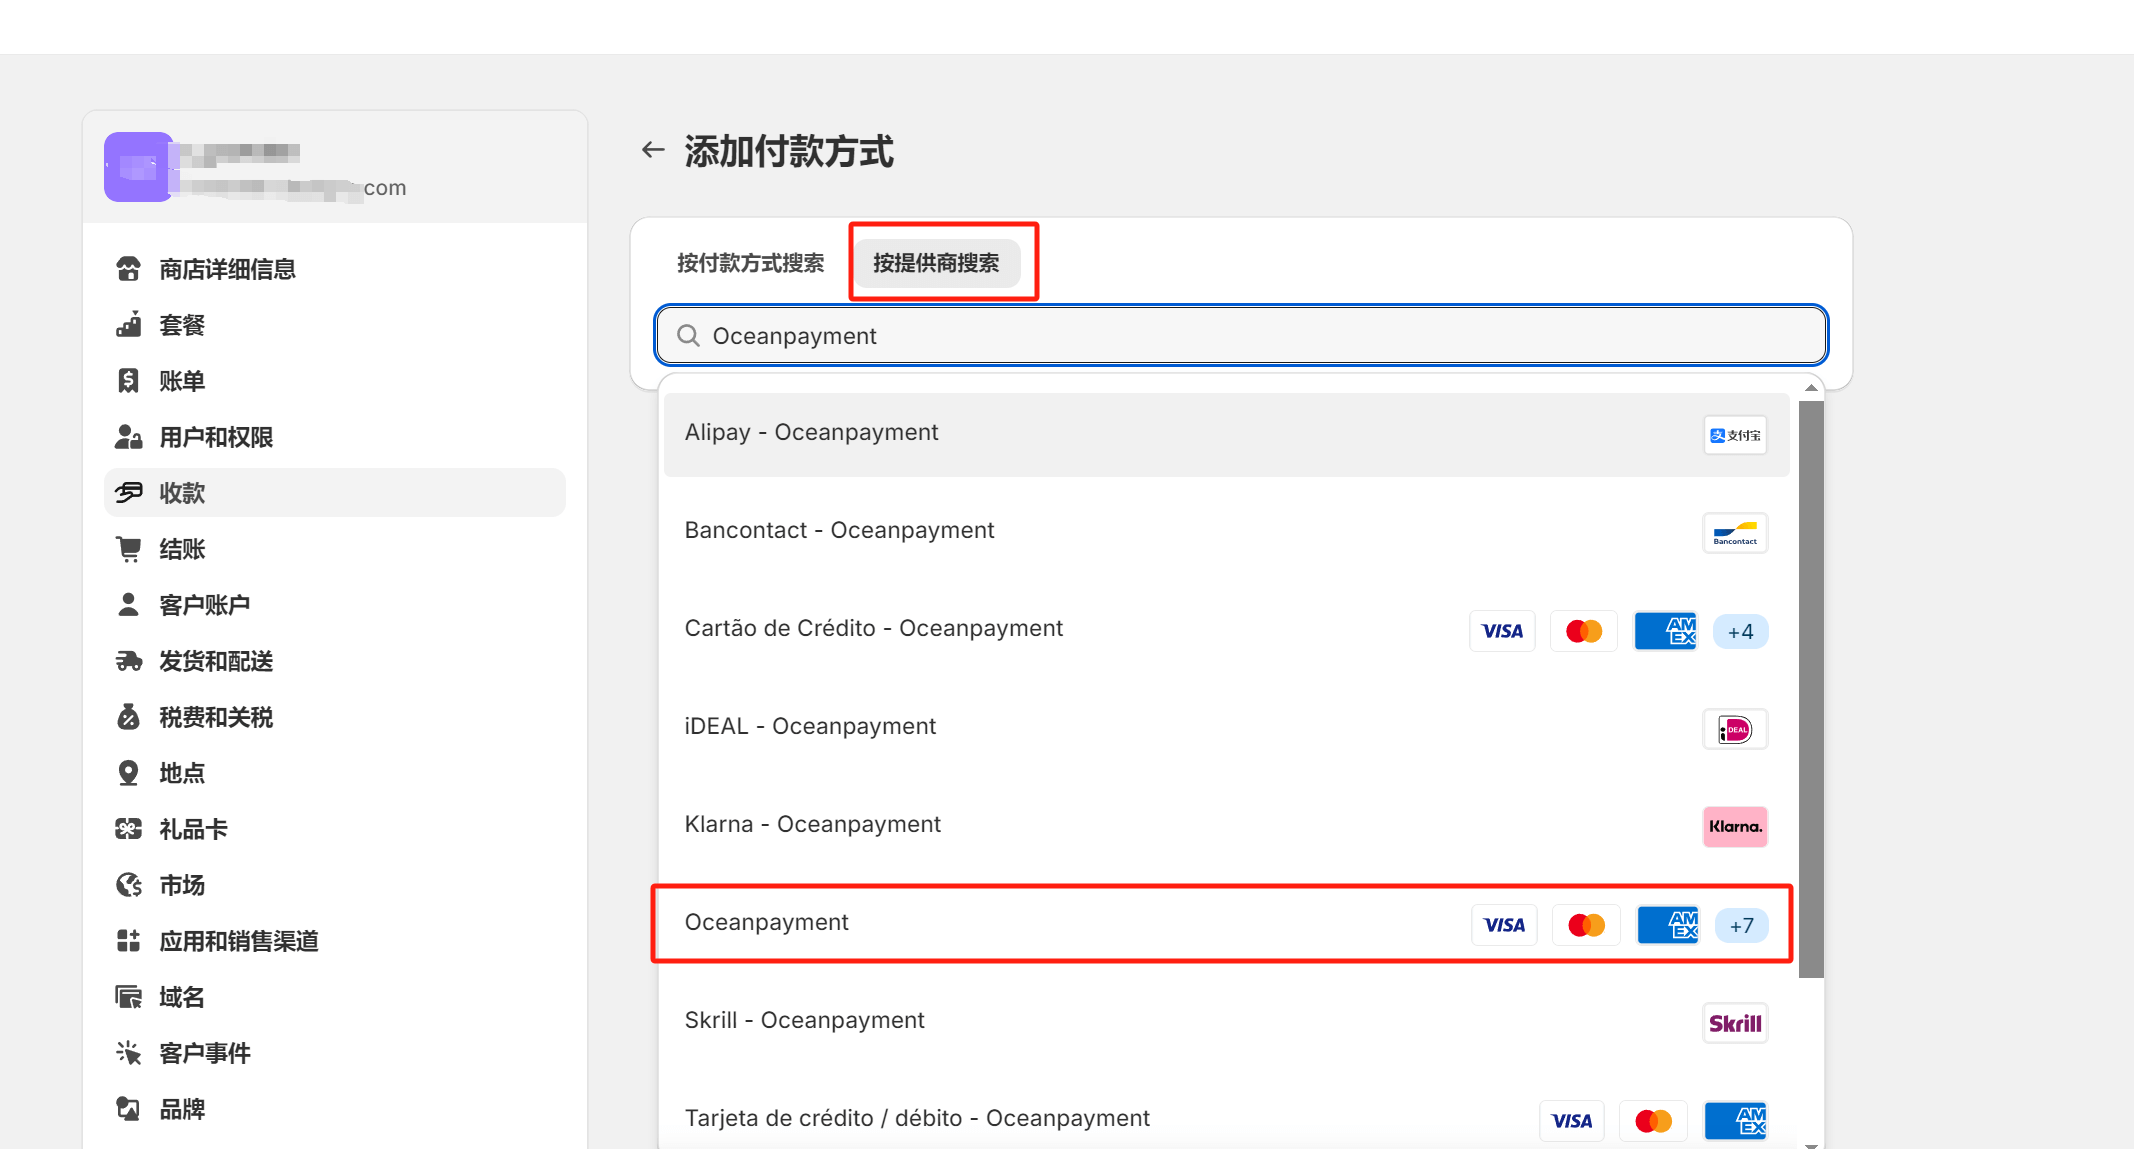
Just like the PayPal activation process, in the Shopify admin panel, follow the path indicated by the red box in the image (Settings button at the bottom of the left sidebar - Payments) to enter the Shopify payment settings interface. As shown in the red box in the image, click the "Add Payment Method" button, search for the Oceanpayment payment plugin. In the search page, select the "Search by provider" mode, then type "Oceanpayment" in the search box, as shown in the image below. Click on the search result highlighted in the red box in the image.
The search results for Oceanpayment are shown in the figure below. Click the result marked with a red box.
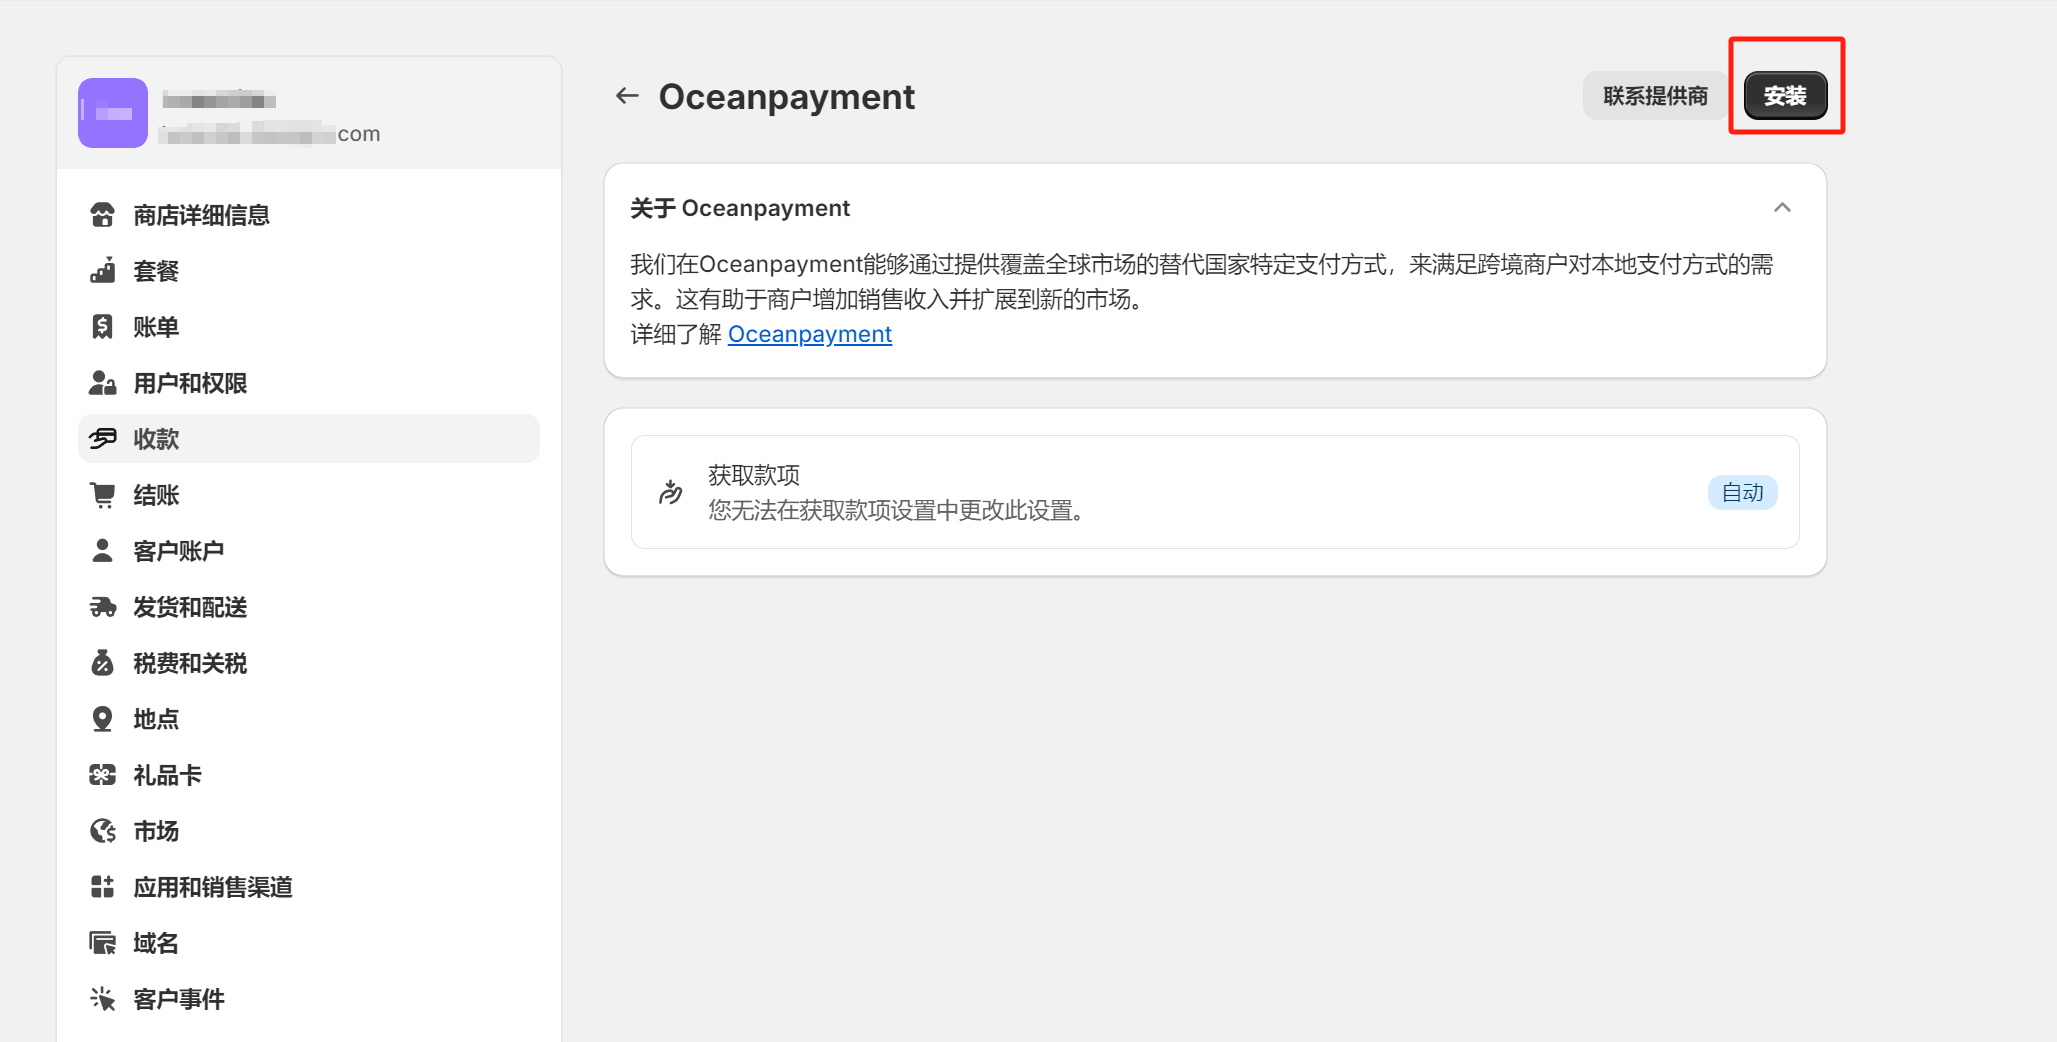
The Oceanpayment plug-in installation interface is shown in the figure below. Click the "Install" button in the upper right corner to install the Oceanpayment plug-in.
Step 4: Enter the Oceanpayment user ID and plugin key to complete the access to the credit card payment function
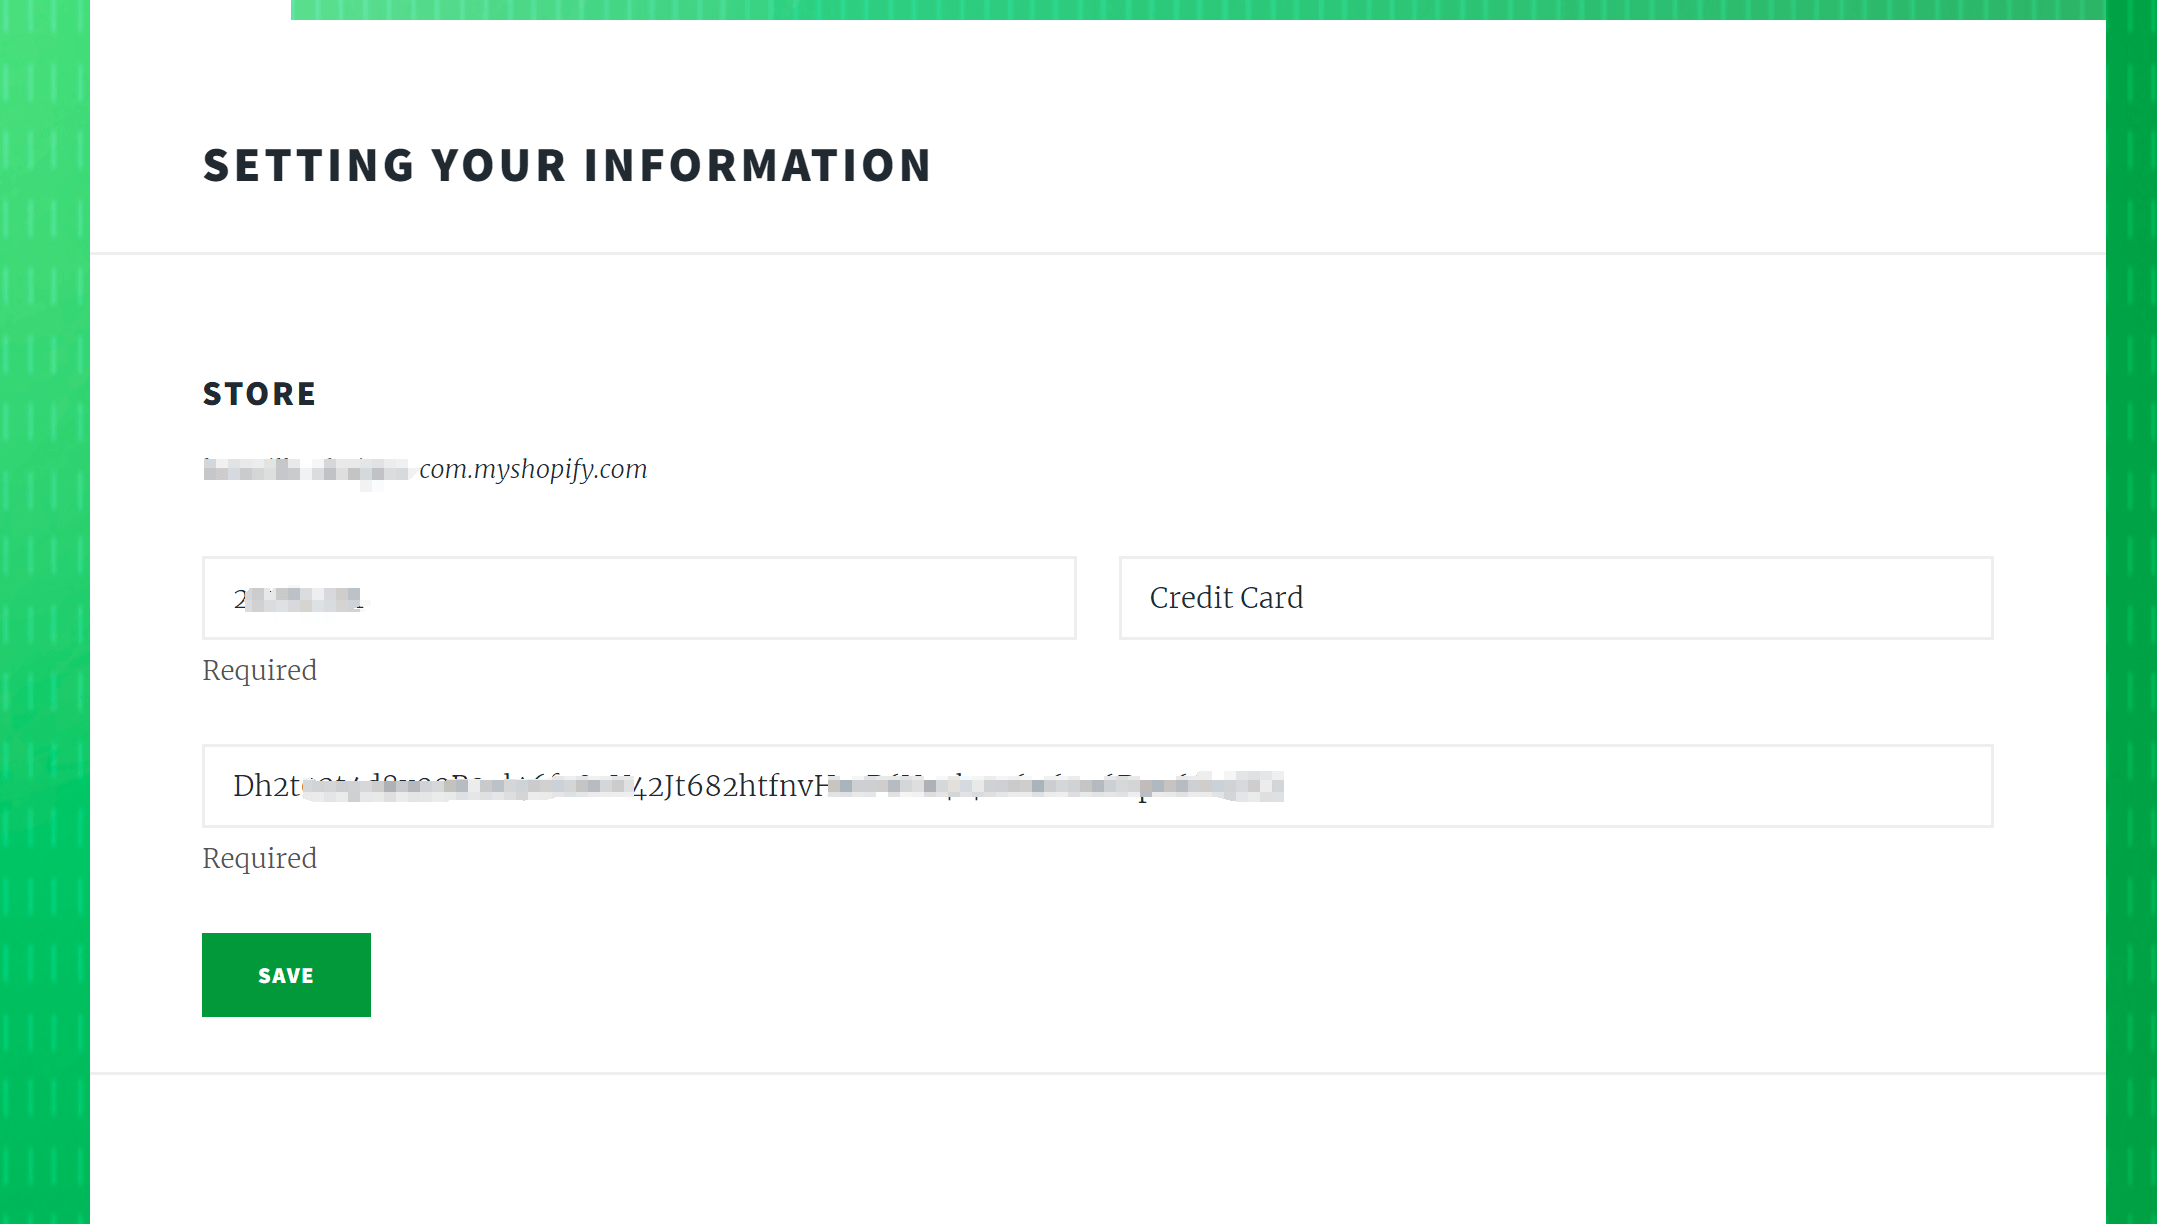
The final step to install the Oceanpayment plugin, as shown in the image above, is to enter the Oceanpayment user ID and user key that you obtained. Enter the correct user ID and key in the corresponding input fields and click the "Save" button. Once the installation is complete, the page will redirect to the Oceanpayment payment settings page, as shown in the image below.
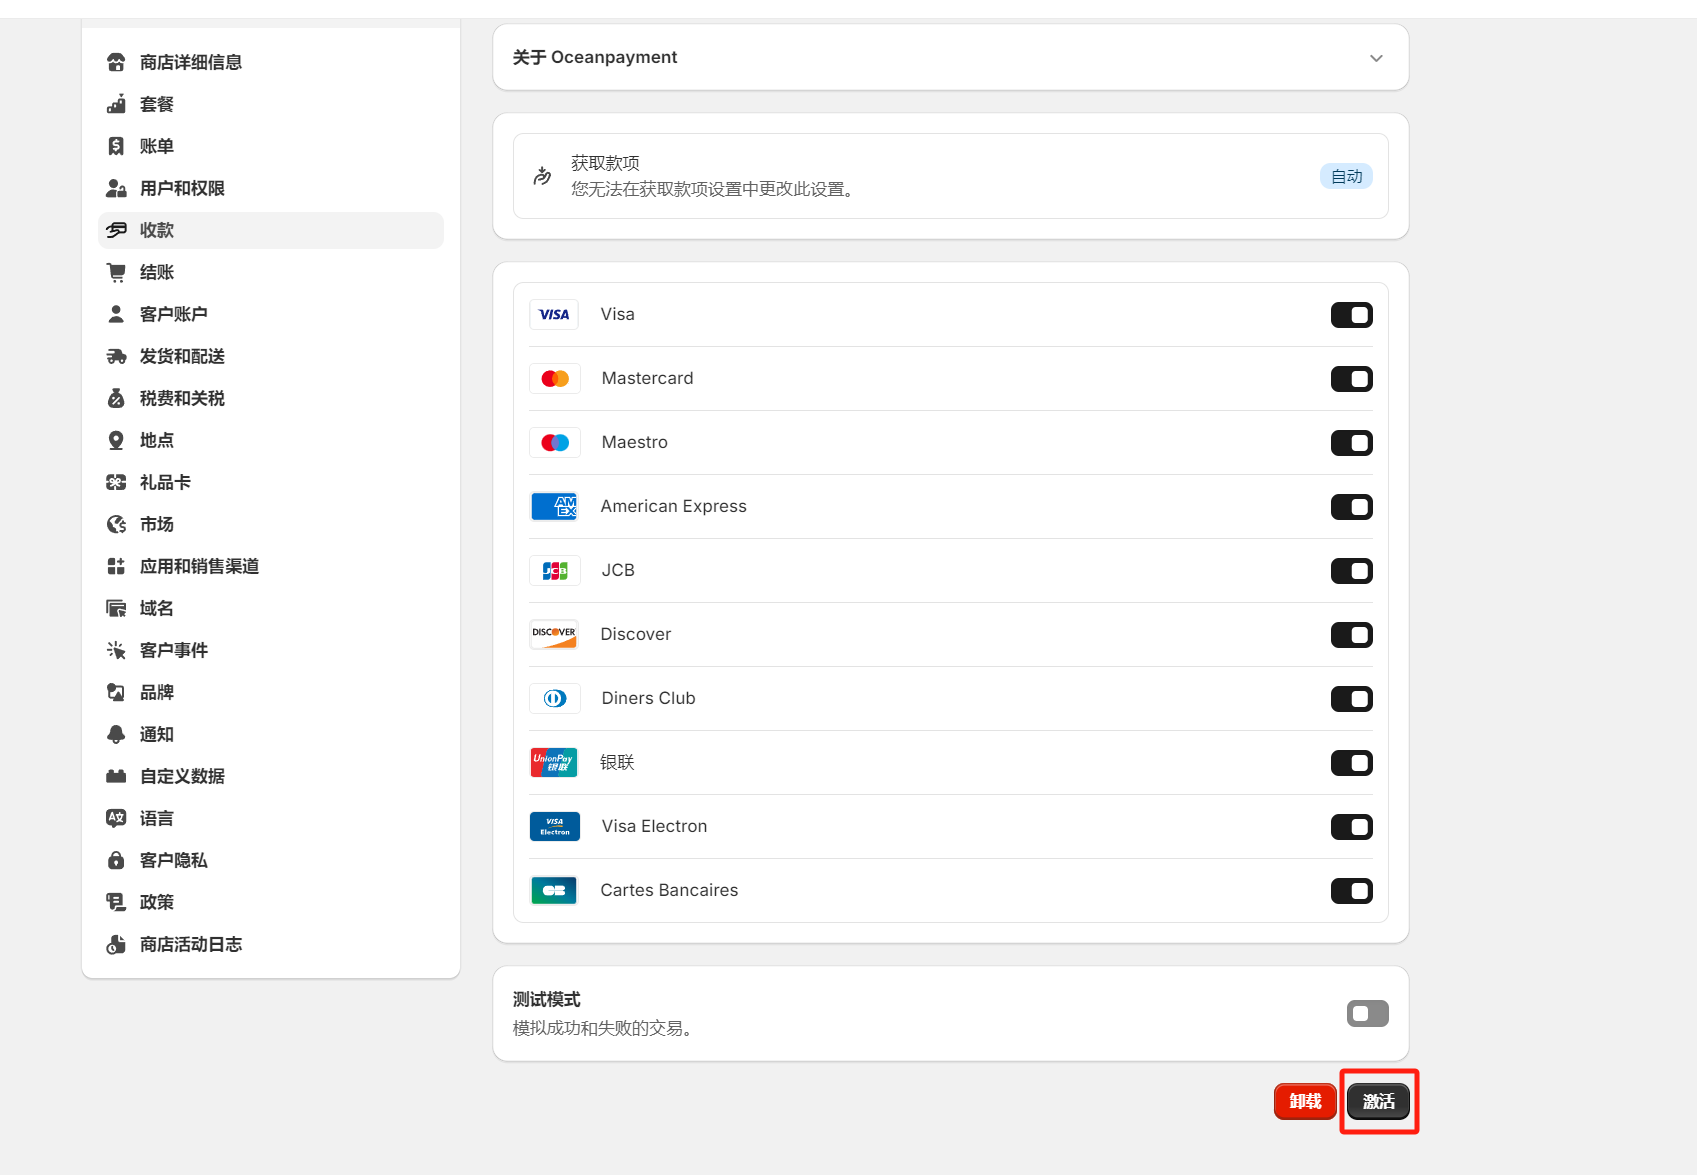
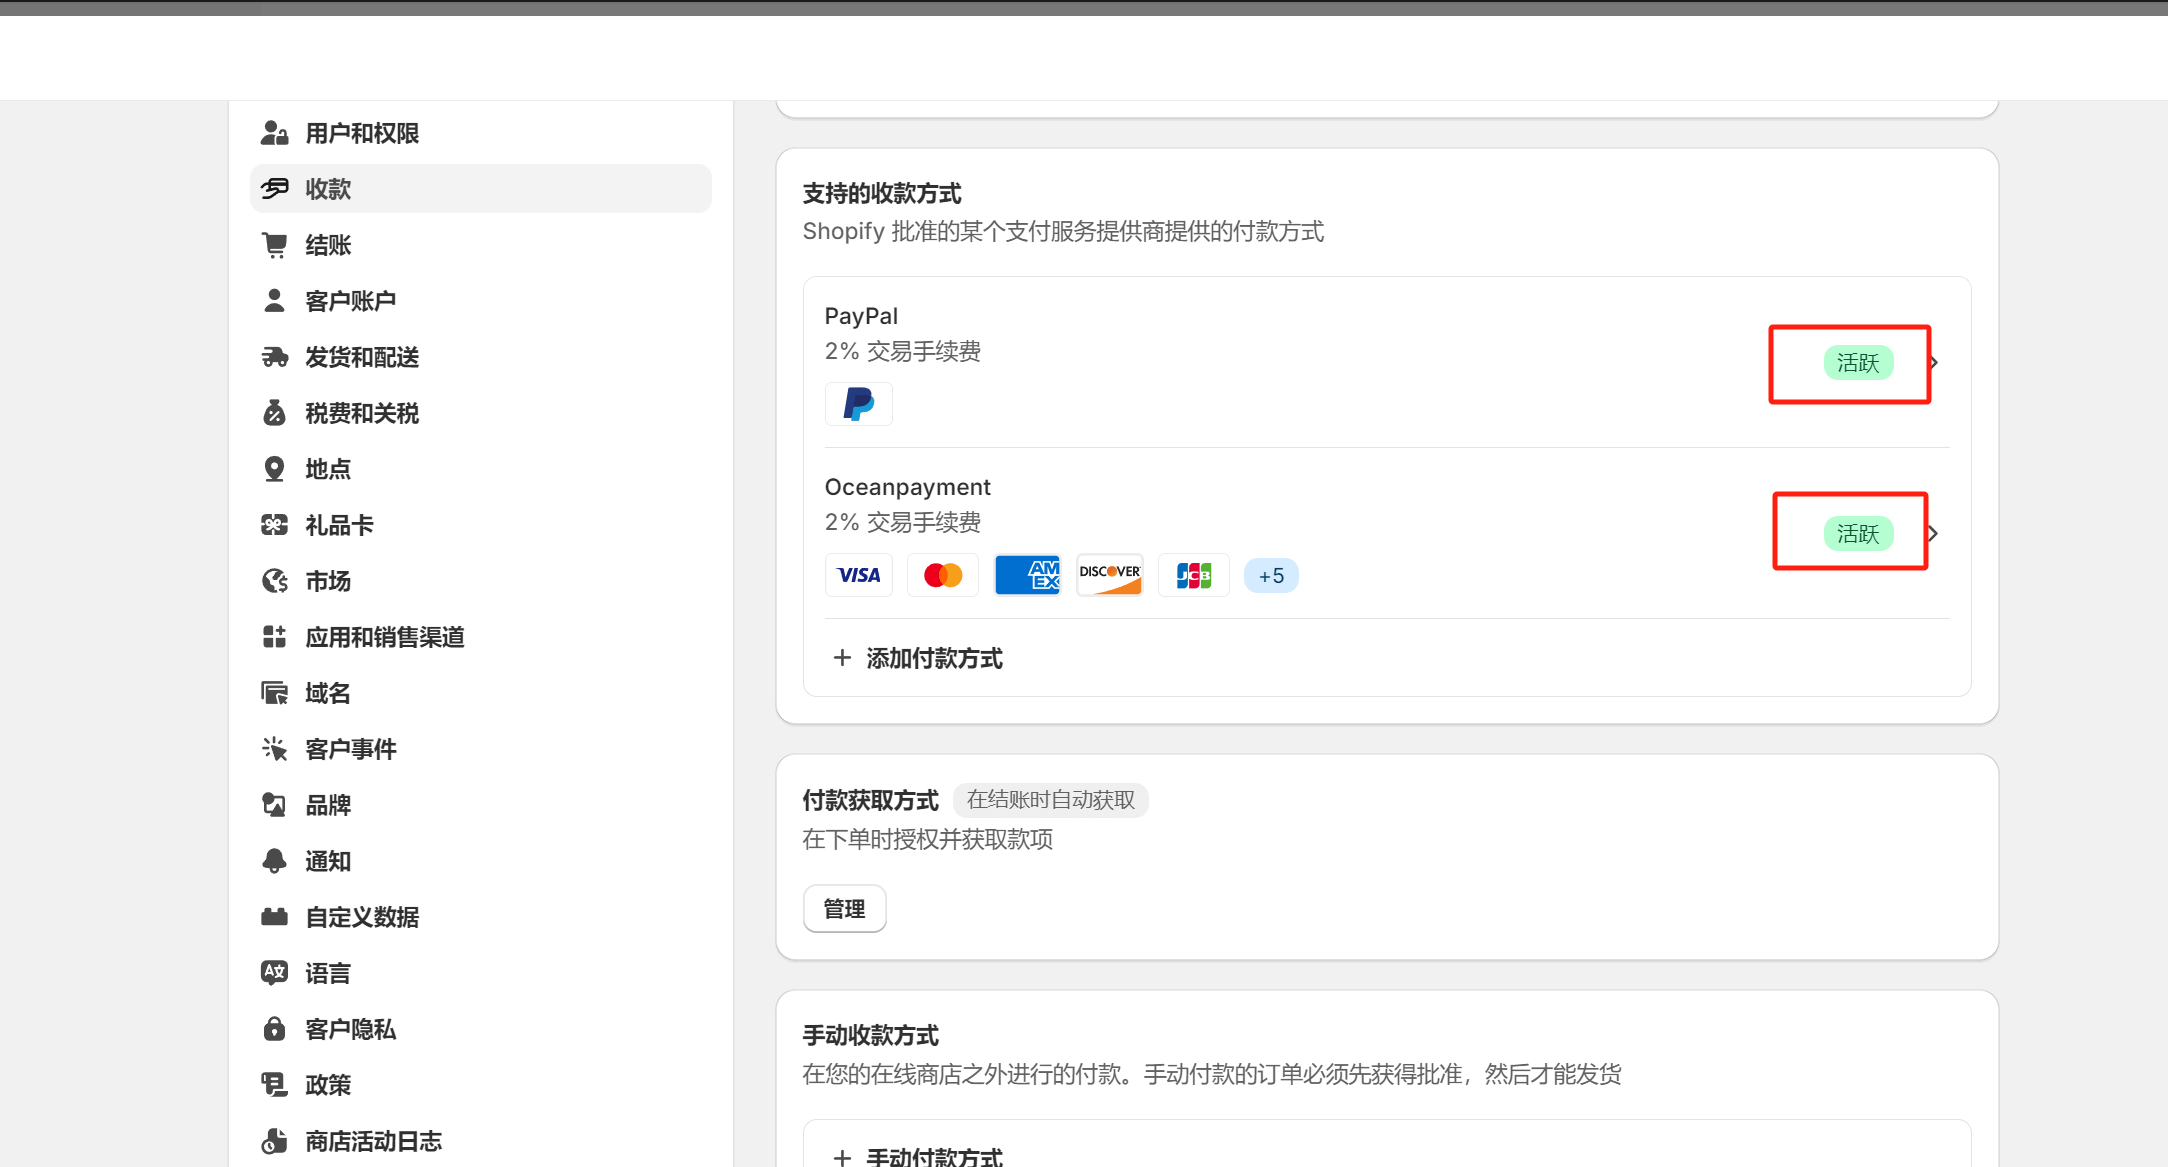
Finally, click the activation button indicated by the red box in the image above. With this, all operations for integrating Oceanpayment into Shopify are complete. At this point, if we go back to the payment methods under Shopify’s payment settings, both PayPal and Oceanpayment have now been updated to active status as shown in the image below. When users on your independent site proceed to checkout, they can now choose to complete their payment using either PayPal or these international credit cards.
Conclusion: The above content constitutes the full article of “How to Set Up Payment for an Independent Site? A Tutorial on Integrating Payment Functionality into an Independent Site.” For readers who are building an independent site for the first time without any hands-on experience, things might have seemed confusing at first. However, those who have read this far should now have dispelled their previous doubts and feel more confident from a technical standpoint in enabling payment functionality for product sales on their independent sites.
Logic Digital Technology (SZLOGIC) All rights reserved. Reproduction is prohibited.


