WordPress Multilingual Support Plugin - TranslateEasy Setup Guide
TranslateEasy is a powerful WordPress Plugin designed specifically for global cross-border e-commerce, trade, and websites that require multilingual capabilities. By integrating translation API interfaces from Google, DeepL, and Baidu, TranslateEasy provides seamless multilingual support and user experience for all WordPress Website Building systems.
TranslateEasy is equipped with powerful features that support multiple global languages, enabling your website to easily cater to international users. By utilizing API interfaces from Google, DeepL, and Baidu, TranslateEasy can automatically translate the entire site’s content. The language switcher supports display via shortcode, floating widget, and navigation menu, making it easier for users to switch languages. At the same time, TranslateEasy also optimizes multilingual website SEO, allowing pages in different languages to appear in search engine SERPs. You can customize the number of characters translated per day to control costs and use resources wisely. TranslateEasy not only makes your website multilingual-friendly but also enhances user experience and search engine visibility.
The above is the product description of the WordPress multilingual translation support plugin TranslateEasy launched by Logic Digital Technology, and it is not the purpose of this article. This article aims to guide both new and existing users of TranslateEasy through the step-by-step setup of the plugin. Before using the frontend page translation engine and language switcher of TranslateEasy, users need to correctly configure the settings of TranslateEasy in the WordPress backend. This ensures that no confusing errors occur when using the frontend translation features.
For the convenience of readers, the table of contents of this article follows the menu order of the TranslateEasy plugin settings. The order of the table of contents is as follows:
Ⅰ、TranslateEasy-General Settings
Under the General Settings of the TranslateEasy plugin, there are a total of six configurable feature items: Current Settings Interface Display Language, Default Language, All Languages, Native Language Name, Use Subdirectory for Default Language, and Sync Theme Language with Translation. Users can configure the required feature items according to their website’s needs. The “General Settings” interface of the TranslateEasy plugin is shown in the image below:
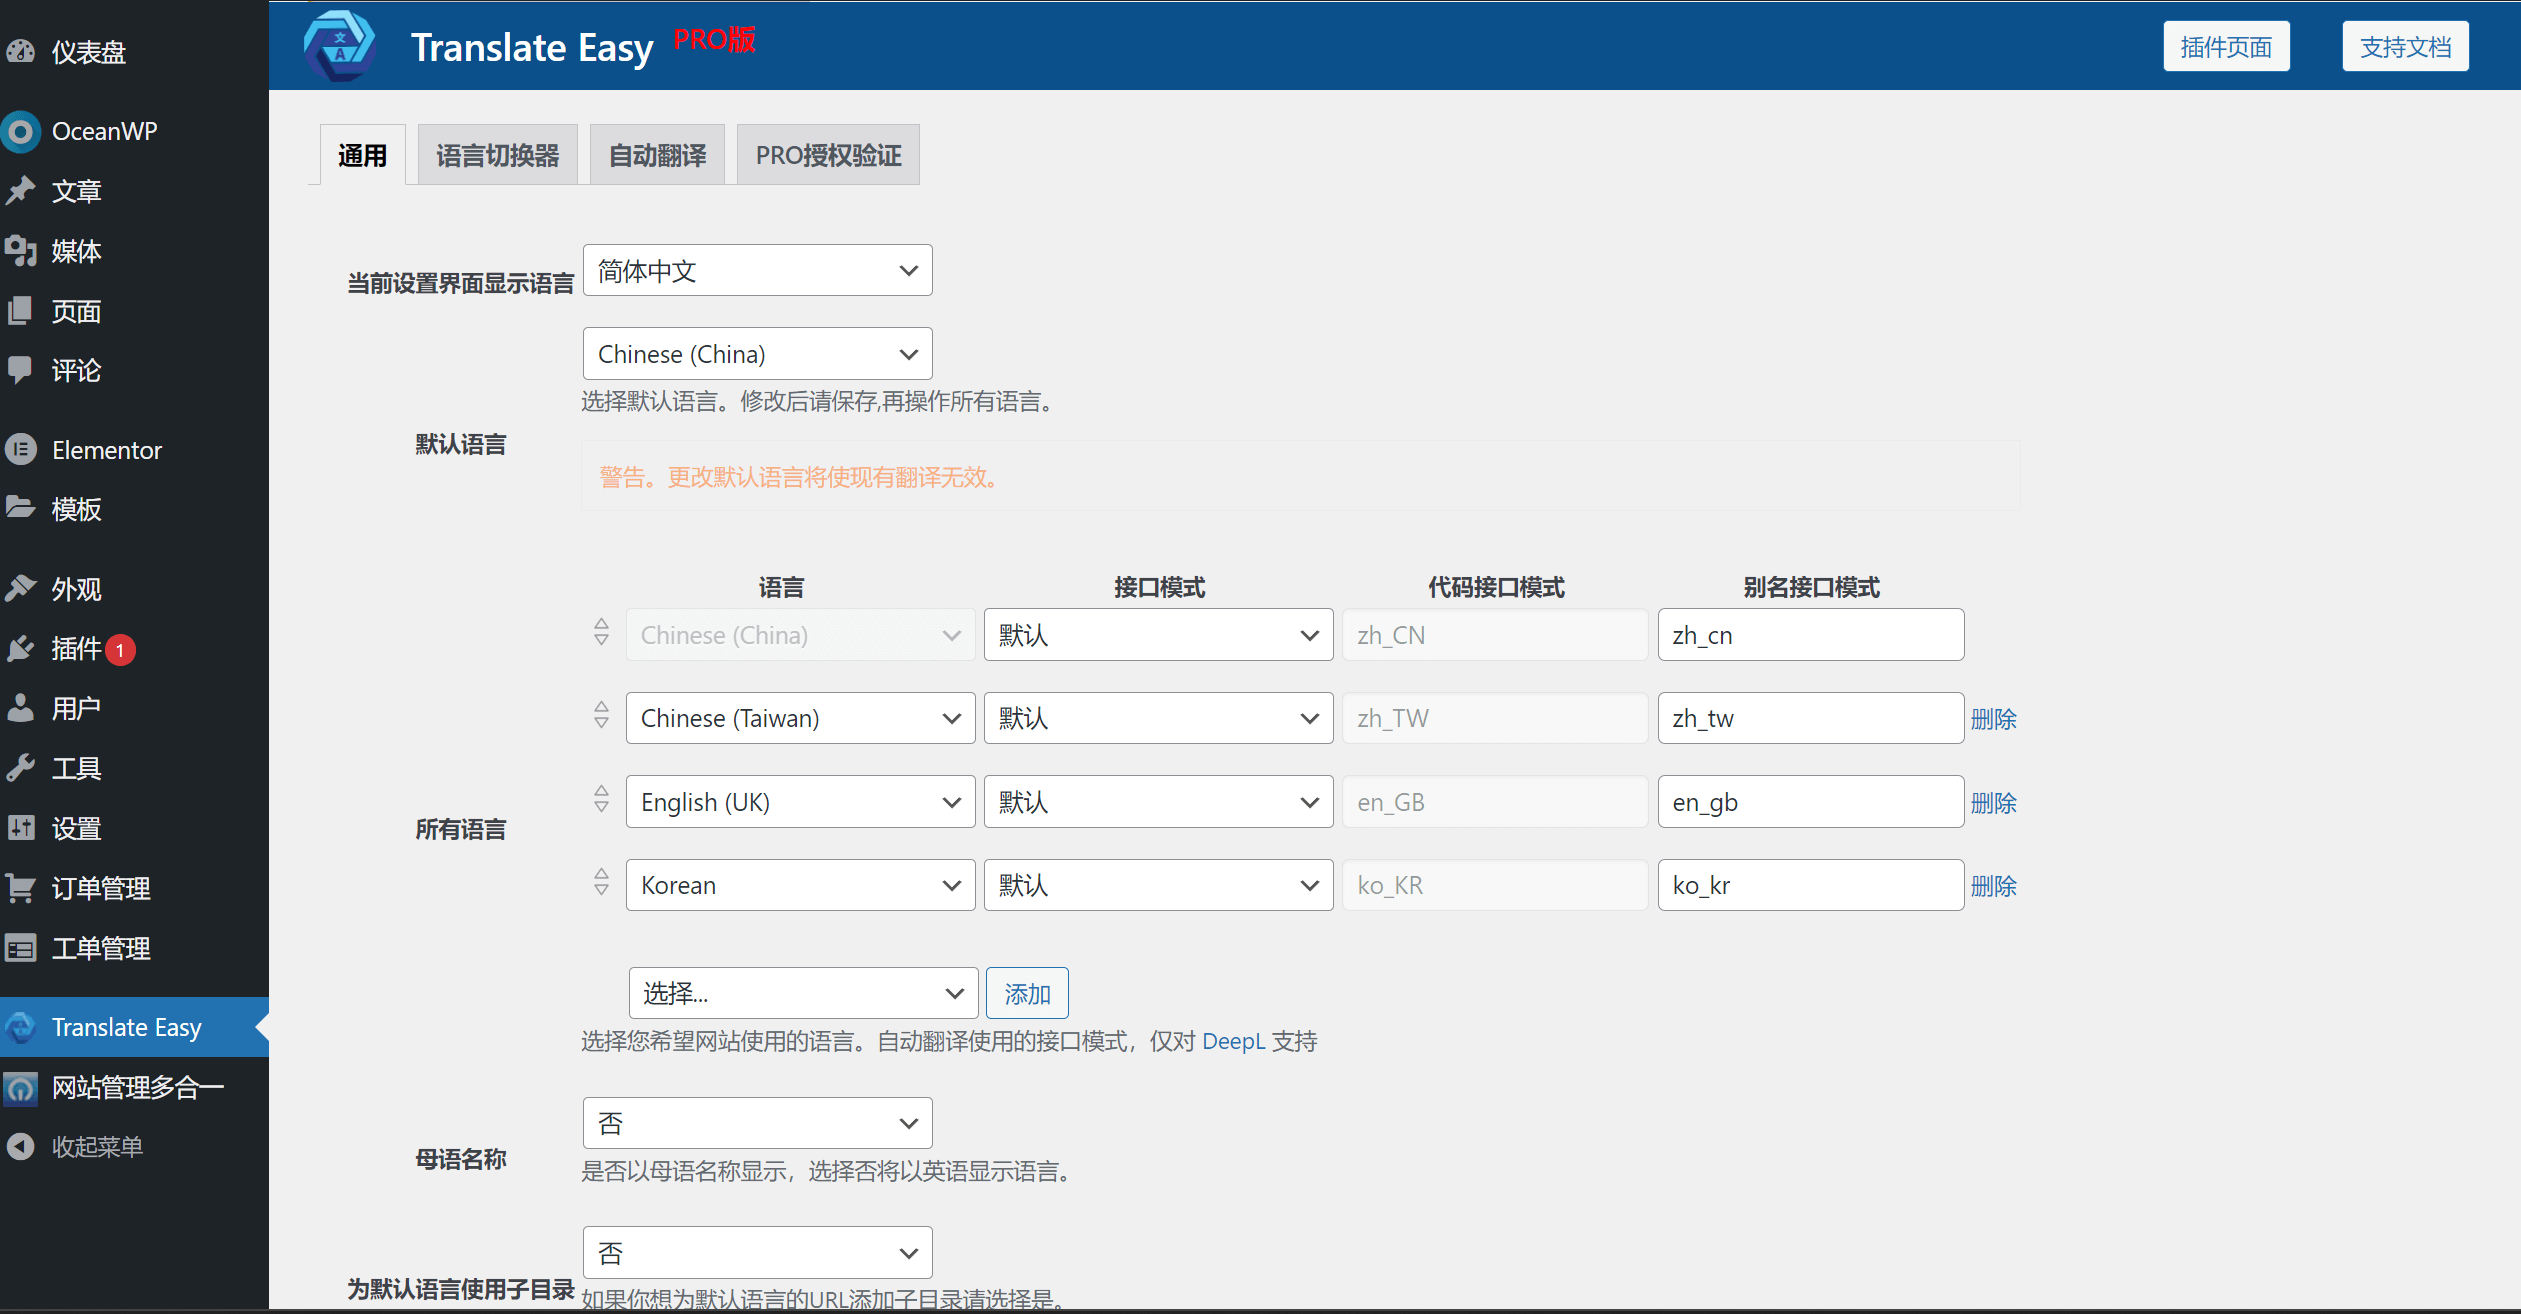
The detailed description of the functions in TranslateEasy-General Settings is as follows:
- Current Settings Interface Display Language: This feature controls the display language of the plugin settings interface. Users can select the most suitable language based on their reading habits.
- Default Language: The default display language of the website. After the plugin is installed, it will read the language set in the WordPress backend as the default language for TranslateEasy. The default language can be understood as the primary language, and all other newly added languages are translated based on the default language. Do not change the default language casually, as changing it will cause previous translations and cached translation files to become invalid. After changing the default language, the entire website will need to be re-translated.
- All Languages: Add the languages needed for the website here. You can add the required languages in the language dropdown box one by one. After saving the changes, the floating language switcher on the front-end page will automatically update the languages. If you need the language switcher in the navigation menu to display the newly added languages, you will need to manually update it in the menu.
- Native Language Name: The native language name refers to the setting item for the default language of the floating language switcher. After setting the “Native Language Name” option to “Yes,” the first language in the floating language switcher will be displayed as the website's default language. If set to “No,” English will be used as the first display language.
- Use Subdirectory for Default Language: What is a URL subdirectory? In the URL structure of different language pages, the last “/” is the subdirectory, such as the “/en_gb” for the English page. If you want the default language page to also display the subdirectory URL format, select “Yes” in “Use Subdirectory for Default Language,” otherwise, keep the default setting as “No.”
- Switch Theme Language for Translation: When certain themes load characters asynchronously, causing TranslateEasy to be unable to save the real translation data, you need to set “Switch Theme Language for Translation” to “Yes.” Enabling this function will change the language tags in the theme code, so that the asynchronously loaded content is displayed in the set language
Ⅱ、 TranslateEasy-language switcher settings
In the plugin settings interface, the Language Switcher section includes various customization options for the display position of the language switcher. You can add the language switcher to the navigation menu, enable the “Floating Language Selector,” and choose the display position. After saving the changes, the floating language switcher will appear on the page. You can also use a shortcode to place the language switcher anywhere on the page. Under the Language Switcher Features section, there is a color picker for setting the background color of the floating language switcher and a margin adjustment option for the display position. These two custom styling features allow users to customize the background color of the floating switcher and adjust its position on the page
The language switcher setting interface of the TranslateEasy plug-in and the function items that can be set in the language switcher are shown in the figure below:
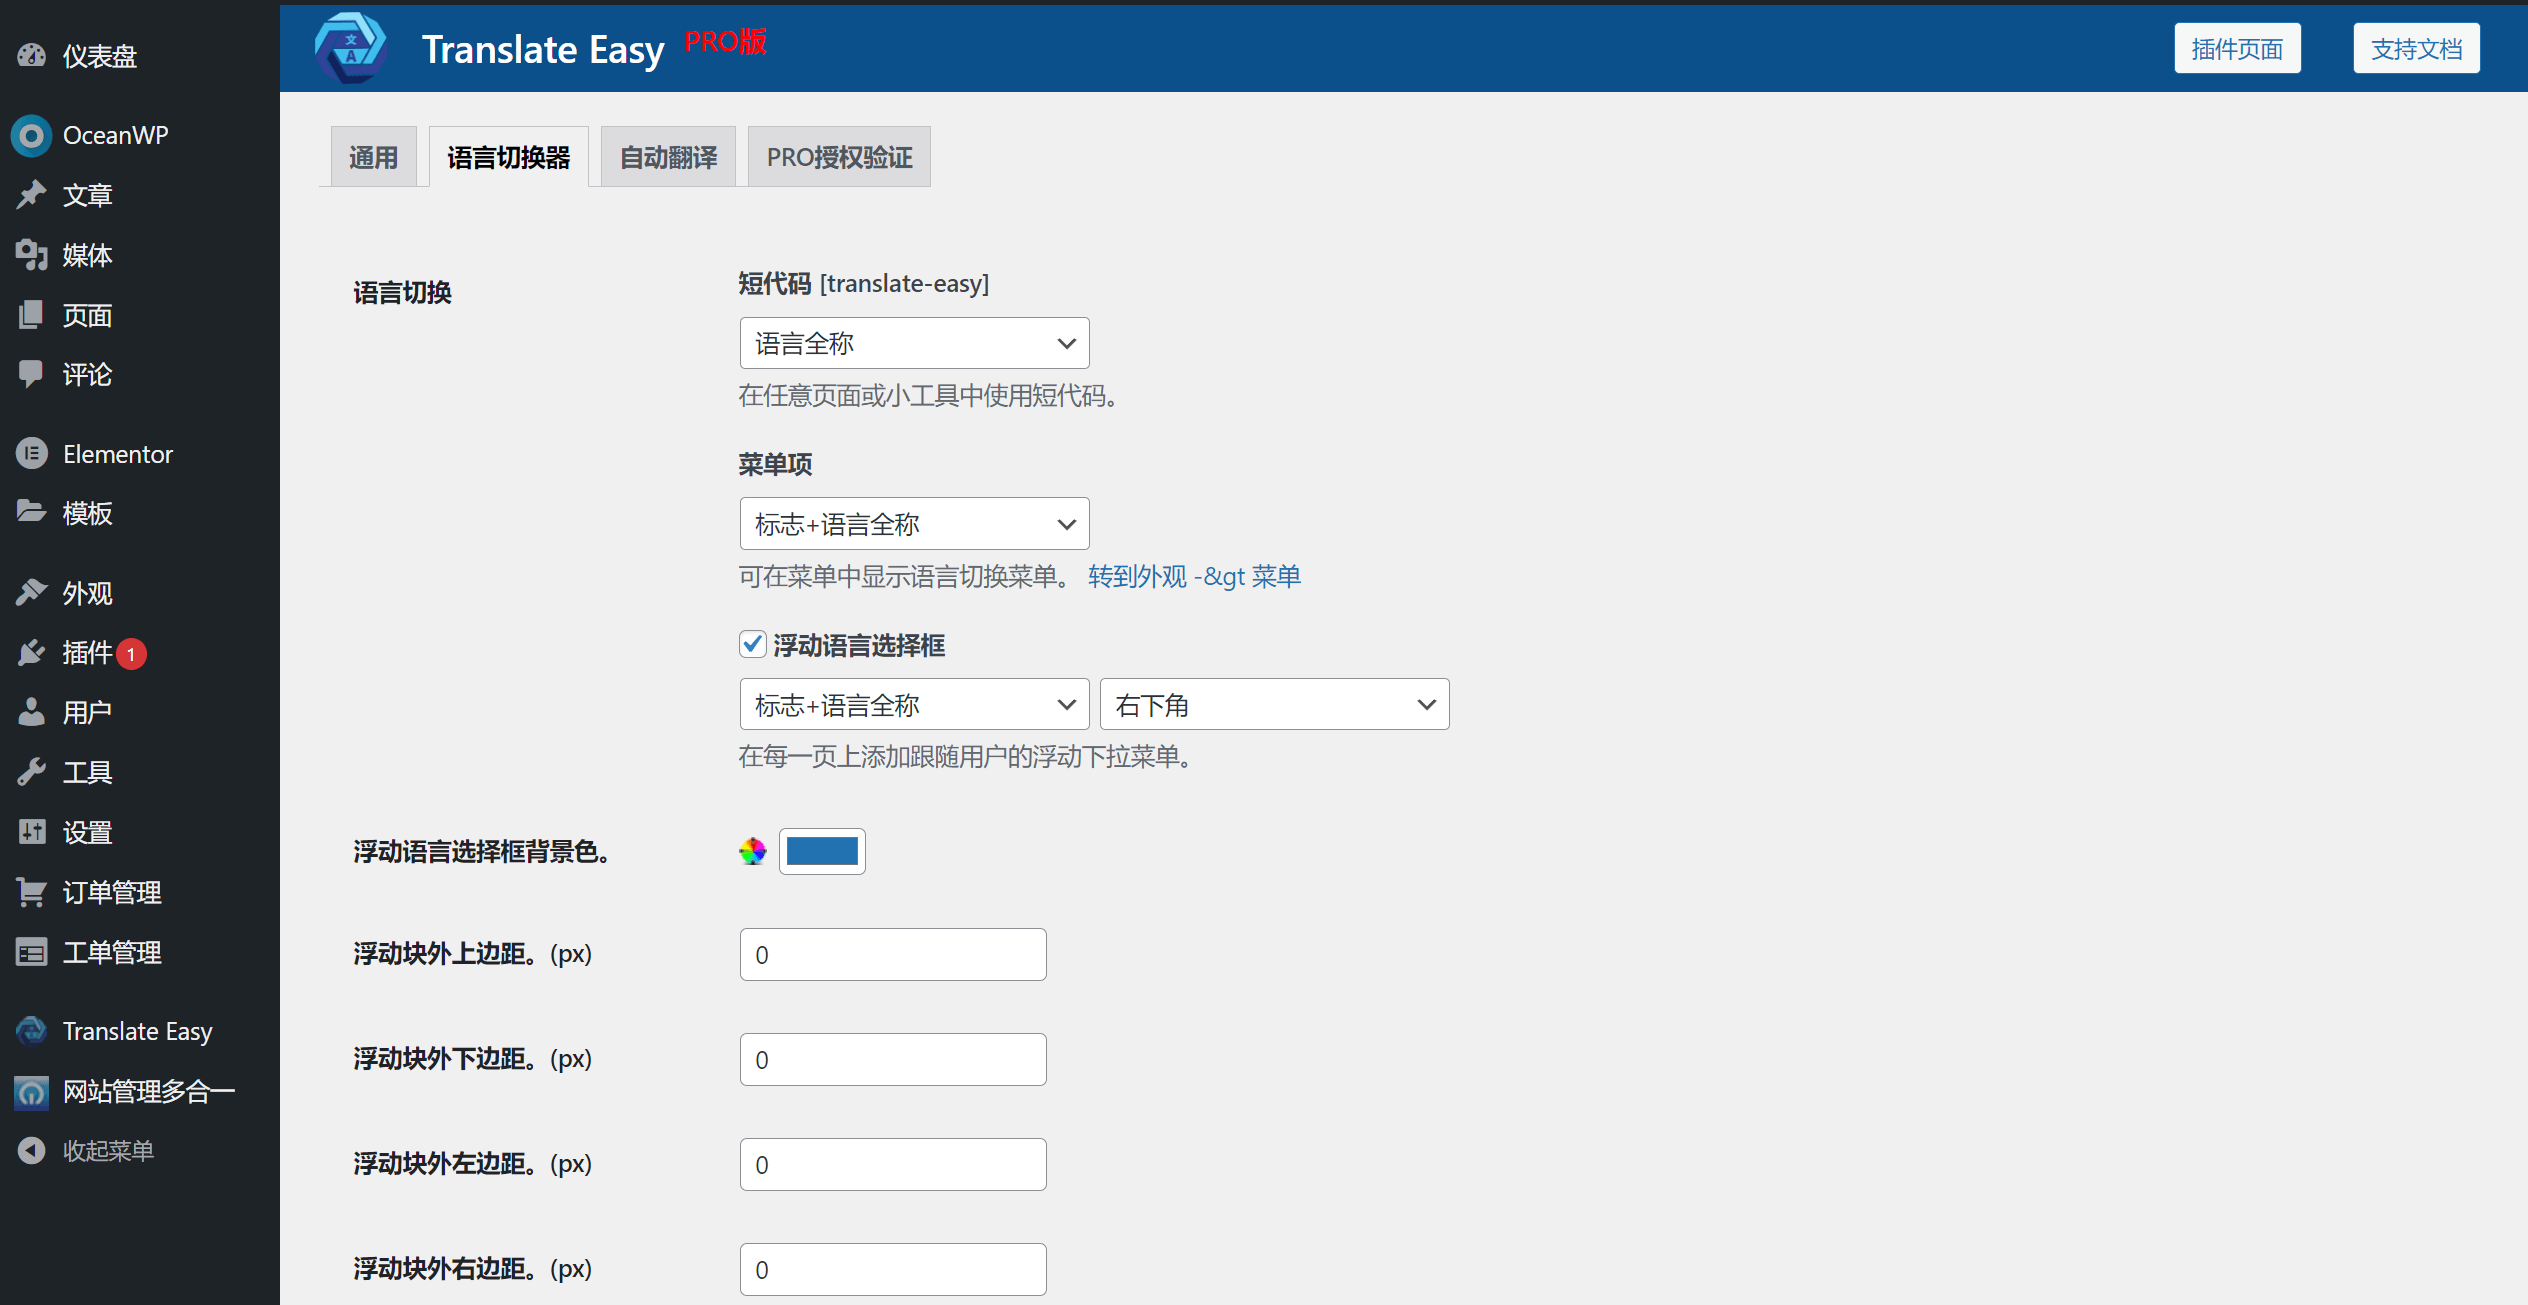
1. Short Code
Use the shortcode to display the language switcher on any page or widget. The dropdown menu for shortcodes allows you to define the display format of the language switcher when the shortcode is applied. For a detailed usage tutorial of the shortcode, please refer to the article titled “TranslateEasy Language Switcher Shortcode Usage” under the TranslateEasy Plugin Configuration Guide.
2. Menu Items
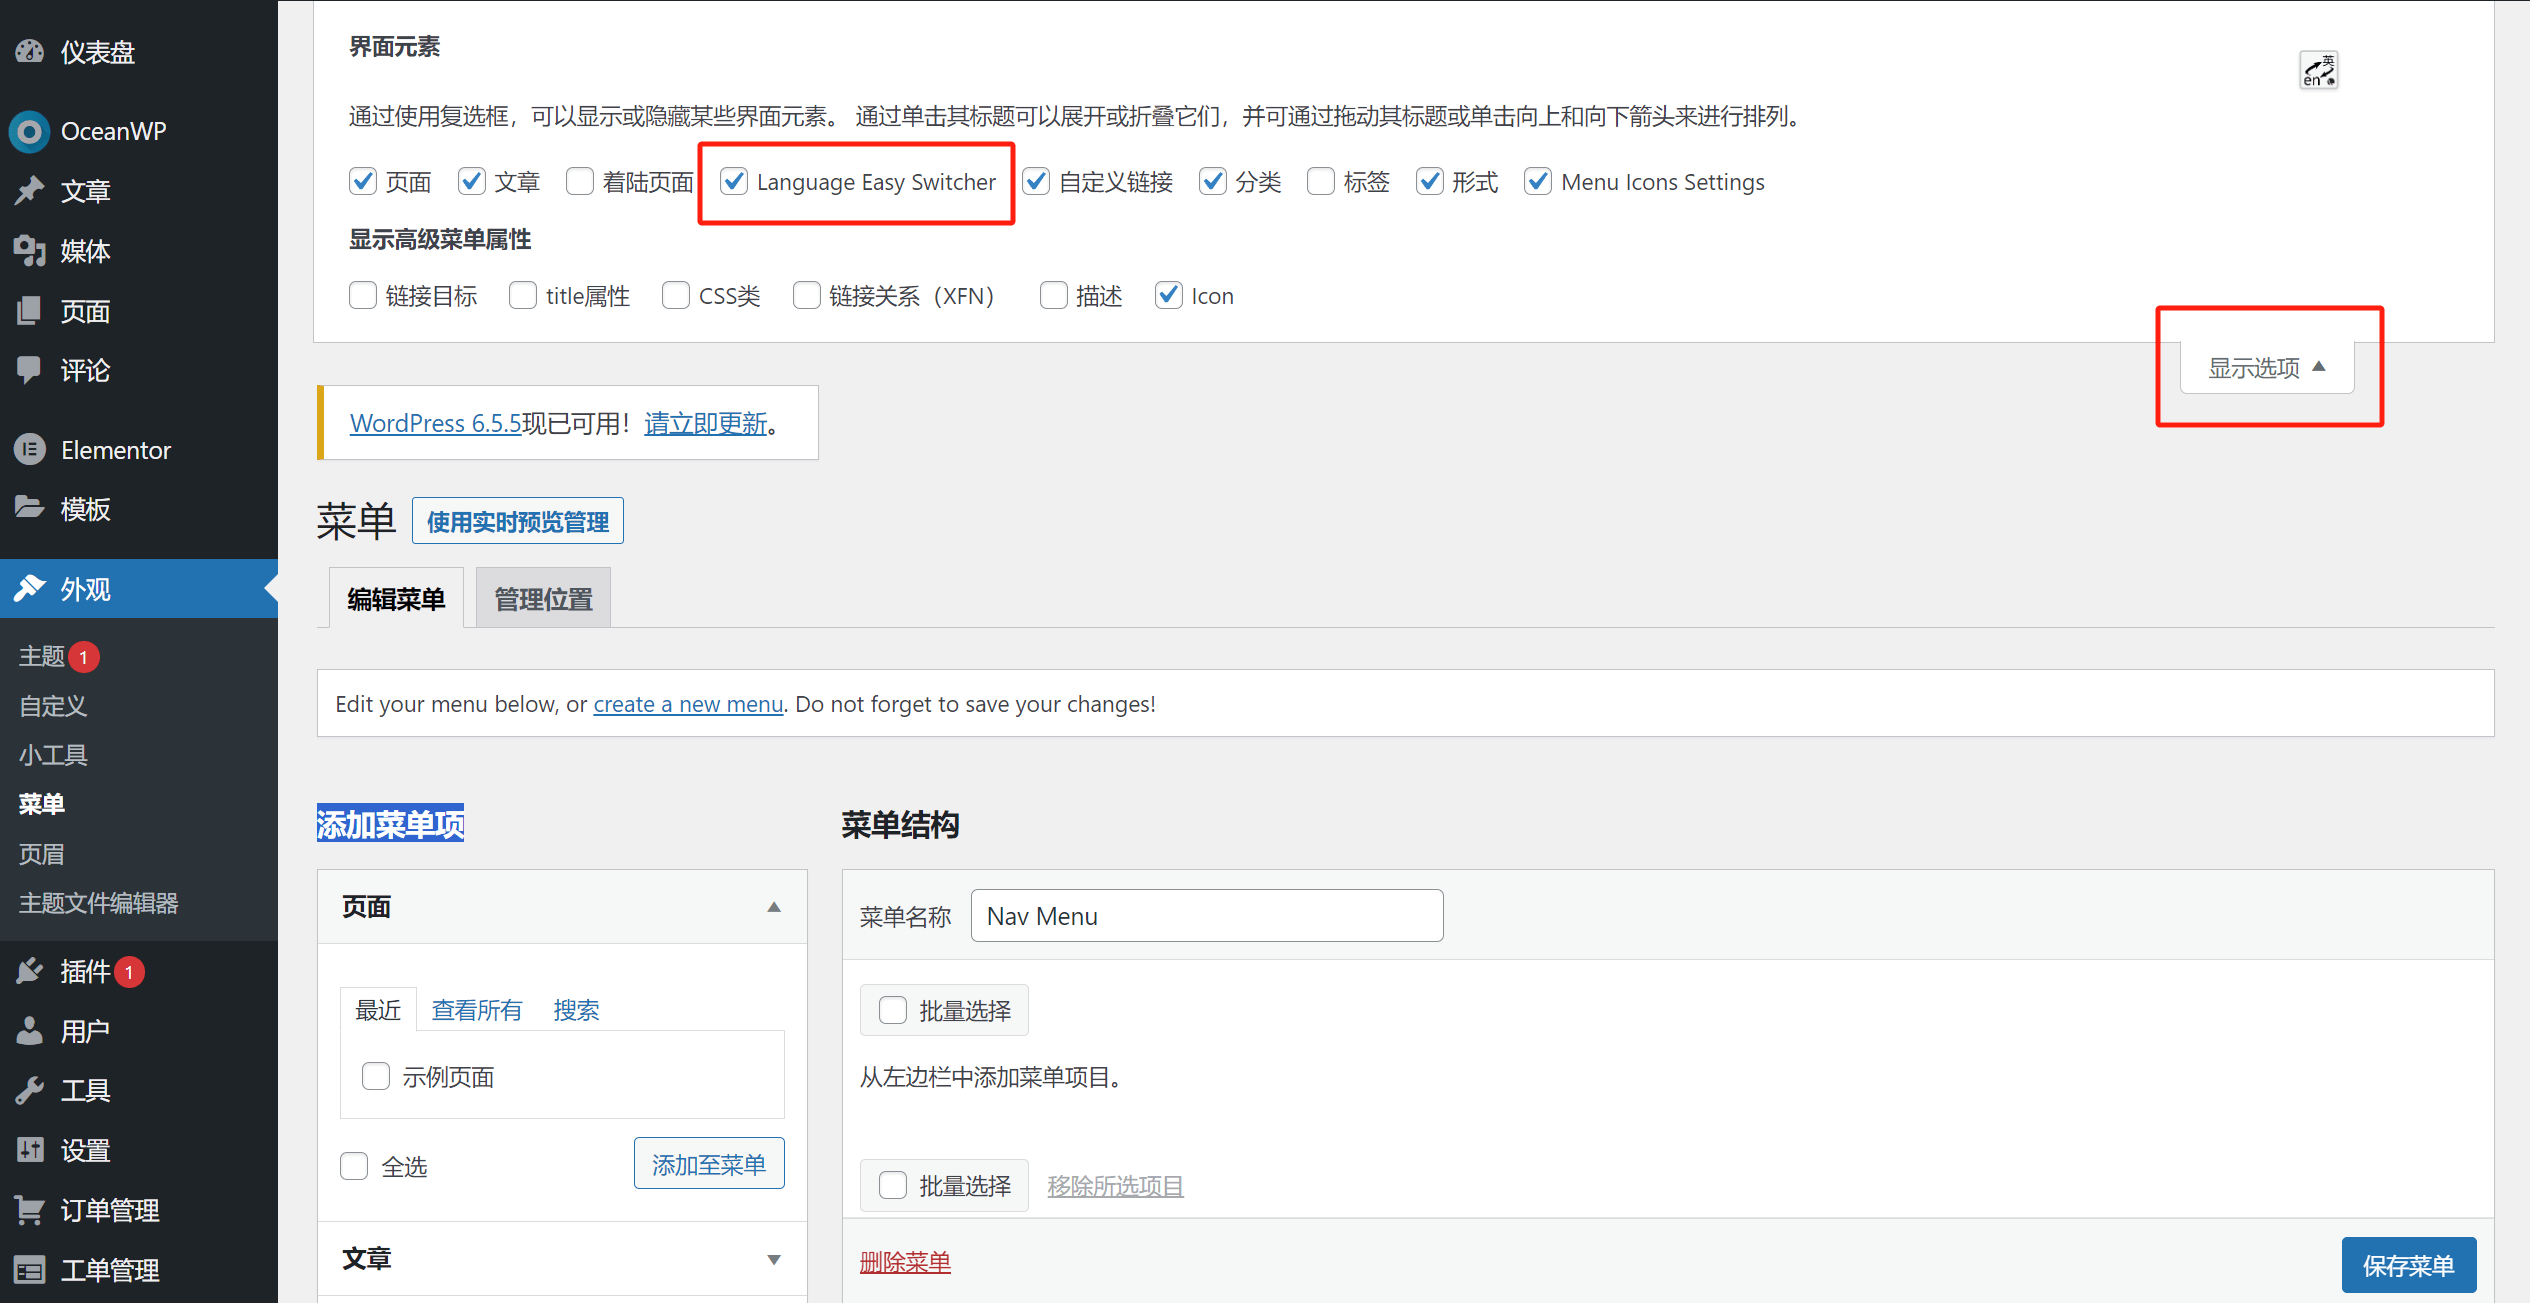
“Menu Item” refers to configuring the TranslateEasy language switcher under Appearance > Menus in the theme, which is a feature enabled by default in TranslateEasy. You can set the language display format of the switcher using the language format options in the dropdown selection. After setting the language format and saving the changes, go to Appearance > Menus to arrange the order of the languages within the switcher. A reminder here: If the language switcher is not shown under “Add Menu Items” in Appearance > Menus, you need to open the “Screen Options” at the top of the menu configuration page, then check “Language Easy Switcher” (TranslateEasy’s language switcher) in the options. Once checked, the language switcher will appear under “Add Menu Items.” By adding the desired languages from the switcher into the “Menu Structure” and saving the updated menu settings, the language switcher will then appear in the navigation menu of the website header.
How to configure the display options and check "Language Easy Switcher" at the top of the Appearance-Menu-Settings interface is shown in the red box below:
3、Floating Language Selector Box
The floating language selector box displays the language switcher options in four corners of the page: top-left, top-right, bottom-left, and bottom-right. This feature needs to be manually enabled, and you can select the location where the language switcher will appear on the page. Additionally, you can set the display format for the language options within the floating language switcher, with options like icon + full language name or icon + language abbreviation, both of which will show the icon.
4、Floating Language Selector Box Background Color
The "Floating Language Selector Box Background Color" and the "Floating Box Margin" settings are part of the custom CSS functionality designed for TranslateEasy plugin users. The "Floating Language Selector Box Background Color" includes a color picker and a color input box, allowing you to customize the background color of the floating language switcher by selecting a color or entering an RGB color value.
5、Floating Box Margin
This is another custom styling feature for the floating language switcher, similar to the "Floating Language Selector Box Background Color" setting. You can adjust the position of the floating language switcher on the page by inputting the margin value in pixels (px).
Ⅲ、TranslateEasy - Automatic Translation Settings
After validating the PRO version license, you can enable the automatic translation feature of TranslateEasy. Choose the translation engine you want to use and input the corresponding API key. Once the changes are saved, the automatic translation feature will be activated for the website pages. Additionally, the settings page for automatic translation allows you to enable a function to block crawlers from triggering automatic translation, preventing unnecessary API usage data. In the "Limit the number of characters per day for machine translation" field, you can specify the maximum number of translation characters allowed per day, controlling the daily API usage. If you want to view the daily character usage for translations, the "Characters Translated Today" section at the bottom of the automatic translation settings page shows the statistics for translated characters on that day.
The following image shows the settings interface for the automatic translation configuration in the TranslateEasy plugin:
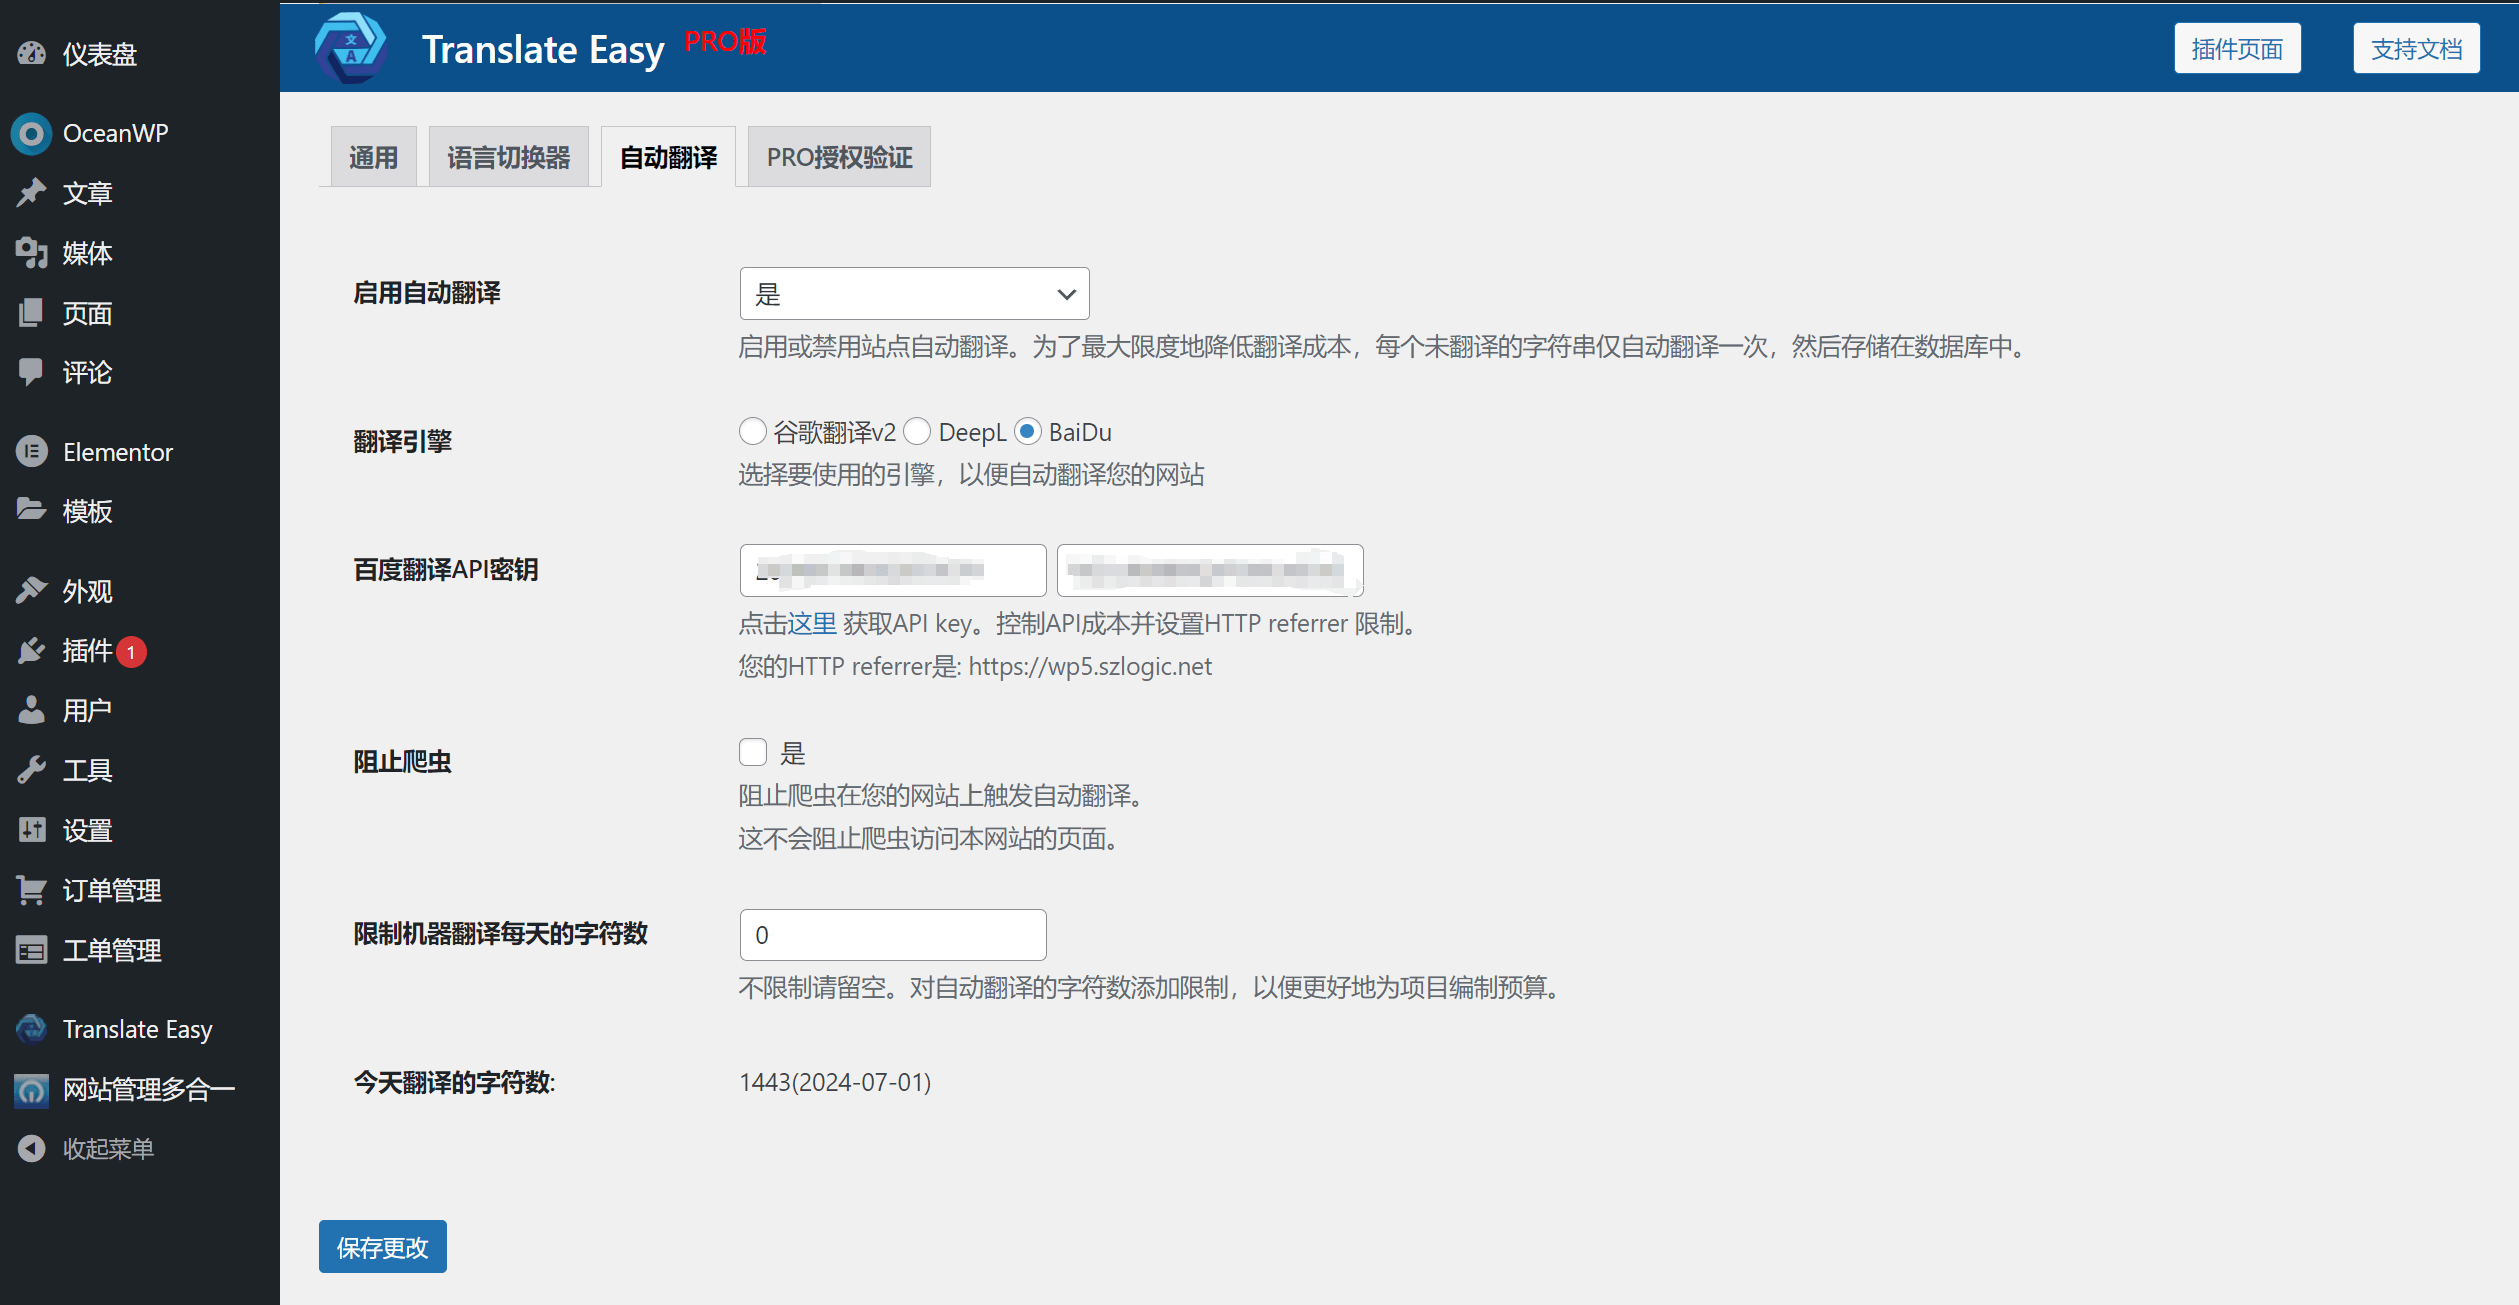
The detailed description of the functions in TranslateEasy-Automatic Translation is as follows:
- Enable Auto Translation: To use the features within auto-translation, you need to enable auto-translation. Once auto-translation is enabled, the settings interface for auto-translation will display all the features under this section.
- Translation Engine: Choose the translation engine you want to use, which refers to the translation technology provider. TranslateEasy supports APIs from Google, DeepL, and Baidu. After selecting the translation engine, correctly enter the API key for the chosen translation technology provider.
- Block Crawlers: It is recommended to enable this feature. The “Block Crawlers” feature does not prevent the website from being discovered or crawled by bots, but rather prevents crawlers from triggering automatic translation of website content, thus avoiding wasting translation API usage
- Limit Characters for Machine Translation per Day: In the input box for limiting machine translation characters per day, enter the limited number of translation characters allowed daily to control the API usage for translations.
- Characters Translated Today: No additional setup is required. This feature tracks the number of characters translated each day. It only displays the total count of translated characters for the day and cannot be configured.
Ⅳ、Pro Authorization Verification
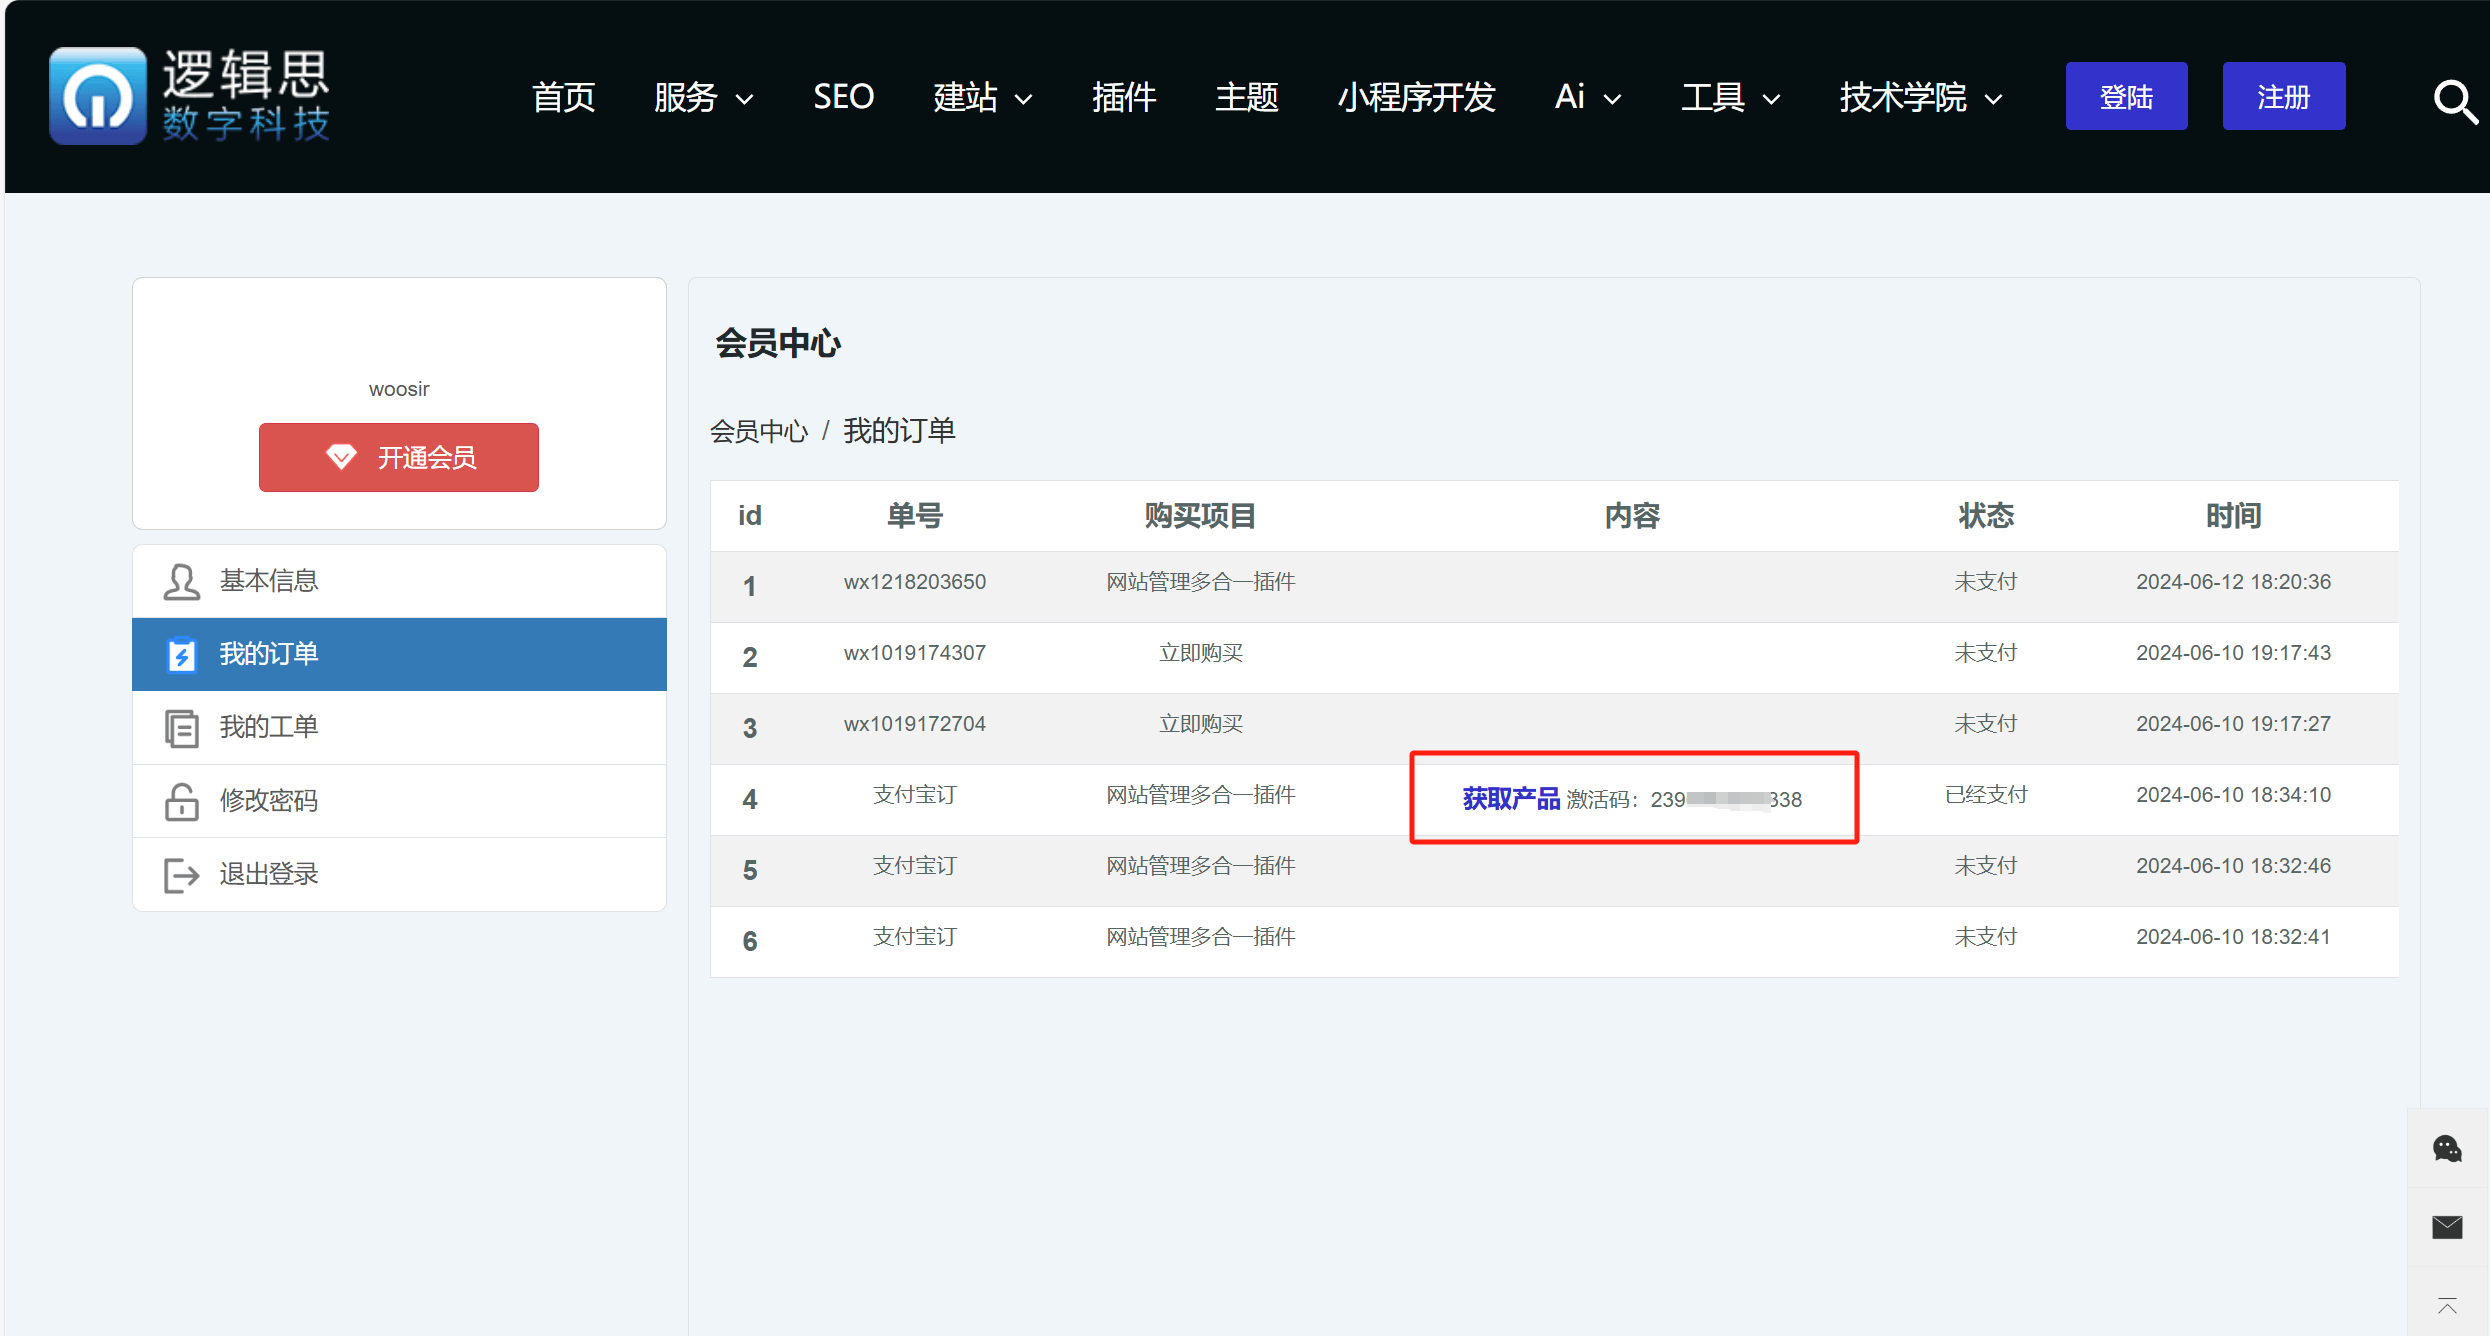
Use the professional version license key by copying and pasting it into the “Pro License Key” input field, then click the “Activate License” button to complete the license activation and feature upgrade. The plugin installation package is a universal package; it does not differentiate between the free and pro versions. Once you obtain the Pro license key, you can directly activate the Pro version via the license code without uninstalling the original plugin or reinstalling using the Pro installation package. The operation to purchase the PRO version plugin and obtain the PRO license key after logging into your Logic Digital Technology user account is shown in the image below:
Conclusion: The above content concludes the article “WordPress Multilingual Support Plugin – TranslateEasy Setup Guide.” After completing the TranslateEasy plugin settings in the WordPress backend, you will also need to perform automatic or manual translations for each language version of your website on the frontend. For detailed frontend operation instructions, please refer to the two tutorial articles under the TranslateEasy Plugin Configuration Guide: “TranslateEasy Automatic Translation Method” and “TranslateEasy Frontend Page Translation Editing Guide” and follow the steps accordingly.
Logic Digital Technology (SZLOGIC) All rights reserved. Reproduction is prohibited.