


Submitting a Website to Google, Baidu, Bing, and Yandex

One of the important methods to drive traffic for a website is search engine optimization. However, before carrying out the numerous steps and specific technical operations involved in Website SEO, a crucial task is to submit the website to search engines. This is the starting point for website management and SEO, and the first step after the website is developed. Without successfully submitting the website to search engines, the subsequent SEO efforts cannot even begin. Therefore, successfully submitting the website to search engines like Google, Baidu, Bing, Yandex, etc., can be considered one of the key tasks for the overall success of website management.
By reading this tutorial, you will learn how to create accounts on the webmaster tools of major search engines, such as Google Search Console, Baidu Webmaster Tools, Bing Webmaster Tools, and Yandex Webmaster Tools. You will also learn how to submit your website to these search engines and begin managing traffic. You will learn:
- Two methods of submitting a website to Google Search Console
- Specific steps for verifying website ownership on search engines
- Different types of sitemaps supported by various search engines and how to submit them
- The market and audience scope of search engines from different countries
This tutorial is organized as follows. It provides a detailed explanation of how to submit a website and sitemap to Google, Baidu, Bing, and Yandex. If you want to submit your website to a specific search engine rather than all of them, you can click the links below to quickly learn and practice submission for your chosen search engine.
- Google Webmaster Tools: Creating an Account on Google Search Console and Submitting Your Website
- Baidu Webmaster Tools: Creating an Account on Baidu Resource Platform and Submitting Your Website
- Bing Webmaster Tools: Creating an Account on Webmaster Tools and Submitting Your Website
- Yandex Webmaster Tools: Creating an Account on Yandex Webmaster Tools and Submitting Your Website
Ⅰ、 How to Create an Account and Submit Your Website on Google Search Console
The method of enabling Google Search Console is very simple—perhaps the term “create” is not entirely accurate, and “activate” may be a better fit. To activate Google Search Console, the prerequisite is that you already have a Google account, i.e., a Gmail account. If you don't have a Google account yet, you need to first create a Google Account, and then open the Google Search Console link to activate it.
Google Search Console add property (add website)
What is meant by “Add Property” here refers to adding your website—that is, adding your site to the Google Search Console backend. According to Google's official documentation, one Google Search Console account can add up to 1,000 websites in the property manager. In other words, multiple websites can be managed under the same Google Search Console account, similar to how Google Analytics manages media properties. For those interested in learning how to install Google Analytics on a website, you can refer to another tutorial by the author titled Install Google Analytics On Website.
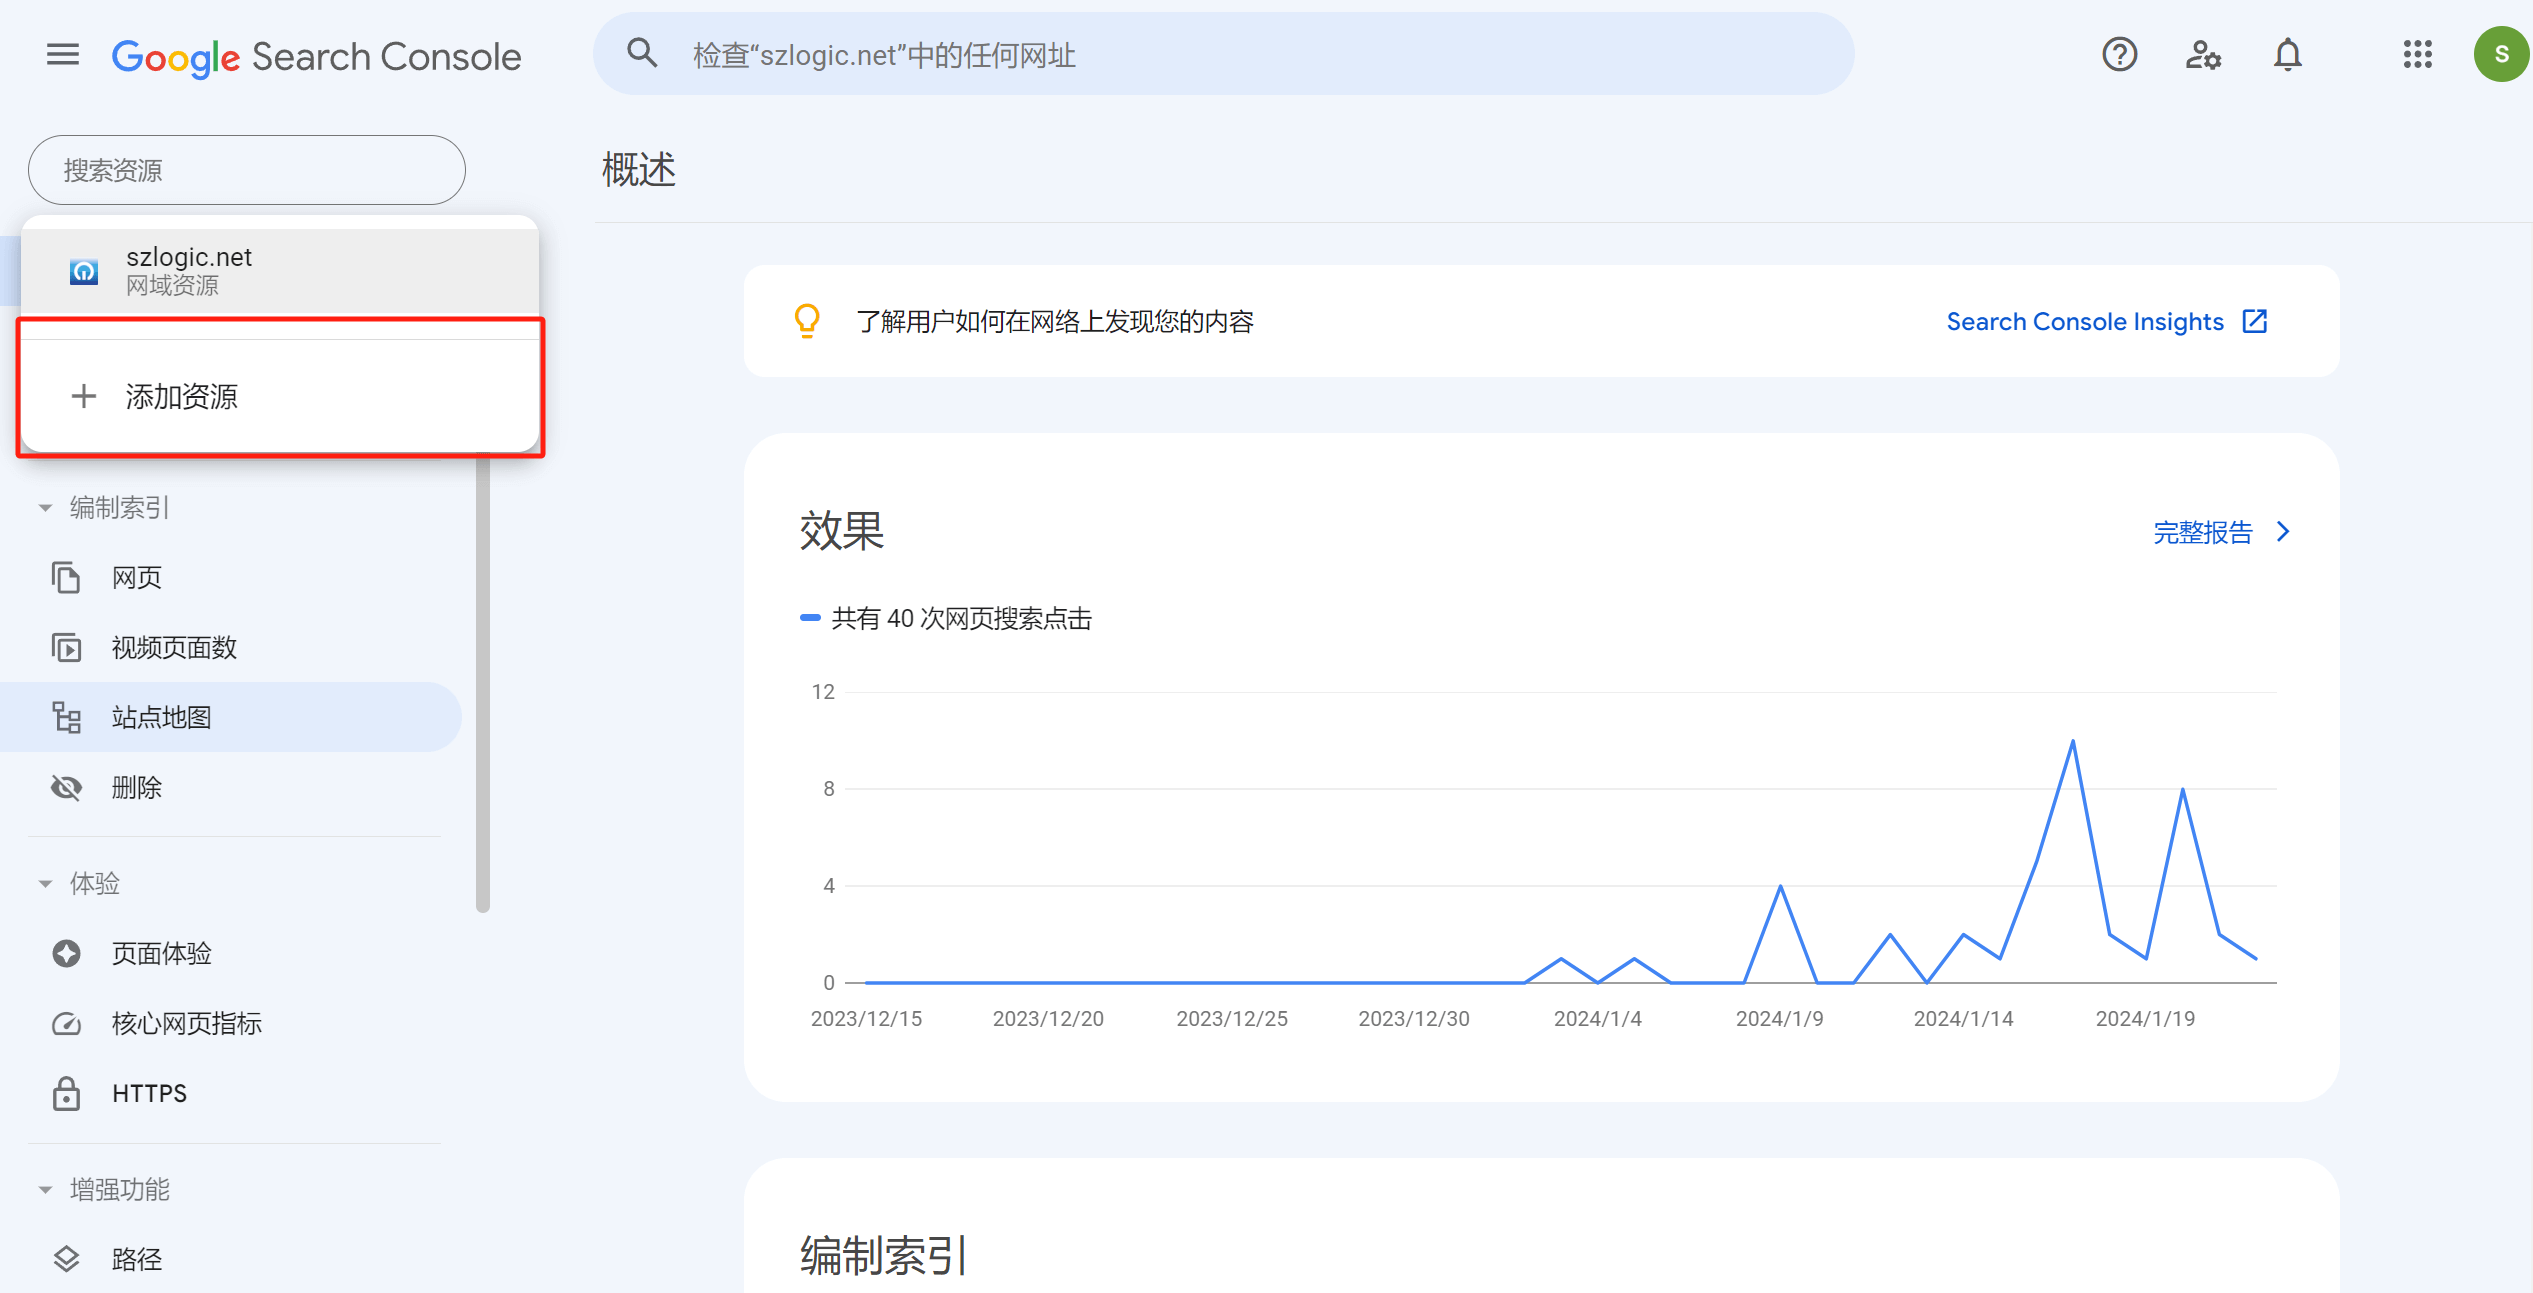
Add Property Box – Click the “Add Property” button again, and a selection mode for adding a property (Domain Name/Website) will pop up as shown in the image below. You can choose either the Domain method or the URL Prefix method to add your website. Only one of the two methods is required to submit your site to Google. Below is an explanation of both methods:
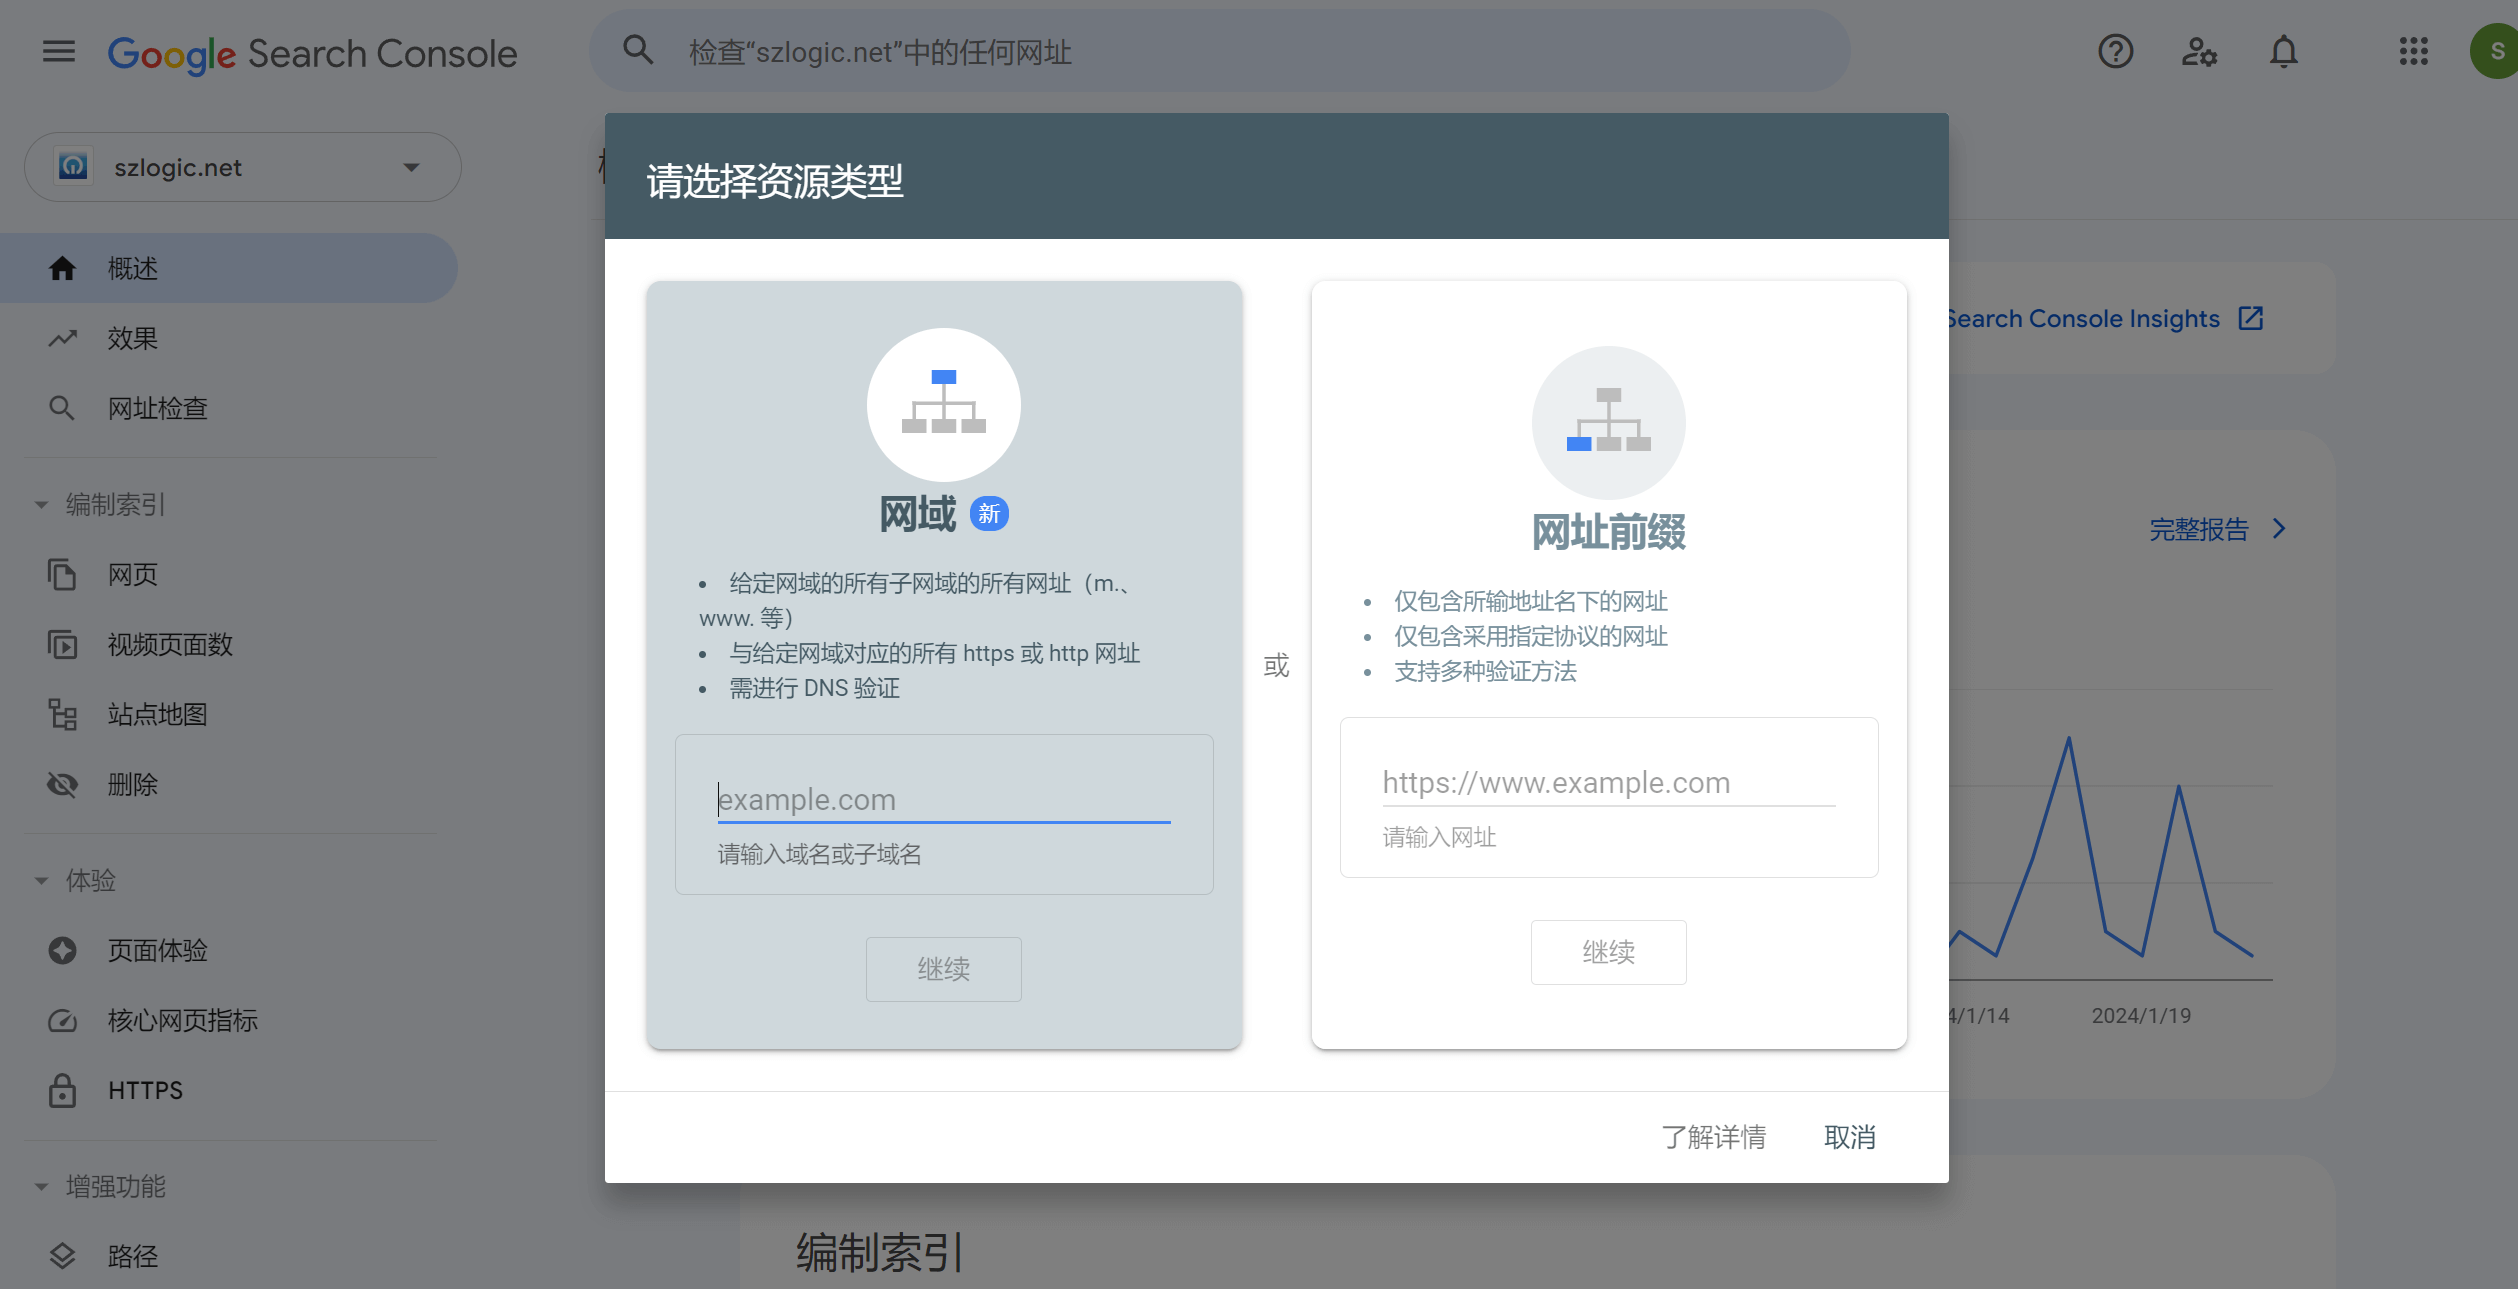
Method 1: Domain Mode
Select the domain mode to add a property. Whether you enter the main domain or a subdomain, Google will treat it as submitting the entire domain (the main domain and all subdomains) to Google. Domain mode can be understood as submitting the entire domain. To submit in this mode, you need to verify the domain by linking your domain registrar account or perform DNS verification in your domain management console as required by Google. After verification, the entire domain is successfully submitted to Google.
Steps for Domain Submission in Google Search Console and DNS Verification with Domain Registra
First, after entering the domain, click the “Continue” button, and you will be redirected to the page shown below. Continue by clicking the “Start Verification” button.
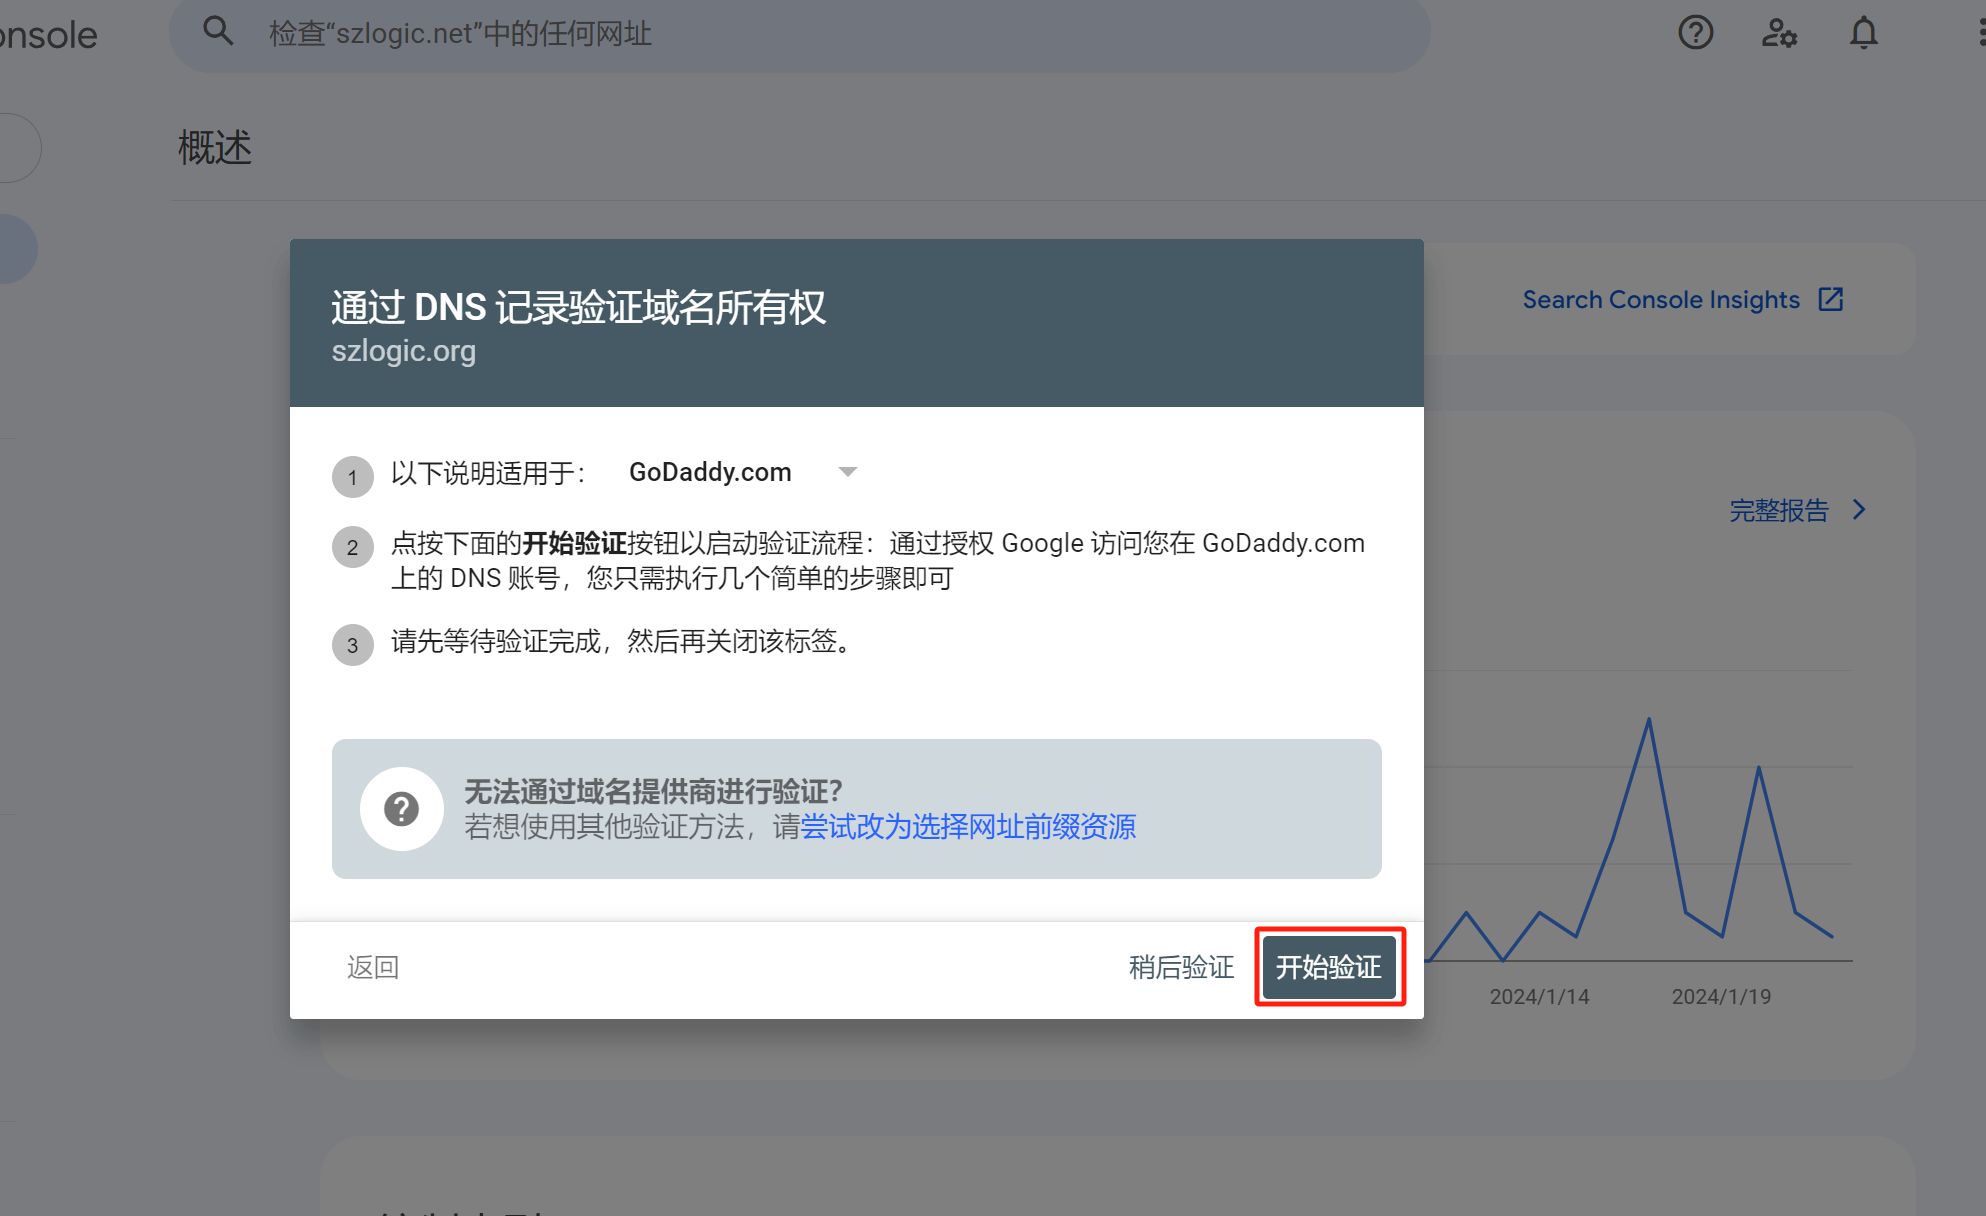

If your domain was purchased from GoDaddy or other domain registrars that can connect to Google, simply clicking the “Connect” button will complete verification via the “Domain” method, and your property (website) will be successfully added.
However, if your domain registrar is not supported by Google for connection verification (such as domestic registrars like Xinwang or Alibaba Cloud), you will need to use DNS verification for website domain submission, as shown in the image below. (Do not close the verification window in Google Search Console. After completing DNS resolution, click the verification button to confirm whether the verification is successful.) Copy the code marked in the red box in the image below and use it as the DNS record.
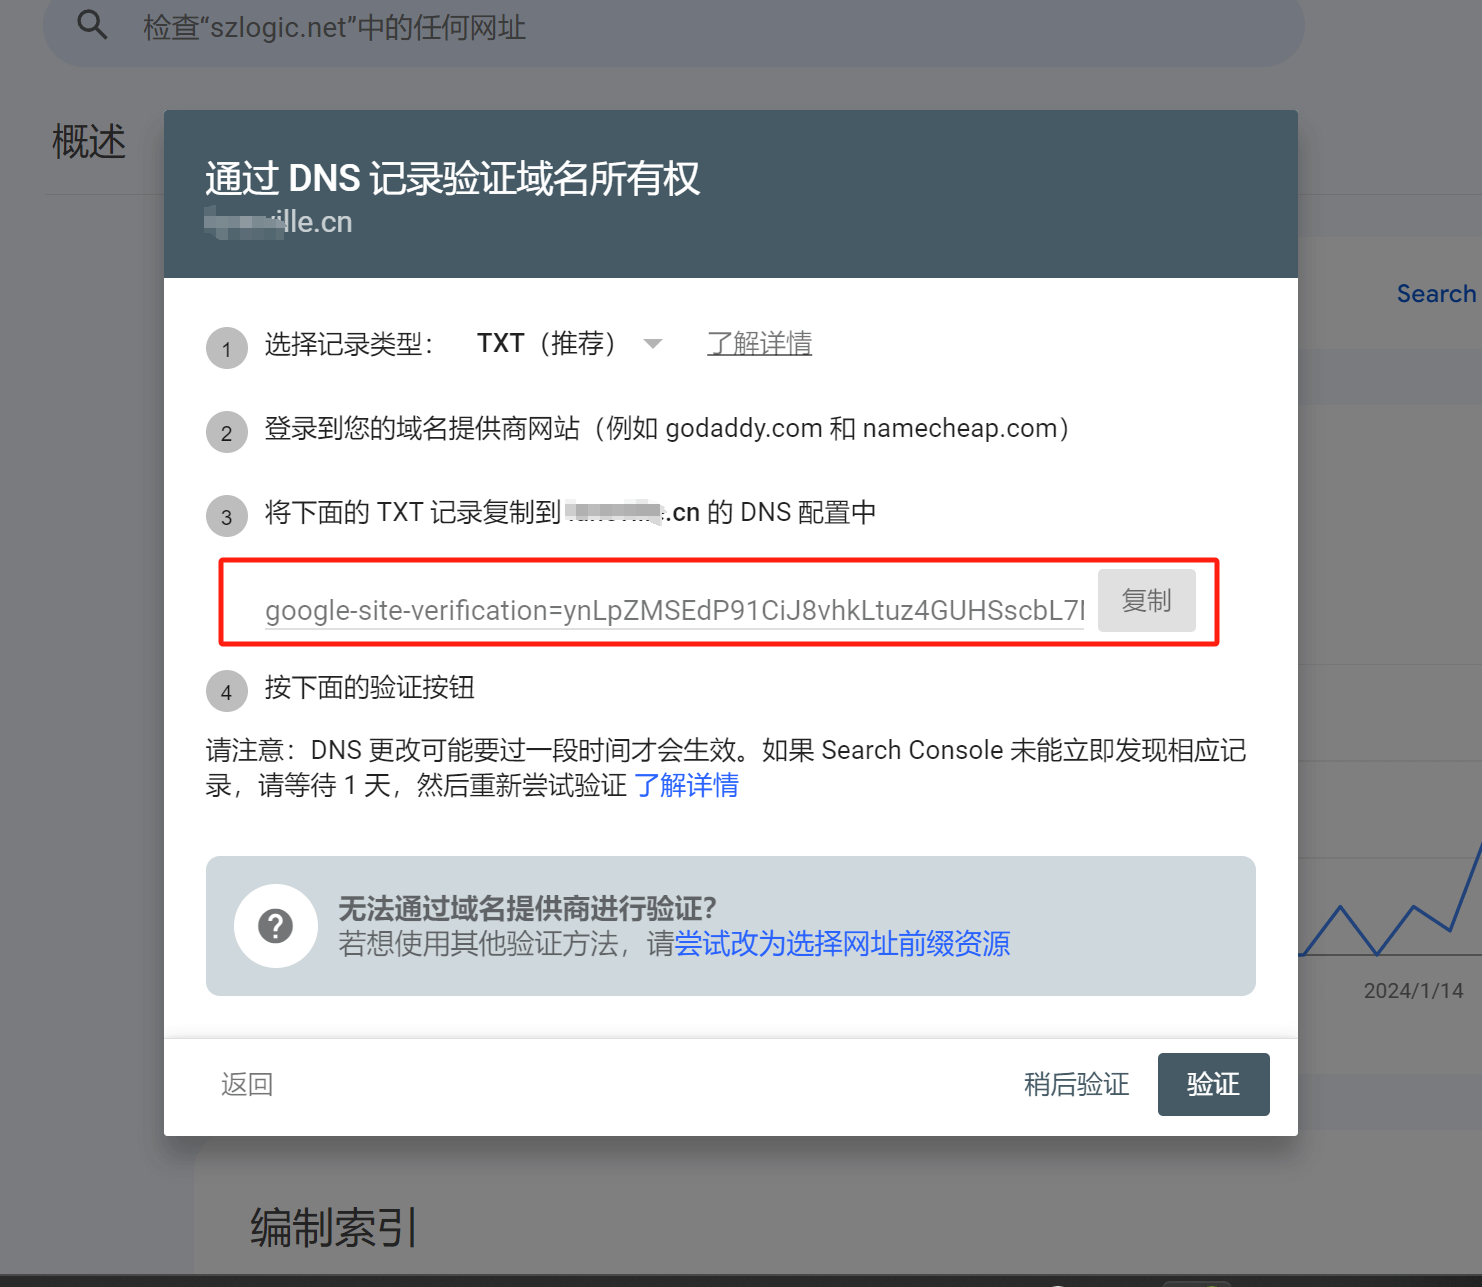
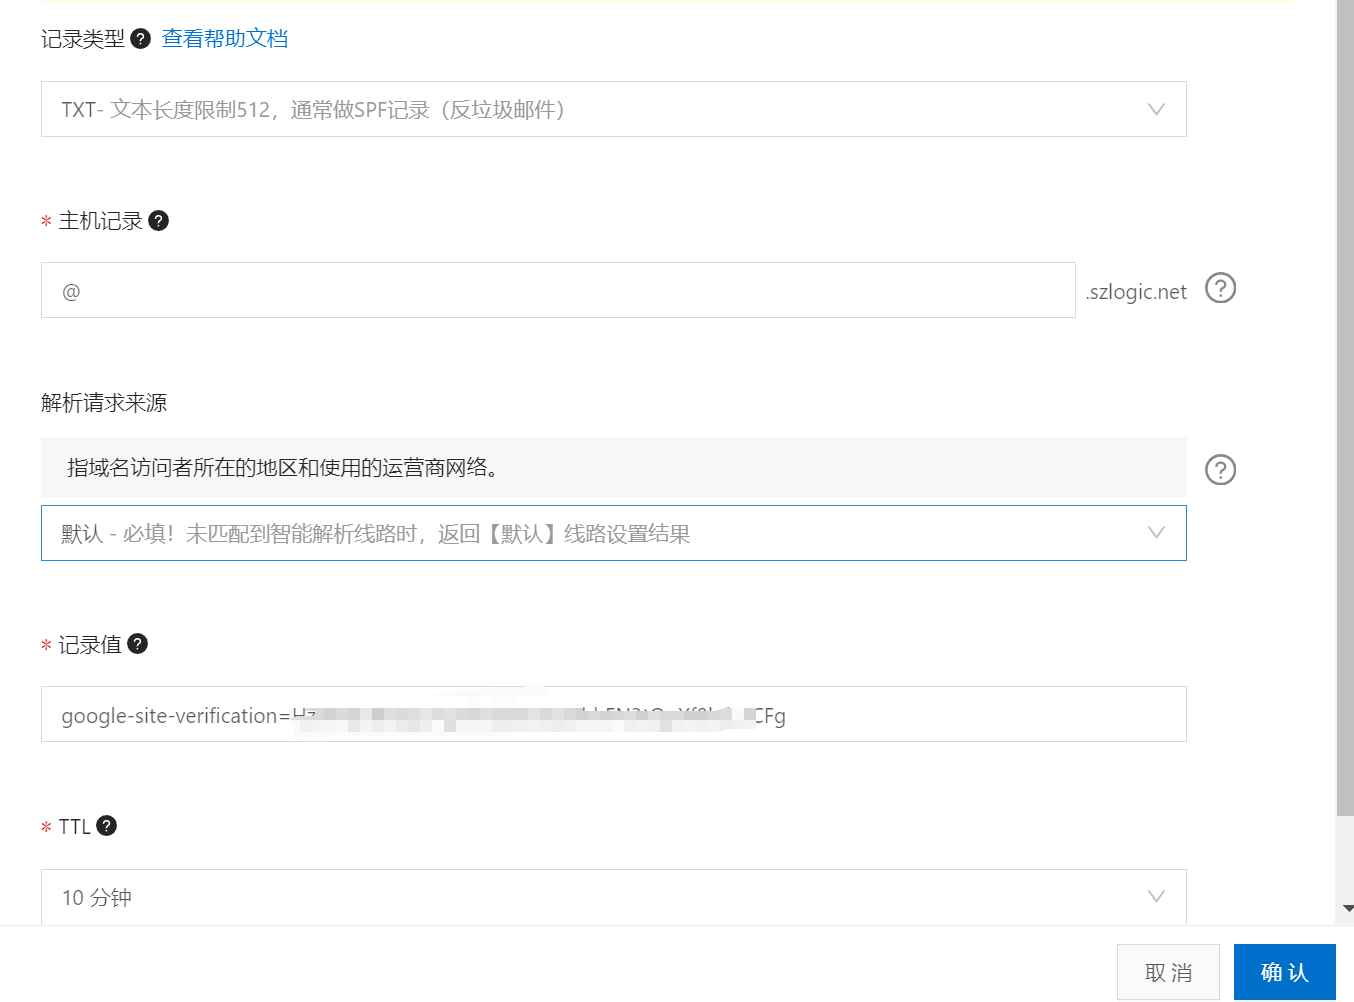
DNS Parameters: Hostname should be @; Record Type is TXT; paste the copied code into the record value input box and don’t forget to click the confirm/submit button. As shown in the image below:
After completing the above steps, click the verification button in the Google Search Console verification window (the one where you copied the DNS record value). If the message indicates successful verification, it means the website has been successfully submitted to Google in domain mode. If the result is an error, check the error message and verify which step was incorrect, then correct it.
Method 2: URL prefix mode
The difference between URL prefix mode and domain mode in Google Search Console is that when adding a domain in URL prefix mode, whether it's the main domain or a subdomain, Google Search Console treats it as a separate entity and does not link it to other domains under the same parent domain. As shown in the image below, there are five methods for verifying a website in URL prefix mode. We will explain each of them below. Note: You only need to choose one method to complete the verification.
HTML File
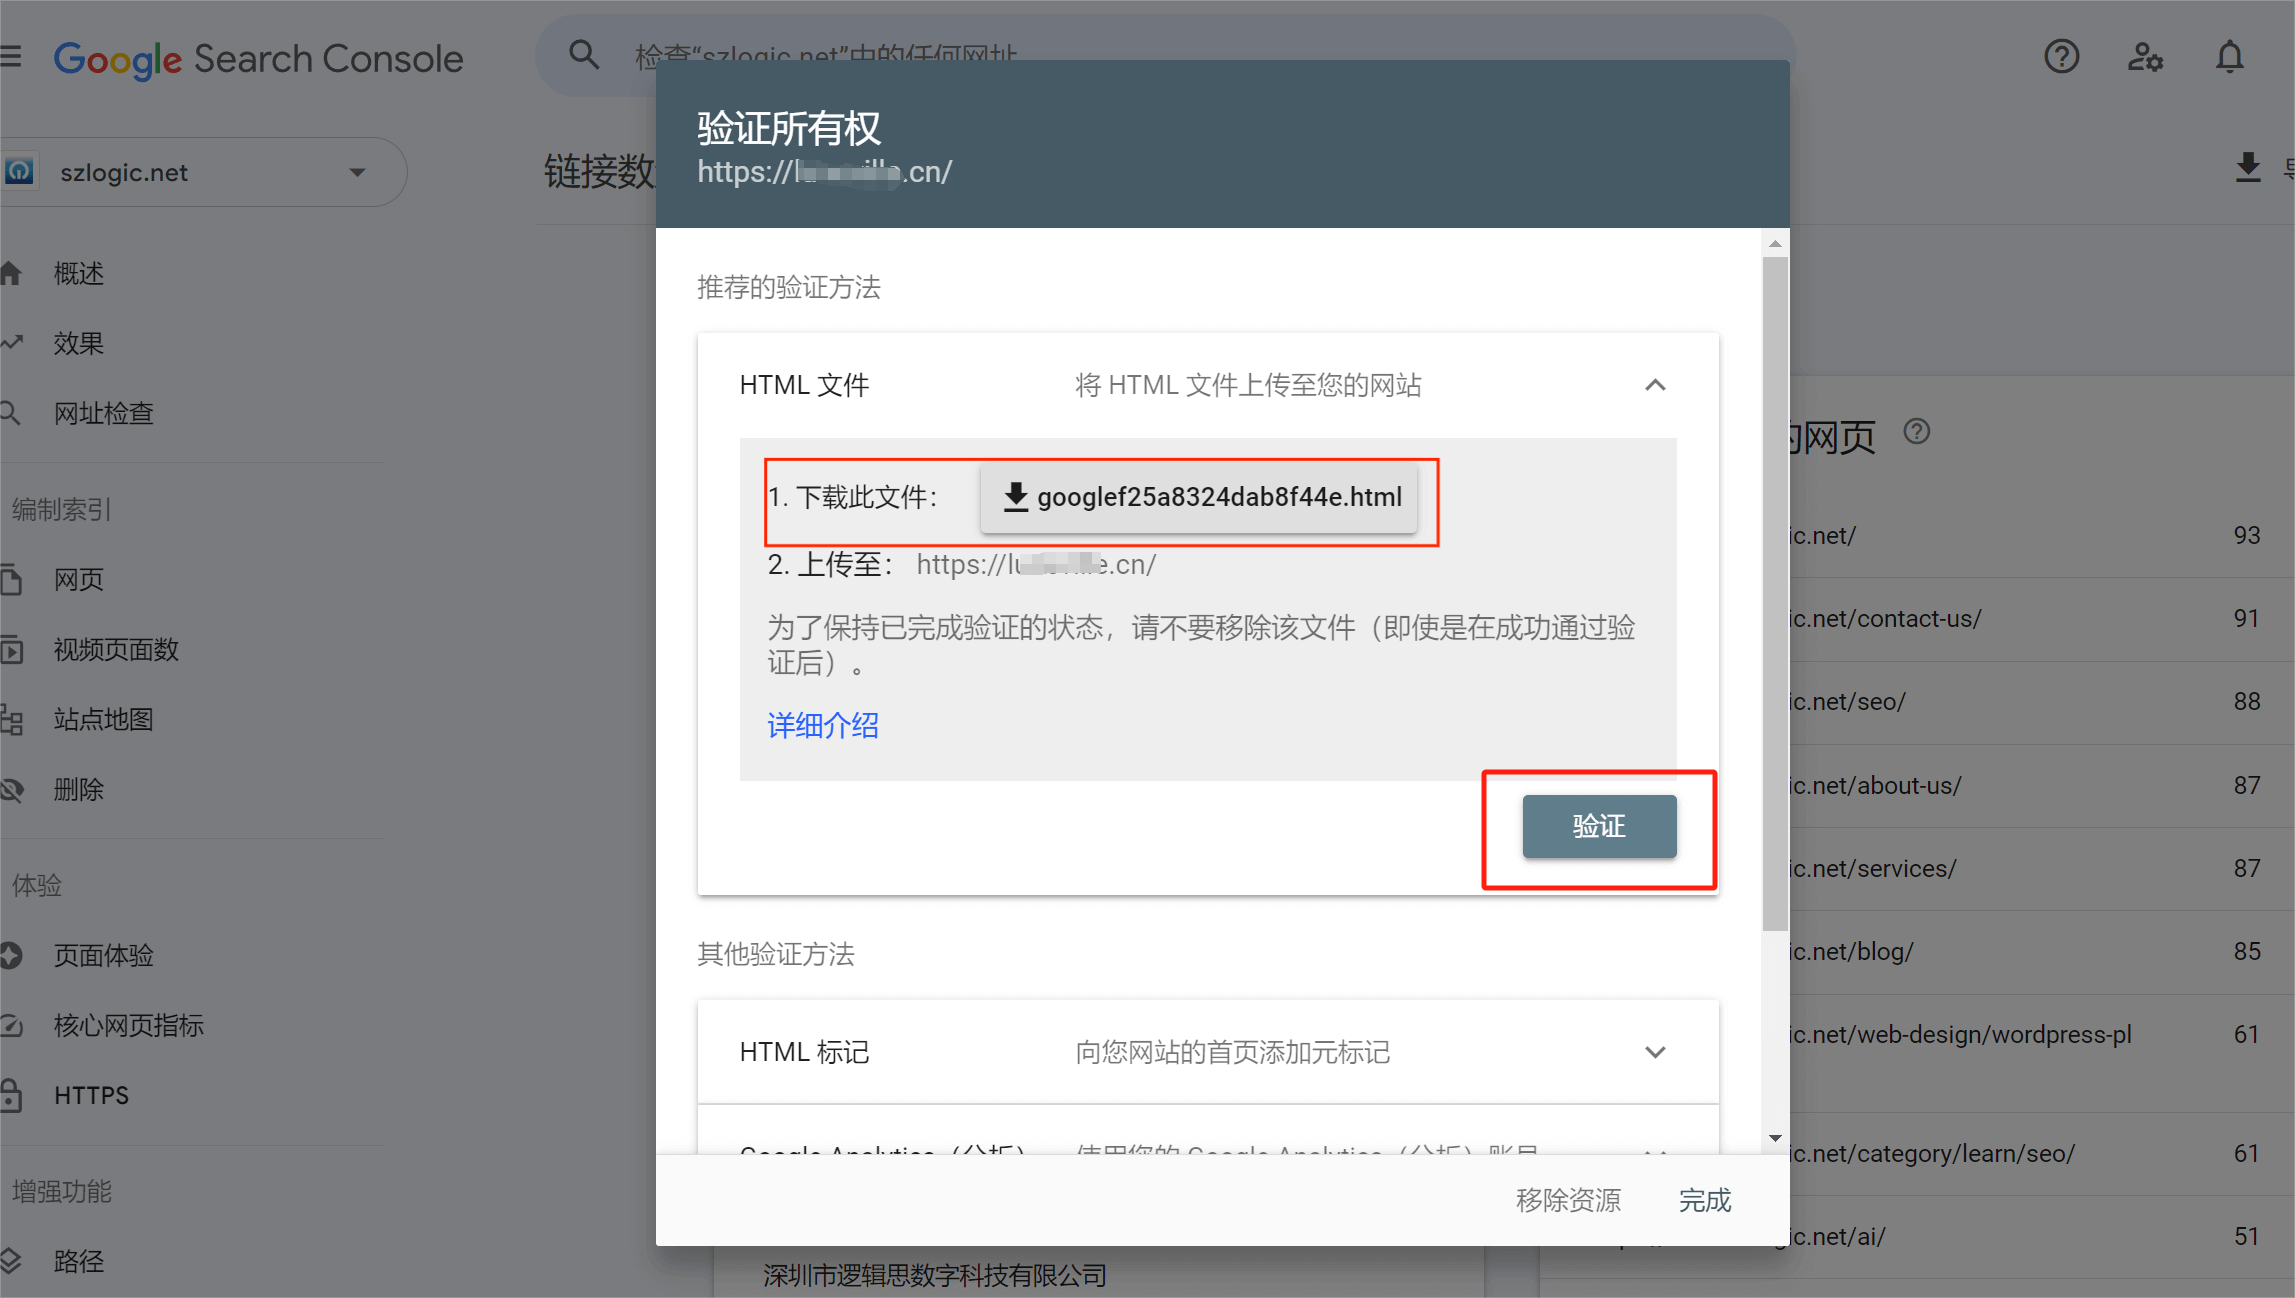
As shown in the image below, click the “Download this file” button to download the file and upload it to the root directory of your website. This method is not suitable for SaaS platforms like Shopify because SaaS building systems cannot perform server-side operations. If you have experience with server systems or control panels, it is recommended to use this method. It is quick and convenient. After uploading the file, click the “Verify” button to confirm the result.
HTML Tags
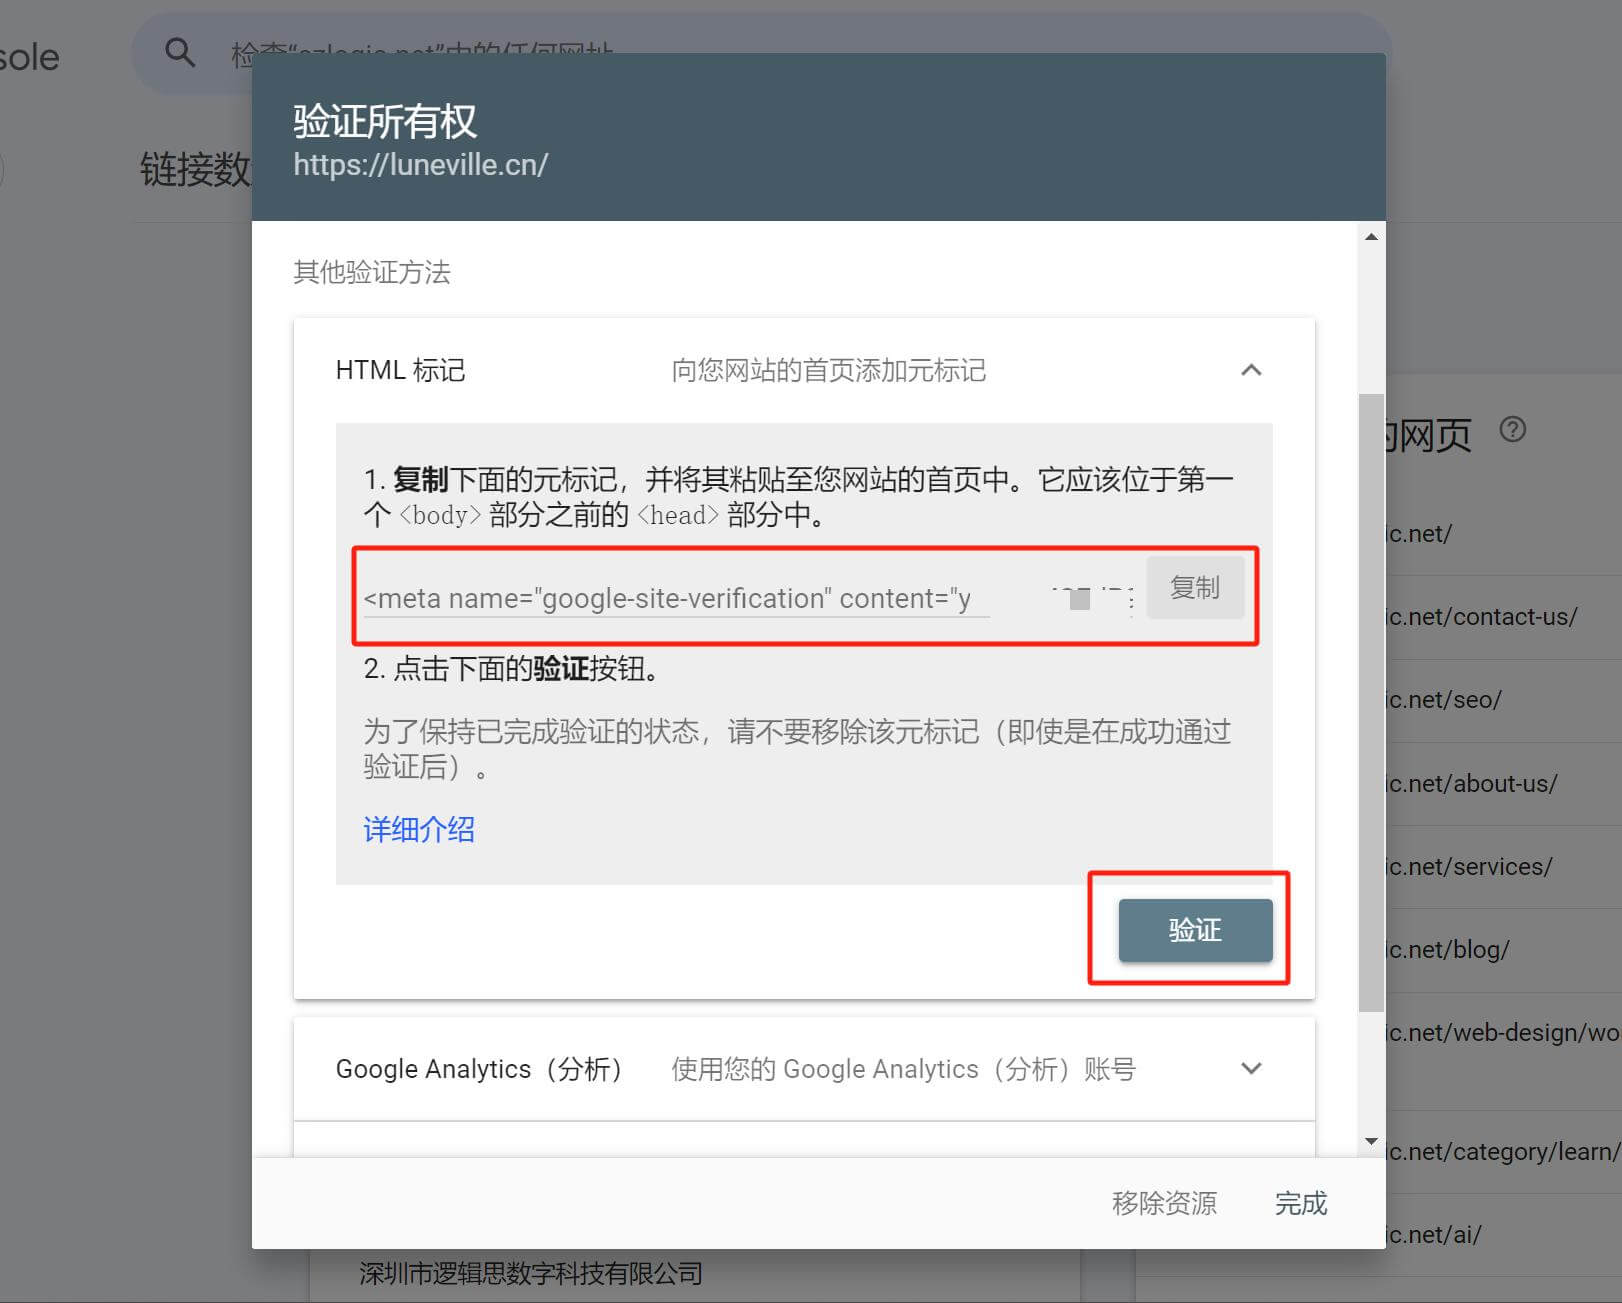
Use the method of installing an HTML tag to verify site ownership. Click to expand the HTML tag content, and you will see the meta tag code that needs to be installed, as shown in the image below. Click the copy button to copy the code and paste it into your website’s theme file. For a WordPress Site, the theme file is header.php, and for a Shopify site, the file is theme.liquid. If you're unsure where to find the theme file, you can refer to the author’s previous tutorial titled Install Analytics On Website, which provides detailed instructions for locating theme files in both WordPress and Shopify. Paste the code inside the ‘head’ tag. Tip: When pasting the code, be careful not to insert it within existing PHP or Ruby code blocks. Place it outside of those blocks—either before the block begins or after it ends. After installing the code, click the “Verify” button to confirm the final result.
Google Analytics
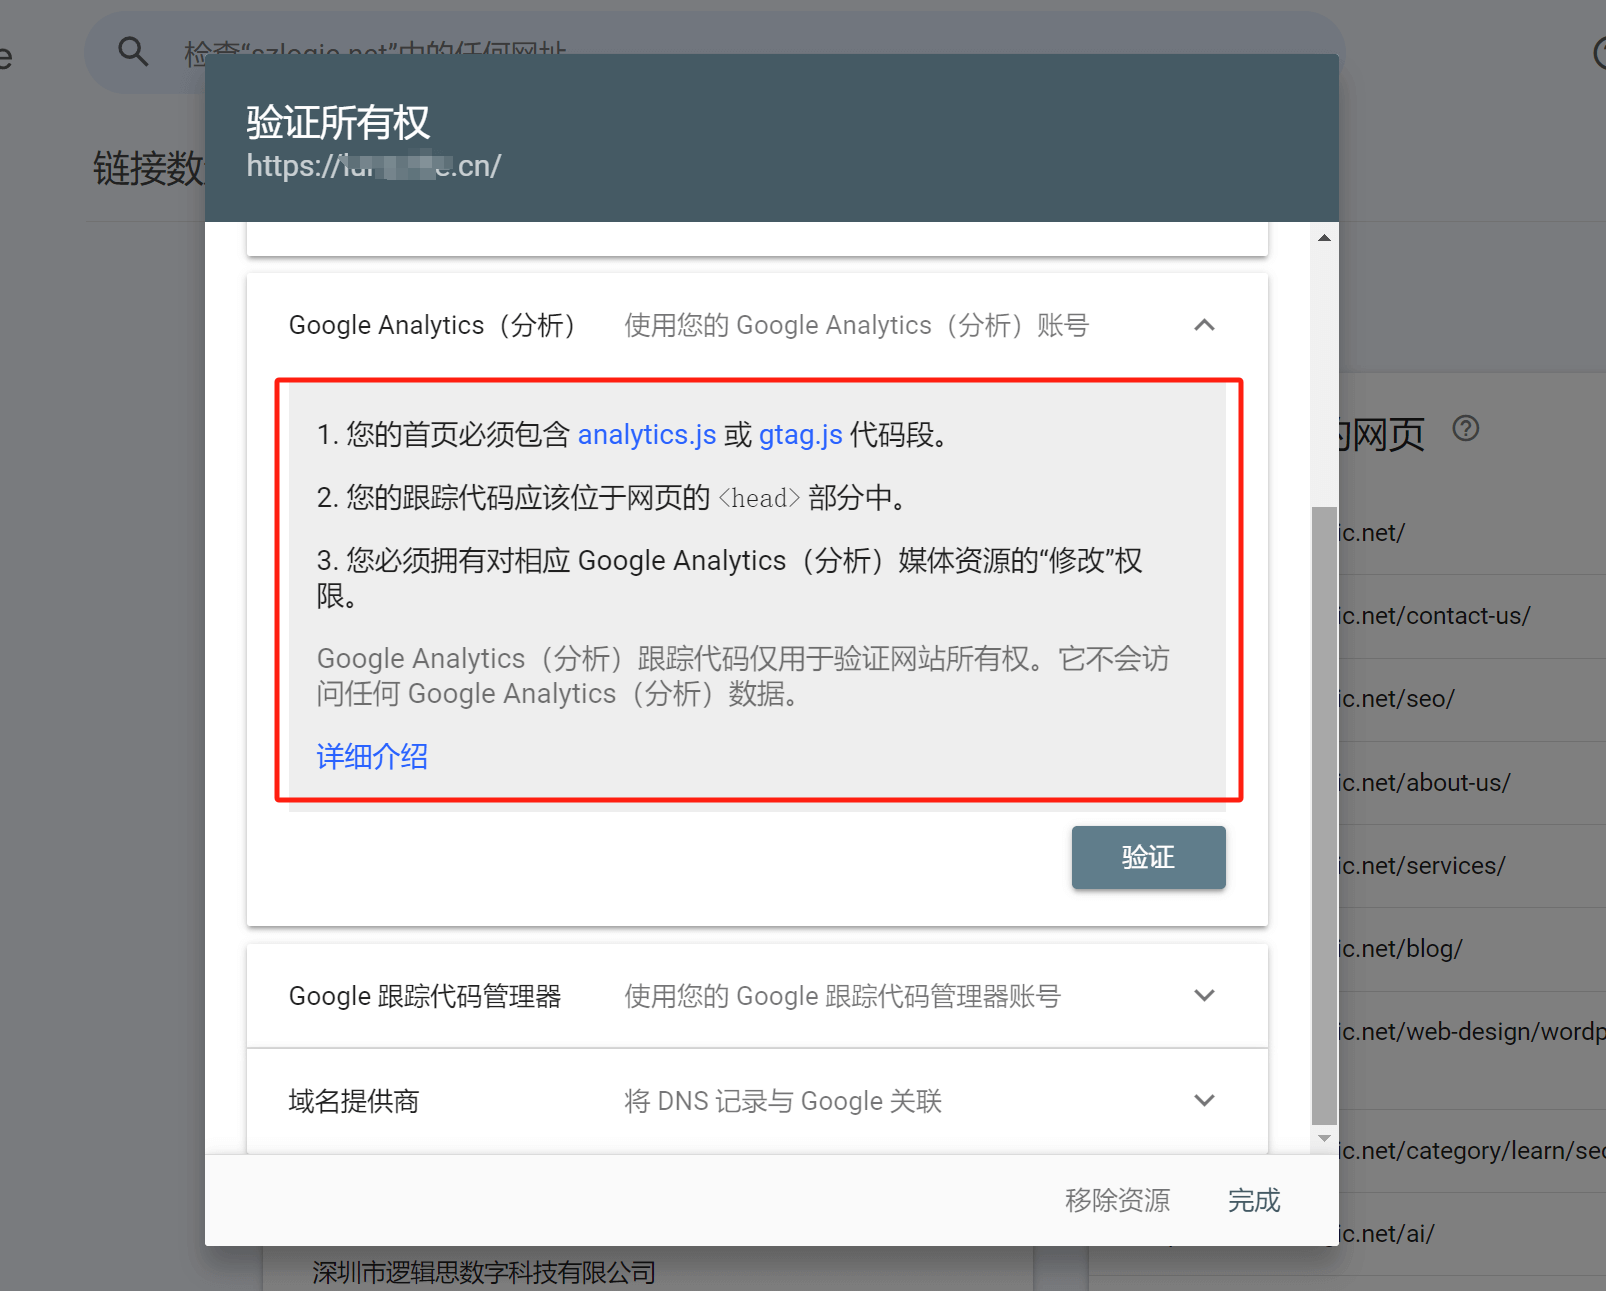
Use your Google Analytics account to verify website ownership. If you have previously verified the ownership of your website through Google Analytics (GA4) and installed the GA code, you can directly connect Google Search Console with Google Analytics to complete the website ownership verification.
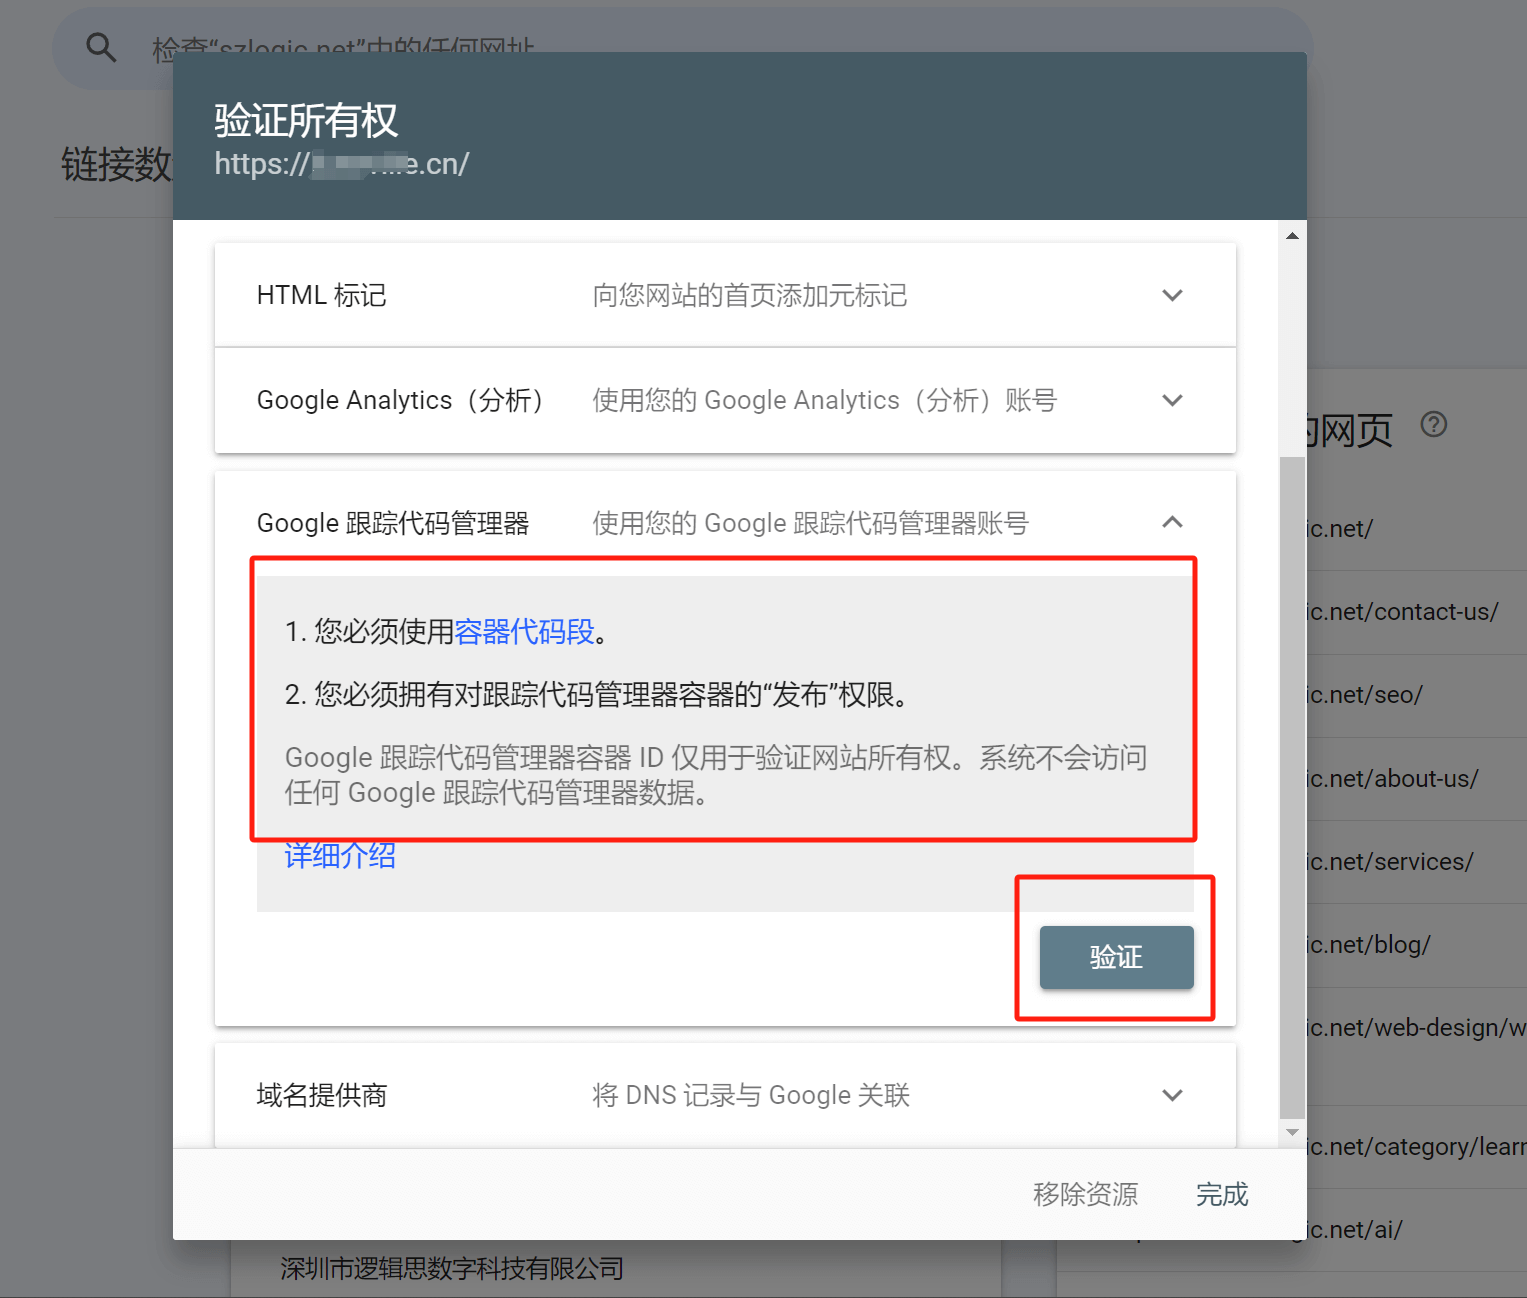
Google Tag Manager
Google Tag Manager (GTM) is Google’s container for code management. After configuring the code on GTM, the website calls the GTM code to execute related programs, mainly in JavaScript. The method of verifying website ownership through GTM works similarly to verifying with Google Analytics. As shown in the image below, if the GTM code is already installed on the website, click the “Verify” button marked in the red box below to link Google Search Console and Google Tag Manager, completing the verification process.
Domain Providers
Just like verifying via the “Domain” method, if your domain registrar is GoDaddy or Namecheap, which support connection with Google, you can directly click the “Verify” button to connect Google Search Console with your domain registrar and verify site ownership.
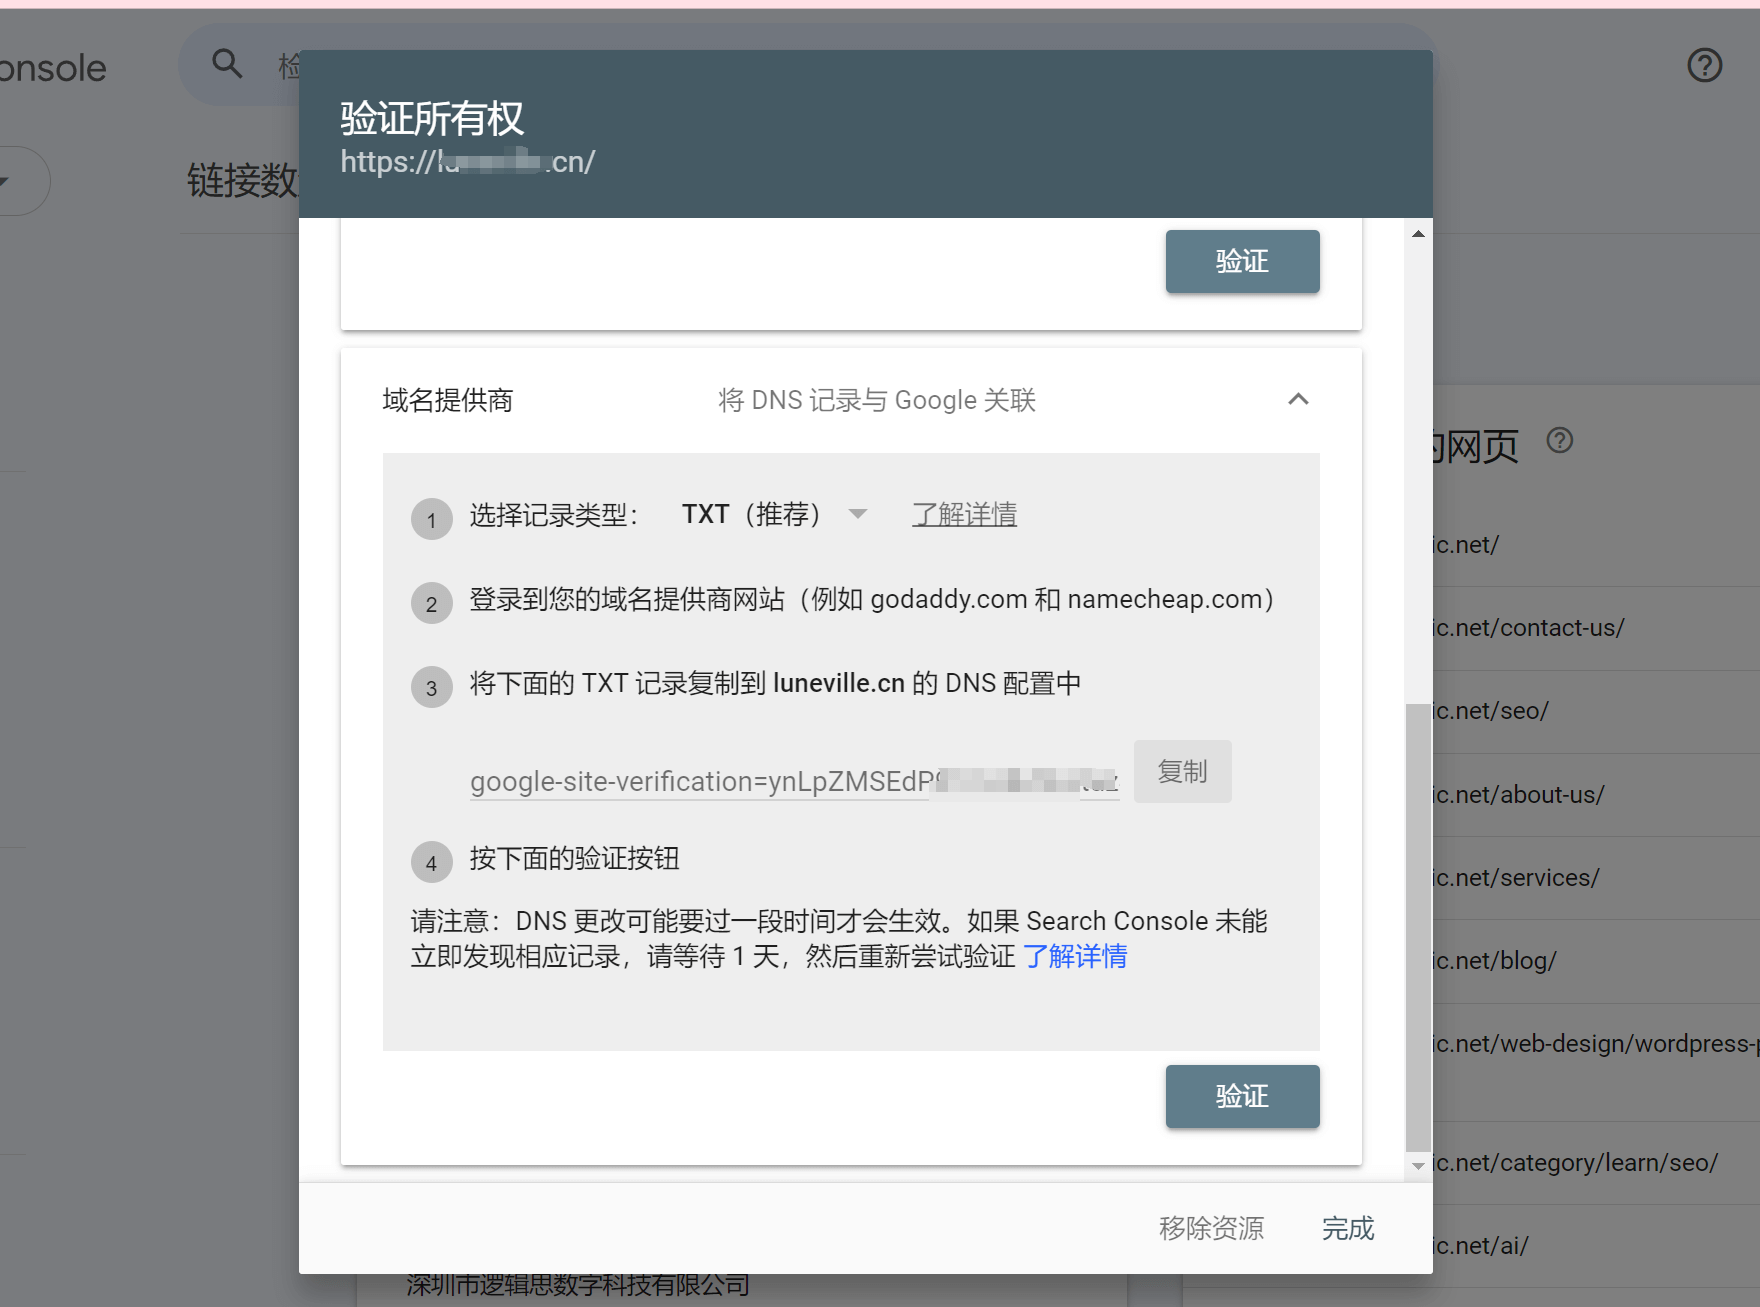
If your domain registrar is a domestic provider, you will need to use DNS verification for website ownership, following the same steps as the DNS verification method described in "Method 1: Domain Mode."
Google Search Console Submit Sitemap
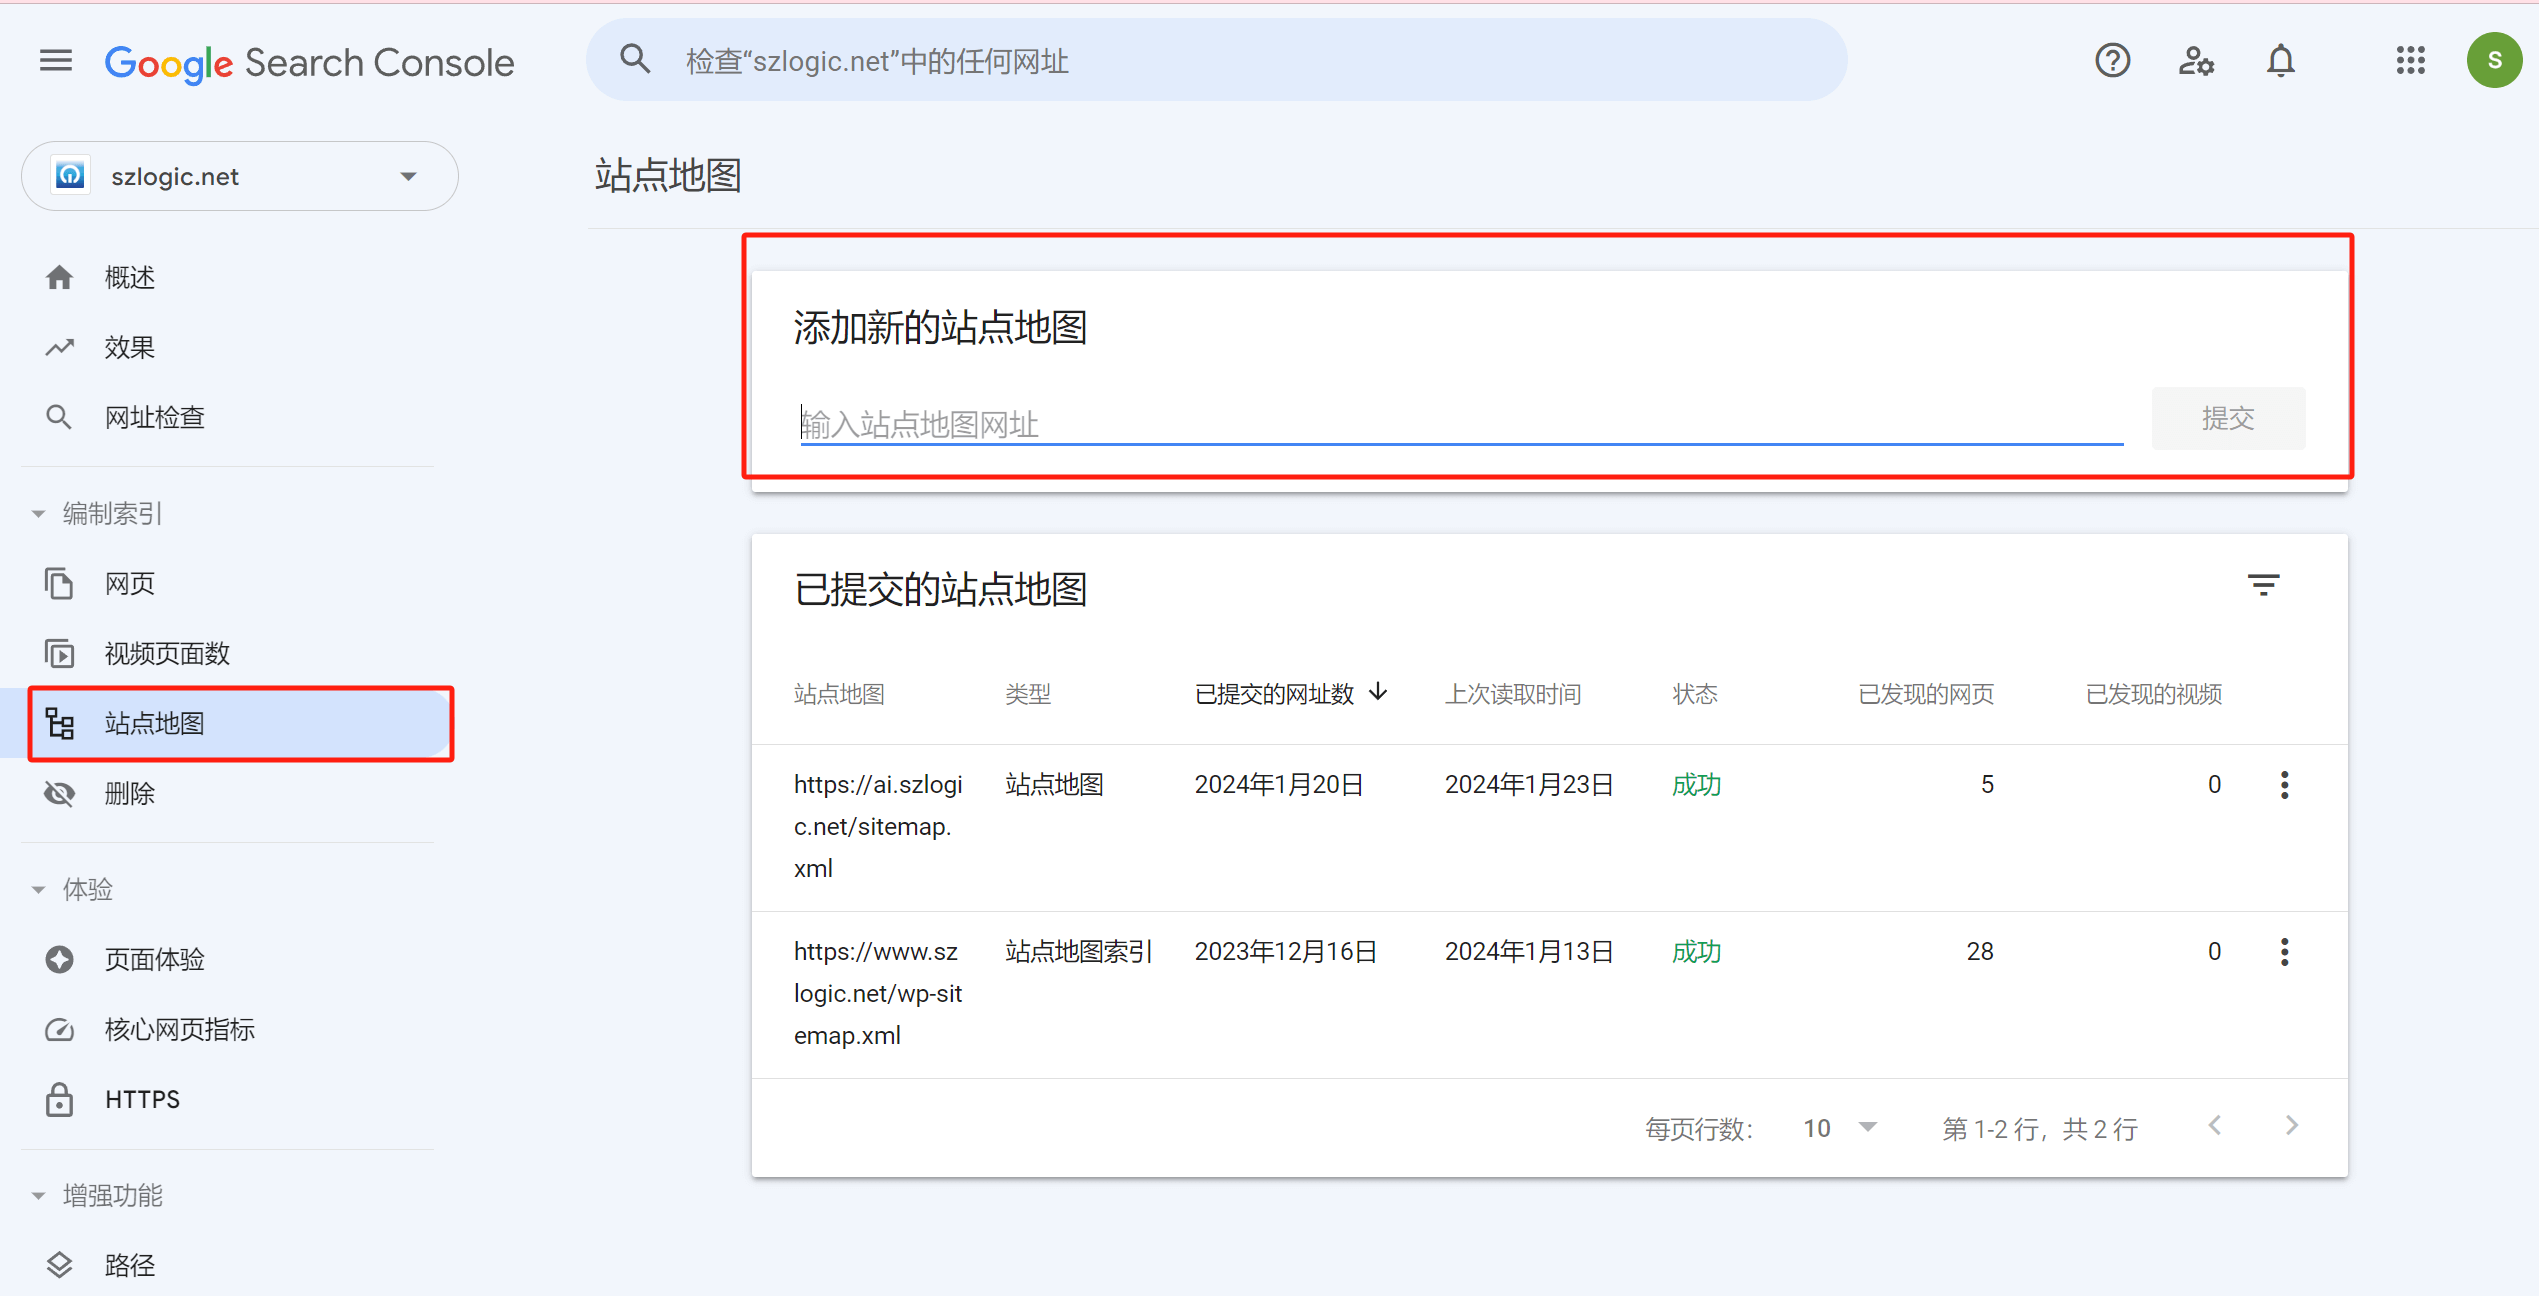
After verifying the website through Google Search Console, to help Google crawl and index your website more efficiently, you need to submit your website’s sitemap to Google. As shown in the image below, click the "Sitemaps" button in the left sidebar of Google Search Console to go to the sitemap submission page. Enter the URL of your sitemap in the "Add a new sitemap" input box, and then click the submit button. Google supports both indexable and non-indexable XML sitemap files. WordPress’s built-in sitemap is an indexable sitemap, while the sitemap generated by Shopify or general plugins is a non-indexable XML sitemap. Google supports both types and allows multiple sitemaps to be submitted simultaneously, making Google one of the most convenient search engines for sitemap submission. That’s all for submitting your website to Google. The remaining step is to wait for Googlebot (the crawler/robot) to crawl and index the pages. This process typically takes a few days to a week for new websites, after which your website's pages will be indexed by Google, and you can find them in Google search results.
Ⅱ、Bing Webmaster Tools: Creating an Account on Webmaster Tools and Submitting Your Website
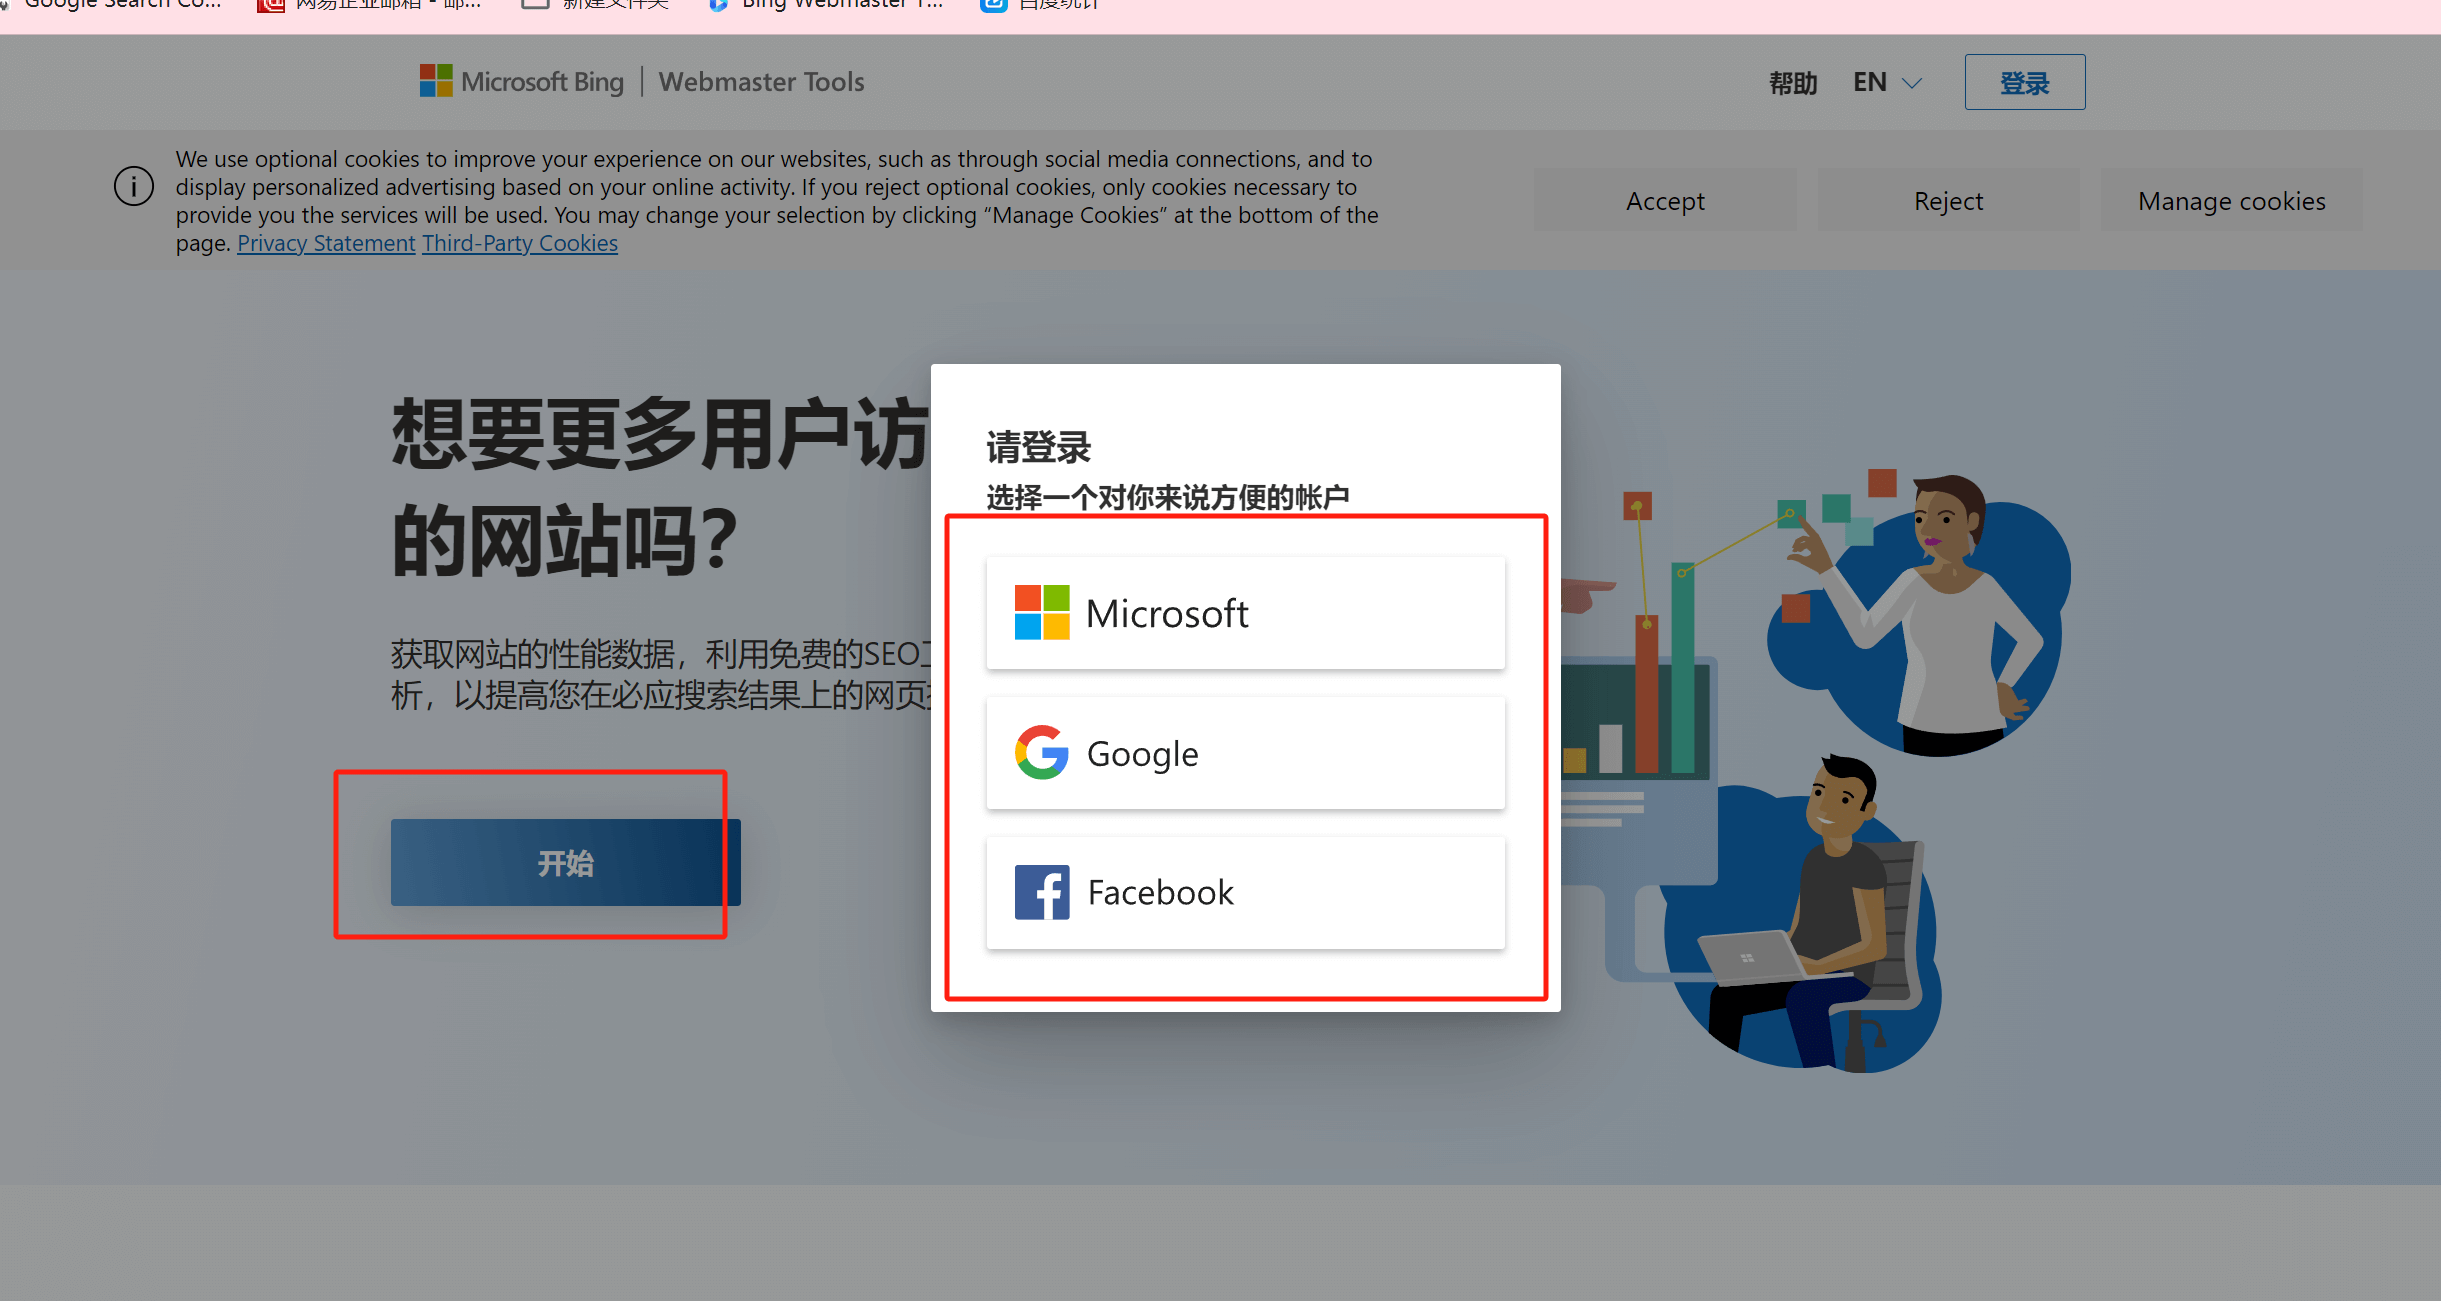
Before activating the Bing Webmaster Tools, you should prepare one of the three globally accepted account types—Microsoft, Google, or Facebook—to log into Bing's webmaster backend. As shown in the image below, after clicking the "Get Started" button, a window will pop up allowing you to choose one of these three account types to log in to Bing Webmaster Tools.
Select the login account, and after successfully logging in, click "Add Website" in the tools on the left sidebar of the Bing website management backend interface. Two adding modes will pop up as shown in the following figure:
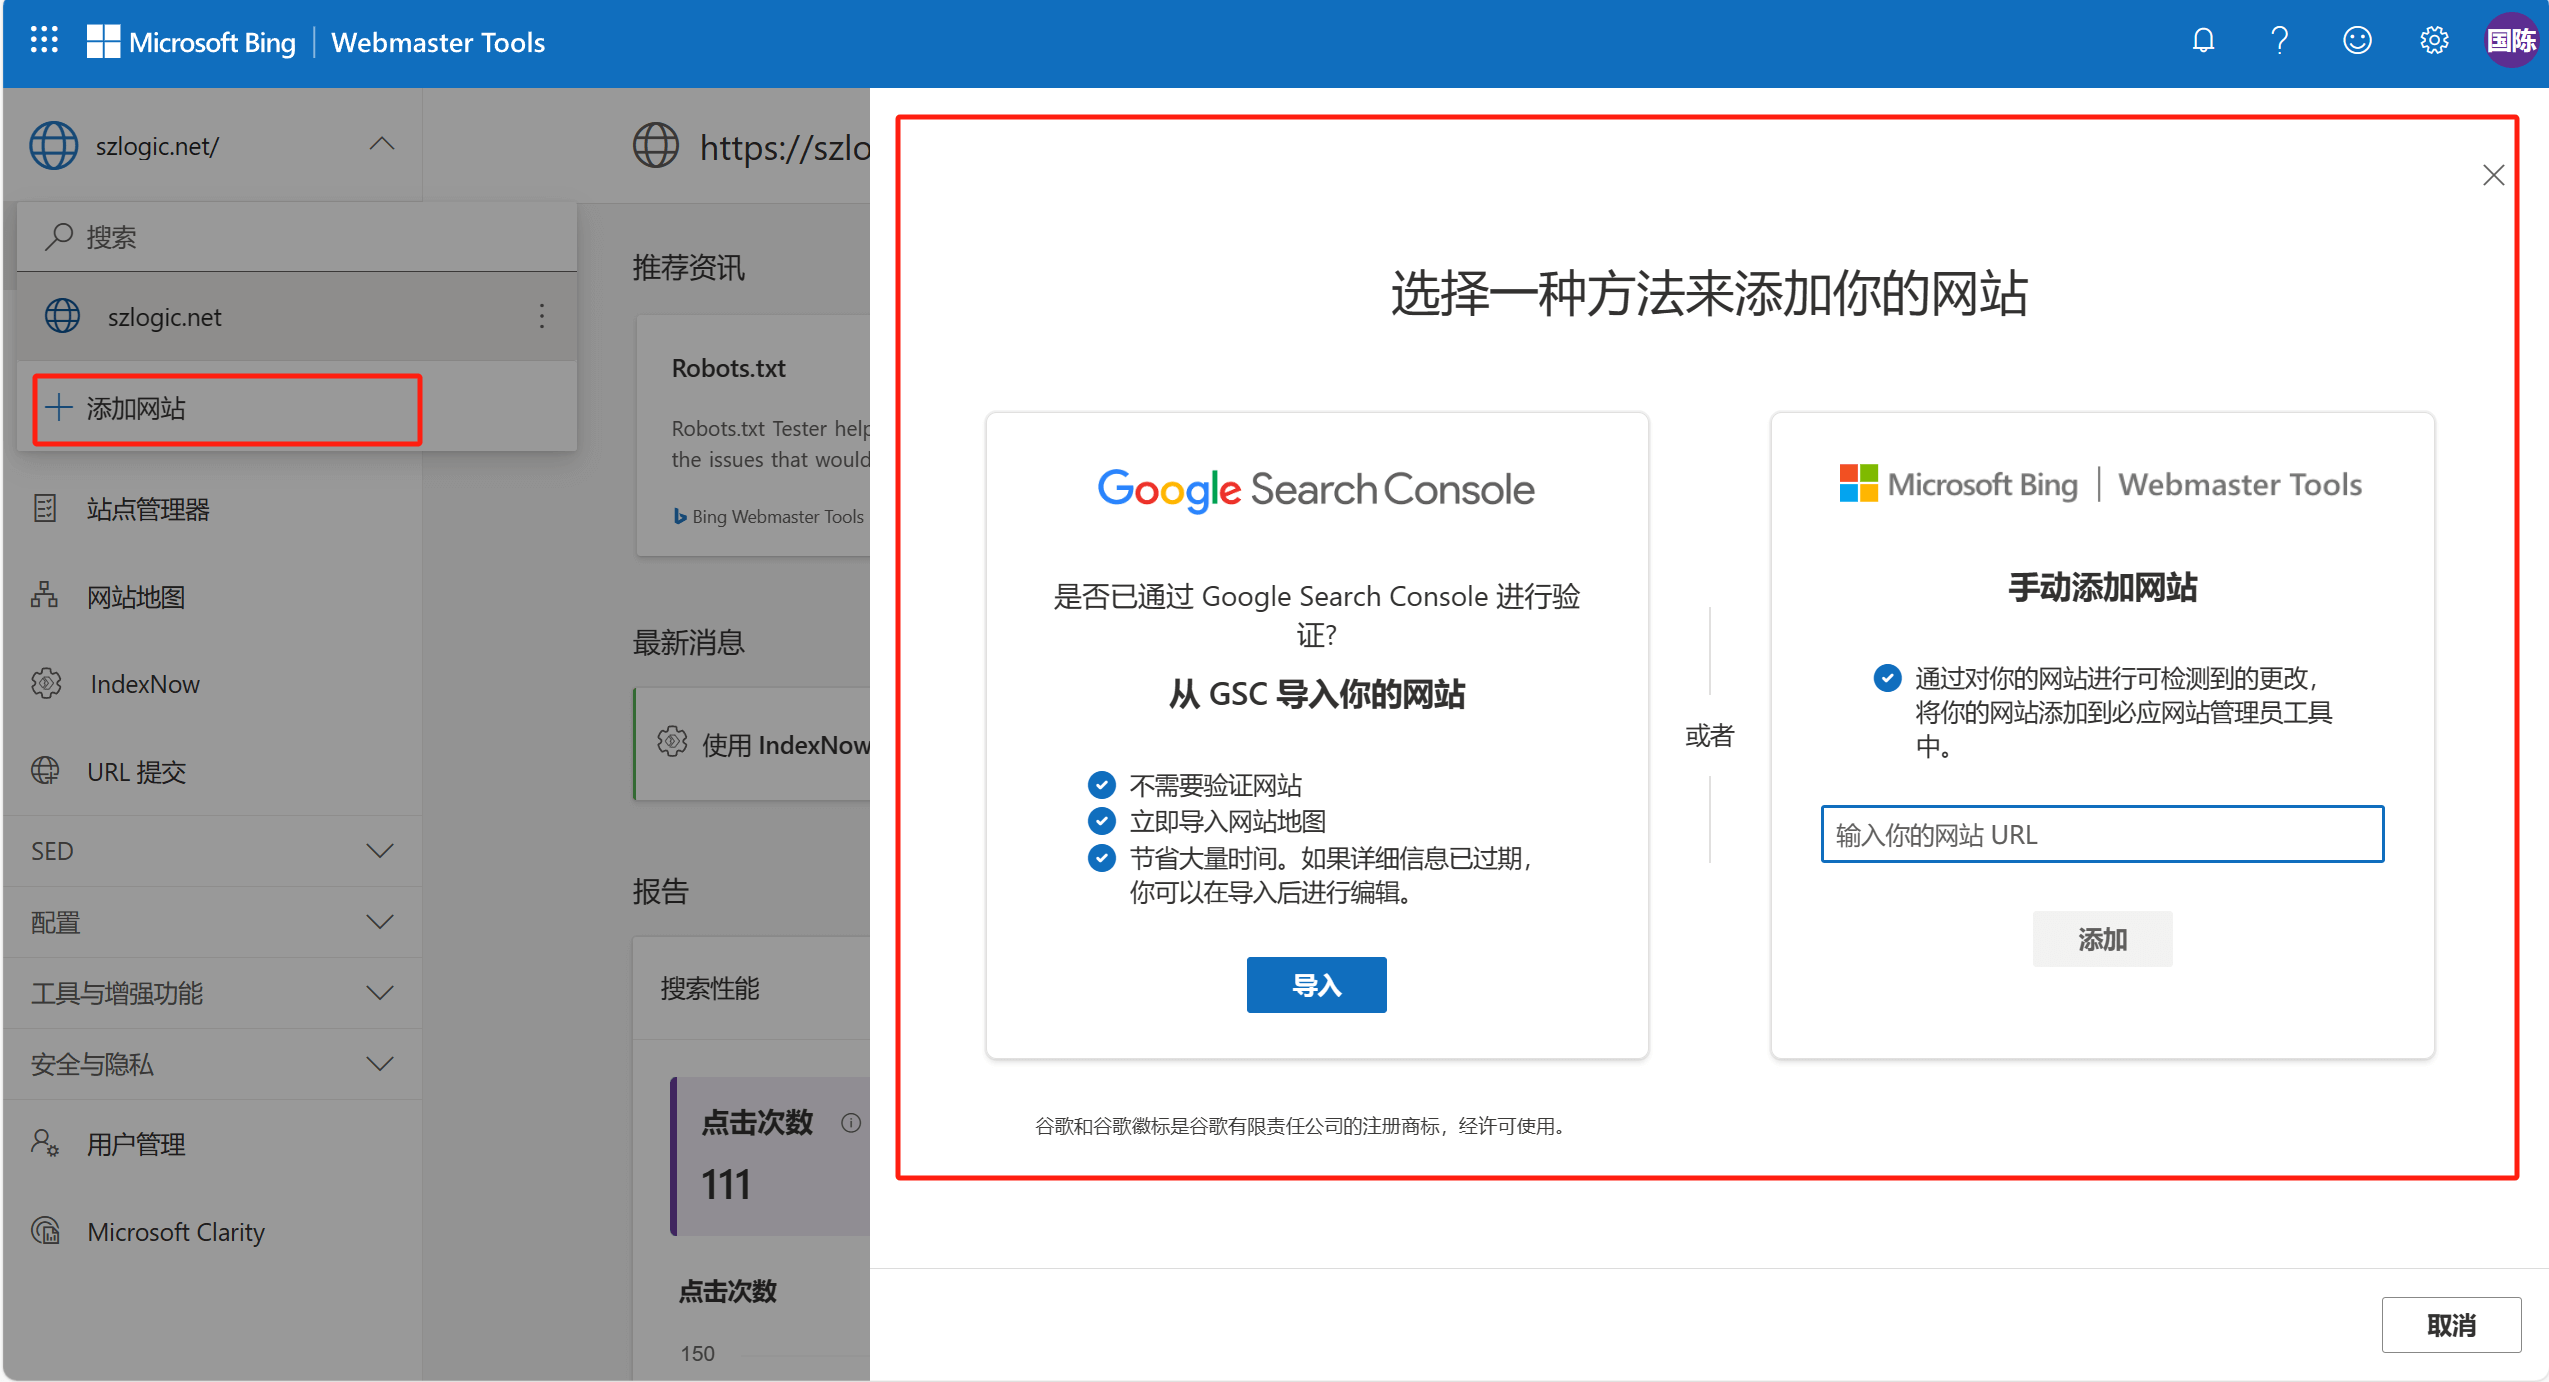
Method 1: Import your website from GSC
GSC stands for Google Search Console. If you have already set up Google Search Console and successfully submitted your website, Bing can directly import your website data from GSC. This is the fastest way to submit your website to Bing. After clicking the import button, simply follow the steps to connect your GSC account. When choosing to import the website from GSC, Bing does not require additional website verification and will also import the sitemap, making the process very convenient.
Method 2: Manually add a website
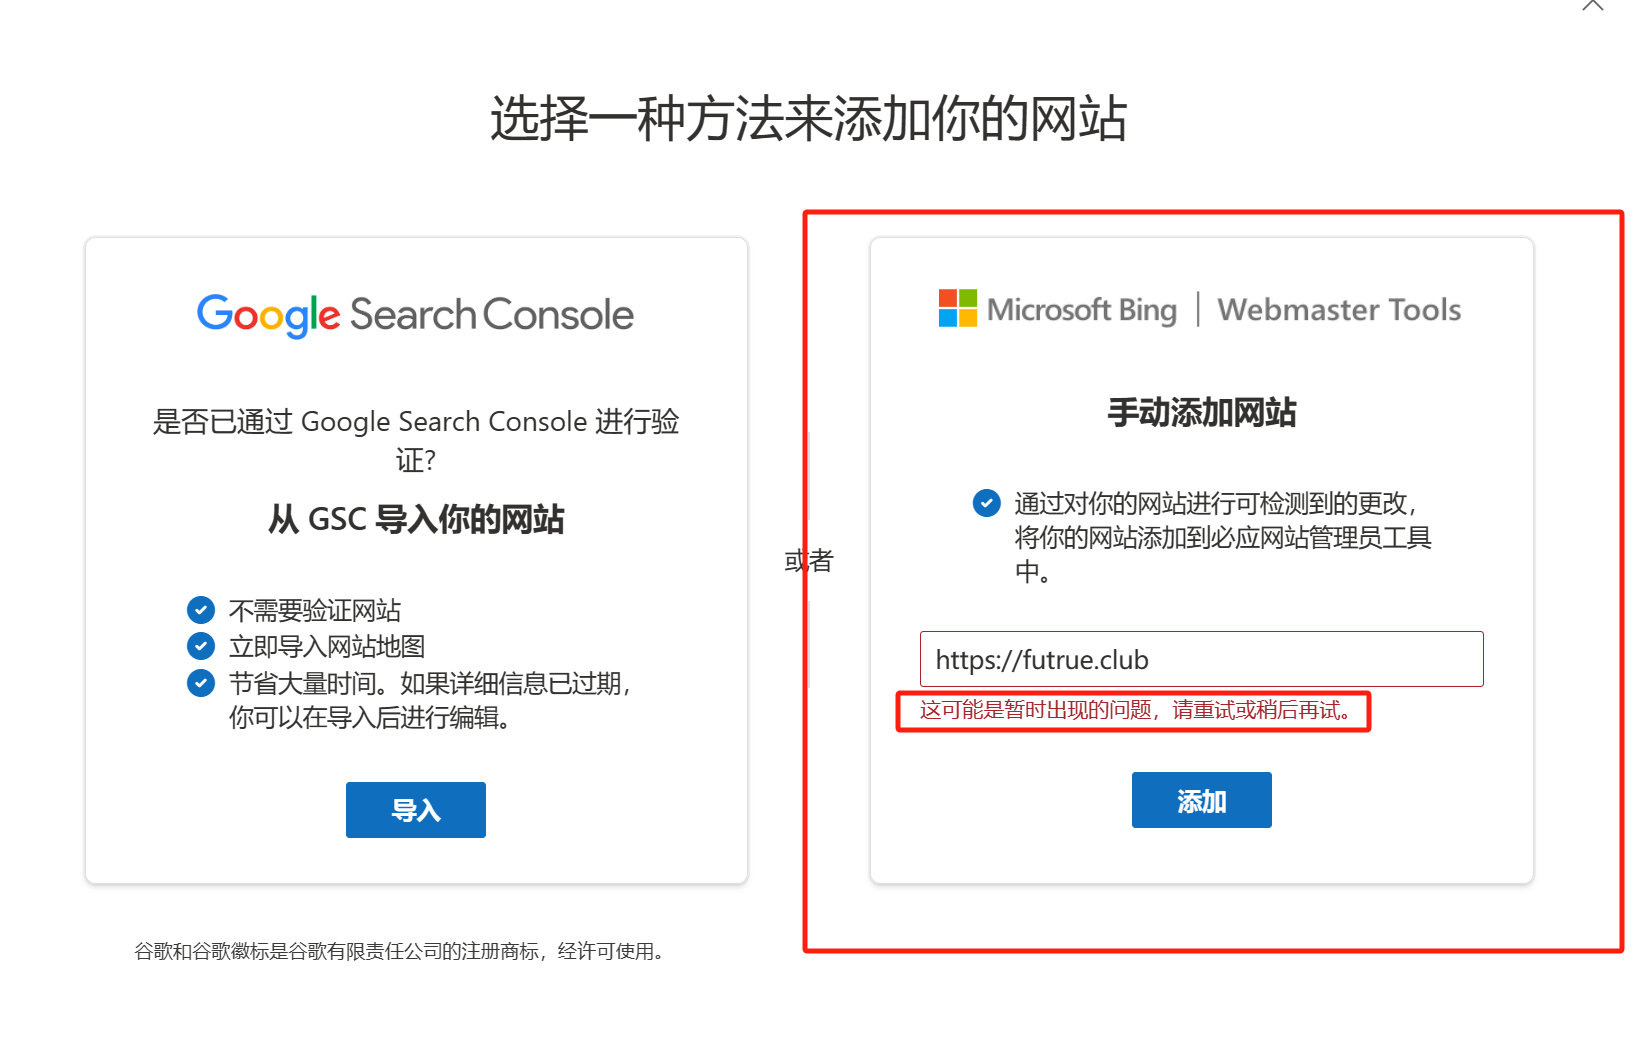
While writing this tutorial, I found that the "Manual Website Addition" feature in the Bing Webmaster Tools was not working, as shown in the image below. On the surface, it appeared that this feature was not stable enough, but after investigation, the issue was found to be related to network protocols, which is linked to our domestic network. The specific reasons are not discussed here, and readers are encouraged to look up the cause on their own.
After troubleshooting and resolving the network issues, the "Manual Website Addition" feature can now be used normally. The interface for manually adding a website is shown in the image below. There are three methods available for manual website verification: XML file, adding an HTML Meta tag, and adding a CNAME record to the DNS (DNS verification of website ownership). Below is a detailed explanation of these three methods for adding a website.
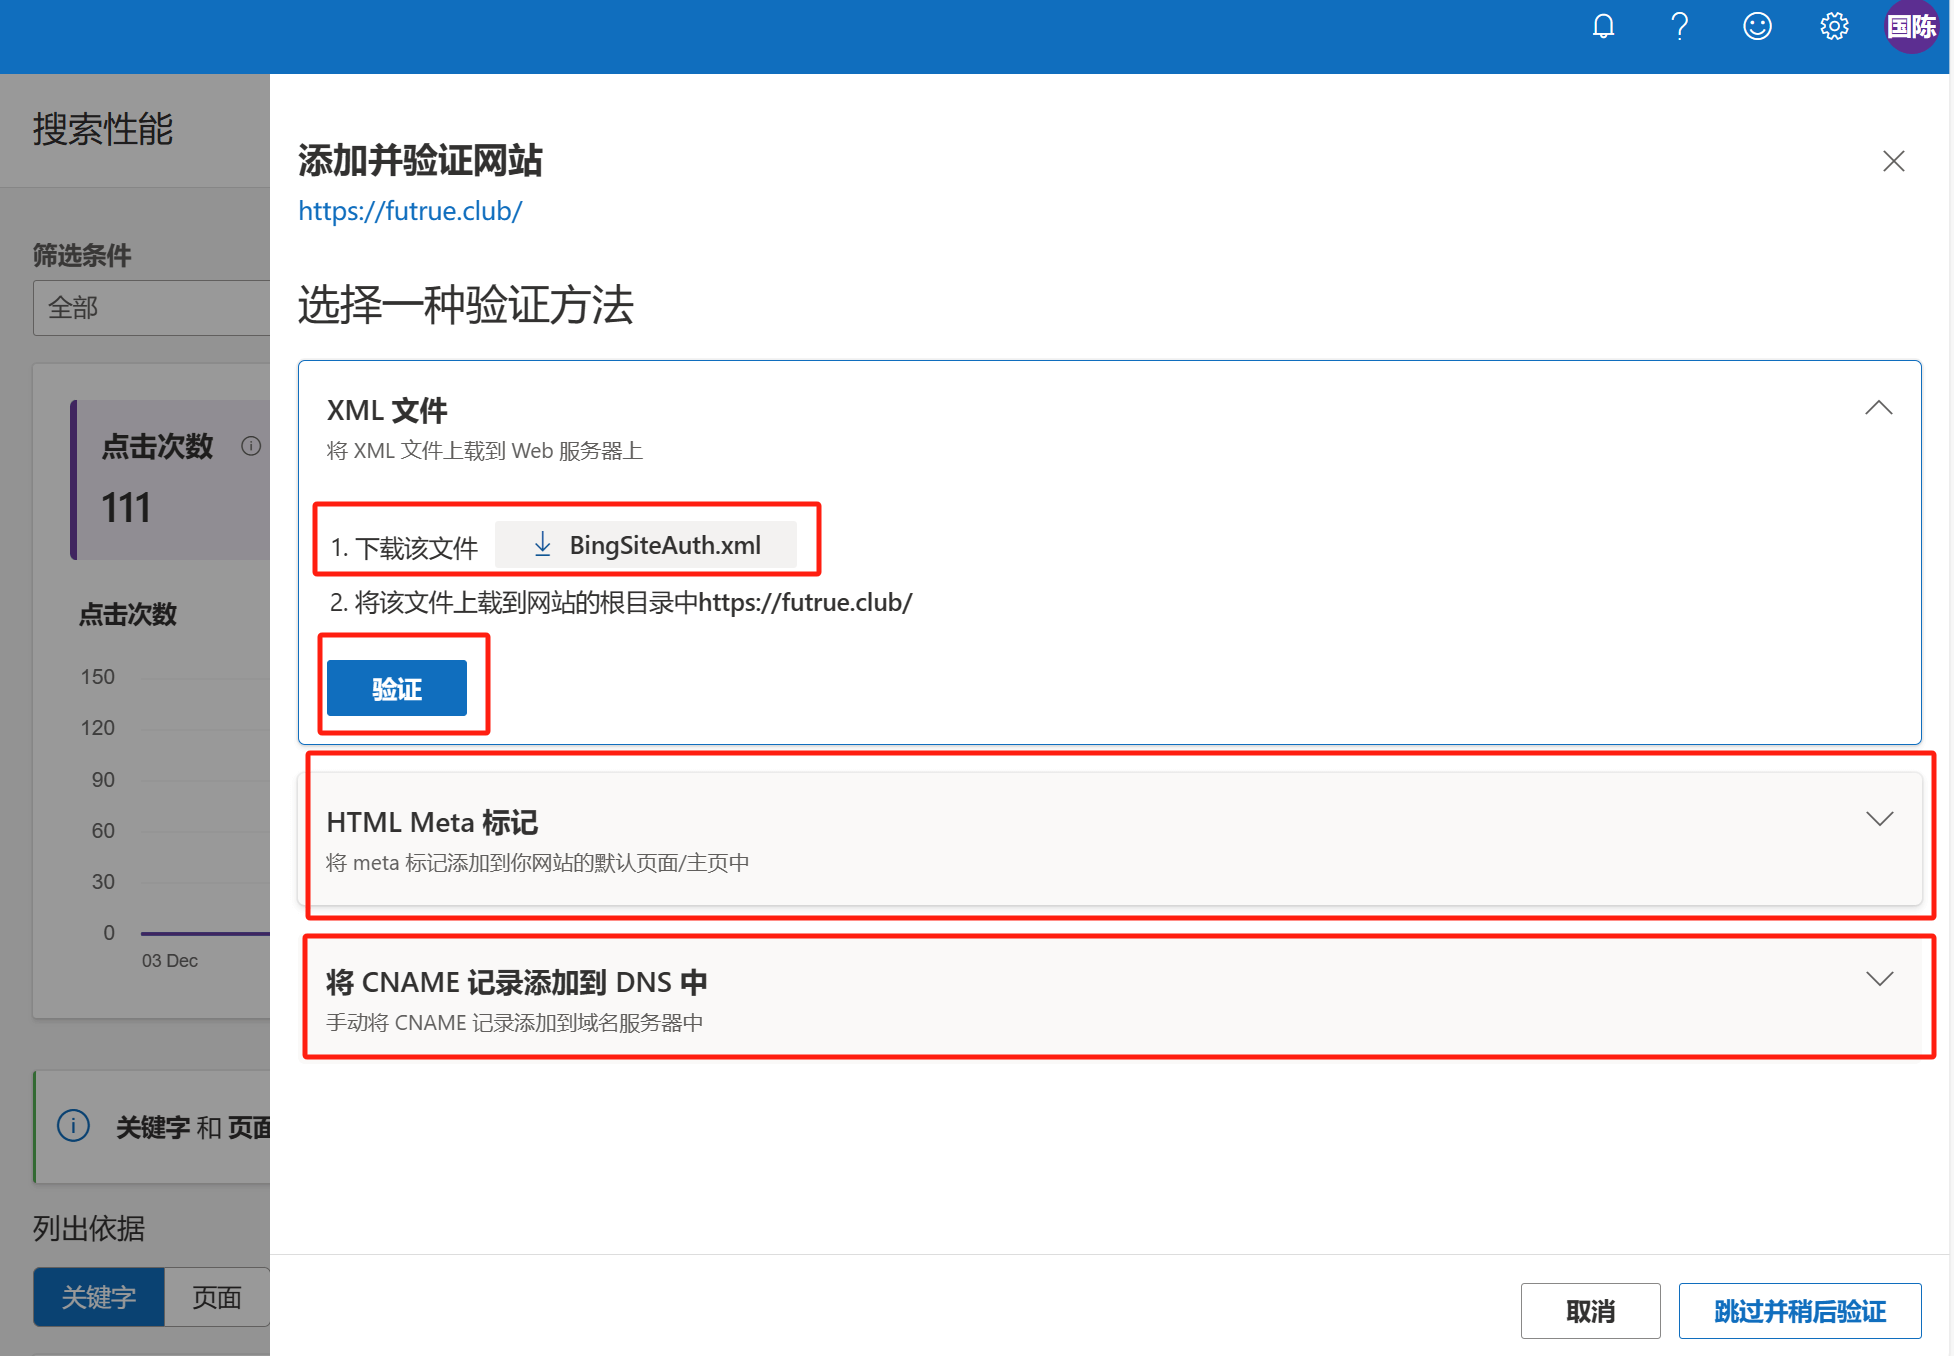
XML file validation method
Note: This method is only suitable for websites that have server control and is not applicable to SaaS websites. Click the "Download this file" button to download the file, then upload the file to the root directory of your website. Afterward, click the verification button to complete the verification. Under normal circumstances, there shouldn't be any issues, and the verification result will be successful. If you have experience managing servers, this method is the most convenient.
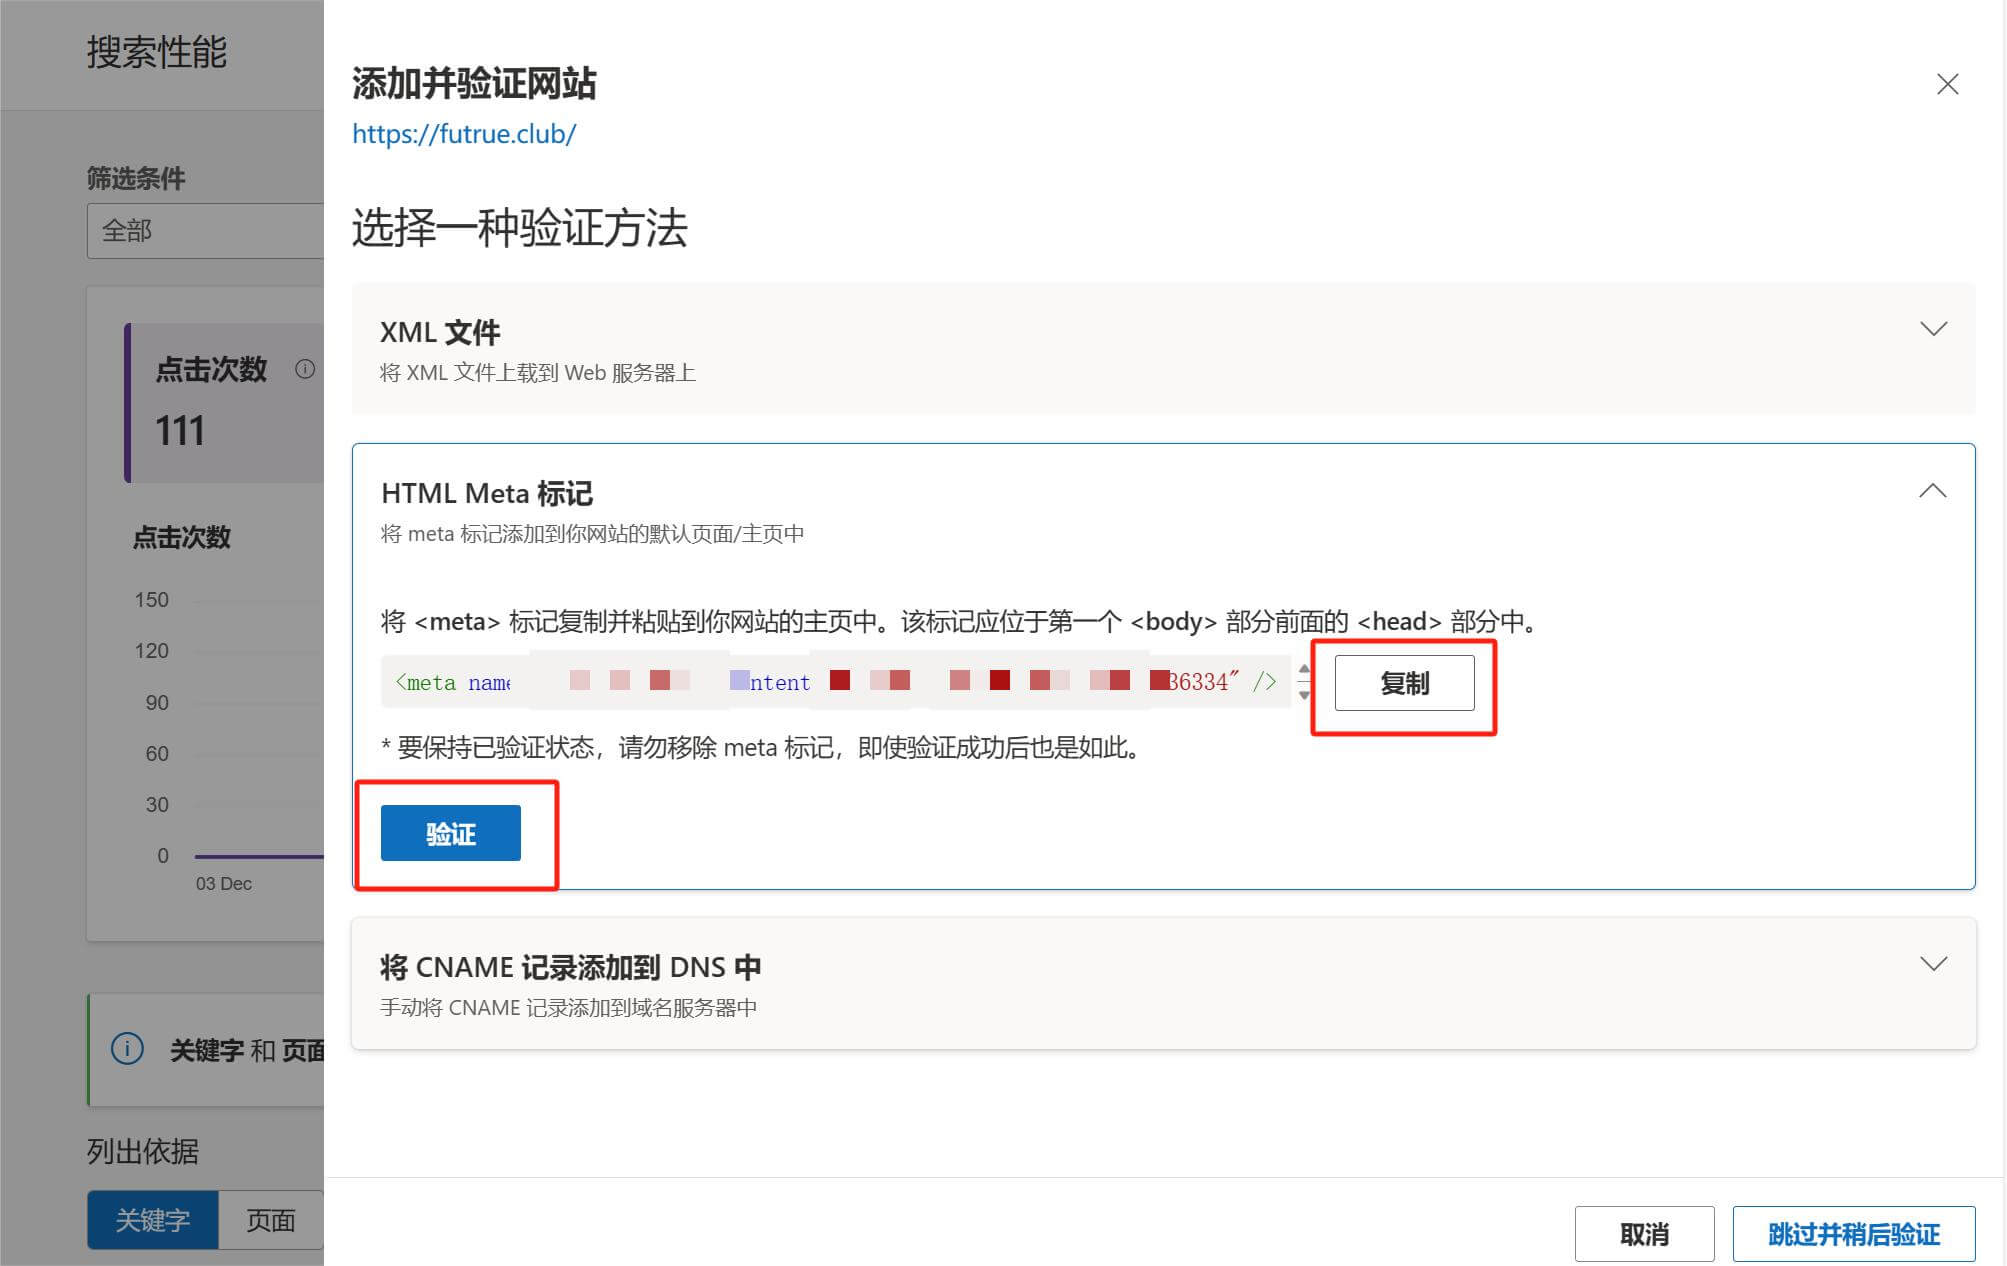
HTML Meta tag verification method
Click the expand button next to "HTML Meta tag" content, and a page will appear with the HTML code that needs to be copied and pasted, as shown in the image below. Then, click the "Copy" button on the right to copy the code and paste it into the corresponding location in your website's files. Note: For WordPress websites, the code should be inserted within the 'head' tag in the theme file header.php. For Shopify websites, the code should be inserted within the 'head' tag in the theme file theme.liquid. After completing this, click the "Verify" button to check whether the code has been correctly installed and is functioning properly.
Add the CNAME record to DNS
Click the expand button next to "Add CNAME record to DNS," and you will see the host record and value provided by Bing, as shown in the image below. Copy the host record and value, then paste them accordingly in your domain's DNS settings. Afterward, click "Verify" to complete the verification.
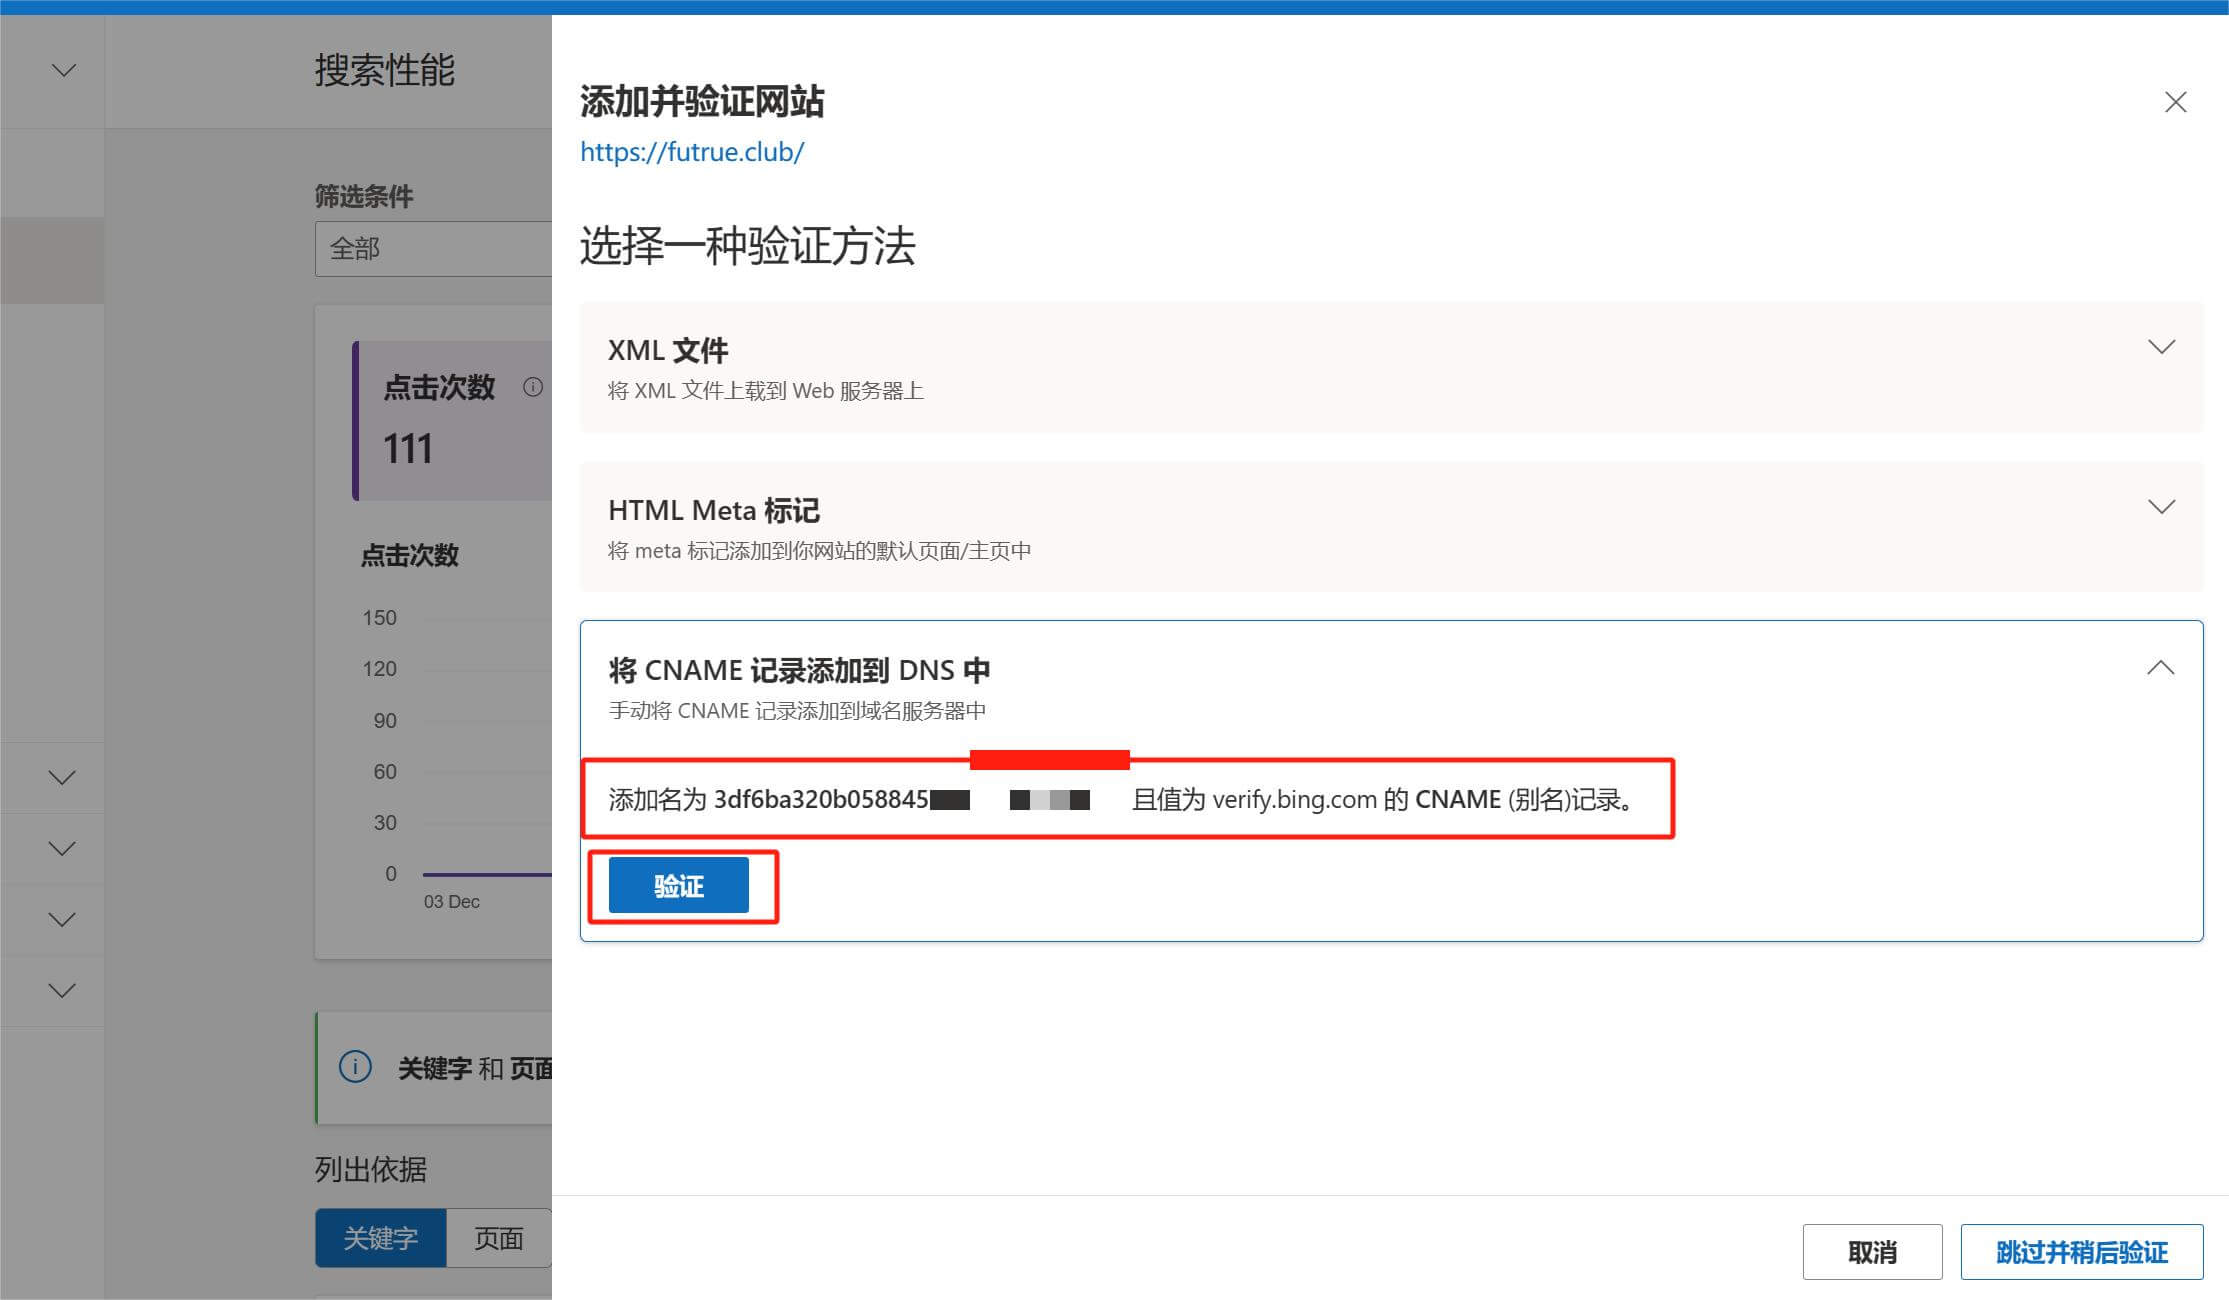
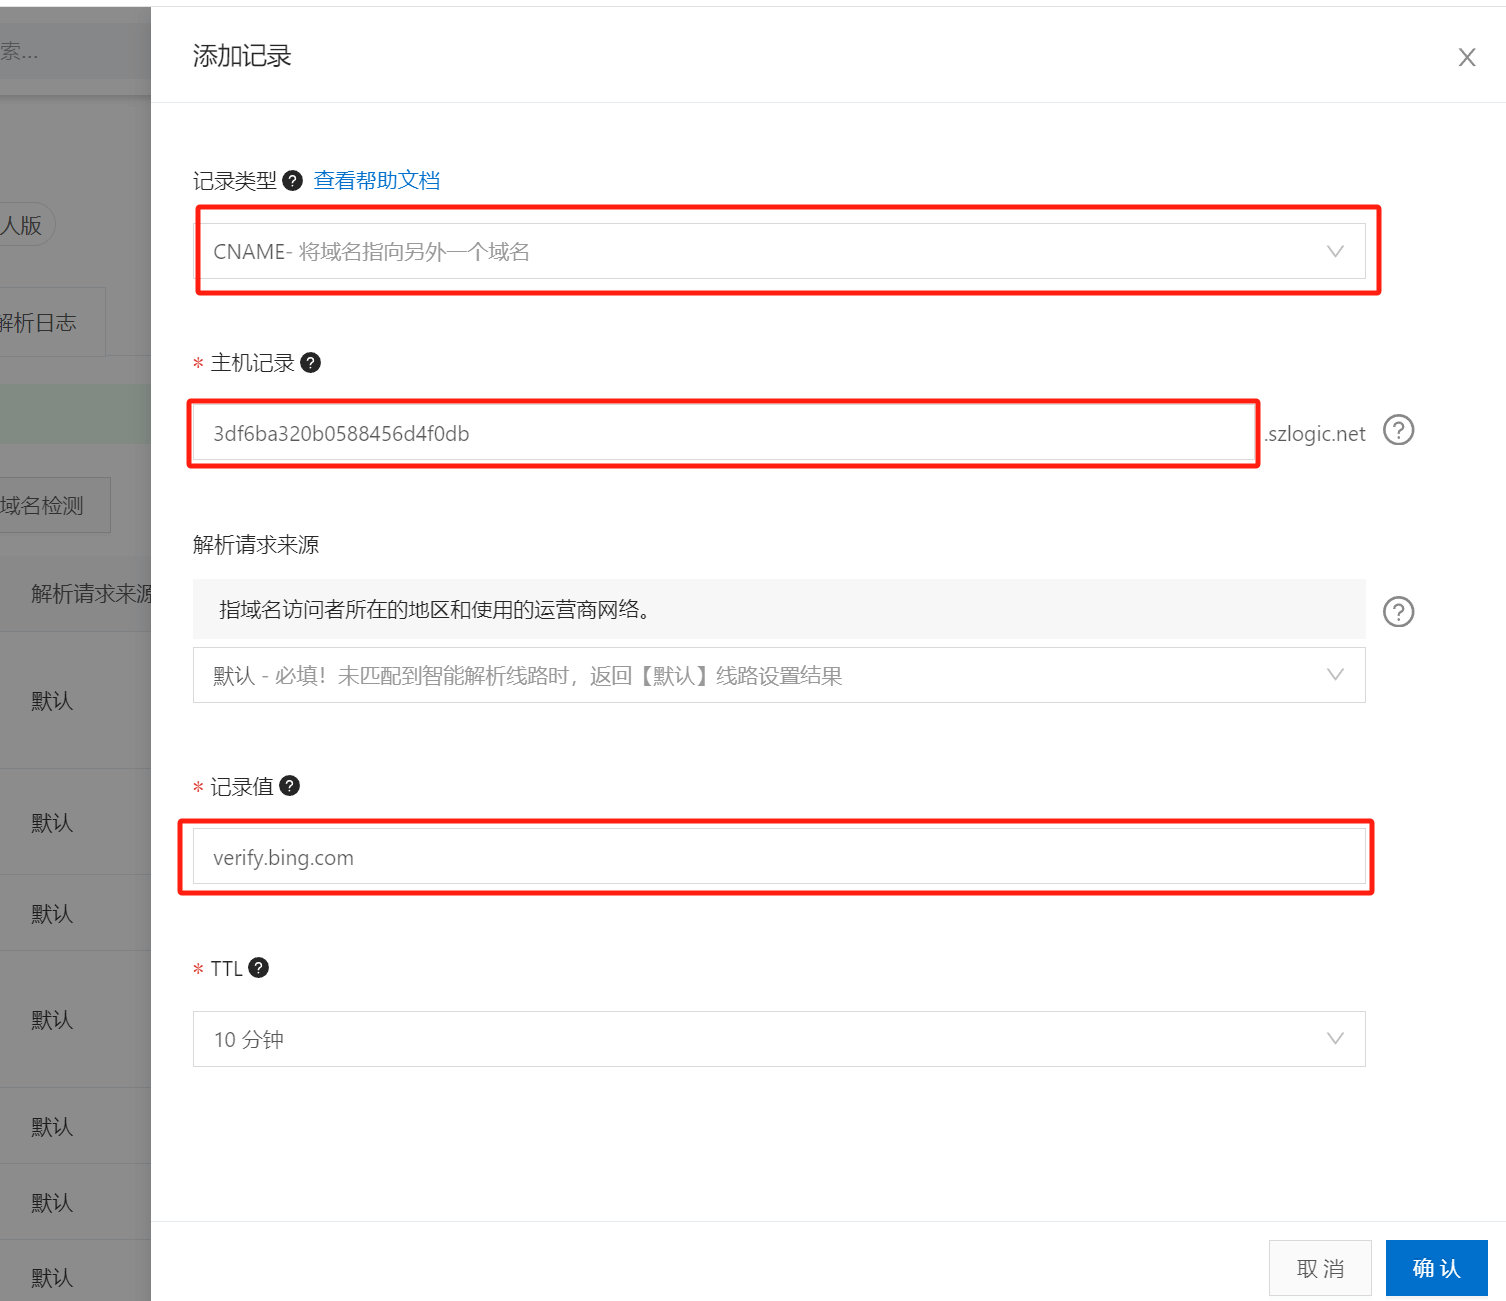
Tip: To help beginners who may lack a basic understanding of domain name DNS resolution concepts and hands-on experience, the author has directly listed the DNS resolution parameters and an example screenshot for this method: The record type is CNAME, the host record is 3df6ba320b058845 (a hexadecimal string provided by Bing), and the record value is verify.bing.com, as shown in the example below:
Here Are The Three Manual Methods For Submitting A Website To Bing. Due To The Lack Of Convenience In Manual Submission Compared To GSC Import, And The Potential Instability Caused By Network Environment, It Is Recommended That Readers First Complete The Submission Of Their Website To Google Search Console. After That, Use The Option In Bing Webmaster Tools To Import Your Website From GSC To Submit It To The Bing Search Engine.
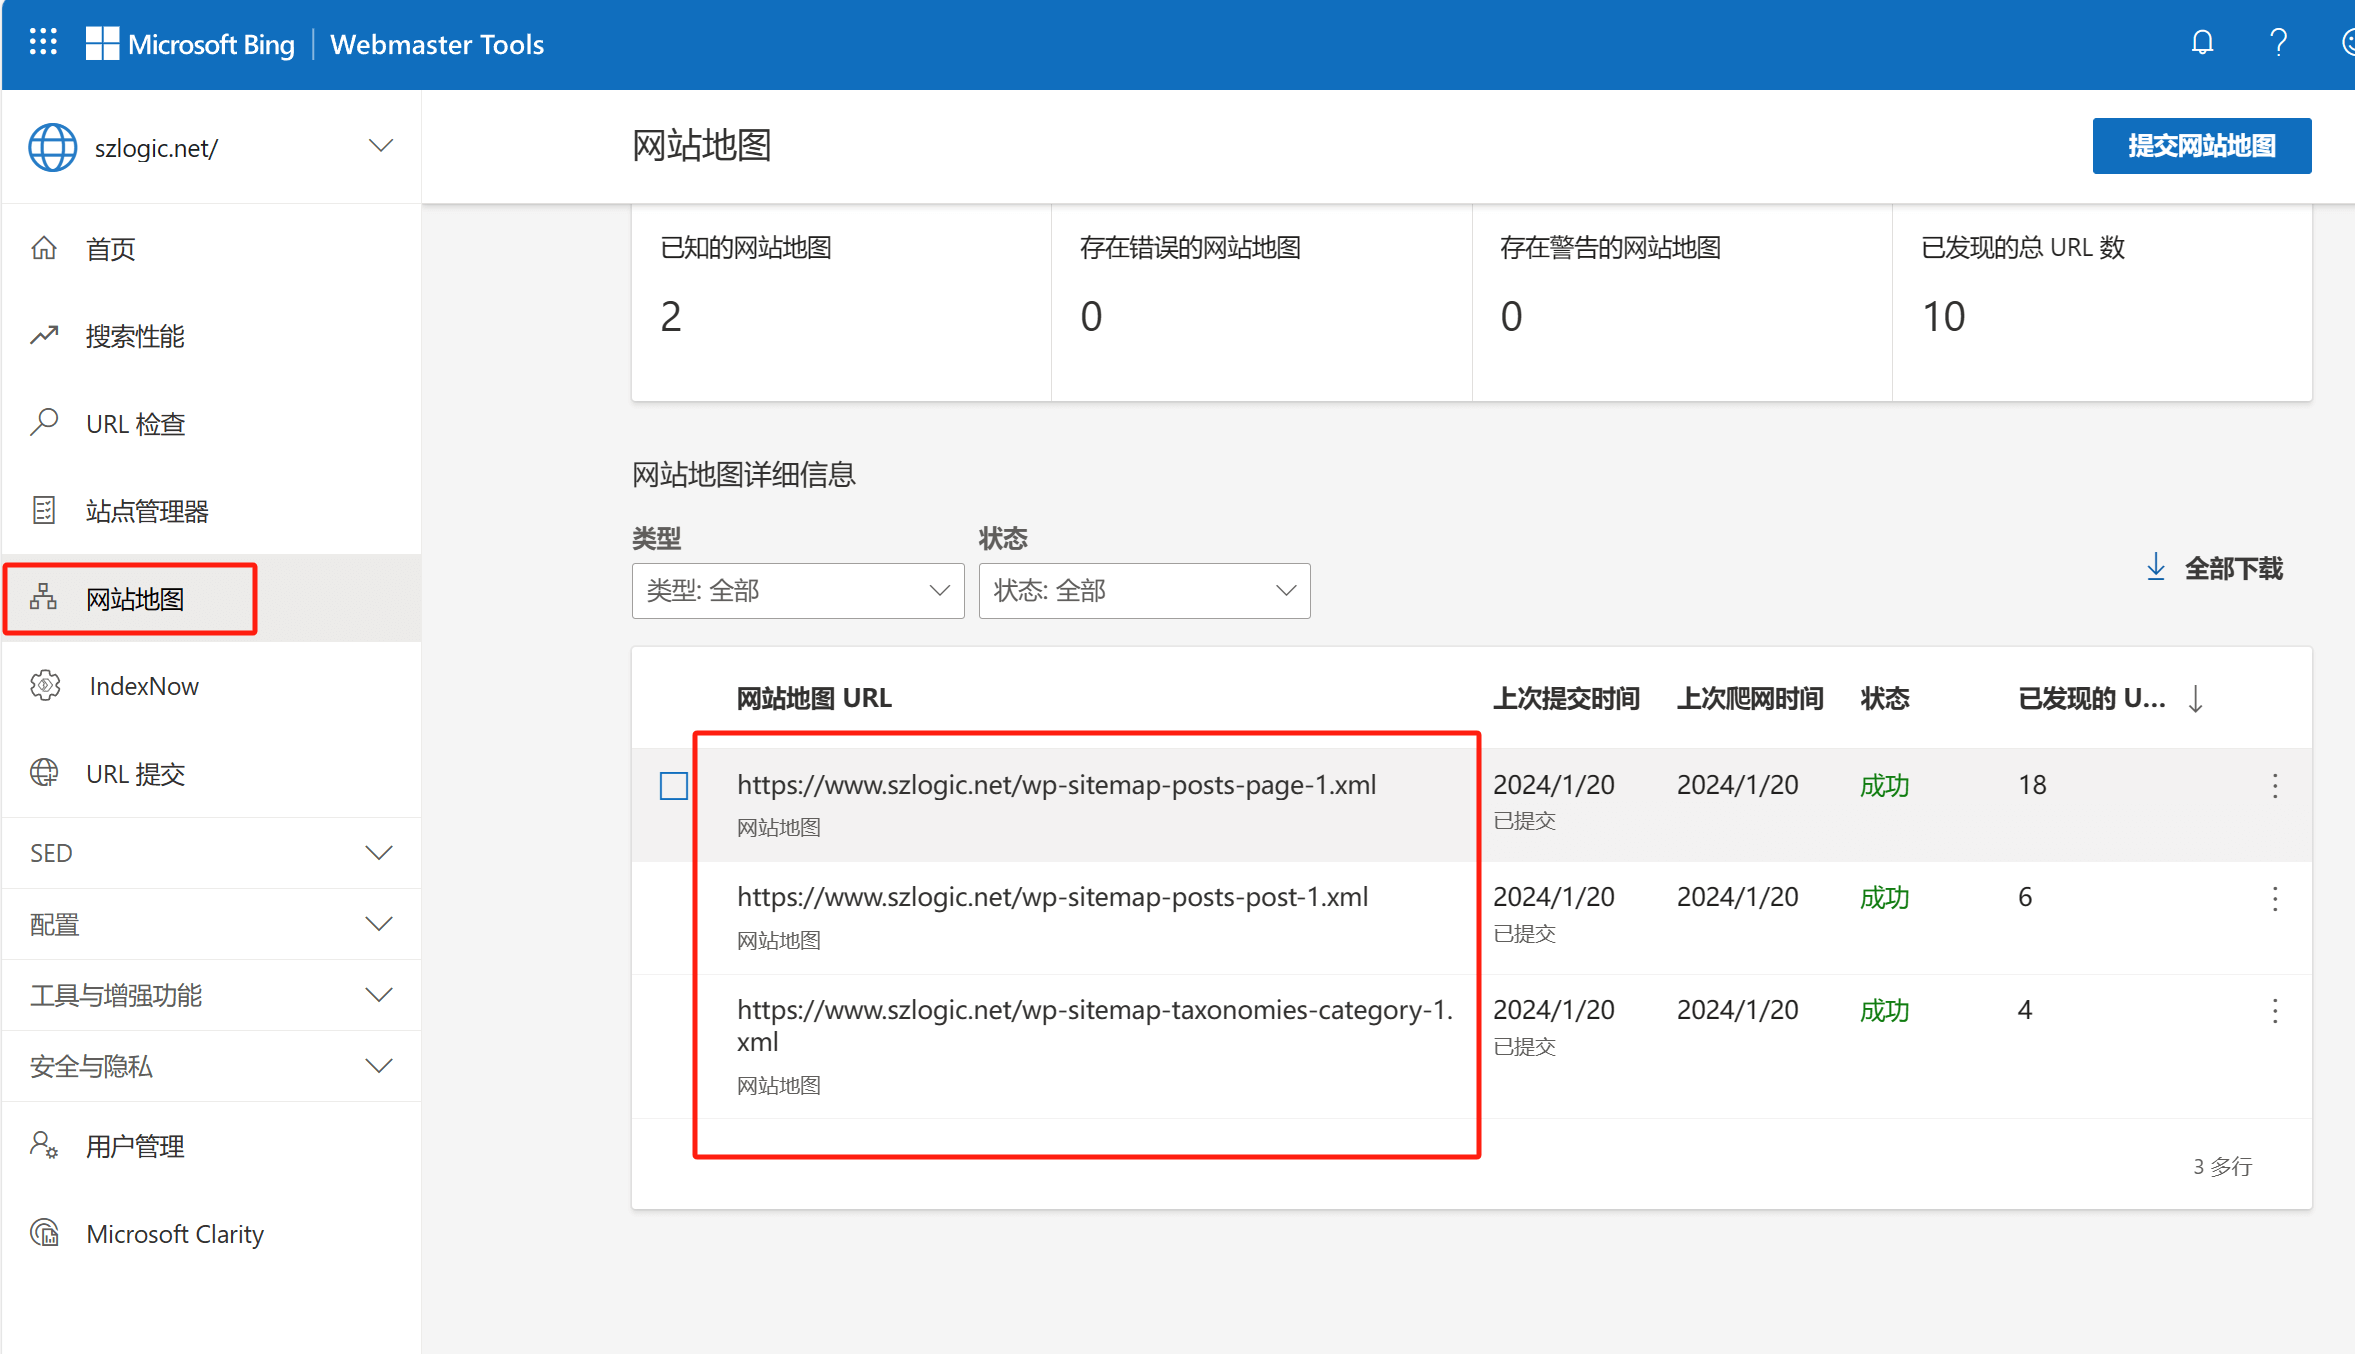
Submit a sitemap to Bing website management backend
Bing and Google support different types of sitemap XML files. Bing only supports non-indexed sitemap XML files and does not support indexed sitemap XML files. This means that if you try to submit the default WordPress sitemap XML file (which is indexed) directly to Bing, it will fail. However, if your website doesn't use the default WordPress indexed sitemap, you can simply click on "Sitemaps" in the left sidebar of Bing's webmaster tools, as shown in the image below, and enter your website's sitemap URL. If your website's sitemap is an indexed sitemap XML file, there is no need to change the sitemap type. For example, LOGIC's website uses the default WordPress indexed sitemap. The issue can be resolved by submitting the sub-sitemaps separately. The principle is simple: an indexed sitemap includes a parent URL by default. To make it a non-indexed sitemap, we only need to remove the parent URL and use the child category URLs from the default WordPress sitemap. This way, it becomes a non-indexed sitemap, and Bing can successfully read the sitemap XML file.
That’s All The Content For Submitting A Website To The Bing Search Engine. Just Follow The Instructions Step By Step To Begin The Basic Work Of Bing Search Engine Optimization. The Prerequisite For Starting SEO Work Is To Submit The Website To A Search Engine And Have It Indexed (Included) By The Search Engine. One Of Bing’s Features And Advantages Is Its Indexing Speed—Normally, It Will Start Indexing Pages Within 24 Hours.
Here’s A Related Search Engine Fact: In July 2009, Yahoo Signed Its First 10-Year Search Engine Partnership Agreement With Microsoft (Bing Is Microsoft’s Search Engine), And This Agreement Is Still In Effect Today. Therefore, Yahoo’s Current Search Engine Uses Bing’s Core Search Technology And Database. This Means That Submitting A Website To Bing Is Equivalent To Submitting It To Yahoo. As Long As A Page Is Indexed By Bing, It Will Also Appear In Search Results On Yahoo.
Ⅲ、Baidu Webmaster Tools: Creating an Account on Baidu Resource Platform and Submitting Your Website
Visit The Baidu Resource Platform And Log In Using Your Baidu Account. If You Do Not Yet Have A Baidu Account, You Will Need To Register One First And Complete Real-Name Authentication (As Required By China’s Real-Name Policy). Just Follow The Steps On The Registration Page As Shown In The Image Below. Since The Registration Process For Domestic Accounts Is Quite Straightforward, We Won’t Go Into Detail Here. Most Users Are Already Familiar With Operating Chinese Platforms, So Simply Follow The On-Screen Prompts To Complete The Registration.

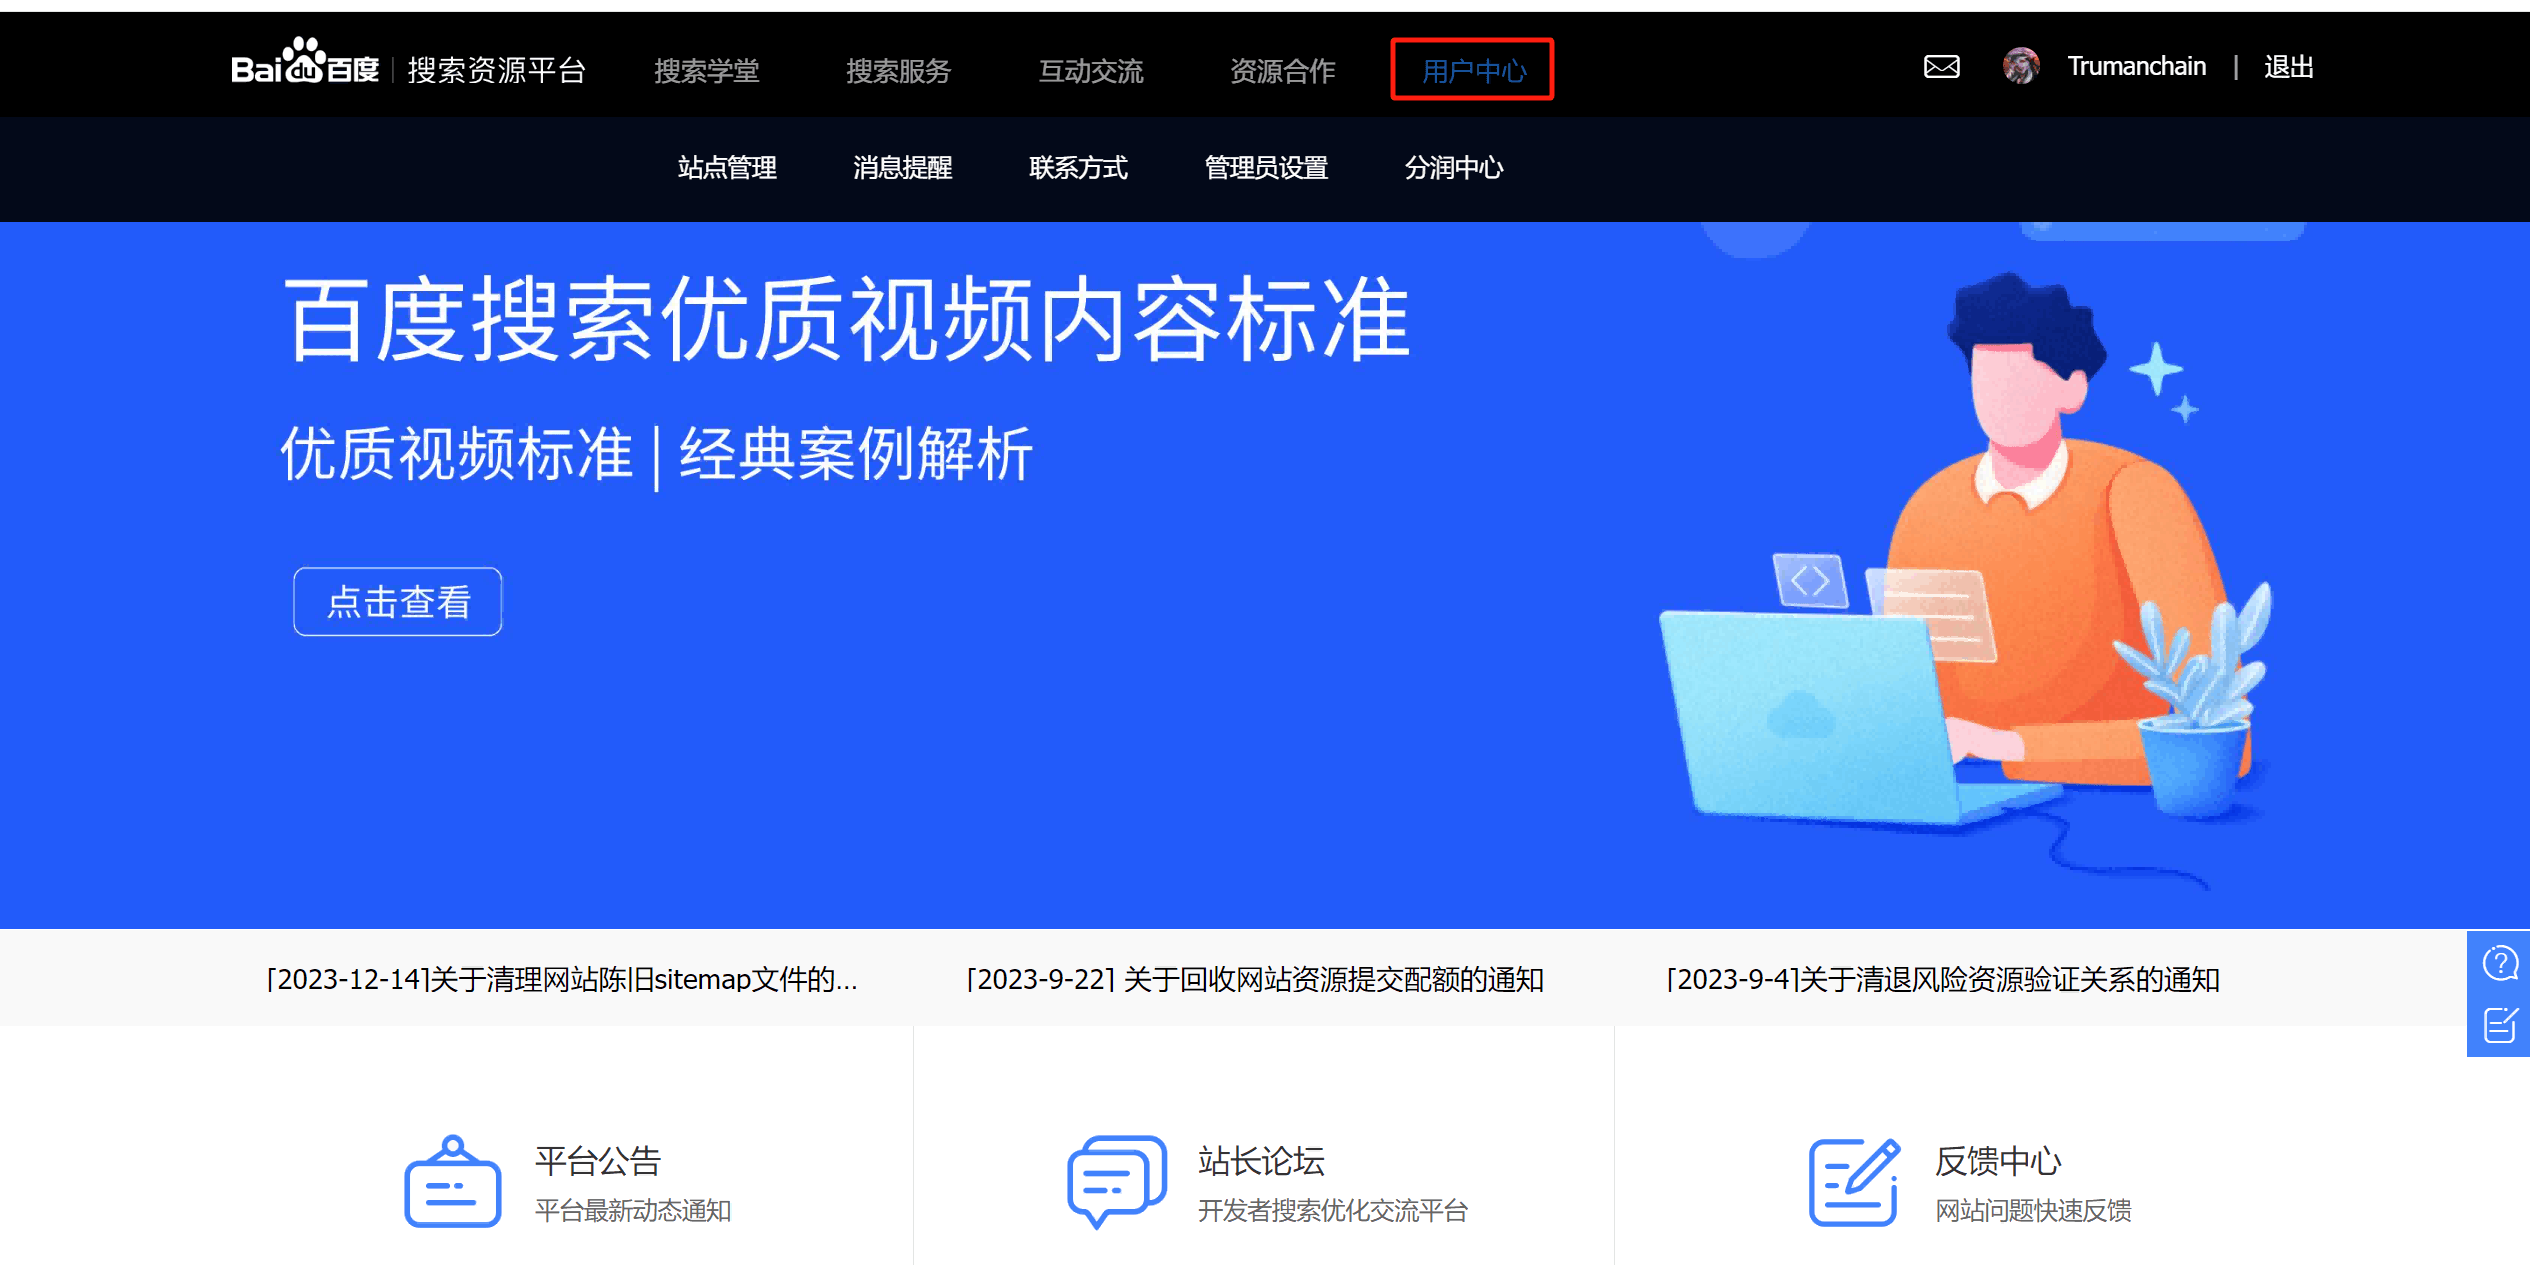
Log in to the Baidu Resource Platform homepage, then click the "User Center" button in the main navigation bar, as indicated by the red box in the image below, to enter the site management page and proceed with adding a new site.
In the Baidu Resource - User Center homepage, scroll down the page, and you will see the "Add Website" button for site management, as indicated by the red box in the image below. Click the button to enter the page for adding a new website, and follow the steps to submit your website to Baidu.
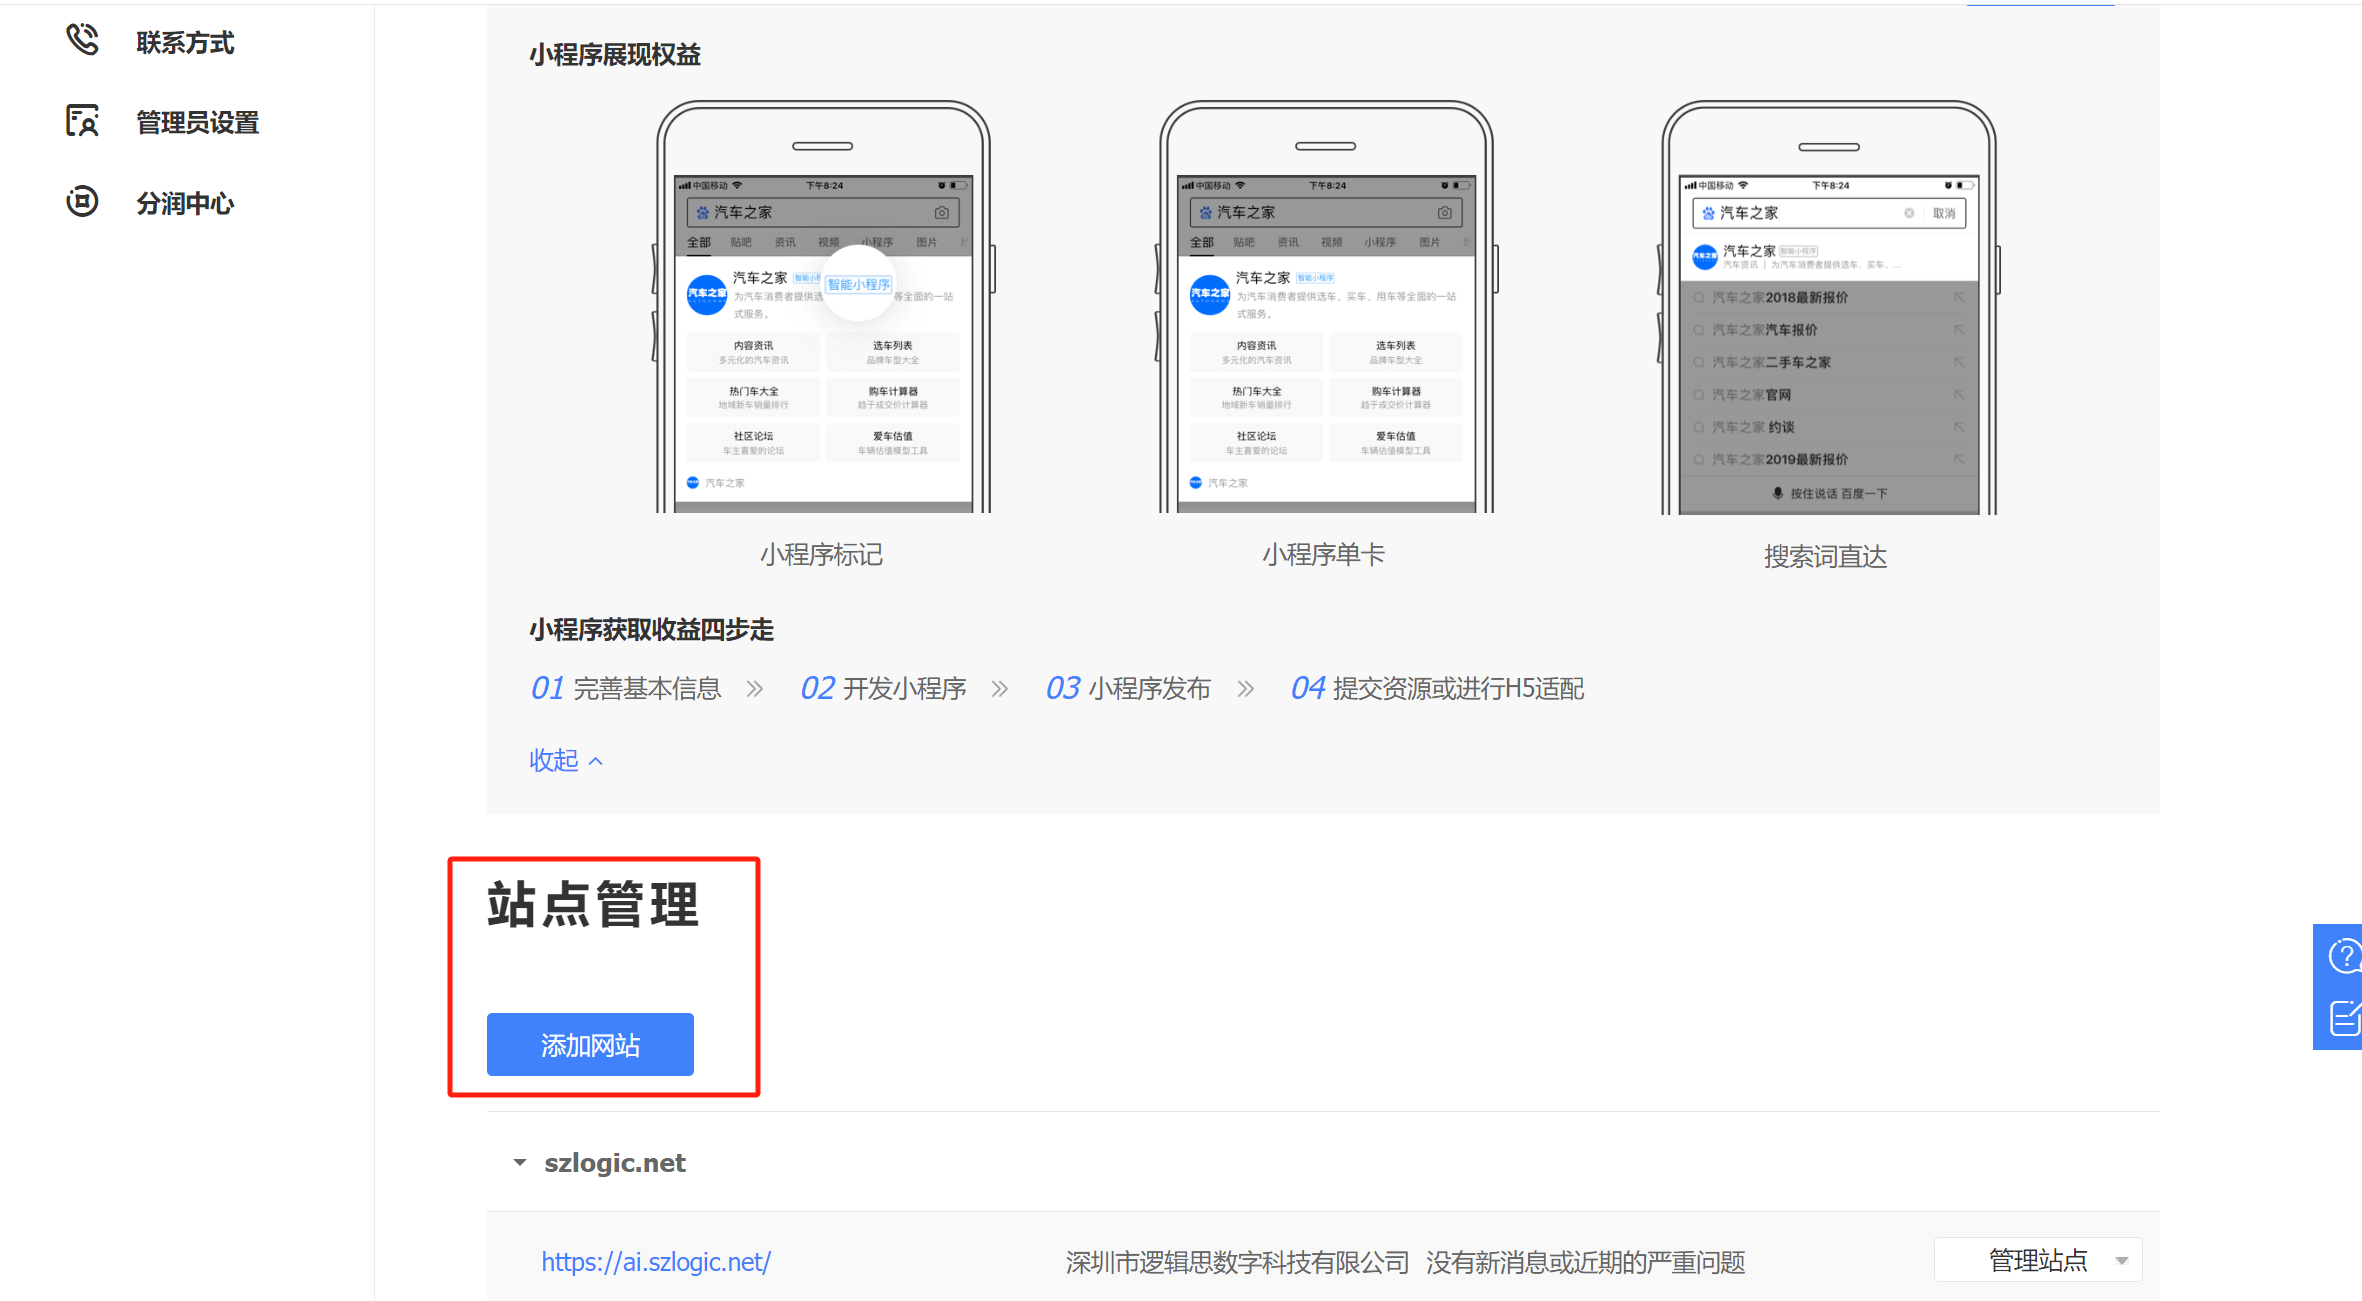
How to add a new website to Baidu Resource Platform (How to submit a new website to Baidu Resource Platform)
Follow the steps in the tutorial below and submit the new website to Baidu step by step in the site management function page of Baidu Resource Platform. As shown in the figure below, it is divided into three steps. We will proceed step by step.
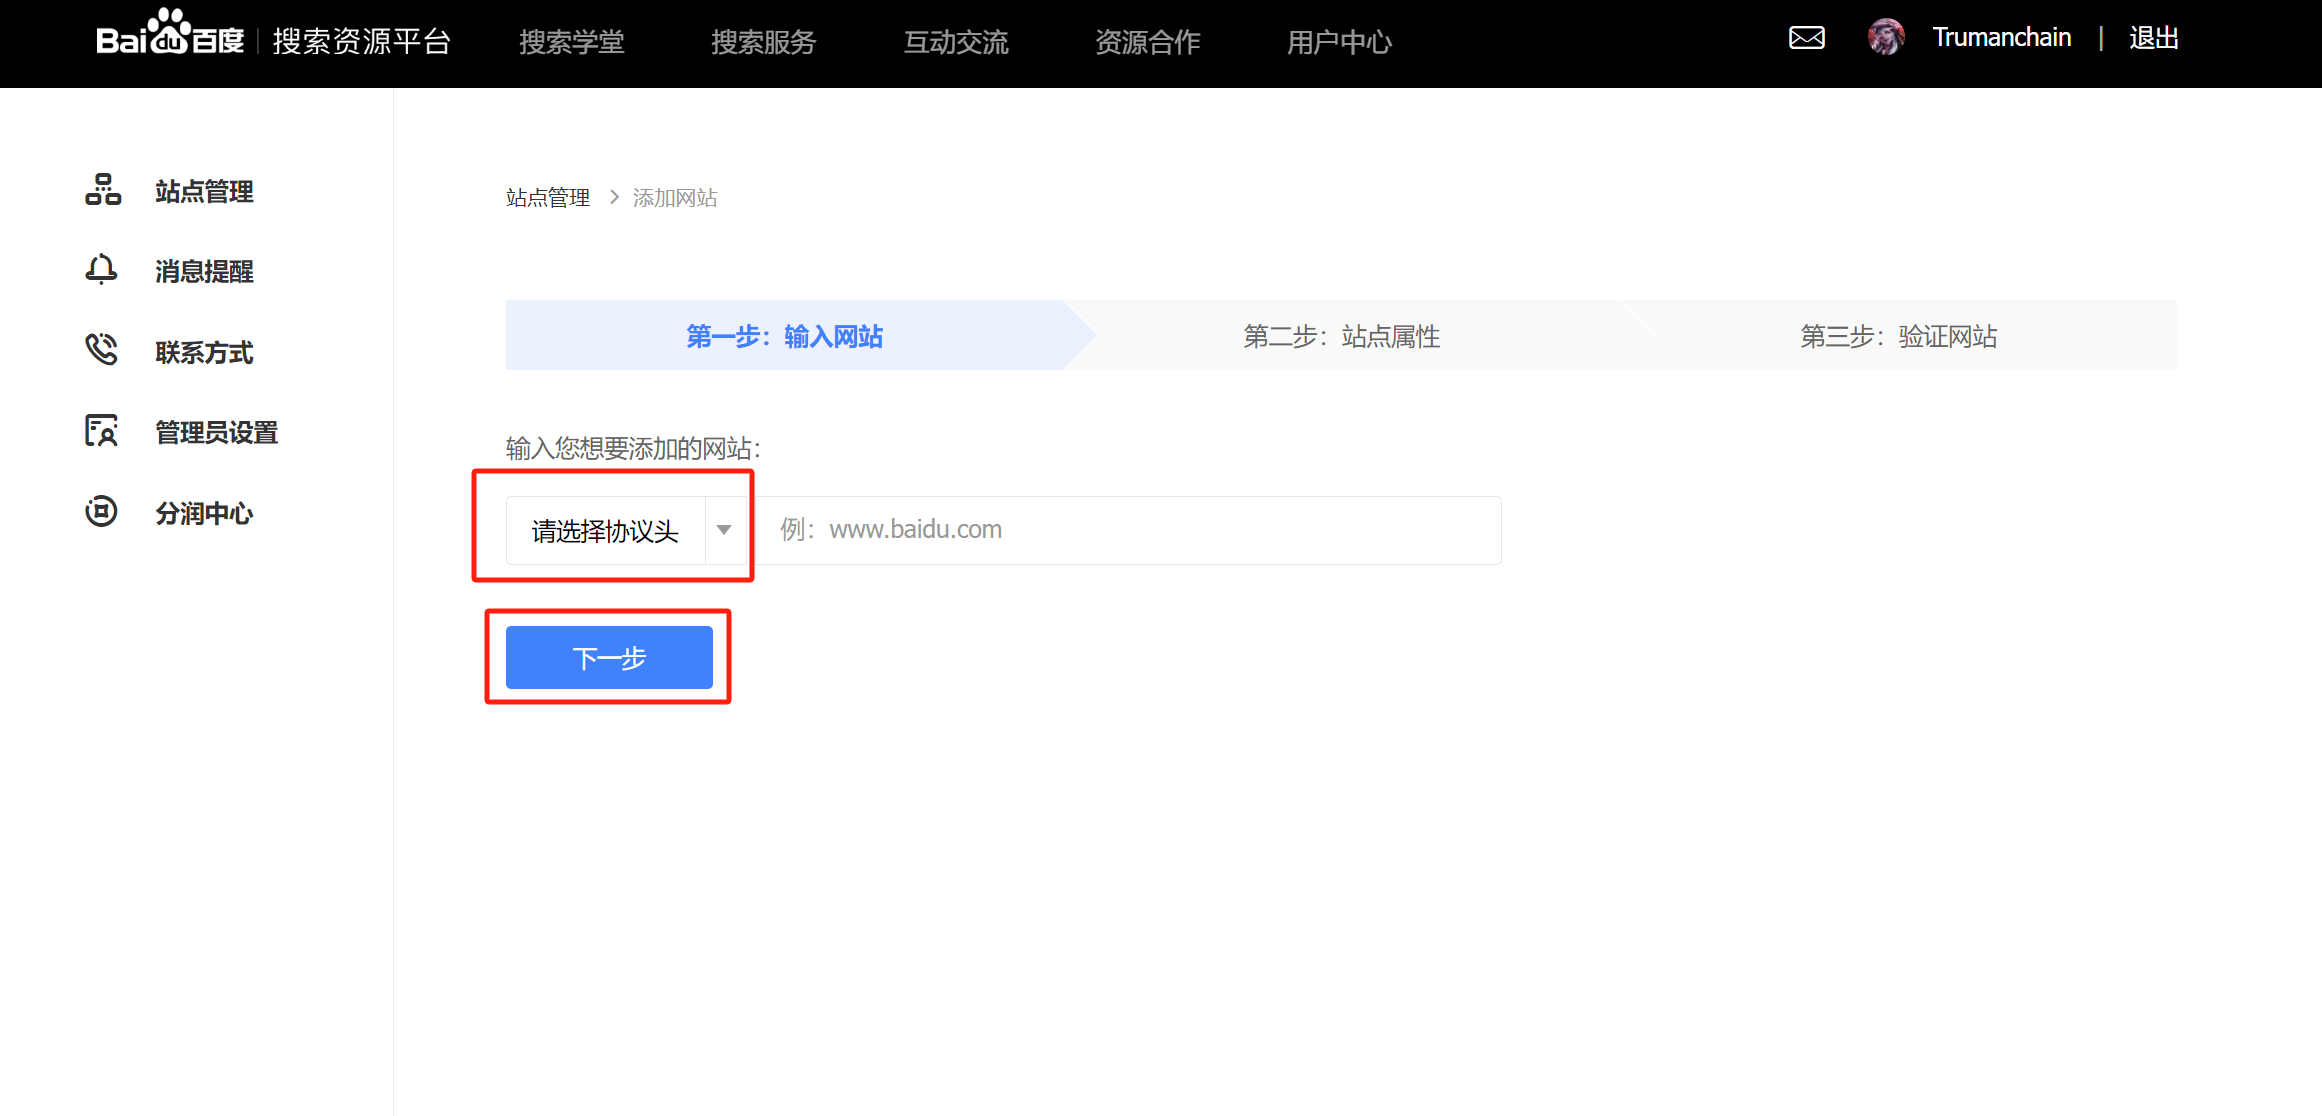
Step 1: Enter the website
Click on the "Select Protocol Header" option indicated by the red box in the image below, and choose "https://". If your domain is not yet using the https protocol, you will need to first apply for an SSL certificate. After successfully obtaining and applying the SSL certificate, enable the "Force https Access" feature in your server or domain management backend. Once the "Force https Access" feature is enabled, users visiting your site will automatically be redirected to the https version, even if they input the http protocol. The http protocol is an unencrypted access protocol used in the past, while https is secured by an SSL certificate, making user access more secure. Therefore, when accessing an http website without an SSL certificate, browsers will display a security warning in the URL bar, while https will show that the website is encrypted and the connection is secure. Nowadays, SSL certificates are an important positive signal in search engine algorithms. As a result, having SSL and https is an essential prerequisite for operating a website. After selecting https and entering your domain name (in the format: www.yourdomain.com), click "Next" to proceed to the second step of adding a website in the site management section.
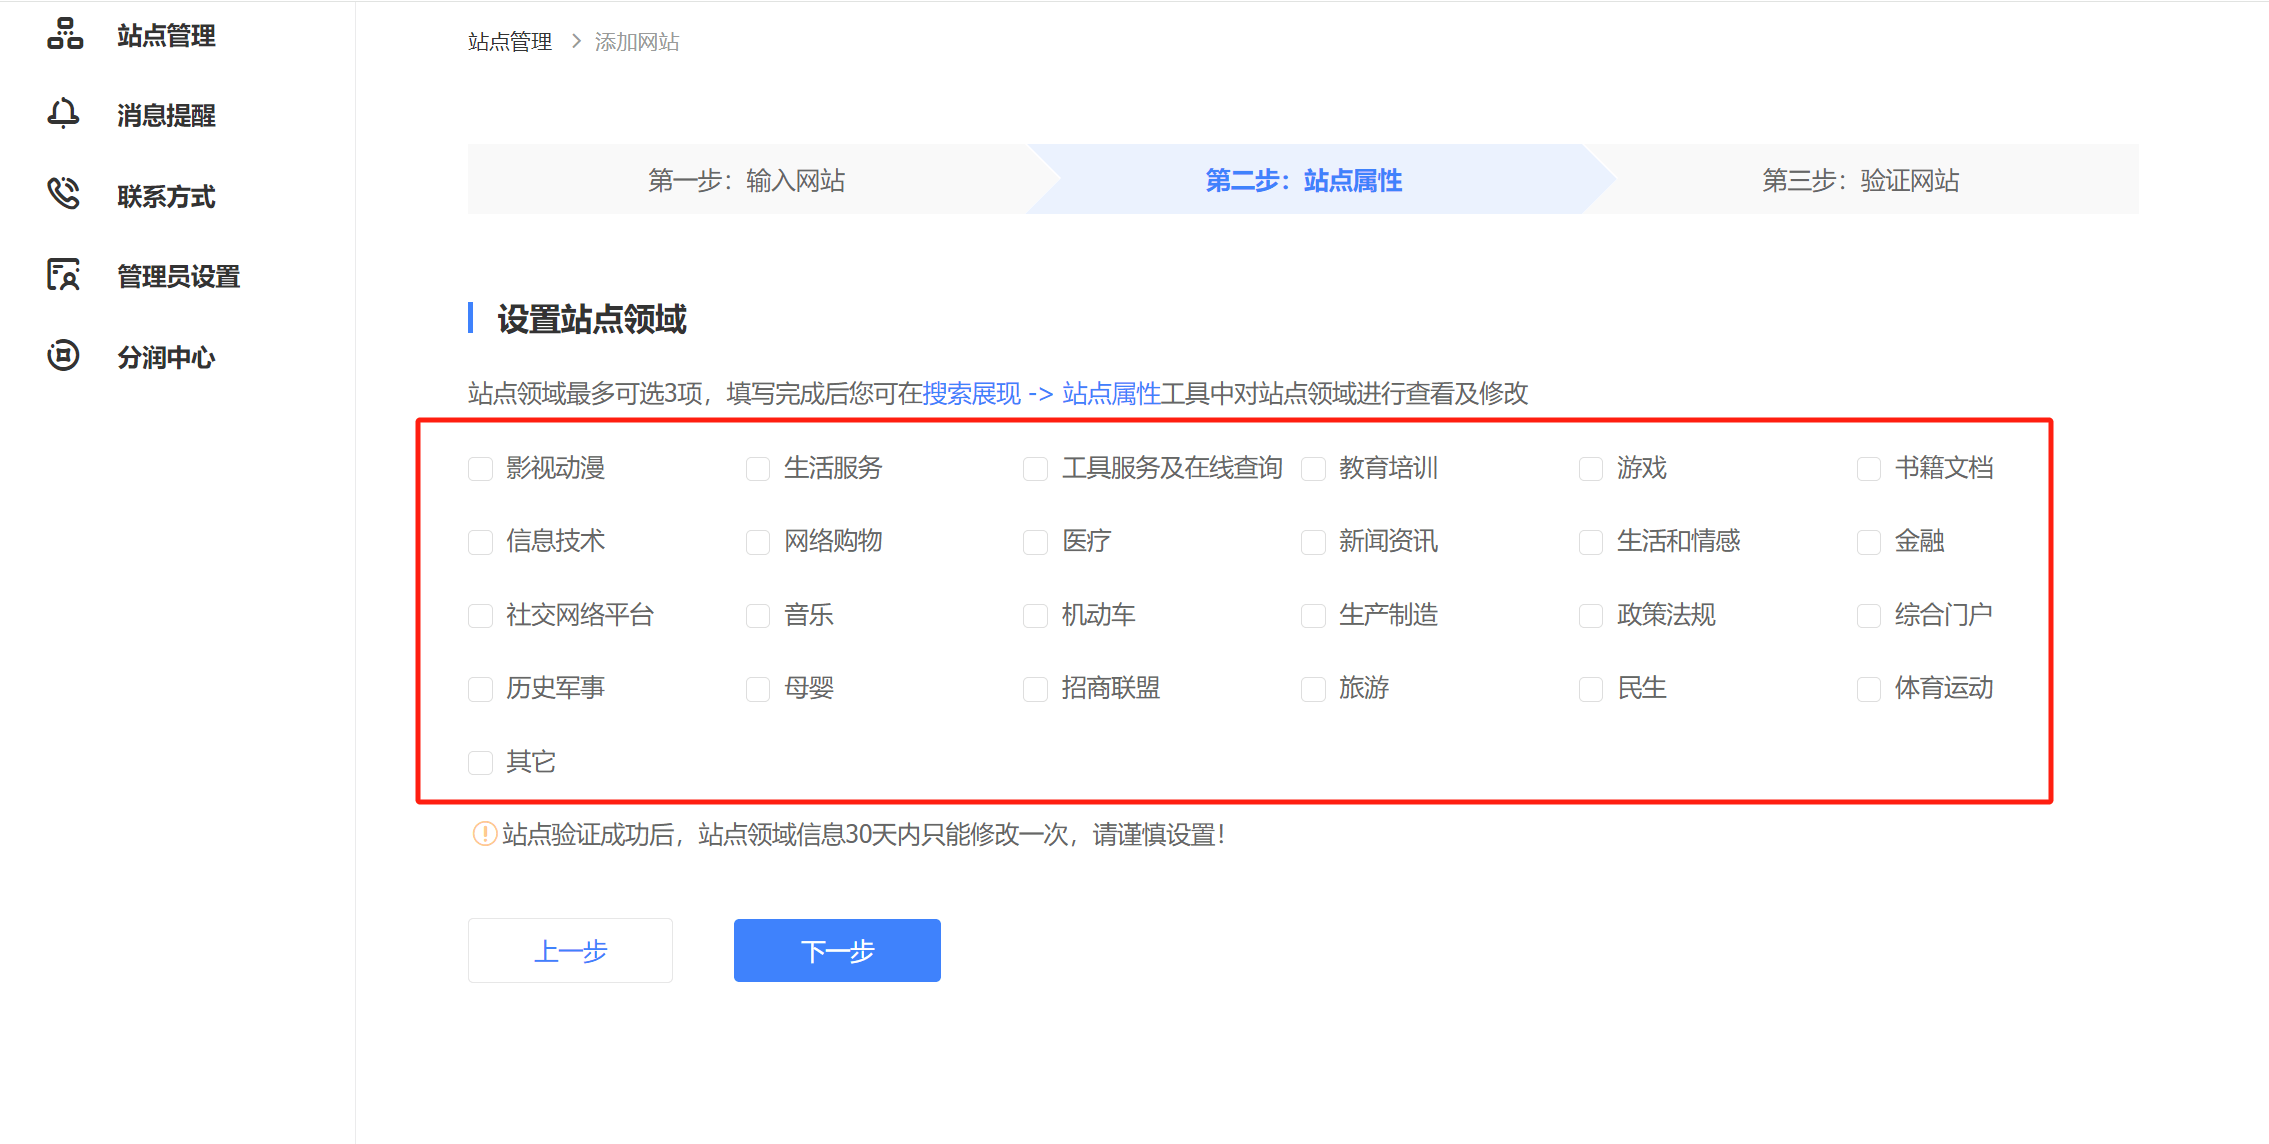
Step 2: Site Properties
Based on your website’s business or content classification, correctly select the matching site attributes. This setting tells Baidu what your website is about and what type of site it is. When selecting, make sure to choose at least one option, and you can select multiple options if applicable. Select as many options as match your site’s attributes. If Baidu doesn’t list a category that fits your site, you can select "Other". The more accurate the classification information, the better it will be for your website's content ranking. Tip: Once the site attributes are set, they can only be modified once within 30 days, so make sure to choose accurately. Avoid changing the site attributes content lightly. After selecting the information, click the "Next" button.
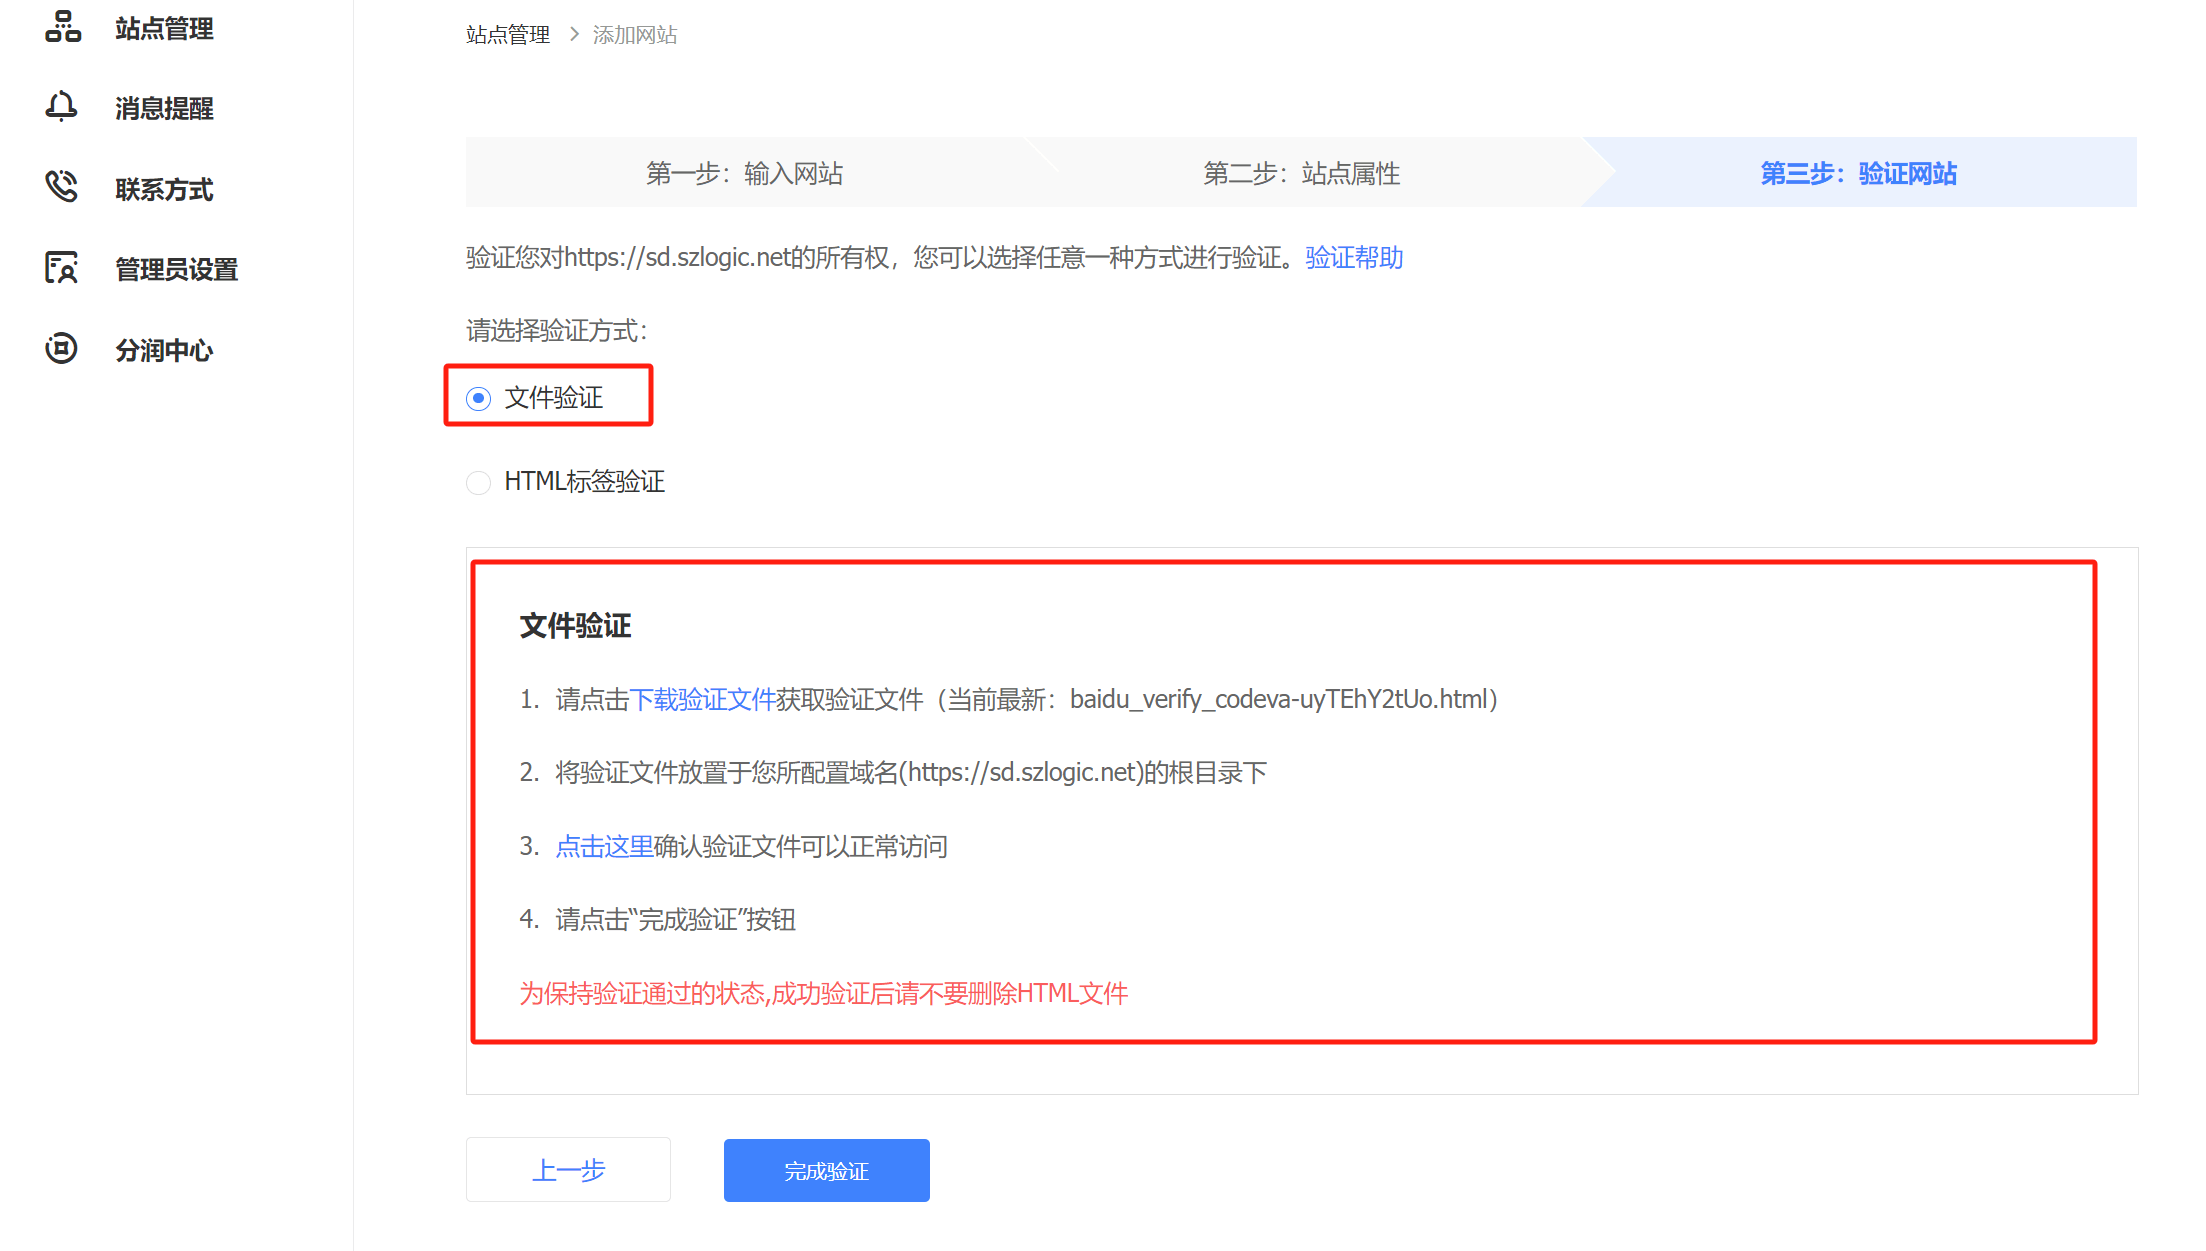
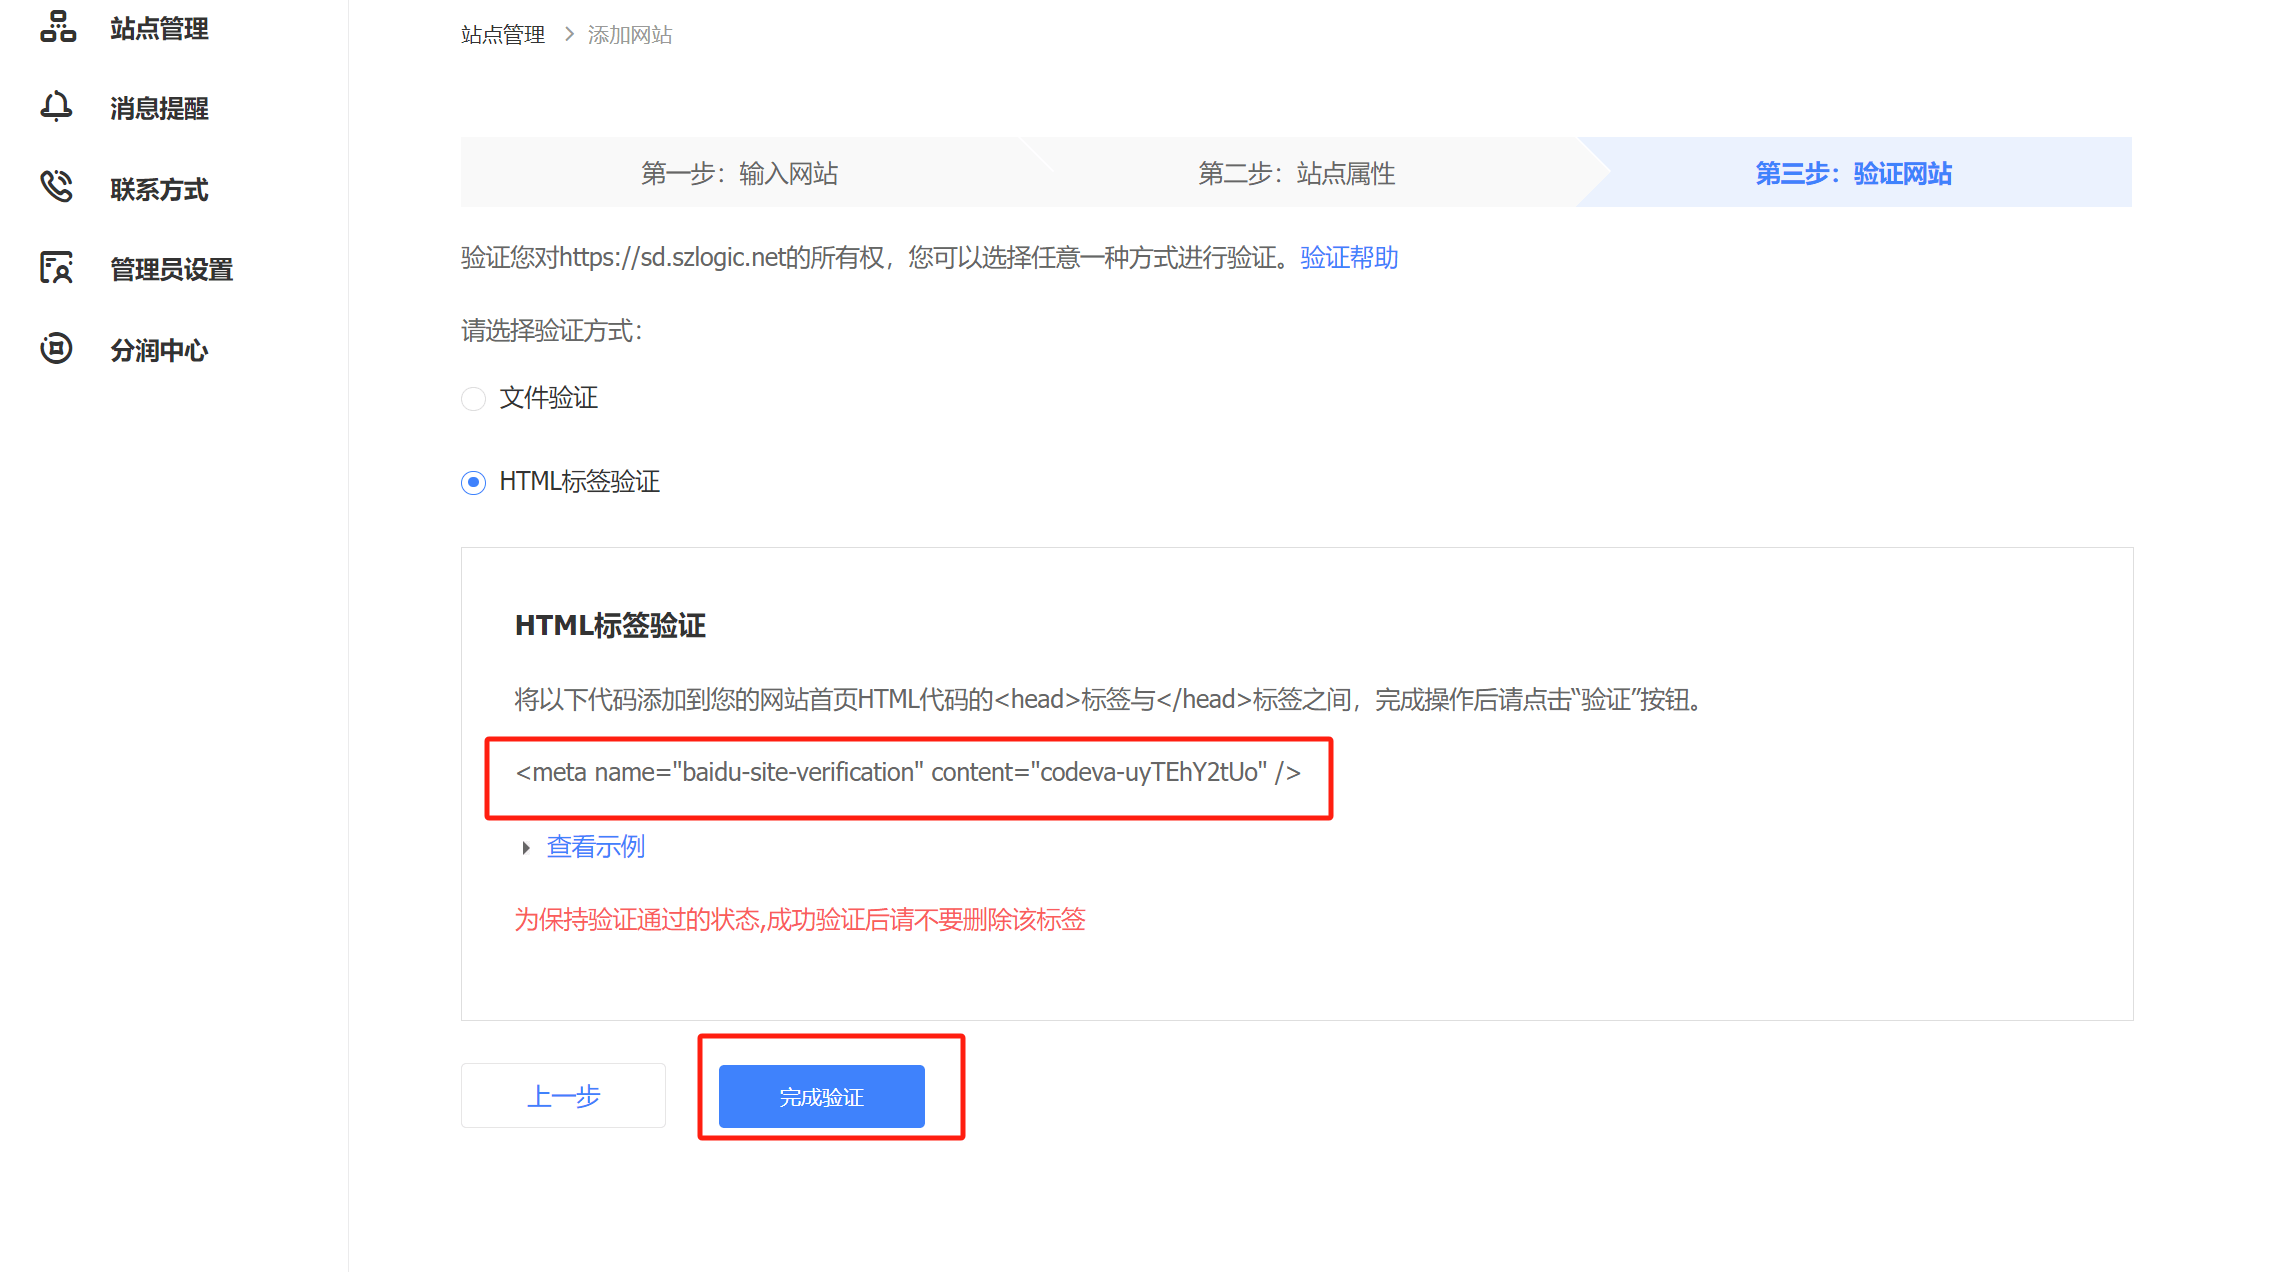
Step 3: Verify your website
Baidu Resource Platform provides two methods for website verification: file verification and HTML tag verification. If readers are following this article sequentially from Google Search Console to the Baidu section, they will likely realize by now that the website ownership verification methods and the installation of verification codes are basically the same across different search engines. This is because the basic principles of the internet are consistent. Let’s start by explaining the file verification method.
Document Verification
Click the "Download Verification File" anchor text under the file verification option to download the verification file. Upload this verification file to the root directory of your website. Similar to the methods for Google and Bing search engines, this method is not suitable for SaaS website builders and is only applicable to CMS or static websites where the server can be accessed. After uploading the file, click the "Complete Verification" button to confirm the verification result. Generally, there will be no issues, and the verification will be successful.
HTML tag validation
Similar to the search engines mentioned above, as shown in the image below, copy the HTML tag code and paste it into the theme file. This method is supported by almost all website building systems because even SaaS website builders allow access to theme files. Simply paste the code into the appropriate location within the theme file. For WordPress, the theme file is `header.php`, which can be found under the "Appearance - Theme Files" path in the WordPress admin panel. For Shopify, the theme file is `theme.liquid`, located under the "Online Store" - "Templates" - "Edit Code" path. The code installation location in both WordPress and Shopify theme files is the same, inside the `head` tag. Be careful not to mix it with other existing code blocks. Finally, click the "Complete Verification" button to confirm the verification result.
After completing the above steps, the website will be successfully submitted to Baidu search engine. Baidu will then send its BaiduSpider to crawl the website's data. If the website's robots.txt file does not block BaiduSpider from crawling, Baidu will successfully crawl the data and index the pages into its database. On the other hand, if the robots.txt file blocks Baidu's crawling, BaiduSpider will respect the robots.txt rules and stop crawling the data. If you don't want to wait for BaiduSpider to crawl your site passively, you can also actively submit the sitemap and URLs to Baidu, allowing it to crawl the site based on the submitted sitemap and URLs. Below, I will explain how to manually submit the sitemap and URLs to Baidu.
A reminder: Domestic search engines have their own policies and features. In addition to real-name registration, websites also need to complete an ICP (Internet Content Provider) filing before they can be indexed by domestic search engines. The ICP filing is essentially a permit for a website to operate within the country. Websites that do not complete ICP filing will not be indexed by domestic search engines.
Manually submit sitemaps and URLs to Baidu
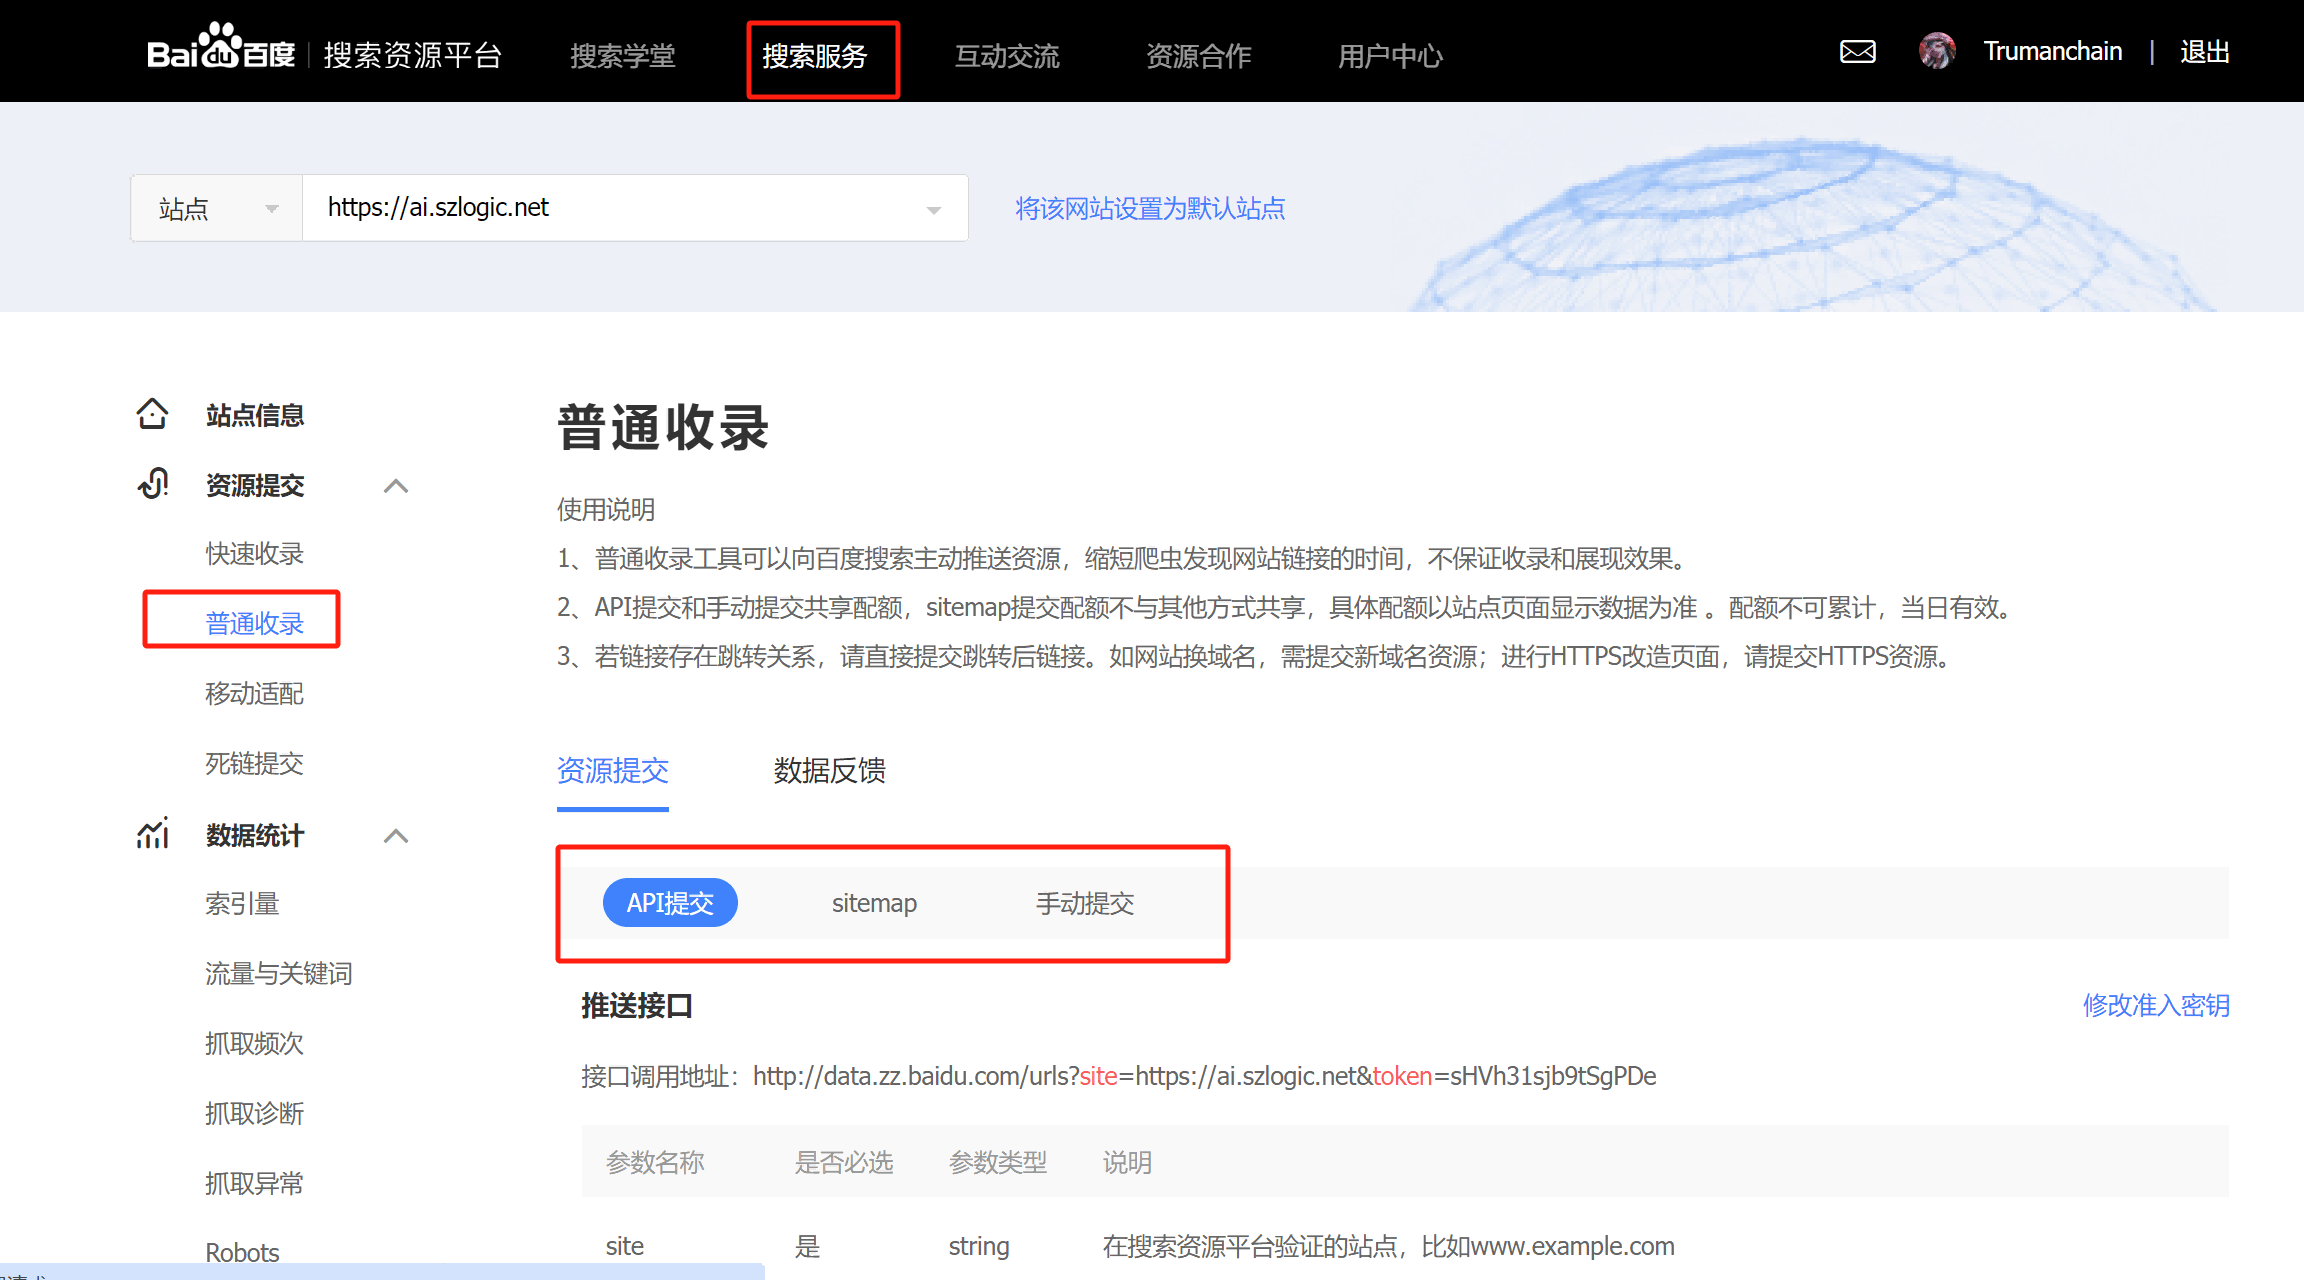
Click the "Search Services" button on the Baidu Resource Platform’s main navigation bar, and then click the "General Indexing" button in the sidebar tool to enter the general indexing page. The operational steps are shown in the red box in the image below. Under the resource submission function, there are three ways to submit URLs to Baidu. The default first method is "API Submission." The API submission method requires the use of a plugin that supports API pushing or writing API interface code to run on the server level. This allows website updates to be automatically pushed to the search engine. The API pushing method is a feature that most major search engines support. WordPress websites also have plugins that can implement search engine API pushing. At the time of writing this article, LOGIC has decided to develop its own search engine API push plugin for readers to use in the future, making SEO work more efficient and stable. We will not go into detail about the API submission method in this article, but once LOGIC’s search engine API push plugin is launched, we will dedicate a separate section to explain it. Here, we will focus on explaining the two methods of submitting resources: sitemap and manual submission.
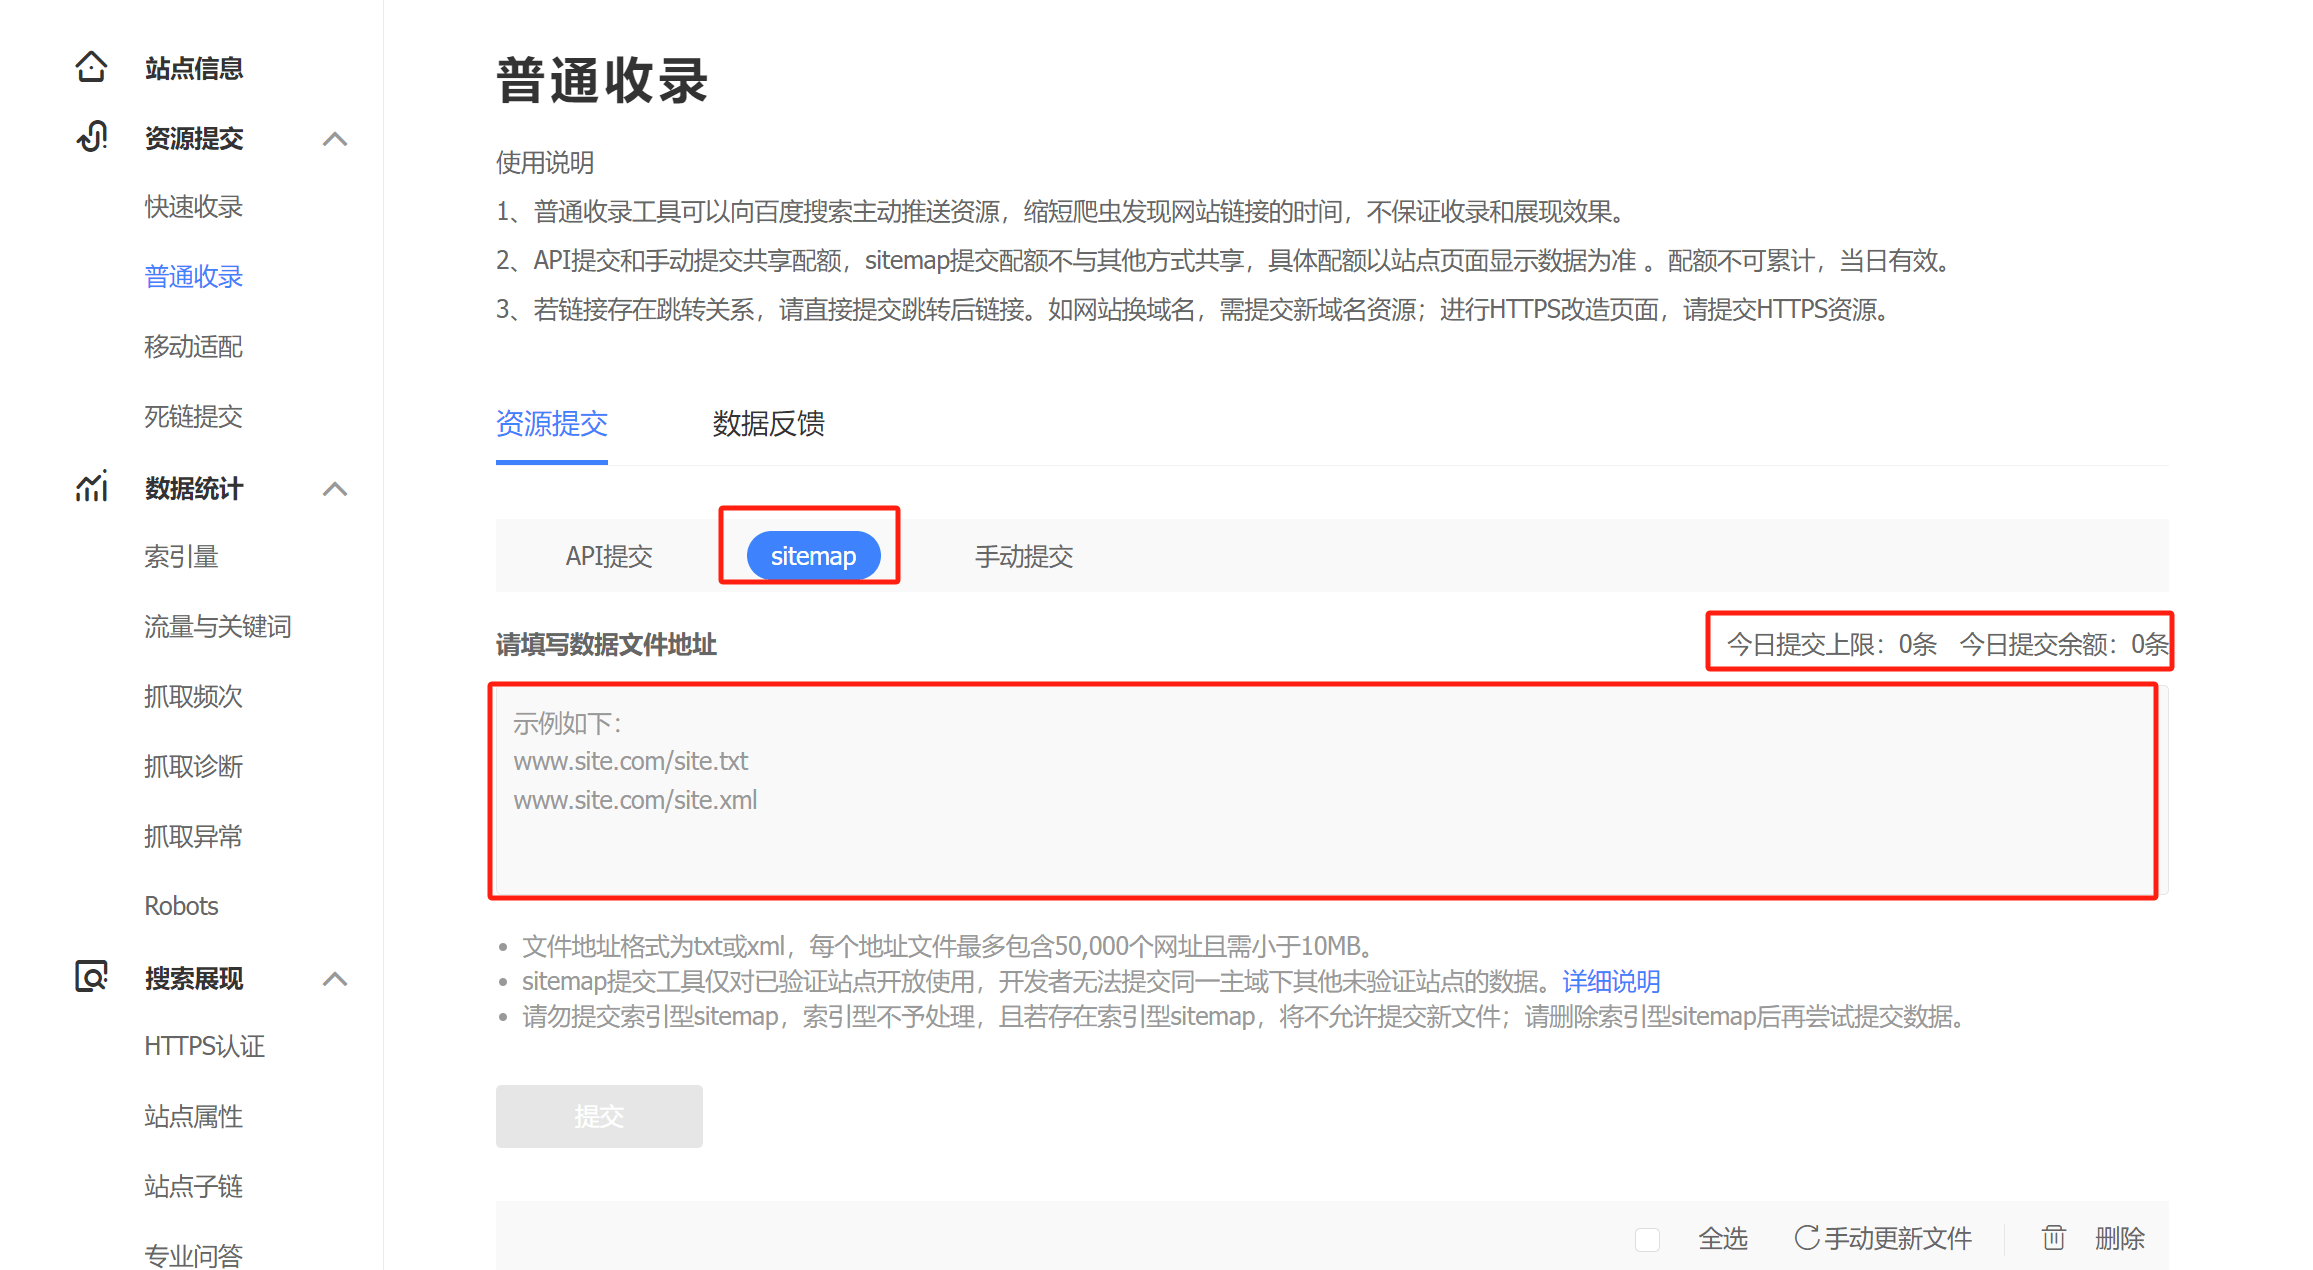
Sitemap (Website Map): The Baidu Webmaster Platform Only Supports The Submission Of Non-Index Sitemaps And Does Not Support Index Sitemaps. As Shown In The Image Below, After Clicking “Sitemap,” Paste The URL Of The Non-Index Sitemap Into The Input Box And Then Click The Submit Button. It Is Worth Mentioning That The Non-Index Sitemap File Formats Supported By Baidu Include Not Only XML Files But Also TXT Files. This Means You Can Create A TXT File, Place The Site’s URLs In The TXT File, Upload It To Your Website’s Directory, And Then Add The URL Of This TXT File Into The Sitemap Input Box. Baidu Will Then Crawl And Index URLs According To This Sitemap.
Reminder: Before I wrote this article, Baidu’s platform announced a "Notice on the Recovery of Website Submission Quotas." This policy was introduced to combat gray industries, low-quality websites, and websites that have not completed real-name registration. The official full explanation states: "Due to the rampant black market and cheating activities recently, which have occupied a large number of platform resources and severely affected the user experience, the Search Resource Platform will stop the sitemap submission capability and adjust the daily API push quota for sites that have not completed real-name registration or are low-quality. Please ensure that sites perform regular maintenance and quality management. The resource platform will gradually restore rights and adjust quotas for compliant sites after the holiday." Unfortunately, my website was affected by this policy. The likely reason is that LOGIC’s website was crawled and indexed by Baidu’s spiders during the website planning phase, and during this time, the website had little actual content, lacked enough pages, and the Baidu resource management account was not real-name registered. These factors led Baidu to mistakenly classify the website as low-quality. I have already filed an appeal for this issue, and I believe the sitemap submission rights and quota will be restored soon.
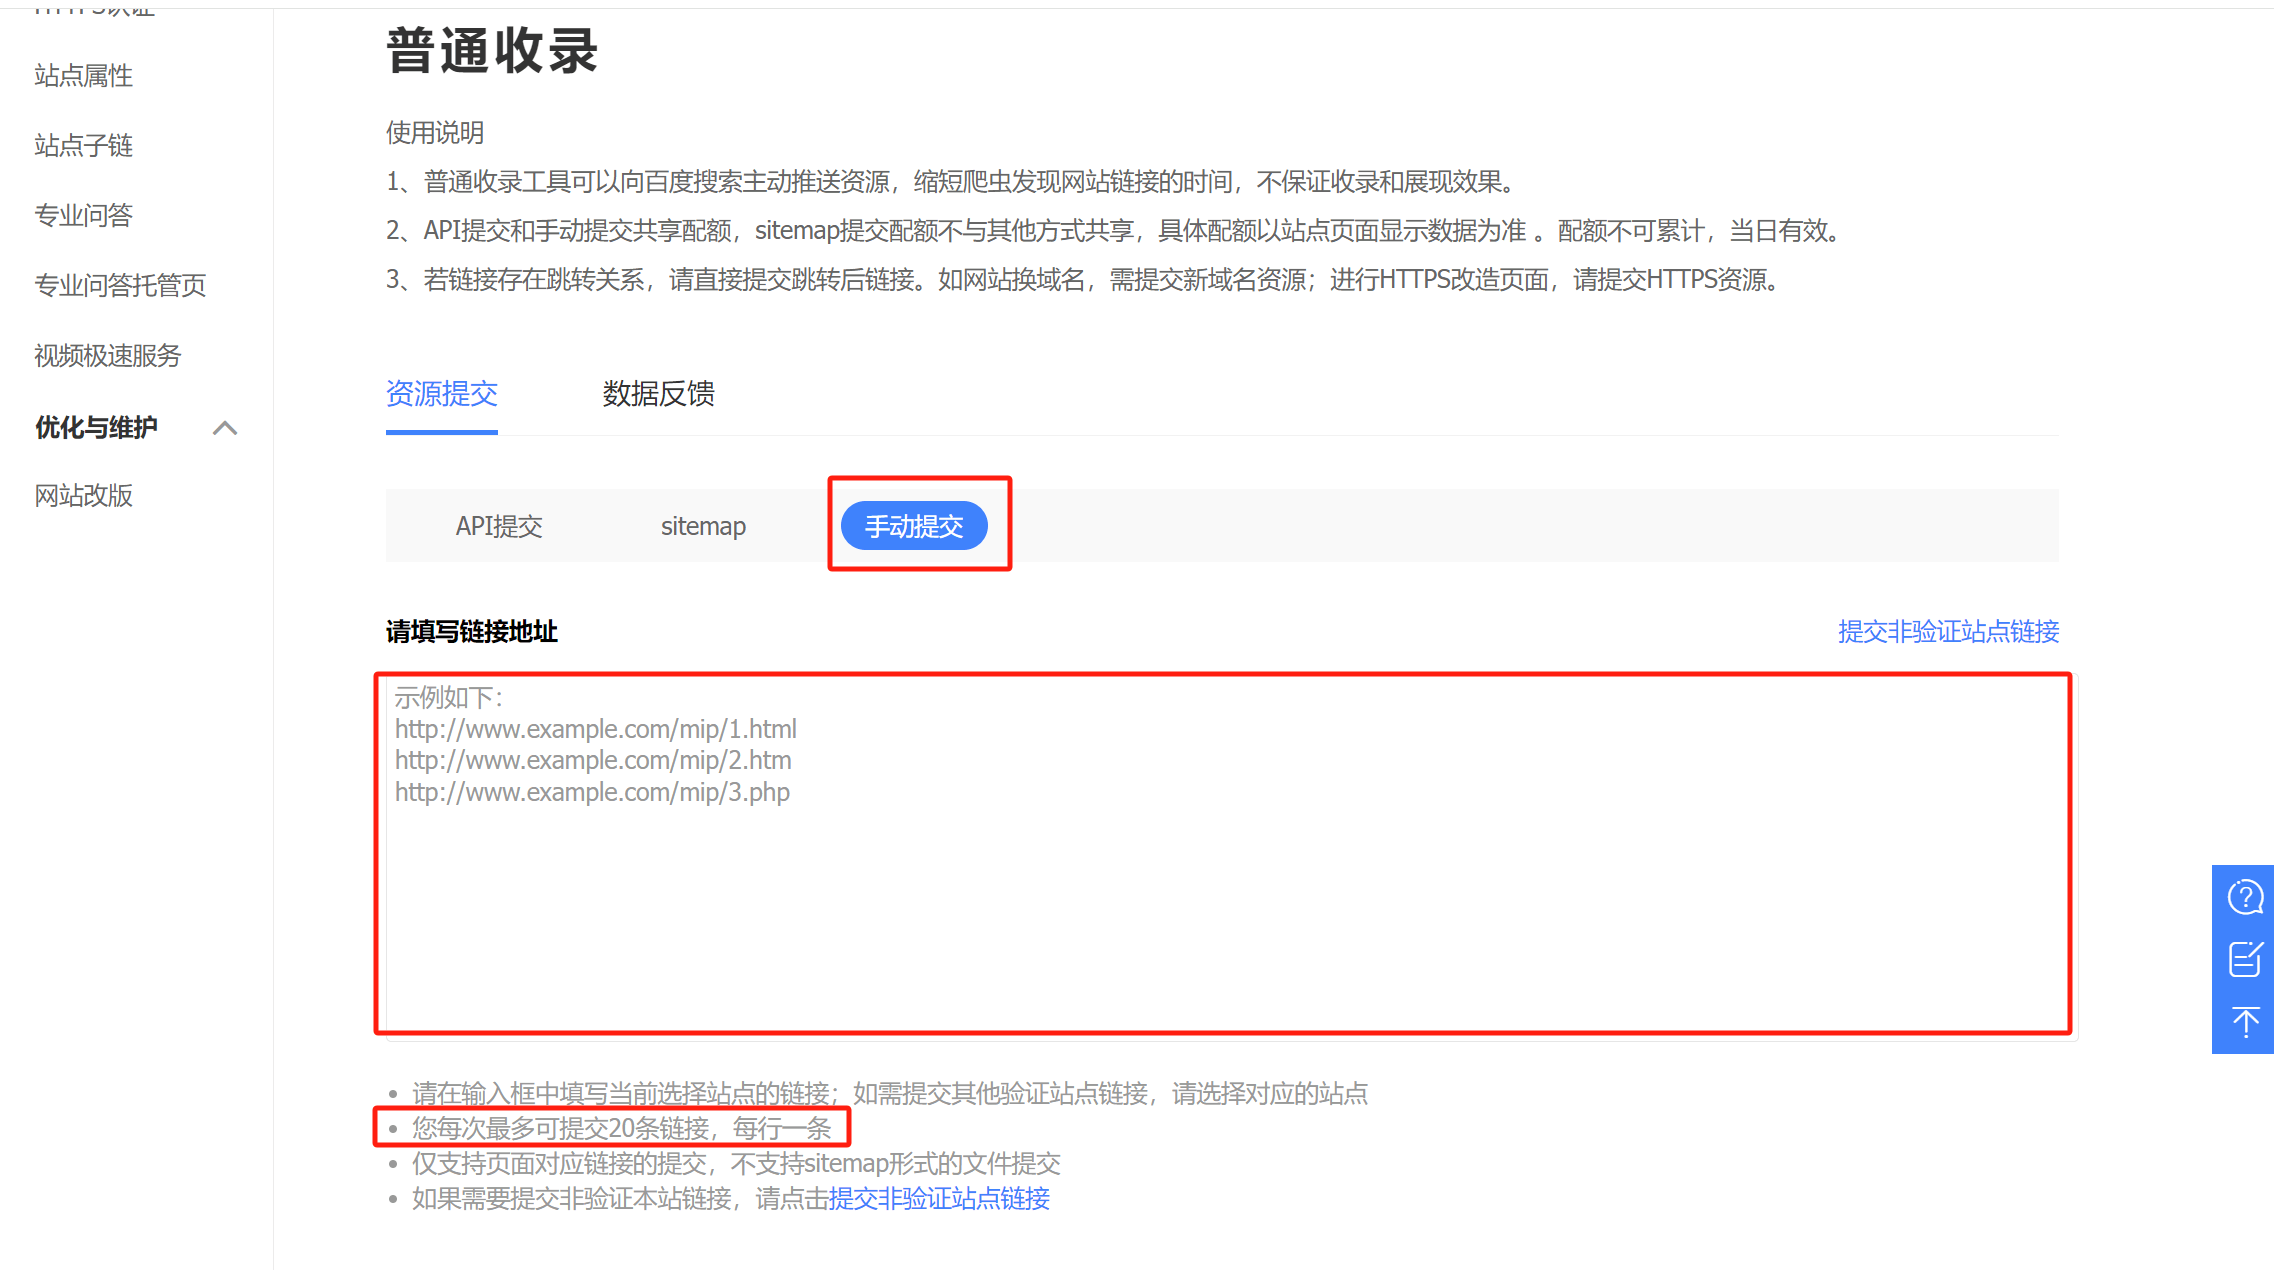
Manual Submission: After Clicking The “Manual Submission” Button, As Shown In The Image Below, The Manual Submission Method For Resources In Baidu Has A Quota Limitation Rule. Only 20 Links Can Be Submitted At A Time, With Each Link Occupying One Line. The Second Link Should Be Added On A New Line. A Maximum Of 20 Links Can Be Submitted Per Day. Simply Copy And Paste The URLs You Wish To Submit Into The Link Address Input Box For Submission. That Concludes The Entire Explanation Of How To Submit A Site To Baidu Search Engine And The Methods Of Submitting Resources To Baidu. Just Follow The Step-By-Step Demonstration To Successfully Submit Your Website To Baidu. After That, You Should Regularly Monitor And Analyze Your Website’s Access Logs To Check Whether The Visits From Baiduspider Are Normal And To Improve The Indexing Rate On Baidu.
Ⅳ、Yandex Webmaster Tools: Creating an Account on Yandex Webmaster Tools and Submitting Your Website
Yandex Is The Largest Search Engine Brand In Russia, Though It Is Not Very Well-Known Among Chinese-Speaking Users. Yandex’s Positioning Is Similar To But Also Different From Baidu. While Baidu Focuses Exclusively On The Chinese Search Engine Market And Has Not Expanded Into English-Speaking Regions, Yandex Has Been Actively Expanding Its Audience In English-Speaking Markets In Recent Years, In Addition To Serving Russian-Speaking Users. Whether Or Not You Need To Submit Your Website To Yandex And Optimize For Its Search Engine Depends On Your Website’s Business Direction And Target Market.
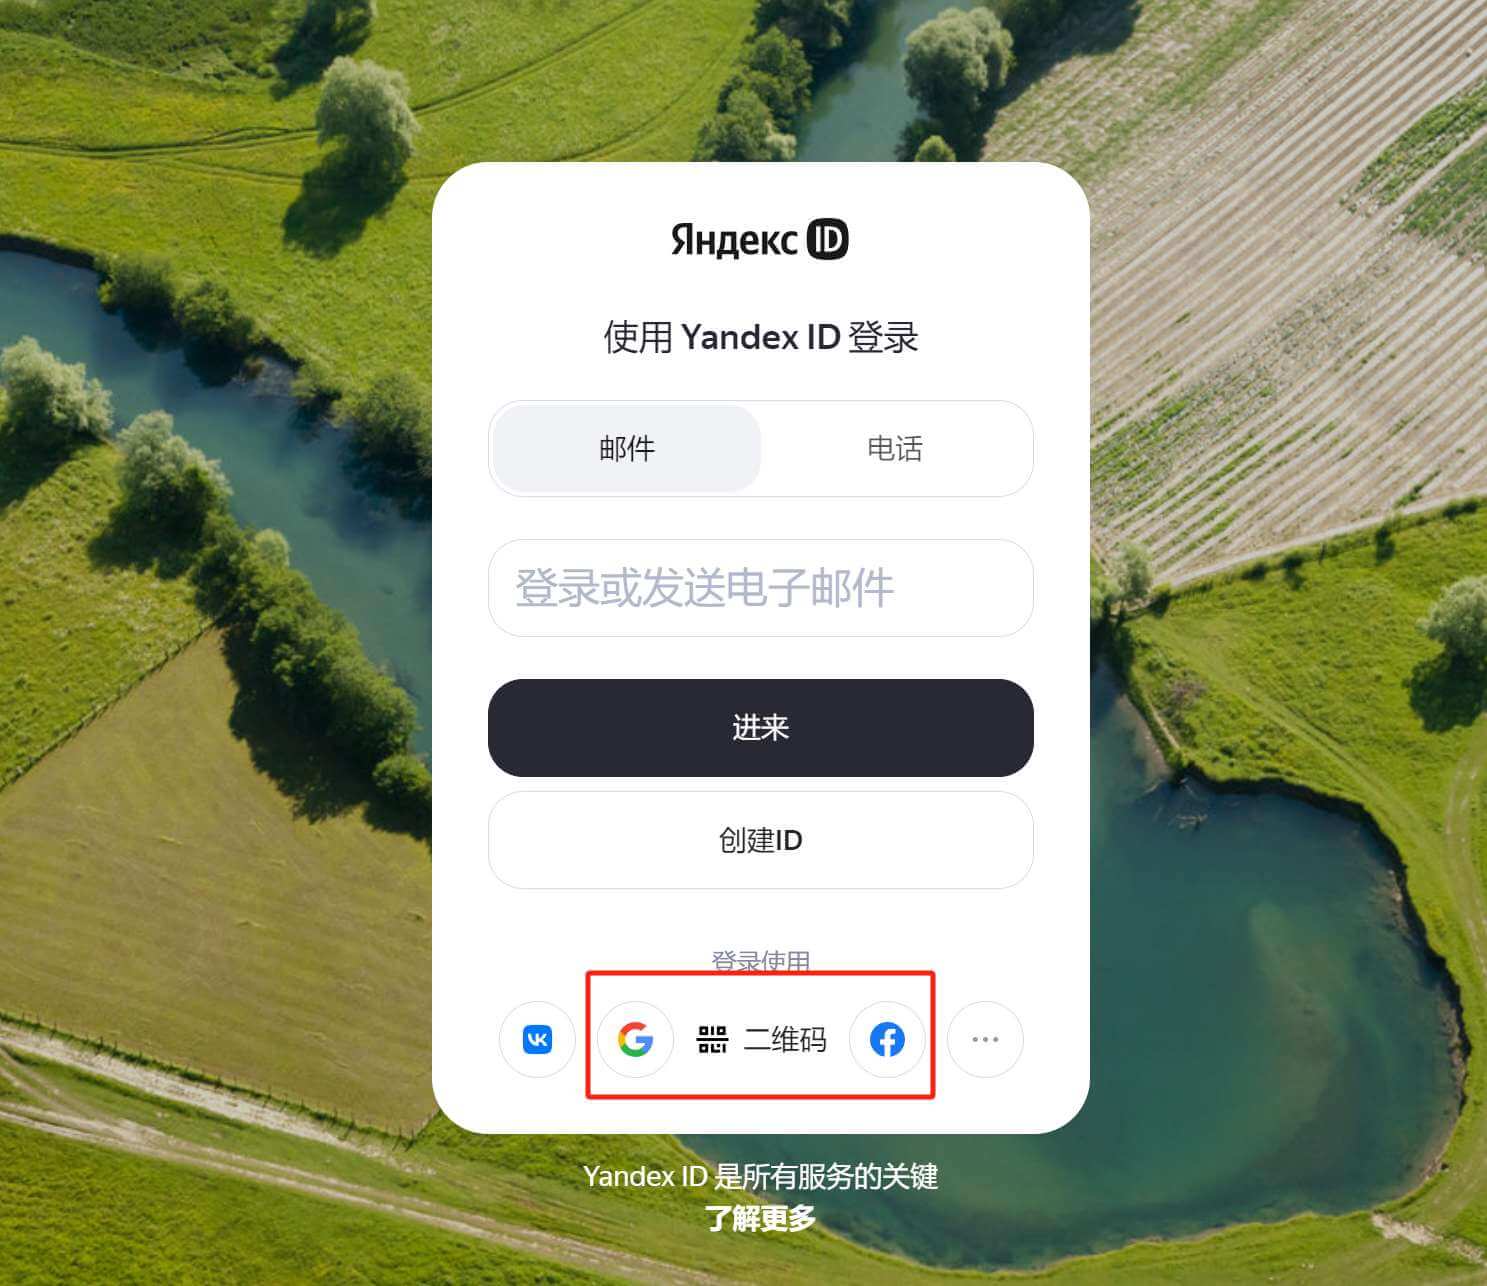
Yandex Allows You To Directly Use Your Google Or Facebook Account To Create A Yandex ID (Yandex Account). The Login Page Is In Russian And Does Not Provide An Option To Change The Display Language, So You’ll Need To Use A Translation Plugin To Translate The Page Into Chinese, As Shown In The Image Below:
After Creating A Yandex ID Using Google And Logging In, The Account Interface Is As Shown In The Image Below. On The Yandex ID Main Page, In The Bottom Left Corner, There Is An Option To Select The Display Language. However, The Available Languages Are Limited, And Chinese Is Not Included—Only English. I Had To Settle For English, As It's Better Than Viewing Russian, Which Looks Like Gibberish. After Logging Into Yandex ID, We Can Leave It Aside Without Any Further Settings. We Just Need The Browser To Remember The Yandex ID Login. The Next Step Is To Visit Yandex's Webmaster Tools Page To Submit The Website.

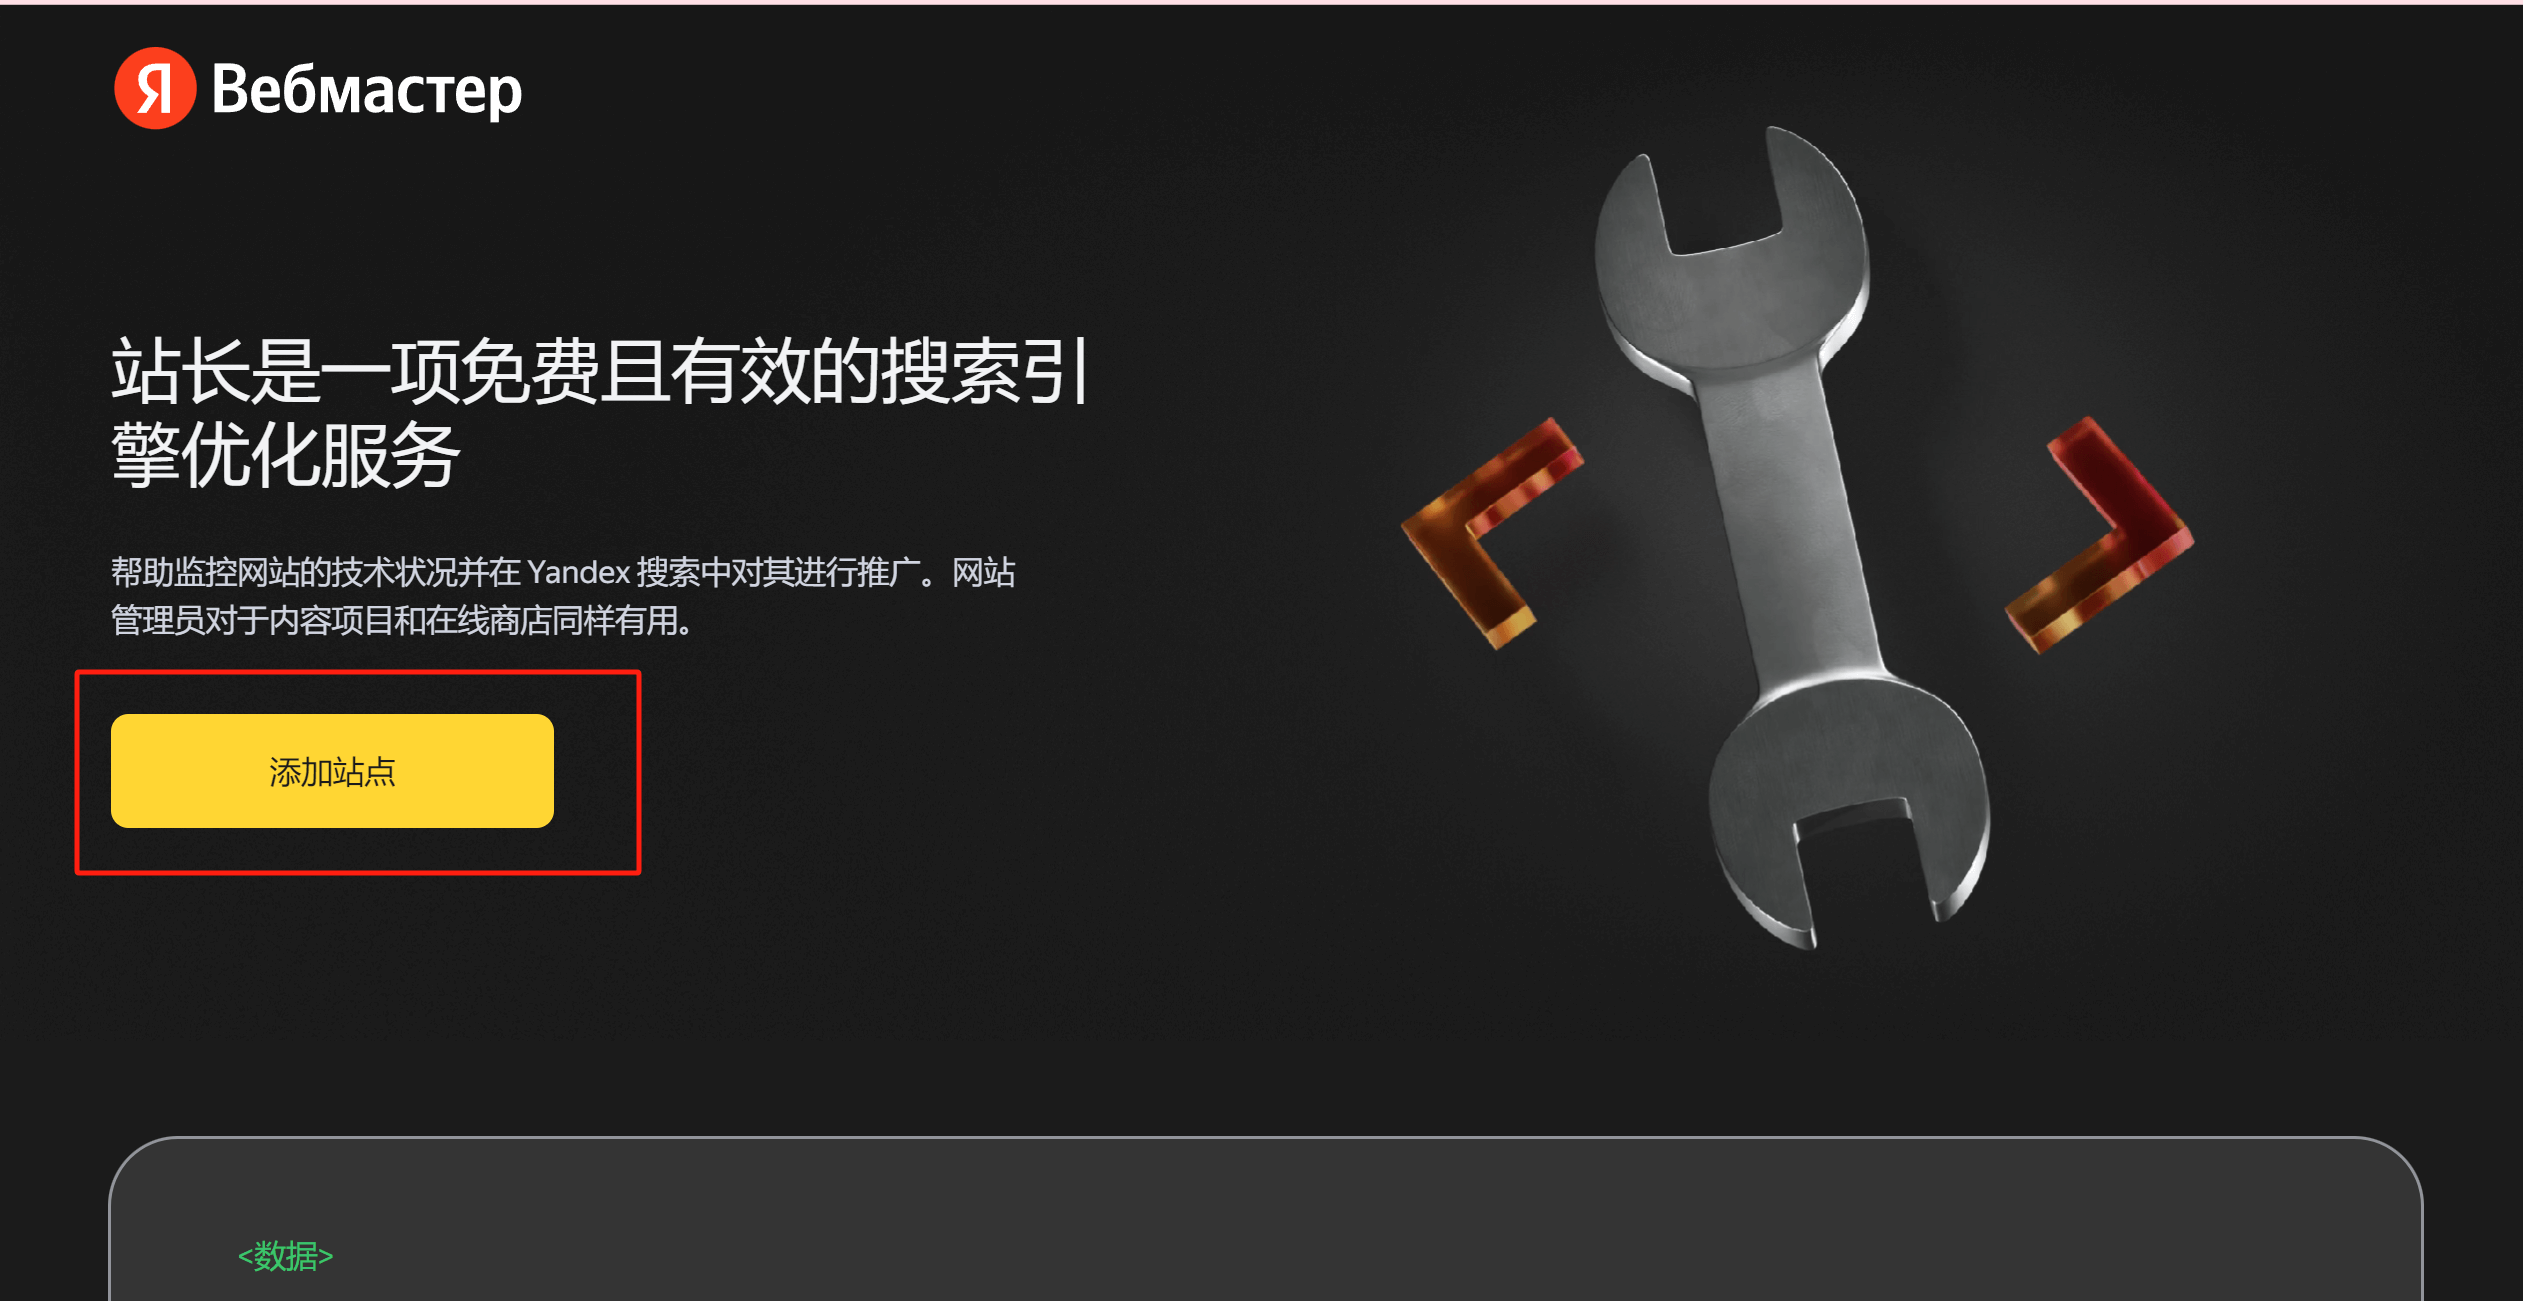
The Yandex Webmaster Tools page is shown in the image below. Click the "Add Site" button to be redirected to the site addition page, as shown in the following image. In the input box on the "Add Site" page, enter our website domain and then click the "Add" button.

After entering the site domain and clicking the "Add" button, the page will redirect to Yandex's website management dashboard, as shown in the image below. Like other search engines, Yandex also requires website ownership verification. This is a necessary procedure for submitting a website to a search engine. Every search engine has its own website ownership verification process. Yandex offers three verification methods: HTML file, meta tag, and DNS record. The specific steps for these methods are very similar to the verification methods of the aforementioned search engines. To make it easier for everyone to follow the steps, I will explain them in detail below.
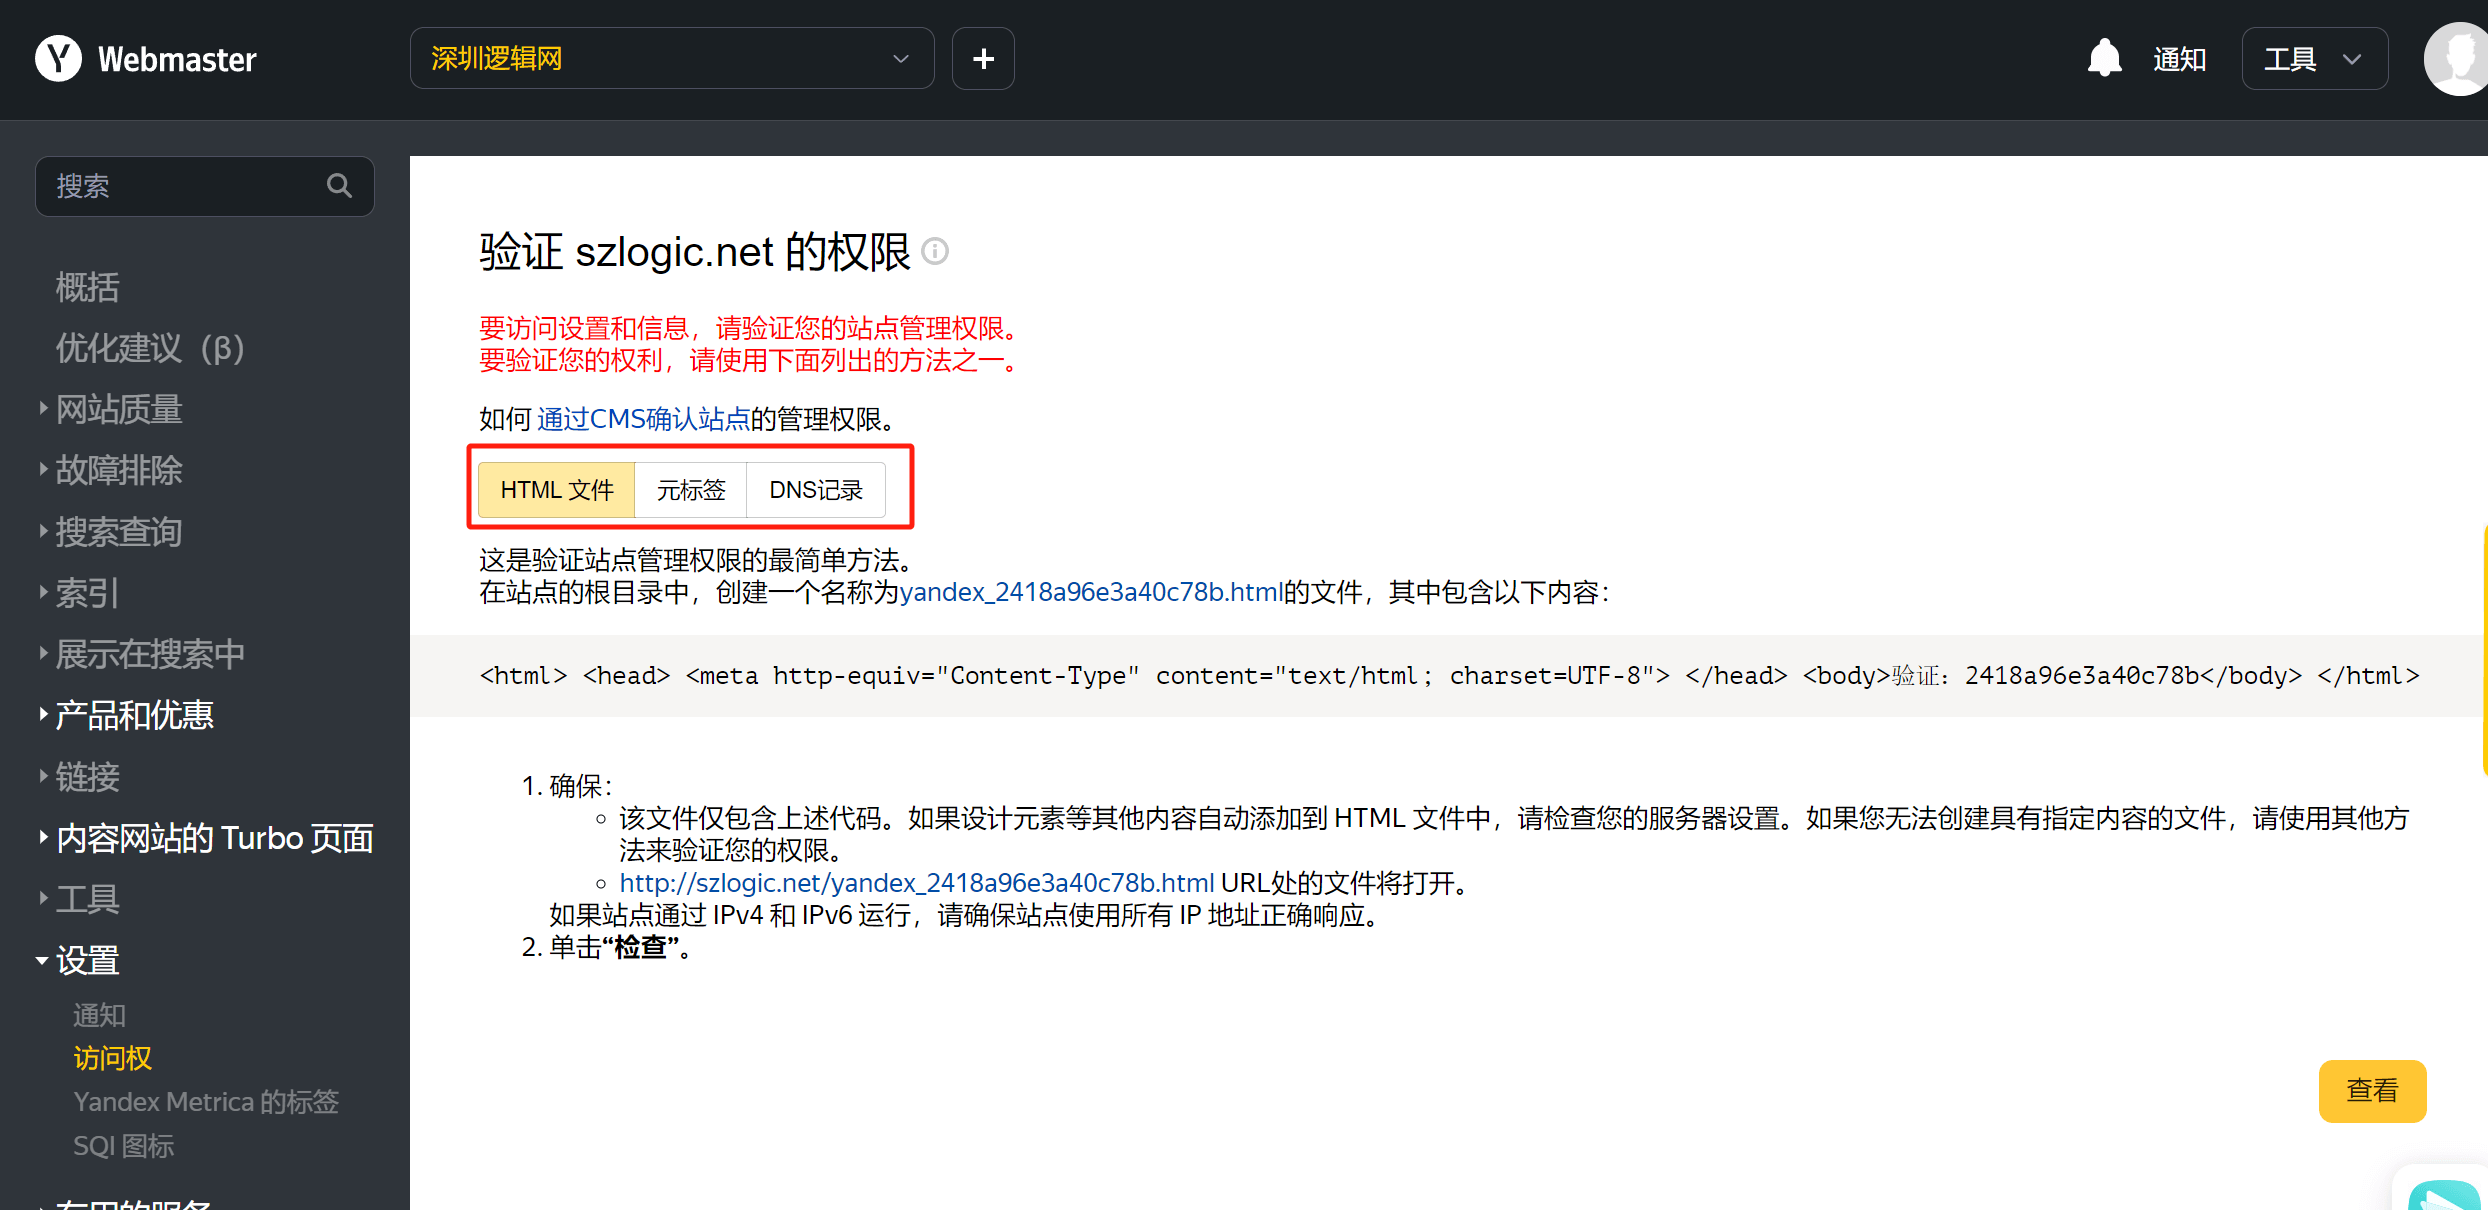
HTML file verification method
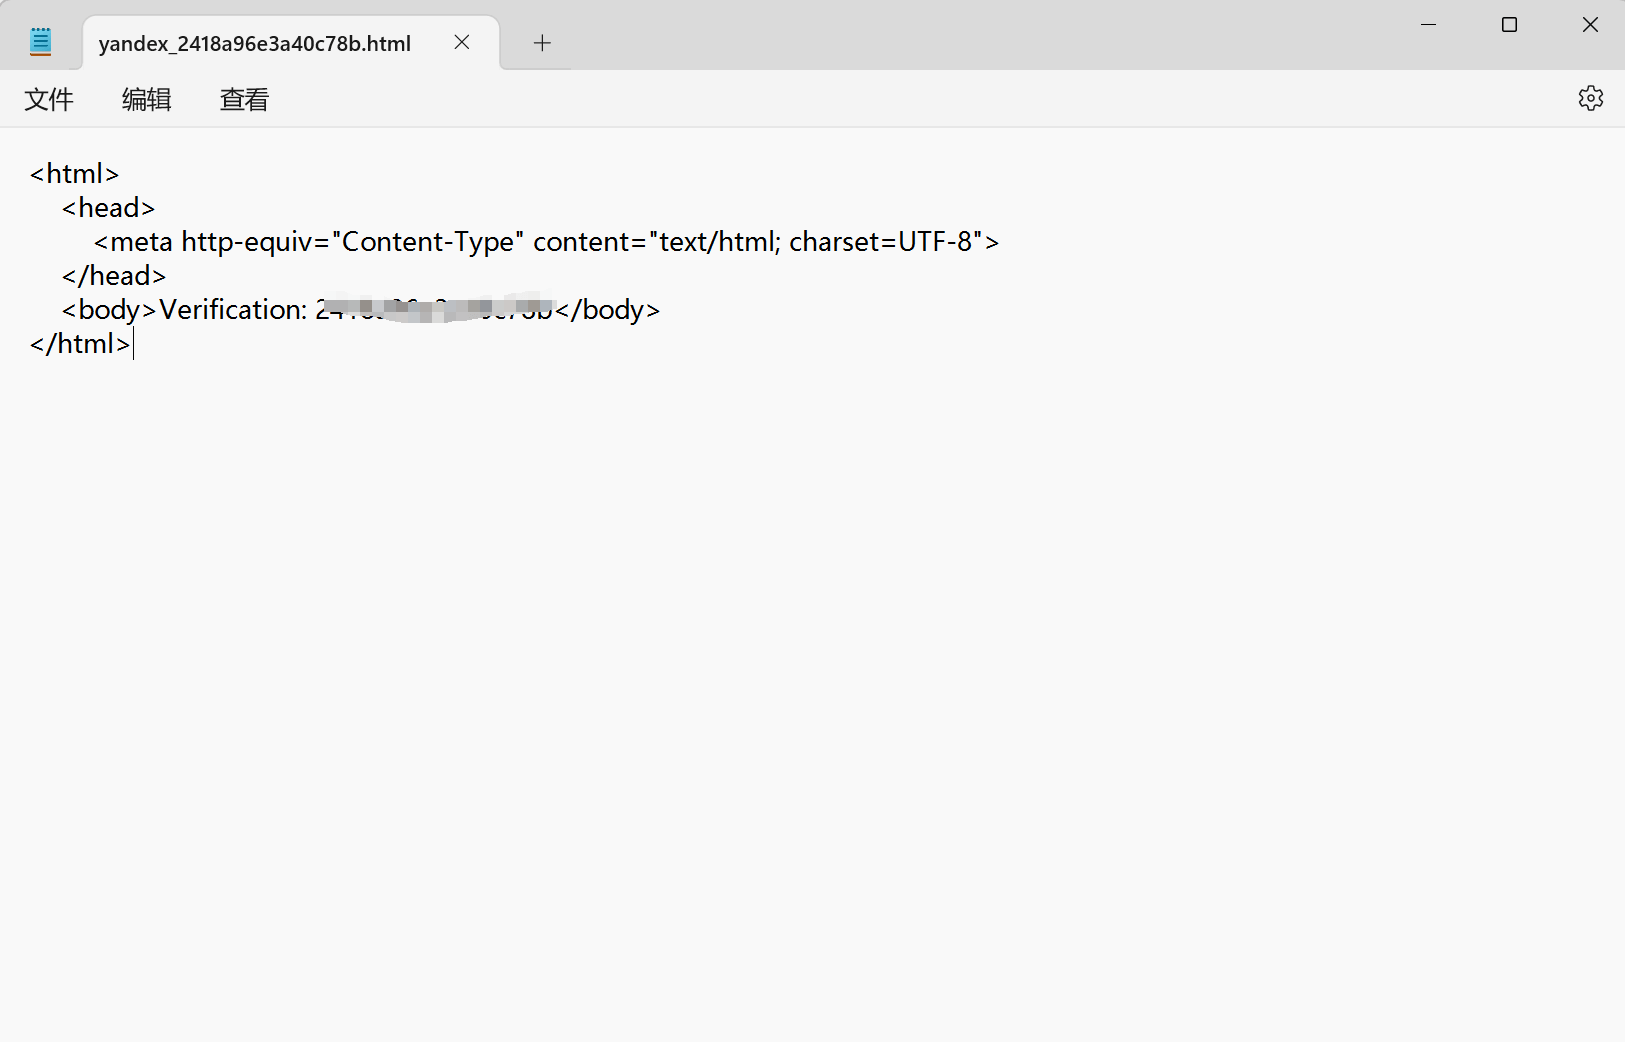
Create A New txt File And Name It According To The Name Given By Yandex. In This Case, The Name Provided By Yandex Is "yandex_2418a96e3a40c78b", As Shown In The Image Below. Copy And Paste The HTML Code Given By Yandex For The Verification Method Into This txt File. Tip: Before Copying The Code, Cancel The Chinese Translation. The Chinese Translation Will Cause The Code Display Format To Be Incorrect. It Must Be Displayed As The Original Text. Like Google, Bing, And Baidu, This Method Is Only Applicable To WordPress Websites And Static Website Modes, Where Server Operations Can Be Controlled. It Is Not Supported By Saas Website Building Systems Like Shopify And Wix. Saas Website Builders Will Need To Use Other Verification Methods, Which Will Be Explained Below. Then Save The File And Change Its Format To HTML (Change The File Extension From .txt To .html) And Upload It To The Root Directory Of The Website On The Server. The Correct Format After Copying And Pasting The Code Is As Shown In The Image Below. After Uploading The File To The Server’s Root Directory, Don't Forget To Click The "View" Button In The Bottom Right Corner Of The HTML File Verification Page To Confirm The Final Result.
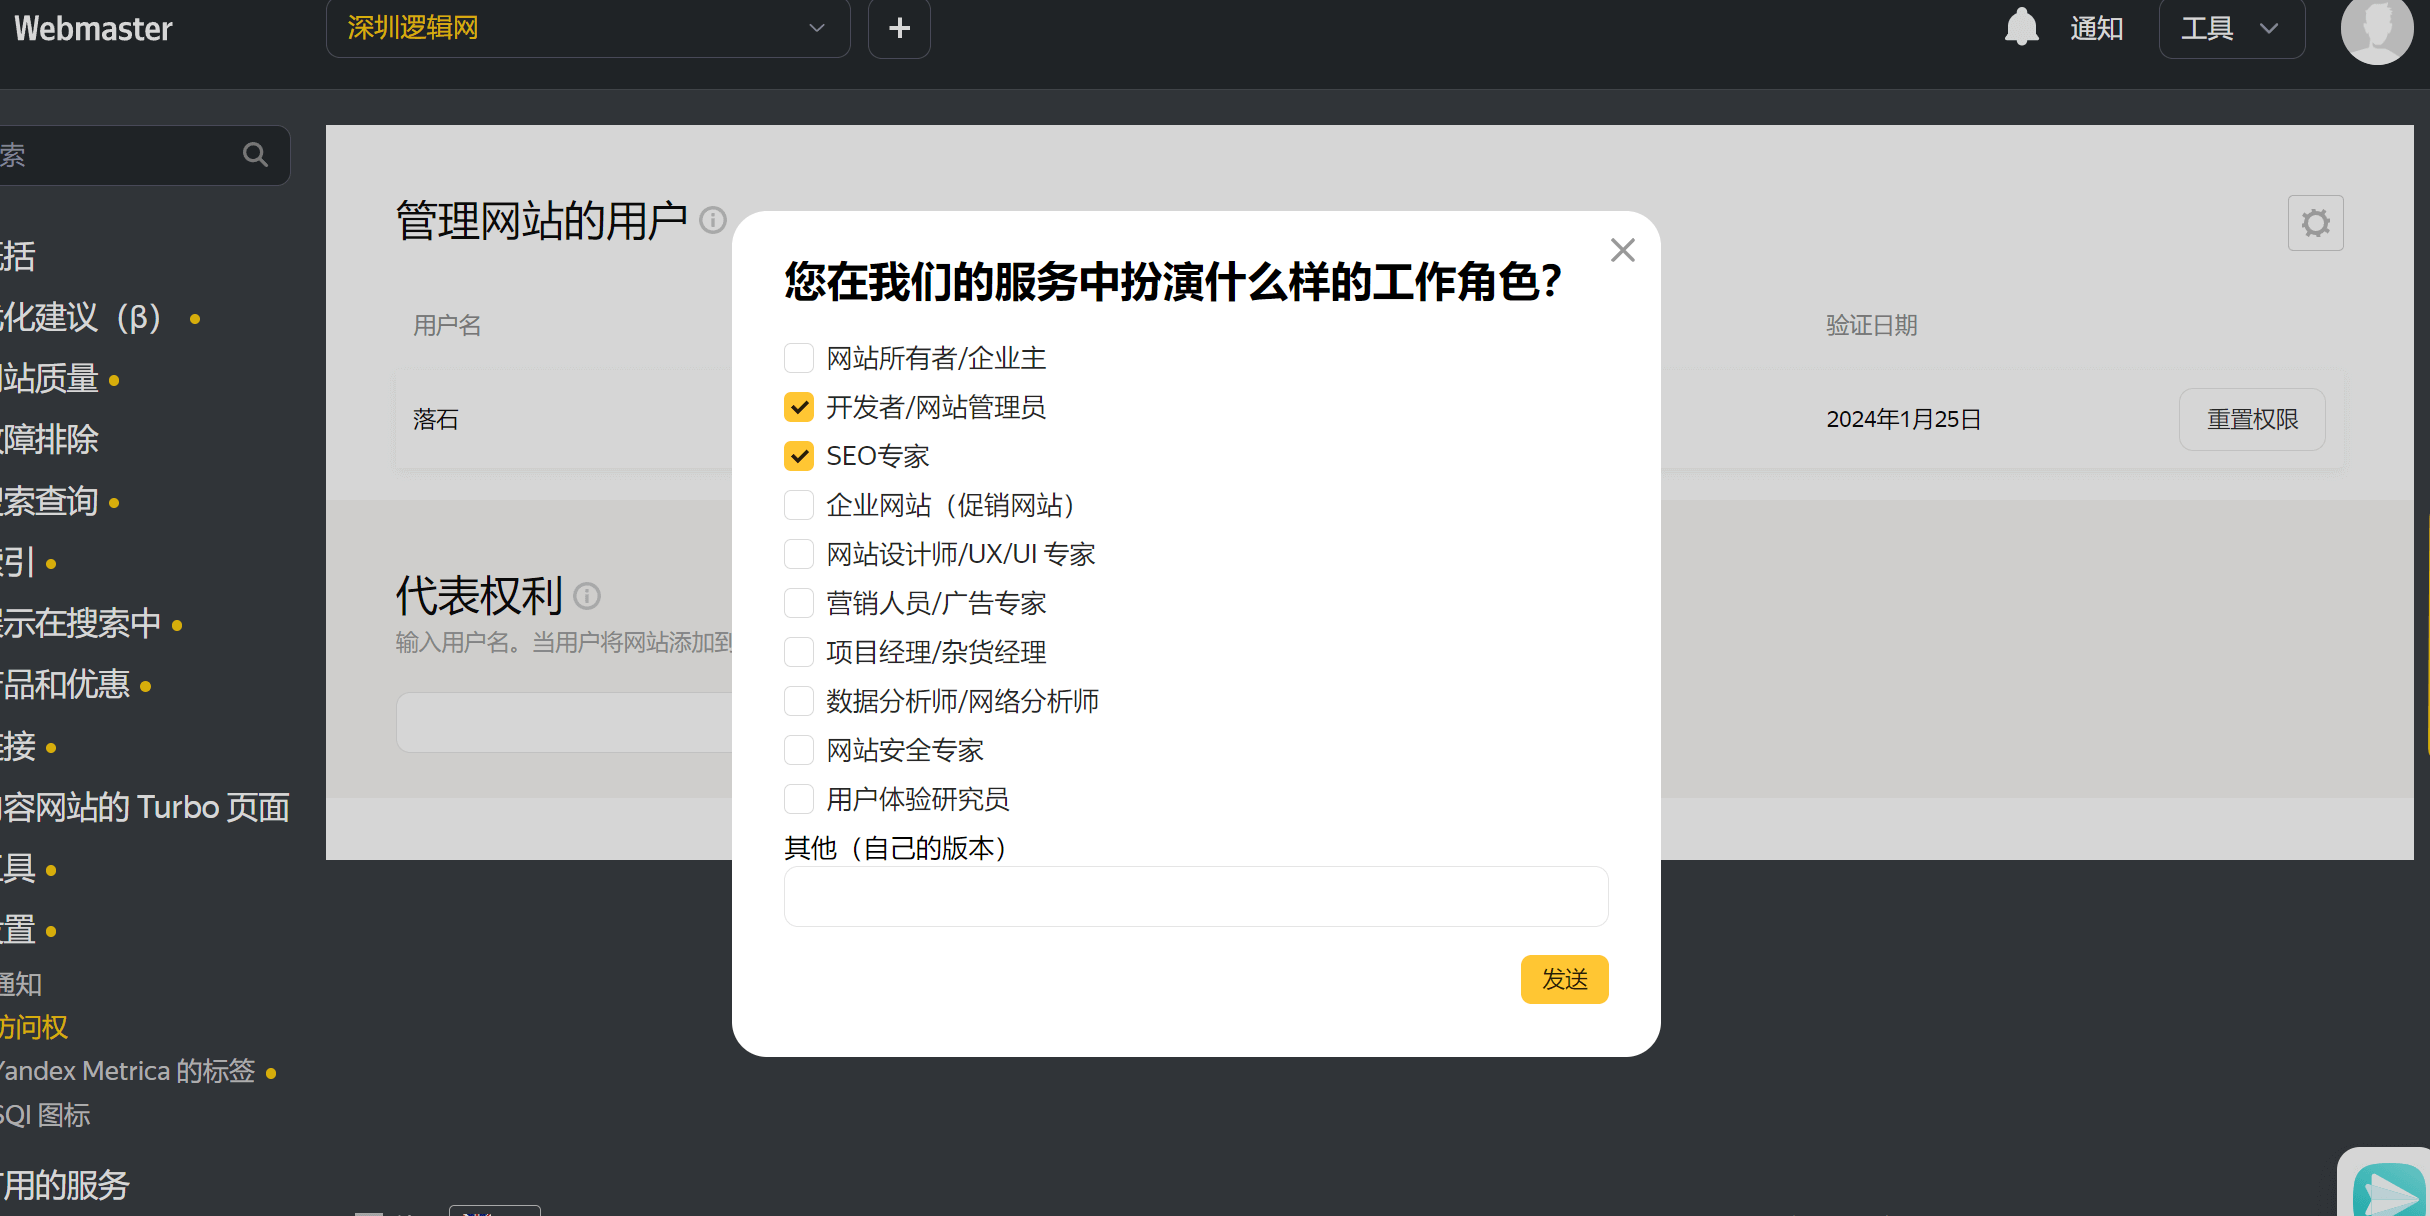
After successfully verifying using the HTML file method, a window will pop up as shown below, prompting you to select some information about the website submitter. Choose the appropriate options based on your situation and then click the "Send" button. By following these steps using the HTML file verification method, the website will be successfully submitted to the Yandex search engine.
Meta tag verification method
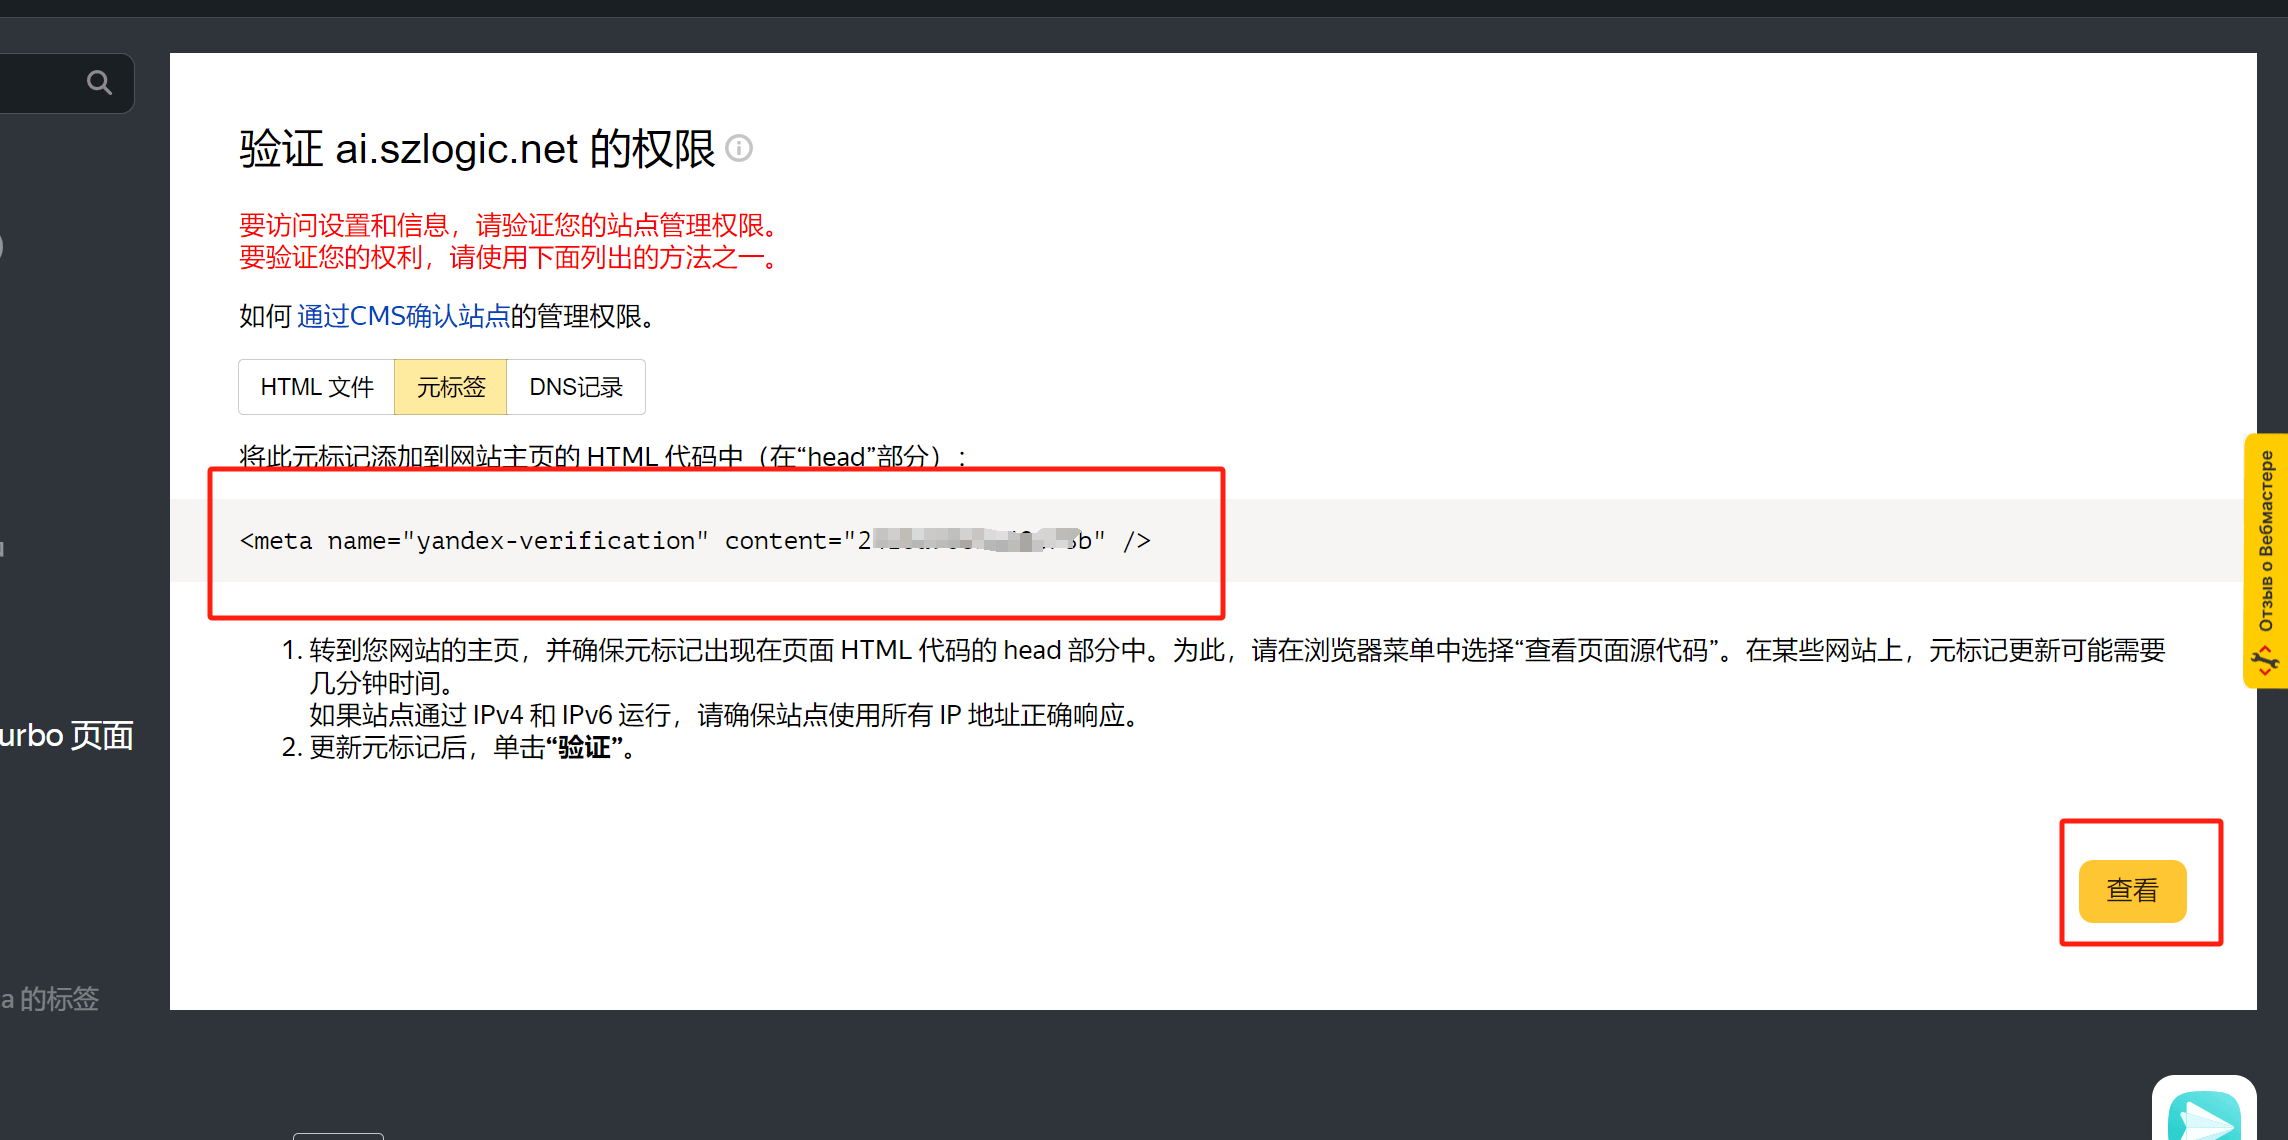
As shown in the image below, the explanation for verifying website ownership using a meta tag, the process of verification via meta tag is the same as the methods used by Google, Bing, and Baidu. The operation is identical: simply copy and paste the meta tag (meta code) provided by Yandex into the theme files of WordPress and Shopify. The paths to the theme files and the location of the code installation are not repeated here. If you have reached the Yandex section directly via an anchor link in the content directory, please refer to the instructions above for Google, Bing, and Baidu search engines on how to install the meta tag (meta code) for website verification.
DNS resolution verification method
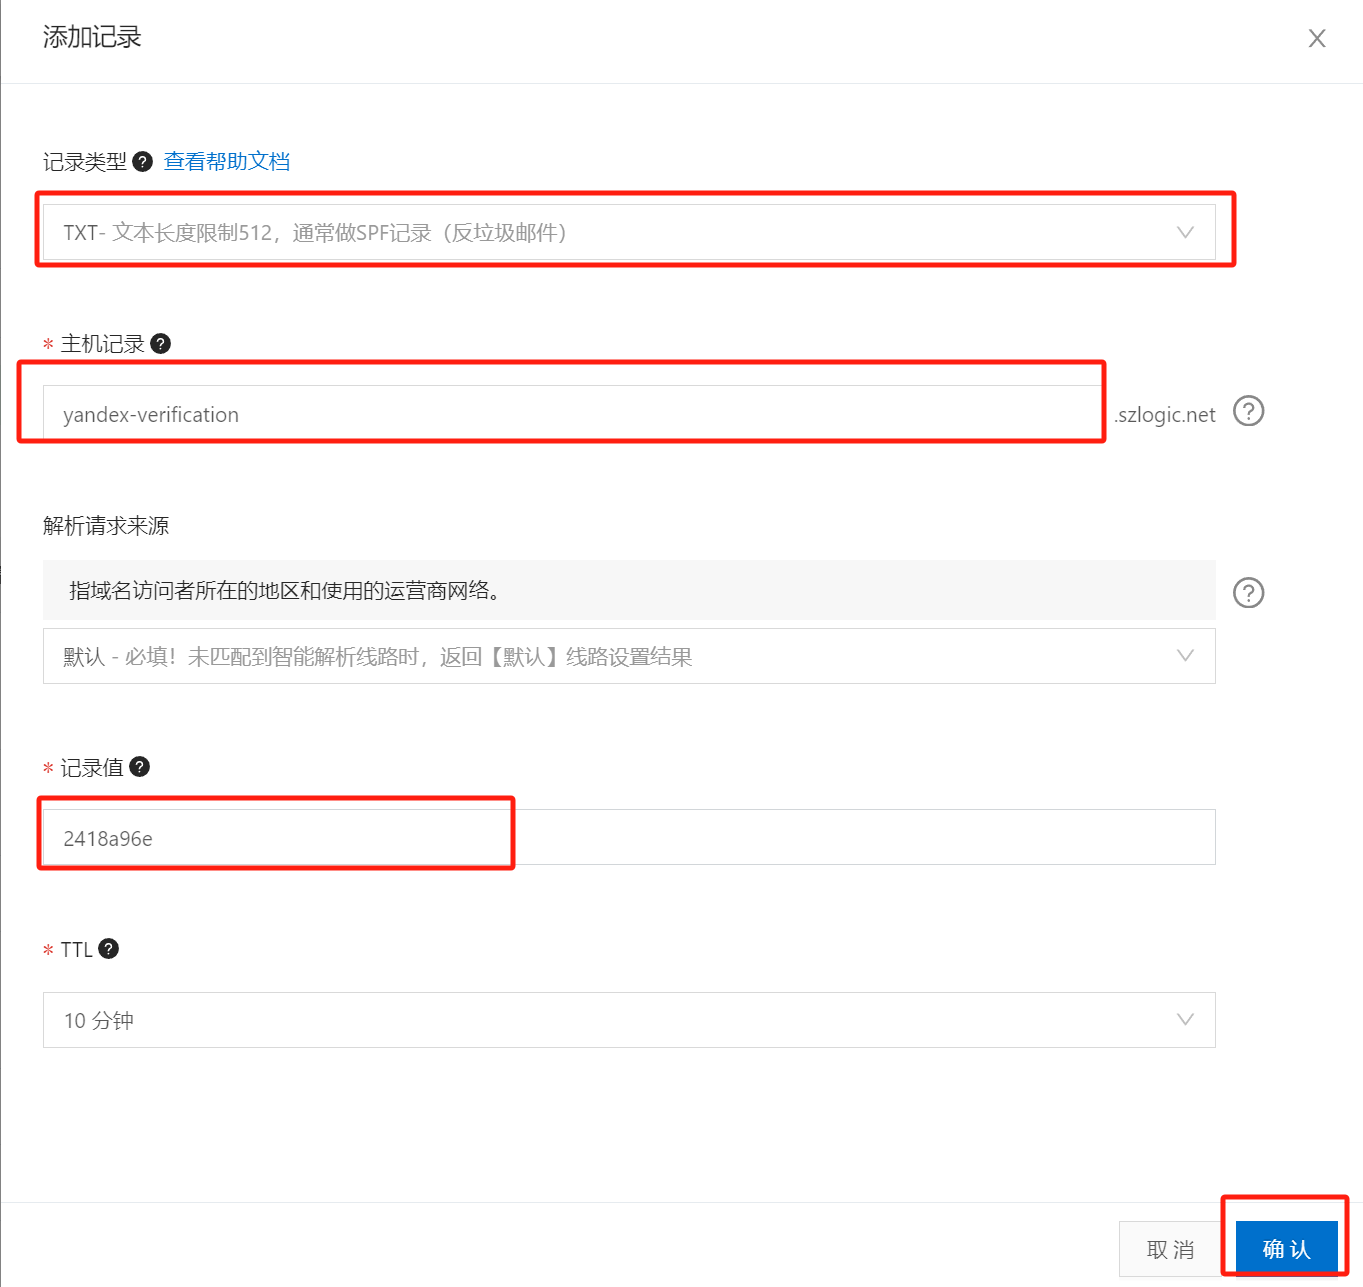
The method of verifying website ownership through DNS resolution is quite similar across different search engines, with the main difference being the DNS parameters. For Yandex, the DNS resolution parameters include a record type of TXT, with the host record as "yandex-verification" and the record value as a hexadecimal code. As shown in the image below, simply copy and paste the DNS resolution information provided by Yandex into the DNS management section of your domain. After entering the DNS parameters, don't forget to click the confirm or submit button. Finally, click the "View" button on the Yandex DNS verification page to confirm the verification result.

Example of DNS parameters for Yandex DNS resolution verification:
The above are three ways for Yandex to verify website ownership. Readers can choose any one of the methods based on their own experience or understanding to allow Yandex to successfully verify the ownership of the website and submit the website to the Yandex search engine.
Submit a sitemap file in Yandex Webmaster Tools/Website Management Backend
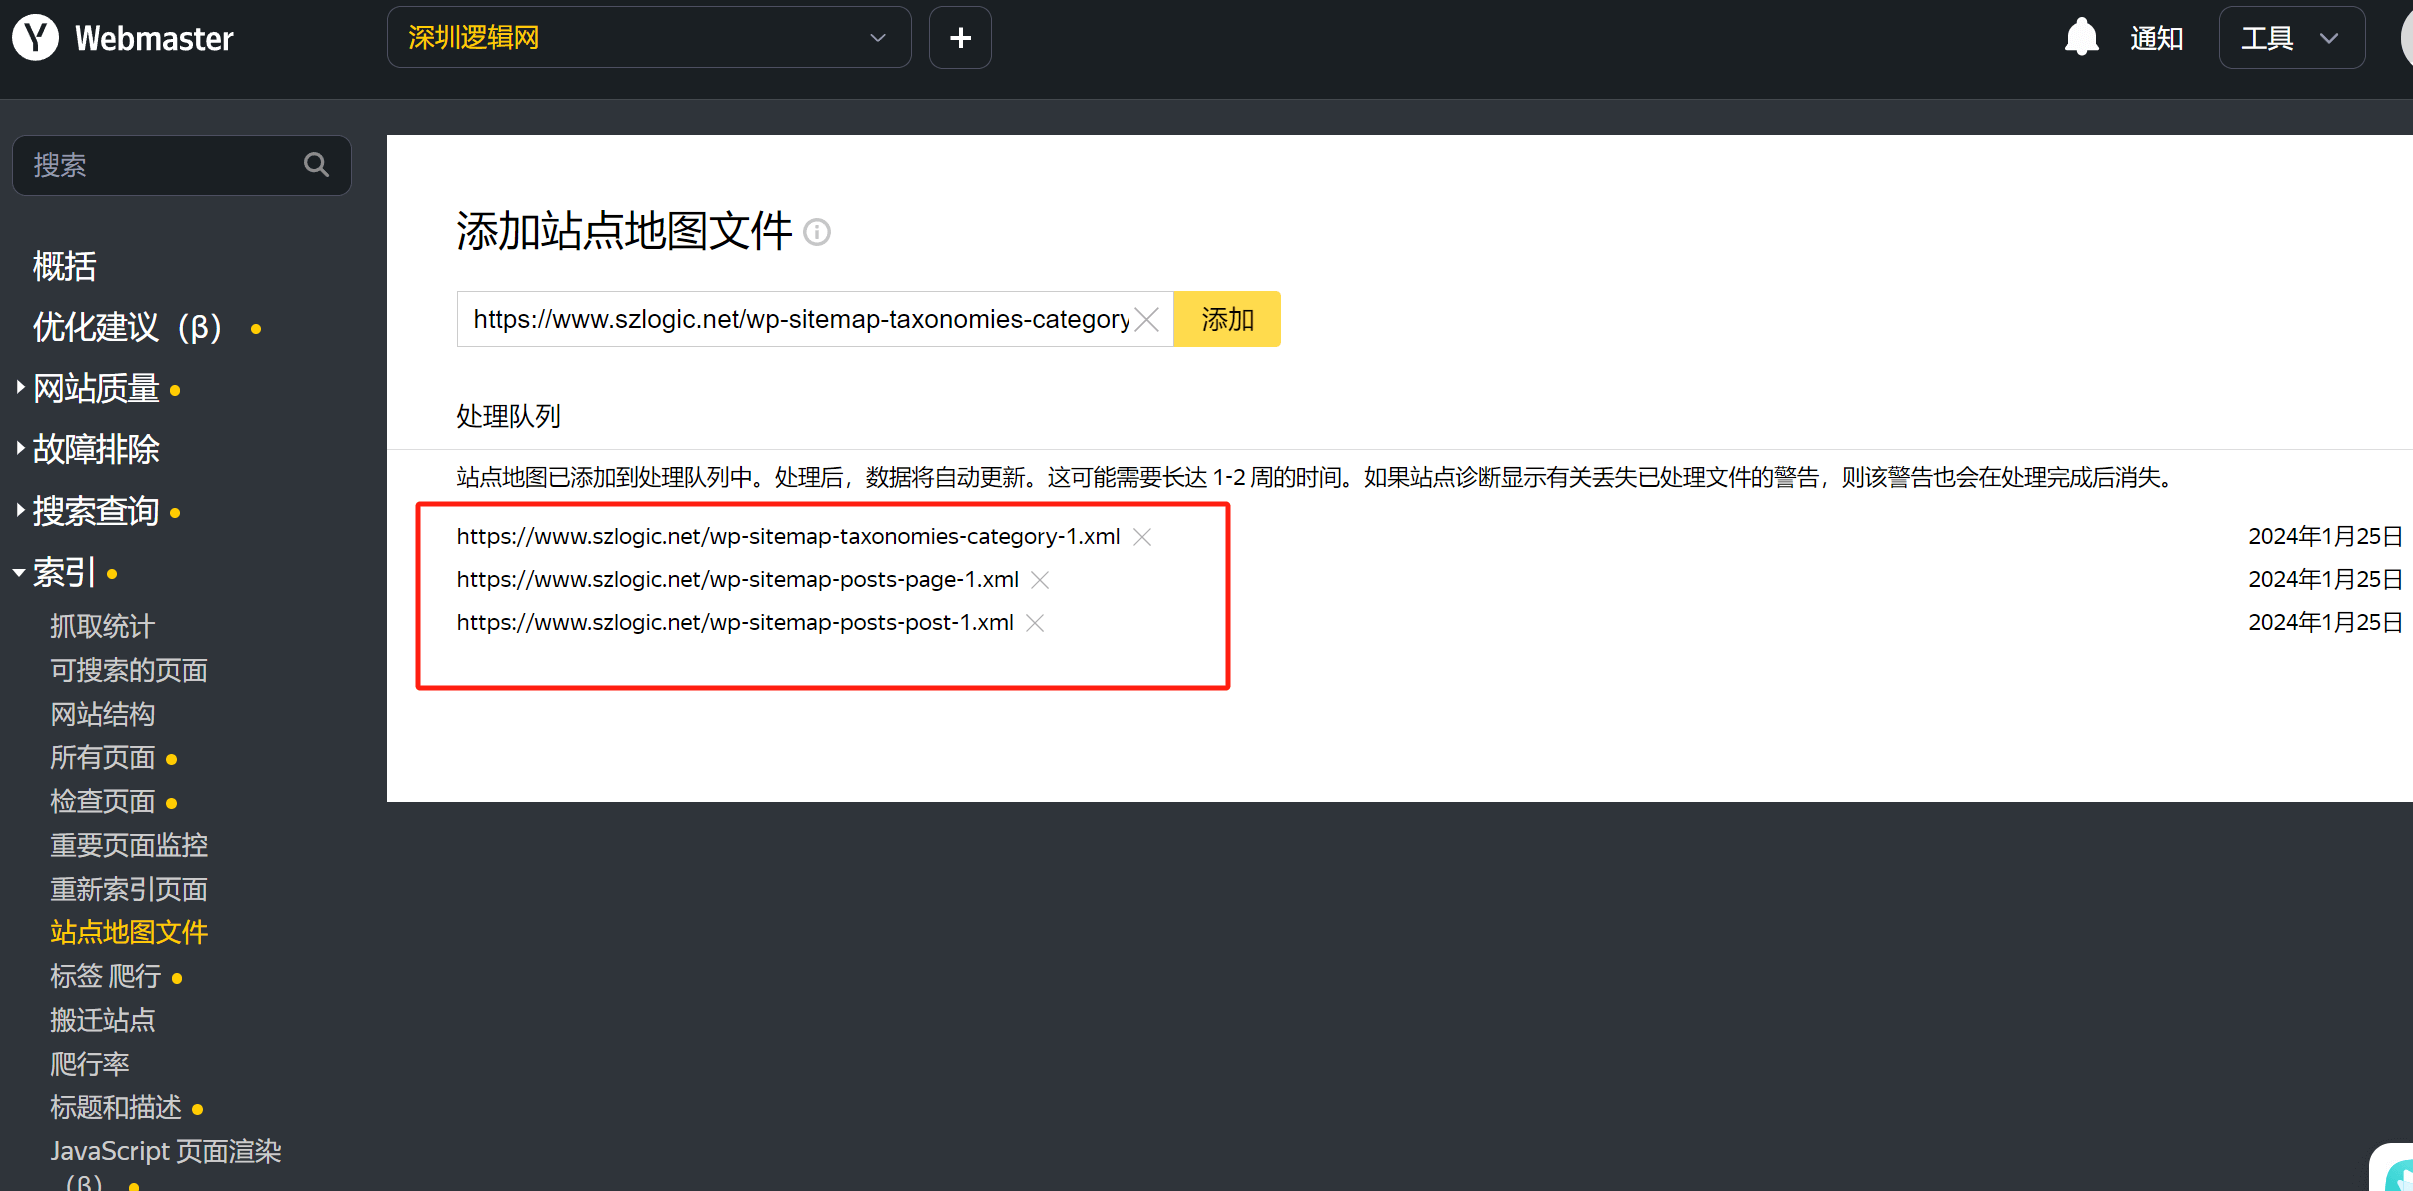
Like Baidu and Bing, Yandex does not support indexed sitemap files. The only search engine that supports both indexed and non-indexed XML sitemaps is Google. To facilitate and speed up the crawling and indexing of our website by Yandex, it is still necessary to submit the sitemap file. If your sitemap file is non-indexed, as shown in the image below, go to the Yandex Webmaster Tools backend, click "Sitemaps" under the "Index" section in the sidebar, then paste the sitemap URL into the input box and click the "Add" button. If your sitemap is indexed, you can copy the sub-URLs (category URLs) from the indexed sitemap XML file and paste them into the Yandex sitemap submission input box, which will also work, and Yandex will be able to recognize and crawl them properly. For search engines, the difference between indexed and non-indexed sitemaps lies in whether the hierarchical structure of the sitemap file causes any issues with recognition and crawling. Once the hierarchy is removed from the indexed sitemap, there is no difference between an indexed and non-indexed sitemap for search engines.

Yandex results page after successfully adding the sitemap
Conclusion: The Above Is The Complete Guide To Submitting Your Website To Major Search Engines, Including Google, Bing, Baidu, And Yandex. Readers Can Choose Which Search Engine To Submit Their Website To Based On The Region And Language Of Their Website. There Might Be Conflicts In Some Cases. For Example, Submitting An English Website To Baidu Is Meaningless, As Baidu Has No Audience For English Websites. Additionally, English Websites Typically Need To Host Their Servers In The Region Where They Operate, Which Makes It Impossible To Fulfill The Domestic ICP Filing Requirements. Foreign Language Websites, Except For Baidu, Are More Suitable To Be Submitted To Google, Bing, And Yandex, And There Is No Conflict In Submitting To All Three. Chinese Websites, Of Course, Should Focus On Baidu, But There Is No Issue With Submitting To All Four Search Engines. However, Google, Bing, And Yandex Will Have Significant Differences In Traffic Volume Compared To Baidu For Chinese Websites. Furthermore, Logic Digital Technology Has Launched SEO Services Based On Google SEO Services. Companies Needing Professional SEO Services To Rank Their Products/Business Keywords On Google Are Welcome To Contact Us. For More Details On SEO Services, Please Visit The "SEO Page."
Logic Digital Technology (SZLOGIC) All rights reserved. Reproduction is prohibited.


