


Website Operations: Promotion Strategies for 4 Marketing Platforms

Running traffic for a Website is an important indicator for evaluating the business capabilities of the website. The operational level of the website determines how much traffic it can attract in the internet world, and accurate traffic will eventually be converted into orders or product sales for the business. After completing the Design and Development stages of the website, the next core task is to focus on traffic operation. Managing traffic effectively is the key to the survival and development of a website business in a competitive internet environment. First, the website business needs to clarify the alignment between the traffic sources and its products, as well as the operational model for traffic. The four major platforms discussed in this article all have two operational modes: SEO (organic traffic) and SEM (paid advertising). In a broader sense, SEO/SEM operations are not limited to search engines. By using SEO or SEM operations on Google Search Engine, Pinterest Visual Platform, Facebook and Instagram social media platforms, as well as the YouTube video platform, the website can drive traffic. The combination of these channels provides a multi-dimensional way to obtain traffic, while also testing the website's understanding of the channel characteristics and user behaviors. Secondly, during the channel operation process, data analysis ability is an indispensable part. Through website traffic analytics tools, businesses can precisely understand the traffic contribution, user behavior, and conversion paths for each channel. This not only helps businesses adjust their channel strategies in a timely manner but also optimizes the website’s content layout and user experience, improving traffic efficiency. Each channel’s user preferences and demands are different, and only through data-driven decisions can website decision-makers tailor their strategies, achieving precise targeting and refined operations.
At the same time, website businesses also need to focus on the quality of traffic conversion, not just pursue the absolute volume of traffic. High-quality content marketing and user interaction strategies are key to improving conversion rates. By offering attractive content and personalized interactive experiences across different channels, websites can increase user stickiness and further guide users through the conversion process from browsing to checkout. Especially on social media platforms, website operators need to maintain continuous interaction with users, attracting new users with high-quality content while reinforcing the brand loyalty of existing users. Additionally, channel operations need to be flexible in response to changes in the external environment, such as search engine algorithm adjustments, social media rule changes, and market competition fluctuations. Website operators need to establish flexible operation mechanisms to ensure they can quickly adapt to market changes while using innovative strategies and tools to broaden traffic sources.
The author will start with the first part below, which is theSEO and SEM traffic operation models, to help readers understand the two operation modes of SEO and SEM. Then, the discussion will move to the operations of Google search engine, Pinterest visual platform, Facebook, Instagram social media, and YouTube video platform in the next four parts. It is essential to first understand the differences and focus of SEO and SEM in order to better comprehend and choose the right operation channels. Otherwise, readers may find the operation demonstration part of this article confusing. The main purpose of the article "Website Operation Practical Guide: Four Major Marketing Platforms Promotion Strategies" is in line with the title, which not only explains the principles of SEO and SEM but also offers practical steps for website operation. Readers can refer to the illustrated steps in each platform operation section to apply for account registration, set up functions, upload content, and create new ad campaigns. This article aims to help readers correctly understand the operation channels of a website and the two SEO/SEM operation models during the planning stage of the website, as well as learn the best SEO/SEM practices from the four major traffic platforms to avoid unnecessary detours when operating the website.
For the convenience of readers, I have organized the table of contents for the article "Website Operations Practical Guide: Four Major Marketing Platform Promotion Strategies" as follows. You can click on the blue anchor text links to directly reach the corresponding sections for reading.
- SEO and SEM Traffic Operation Models
- Google Search Engine Operations
- Pinterest Visual Platform Operations
- Facebook and Instagram Social Media Operations
- YouTube Video Platform Operations
Ⅰ、SEO and SEM Traffic Operation Models
1、Understanding SEO
The full Chinese name of SEO is Search Engine Optimization, but the term "search engine optimization" tends to create a narrow perception, implying that SEO is a traffic operation method exclusive to search engines. In reality, this is not the case. Whether it's Pinterest, YouTube, or social media platforms, as long as these platforms have large amounts of data and a search function, they will develop search-matching algorithms. The most visible place for this is in the titles of the content and the tags set for the content. Of course, optimizing keywords based on content titles and tags is a technical optimization aspect. Technical optimization is the basic condition for effective SEO, but more importantly, there must be content quality. The scope of content quality includes high-quality images, videos, and engaging copywriting. Therefore, the application scope of SEO is far beyond just search engines. When freed from its narrow definition, SEO can be understood as a broader content marketing strategy, which more comprehensively demonstrates its importance and diverse applications in the digital ecosystem. When we define SEO as "content marketing," its core concept shifts from pure technical optimization to user-centered content creation and dissemination. This definition broadens the scope of SEO, allowing us to more clearly grasp its focus.
Once the definition of SEO, which is content marketing, is clarified, the direction and strategy for SEO become much clearer. First, we need to deeply understand our target audience, uncover their search behaviors, interests, and pain points across different platforms. By analyzing this data, we can create content themes around the needs of users (topics they are interested in). Secondly, in content creation, the attractiveness of titles, the accuracy of tags, and the value of the content will be key factors. Continuously producing and updating high-quality content not only helps improve search rankings but also attracts users to stay, interact, and share, further expanding traffic. Moreover, because SEO requires the continuous creation of high-quality content, there is a cyclical nature to content creation. This cyclical characteristic leads to the fact that SEO results take longer to materialize compared to SEM. Additionally, the algorithms and user behaviors on different platforms may vary, and therefore, content must be tailored to match the platform's attributes. After content is published, it must be tested, verified, and optimized. Whether it's search engines or social media, an adaptive SEO strategy is needed to increase the reach and impact of the content.
2、Understanding SEM
The full Chinese name of SEM is Search Engine Marketing. If we understand it literally by its name, SEM refers to advertising on search engines. Why are both SEO and SEM types of internet marketing methods named after search engines? My understanding is that search engines, as large internet applications, were introduced earlier than other types of platforms and provided methods for websites to conduct internet marketing. Therefore, people have gradually adopted the terms SEO and SEM to refer to content marketing and advertising placement methods in internet marketing. The broader definition of SEM is any operation that can conduct advertising placement, which is a marketing strategy that displays a brand, product, or service in search results or information flows across various platforms through paid promotion, thereby attracting targeted traffic and achieving conversion goals for the website. Search engine SEM typically centers around keyword bidding advertisements. By placing ads through search engine platforms (such as Google Ads or Baidu Promotion), users see the ads first when searching for related keywords, thus increasing click-through rates and conversion rates. However, SEM on social media platforms is not based on keywords for ad placement and content display, but instead on customer demographics and attributes for targeting the ad content. The characteristics of SEM are controllable effects, flexible placement, and the ability to optimize ad performance in real-time through data analysis. Compared to SEO (content marketing), SEM (advertising placement) shows quicker results, and the ad budget invested is a decisive factor in the quantity of traffic acquired. Different website companies can set their daily or monthly ad budget for SEM based on their own resources. It is important to remind readers that although the ad budget determines the quantity of traffic that can be acquired, it does not directly determine the conversion rate or sales volume. The conversion rate and sales volume are also related to deeper levels of internet marketing dimensions, such as the elements on the landing page that contribute to conversion, the professionalism demonstrated by the website, product advantages, user value, and aspects like shipping, payment, and after-sales guarantees.
Ⅱ、Google Search Engine Operations
The Google Search Engine is the most widely used search engine globally, without exception. Even though Baidu, which dominates the domestic market, has a large user base, it still falls short in comparison to Google’s global user base. Google Search Engine’s global user engagement and market position firmly hold the top spot, and no competitor has been able to rival it. It is because of the global user market of Google Search Engine that SEO and SEM on Google Search Engine have become essential for countless websites, creating a highly competitive landscape. This competitive environment does not arise because of the low technical or financial barriers to entry for Google, but because the commercial value that Google Search Engine marketing can bring to websites is what attracts so many websites to participate. One could say that if the products or services of your website are not extremely unique, meaning the target audience does not use search engines to search for relevant information (I can't think of any product category that fits this description), the commercial value of Google Search Engine is absolutely the highest among the four traffic platforms discussed in this article. Additionally, since search traffic is passively acquired, the conversion rate for traffic from Google Search Engine is typically the highest. Those readers with hands-on experience with Google Ads will certainly resonate with this.
The traffic from Google Search Engine is considered passive traffic, and this characteristic does not change based on whether Google Search Engine operates in SEO or SEM mode. The passive nature of the traffic is because the content, whether it’s content marketing or advertising, is triggered by the search terms users input into the search engine. As a result, as long as the keywords are the same, the content matches the user's search intent, and meets their needs, there will be little difference in conversion rates between SEO and SEM. In fact, for some users who are averse to search engine ads, they may prefer to click on SEO content that does not carry the "sponsored" label. This phenomenon has led some internet marketing professionals to believe that SEO traffic has a higher conversion rate and greater commercial value than SEM traffic.
1、Google SEO
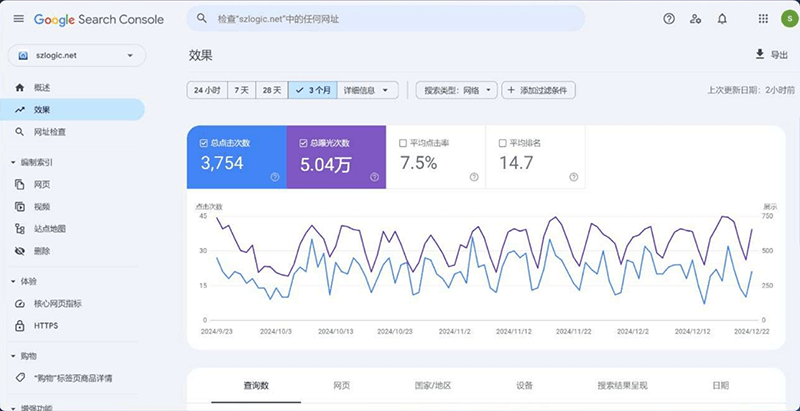
The image above is the Google Search Console, which is the search control console for the Google Search Engine, abbreviated as GSC. After publishing the content of a page or article on a website, the website’s domain name is submitted to the Google Search Console via DNS resolution and the website’s sitemap. This completes the site submission and binding. Once Google Search Engine indexes and includes pages that meet its search standards, we can view the SEO-related metrics on the Google Search Console panel. SEO operations on Google Search Engine are a multidimensional system project, which cannot be fully explained in just a few hundred or thousand words. To write a comprehensive article on Google Search Engine SEO, one would need to write 50,000 to 100,000 words. Such a large volume of content is clearly unsuitable for inclusion in this article, as it would cause confusion and prevent the article from achieving its SEO effectiveness. Therefore, in this article, we will provide only a general overview. Overall, it can be summarized into three main parts: "Technical SEO, Content SEO, and Link SEO." If you want more details, you could extend it further with Data SEO practices. Technical SEO refers to the SEO features required for the website, which is the foundation of good SEO. We need to create quality content on the website development SEO features to fully leverage the SEO effect of high-quality content. For readers who are unfamiliar with the SEO features required for the website, you can click the anchor link to open the previous article titled "Essential Functional Requirements for Website Development" to find the answer. Content SEO refers to the structure specifications and content quality of articles. The scope of content quality has already been explained in the section "Understanding SEO Operations" above. Link SEO refers to the link-building strategy for pages or article pages. Pages or articles need to build three types of links: "external links, internal links, and outbound links." These three types of link anchor texts all have a voting effect and can help improve the ranking of the keywords in the anchor text. The introduction to Google Search Engine SEO operations ends here. The Google SEO system tutorial is currently being planned and is scheduled to be completed and published in early February 2025. Interested readers can also continue to follow the Logic Digital Technology SEO Optimization Technical Tutorials archive page.
2、Google Ads Account Setup
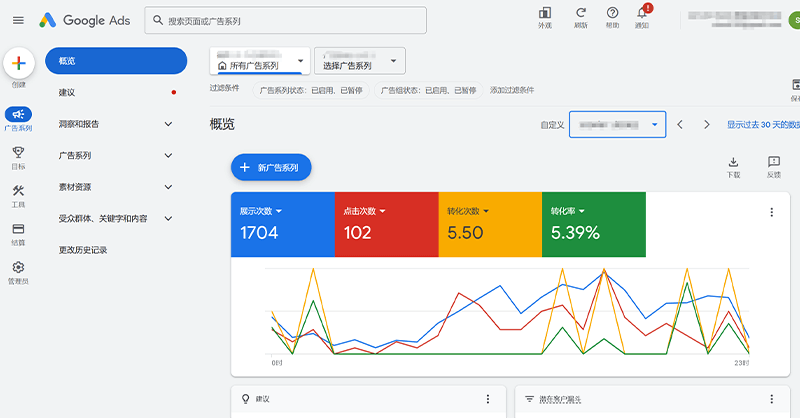
Google SEM refers to Google Ads, and the image above shows the overview interface of Google Ads. In the overview interface, you can view various metrics for the running advertising campaigns. The most commonly used metrics include "Impressions, Clicks, Conversions, Conversion Rate, Average Cost Per Click, and Cost (Total Cost)." For a website to conduct SEM operations (advertising) on the Google search engine, the website business must first open a Google Ads account. The Google Ads account can be directly created using a Gmail account. For readers who have not yet used a Google account, let me clarify that a Google account is essentially a Gmail account. A Gmail account can be used to access all services within the Google ecosystem, such as Google Cloud, Google Ads, Google Play, Google Analytics, YouTube, Google Search Console, and Google Merchant Center, among others. Additionally, for domestic businesses opening Google Ads, it is recommended not to open the account by yourself, as Google Ads accounts opened independently are not registered in the Google marketing regional company system. This may lead to the account being easily banned. Once the Google Ads account is banned, the process of unblocking it can be time-consuming and laborious. Therefore, it is advisable for businesses with compliant products to find a direct client of Google marketing to open the Google Ads account. The direct client can guide the business in filling out the account information and performing relevant operations, avoiding mistakes that may affect the account's performance. After opening Google Ads with Gmail, we also need to configure and use the features of Google Ads to serve our Google SEM operations. These practical tools can help website operators manage multi-dimensional and multi-level data analysis, and can also be used to optimize advertising campaigns. The features of Google Ads backend, as shown in the image above, are mainly concentrated in the left sidebar. I will explain them one by one in the following content:
(1) Create a button
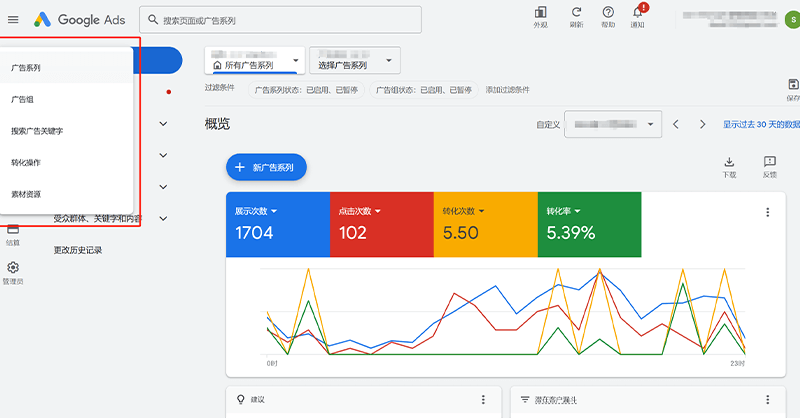
After clicking the "Create" button at the top of the left toolbar in the Google Ads backend, as shown in the red box in the image above, a list of items that can be created will pop up. The items include Campaigns, Ad Groups, Search Ad Keywords, Conversion Actions, and Asset Resources. These items can all be quickly created by using the "Create" button. However, my usual habit with the "Create" button is to use it to create campaigns, while for creating other items, I prefer to navigate into the corresponding layers and add new content from there.
(2) Advertising campaign
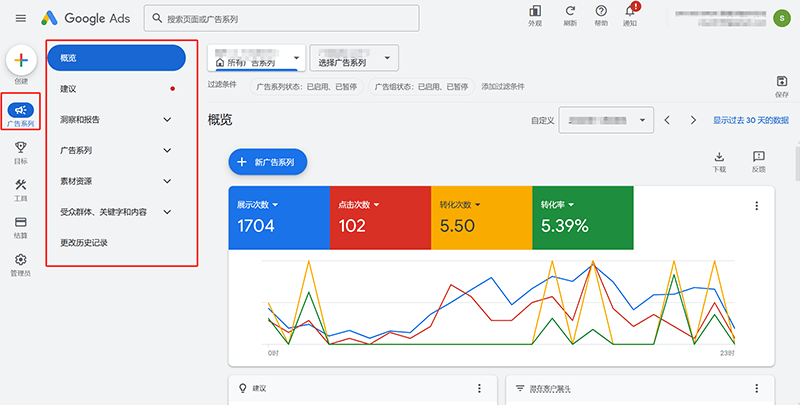
As shown in the red box in the image above, the second item in the left toolbar of Google Ads is "Campaigns." After clicking on "Campaigns," the corresponding function options will appear on the right. Some of these options have an expand icon, which indicates that there are additional sub-items under them. The following is an explanation of these function items and their sub-items:
- Overview: The Overview section serves as the dashboard for the campaigns. In the Overview interface, you can view summary charts of campaign performance and advertising data across different dimensions, such as: keyword data, campaign performance across different devices, campaign performance during different time periods, bid analysis, and system recommendations for the campaign.
- Insights and Reports: After expanding Insights and Reports, there are eight sub-items: "Insights, Bid Analysis, Search Terms, Ad Display Time and Location, Landing Pages, Stores, Report Editor, and Information Center." These sub-items help website operators achieve more detailed data analysis of ad performance.
- Campaigns: Under the Campaigns section, there are five operational functions: "Campaigns, Ad Groups, Ads, Experiments, and Campaign Groups." Campaigns, Ad Groups, and Ads represent a hierarchical structure for campaigns. Each level contains specific content, and the combination of these three levels forms a complete campaign.
- Asset Library: The Asset Library is the collection of all the text, image, and video assets added to the campaigns in Google Ads. After creating a campaign, you can enter the Asset Library to update, add, or remove assets for specific campaigns. Additionally, you can view the performance data of each asset within the library.
- Audience, Keywords, and Content: By clicking the expand icon for "Audience, Keywords, and Content," there are five settings: "Search Ad Keywords, Audience, Location, Ad Scheduling, and Advanced Bidding Strategies." These features help optimize the campaign setup.
- Change History: Change History is the operation log of Google Ads. Every action performed on the campaigns is recorded in the Change History interface. This feature provides SEM managers with the ability to review the logs of campaign modifications.
(3) Objectives
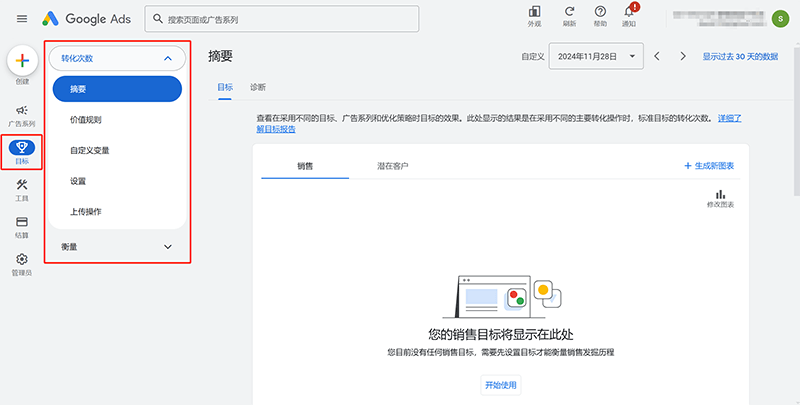
The third item in Google Ads is "Goals". As shown in the red box in the figure above, there are two major items under Goals: "Conversions and Measurement". Both functions have expansion icons, which means that there are sub-items under the functions. Let's continue to use the list to explain these two items and their sub-items:
- Conversions: Under Conversions, there are features like "Summary, Value Rules, Custom Variables, Settings, and Upload Operations." In the Summary interface, scrolling down the browser will reveal the created conversion goals. If Google Ads has not created conversion goals yet, you can create them here. In the "Settings" interface, you can manage enhanced conversion codes and set up the statistics for browsing-based conversion counts.
- Measurement: Under Measurement, there is only one sub-item: "Attribution." In the Attribution interface, you can view multiple metrics related to the conversion path of the campaign, such as Path Analysis, Device Analysis, and Assisted Conversions.
(4) Tools
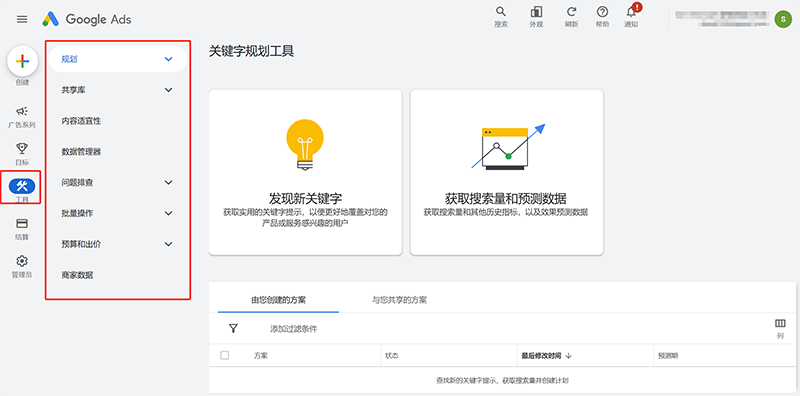
In the Google Ads toolbar, under the “Tools” section, there are a total of eight items: “Planning,” “Shared Library,” “Content Suitability,” “Data Manager,” “Troubleshooting,” “Bulk Actions,” “Budget and Bidding,” and “Business Data.” Among these, the most frequently used and practical tool is the Keyword Planner. With the Keyword Planner, you can check the search volume of keywords on the Google search engine. This tool is extremely useful in helping us formulate keyword strategies for ad campaigns and serves as a key reference for making traffic direction decisions. Although the other features are not used as often, it's still beneficial to have a general understanding of them. As usual, I’ve put together a list to explain each one for you:
- Planning: The most practical keyword planning tool is under "Planning." In addition to the Keyword Planner tool, the drop-down menu under Planning also includes options like "Performance Planner, Coverage Planner, and App Campaign Center."
- Shared Library: The drop-down menu of Shared Library includes "Audience Manager, Exclusion Lists, Brand Lists, Asset Library, and Business Location Groups." The Shared Library can be understood as the management hub for advertising data and files.
- Content Suitability: The content suitability mentioned here is not about evaluating the content quality of your campaigns. It refers to when you enable ad content to be displayed on YouTube, the Display Network, and Google Video Partners. You can set your ad content to be excluded or allowed in specific categories of content in the "Content Suitability" settings. For example, you can set your ad content to be restricted from appearing on pages containing political content, profanity, or sexual innuendos.
- Data Manager: The Data Manager is where Google Ads integrates data. Here, you can link Google Ads with other Google ecosystem apps or third-party apps supported by Google Ads, enabling data sharing across different applications. Additionally, the user feedback collection settings for Google Ads are located here.
- Troubleshooting: Under Troubleshooting, there are two sub-items: "Policy Manager Center" and "Ad Preview and Diagnosis." Here, you can view the health status of the campaigns. If there are any violations in the campaign or account, it will be reported in the Policy Manager Center. Ad Preview and Diagnosis helps diagnose issues like improper settings or limited visibility of ads, providing insights to quickly detect and resolve campaign problems.
- Bulk Operations: The Bulk Operations feature is suitable for complex ad accounts, and most regular Google Ads accounts rarely use the functionalities under this section. In the Google Ads tool menu, Bulk Operations allow advertisers to efficiently manage and update large-scale ad activities. Through this feature, you can perform tasks like uploading and making bulk changes to files, creating rules, setting up scripts, and using predefined solutions to automate management tasks. This not only saves time but also reduces the risk of errors.
- Budget and Bidding: The Budget and Bidding section is where you set your bidding strategies and shared budgets. After expanding the drop-down menu, you can configure settings in the corresponding sub-items.
- Merchant Data: The Merchant Center is where you manage your Google Shopping Merchant account. You can sync or upload product information (product feeds) from Google Merchant here. The product information uploaded or synced in Merchant Data will be used as a data source for Google Shopping ads after passing the review.
(5) Settlement
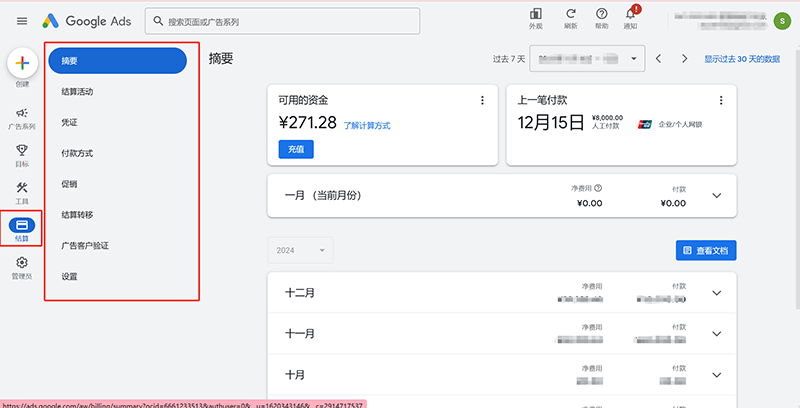
The interface of the Google Ads billing tools is indicated by the red box in the image above. The features within the billing tools are primarily related to the payment and billing of ad funds for a Google Ads account. These features allow you to set up ad fund top-ups, payment methods, payment models, and access to payment receipts, among other options. Additionally, it's worth noting that although the Advertiser Verification feature may not seem closely related to the other billing tool functions in terms of logic, the designers of Google Ads have nonetheless categorized it under the billing tools section. The descriptions of each feature under the billing tools are listed below:
- Summary: In the Summary interface, you can not only view the amount paid, amount used, and the last payment amount for the previous months but also access the top-up button for advertising funds. Clicking the top-up button will redirect you to the corresponding top-up page.
- Billing Activities: Billing activities track the daily spending of each campaign. The click-through rate and cost for each campaign will be recorded in the billing activities section. This helps SEM managers of the website calculate ad spending and download data tables for archiving.
- Receipts: Google Marketing issues VAT invoices corresponding to the recharge amount each month for Google Ads users. The electronic invoice is directly sent to the Google Ads Gmail account. While the invoice file itself is not stored in the Receipts section, the issuance date, invoice tax number, and amount for each month are displayed for users to check the relevant information. It is also worth informing readers that Google Marketing sends the electronic invoice for the previous month's recharge amount to Gmail on the 5th of each month.
- Payment Methods: Under Payment Methods in the Google Ads billing tool, you can set the primary payment method for recharging advertising funds, as well as add multiple payment methods. If the Google Ads account is set up under Google's direct client guidance, it will generally be a Chinese account, and the payment methods will automatically match the domestic payment methods (e.g., Alipay for recharging, corporate bank transfers, bank remittances, etc.).
- Promotions: The Promotions interface records information about promotional ad credits, recharge activities, new account bonuses, and the usage history of promotional credits.
- Billing Transfer: Billing Transfer seems to be a mistranslation, as the content is unrelated to the name. The Billing Transfer interface actually shows the business billing information for Google Ads users, including the Google Ads ID, the business name, and payment ID, etc. There is no option to modify this information in the Billing Transfer interface.
- Advertiser Verification: Advertiser Verification is mandatory for newly created Google Ads accounts. It involves submitting the business and account manager's information for authenticity verification. To protect Google Search users from fraud, Google Ads has made advertiser verification a compulsory requirement. SEM operators need to complete the advertiser verification process, or it will impact the normal delivery of campaigns.
- Settings: By clicking the anchor text for Settings, you can set the payment mode for your account. There are two payment modes: Manual Payment and Automatic Payment. You can also update or modify the payer’s organization name, organization address, and the tax registration information of the business in this section.
(6) Administrator
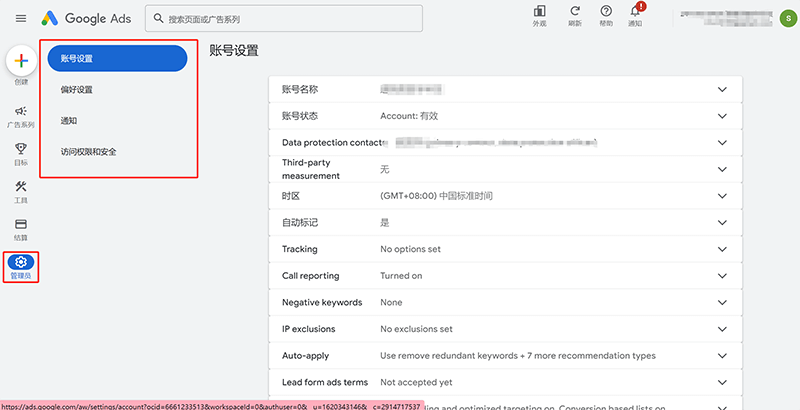
"Admin" is the last tool at the bottom of the left toolbar in Google Ads, as indicated by the red box in the image above. The options under the "Admin" tool are related to account settings, account security, and preference settings. All the functions categorized under the "Admin" tool are individual function items, with no additional sub-functions included under each. When you click on any of these functions, the corresponding operation interface will appear directly on the right side. In addition to the regular and preferred account settings, the "Admin" section also includes important settings related to access permissions and security. The detailed descriptions of each function under "Admin" are provided in the list below.
- Account Settings: In Account Settings, you can set or change the Google Ads account name, time zone, and exclude IP address ranges for ad display, among other settings. Click the expand icon next to the corresponding feature to make changes and save them.
- Preferences: In Preferences, you can set the display language for the Google Ads interface and provide contact information for the Data Protection Officer.
- Notifications: In the Notifications interface, you can choose which email address to receive Google Ads notifications and what types of notifications to receive. By default, all types of notifications are enabled. After selecting the types of notifications to allow, Google Marketing will send only the selected notifications to the specified email address.
- Access and Security: Under Access and Security, you can add new users to manage Google Ads or perform data analysis. After adding a new user’s Gmail to the access list, the user will have access to Google Ads. You can also assign specific roles to new users, with five available roles: "Email only, Billing, Read-only, Standard, and Admin." Each role corresponds to a set of permissions.
3. Create a new campaign in Google Ads
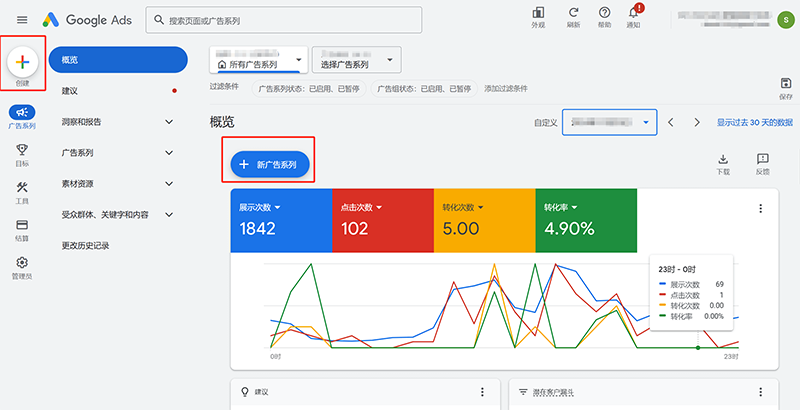
If we don't include a hands-on demonstration of how to create a Google Ads campaign, the article *"Practical Guide to Independent Website Operations: Promotional Strategies for Four Major Marketing Platforms"* may come across as somewhat incomplete, and the practical value might be slightly lacking. Therefore, it's still necessary to present a step-by-step demonstration, using both images and text, to guide readers through the process of creating a new Google Ads campaign from start to finish, helping them get hands-on experience in launching ads on the Google search engine. Google Ads campaigns are structured with multiple layers, including campaign type, ad groups, landing pages, keywords, and creatives. These layers together form a complete campaign. When we talk about SEM optimization, besides optimizing the entire website or the landing pages, we are also referring to optimizing the parameters and content within these layers of the campaign. The quality of the content in these layers determines the effectiveness of the ads. As shown in the red box in the image above, you can create a new campaign by clicking the “Create” button at the top of the left toolbar in Google Ads. Alternatively, you can also click the “New Campaign” button in the campaign overview chart to start the process. Since creating a campaign involves setting a number of parameters and filling out various content, please carefully follow the steps outlined in the image-and-text guide below.
(1) The first step in creating a Google Ads campaign: choosing your advertising objective and conversion goal

After clicking the “New Campaign” button, the first step in creating a Google Ads campaign is to select and confirm the campaign’s advertising goal. The advertising goal refers to the marketing objective that the campaign aims to achieve and can also be understood as the desired conversion goal for the campaign. For B2C independent websites, the commonly selected advertising goal is “Sales,” while for B2B independent websites, the goal can be either “Sales” or “Leads.” Once the appropriate advertising goal is selected, corresponding conversion goals that match the chosen advertising objective will appear below. If there is only one conversion goal, no additional action is needed. However, if there are multiple conversion goals, you will need to manually select the correct one. After completing the selection of the advertising goal and conversion goal, click the “Continue” button in the bottom right corner to proceed with creating the campaign.
(2) The second step in creating a Google Ads campaign: choosing the type of campaign and how to achieve your goals
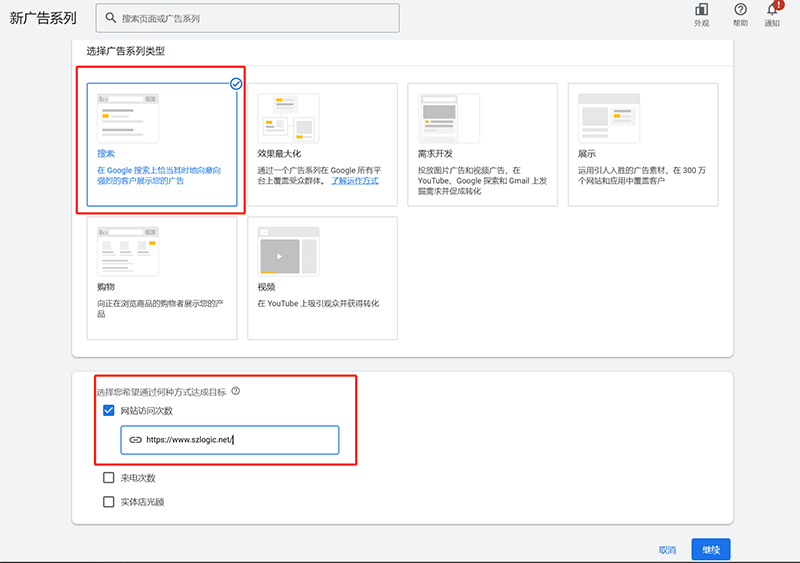
As mentioned earlier, we are creating a campaign to be displayed on the Google search engine, so in the campaign type selection, we need to choose “Search” as the campaign type. After selecting the “Search” type, we also need to specify how the advertising goal will be achieved. Since the conversion goals of our ads are all completed through the independent website, there is only one option that fits this method—“Website visits.” Select “Website visits” and enter the domain name of the independent website. Once completed, click the “Continue” button to proceed to the next step.
(3) Step 3 of creating a Google Ads campaign: Name your campaign
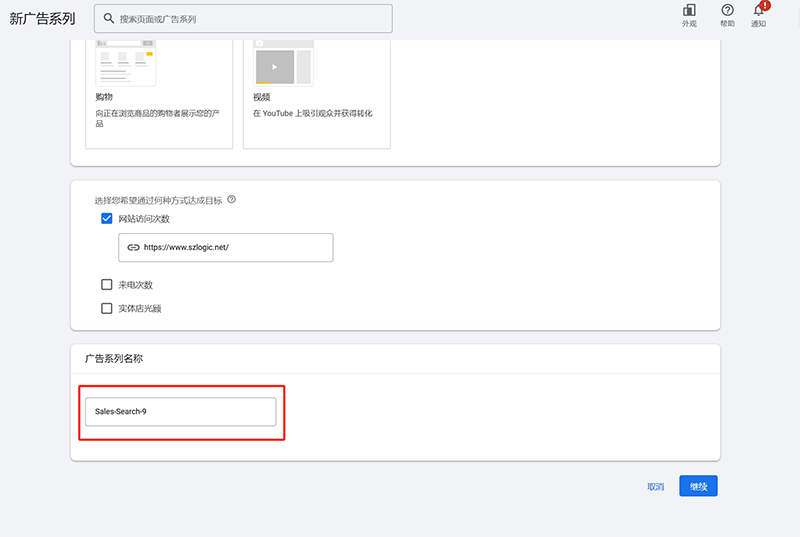
This step is very simple—just enter a custom campaign name in the campaign name input field. There are no specific formatting requirements for the campaign name, and it doesn't serve any other functional purpose. It is solely used for identification by Google Ads operators and account managers.
(4) Step 4 of creating a Google Ads campaign: Setting bids
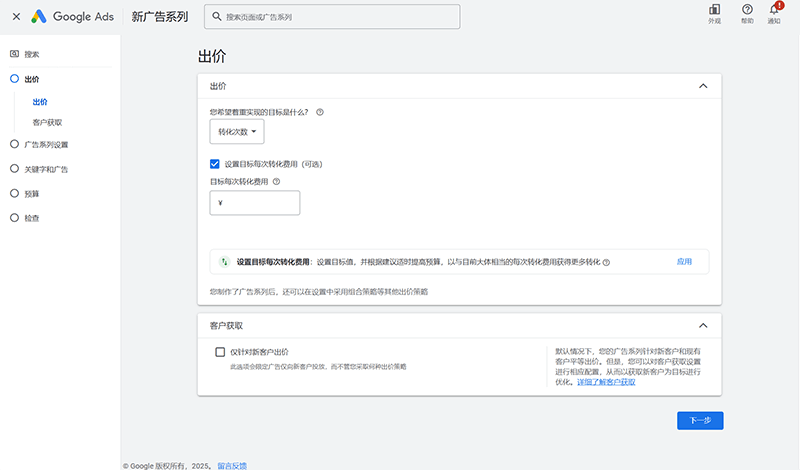
Bidding settings refer to the bidding strategy of the campaign. There are three settings in this section: Focused Goal, Set Target Cost Per Conversion (optional), and Bid Only for New Customers. Each of these settings has default options provided by the Google Ads system. Here, it’s important to point out that the system's default options are not always the most suitable or optimal. Any settings that can be customized should be adjusted according to your actual situation. It’s essential to understand the purpose of each setting before making any changes, as incorrect configurations can negatively affect the performance of the campaign. The key points for each setting are explained in the list below.
- Primary Objective: The primary objective in Google Ads is set to conversions by default, but new campaigns do not have accumulated conversion data. If the primary objective is set to conversions for a new campaign, the campaign will not generate display volume, as the model won’t know how to run the data. Therefore, new campaigns should not select conversions as the primary objective. The correct approach is to select "Clicks" instead.
- Target Cost-per-Conversion (Optional): Google Ads system will default to setting the Target Cost-per-Conversion, which is an optional setting. Similar to the primary objective, this option can be unchecked.
- Bid Only for New Customers: The "Bid Only for New Customers" option is not selected by default in Google Ads, and this default value matches actual usage scenarios. It is recommended not to select it at any time. This setting applies to bidding strategies and prevents ads from showing to customers who have already converted. For B2B websites, conversions usually involve multiple clicks on ads or visits to the website, and it is difficult to determine if the clicks are valid inquiries or temporary ones. Thus, "Bid Only for New Customers" should not be selected.
(5) Step 5 of Creating a Google Ads Campaign: Campaign Settings
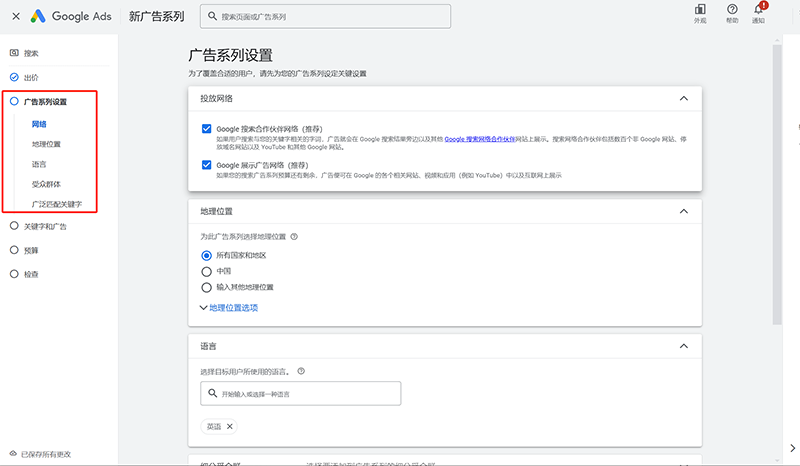
As shown in the red box in the image above, the campaign settings section contains several configuration items and serves as the main setup area for the campaign. Campaign settings include “Networks,” “Locations,” “Languages,” “Audiences,” and “Broad Match Keywords.” Since there are multiple items to explain, using a list format is more in line with readers’ habits and makes it easier to understand compared to paragraph-style descriptions. The explanations for each setting in the campaign settings section are provided in the list below.
- Network Placement: Network Placement refers to setting the networks where the campaign will be displayed within the Google ecosystem. Google Ads offers two network options (there are actually three; for Search Campaigns, the default and unselectable network is the Google Search Engine): Google Search Partner Network and Google Display Network. The Google Search Partner Network means that ads can be displayed on Google’s own ecosystem as well as on partner websites, platforms, and apps. The Google Display Network, similar to the Search Partner Network, is triggered by contextual displays instead of keyword searches, meaning ads can be shown without a keyword search. Both networks can be selected individually or together, depending on the needs of the website operator.
- Geographic Location: Geographic Location refers to setting the geographic locations for ad display. Ads will be shown according to the defined geographic locations. Locations that are excluded or not included in the targeting will not display ads.
- Language: Language refers to the language selection for the campaign's display. This option matches the user's browser language. For example, if the campaign is set to English by default, Chinese-speaking users with a browser set to Chinese will not see the campaign’s content.
- Audience: Audience refers to the segmentation of the audience for ad targeting. It is important to note that after selecting the audience segments, the “Observation” option should be used for audience targeting, rather than “Targeting.” The difference is that "Observation" only considers the selected audience segments as references, while "Targeting" restricts the ads to be shown only to those specific groups. Since precise audience segmentation is not always possible (and for most products/businesses, it’s difficult to do so), it is advised to relax the conditions and use the "Observation" setting.
- Broad Match Keywords: Broad Match Keywords is an optional feature that can either be enabled or disabled. It is recommended to disable Broad Match Keywords. This is because the keyword matching options can be controlled in the next steps, and enabling Broad Match might cause the keyword matching rules to become invalid or lead to logical confusion.
(6) Step 6 of Creating a Google Ads Campaign: Keywords and Ad Content
Icon of the keyword filling operation part
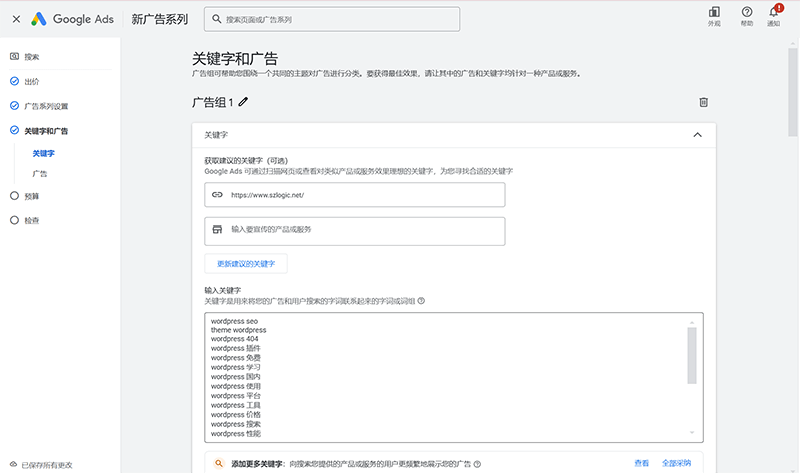
As shown in the image above, we’ve now reached the sixth step of creating the campaign, which is the “Keywords and Ads” section. The content of keywords and ads determines what the ad will display. As seen from the step indicator on the left side, under the “Keywords and Ads” section, “Keywords” is placed above “Ads.” This indicates that we need to first input and configure the campaign's keywords before proceeding to add and refine the ad content. In the keyword input box, Google Ads will automatically generate keywords based on the independent site's category and existing page content. You can either select suitable keywords for your campaign from these suggestions or delete them entirely and paste your pre-selected keywords into the input box to be used for the campaign. As a side note, here are the symbols used in the keyword match types mentioned earlier:
[]字符=完全匹配,正确的使用格式是[关键词]
""字符=词组匹配,正确的使用格式是"关键词"
无字符=广泛匹配
Illustration of the advertisement content filling operation part
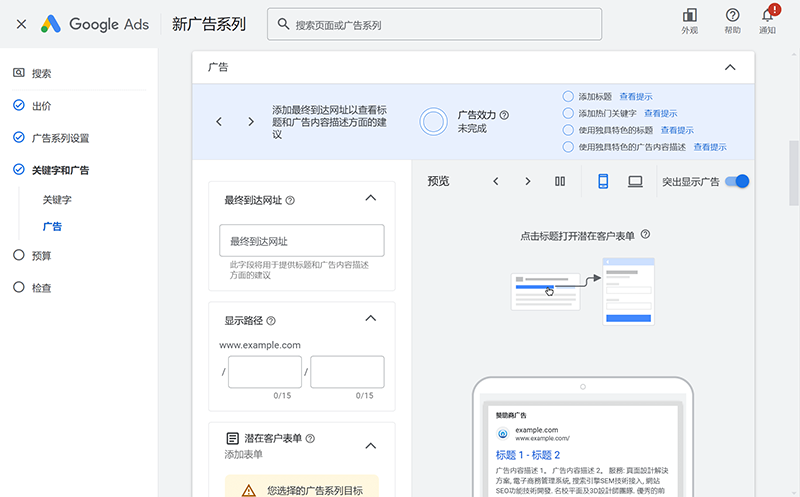
At the top of the ad content section is the field for setting the final URL, which is the page users will land on after clicking the ad. In this input box, enter the correct landing page URL. Below that, you need to fill in the display path, which is the URL path shown under the ad headline on the search engine results page (SERP). Next, you’ll need to input and add multiple ad headlines and ad assets. These assets include the business name, logo, sitelinks, phone number, promotional text, and more. The more comprehensive your ad assets are, the better—having a rich set of ad content can improve the campaign’s optimization score and enhance the effectiveness of the ad.
(7)Step 7 of Creating a Google Ads Campaign: Advertising Budget
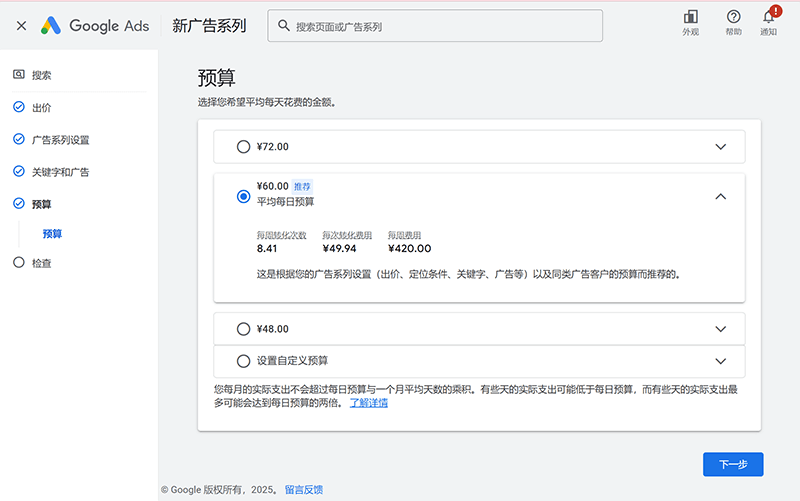
In the corresponding interface on the right side of the Budget section, you can set the budget for the campaign you are creating. You can select “Set a custom budget” at the bottom of the budget options and enter your desired daily budget amount in the input box. Alternatively, you can directly choose one of the system-recommended daily budgets. If you’re currently unsure about the average cost-per-click of the keywords in your campaign, it is recommended to temporarily use the system-recommended budget.
(8) Step 8 of Creating a Google Ads Campaign: Review
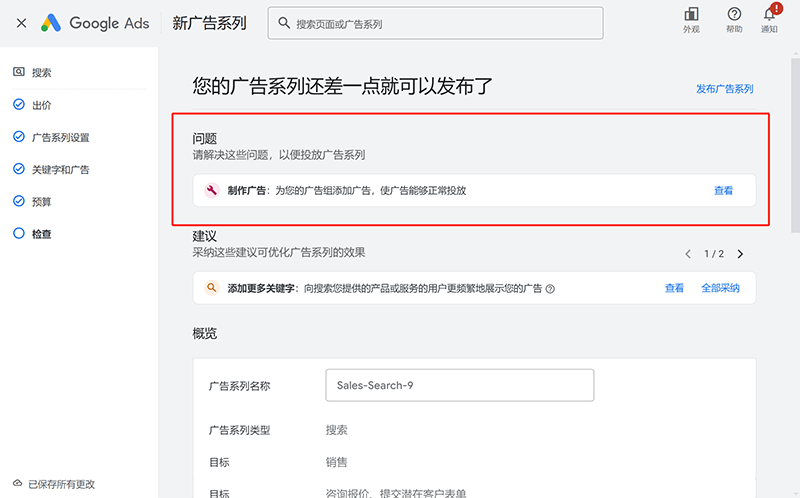
“Check” refers to the system’s automatic checking function. When we reach this step in creating the campaign, the system will automatically start a check to review the campaign settings. This is the final step in creating the campaign. As shown in the image above, if there are errors, feedback will appear in the content area on the right, highlighting the issues. The error messages will indicate the specific areas of concern, and you can click the “View” button to go back to the specific step where the issue occurred. If there are no error messages in the check interface, simply click the “Publish Campaign” button on the right to launch the ad. If there are errors, follow the prompts to return to the specific step where the issue or incomplete section is and make corrections. After making the necessary changes, recheck and publish the campaign.
At this point, the section on operating Google Ads on the search engine has been fully explained. The newly created campaign is now just waiting for approval and to go live. Generally, the review time for a newly published Google Ads campaign is within 24 hours, with some campaigns being approved in as little as 2 hours. Once the campaign is live and running, you should analyze the traffic data collected and, with a clear understanding of the optimization direction and specific areas to improve, proceed with optimization work. However, avoid making changes too easily, as every modification to the campaign may reset its machine learning phase. Google Ads' data model has the characteristic that the campaign's data only stabilizes after the machine learning phase is complete.
Ⅲ、Pinterest Visual Platform Operations
Pinterest is a visual-centric search engine where users can express their inspirations through images and videos. As an interest-based content platform, Pinterest allows users to create and manage themed “boards” and save their favorite content to these boards by “pinning” it. These pieces of content are often linked to the original external websites, providing high visibility and a potential source of traffic for independent websites. Pinterest is particularly well-suited for showcasing visually appealing products such as home décor, fashion, beauty, crafts, and food items—products that are also more likely to resonate emotionally with viewers and encourage impulse purchases. With a content strategy that aligns with the platform’s features, businesses can turn Pinterest into a powerful tool for driving traffic and promoting their brand. More importantly, Pinterest’s analytics tools help businesses gain insights into user behavior, optimize content performance, and adjust marketing strategies to better meet audience needs. Overall, Pinterest is not only a source of inspiration but also an important platform for e-commerce websites to expand brand influence, increase user engagement, and drive sales growth.
For independent website traffic marketing, Pinterest offers numerous benefits and positive effects. First, most Pinterest users are focused on discovering new products and getting shopping inspiration, making the platform inherently suitable for e-commerce businesses. By optimizing product images and descriptions and using Pinterest’s "Shop the Look" feature, businesses can directly showcase their products to users with purchase intent. Additionally, Pinterest has strong long-tail search capabilities and content sustainability. A well-crafted Pin can continue to attract traffic for months or even years. Furthermore, Pinterest’s advertising tools, such as Promoted Pins and Dynamic Product Ads, help independent websites reach target audiences precisely, delivering relevant content based on user interests, which in turn increases conversion rates.
1、Registering and Creating a Pinterest Business Account
Before implementing Pinterest SEO and SEM operations, we need to have a Pinterest business account. For readers who have not yet registered a personal or business Pinterest account, please follow the steps in this chapter to create one. If you already have a personal Pinterest account, you can directly convert it into a business account without the need to create a new one. Below, I will guide you through the complete process of creating a Pinterest business account using a step-by-step image and text demonstration.
(1) Create a Pinterest business account. Step 1: Fill in user information
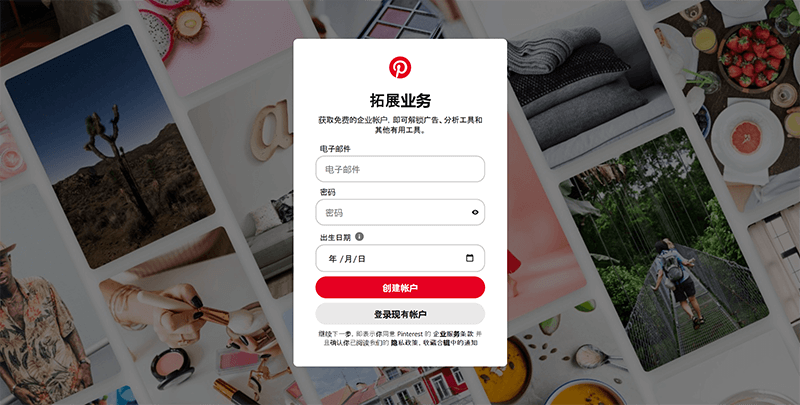
After visiting the Pinterest homepage, click on the "Business" link in the top right corner of the page to go to the login and registration page for business accounts. Then, click the "Sign up" button to enter the business account registration process page, as shown in the image above. In the form, fill in the required email address, password, and date of birth. After completing the form, click the "Create Account" button to proceed to the next step of the registration process.
(2) Step 2 of creating a Pinterest business account: Industry selection (describe your business)
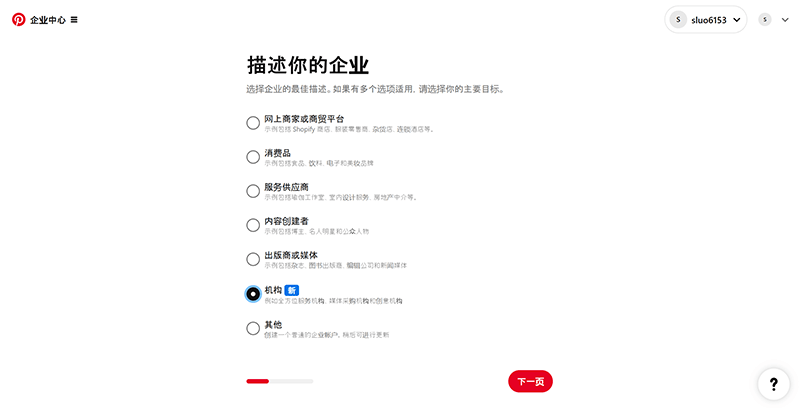
The industry selection step is straightforward. As shown in the image above, choose the industry from Pinterest’s provided list that most closely matches your independent website’s category. After selecting the appropriate industry, click the “Next” button in the bottom right corner to continue to the next step.
(3) Create a Pinterest business account Step 3: Account creator’s role (What is your role in the organization?)
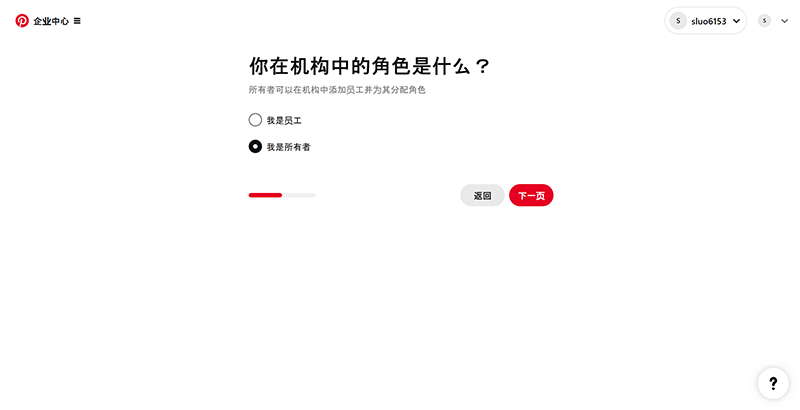
As shown in the picture above, just select any one from the list provided by Pinterest, and continue to click the "Next Page" button on the right to proceed to the next step to complete the creation of the business account.
(4) Create a Pinterest business account Step 4: Fill in your organization information (introduce your structure)
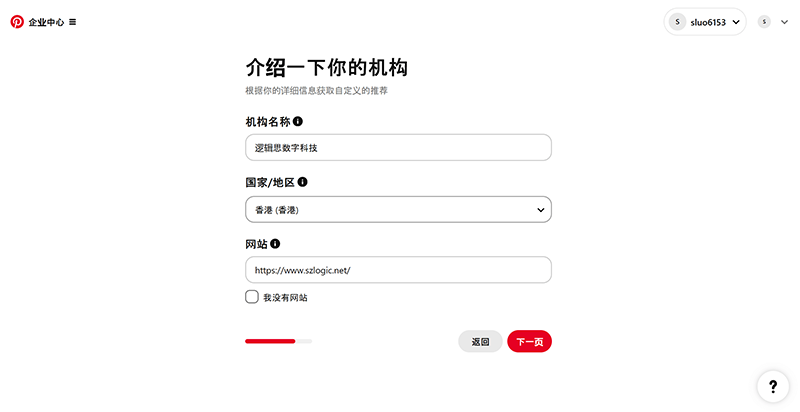
As shown in the image above, in the organization information interface, enter the organization name and website domain as required by the form titles. In the "Country/Region" dropdown menu, select the corresponding region. Due to domestic policy restrictions, China is not available as an option in the dropdown menu. Readers can choose Hong Kong as the region for the business account. After filling in the information and selecting the region, click the "Next" button on the right to continue with the business account application process.
(5) Create a Pinterest business account Step 5: Provide more details about your business
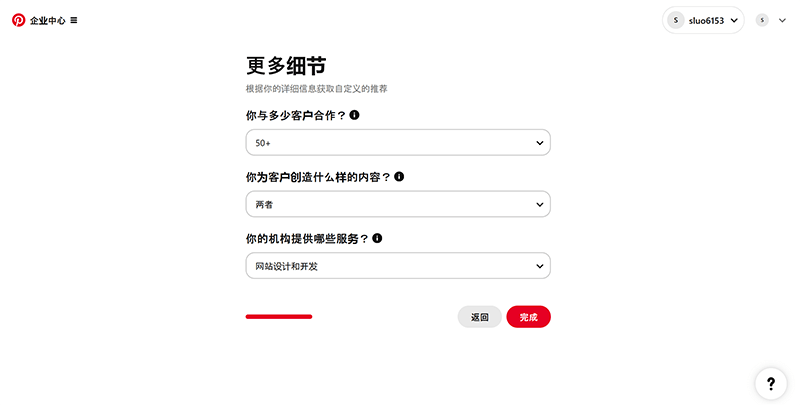
In the form on the more detailed page shown in the image above, expand the dropdown menus for each option and select the choices that most closely match your independent website, such as the number of customers, whether you provide organic or paid content (select both), and the specific products or services offered by your organization. Once all the options are correctly selected, click the "Done" button on the right. At this point, the process of applying for a Pinterest business account is complete.
2、Pinterest Business Account Setup
After completing the creation of the Pinterest business account, we now need to improve the account-related information and functionality settings. Enhancing the account's functionality settings not only facilitates account management and improves data privacy and security, but also helps increase the visual appeal and trustworthiness of the Pins published on the account when the account information is complete. Below, I will explain the path to access the settings page of the Pinterest business account and provide a step-by-step guide for setting up each piece of information and functionality, using images and a list format.
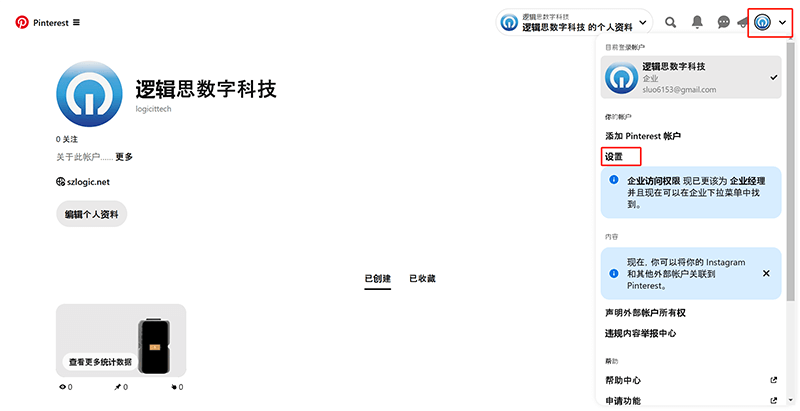
As shown in the red box on the right side of the picture below, click the expand icon of the avatar in the upper right corner of the Pinterest business account management interface, and continue to click "Settings" in the drop-down menu to enter the account settings management page.
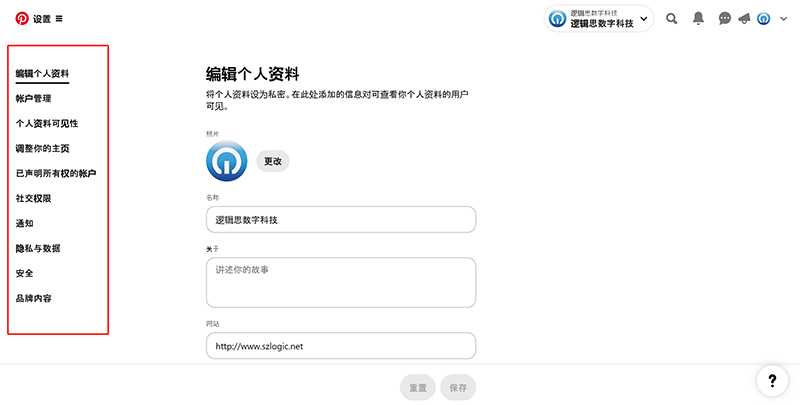
The sections in the account settings, as shown in the red box in the image above, are categorized in the left sidebar. These are standard settings that are generally easy to understand. After entering new information or changing settings in the content area on the right side of each setting category, the "Save" button at the bottom of the page will be activated and clickable. Once the modifications are complete, simply click the save button. Below, I will provide a brief explanation of each setting category in list form.
- Edit Profile: The Edit Profile section allows you to customize and edit a variety of account information. This includes uploading or changing your profile picture, customizing the account name, account description, website domain, username (the username is the suffix of the Pinterest homepage), email address, phone number, and address information.
- Account Management: In the Account Management section, you can set up account-related items such as the email address, account password, personal information, business account goals, and options for deactivating the account or deleting data.
- Profile Visibility: Manage how your profile is visible on Pinterest and in search engines. You can set the visibility of your profile, such as making it fully invisible or visible to certain users. Additionally, you can set Pinterest’s information not to be indexed by search engines, meaning Pinterest Pins and account information will not appear in Google, Bing, or other search engine results.
- Adjust Your Homepage: In this section, you can save Pins you’ve watched and choose whether to show or hide your boards.
- Claimed Accounts: Under Claimed Accounts, there are two important settings: The first allows you to link your Pinterest account with Instagram. After linking Pinterest with Instagram, you can automatically publish Instagram posts as Pins. The second option is to claim ownership of a website. After verification, claiming ownership will unlock features such as profile display, ranking improvements, and data analytics.
- Social Permissions: Includes settings for mentioning users, playing Pins, downloading and sharing Pins, and commenting permissions.
- Notifications: In this section, you can configure how you receive Pinterest notifications.
- Privacy & Data: Here, you can manage the types of data Pinterest is allowed to collect and whether you want to actively request Pinterest to collect data.
- Security: Under Security, you can set options for account security management, including two-factor authentication, login options, and linked devices.
- Brand Content: The Brand Content section allows you to apply for Pinterest’s Brand Content program, which connects creators and brands to promote partnerships and other opportunities on Pinterest.
3、Implementing Pinterest SEO
In the first part of this article, titled “SEO and SEM Traffic Operations Models,” there was a definition of SEO. The broad definition of SEO is "Content Marketing." Once we have clarified this clear definition of content marketing, we can create high-quality materials that align with user search intent, tailored to each platform's characteristics, to meet users' needs. When users browse Pins on Pinterest, the URL we bind to the Pin gives us the opportunity to guide Pinterest viewers to our website page. This process of driving traffic works in the same way across all platforms. The larger the volume of data in this process, the better the SEO performance, and this SEO traffic will lead to more conversion opportunities for the products or services operated by the website. Below, I will demonstrate the step-by-step implementation of Pinterest SEO. Readers can follow each step's key points and refer to the corresponding settings to publish content on Pinterest, using high-quality content to attract organic search traffic from Pinterest.
(1) Step 1 of Pinterest SEO: Create a Pinterest board

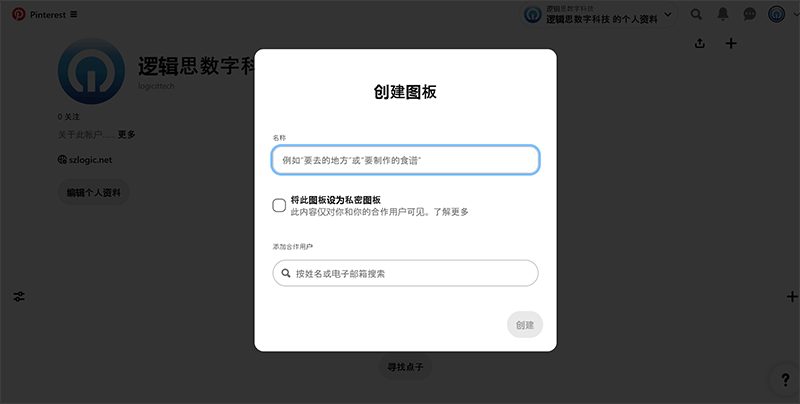
A board, also known as a pinboard, can be understood as a category storage directory for Pins. In the Pinterest business account management interface, click the "+" button on the right side. In the pop-up options, click "Board" (as shown in the red box in the first example image above). This will bring up the "Create Board" window, as shown in the second example image above. In this window, you can set the board’s name and visibility. The default visibility is set to public, but if you check the "Make this board secret" box, the board will be invisible to the audience. After adding different Pins into the corresponding boards, the boards will be displayed in the backend of the Pinterest account. Whether the audience can view the board depends on the custom visibility settings. The "Add Collaborators" option at the bottom is an interesting feature. By entering a collaborator’s ID, once they accept the invitation, the content of the board will also be displayed on their account.
(2) Step 2 of Pinterest SEO implementation: Create a Pin in the Account Management Center
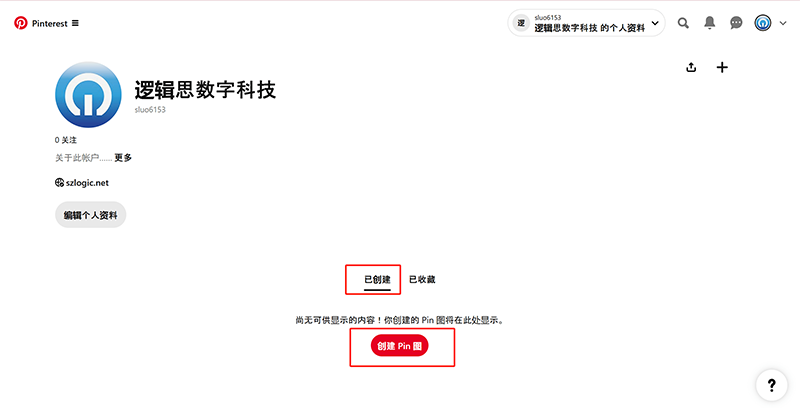
As shown in the red box in the example image above, click the "Create Pin" button on the right side of the management center page of the Pinterest business account to proceed to the next step of creating and publishing a Pin.
(3) Step 3 of Pinterest SEO implementation: Upload Pin material and fill in key information to create Pin
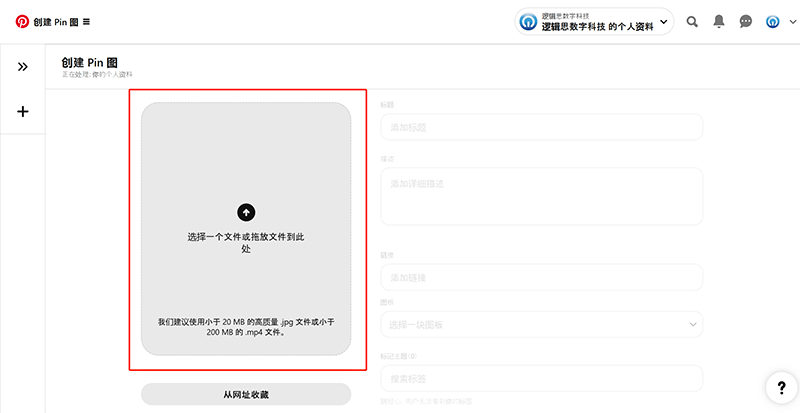
In the Pin creation interface, upload the Pin's image or video file by selecting the file from your directory or dragging the file into the area highlighted in the red box of the example image above. Based on the principles of search engine data indexing and triggering, it’s important to name the uploaded files according to SEO standards, similar to how webpage assets are named. Once the Pin file is uploaded, write attractive and SEO-valuable text content in the corresponding input fields on the right side. The SEO value is evaluated based on the following criteria: keywords with a certain search volume, a theme that satisfies search intent and solves user needs, and compelling descriptive copy. Finally, if you want to store the current Pin in a specific board, select the designated board from the dropdown menu under the "Board" section. After completing these steps, click the "Publish" button in the top right corner of the page, and the Pin will be displayed in other Pinterest users’ search results or related queries.
4、Setting Up Pinterest Ads Account
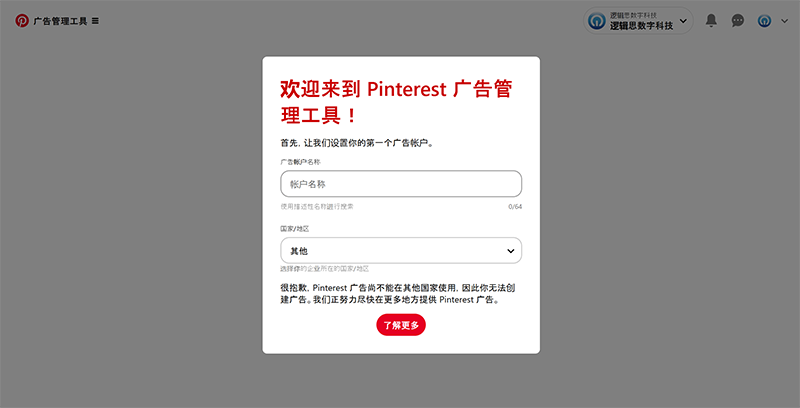
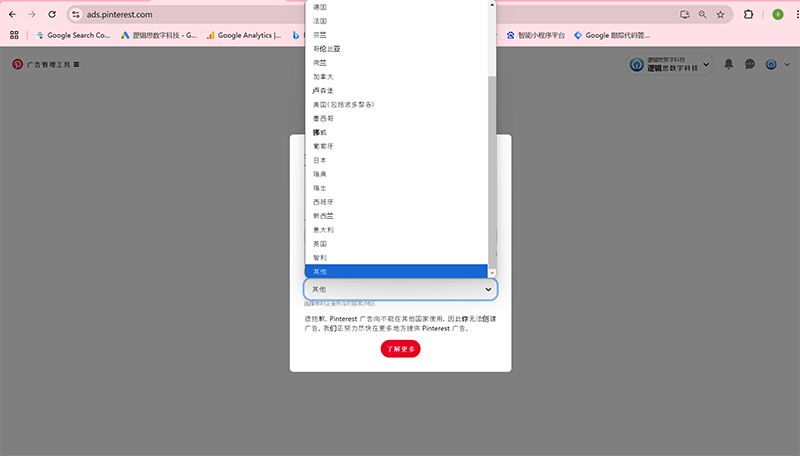
Currently, Pinterest's policy only supports businesses in Japan to open advertising accounts in the Asia region, and does not support advertising accounts in other Asian countries. However, companies in regions such as Europe, Australia, South America, and North America are generally supported. Therefore, I am unable to use the newly activated business account of Logic Thinking Digital Technology to demonstrate the process of opening a Pinterest advertising account.
5、Creating a Pinterest Ad Campaign
Due to the reason that the aforementioned business entity cannot open a Pinterest advertising account, I will switch to a previously activated Pinterest business account that already has an advertising account to complete the following step-by-step explanation of creating a Pinterest ad. Although I am unable to demonstrate the process of opening a Pinterest advertising account due to the business entity issue, it does not affect the hands-on explanation of creating a Pinterest ad.
(1) The first step in creating a promotion plan: Select the promotion plan goal
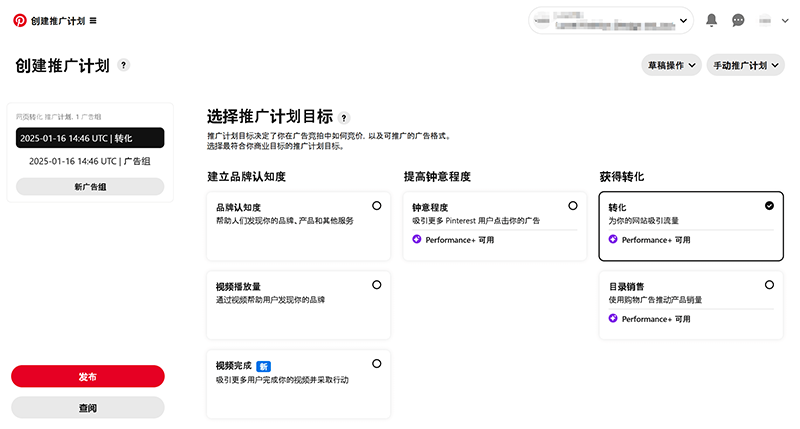
The campaign objective refers to the goal that the ad campaign aims to achieve. As shown on the right side of the image above, under "Select Campaign Objective," there are three main conversion goals: building brand awareness, increasing consideration, and driving conversions. Each type has 1-3 sub-conversion goals to choose from. Based on the descriptions of the different types of conversion goals, the most commonly used conversion goals for independent sites are, of course, "Conversion" and "Catalog Sales" under the "Conversions" category. The difference between "Conversion" and "Catalog Sales" is that the "Conversion" goal targets Pins, while "Catalog Sales" promotes product catalogs that have already been created in the account, so "Catalog Sales" is also referred to as shopping ads. Here, I will use "Conversion" as the campaign objective to demonstrate the entire ad campaign creation process for readers.
(2) Step 2 of creating a promotion plan: Promotion plan name and status
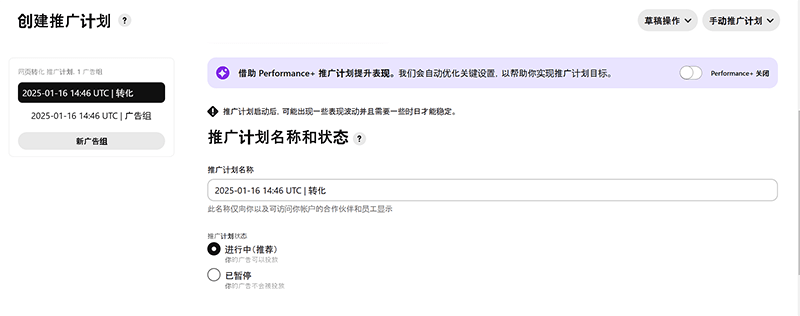
The operation for the second step, as shown in the image above, is very simple. Just enter a custom campaign name in the "Campaign Name" input box, and leave the "Campaign Status" below it set to the default option "Active."
(3) Create a promotion plan Step 3: Promotion plan budget and schedule
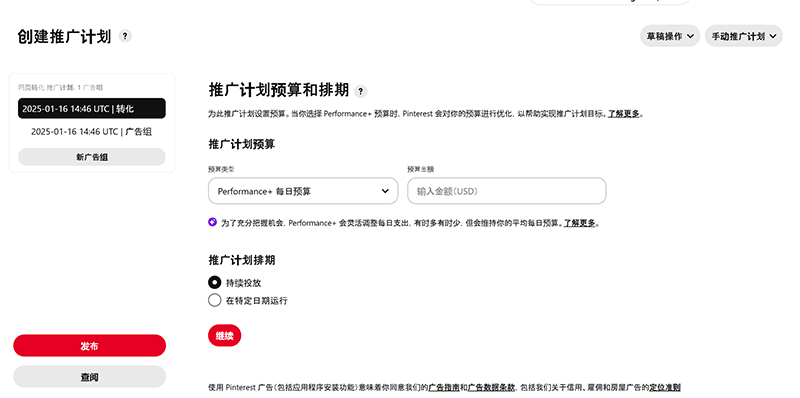
In the campaign budget and scheduling step, you need to select the budget type for the ad campaign and enter the corresponding amount in the budget input box in USD. Below, leave the "Campaign Scheduling" option set to the default "Run continuously" option. After completing this, click the "Continue" button at the bottom of the page to proceed with creating the Pinterest ad campaign.
(4) Step 4 of creating a promotion plan: Ad group details - positioning strategy
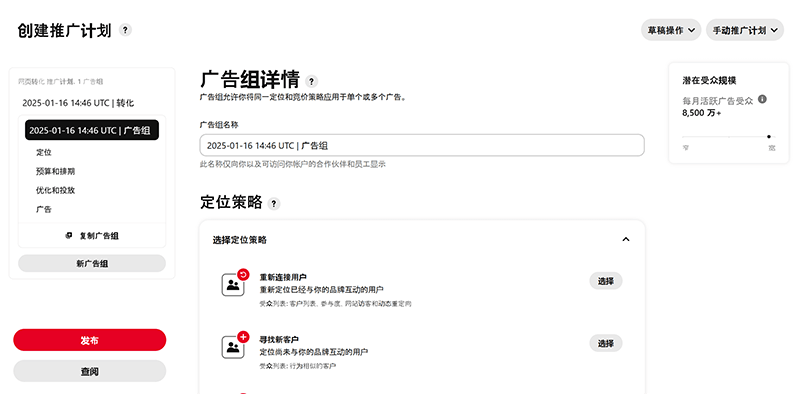
The fourth step in creating the campaign is the ad group details section. In this section, the first thing to set is the targeting strategy. There are three types of targeting strategies: "Reconnect with users," "Find new customers," and "Custom selection." It is recommended that new accounts choose either "Reconnect with users" or "Find new customers."
(5) Step 5 of creating a promotion plan: Ad group details - targeting details
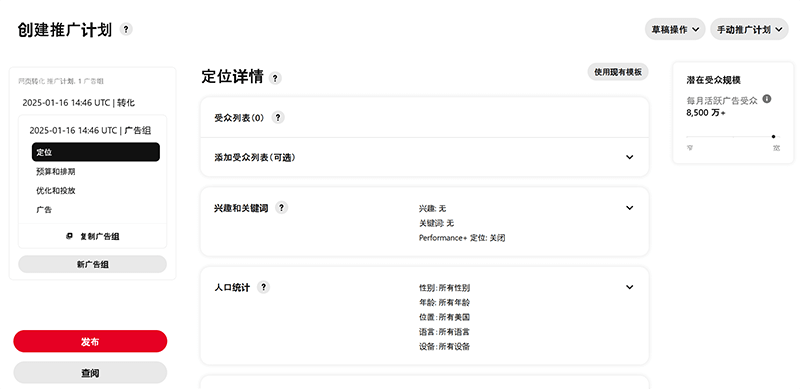
As shown in the image above, the steps include adding audience lists, selecting audience interests and inputting keywords, and choosing demographic-related audience data, among others. For new accounts that have not yet accumulated advertising audience data, it is recommended to initially skip the "Add Audience List" section. This can be organized and uploaded once the account has gathered a sufficient number of users. "Interests and Keywords" are important settings for audience targeting, and you should select the options in the interest list and enter the product/business keywords as accurately as possible based on the user interest characteristics related to the promoted products or services.
(6) Create a promotion plan Step 6: Optimize and launch
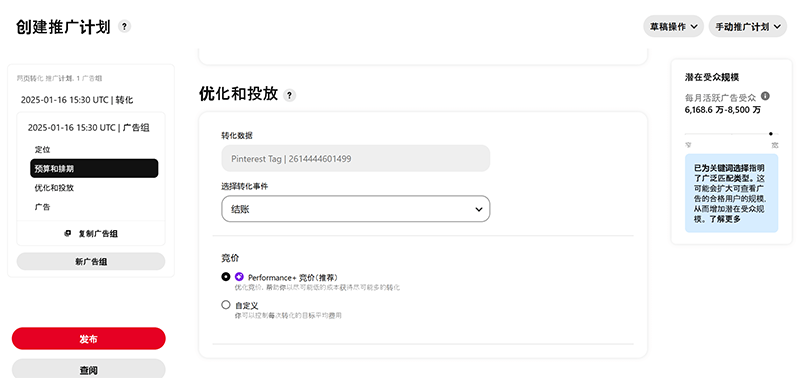
As shown in the image above, there are two important settings in the optimization and delivery interface: selecting the conversion event and bidding. In the "Select Conversion Event" dropdown menu, you need to choose the conversion event for the ad campaign. For B2C independent sites, the default conversion event is "Checkout," while for B2B independent sites, the corresponding conversion event is either "Sign-up" or "Lead." The term "Lead" refers to potential leads or prospects. The "Bidding" option, as shown in the image, offers two choices: recommended and custom. It is recommended to use the system's recommended bidding method.
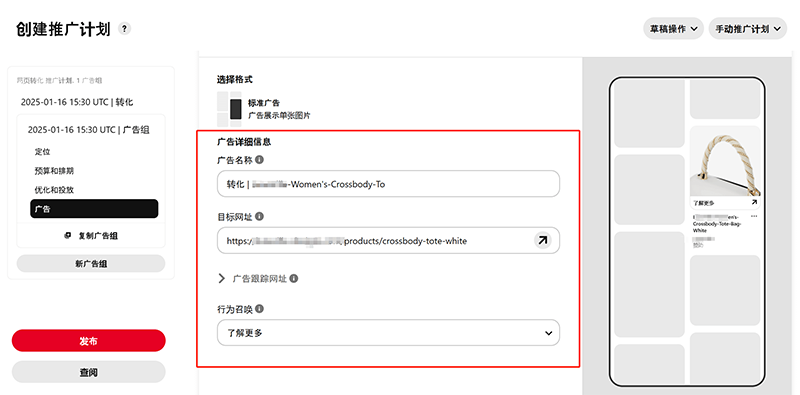
(7) Create a promotion plan Step 7: Advertising (Ad content)
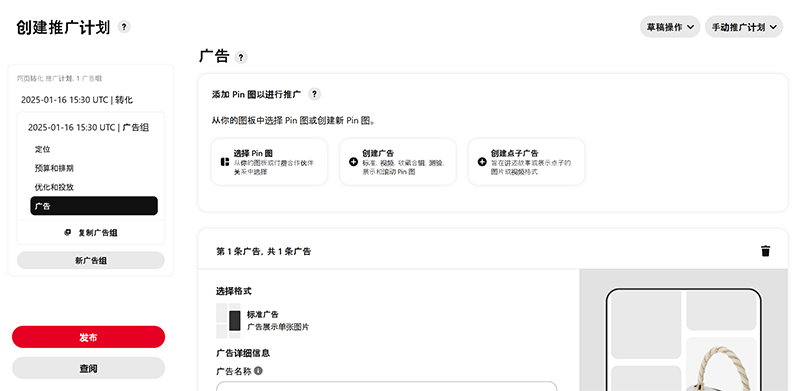
The ad is the content displayed in the ad. This is the final step in the process of creating a Pinterest ad campaign. As shown in the image above, there is a "Select Pin" button in the ad interface. Click the "Select Pin" button to choose the Pin that will be used in the ad campaign. The selected Pin will be the specific content displayed in the ad campaign. As shown in the image below, by scrolling down the page, you will see an "Ad Details" input box. Here, you should enter the URL of the landing page and the call-to-action (CTA) text that will appear in the ad. Once these steps are completed, click the "Publish" button on the left side of the interface to submit the ad campaign for review. Once the campaign is live, the SEM operators for the independent site can analyze audience behavior and optimize ad parameters based on the campaign's performance data.
With that, the practical operation of Pinterest's visual platform management has been fully demonstrated. Observant readers may have noticed that the process of creating an ad campaign and setting ad parameters on Pinterest is much simpler compared to Google Ads. That's right; it is indeed the case. Based on my hands-on experience with advertising on more than ten domestic and international marketing platforms, not only is Pinterest—being a visually-driven, social media-oriented image search engine—easier to handle, but even advertising platforms like Baidu's marketing, which is also a search engine, have fewer customizable features and a simpler campaign structure compared to Google Ads.
Ⅳ、Facebook and Instagram Social Media Operations
Facebook and Instagram, as the most popular social media platforms globally, play a crucial role not only in enhancing brand awareness but also in shaping the SEO (social media content marketing) and SEM (social media advertising) strategies for independent websites. In terms of SEO, high-quality content on Facebook and Instagram can attract users to watch, like, share, and follow, with the long-term goal of growing the fan base. The larger the fan base, the greater the content's reach, leading to a significant increase in traffic directed to the independent website. Audience members or followers on Facebook and Instagram interact with the independent site by clicking on the domain linked to the social media account or on anchor text links embedded in the content, which leads them to the independent site’s pages to further explore the products or services offered. This creates an opportunity for social media users to potentially complete conversion goals on the independent site.
In terms of SEM, Facebook and Instagram, with their powerful advertising systems, provide brands with precise ad placement and optimization tools. These platforms allow SEM operators for websites to create personalized ad strategies based on user interests, behaviors, geographic location, and other characteristics, thus improving ad performance and conversion rates. With precise audience targeting, brands can display ads to the right users at the right time, increasing click-through rates, visits, and ultimately boosting website traffic and sales conversions. At the same time, Facebook and Instagram's advertising systems offer a wealth of analytics tools to help brands monitor ad performance in real time and optimize based on data, achieving a higher return on investment (ROI). Therefore, by combining effective SEO and SEM strategies, brands can not only increase website traffic but also significantly enhance their influence in the competitive market.
1、Registering and Creating a Facebook Account
Before implementing SEO operations on Facebook and Instagram, we need to first create and have a Facebook account. Instagram and Facebook are owned by the same company, Meta, so an Instagram account does not need to be created separately and can be linked through a Facebook account. A single Facebook account can not only be linked to both platforms but can also sync content creation and publishing across both platforms at the same time. Below, I will demonstrate the entire process of creating a Facebook account step by step with images, so readers can follow the tutorial below to create their own Facebook account.
(1) Create a Facebook account. Step 1: Fill in account information
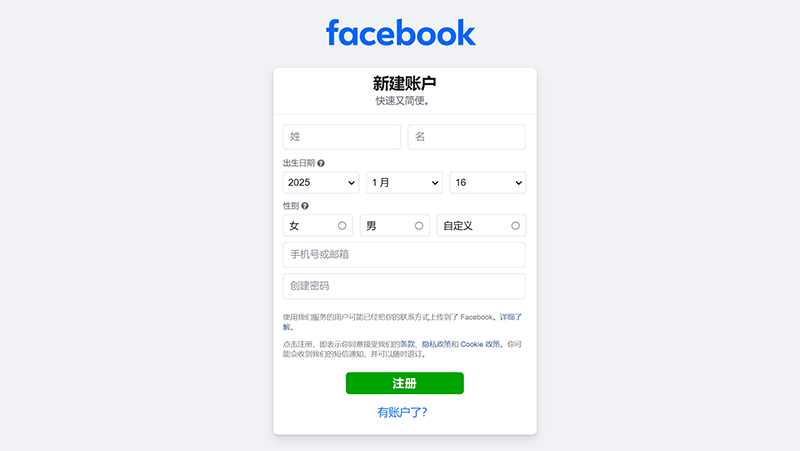
The first step to creating a Facebook account is shown in the image above. In the account registration form, fill in the corresponding registration information, including your name, birthdate, gender, phone number or email, and create a password. Simply select and enter the relevant information in the corresponding fields of the form. Regarding the phone number or email for registering the account, I would like to remind and suggest that using an email address instead of a phone number might be a more reliable option, as domestic phone numbers may not always receive Facebook verification messages and notifications. To avoid unnecessary complications, it is recommended to use email services such as Gmail or Outlook, and avoid using domestic email addresses.
(2) Create a Facebook account. Step 1: Fill in the verification code
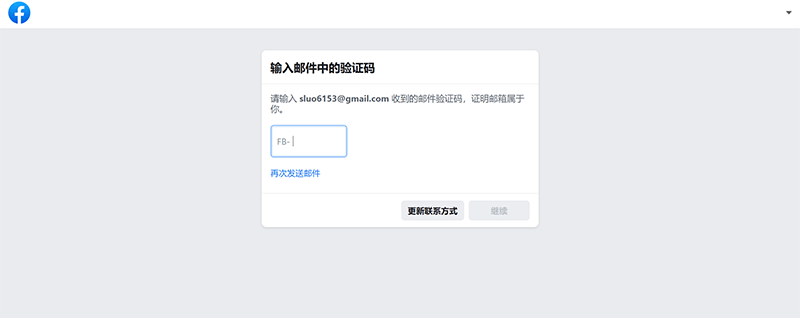
Receive and copy the verification code from the registered email address filled in the previous step and paste it into the verification code input box as shown in the figure above. After entering the verification code, the "Continue" button in the form will be activated and clickable. Click the "Continue" button to proceed to the next step of the operation process.
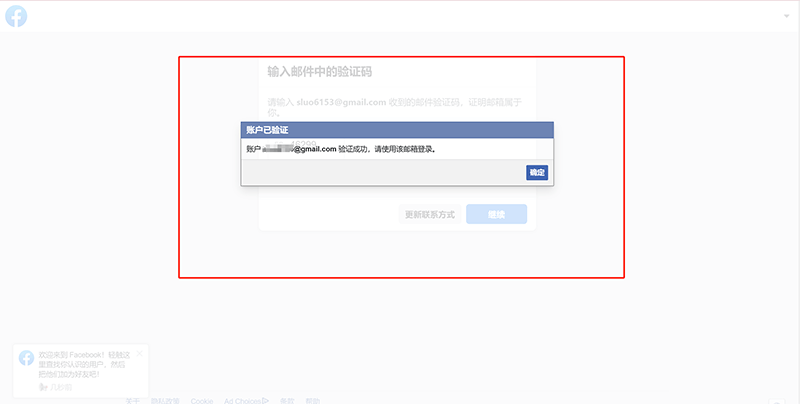
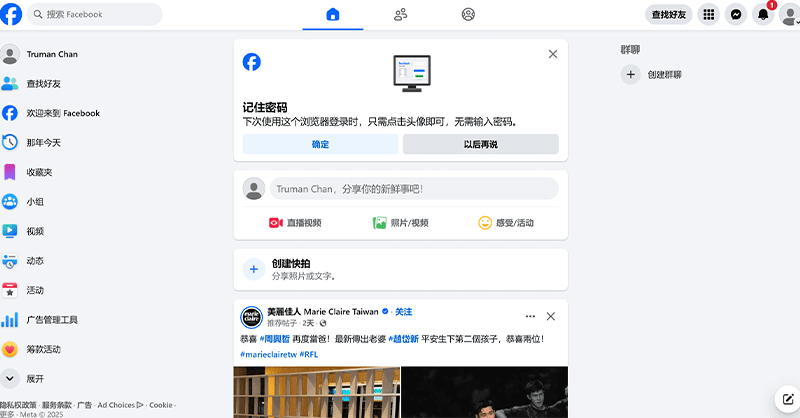
The process of applying for a Facebook account is very convenient. As shown in the red box in the image above, once the page shows the account verification confirmation message, the entire account application process is complete, and we can log into Facebook using the account information entered during registration. After successfully logging into Facebook, the interface will look like the one shown in the next image, where the page will automatically redirect to the Facebook account's homepage.
2、Facebook Login and Creating an Instagram Account
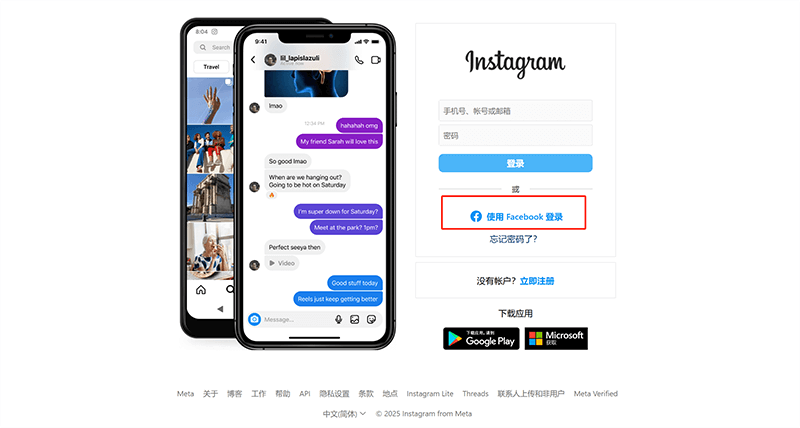
To log in and create an Instagram account using a Facebook account, you need to change your internet tool's mode to "secure" or "global proxy mode" (different tools have different names, some refer to it as "secure mode," while others call it "global proxy mode"). This is because Instagram has region-based restrictions, and the commonly used Hong Kong region will block the option to log in via Facebook. The specific process is to click the "Log in with Facebook" button, as shown in the red box in the image above. Then, input your Facebook account password in the pop-up Facebook login page, and follow the prompts and steps for using your Facebook account to set up Instagram.
3、How to Link Facebook and Instagram Accounts
(1) How to link Facebook to Instagram account
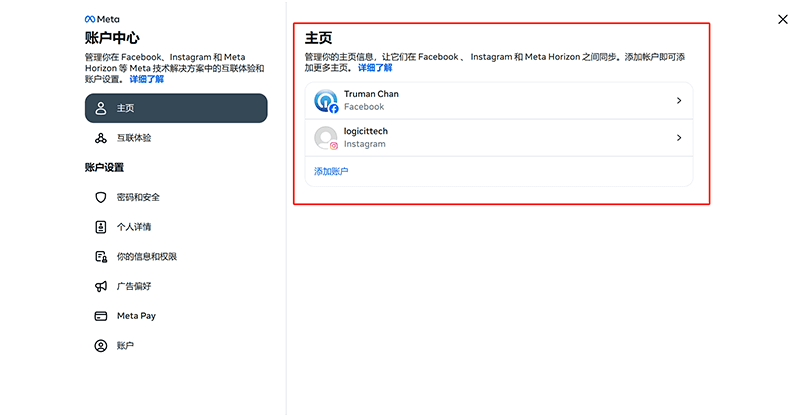
Once you have completed the steps for "How to Log In to Instagram with a Facebook Account (How to Create an Instagram Account Using Your Facebook Account)" and successfully used Facebook to open your Instagram account and log into your Instagram homepage, Meta's system will automatically link and bind your accounts for both platforms. You can click on the Facebook Account Center anchor text link to reach the settings page of the Account Center to verify whether your Facebook and Instagram accounts are linked. If the result displayed in your Facebook Account Center is the same as the one shown in the red box in the image above, where both Facebook and Instagram accounts are listed under the homepage, it means the linking of Facebook and Instagram has been successfully completed.
4、Facebook Account Setup
After completing the Facebook account registration and logging in according to the process mentioned above, the next step is to complete the Facebook account settings. While the specific settings may vary between platforms, the general process remains the same. Click on the profile icon button in the top right corner of the Facebook homepage (the initial page after logging in), and in the expanded menu, select "Settings & Privacy." This will open the menu items, as shown in the red box in the image above. These menu items are the settings options available for the Facebook account.
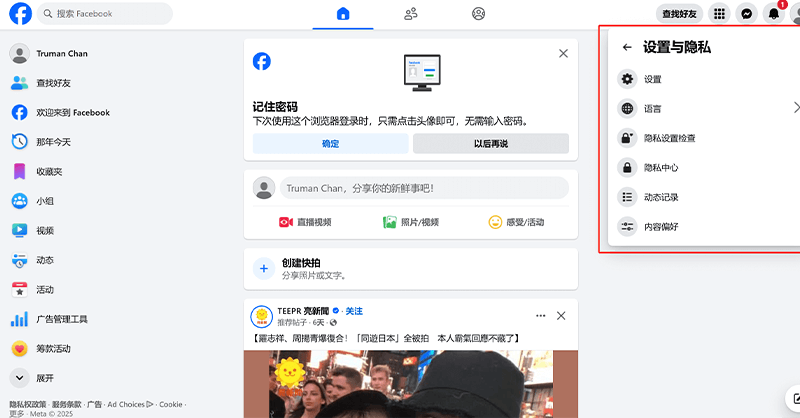
The items that can be set within the "Settings & Privacy" section of the Facebook personal account are shown in the red box in the image above. Below, I will briefly explain each setting and its corresponding detailed options in the menu using a list format.
(1) Settings
Under the settings, there are six sections: "Account Center, Tools and Resources, Preferences, Audience and Visibility, Your Activity, Community Standards and Legal Policies." The details of each section are as follows:
Account Center
- Personal Details: In the Personal Details settings section, you can customize the account’s displayed name, Facebook homepage URL suffix (e.g., if you set "logic," your Facebook homepage URL will be facebook.com/logic), upload a user profile picture, and customize your account’s virtual avatar.
- Password and Security: In the Password and Security settings, you can change your account’s login password and set up security-related two-factor authentication and login security checks.
- Ad Preferences: Control where and what type of ads your current Facebook account will receive. This is a very user-friendly feature that Facebook offers for personal accounts to avoid overwhelming users with excessive ads. Accepting a large number of ads passively on the internet can create discomfort for personal users.
Tools & Resources
- Privacy Settings Check: In the Privacy Settings Check, you can set who can see the content you post and how others can find you. There are three ways others can find you: friend requests, phone number/email, and search engines. You can choose to prohibit or allow these three methods.
- Parental Supervision: Invite your child’s Facebook account to accept you as a supervisor on Facebook and Messenger. Only after the child accepts can you begin supervising. You will be able to see their Facebook friends, Messenger contacts, conversations with them, and users they have blocked.
- Default Sharing Settings: There are three default sharing settings options: "Public, Friends, Custom." After selecting a default sharing option, the system will automatically set the sharing audience for some of your content, but you can always change the sharing settings for individual posts, stories, or Reels.
Preferences
- Mood Preferences: Allow users to customize content recommendations based on their current mood or emotions. With this feature, users can select topics, content types, or interaction methods related to their mood, such as happiness, relaxation, motivation, etc. Facebook may adjust your feed according to these preferences, recommending posts, videos, or ads that match your mood to enhance your platform experience.
- Notifications: Set your preferences for receiving notifications, including the types of information you want to receive and how you want to receive it. You can choose to receive notifications via browser or email. If you select browser notifications, you will receive the chosen information types when logged into Facebook in the browser. If you select email notifications, information will be sent to your email address.
- Accessibility Features: Facebook account accessibility features include "Display Mode, Keyboard and Assistive Technology, Video and Motion." Display Mode allows you to switch between Night Mode and Normal Mode. Keyboard and Assistive Technology controls how content is interacted with when hovering with the mouse. Video and Motion refers to video playback settings and subtitle display settings.
- Language and Region: This setting allows you to customize your Facebook account’s display language and the date, time, and number formats according to regional preferences. You can also set the translation language for posts from friends and public pages, which is a great internationalization feature for users from different regions.
- Audio-Visual Content: Audio-Visual Content refers to settings for video playback modes. The video playback and subtitle display modes are similar to those found in the "Video and Motion" section under Accessibility Features. The additional setting here is "Default Video Quality," which allows you to set a default video quality for playback.
- Night Mode: A quick toggle for Night Mode. You can also set Night Mode in the "Accessibility Features" section, but it's more convenient to adjust it here.
Sharing and visibility
- Lock Profile: Locking your profile is a privacy-related feature. After locking your profile, only friends will be able to see all of your past and future photos, posts, and stories.
- Profile Details: The Profile Details section refers to your profile introduction page. Here you can add information such as your profile picture, work and education, location, contact details, family members, relationship status, and life events.
- How Users Find and Contact You: This section is an extension of the "Privacy Settings Check" under "Tools & Resources," providing additional settings for how users can find and contact you. You can set who can send you friend requests, who can see your friend list, and who can send you messages. If you don’t want others to see your friend list, you can change the default setting to "Only Me."
- Posts: In the Posts section, you can set which type of users can view your posts and restrict the audience for old posts. You can also enable or disable the visibility of comment summaries for your posts.
- Stories: Manage your story settings, similar to the Posts section. You can control the visibility and sharing permissions of your story content.
- Reels: The settings for Reels are similar to those for Posts and Stories, allowing you to control the visibility and sharing permissions of your Reels content.
- Fans and Public Content: Manage the visibility settings for your Facebook fans, followers, comments, and profile information.
- Profile and Tagging: In this section, you can manage the visibility of posts, user information, and tagging, as well as approval permissions for tagging.
- Blocking: The Blocking settings not only allow you to block other users but also provide options to block messages or hide specific content.
Your updates
- Activity Log: The Activity Log is not a functional setting but a record of activities. It records your Facebook activities, such as posts you create, likes, interactions, posts you’ve been tagged in, groups you belong to, videos you’ve watched, etc.
- Apps and Websites: The Apps and Websites settings allow you to manage third-party applications and websites linked to your Facebook account. You can view and control which external apps and websites have access to your Facebook account information. You can remove connected apps or websites to revoke their access to your data. You can also adjust the data each app or website can access, such as your name, email address, or friend list. Additionally, you can review expired app permissions and reactivate or delete them as needed. This feature helps protect your privacy and gives you control over your data security.
- Business Integration Tools: Business Integration Tools refer to the applications and services you use to manage your Facebook business assets, including ads, public pages, and messages. You can check what information these tools have access to and remove them if necessary.
- Learn How to Manage Your Information: This is not a functional setting. Clicking "Learn How to Manage Your Information" will redirect you to Facebook's Help Center.
Community Guidelines and Legal Policies
- Terms of Service: This is not a functional setting. Clicking it will redirect you to Facebook’s Terms and Policies page.
- Privacy Policy: This is not a functional setting. Clicking it will redirect you to Facebook’s Privacy Center Privacy Policy page.
- Cookie Policy: This is not a functional setting. Clicking it will redirect you to Facebook’s Privacy Center Cookie Policy page.
- Community Standards: This is not a functional setting. Clicking it will redirect you to Facebook’s Community Standards page.
(2) Language
The "Language" option is a shortcut for selecting the display language of the personal account. Clicking the "Language" button will not redirect you to a settings page, but instead will pop up a language selection menu where you can choose your desired language.
(3) Privacy Policy Review
The privacy settings review here is the same as the "Privacy Settings Review" under "Tools and Resources" in the "Settings" section. The privacy settings review in the privacy menu is just a shortcut to that same page.
(4) Dynamic Recording
The "Dynamic Recording" here is a shortcut. The content of dynamic recording is the same as the "Your Activity" section under "Settings."
(5) Content Preferences
Clicking "Content Preferences" will pop up a window for managing content preferences. Through the settings in this window, you can control what content you see on Facebook. These settings allow you to manage the display and priority of content from both users who follow you and those who do not.
5、Facebook and Instagram SEO Implementation Methods
Like any other platform, social media platforms share a fundamental purpose: to provide content that attracts and retains users. Engaging content can boost the growth of new users and increase the retention of existing ones. Therefore, to perform effective Facebook and Instagram SEO (content marketing) and drive more traffic, the core is to first analyze data using tools or search results within the social media platform to see what content is ranking well, as well as the content format and traffic data. With data-driven insights, we can create high-quality content. Though the types of content and materials on different platforms may vary (such as text, images, videos, or live streams), the goal remains the same: to provide value, meet needs, and foster interaction. This content-driven nature makes social media an important bridge for brands to connect with users. Below, I will use a step-by-step guide with images to demonstrate the entire Facebook and Instagram SEO implementation method. Readers can follow these steps to upload content and create their own Facebook and Instagram posts, starting their Facebook and Instagram SEO journey.
(1) Facebook and Instagram SEO Step 1: Choose the Type of Content to Create
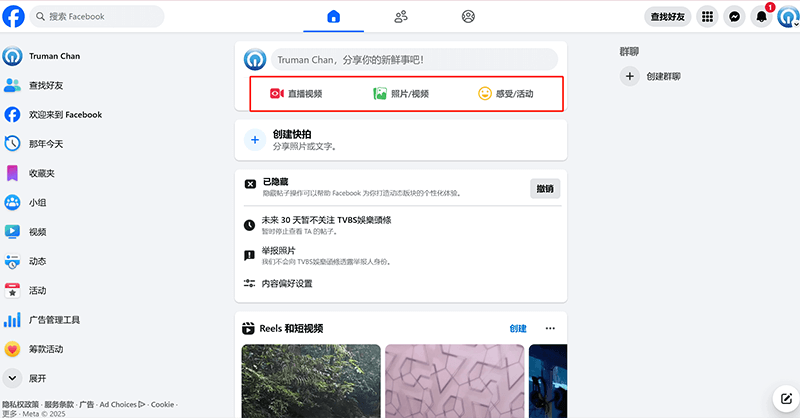
As shown in the red box in the image above, there are three types of content that can be created and published on Facebook: Live Video, Photo/Video, and Feeling/Activity. Next, I will continue the demonstration of the Facebook and Instagram SEO implementation method by choosing to create a Photo/Image type of content. The publishing process for other content types is quite similar. Once you master the creation and publishing process for one type, it can be easily applied to others, so I won’t go into detail for the rest.
(2) Facebook and Instagram SEO Step 2: Upload Post Materials and Enter Post Text Content
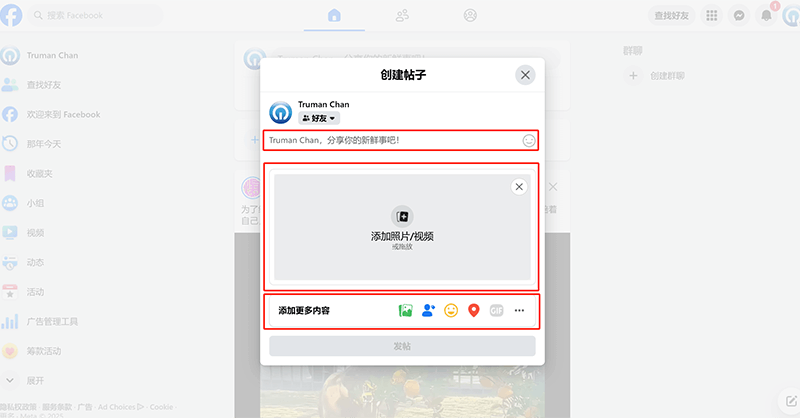
As shown in the red box in the image above, from top to bottom, the sequence is to first input the description text for the shared content, upload the photo or video file for the post, and then add more content to the post at the bottom. "Add More Content" includes several personalized options, such as tagging users, adding feelings/activities, and check-ins, etc. Once the operations are successful, the "Post" button at the bottom will become clickable. Click the "Post" button to complete the post on Facebook.
(3) Facebook and Instagram SEO Step 3: Share the Facebook Post to Instagram
Facebook does not support the feature of sharing posts to Instagram from the desktop page. After publishing the post on Facebook via the desktop, you can share it to Instagram using the Facebook app on your mobile device. Please refer to the paths and functional options highlighted in the red boxes in the following two example images for the specific steps to complete this action.
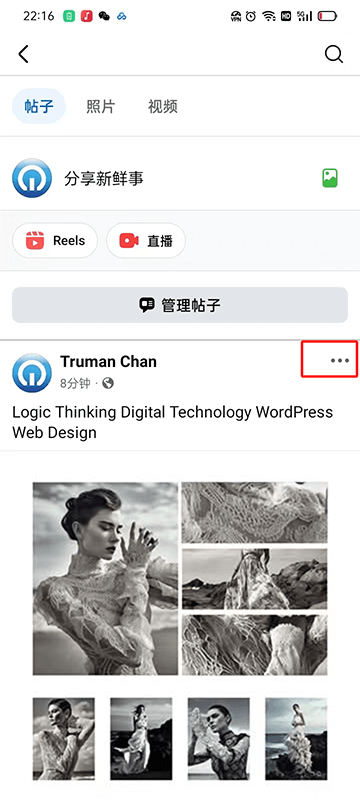
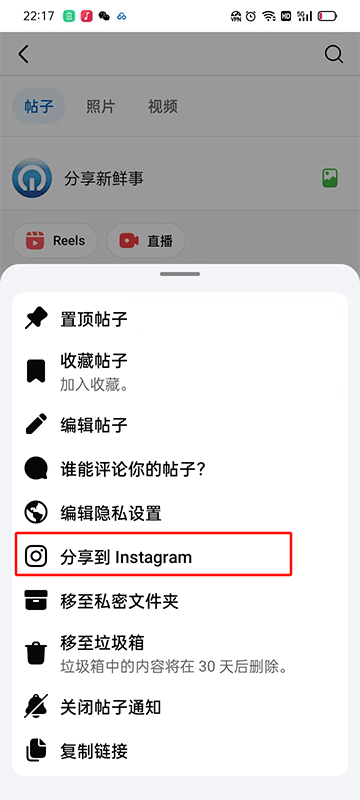
6、Setting Up Facebook Business
Before creating a Facebook ad campaign, you need to have a Business Manager, which allows you to create ad campaigns and use the management tools within the Business Manager to set up ad parameters, ad content, ad data, and more. Facebook Business can be understood as the corporate account or Ads control panel of the platform mentioned above, with the main difference being the internal tools and functions, which may vary. When setting up Facebook Business, you also need to create a Facebook public page. First-time users of Facebook operations may be unfamiliar with the term "public page," so let's familiarize ourselves with what a public page is. The public page is the tool used by Business Manager to manage and operate the website business's advertising data assets, including ad accounts, pages, etc. In order for Business Manager to work, there needs to be an entity that can manage and promote ads — and that entity is the public page. Only by linking a public page to Business Manager can you create and manage ads for that page. Without a page, you cannot effectively use Business Manager to promote and manage ads. Once you are familiar with the basic concept of Facebook Business, we will now demonstrate the entire process of setting up Facebook Business.
(1) Step One to Set Up Facebook Business: Access the Facebook Business Entry Point
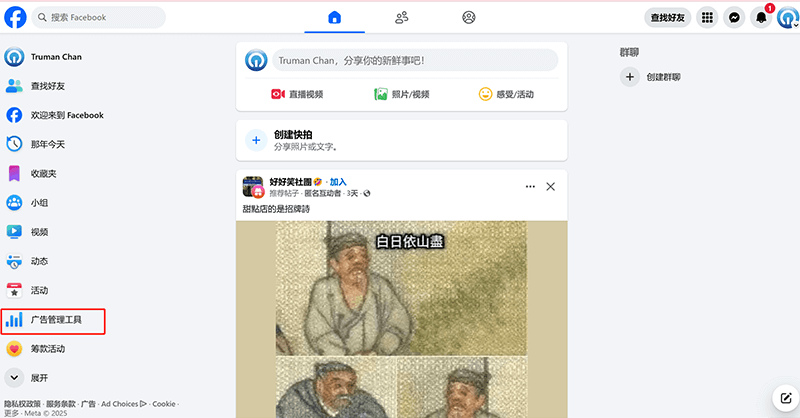
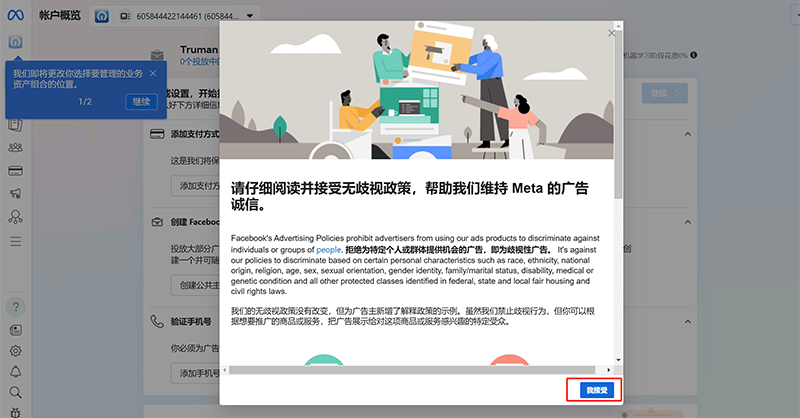
As shown in the red boxes in the two example images above, first click “Ads Manager” in the left toolbar on the Facebook homepage to enter the Business Manager interface shown in the second image. Ads Manager is also known as Business Manager. The first time you access this interface, you need to read and accept Facebook's advertising policies.
(2) Step Two to Set Up Facebook Business: Add a Payment Method
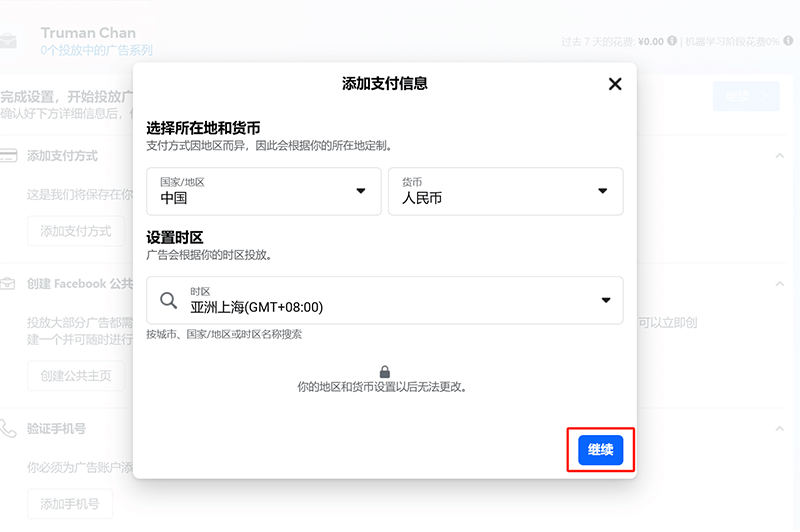
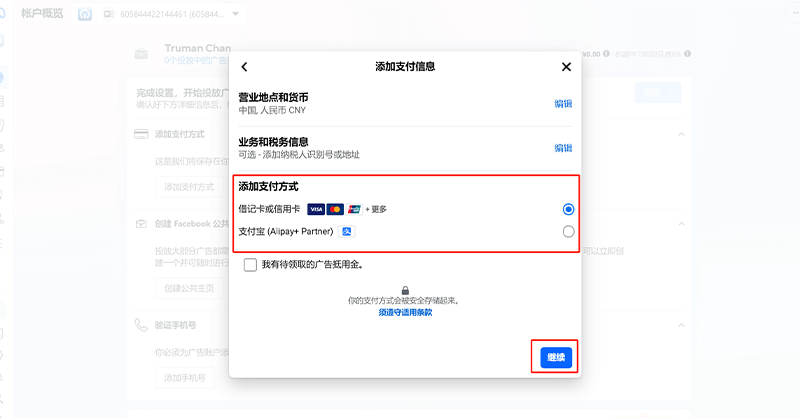
The added payment method is the billing method for Facebook ads (Meta ads). As shown in the red boxes in the two example images above, after correctly selecting the payment region, currency, and time zone, click the “Continue” button in the pop-up window to proceed to the screen for entering tax information and binding a payment type. Fill in the invoice details under “Business and Tax Information,” and under the red-boxed “Add Payment Method,” choose the payment method that best suits your needs.
(3) Step Three to Set Up Facebook Business: Create a Facebook Page
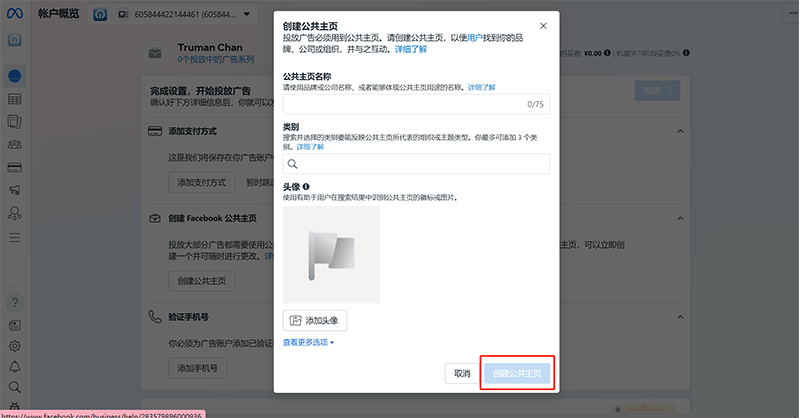
As shown in the image above, in the pop-up window for creating a Facebook Page, enter the name of the Page and choose the category that best represents the theme of the Page. You can select up to three categories. Finally, upload a profile picture for the Page. After completing these steps, click the “Create Page” button shown in the red box in the image above to finish creating your Facebook Page.
(4) Step Four to Set Up Facebook Business: Add a Verification Phone Number for Facebook Business
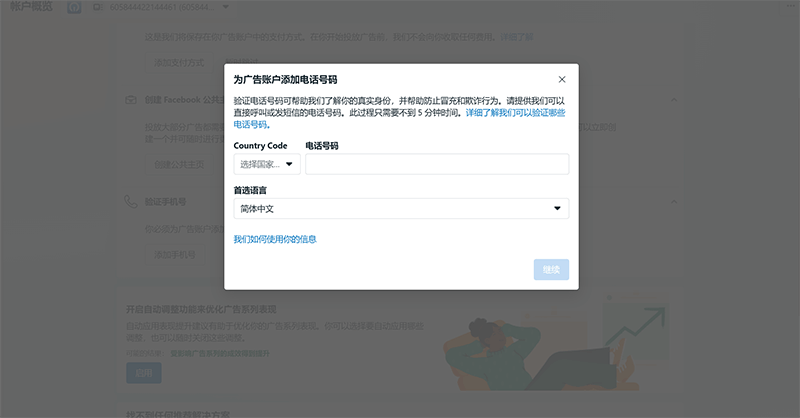
As shown in the image above, enter the phone number to be used for verifying Facebook Business. Once the “Continue” button is activated, click it to proceed to the next step and follow the prompts to complete the process.
(5) Step Five to Set Up Facebook Business: Enable the Advantage Campaign Budget Feature to Optimize Ad Performance
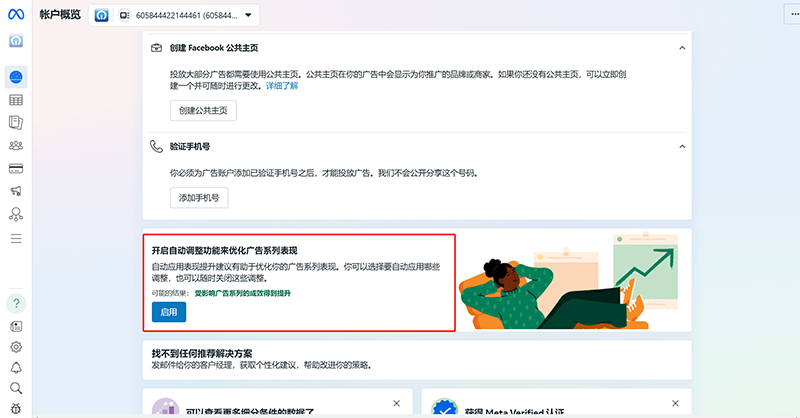
The Advantage Campaign Budget feature allows you to enable automatic optimization either for all assets in your Facebook ad account or for selected areas. Whenever there is an opportunity to improve the performance of an ad campaign, the system will automatically apply the selected optimizations. After clicking the “Enable” button, you can choose which campaign elements will be optimized by the Advantage feature.
7、Creating Facebook and Instagram Ad Campaigns
Once the Facebook Business account is fully set up, you can begin creating corresponding Facebook and Instagram ad campaigns based on your promotional needs. These campaigns use budget allocation and targeting parameters to deliver your ads to a broader audience. From the left sidebar of the Facebook homepage, click “Ads Manager” to enter the Facebook Business console. Then, in the Facebook Business console's left toolbar, click “Campaigns” to reach the operation interface shown in the example image below. From the red-boxed area, select the created Facebook Page to manage and create Facebook ad assets and activities. The step-by-step image-and-text walkthrough will continue to guide you through the entire process of creating Facebook and Instagram ad campaigns.

(1) Create Facebook and Instagram campaigns Step 1: Select your ad objective
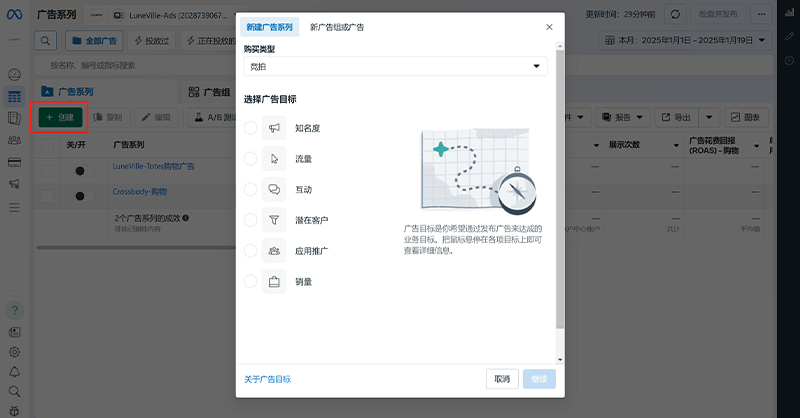
As shown in the red box in the image above, after clicking the “Create” button in the ad campaign operation interface, a “Select Ad Objective” window, as shown in the image above, will pop up. In the ad objective form, there are six options available: “Awareness, Traffic, Engagement, Lead Generation, App Promotion, and Sales.” The six ad objectives correspond to three different types of websites: Awareness and Engagement match brand websites, Traffic and Lead Generation match B2B websites, and B2C websites are more closely aligned with Sales. For this demonstration, I will select the “Sales” ad objective for a B2C website. After selecting the ad objective, the “Continue” button at the bottom-right of the form will become clickable. Click the button to continue the process of creating the ad campaign.
(2) Create Facebook and Instagram campaigns Step 2: Select campaign settings
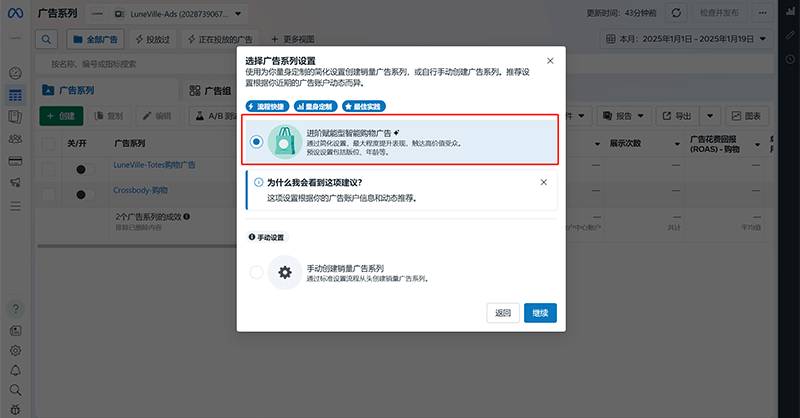
As shown in the red box in the image above, in the pop-up form for selecting campaign settings, we can choose between two types of ad campaigns: "Advanced Empowered Smart Shopping Ads" and "Manual Sales Campaigns." In the prompt within this window, we can see that Advanced Empowered Smart Shopping Ads are the recommended type by the Facebook Business system. If you accept the recommendation, select the Advanced Empowered Smart Shopping Ads option and proceed.
(3) Create Facebook and Instagram campaigns Step 3: Setting campaign parameters

The content area on the right side of the example image above shows the customizable settings for the Facebook ad campaign parameters. In this step, we need to configure the campaign parameters, as these settings will significantly impact the performance of the ad campaign. Below, I will use a list format to explain these settings, so readers can understand the definition of each setting when completing this step.
- Campaign Name: The campaign name here refers to the custom name entered for the ad campaign, which serves no specific purpose other than helping Facebook Business operators identify it. It can be customized.
- Declare Ad Category: Generally, only ads related to financial products and services, employment, housing, social issues, elections, or politics require the declaration of an ad category. You can click to expand the dropdown menu for declaring the ad category. If there is no relevant category for website ads, you can simply ignore this.
- Advanced Empowerment Catalog Ads: The type of ad we are choosing to run is a shopping ad, and here we select the product catalog for the ad. If our product catalog has already been set, the system will automatically select it.
- Effect Goal: For shopping ads, the effect goal is set to "Maximize Conversions."
- Conversion Event: A conversion event refers to the tracked event for conversions. For shopping ads, the conversion event is "Purchase."
- Cost Per Conversion Goal (Optional): It is not recommended to set a cost per conversion goal for newly created ad campaigns, as this requires accumulated data on average cost per conversion to set a specific amount to control conversion spend. Setting this too early will prevent the ad data from being generated.
- Attribution Settings: Attribution settings refer to the limited time period during which conversion events are attributed to your ad and used as the basis for campaign optimization. For example, when selecting "1 Day After Interaction," Facebook's system will analyze conversion events that occur within 1 day and show ads to the users most likely to convert within this period. You can select multiple attribution settings for reporting.
- Promoted Products: Choose the specific products from the product catalog to be promoted in the ad.
- Target Region: The target region refers to the geographical area where the ad campaign will be shown. The ad content will be displayed according to the specified target region, and users outside this region will not be able to see the ad.
- Budget and Schedule: Under the budget and schedule settings, you can set the daily or total budget for the ad campaign, along with the end date and ad display time.
(4) Create Facebook and Instagram campaigns Step 4: Ad group and ad content settings
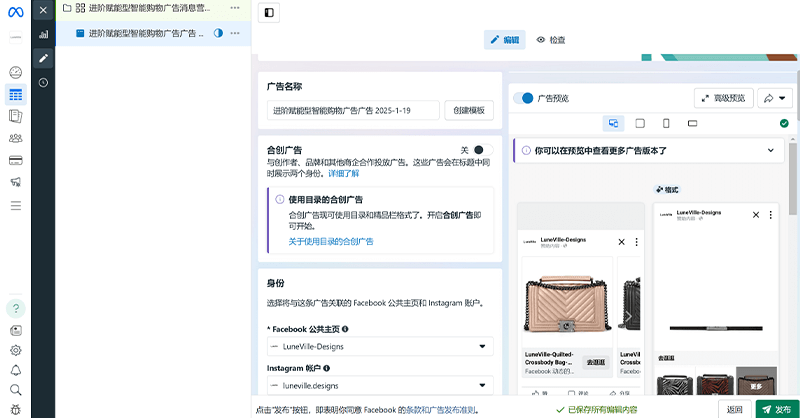
"Ad set and ad content setup" is the final part of creating a Facebook and Instagram ad campaign. As shown in the image above, the left side contains the ad set settings, while the right side is the ad content preview area. By scrolling down in the preview area, you can view the complete display of the ad content across different Facebook and Instagram device interfaces. After completing the parameter settings for each item in the ad set, click the "Publish" button at the bottom right of the page to publish the campaign. The descriptions of each ad set setting are provided in the list below.
- Ad Name: The ad name here refers to the name of the ad group, similar to the campaign name mentioned above, and serves only for identification purposes for Facebook Business operators.
- Combined Ads: Combined ads refer to the type of ads where, as mentioned above, by creating a single Facebook ad campaign, the ad can be displayed simultaneously on both Facebook and Instagram. There is a toggle button on the right side of the ad title. When this function is enabled, the ad content will be displayed on both Facebook and Instagram at the same time.
- Identity: Identity refers to the Facebook public page and Instagram account associated with the ad campaign. You can select the corresponding public page and Instagram account.
- Ad Settings: Under ad settings, you can choose the ad format. The available formats are "Single Image or Video," "Carousel," and "Collection."
- Ad Creative: The ad creative section contains several settings, including "How Products are Displayed in the Feed," ad text, ad titles, and call-to-action buttons. You just need to choose the product display method and input compelling copy in the corresponding text fields.
- Target URL: Enter the URL of the website page that the user will land on after clicking the ad.
With that, I have completely demonstrated and explained the relevant aspects of Facebook and Instagram social media management. From registering and applying for Facebook and Instagram accounts from scratch to successfully creating ad campaigns, every step has been thoroughly presented. You can follow the above process to complete these operations smoothly. In Facebook and Instagram social media management, SEO and SEM optimization are crucial. It’s important to note that content marketing and ad placement on Facebook, Instagram, or any other platform is an ongoing process of optimization. It not only depends on accumulated ad data but also requires precise data analysis for adjustments and improvements. Therefore, the success of Facebook and Instagram social media management often relies on continuous optimization and fine-tuning.
Ⅴ、YouTube Video Platform Operations

When we talk about YouTube operations, we are actually referring more accurately to YouTube channel operations. This involves managing the channel by uploading content to it. YouTube is the largest platform in the world for video content creation and viewing. As of 2024, this video content giant has over 2.7 billion active users globally and is expected to reach 2.85 billion users by 2025. In terms of viewing volume, users collectively watch over 1 billion hours of video on YouTube every day. Additionally, more than 720,000 hours of new video content are uploaded to the platform daily, ensuring a constant stream of updates. These figures demonstrate that as the world's largest video-sharing platform, YouTube’s user base and content consumption continue to grow steadily. At the same time, the data gives us a clear sense of the immense business opportunities available across various industries on YouTube. However, the key to tapping into this massive traffic and unlocking YouTube’s commercial value lies in our ability to effectively operate a YouTube channel. These operational capabilities are reflected in the indicators covered in the following sections. These include metrics at the account level, content positioning and content quality, and even parameters related to YouTube video ad campaigns.
1、YouTube Account Setup
YouTube is a video content platform owned by Google, which means you can log in directly using a Gmail account that is part of the Google ecosystem. I will be creating a tutorial on how to register for a Gmail account. If you don’t have a Gmail account yet, stay tuned to the LogicMind Digital Technology blog for the article on how to create a Gmail account and follow the steps outlined there to complete your registration. After successfully logging into YouTube for the first time with your Gmail account, you will need to further complete your account information and configure settings such as playback preferences and other account options. The first sample image below, marked in the red box, shows the path to access account settings on YouTube. The second sample image displays the various sections available in the YouTube account settings interface.
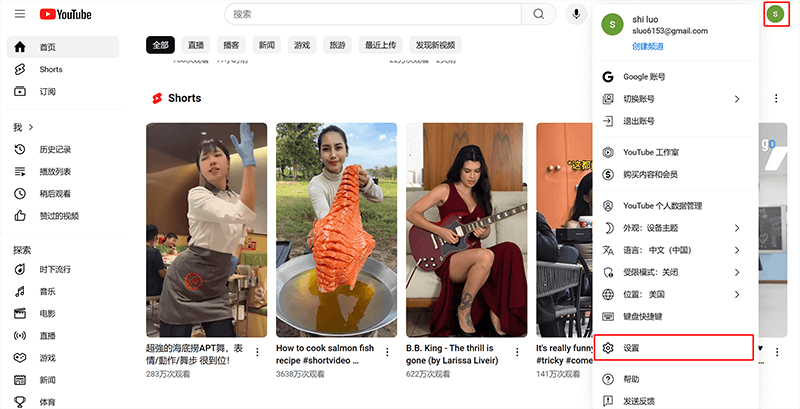
As shown in the picture above, click the account icon in the upper right corner of the page and select "Settings" in the pop-up menu to enter the Youtube account settings page.
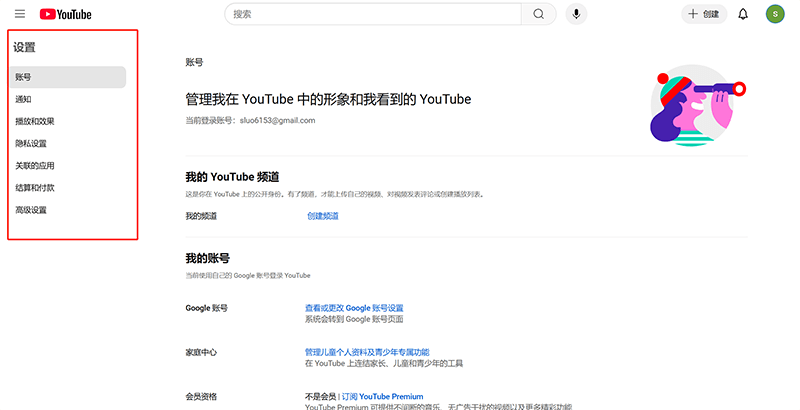
As shown in the red box in the image above, the YouTube account settings page includes seven categories: “Account, Notifications, Playback, Privacy, Connected Apps, Billing and Payments, and Advanced Settings.” When you click on each category in the left sidebar, the corresponding settings options will appear in the content area on the right. Below, I will walk readers through each settings category one by one from top to bottom, following the order of the sidebar on the settings page.
(1) Account
The settings under the “Account” section are shown in the red box on the right side of the image above. In the content area, under “My YouTube Channel” at the top, there is an anchor text link labeled “Create Channel.” Creating a YouTube channel is a core operation for account management. Therefore, I won’t briefly skim over this process here. A detailed demonstration of how to create a YouTube channel will be provided in the following sections, so we will skip it for now. The descriptions of each setting under the “Account” section are as follows:
- Google Account: Clicking the blue "View or Change Google Account Settings" link will redirect you to the Google account page. This setting has no special impact on YouTube channel performance, and generally, no additional settings are needed.
- Family Center: This setting is for managing children's personal profiles and features specific to teenagers. These features are unrelated to YouTube operations and do not require additional settings.
- Membership: Here you can subscribe to YouTube membership, which is for content viewers. This is not related to our account type and does not require additional settings.
(2) Notification (select the time and method to receive notification)
The configurable items in the notification section of the Youtube account settings are shown in the figure above. The settings in the notification interface are described in the following list:
- Preferences: Turn on and off various types of notifications, such as subscription alerts, interactions, and "@ mentions."
- Email Notifications: Turn on or off the permissions for email notifications.
(3) Playback and effects
As shown in the figure above, the items on the right side of the page are the configurable parts of the Play and Effects column. The description of the setting items is as follows:
- Manage Video Viewing Experience (Settings Apply Only to This Browser): Below this, there are custom settings for video content playback on your YouTube channel, where you can adjust the video format and whether subtitles are enabled by default.
(4) Privacy settings
The contents of the privacy settings are shown in the picture above. The "Subscription" switch here can set whether the subscription information of the Youtube account is public or invisible to others. Immediately below "Subscription" is "Ads on Youtube", which can be understood as a brief description of Youtube's advertising policy.
(5) Related applications
Under the “Connected Apps” section, the content area on the right lists applications that can be linked with YouTube. Most of these connectable apps are game-related. Once linked, they enable cross-platform data sharing, allowing features such as game livestream content sharing and the ability to receive certain rewards—for example, receiving in-game items or virtual currency when watching events on YouTube or subscribing to related channels. This feature is not relevant to the purpose of operating a YouTube channel, so it can be ignored.
(6) Settlement and payment
Billing and Payment is for setting up the payment method used when making purchases on YouTube. This is a personal user payment feature and is not related to operating a YouTube channel, so it can be ignored.
(7) Advanced Settings
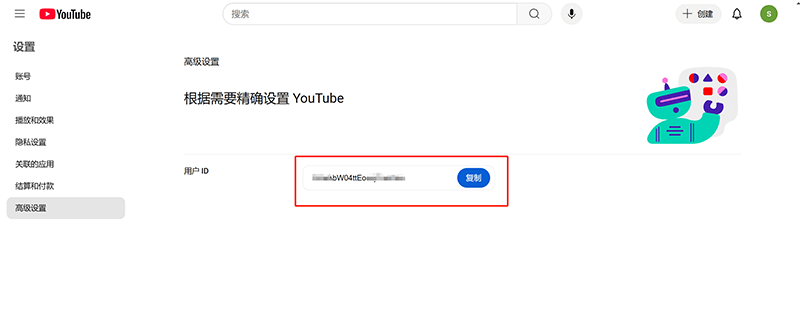
In the advanced settings section of YouTube, users can obtain their YouTube user ID. The ID is a code used by the platform to uniquely identify each user, and it is associated with the user's personal profile or channel. It does not change even if the channel name or custom URL is changed. In terms of YouTube-related development, developers can use the YouTube Data API to access user data or channel information and can use the user ID as a parameter to query related data (such as video lists, subscription information, etc.).
2. Creating a YouTube Channel
Before implementing YouTube SEO and creating YouTube ad campaigns, we need to first create a channel on YouTube. Only after having a channel can we upload video content used for YouTube content marketing and advertising campaigns. Below, I will demonstrate the process of creating a YouTube channel with illustrated steps. The process of creating a YouTube channel is not complicated; it simply involves uploading a profile picture and filling in some information. The first example image below shows the path to create a channel on YouTube. Click the account avatar in the top right corner of the page as marked by the red box in the image, then click the blue anchor text “Create Channel” in the dropdown menu to proceed to the channel creation step. The second example image below shows the channel information window. As marked by the red box in the image, upload the channel’s profile picture and enter the displayed username and handle. Finally, click “Create Channel” in the bottom right of the window to complete the YouTube channel creation.
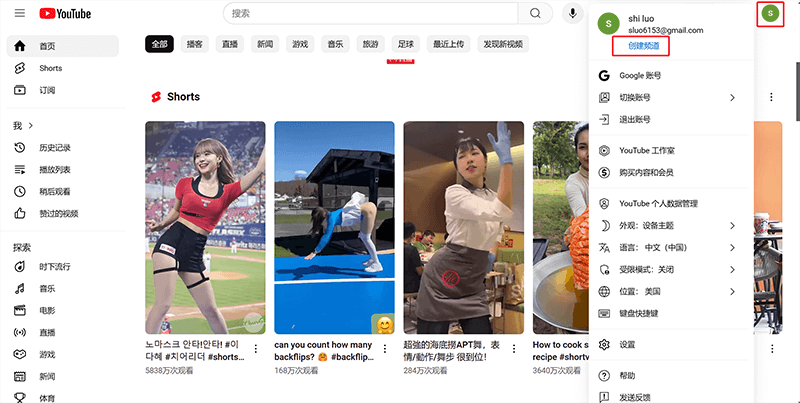
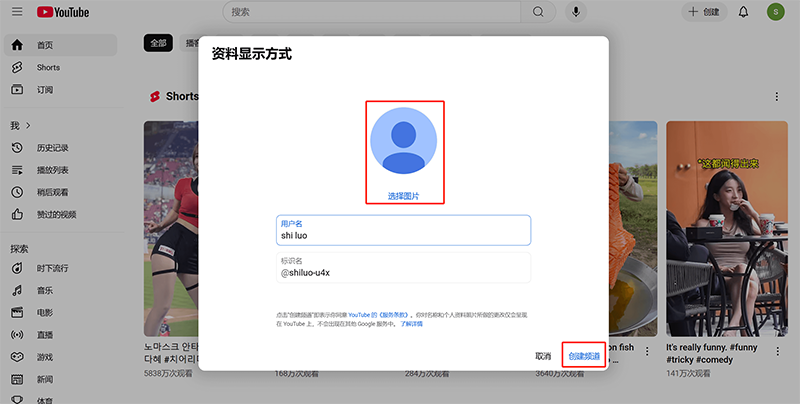
3. YouTube Channel Settings (Customize Channel)
As shown in the first example image below, after completing the “Create YouTube Channel” operation above, the page will be redirected to the homepage of the created channel. On the homepage of the YouTube channel, you will see two function setting entry buttons marked by the red box in the first image below: “Customize Channel” and “Manage Videos.” Click the “Customize Channel” button to enter the channel customization settings page as shown in the second example image below. On this page, complete settings for the channel homepage banner, profile picture, channel name, handle, channel description (channel bio), links (you can enter the website link address), and contact email address.
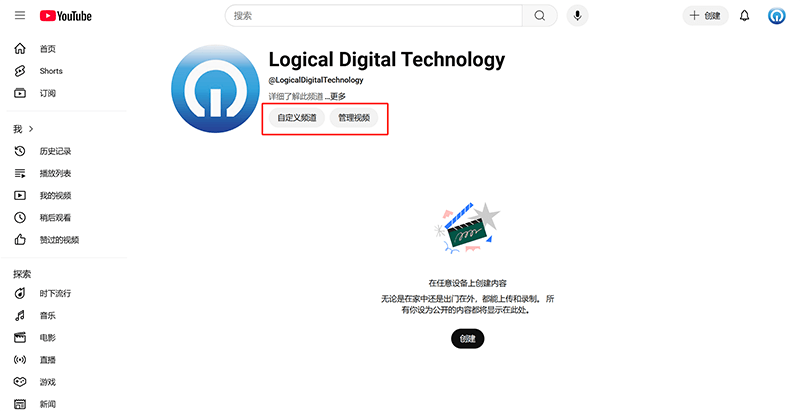
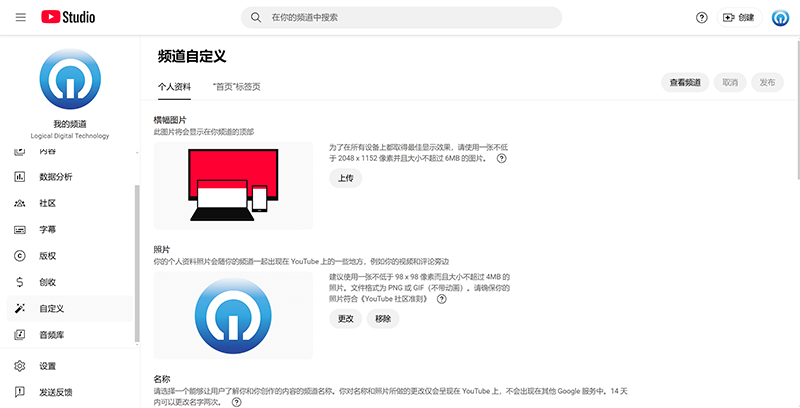
4. YouTube SEO Implementation Method
The core of YouTube SEO lies in optimizing keywords and enhancing content to improve the video’s search ranking and recommendation rate. The implementation method includes accurately integrating target keywords into the title, description, and tags, while designing an eye-catching custom thumbnail to improve the click-through rate. The video content should be of high quality and well-structured, using timestamps and playlists to enhance the user experience. Viewers should be encouraged to subscribe, like, comment, and share to increase engagement and improve the overall ranking and view count of the channel’s content (subscriptions, likes, comments, and shares are the core algorithms for YouTube content recommendations). Additionally, regularly posting content to keep the channel active will further expand the reach and distribution of the video content. Below, I will guide you step by step through the implementation of YouTube SEO. On the homepage of the YouTube channel, clicking either of the “Create” buttons marked in red in the image below will take you to the content upload page.
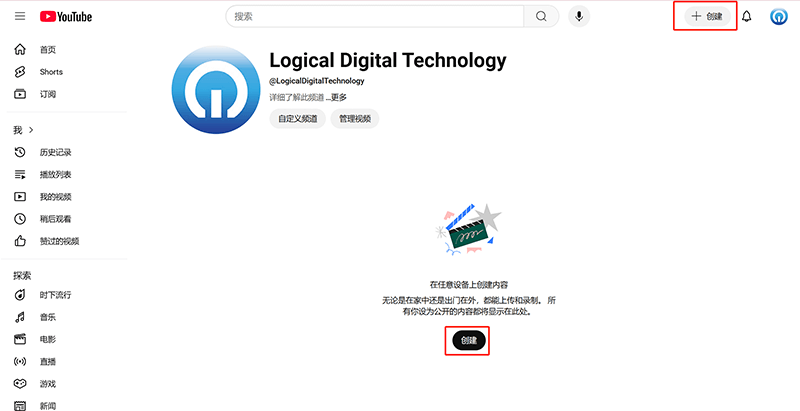
(1) YouTube SEO Implementation Step One: Upload Video File
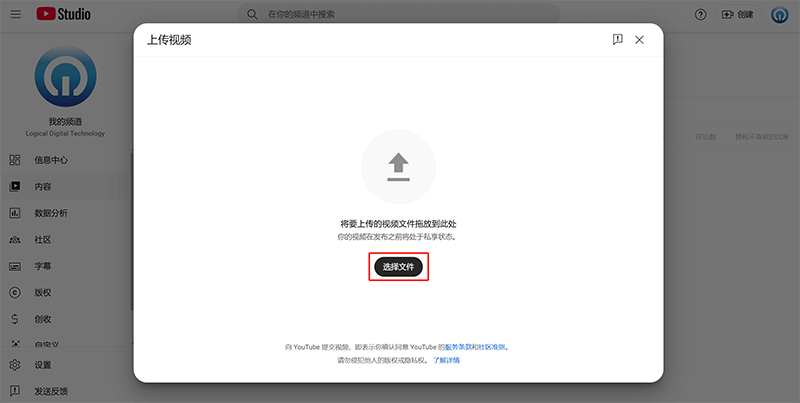
As shown in the image above, drag the video file into the pop-up video upload window, or click the “Select Files” button marked in the red box in the image to upload the video by selecting the file.
(2) YouTube SEO Implementation Step Two: Details
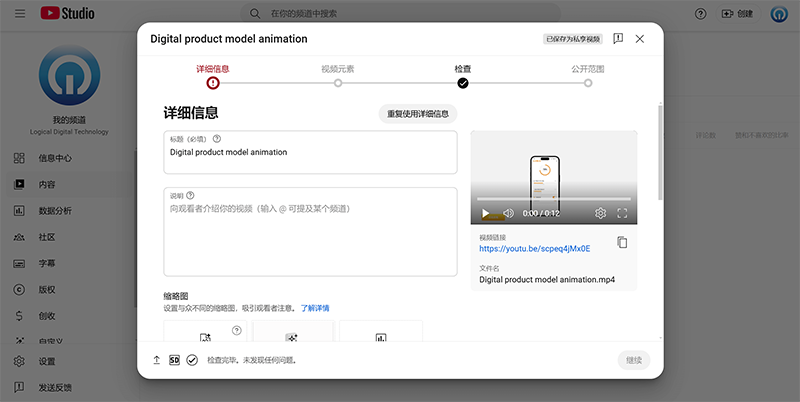
As shown in the image above, in the “Details” section, enter a title that fits user search intent and habits. In the adjacent description box, enter copy that matches the video content. Below that is the thumbnail, which is the video’s cover image. For the thumbnail, you can either use the system's automatically generated one or upload a custom thumbnail by clicking “Upload File.” Scroll the page downward and you will find more settings. Please note the “Show More” button at the bottom. By default, YouTube hides items such as “Paid Promotion,” “Tags,” and “Subtitles.” You need to click “Show More” to see these hidden settings. To help YouTube's algorithm quickly identify the content of your video and recommend it to a precise audience to gain traffic, the more detailed the settings in the list below, the better. I will explain these settings in the form of a list for the readers.
- Playlists: Newly created YouTube channels do not have playlists. You can create one here. A playlist is a categorized list of videos.
- Audience: Set whether the video is intended for children. Commercial content is generally not intended for children, so choose "No" from the available options.
- Age Restriction (Advanced): Here, you can set whether the video is restricted to adult audiences or not. For commercial content, select "Yes, restrict to viewers aged 18 and older."
- Paid Promotion Content: If your uploaded video includes a payment code or content related to product sales or donations, you must check "My video includes paid promotional content (such as product placements, sponsorships, or endorsements)." YouTube will display a message informing viewers that the video contains paid promotional content.
- Processed Content: Indicates whether the video has been processed, such as modifying real people's actions or altering video segments related to real events or locations. If yes, select "Yes," otherwise choose "No."
- Automatic Chaptering: Chapters and important moments make it easier for viewers to browse the video content. The system will automatically create chapters, but you can add custom chapters in the video description if needed.
- Involved Locations: "Involved locations" refers to important public places shown in the video, such as restaurants or shops. This is not your current location information. The system will default to "Allow automatic location display," but you can opt out of showing this information.
- Tags: Enter relevant tags that match the content of the video. Tags should include keywords related to the content.
- Language and Subtitle Certification: Choose the subtitle language (if there is speech in the video). If the content was broadcast on U.S. television after September 30, 2012, it may require subtitle certification. If it doesn’t meet this criterion, the system will default to "None."
- Licensing: There are two types of licenses: "Standard YouTube License" and "Creative Commons Attribution." If your video content is unrelated to intellectual property, keep the default "Standard YouTube License." There are additional options for allowing embedding and posting to subscribers’ feeds, which are enabled by default, but you can uncheck these options to disable them.
- Shorts Remix Feature: Shorts is short-form video content. This setting controls whether others can use your video content to create Shorts. The options include allowing remixing of both video and audio, only audio, or not allowing remixing. Choose according to your preference, or keep the default option.
- Category: Select the video content category from the dropdown menu.
- Comments and Ratings: Choose whether to enable comments and set how they are displayed.
(3) YouTube SEO Implementation Step Three: Video Elements

As shown in the image above, add relevant video elements. These include “add subtitles (if any), add end screen (if any), and add cards.” Cards refer to promotional content that can appear during video playback. Once the content is added, click the "Next" button in the bottom right corner of the window to proceed to the next step to continue the video upload process.
(4) YouTube SEO Implementation Step Four: Checks
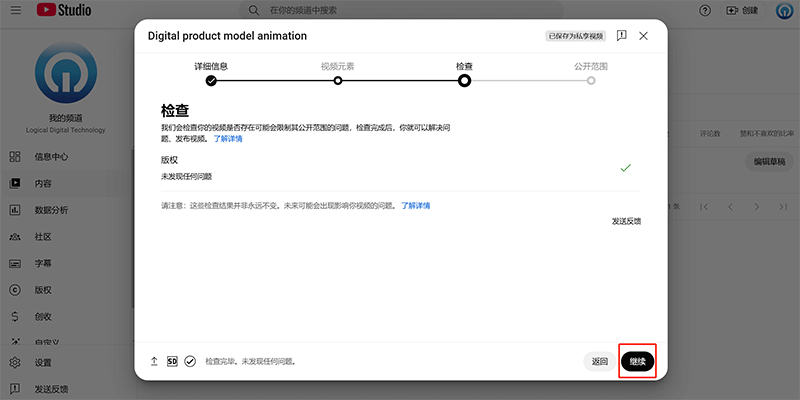
“Checks” refers to YouTube’s system review and feedback window for the video content. This step does not involve adding content or settings. It simply provides YouTube’s review results in the window shown above. If there is an error notification in the check window, you can return and correct it based on the error details. If there are no issues, click the “Next” button marked by the red box in the image above to continue with the content creation process.
(5) YouTube SEO Implementation Step Five: Visibility
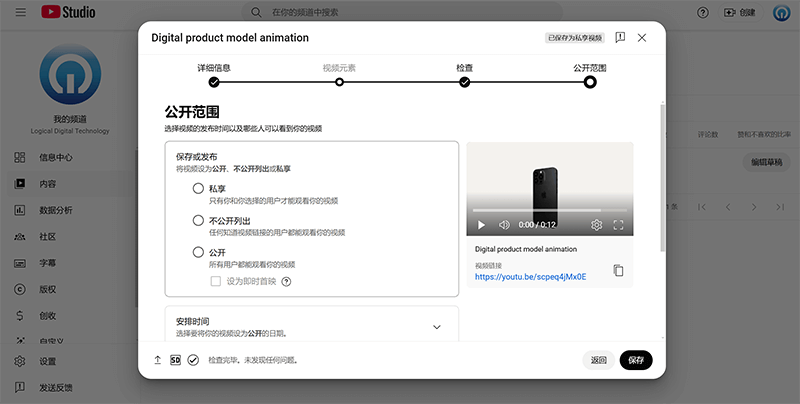
Visibility is the final step in the YouTube SEO video upload and content creation process. Choose from the options listed in the visibility settings window as shown above. Since the purpose of uploading the video is to generate traffic, unless there is a special reason, we would of course select “Public” for the content. Otherwise, if “Private” is selected, others will not be able to view the video. In the visibility window, aside from setting whether the video is “Public” or “Private,” you can also click the “Schedule” dropdown icon to select a specific date and time for publishing the video. Once “Public” is selected in the visibility settings, the “Save” button in the bottom right of the window will change to “Publish.” After all the steps above are correctly completed, click the “Publish” button to release the content we have created.
5、Creating a YouTube Video Campaign
As mentioned earlier, YouTube belongs to Google and is one of the most important video content platforms in the Google ecosystem. The data interoperability between the platforms helps integrate and expand advertising channels and exposure. Therefore, from an ecosystem perspective, it is easy to deduce that Google will certainly integrate YouTube ads into Google marketing (Google Ads). The integration of all platforms into a single advertising control panel also provides convenience for advertisers. Since Google has integrated the operation permissions for YouTube ads into Google marketing, creating YouTube video ad campaigns still needs to be done in Google Ads. The specific method for creating a campaign can be referenced in the second part of this article, "Google Search Engine Operations" under the section "Creating a New Campaign in Google Ads." The difference is that under the "Choose Campaign Type" section, you must select the "Video" ad type. In the ad group settings, there are two ways to add the video for placement: one is to add a video link from the YouTube channel associated with the Google Ads account (if the Google Ads account has not been associated with the YouTube channel, you can first link the YouTube ad in the "Tools - Data Manager" on the left side of the Google Ads console before creating the YouTube video campaign), or you can create the video content for the ad using the video creation tools provided in the ad group.
Conclusion: Readers who have finished this article and have a similar understanding and hands-on ability should be fully capable of completing the setup tasks for the four platforms independently. If you want to learn about the Website Setup Costs, you can click on the anchor text link to go directly to Logic Think Digital Technology’s previous article titled "What Preparations Are Needed to Build a Website, and How Much Does It Cost to Build a Website?" to find the answer. If you are planning the Website Functions but are unsure how to select the necessary features, the article "Essential Functional Requirements for Building a Website" can help you clarify the functional needs of websites for both B2B and B2C business models. For creating and operating a website, my advice is to plan thoroughly before acting. First, study the broader aspects of website creation, then proceed with specific planning tasks. This way, the website developed and launched will better align with market and user needs, which is the original intention behind my creation of this series of content about websites.
Logic Digital Technology (SZLOGIC) All rights reserved. This article is welcome to be shared by individuals to help newcomers entering the cross-border e-commerce independent website track, but reproduction for commercial purposes is prohibited.


